
SGT2400V PRO - Iron GORENJE - Free user manual and instructions
Find the device manual for free SGT2400V PRO GORENJE in PDF.


| Product Type | Steam Generator Iron |
| Brand | Gorenje |
| Model | SGT2400V PRO |
| Power Consumption | 2400 W |
| Water Tank Capacity | 1.5 L |
| Soleplate Material | Stainless Steel |
| Continuous Steam Output | 120 g/min |
| Steam Boost | Yes, concentrated steam at front |
| Vertical Steam | Yes |
| P-Temp Mode | Yes, programmed temperature for all fabrics |
| Fabric Selection | Acryl, Nylon, Silk, Polyester, Blend, Wool, Cotton, Jeans, Linen |
| Auto Shut-off | Yes, after 10 minutes of inactivity |
| ECO Mode | Yes |
| Anti-Scale System | Replaceable anti-scale cartridge with reminder |
| Water Hardness Setting | Adjustable (Low, Medium, High) |
| Language Selection | English, French, German |
| Dry Ironing | Yes |
| Power Cord Length | Approx. 2 m |
| Steam Hose Length | Approx. 1.5 m |
| Weight | 5.2 kg |
| Dimensions (W x D x H) | 35 x 25 x 30 cm |
| Warranty | 2 years (subject to country) |
Frequently Asked Questions - SGT2400V PRO GORENJE
User questions about SGT2400V PRO GORENJE
0 question about this device. Answer the ones you know or ask your own.
Ask a new question about this device
Download the instructions for your Iron in PDF format for free! Find your manual SGT2400V PRO - GORENJE and take your electronic device back in hand. On this page are published all the documents necessary for the use of your device. SGT2400V PRO by GORENJE.
USER MANUAL SGT2400V PRO GORENJE
SGT 2400V PRO
EN Instructions for use 51
Slika 1

Slika-2


POLNJENJE REZERVOARJA ZA VODO
Slika 6
VARNOSTNI IZKLOP
Slika 7
Opomba:
| 1. Spremnik za vodu | 2. Poklopac otvora za dolijevanje vode |
| 3. Kućište kasete za vodeni kamenac | 4. Kaseta za vodeni kamenac |
| 5. Gumb za ispuštanje pare | đ. Gumb za podešavanje pare |
| 7. Radna ploča za glačanje | 8. Oslonac za odlaganje glačala |
| 9. Signalna lampica za zagrijavanje glačala | 10. Signalna lampica pripremljenosti glačala |
| 11. Ploča za upravljanje | 12. Dovodna cijev glačala (cijev za paru) |
| 13. Priključni kabel | 14. Konzola za navijanje priključnog kabela |
| 15. Glačalo | 1đ. Postolje |
PLOČA ZA UPRAVLJANJE:

| 1. Pokazivač tvrdoće vode | 8. Pokazivač načina P-TEMP |
| 2. Podešavanje temperature | 9. Pokazivač izbora vrste tkanine |
| 3. Pokazivač: stavite ili zamijenite kasetu za zaštitu od kamenca | 10. Gumb P-TEMP |
| 4. Pokazivač količine pare | 11. Gumb za izbor vrste tkanine '+' |
| 5. Pokazivač ECO | 12. Gumb za izbor vrste tkanine '-' |
| 6. Pokazivač automatskog isključenja | 13. Gumb za uključenje /isključenje |
| 7. Pokazivač: doliti vodu |
PRIJE PRVE UPORABE
Slika 3
PUNJENJE SPREMNIKA ZA VODU
SIGURNOSNO ISKLJUČENJE
Funkcija sigurnosnog isključenja aktivira se automatski ako glačalo ne pomaknete u roku 10 minuta.
- U tom slučaju pokazivač za automatsko isključenje bljeska, što znači da se je uređaj iz sigurnosnih razloga automatski isključio.
- Za ponovno aktiviranje glačala pritisnite gumb za uključenje/isključenje. Ploča za upravljanje vraća se na prethodno izabranu temperaturnu regulaciju, i uređaj se ponovno počne zagrijavati. Možda će biti potrebno do 60 sekundi da glačalo bude ponovno spremno za uporabu.
Slika 7
Napomena:
-
Vlažnom krpom ili nekim drugim pomagalom za čišćenje koje neće izgrepsti površinu, uklonite eventualne ostatke sa površine za glačanje i sa kućišta.
-
Nikad nemojte koristiti oštre ili grube predmete za skidanje ostataka sa površine za glačanje.
-
Također nemojte nikad koristiti grubi pribor ili sredstva za čišćenje, ocat, ili sredstva za uklanjanje kamenca.
OTKLANJANJE KVAROVA
| Problem | Uzrok | Rješenje |
| Uređaj ne radi. | Uređaj se još zagrijava. | Prije uporabe pričekajte nekoliko minuta. |
| Uređaj nije priključen. | Priključite uređaj na električnu mrežu. | |
| Gumb za uključenje/isključenje je u isključenom položaju (OFF). | Pritisnite gumb za uključenje/isključenje na uređaju. | |
| Utičnica je neispravna. | Uređaj priključite na ispravnu utičnicu. | |
| Pokazivač za punjenje spremnika za vodu je upaljen. | Spremnik za vodu je prazan. | U spremnik za vodu dolijte dovoljnu količinu vode. |
| Površina za glačanje se ne zagrije dovoljno. | Nepravilan izbor regulacije za vrstu tkanine. | Pritisnite gumb za podešavanje pare, i odaberite pravilnu regulaciju za vrstu tkanine. |
| Iz radne površine za glačanje kaplje voda. | Para koja je ostala u cijevi se je ohladila i kondenzirala. | Nekoliko sekundi puštajte paru iz glačala, a mlaz okrenite na drugu stranu od odjeće. |
| Iz uređaja ne izlazi para. | Kaseta za zaštitu od kamenca je suha. | Izvadite kasetu za zaštitu od kamenca, uronite u vodu i držite pet minuta, a zatim ju ponovno stavite u uređaj. |
| Oštećenje tkanine | Pregrijavanje | Pridržavajte se uputa za glačanje odjeće, ili isprobajte glačanje sa izabranim postavkama na sakrivenom dijelu odjeće. |
| Iz kućišta teče ili kaplje voda. | Filtar za kalcij nije pravilno namješten. | Pravilno namjestite filtar. |
| Šumovi (buka) | Prva uporaba | To je normalno. |
| Crpenje vode u grijač | To je normalno. | |
| Spremnik za vodu je prazan. | Napunite spremnik za vodu. |
Okolina


OPOZNAJTE VAŠU PARNU STANICU ZA PEGLANJE

| 1. Rezervoar za vodu | 2. Poklopac otvora za sipanje vode |
| 3. Kućište kasete za vodeni kamenac | 4. Kaseta za vodeni kamenac |
| 5. Dugme za ispuštanje pare | 6. Dugme za regulisanje pare |
| 7. Ploča za peglanje | 8. Oslonac za stavljanje pegle |
| 9. Signalna lampica za zagrejavanje pegle | 10. Signalna lampica pripremljenosti pegle |
| 11. Kontrolna tabla | 12. Dovodno crevo pegle (crevo za paru) |
| 13. Priključni kabl | 14. Konzola za namotavanje priključnog kabla |
| 15. Pegla | 16. Postolje |
KONTROLNA TABLA:

| 1. Indikator tvrdoće vode | 8. Indikator načina P-TEMP |
| 2. Regulisanje temperature | 9. Indikator izbora vrste tkanine |
| 3. Indikator: stavite ili zamenite kasetu za zaštitu od kamenca | 10. Dugme P-TEMP |
| 4. Indikator količine pare | 11. Dugme za izbor vrste tkanine '+' |
| 5. Indikator ECO | 12. Dugme za izbor vrste tkanine '-' |
| 6. Indikator automatskog isključenja | 13. Dugme za uključenje/isključenje |
| 7. Indikator: sipati vodu u rezervoar |
PRE PRVE UPOTREBE
- Sa aparata odstranite sve zaštitne folije i nalepnice.
- Odmotajte i izravnajte priključni kabl.
- Za bolje delovanje, pre prve upotrebe pegle potopite novu kasetu za zaštitu od kamenca u vodu i ostavite 5 minuta (pogledati poglavlje "KdSETd Zd ZdŠTITU OD KdMENCd").
Slika 3
PUNJENJE REZERVOARA ZA VODU
| 1. Aparat treba da je isključen iz električne mreže. | ||
| 2. Pritisnite dugme za vađenje rezervoara za vodu na dnu rezervoara, i izvucite ga. |  | |
| 3. Otvorite poklopac otvora za sipanje vode, i u rezervoar sipajte vodu do oznake za maksimalnu količinu. |  | |
| 4. Pritisnite i držite pritisnuto dugme za vađenje rezervoara za vodu. Sada rezervoar ponovno vratite na svoje mesto. Proverite da li je čvrsto naseo na svoje mesto. | ||
PROGRAMIRANA TEMPERATURA (način P-Temp)
Aparat ima funkciju programirane, odnosno prethodno odabrane i podešene temperature koja omogućuje peglanje svih vrsta tkanina podesnih za peglanje, a da nema potrebe za podešavanjem temperature pegle. To je fabrički dodeljen način rada ovoga aparata.
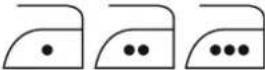 | Simbolima prikazanim na levoj slici označene su vrste tkanina koje su primerene za peglanje, na primer poliester, svila, viskoza, vuna, pamuk, i lan. |
 | Simbolom na levoj slici označene su vrste tkanina koje nisu primerene za peglanje, na primer polipropilen i elastan. |
UPOTREBA FUNKCIJE P-TEMP
- Dugme za regulisanje pare možete okrenuti u levi ili u desni položaj, čime birate jednu od dve mogućnosti ispuštanja pare.
VERTIKALNO ISPUŠTANJE PARE
BEZBEDNOSNO ISKLJUČENJE
Slika d
Napomena:
-
Vlažnom krpom ili nekim drugim pomagalom za čišćenje koje neće izgrepsti površinu, uklonite eventualne ostatke sa površine za peglanje i sa kućišta.
-
Nikad nemojte koristiti oštre ili grube predmete za skidanje ostataka sa površine za peglanje.
-
Takođe nemojte nikad koristiti grub pribor ili sredstva za čišćenje, sirće, ili sredstva za uklanjanje kamenca.
OTKLANJANJE KVAROVA
| Problem | Uzrok | Rešenje | |
| đparat ne radi. Đparat | se još zagrejava. Pre upotre | be pričekajte nekoliko minuta. | |
| đparat nije priključen. Priključite aparat na električnu mrežu. | |||
| Dugme za uključenje/isključenje je u isključenom položaju (OFF). | Pritisnite dugme za uključenje/isključenje na aparatu. | ||
| Utičnica je neispravna. Đparat priključite na ispravnu utičnicu. | |||
| Indikator za punjenje rezervoara za vodu je upaljen. | Rezervoar za vodu je prazan. | U rezervoar za vodu sipajte dovoljnu količinu vode. | |
| Površina za peglanje ne ugreje se dovoljno. | Nepravilan izbor regulacije za vrstu tkanine. | Pritisnite dugme za podešavanje pare, i odaberite pravilnu regulaciju za vrstu tkanine. | |
| Iz površine za peglanje kaplje voda. | Para koja je ostala u crevu se je ohladila i kondenzovala. | Nekoliko sekundi ispuštajte paru iz pegle, a mlaz okrenite na drugu stranu od odeće. | |
| Iz aparata ne izlazi para. | Kaseta za zaštitu od kamenca je suva. | Izvadite kasetu za zaštitu od kamenca, potopite u vodu i držite pet minuta, a zatim ju ponovno stavite u aparat. | |
| Oštećenje tkanine Pregrejavanje Pridržavajte se uputa za peglanje odeće, ili isprobajte peglanje sa izabranim regulacijama na sakrivenom delu odeće. | |||
| Iz kućišta teče ili kaplje voda. | Filter za kalcijum nije pravilno namešten. | Pravilno namestite filter. | |
| Šumovi (buka) Prva upotreba To je normalno. | |||
| Pumpanje vode u grejač To je normalno. | |||
| Rezervoar za vodu je prazan. | Napunite rezervoar za vodu. | ||
Zaščita okoline

Simbol na proizvodu ili na njegovoj ambalaži označava, da se sa tim proizvodom ne sme postupati kao sa otpadom iz domaćinstva. Umesto toga, proizvod treba predati odgovarajućim sabirnim centrima za reciklažu elektronskih I električnih aparata. Ispravnim odvoženjem ovog proizvoda sprečićete potencijalne negativne posledice na životnu sredine I zdravlje
ljudi, koji bi inače mogli biti ugroženi neodgovarajućim rukovanjem otpadom ovog proizvoda. Za dobijanje detaljnih informacija o tretmanu, odbacivanju I ponovnom korišćenju ovog proizvoda, stupite u kontakt sa prikladnim lokalnim ustanovama, službom za sakupljanje kućnog otpada ili sa prodavnicom u kojoj ste kupili ovaj proizvod.
Garancija i servis
Za informacije ili u slučaju problema obratite se Centru Gorenja za pomoć korisnicima u vašoj državi (telefonski broj naći ćete u međunarodnom garantnom listu). Ako u vašoj državi nema takvog centra, obratite se lokalnom prodavcu Gorenja, ili odelu Gorenja za male kućanske aparate.
Nije za komercialnu upotrebu! Pridržavamo pravo do promena!
GORENJE
VAM ŽELI MNOGO ZADOVOLJSTVA U RADU S VAŠIM APARATOM
ОЗНАJTEaJAaВАШАТАаПЕГЛАаНАаПАРЕАaaa
Слика 3
ПОЛНЕЊЕ НА РЕЗЕРВОАРОТ ЗА ВОДА
Слика 5
Слика 6
Слика 7
For your safety, please read the instructions carefully before using the appliance for the first time. Save the instructions for future reference.
The appliance is designed for domestic use and may only be operated in accordance with these instructions for use.
The appliance generates hot steam. Always handle with care and warn other users of potential danger.
DO'S
- Check if the mains voltage stated on the rating plate corresponds to the local electricity supply.
- Unwind and straighten the power cord and steam hose before use.
- Place the appliance on a firm and steady surface.
- The iron must be used and rested on a stable surface
- Make sure the power cord or steam hose do not touch the soleplate.
- Insert the anti-scale cartridge before use.
- Unplug the power cord from the socket before filling the water tank with water.
- Keep the anti-scale cartridge and granules away from children at all times.
- Keep electrical appliances out of reach from children or infirm persons. Do not let them use the appliances without supervision.
- Ensure the stand is placed on a stable surface before placing iron on it
- If the power cord or steam hose are damaged, have them replaced by the manufacturer, a service agent or a similarly qualified person, in order to avoid hazard.
- Empty the water tank after use.
- Do not allow children to play with the appliance.
- This appliance may be used by children aged 8 years and above, and by persons with reduced physical, sensory or mental capabilities or lack of experience and knowledge, if they are supervised or if they have been instructed on how to use the appliance in a safe way, and if they understand the hazards involved.
- Keep the iron and its cord out of reach of children less than 8 years of age when it is energized or cooling down.
DO NOT'S
- Do not allow children to touch the appliance when ironing.
- Do not leave the appliance unattended when it is connected to a mains supply outlet.
- Do not use an extension power cord unless a competent authority has approved it.
- Do not add perfumed water, vinegar or other chemicals into the water tank as they can seriously damage the appliance.
- Do not immerse the appliance in water or any other liquid.
- Do not use the appliance when it is damaged or performs abnormally.
- Do not use the iron if it has been dropped, if there are visible signs of damage, or if it is leaking.
- Do not touch the iron rest during or just after ironing. It is hot!
- Do not roll the power cord or steam hose around the iron unit or base for storage until the appliance has cooled down completely.
- Do not attempt to open the cabinet or disassemble any parts from the appliance. There are no serviceable parts inside.
- Do not open the water inlet cover during use. Instructions for safe refilling of the water tank are provided in this manual.
- Do not allow children to perform cleaning and user maintenance tasks without supervision.
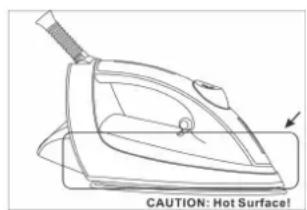
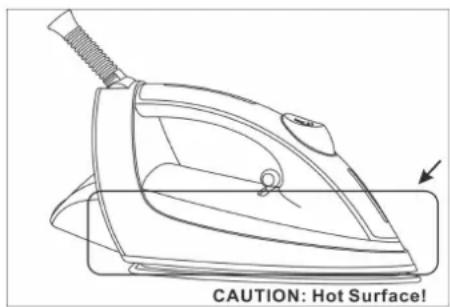
- Do not touch the surfaces marked with symbol ⚠during or just after ironing. They are hot! (Please refer to the Figure 1 and Figure 2 below)

Figure 1: Left Side: hot surface
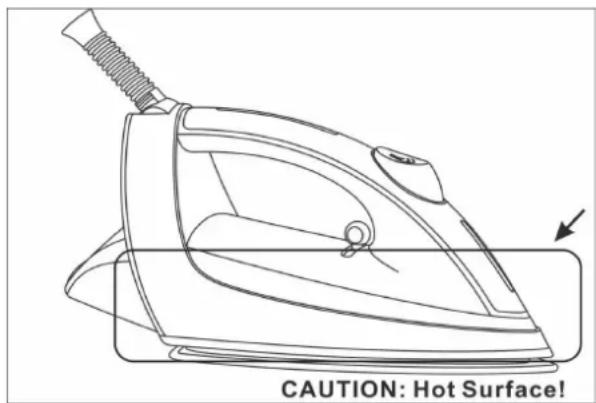
Figure 2: Right Side: hot surface
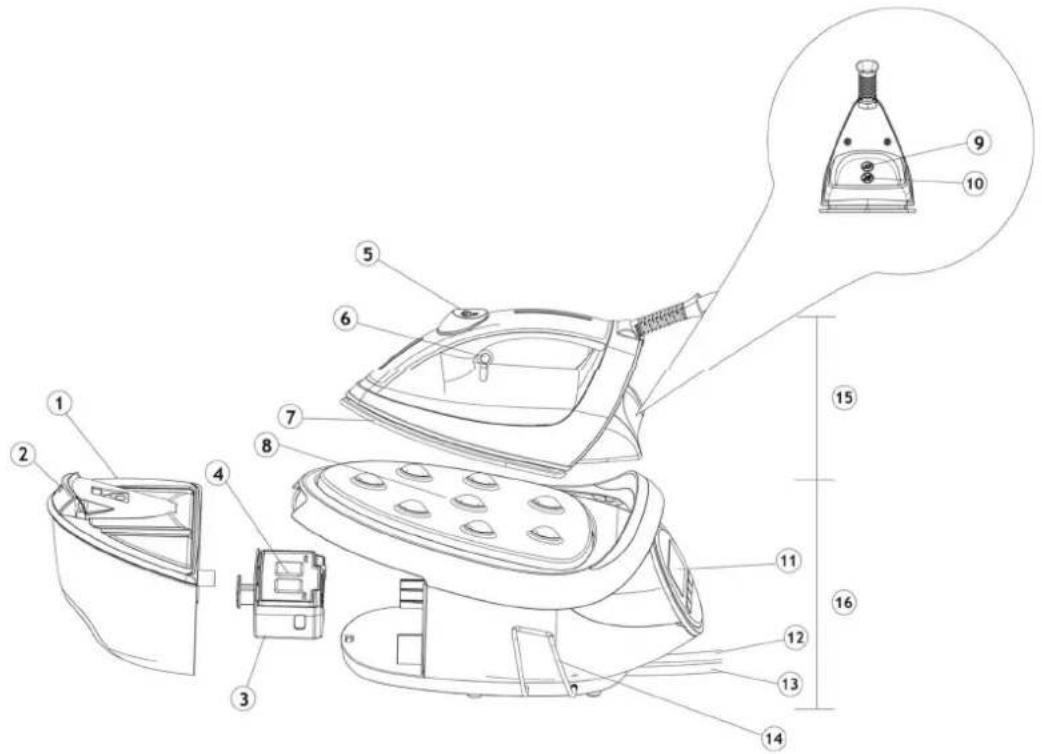
GET TO KNOW YOUR STEAM GENERATOR

| 1. Water tank | 2. Water inlet cover |
| 3. Anti-scale cartridge container | 4. Anti-scale cartridge |
| 5. Steam trigger | 6. Steam control button |
| 7. Soleplate | 8. Iron rest |
| 9. Iron heating up light | 10. Iron ready light |
| 11. Control panel | 12. Steam hose |
| 13. Power cord | 14. Cord storage clip |
| 15. Iron unit | 16. Base |
CONTROL PANEL:
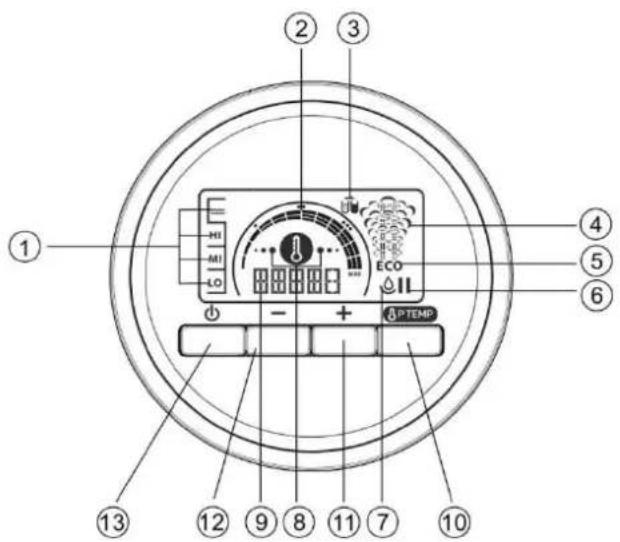
| 1. Water hardness level indicator | 8. P-TEMP mode indicator |
| 2. Temperature control setting | 9. Fabric selection indicator |
| 3. ANTI-scale cartridge replace/missing indicator | 10. P-TEMP button |
| 4. Steam level indicator | 11. Fabric selection button '+' |
| 5. ECO indicator | 12. Fabric selection button '-' |
| 6. Auto shut off indicator | 13. Power ON/OFF button |
| 7. Water refill Indicator |
BEFORE USING THE APPLIANCE FOR THE FIRST TIME
- Remove any protective films or stickers from the appliance
- Unwind and straighten the power cord.
- Immerse a new anti-scale cartridge into water for 5 minutes before first use for better performance (see "Replaceable anti-scale system")
Note: When using the steam function for the first time, do not use it on your laundry. Some residue may remain inside the appliance. Use an old towel when ironing for the first time. Press the steam trigger to make sure the residues are completely released.
USING YOUR APPLIANCE
- This appliance is designed for use with regular tap water. Other liquids or condensate might damage the appliance.
- Connect the appliance to a suitable power outlet.
- When the required temperature is reached and the appliance is ready to use, the icons on the display panel stop flashing. You can then begin ironing.
- Always disconnect the appliance from the power mains after use.
Using the Cable Support Accessory,
- Unwind and straighten the supply cord.
- Install the cable support as shown in the figure.
- Place the supply cord onto the cable support hook as shown in Figure 3.

Figure 3
FILLING THE WATER TANK
| 1. Disconnect the power cord from electric outlet. | ||
| 2. Press the water tank release trigger at the bottom of the water tank and pull out the water tank. | 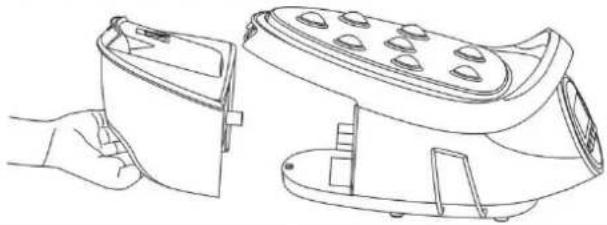 | |
| 3. Open the Water Inlet Cover and fill the water tank with water up to the max level mark. |  | |
| 4. Hold down the water tank release trigger and return the water tank to its original position. Make sure that it is firmly positioned in place | ||
PROGRAMMED TEMPERATURE (P-Temp Mode)
The appliance features the Programmed Temperature mode which allows ironing all ironable fabrics without adjusting the temperature of the iron. It is the default mode of this appliance.
 | Fabrics with these symbols are ironable, for example, polyester, silk, viscose, wool, cotton and linen. |
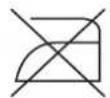 | Fabrics with this symbol are not ironable, for example, polypropylene and elastin |
USING P-TEMP MODE
When the appliance is switched on, it will be in P-temp mode by default. You can always press the P-temp button to use the P-temp mode when another fabric setting is selected.
SETTING THE APPLIANCE ACCORDING TO DIFFERENT FABRIC
The appliance has different temperature settings to handle different kinds of fabrics. You can select the setting for a particular type of fabric by pressing the + or -button. The appliance will cycle the setting between “Acryl” <-> “Nylon” <-> “Silk” <-> “Polyester” <-> “Blend” <-> “Wool” <-> “Cotton” <-> “Jeans” <-> “Linen” as shown in below sequence:
![graph LR A["ACRYL"] --> B["NYLON"] B --> C["SILK"] C --> D["POLY"] D --> E["LINEN"] E --> F["JEANS"] F --> G["COTTO"] G --> H["WOOL"] H --> I["BLEND"] I --> J["Eco"]](/content/2026/05/1069300/images/ae1560510d0bd97719d235c4dcd45a363730ead77636cbb74c2833594693a5b9.jpg)
IMPORTANT: Before you start ironing, read the garment labels and follow the manufacturer's ironing instructions which are normally indicated with symbols such as the following:
| Temperature control setting | ||
 |  |  |
| . Acetate | . Polyester | |
| . Elastane | . Silk | . Cotton |
| . Polyamide | . Triacetate | . Linen |
| . Viscose | ||
| . Wool | ||
If you are not sure about which fabric your garment is made of, use the P-temp mode or begin the ironing at a low temperature.
AUTO STEAM FUNCTION
The appliance will automatically adjust the steam output to the selected fabric setting. The function provides the right amount of steam for each temperature to achieve the desired ironing result.
USING YOUR IRON
| 1. Press the Power On/Off button to turn on the appliance and select the desired temperature. | |
| 2. Depending on the selected temperature setting, the corresponding temperature symbol on the control panel will be flashing. When the iron is ready for use, the temperature symbol stops flashing and stays unsteadily. |  |
| 3. If you would like to do dry ironing, you can start ironing once the iron is ready for use. | |
| 4. Steam ironing is available for “Blend”, “Wool”, “Cotton”, “Jeans”, and “Linen”.To generate steam for steam ironing, hold the steam trigger. The respective steam indicator for the fabric setting you selected will flash, indicating that it is generating steam. Release the steam trigger to stop generating steam. |  |
| 5. You can change the fabric setting by pressing the +or - button, or switch to P-temp mode by pressing the P-temp button. | |
| 6. After use, press the Power On/Off button to turn off the appliance. | |
| 7. After every use, follow the instructions in “Draining the water tank”. It is recommended to drain the water from the water tank after use. |
STEAM CONTROL
The appliance allows two different steam distribution settings:
- Regular steam setting: distribute the steam from the entire soleplate to evenly iron the fabric (Figure 4).

- Steam boost setting: concentrate the steam at the front part of the soleplate for higher pressure of steam when removing stubborn creases (Figure 5).
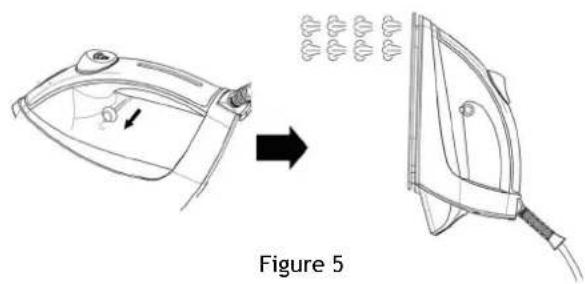
- You can move the steam control button to left or right position to select the two steam distribution setting.
VERTICAL STEAMING
You can also remove creases on items that are hung, such as delicate garments, curtains or other hanging fabrics:
- Select your temperature setting with steam ironing available.
- Hold the iron in vertical position (Figure 6) 15 to 30 centimetres away from the fabric.
- Press the steam trigger.
Warning: Do not apply steam on any clothes or fabrics when they are worn by human or pets. The steam is very hot.

SAFETY AUTO SHUT-OFF FUNCTION
The safety auto shut-off function will be activated automatically when the iron unit is not moved for 10 minutes.
- The Auto Shut -off indicator will flash to indicate the safety auto shut-off function is activated.
- To reactivate the iron, press the Power On/Off button. The control panel will return to its previous temperature setting and start heating up. It may take about 60 seconds for the iron to be ready for use.
Note: The appliance is not switched off completely when it is in safety auto shut off state. Press and hold the function button to turn the appliance off and unplug it from the power outlet.
DRAINING THE WATER TANK
| 1. Disconnect the iron from the mains supply outlet. | |
| 2. Pull the water tank out by pressing the water tank release button. |  |
| 3. Open the water inlet cover and drain the water tank |  |
| 4. Replace the water tank and make sure that it is firmly positioned in place |
LANGUAGE SELECTION
This appliance has three different language settings: ENGLISH, FRENCH and GERMAN.
- To change the language, press the + and - buttons simultaneously and hold them for 5 seconds. The language selection mode will open.
- Press and to choose a different language.
- Wait for a few seconds. Language setting will be automatically updated and the appliance will return to main settings display.
CLEANING AND MAINTENANCE
ANTI-SCALE SYSTEM AND REMINDER SYSTEM
The appliance is equipped with a double anti-scale system to prolong its useful life. Both systems filter and eliminate the calcium from the water:
A. Replaceable anti-scale system:
Depending on the water hardness and actual usage, the cartridge needs to be replaced periodically. The appliance has an electronic system to monitor the useful life of anti-scale cartridges. According to the water hardness setting, the symbol will remind you to replace the anti-scale cartridge. If a new cartridge is not available, you may continue to use the appliance with distilled water instead of tap water.
To replace the anti-scale cartridge:
- Immerse the new anti-scale cartridge in water for 5 minutes.
- Remove the water tank.
- Slide out the anti-scale cartridge container and replace the anti-scale cartridge.
- Wait for 5 seconds to reinstall the anti-scale cartridge container.
- Reinstall the water tank.
Note:
If the anti-scale cartridge container is not properly installed, the flashing symbol and a beep will indicate that the cartridge is missing. Moreover, if the anti-scale cartridge is replaced while the appliance is switched off, it will not be able to recognize that the cartridge has been replaced.
Important:
- Do not attempt to use a used anti-scale cartridge. This will cause damage to the appliance.
- Do not let the anti-scale cartridge container empty. This will cause damage to the appliance.
WATER HARDNESS SETTING
Check the Water Hardness Level
You can check the water hardness in your area with the test strip supplied with the instruction booklet, by following the following instructions:
Immerse the test strip into water for 1 second.
- Shake off excess water and compare the colour change on test strip after 1 minute to the colour chart.
- Match the water hardness rating for your steam generator by selecting the water hardness setting.
Set the Water Hardness level,
-
Press and hold the —TEMP buttons simultaneously for 5 seconds to select the water hardness setting mode.
-
Press the fabric selection button to select the water hardness level according to the following table.

Your appliance has been designed to be used with tap water. If you live in an area with very hard water, fast scale build-up will occur. It is therefore recommended to use distilled water !!
*Very soft water(0° dH)
*Soft water (3°-7° dH)
Use tap water/LO
Use tap water/MI
water hardness setting
water hardenss setting
*Medium hard water(8°-7° dH)
-Use mixture of 50% tap water and 50% distilled water/ HI water hardness setting
*Hard water/Very had water(12°-25° dH)
-Use mixture of 30% tap water and 50% distilled water or filtered water/HI
Do not put perfume, vinegar, starch, descaling agents, ironing aids or other chemicals in the water tank, as your appliance is not designed to work with these chemicals.
STORING THE APPLIANCE
- Disconnect the power cord from the mains supply outlet.
- Allow the appliance to cool down completely.
- Drain the water from the water tank (See “Draining the water tank”)
- Place the iron on the steam generator base horizontally.
- Store the main cord and steam hose by using the cord storage clip (Figure 7).

Figure 7
Note:
- Use a damp cloth or a non-abrasive cleaner to remove the deposits from the soleplate or the housing.
- Never use any sharp or rough objects to remove the deposits on the soleplate.
- Never use any abrasive agents, vinegar or descaling agents to clean the iron.
Environment
Do not throw away the appliance with the normal household waste at the end of its life, but hand it in at an official collection point for recycling. By doing this, you help to preserve the environment.
This appliance is marked according to the European directive 2012/19/EU on Waste Electrical and Electronic Equipment (WEEE). This guideline is the frame of a European-wide validity of return and recycling on Waste Electrical and Electronic Equipment.
TROUBLESHOOTING
| Problem | Cause | Solution |
| The appliance does not work | The appliance is heating up. | Wait for a few minutes before use. |
| It is not plugged in. | Plug into a suitable mains supply socket. | |
| The power on/off button is in off position. | Press the power On/Off button to switch on the appliance. | |
| Socket doesn’t work. | Plug into a working socket. | |
| The water fill indicator is ON | Water tank empty | Fill the water tank with a sufficient amount of water. |
| Soleplate does not heat well | Incorrect fabric setting | Use the steam selection buttons to select the desired type of fabric. |
| Water droplets come out of soleplate | The steam that remained in the hose has cooled down and condensed into water. | Release steam away from the garment for a few seconds. |
| No steam coming out of the appliance | Anti-scale cartridge is dry. | Remove the anti-scale cartridge from the appliance and immerse it into water for 5 minutes, then replace it into the appliance. |
| Damage to the fabric | Excessive heat | Follow the garment guide or test on the inside of the hem of the garment. |
| Water leakage from base | Anti-scale filter not inserted correctly. | Fit it correctly. |
| Loud noise | First time use | This is normal. |
| Water is being pumped into the heater. | This is normal. | |
| Water tank is empty. | Fill the water tank. |
Guarantee & service
If you need information or if you have a problem, please contact the Gorenje Customer Care Centre in your country (you find its phone number in the worldwide guarantee leaflet). If there is no Customer Care Centre in your country, go to your local Gorenje dealer or contact the Service department of Gorenje domestic appliances.
For personal use only!
We reserve the right to any modifications!
GORENJE
WISHES YOU A LOT OF PLEASURE WHEN USING YOUR APPLIANCE
DÔLEŽITÉ

Obrázok L'
NAPLNENIE NÁDRŽKY NA VODU
| 1. Napájací kábel odpojte od napájania. | |
| 2. Stlačte tlačidlo na nádržke na vodu a vytiahnite nádržku von. | 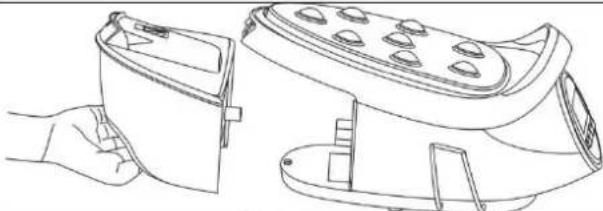 |
| 3. Otvorte kryt a naplňte nádržku na vodu až po označenie maxima. |  |
| 4. Stlačte tlačidlo na nádržke na vodu a zasuňte ju spät’ do jej pôvodnej pozície. Skontrolujte, že je pevne umiestnená na svojom mieste. |
NAPROGRAMOVANÁ TEPLOTA (Režim P-Temp)
Obrázok 6
BEZPEČNOSTNÁ FUNKCIA AUTOMATICKÉHO VYPNUTIA
Obrázok č
Poznámka:
A ŻELAZKA PAROWEGO

Rysunek 3
NAPŚLNIANIŚ ZBIORNIKA WOĘA
Rysunek a
FUNKCJA AUTOMATYCZNŚGO WYŁĄCZŚNIA
Rysunek 7
Uwaga:
ISMERJE MEG A GÖZÁLLOMÁST!

- ábra
A VÍZTARTÁLY FELTÖLTÉSE
- ábra
BIZTONSÁGI AUTOMATIKUS KIKAPCSOLÁS FUNKCIÓ
Megjegyzés:
Малюнок 3
Рисунок 6ю
Рисунокю7ю
Примітка.л
Фигура 6
ФУНКЦИЯкЗАкБЕЗОПАСНОкАВТОМАТИЧНОКИЗКЛЮЧВАНЕ
Фигура 7
Забележка:
Obrázek 6
FUŇKCE BEZPEČŇOSTŇÍHO VYPŇUTÍ
Obrázek
Poznámka:
Figura 3
UMPLEREA REZERVORULUI DE APĂ
Figura \$
Notă:
Puc. 3
РЕЖИМ ПОДАЧИ ПАРА
Puc. 4
Puc. 5
Puc. 6
ВЫБОР ЯЗЫКА
Puc. 7
Примечание


- POLNJENJE REZERVOARJA ZA VODO
- VARNOSTNI IZKLOP
- OPOMBA
- PLOČA ZA UPRAVLJANJE
- PRIJE PRVE UPORABE
- SIGURNOSNO ISKLJUČENJE
- NAPOMENA
- OTKLANJANJE KVAROVA
- OKOLINA
- KONTROLNA TABLA
- PRE PRVE UPOTREBE
- PROGRAMIRANA TEMPERATURA (NAČIN P-TEMP)
- UPOTREBA FUNKCIJE P-TEMP
- VERTIKALNO ISPUŠTANJE PARE
- BEZBEDNOSNO ISKLJUČENJE
- ZAŠČITA OKOLINE
- GARANCIJA I SERVIS
- GORENJE
- ОЗНАJTEAJAAВАШАТААПЕГЛААНААПАРЕАAAA
- ПОЛНЕЊЕ НА РЕЗЕРВОАРОТ ЗА ВОДА
- DO'S
- DO NOT'S
- CONTROL PANEL
- BEFORE USING THE APPLIANCE FOR THE FIRST TIME
- USING YOUR APPLIANCE
- USING THE CABLE SUPPORT ACCESSORY
- FILLING THE WATER TANK
- PROGRAMMED TEMPERATURE (P-TEMP MODE)
- USING P-TEMP MODE
- SETTING THE APPLIANCE ACCORDING TO DIFFERENT FABRIC
- AUTO STEAM FUNCTION
- USING YOUR IRON
- STEAM CONTROL
- VERTICAL STEAMING
- SAFETY AUTO SHUT-OFF FUNCTION
- LANGUAGE SELECTION
- CLEANING AND MAINTENANCE
- ANTI-SCALE SYSTEM AND REMINDER SYSTEM
- REPLACEABLE ANTI-SCALE SYSTEM
- NOTE
- IMPORTANT
- WATER HARDNESS SETTING
- CHECK THE WATER HARDNESS LEVEL
- SET THE WATER HARDNESS LEVEL
- YOUR APPLIANCE HAS BEEN DESIGNED TO BE USED WITH TAP WATER. IF YOU LIVE IN AN AREA WITH VERY HARD WATER, FAST SCALE BUILD-UP WILL OCCUR. IT IS THEREFORE RECOMMENDED TO USE DISTILLED WATER
- STORING THE APPLIANCE
- ENVIRONMENT
- GUARANTEE & SERVICE
- FOR PERSONAL USE ONLY
- DÔLEŽITÉ
- NAPLNENIE NÁDRŽKY NA VODU
- NAPROGRAMOVANÁ TEPLOTA (REŽIM P-TEMP)
- BEZPEČNOSTNÁ FUNKCIA AUTOMATICKÉHO VYPNUTIA
- POZNÁMKA
- A ŻELAZKA PAROWEGO
- NAPŚLNIANIŚ ZBIORNIKA WOĘA
- FUNKCJA AUTOMATYCZNŚGO WYŁĄCZŚNIA
- UWAGA
- A VÍZTARTÁLY FELTÖLTÉSE
- BIZTONSÁGI AUTOMATIKUS KIKAPCSOLÁS FUNKCIÓ
- MEGJEGYZÉS
- ПРИМІТКА.Л
- ФУНКЦИЯКЗАКБЕЗОПАСНОКАВТОМАТИЧНОКИЗКЛЮЧВАНЕ
- ЗАБЕЛЕЖКА
- FUŇKCE BEZPEČŇOSTŇÍHO VYPŇUTÍ
- UMPLEREA REZERVORULUI DE APĂ
- NOTĂ
- РЕЖИМ ПОДАЧИ ПАРА
- ВЫБОР ЯЗЫКА
- ПРИМЕЧАНИЕ
Brand : GORENJE
Model : SGT2400V PRO
Category : Iron