
AccuBird - Hand tool GESIPA - Free user manual and instructions
Find the device manual for free AccuBird GESIPA in PDF.

| Product type | Cordless electromechanical rivet tool |
| Brand | GESIPA |
| Model | AccuBird |
| Weight (with battery) | 2,0 kg |
| Power supply | Battery Li-Ion 14.4 V, capacity 1.3 Ah or 2.6 Ah |
| Charger | Quick charger 220-240 V~, 50-60 Hz, output 14.4 V / 1.5 A max |
| Riveting capacity | Up to Ø 5 mm for standard rivets; BULB-TITE® Ø 4, 5.2 and 6.3 mm |
| Stroke | 20 mm |
| Traction force | 10 000 N |
| Noise level (Lpa) | 78.5 dB (uncertainty K=3 dB) |
| Vibrations | < 2.5 m/s² (uncertainty K=1.5 m/s²) |
| Motor | DC motor 14.4 V |
| Nozzles supplied | 17/32 (fitted), 17/27, 17/29, 17/24 |
| Mandrel collection container | Yes, screw-on (No. 31) |
| Suspension device | Retractable into housing |
| Charging temperature | 0°C to 40°C |
| Maintenance | Clean and grease clamping jaws; maintenance every 2 years by an approved service center |
| Warranty | According to terms and conditions available at www.gesipa.com/agb |
| Application areas | Installation of blind rivets, professional use |
| Safety | Wear safety glasses; do not use in humid or flammable environments |
Frequently Asked Questions - AccuBird GESIPA
User questions about AccuBird GESIPA
0 question about this device. Answer the ones you know or ask your own.
Ask a new question about this device
Download the instructions for your Hand tool in PDF format for free! Find your manual AccuBird - GESIPA and take your electronic device back in hand. On this page are published all the documents necessary for the use of your device. AccuBird by GESIPA.
USER MANUAL AccuBird GESIPA
Battery Powered Riveting Tool
Operating Manual with Spare Parts List

natural_image
Gesipa Li-ion electric drill with visible model and specifications (no text or symbols on the device itself)| DE | Seite | 7-16 | Zum Lesen der Bedienungsanleitung bitte die erste Umschlagseite herausklappen. |
| GB | Page | 17-26 | When reading these instructions, please open the first cover leaf. |
| FR | Page | 27-36 | Mode d'emploi: déplier la première page de couverture. |
| ES | Página | 37-46 | Para leer las instrucciones de uso, abrir la primera página de la cubierta. |
| IT | Pagina | 47-56 | Per leggere le istruzioni d'uso aprire la prima pagina. |
| NL | Bladzijde | 57-66 | Bij het lezen van de gebruiksaanwijzing deze bladzijde openslaan. |
| DK | Side | 67-76 | Slå den første side ud for bedre at kunne lóse og forsta betjeningsvejledningen. |
| SE | Sida | 77-86 | Vik ut den första omslagssidan för att kunna läsa bruksanvisningen. |
| NO | Side | 87-96 | Vennligst les forsiden først for å få en bedre rettledning og forståelse av bruksanvisningen. |
| FI | Sivu | 97-106 | Lukiessasi tätä käyttöohjetta käännä etummainen kuvasivu esiin. |
| PT | Página | 107-116 | Para ler as instruções de uso, favor abrir a folha no verso da capa. |
| CZ | Strana | 117-126 | Pro přečtení návodu k obsluze rozložte prosím první stranu obálky. |
| GR | Σελίδα | 127-136 | Για να διαβάσετε αυτές τις οδηγίες χρήσης, ξεδιπλώστε την πρώτη σελίδα του εξώφυλλου. |
| HU | Oldal | 137-146 | A kezelési útmutató elolvasásához kérjük nyissa fel az alső borítóoldalt. |
| PL | Strana | 147-156 | Aby przeczytać instrukcję obsługi proszę rozłożyć pierwszą stronę okładki. |
| CN | 页 | 157-165 | 阅读这些说明书时,请先打开扉页。 |
| RU | Страница | 166-176 | Чтобы прочитать инструкцию по эксплуатации, откройте вторую страницу обложки . |
DE Ersatzteile
GB Spare Parts
FR Pièces détachées

| 1 • | 143 4955 17/24 |
| 143 4973 17/27 | |
| 143 4974 17/29 | |
| 143 4975 17/32 | |
| 2 | 143 4956 |
| 3 • 143 4129 | |
| 4 • | 143 4958 |
| 143 4173 BT* | |
| 5 • | 143 4959 |
| 143 4992 BT* | |
| 6 • 144 5314 | |
| 7 143 4966 | |
| 8 | 143 4957 |
| 9 | 144 5768 |
| 10 | 143 5027 |
| 11 | 145 7363 |
| 12 | 143 4967 |
| 13 | 143 5028 |
| 14 | 145 7361 |
| 15 | 143 4952 |
| 16 | 144 5763 |
| 17 143 5031 | |
| 18 | 144 5770 |
| 19 | 144 5769 |
| 20 | 146 2906 |
| 21 | 144 5774 |
| 22 • 143 5030 | |
| 23 | 144 5773 |
| 24 | 144 5772 |
| 25 | 145 7364 |
| 26 | 143 5017 |
| 27 | 143 5016 |
| 28 | 143 4978 |
| 29 | 144 5760 |
| 30 | 143 4953 |
| 31 | 143 5032 |
| 32 | 143 5034 |
| 143 5033 | |
| 146 2907 | |
- Verschleißteile, wearing parts, pièces consommables, piezas consumibles, produzione di pezzi resistenti all'abrasione, sluitstukken, sliddele, slitdelar, slitedeler, sulkuosat, peças consumíveis, spotřební materiál, παραγωγή ανταλλακτικών, kopó alkatrészek, zużycie części, 耐磨零件, износ деталей
$$ B T = B U L B - T I T E ^ {\circledR} $$
Inhaltsverzeichnis
1. Blindniet-Setzgerät......8
2. Quick charger and battery 21
2.1 Technical data ....21
2.1.1 Quick charger 21
2.1.2 Battery 21
2.2 Safety information 22
2.2.1 Quick charger 22
2.2.2 Rechargeable battery 22
2.3 Charging procedure....23
2.4 Battery care....23
2.5 Environmental protection....24
3. Repairs 24
4. Troubleshooting ....24
4.1 Blind rivet is not set 24
4.2 No spent mandrel disposal....25
4.3 Red lamp indicates fault 25
5. Warranty 26
6. CE Declaration of conformity....26
1. Blind rivet setting tool
1.1 Intended use
As described in these operating instructions, the riveting tool may only be used for the purpose of setting blind rivets.
Observe the safety information!
1.2 Safety instructions
Caution!

The following safety rules must be observed to ensure adequate protection against electric shocks, injuries or fire hazards:
- The riveting tool is intended solely for the purpose of processing blind rivets.
- Never overload the tool; work within the specified working capacity.
- Never use the riveting tool in a humid or wet environment or close to flammable liquids or gases. Danger of explosion!
- Ensure that the battery is properly secured in the handle.
• Always remove the battery when the riveting tool is not in use and for maintenance.
- Never use the riveting tool as a hammer.
- When not in use, keep the riveting tool in a dry, closed room and out of the reach of children.
- Always wear protective goggles when working with the riveting tool. Personal protective equipment such as protective clothing, gloves, safety helmet, non-slip footwear, ear protection and fall arresting device is recommended.
- The air inlets for the motor should not be obstructed; do not insert any objects into them.
- When putting down the riveting tool, make sure that it cannot fall.
- Use only genuine spare parts for repairs.
- Repairs must be carried out only by skilled personnel. In case of doubt, always send in the riveting tool to the manufacturer.
- Do not use tool without material! The blind rivet could be flung from the riveting tool! Never turn the riveting tool towards yourself or towards another person!
- The spent mandrel container (No. 31) must remain mounted on the riveting tool during operation.
1.3 Working range
For blind rivets up to ∅ 5 mm in all materials. BULB-TITE® blind rivets 4 mm; 5.2 mm and 6.3 mm ∅ aluminium and steel.
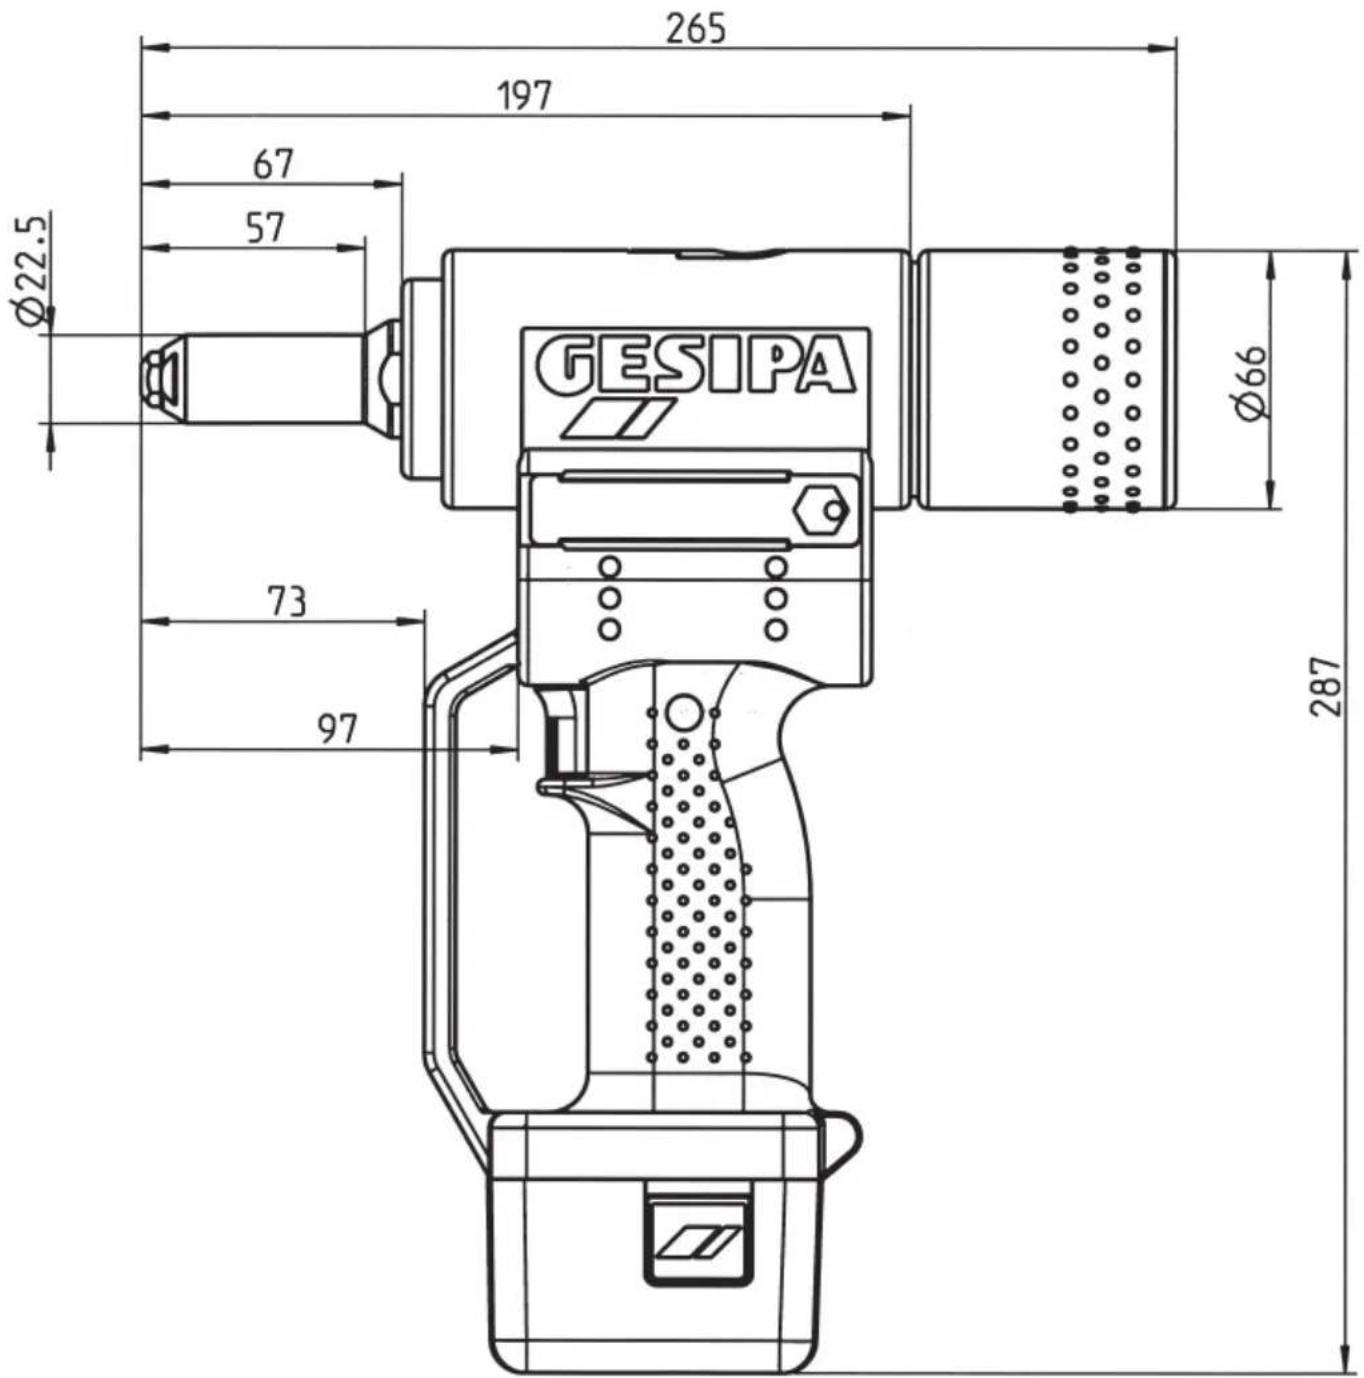
1.4 Equipment/accessories
Nosepieces: 17/32 in working position
17/27, 17/29 and 17/24 in magazine
Wrench: WAF 12 (cover for nosepiece magazine)
Hanger: Concealed in housing
Quick-change battery: 14.4 V
1.5 Technical data
Weight: 2.0 kg (with battery)
Stroke: 20 mm
Drive: DC motor 14.4 V
Setting force: 10,000 N
Noise emission: L 78.5 dB
Measurement uncertainty K = 3 dB
Vibration: < 2.5 m/s ^4
Measurement uncertainty K = 1.5 m/s^2
1.6 Nosepiece allocation
| Rivet ∅ (mm) Rivet material Nosepiece Part No. | |||
| 2.4 | Al | 17/18* | 143 4976 |
| 3.2 | CAP® Al, CAP® Cu | 17/18* | 143 4976 |
| 3 and 3.2 | Al, Cu, steel, stainless steel, Stinox, Al/Al, PG Al, PG steel, PG stainless steel | 17/24 | 143 4955 |
| 4 | Al, Cu, CAP® Al, CAP® Cu | 17/24 | 143 4955 |
| 4 | Steel, Al/Al, PG Al | 17/27 | 143 4973 |
| 4 | Stainless steel, Stinox, PG steel, PG stainless steel | 17/29 | 143 4974 |
| 4.8 and 5 | Alu, CAP® Al, CAP® Cu, PG-Al | 17/29 | 143 4974 |
| 4.8 and 5 | Steel, Al/Al | 17/32 | 143 4975 |
| 4.8 and 5 | PG steel, PG stainless steel, G-Bulb | 17/36* | 143 4977 |
| 6 | Al | 17/36* | 143 4977 |
* available as special accessory. Elongated nosepieces and other special nosepieces are available on request.
| BULB-TITE® ∅ (mm) Rivet material Nosepiece Part No. | ||
| 4 Al/Al 17/26 BT* 143 4985 | ||
| 5.2 Al/Al 17/32 BT* 143 4986 | ||
| 6.3 Al/Al, steel/steel 17/42 BT** 143 4988 |
| BULB-TITE®∅ (mm) | Rivet material Jaw pusher Part | No. Jaws Part | No. | ||
| 6.3 | Al/Al, steel/steel | 5** | 143 4992 | 4** | 143 4173 |
* available as special accessory. Elongated nosepieces and other special nosepieces are available on request.
** also available as conversion kit Part No. 143 5033.
1.7 Start-Up
Before starting the riveting tool, read and observe the operating instructions and safety information and keep in a safe place.
- Insert fully charged battery in correct position into riveting tool.
- Select nosepiece from Table 1.6 and screw on (17/32 in working position).
Caution!

The air inlets for the motor should not be obstructed; do not insert any objects into them.
1.7.1 To attach spent mandrel container
- Fully screw on spent mandrel container (No. 31) by turning clockwise.
1.7.2 To set a blind rivet
a. Pressing and holding the switch:
Press and hold the switch to start riveting. The pulling process stops automatically when the rivet reaches the rear end position. The tool automatically assumes the front starting position when the switch is released.
b. Tapping the switch:
Riveting is triggered by briefly tapping and immediately releasing the switch. As soon as the mandrel breaks off, the blind riveting tool stops and automatically re-assumes the front starting position.
1.8 Maintenance
Maintenance of the riveting tool is limited to the complete jaw mechanism and its wearing parts:
- Detach battery from riveting tool.
- Unscrew steel head sleeve (No. 2) with WAF 27 open-ended spanner and clean.
Check for deposits in the tip of the steel head sleeve (No. 2).
- Use WAF 17 open-ended spanner to release jaw housing (No. 3) from adapter (No. 8).
- Remove jaws (No. 4), clean and oil sliding surfaces; replace if worn.
- Re-assemble in reverse order ensuring that all parts are tightened!
Regular maintenance will extend the service life of your high-quality GESIPA® tools which should be serviced at least every 2 years by an authorised workshop or by GESIPA® Service. We recommend servicing tools that are subject to intensive use ahead of schedule.
2. Quick charger and battery
2.1 Technical data
2.1.1 Quick charger
Type: 12355/12356
Input voltage: 220-240 V\~ / 50-60 Hz
Output voltage: 14.4 V
Output current: 1.5 A max.
Weight: 0.6

kg
2.1.2 Battery
Nominal voltage: 14.4 V
Number of cells: 4/8
Type of cells: Li-Ion
Capacity: 1.3 Ah / 2.6 Ah
Weight: 0.35 kg / 0.5 kg

2.2 Safety information
2.2.1 Quick charger
Caution!

The following safety rules must be observed to ensure adequate protection against electric shocks, injuries or fire hazards:
- The charger must only be used to charge GESIPA ^ rechargeable batteries.
- Regularly check the plug, power cable and charger and have them repaired by Service or by an authorised electrician when damaged.
- Use only genuine power cables and genuine spare parts for repairs.
- Never use the riveting tool in a humid or wet environment or close to flammable liquids or gases. Danger of explosion!
• Take the charger out of its packaging before use.
Using minimum force, insert the GESIPA® battery in the correct position (+pole to +pole) into the charger.
- Never try to charge non-rechargeable batteries.
- Store the charger in a dry, closed room and out of the reach of children.
- Never insert metallic parts into the battery compartment - danger of short circuiting.
- If the charger is wall-mounted, make sure that external influences (e.g. vibration) cannot cause the battery to fall out of the charger.
- The battery charger is designed only for use at altitudes up to 2000 m above sea level.
- This battery charger must not be operated by persons with restricted physical, sensory or mental abilities nor by inexperienced or unskilled persons unless they are supervised by someone who is responsible for safety or receive instructions from them on how to use the charger.
2.2.2 Rechargeable battery
Caution!

The following safety rules must be observed to ensure adequate protection against electric shocks, injuries or fire hazards:
- Never try to charge a damaged battery.
- Do not insert a dirty or wet battery into the charger.
- Never discard batteries into household waste, fire or into water.
- Do not charge batteries at a temperature below 0^ !
2.3 Charging procedure
- Only charge GESIPA ^ batteries at a temperature between 0 °C and 40 °C!
• Take the quick charger out of its packaging and connect to the power supply. Pay attention to the voltage specified on the rating plate! - Using minimum force, insert the GESIPA ^ battery in the correct position (+pole to +pole) into the charger.
- The charging operation starts automatically.
Function indicators
| Steady green Battery charged / trickle charging | |
| Flashing green Charging | |
| Steady red Impermissible charging temperature | |
| Flashing red Battery defective |
Charging times
| Battery type Part No. Charging time* | |
| 1.3 Ah 143 4921 approx. 50 min | |
| 2.6 Ah 145 7269 approx. 100 min. |
* Charging times may vary depending on the residual capacity and the battery temperature.
2.4 Battery care
• To obtain an optimum charge, allow the battery to cool down before inserting it in the charger.
- The GESIPA ^® battery can be recharged approx. 1000 times and reaches its full capacity after several charges.
- Do not insert the battery into the charger after each use.
- Only charge the battery when it is discharged and rivets can no longer be set. Only recharge the battery after a prolonged idle period.
- Significantly shorter battery operating times, despite proper recharging, indicate that the battery needs to be replaced.
- Store batteries in a dry place where there is no danger of frost. The optimum operating temperature range is 10°C to max. 50°C.
2.5 Environmental protection
If batteries need to be replaced, please observe the following:
- Return used GESIPA ^® rechargeable batteries to your dealer or to GESIPA ^® for recycling.
- Never discard used batteries into household waste, fire or into water!
Caution!

In all EU countries (except Germany) the relevant national regulations for implementing the EU guideline shall apply.
- In accordance with the EU Directive 2002/96/EC (WEEE), in Germany, this tool is registered under the WEEE Reg.-No. DE 45695505. If the tool has an 8-digit serial number it can be returned free of charge to GESIPA® for correct disposal.
3. Repairs
Repairs under warranty are carried out by the manufacturer. Repairs outside the warranty period should only be carried out by skilled technical personnel. Failure to observe the assembly and setting procedures and operation by non-skilled personnel may result in serious damage to the riveting tool. In case of doubt, always send the riveting tool back to the supplier or to GESIPA®.
4. Troubleshooting
4.1 Blind rivet is not set
| Cause Corrective measures | |
| Battery switched off because it has been idle for longer than 21 days | Place battery in the charger for 2 minutes (see 2.4) |
| Battery discharged Charge battery; replace if necessary | |
| Jaws (No. 4) dirty or worn Clean and oil sliding | surfaces or replace (see 1.8) |
| Jaw mechanism loose Tighten (see 1.8) | |
| Compression spring weakened (No. 6) Replace | |
| Tool does not operate when yellow trigger button is pressed (red indicator light) | (see 4.3) |
4.2 No spent mandrel disposal
| Cause Corrective measures | |
| Wrong nosepiece (No. 1) used Exchange according to table (see 1.6) | |
| Nosepiece worn (No. 1) Replace | |
| Mandrel jammed in jaws (No. 4) Release mandrel, clean jaws and jaw housing, oil sliding surface or replace jaws (see 1.8) | |
| Inside of steel head sleeve (No. 2) dirty Clean (see 1.8) | |
| Spent mandrel container (No. 31) full Detach and empty | |
| Passageway blocked Remove jammed mandrels and check for trouble-free ejection (see 1.8) | |
4.3 Red lamp indicates fault
When pressing the trigger button
| Cause Corrective measures | |
| Riveting tool not in front end position Release | trigger button |
During pulling operation
| Cause Corrective measures | |
| Overload Use tool within working range as specified in table (see 1.6.) | |
| Electronics overheated Allow riveting tool to cool down in air | |
| Battery discharged Charge or replace | |
After releasing the trigger button
| Cause Corrective measures | |
| Front end position not reached Tighten jaw me | mechanism (see 1.8 and 4.2) |
Caution!

If faults occur that are indicated by the red lamp and cannot be rectified as described above, have the riveting tool repaired by a skilled technician or send it in to the manufacturer.
5. Warranty
The applicable terms and conditions of warranty shall apply and can be viewed under following link: www.gesipa.com/agb
6. CE Declaration of conformity
We hereby declare that the design and construction of the tool named below, as well as the version that we have put on the market, complies with applicable fundamental health and safety requirements stipulated in EU directives. Tool modifications made without our authorisation shall render this declaration void. The safety information in the product documentation provided must be observed. This document must be retained.
AccuBird®
• DIN EN ISO 12100:2011
• DIN EN 60745-2-1:2011-01
• DIN EN ISO 82079-1:2013
• DIN EN 55014-1:2016
• DIN EN 55014-2:2016
• DIN EN 61000-4-2:2009
• DIN EN 61000-4-3:2011
• DIN EN 62233:2008+
• EN 60335-1:2012
• EN 60335-2-29:2010
• DIN EN 62133:2013
• 2012/19/EU
• 2011/65/EU
Authorised documentation representative:
GESIPA Blindniettechnik GmbH
Nordendstraße 13-39
meetonzekerheid K = 3dB
Trillingen: < 2,5 m/s²
meetonzekerheid K = 1,5 m/s²
1.6 Indeling mondstukken
| Blindklinknagel ∅ (mm) Te | klinken materiaal Mondstuk Artikelnr. | ||
| 2,4 aluminium 17/18* 143 4976 | |||
| 3,2 CAP | ®-aluminium, CAP®-Cu | 17/18* 143 | 4976 |
| 3 en 3,2 | aluminium, Cu, staal, rvs, Stinox, alu-minium/aluminium, PG-aluminium, PG-staal, PG-rvs | 17/24 | 143 4955 |
| 4 | aluminium, Cu, CAP®-aluminium, CAP®-Cu | 17/24 | 143 4955 |
| 4 | staal, aluminium/aluminium, PG-aluminium | 17/27 | 143 4973 |
| 4 rvs, Stinox, PG-staal, PG-rvs | 17/29 | 143 4974 | |
| 4,8 en 5 | aluminium, CAP®-aluminium, CAP®-Cu, PG-aluminium | 17/29 | 143 4974 |
| 4,8 en 5 | staal, aluminium/aluminium | 17/32 | 143 4975 |
| 4,8 en 5 | PG-staal, PG-rvs, G-Bulb | 17/36* 143 | 4977 |
| 6 | aluminium 17/36* 143 4977 | ||