KOYA - Baby bed Kindercraft - Free user manual and instructions
Find the device manual for free KOYA Kindercraft in PDF.

User questions about KOYA Kindercraft
0 question about this device. Answer the ones you know or ask your own.
Ask a new question about this device
Download the instructions for your Baby bed in PDF format for free! Find your manual KOYA - Kindercraft and take your electronic device back in hand. On this page are published all the documents necessary for the use of your device. KOYA by Kindercraft.
USER MANUAL KOYA Kindercraft
Thank you for choosing a product by Kinderkraft. Our designs are child-oriented - safety and quality always comes first, stay comfortable knowing that you have made the best choice.
IMPORTANT, RETAIN FOR FUTURE REFERENCE, READ CAREFULLY
SAFETY INSTRUCTIONS AND PRECAUTIONS
WARNING
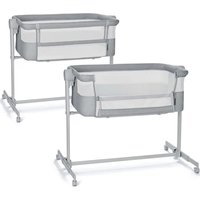
Co-sleeping baby cot + baby cot 90 x 60 cm:
- Do not use this product without reading the instructions for use first.
- Stop using the product as soon as the child can sit or kneel or pull itself up.
- Placing additional items in the product may cause suffocation.
- Do not place the product close to another product, which could present a danger of suffocation or strangulation, e.g. strings, blind/curtain cords, etc.
- Do not use more than one mattress in the product.
- The product should be placed on a horizontal floor.
- Young children should not be allowed to play unsupervised in the vicinity of the crib.
The crib should be locked in the fixed position when the child is left unattended. - All assembly fittings should always be tightened properly.
- Care should be taken that no screws are loose, because a child could trap parts of the body or clothing (e.g. strings, necklaces, ribbons for babies' dummies, etc.), which would pose a risk of strangulation.
Maximum mattress thickness: 6cm (according to the product label). - Be aware of the risk of burning cigarettes, open fires and other sources of strong heat, such as electric bar fires, gas fires, etc. in the near vicinity of the crib
DO NOT use crib if any parts are missing, damaged, or broken. Contact 4Kraft Sp. z o.o. for replacement parts and instructional literature if needed. DO NOT substitute parts. - Only use the mattress sold with this crib, do not add a second mattress on this one, suffocation hazards.
- For the bedside sleeper mode, use of straps (15) and low side (16) is required. DO NOT use bedside sleeper if any parts are missing, damaged, or broken. Contact 4Kraft sp. z o.o. for replacement parts and instructional literature if needed. DO NOT substitute parts
- Height from the floor of the adult's bed for which the bedside sleeper is suitable can be found on picture K.
Information on the types of adult bed for which the bedside sleeper is suitable can be found on picture K.
- User shall not use other attachment system.
- Bedside sleepers shall never be used in an inclined position
- To prevent a suffocation hazard from entrapment, the bedside sleeper shall be properly secured to the adult bed using the attachment system.
- There shall never be a gap between the lower side of the bedside sleeper and the mattress of the adult bed.
- Check the tightness of the attachment system before each use by pulling the bedside sleeper in a direction away from adult bed.
- If there is any gap between the bedside sleeper and the adult bed, DO NOT use product.
- Gaps should not be filled with pillows, blankets or other items.
DANGER! - Always completely raise the drop side when not attached to the adult's bed.
- To avoid hazards from the child's neck being caught on the top rail on the side that is next to the adult bed, the top rail must not be higher than the adult bed mattress.
- To avoid the risk of your child being strangled the attachment system to the adult's bed shall always be kept away from and out of the crib.
- Baby cot should have size 90 × 60 cm. Length and width shall be that there shall be no gap more than 30mm between the mattress and the sides and ends.
Baby cot 120 × 60 cm
- Be aware of the risk of open fire and other sources of strong heat, such as electric bar fires, gas fires, etc. in the near vicinity of the cot;
- Do not use the cot if any part is broken, torn or missing and use only spare parts approved by the manufacturer; spare parts may be only delivered by manufacturer.
- Do not leave anything in the cot or place the cot close to another product, which could provide a foothold or present a danger of suffocation or strangulation, e.g. strings, blind/curtain cords.
- Do not use more than one mattress in the cot.
- The lowest position of the base is the safest (R-IV). When a child starts to sit down without the assistance - use only this level.
-
Thickness of the mattress shall be such that the internal height (measured from the top of mattress to the upper edge of the cot frame) was at least 500mm in the lowest position of the cot base and at least 200mm in the highest position of the cot base.
Maximum thickness of the mattress: 6 cm. -
Mattress should have size 120 × 60 cm. Length and width shall be that there shall be no gap more than 30mm between the mattress and the sides and ends.
- All assembly elements and fittings should be tightened properly and checked regularly and retightened as necessary.
- To prevent injury from falls, if the child is able to climb out of the cot, the cot shall no longer be used for that child.
Playpen:
WARNING Do not place the playpen close to an open fire or other heat source.
- WARNING Do not use the playpen without the base.
- The bottom of the playpen must be mounted at the lowest level (R-V).
- The playpen is designed for children up to 24 months.
- Accessories which are not approved by the manufacturer shall not be used.
- Be aware that items left inside the playpen may be used as a foothold by the child or create a danger of suffocation or strangulation.
- All assembly fittings should always be tightened properly.
- Do not use the playpen if any part is broken, torn or missing and use only spare parts approved by the manufacturer. The components may only be obtained from the manufacturer. Do not use components not authorised by the manufacturer.
I List of baby cot components - page 5-8
| 1 | Screw M6*40 (x22) | 7 | Leg A (x2) & leg B (x2) | 13 | /. |
| 2 | Screw M6*30 (x12) | 8 | Headboard (x2) | 14 | /. |
| 3 | Connector M6*15 (x10) | 9 | Side A & side B | 15 | Straps (x2) |
| 4 | Spanner | 10 | A & B side extension | 16 | Low side |
| 5 | Allen key (x2) | 11 | Bottom | 17 | Mattress 90 x 60 cm |
| 6 | Wheels (x4) | 12 | Bottom extension |
II Co-sleeping baby cot
For installation you need an Allen key (5) and a spanner (4). Mounting should be done on a soft surface that will not damage the surface of the components. The assembly should be carried out by two persons.
- Screw two legs (7a i 7b) to the headboard (8). Make sure that the holes in the components are aligned: connect the leg with the headboard where there are only two holes. Also note that there are wheel holes at the ends
of the legs. These leg ends should be at the wider (horizontal) top slat. Connect the headboard to the legs with four screws (1) (Fig. A). Repeat this step with the other legs and the other headboard.
- Position one of the sides (9) of the cot perpendicular to one of the assembled structures in step 1. Make sure that the five holes in the side (9) are facing inwards. Make sure that the wider
horizontal slat on the side (9) is facing down. Screw the side to the structure using two screws (1) (Figure B). Use three screws (1) to connect the side (9) to the second headboard.
- Place the bottom (11) inside the structure. Note that the mounting holes in the bottom should be on the underside. Screw the bottom of the baby cot to the previously constructed structure with four screws (2) (Fig. C). Attention! All four screws (2) should be screwed into the legs (7). Attention! The bottom of the cot can be adjusted to one of three levels (see point 7). Attention! The bottom of the cot should be flat - it cannot be tilted.
- Low side (16) use screw the entire structure to the cot using four screws (1) (fig. E). Remember that the slat of the low side should face outwards from the cot and form the upper edge of the low side. Attention! The low side of the cot can be adjusted to one of the three levels (see point 7).
- Mounting the wheels: Screw the wheels (6) to the structure (Fig. F) using a spanner (4). The wheels have a locking device which must be engaged when the cot is set up in the desired place. To engage the lock, move the lever downwards (fig. I).
- Make sure that all connections are securely tightened. Slide the mattress into the interior. The cot ready for connection to the parents' bed is shown in figure S.
- The low side of the cot is height-adjustable and can be adjusted to the height of the parents bed. The height of the low side should be adjusted so that its upper edge is at least two centimetres below the upper surface of the parents' bed (Figure K). To change the position of the low side, choose one of the three sets of holes which are located on the legs (7) (fig. P) and then screw the low side into these holes with the screws (1) as described in point 4. Attention! The bottom of the cot is height-adjustable, but the position of the bottom of the cot has to be adjusted to the position of the low side. There should be no space between the lower edge of the low side and the upper edge of the cot bottom (Fig. J). There should be no gaps between the components and they should not overlap. The relationship between the different positions is shown in the table below:
To change the position of the bottom (11), select one of the three sets of holes which are located on the legs (7) (Fig. R - I-III) and then screw the bottom with the screws (2) as indicated
| Position of the low side | Height from floor to top edge of low side | Height from floor to bottom edge of low side | Position of the bottom | Height of the parents' bed mattress |
| Highest (I) | 63,6 cm | 53,6 cm | Highest (I) | Min. 65,6 cm |
| Medium (II) | 58,8 cm | 48,8 cm | Medium (II) | Min. 60,8 cm |
| Lowest (III) | 54 cm | 44 cm | Lowest (III) | Min. 56 cm |
in point 3. You can place the cot on its side (9) to adjust the height of the bottom.
- Use the straps (15) to connect the KOYA cot with the parents' bed. Unfold the strap to its full length, place it around the lower slat of the low side and the bottom in the outermost space between the rungs and then attach it to the parents' bed frame or around the parents' mattress (fig. N + O). Repeat on the other side of the bed. Tension the straps by adjusting their length. The cot must fit tightly into the parents' bed mattress.
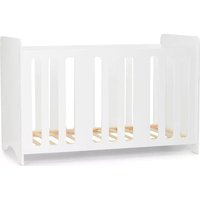
III Baby cot 90 x 60 cm
For installation you need an Allen key (5) and a spanner (4). Mounting should be done on a soft surface that will not damage the surface of the components. The assembly should be carried out by two persons.
- Screw the two legs (7a + 7b) to the headboard (8). Make sure the holes in the components are aligned: connect the leg with the headboard where there are only two holes. Note that there are wheel holes at the ends of the
legs. These leg ends should be at the wider (horizontal) top slat. Connect the headboard to the legs with four screws (1) (Figure A). Repeat this step with the other legs and the other headboard. - Position one of the sides (9) of the cot perpendicular to one of the structures assembled in step 1. Make sure that the five holes of the side (9) are facing inwards. Make sure that the wider, horizontal slat of the side (9) is facing down. Screw the side to the structure using two screws (1) (Figure B). Use three screws (1) to connect the side (9) to the second headboard.
- Add the second side (9). Make sure that the five holes of the side (9) are pointing inwards. Make sure that the wider, horizontal slat on the side (9) is facing down. Use five screws (1) to fasten the side to the structure.
- Place the bottom (11) inside the structure. Note that the mounting holes in the bottom should be on the underside. Screw the bottom of the cot to the previously obtained structure using four screws (2). Attention! All four screws (2) should be screwed into the legs (7). Attention! The bottom of the cot of the dimensions 90 × 60 cm can be adjusted to one of the four levels (see point 7).
- Mounting the wheels: Screw the wheels (6) to the structure (fig. F) using the spanner (4). The wheels have a locking device which must be engaged when the cot is set up in the desired position. To engage the lock, move the lever downwards (fig. I).
- Make sure that all connections are securely tightened. Slide the mattress into the interior. A cot of the dimensions of 90 × 60 cm that is ready to use is shown in figure T.
- The bottom of the cot is adjustable in height (11). To change the height of the cot, select one of the four sets of holes that are located on the legs (7) (Figure R - I-IV), then screw the bottom with the screws (2) as shown in point 4. You can place the cot on its side (9) to adjust the height of the bottom.
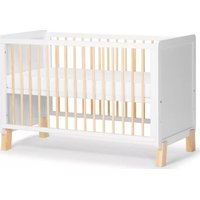
IV Baby cot 120 x 60 cm
For installation you need an Allen key (5) and a spanner (4). Mounting should be done on a soft surface that will not damage the surface of the components. The assembly should be carried out by two persons.
- Screw the two legs (7a + 7b) to the headboard (8). Make sure the holes in the components are aligned: connect the leg with the headboard where there are only two holes. Note that there are wheel holes at the ends of the
legs. These leg ends should be at the wider (horizontal) top slat. Connect the headboard to the legs with four screws (1) (Figure A). Repeat this step with the other legs and the other headboard.
- Place the side (9) and side extension (10) on a soft surface so as not to damage the components. The five holes of both components should be parallel. Note that both components should have the same mark (either A or B). Slide three connectors (3) into the holes in the side extension (10). Then insert the three screws (1) through the side (9) and screw together the two components (Fig. G). Repeat these steps when connecting the other two components (9 & 10).
- Position one of the sides of the cot perpendicular to one of the structures assembled in step 1. Make sure that the ten holes in the side are facing inwards. Make sure that the wider horizontal slat of the side (9) and side extensions (10) are facing down. Screw the side panel to the structure using two screws (1) (Fig. B). Using two screws (1), connect the side panel to the second headboard.
- Attach the other side. Make sure that the ten holes of the side are facing inwards. Make sure that the wider, horizontal side slat (9) and side extensions (10) are facing down. Screw the side panel to the structure using four screws (1).
- Place the bottom (11) and the bottom extension (12) with rungs upwards on a soft surface so that the components do not get damaged. Note that there are four holes in one of the shorter bottom slats and bottom extensions that need to be put together. Slide the four connectors (3) into the holes in the bottom extension (12). Then put the four screws (2) through the bottom (11) and connect the two components (fig. H).
- Using eight screws (2), screw the extended bottom of the cot to the structure from step 4, making sure that the mounting holes in the bottom are on the underside of the cot. Make sure that the bottom extension (12) is on the same side as the side extensions (10). Attention! The bottom of the cot of the dimensions of 120 × 60 cm can be adjusted to one of four selected levels (see fig. L).
- Mounting the wheels: use the spanner (4) to tighten the wheels (6) to the structure (fig. F). The wheels have a locking device which must be engaged when the cot is set up in the desired position. To engage the lock, move the lever downwards (fig. I).
- Make sure that all connections are securely tightened. The cot of the dimensions of 120 × 60 cm that is ready to use is shown in figure U.
- The extended bottom of the cot is adjustable in height. To change the height of the cot, select one of the four sets of holes which are located on the legs (7) (fig. R - I-IV) and sides, then screw the bottom down with the screws (2) as indicated in point 6. You can place the cot on its side (9) to adjust the height of the bottom.
V Playpen
For installation you need an Allen key (5) and a spanner (4). Mounting should be done on a soft surface that will not damage the surface of the components. The assembly should be carried out by two persons.
- Screw the two legs (7a + 7b) to the headboard (8). Make sure the holes in the components are aligned: connect the leg with the headboard where there are only two holes. Note that there are wheel holes at the ends of
the legs. These leg ends should be at the wider (horizontal) top slat. Connect the headboard to
the legs with four screws (1) (Figure A). Repeat this step with the other legs and the other headboard.
- Place the side (9) and the side extension (10) on a soft surface so as not to damage the components. The five holes in the both components should be parallel. Note that both components should have the same designation: either A or B. Slide three connectors (3) into the holes in the side extension (10). Then insert the three screws (1) through the side (9) and screw together the two components (Fig. G). Repeat these steps when connecting the other two components (9 & 10).
- Position one of the sides of the playpen perpendicularly to one of the structures assembled in step 1. Make sure that the ten holes in the sides are facing inwards. Make sure that the wider, horizontal side slat (9) and side extensions (10) are facing down. Screw the side to the structure using two screws (1) (Fig. B). Using two screws (1), connect the side to the second headboard.
- Attach the other side. Make sure that the ten holes of the side panel are pointing inwards. Make sure that the wider, horizontal side slat (9) and side extensions (10) are facing the bottom. Screw the side to the structure using four screws (1).
- Place the bottom (11) and the bottom extension (12) with rungs upwards on a soft surface so as not to damage the components. Note that there are four holes in one of the shorter bottom slats and the bottom extensions that need to be put together. Slide the four connectors (3) into the holes in the bottom extension (12). Then put the four screws (2) through the bottom (11) and connect the two pieces (fig. H).
- Screw the playpen bottom extension to the structure from step 4 with eight screws (2), making sure that the mounting holes in the bottom are on the underside. Make sure that the bottom extension (12) is on the same side as the side extensions (10). Attention! The playpen bottom can only be adjusted to the lowest level (fig. M - V).
- Mounting the wheels: Screw the wheels (6) to the structure (fig. F) using the spanner (4). The wheels have a locking device which must be engaged when the playpen is set up in the desired position. To engage the lock, move the lever downwards (fig. I).
- Make sure that all connections are securely tightened. The playpen that is ready to use is shown in figure W.
VI MAINTENANCE AND CLEANING
Frame - clean with a soft, clean and dry cloth. Clean the mattress cover according to the instructions on the label.
| Handwash. | Do not wash. Clean the product gently with a damp cloth and a mild detergent. |
| Do not bleach | Do not iron |
| Do not dry in a tumble dryer | Do not dry clean |
Do not fold or store the product when it is wet and never store it in wet conditions, as it can lead to mould growth.
VII WARRANTY
A. All Kinderkraft products are covered by a 24-month warranty. The warranty period begins on the date of releasing the product to the Buyer.
B. The warranty is valid for products sold in the following countries: France, Spain, Germany, Poland, United Kingdom, Italy.
C. In countries not listed above warranty terms and conditions are determined by the Seller.
D. It is possible to extend the warranty period to 120 months (10 years). Full text of the terms and conditions and warranty extension registration form are available at www.KINDERKRAFT.COM
E. The warranty is valid only in the country where the purchase was made.
F. Complaints should be submitted by completing the form available at www.RMA.KINDERKRAFT.COM
G. The warranty shall not cover:
a. claims arising from product specifications, as long as they comply with those specified by the manufacturer in the instruction manual or other documents of a legislative nature;
b. product damage caused by improper maintenance or use of inadequate chemicals;
c. colour change (discolouration) when the product has been exposed to direct sunlight against the instructions provided in the instruction manual;
d. tear, wear, crack of fabric/plastic that is the fault of the Customer;
e. reduction in the quality of the product and consumables due to normal wear and tear;
f. products which have not been used according to specifications;
H. The warranty period for accessories attached to the device is 6 months from the date of sale, with the exception of mechanical damage.
I. With regard to Products such as furniture, the Customer is obliged to deliver the Product only at the express request of the Warrantor. In such a case, the Product should be packed in a way that allows for safe transport, i.e., if possible, in the original packaging, or, if there is no original packaging, in substitute, cubic packaging, which protects the Product against damage in transport. The Guarantor reserves the right not to collect the Product if it is packed in an incorrect way, until the indicated irregularities are removed.
J. The warranty claim for Products such as furniture is considered on the basis of the complaint form available at www.rma.kinderkraft.com and the attached photos. In case the piece of furniture is shipped by the Customer on its own, i.e. before the previous instruction from the Guarantor, referred to in point I above, the Guarantor is not obliged to refund the costs incurred in this way and take any actions resulting from the Guarantee.
K. These guarantee terms and conditions are complementary to the Customer's rights in relation to 4KRAFT sp. z o.o. The warranty shall not exclude, limit or suspend the rights of the Customer arising from the provisions on the warranty for defects in the goods sold.
Full text of Warranty Terms and Conditions is available at www.KINDERKRAFT.COM.
All rights to the present document belong entirely to 4Kraft Sp. z o.o. Any unauthorized use of them against their purpose, including in particular: using, copying, reproducing, making available - in whole or in part, without the consent of 4Kraft Sp. z o.o. may result in legal consequences.
ES
jEstimado Cliente!
II Pătuţ ataşabil, co-sleeper
HCTPYKUNI NO TEXHNIK E3ONACHOCTN MEPbI PEPDOCTOPOXHOCTN PEPDYNPEXKDEHNE
PnctabHna KpObaTka + DeTcKaa KpObaTka 90 x 60 cm:
He nCnoIb3yIe 3TO n3dJIne 6e3 npEdbapHTbHOrO npOHTeHHN HnCTpyKcH N O KcPlyatauH.
- Ппекратinte Использоване Идени, Кам Толбко peбенок сможет сесь, Всты.
- На Кoleни подени.
Pa3MeueHne Ha n3deJInn dOIOJIHTeIbHbIX npEaMeTOB MoXeT Bbl3BaTb ydyuBe.
He pa3meaate n3dene pAOM c dpyrHmnpedMeTAMn, KOtOpbIe MoryT npedCTabIbOnachOCTb yduBra, TaKIMN KaK HNTn, WHypbI dJa wTOP n T. d.
He nCnoB3yIte 6OJIe oDHoro MaTpaca Ira 3TOrO n3dJIIn.
- IomeCTHTe H3JeJIne Ha poBHyI IIOJI.
MaJIeHbKHe IeTH He IOJIxHbI HrpaTb 6e3 IIpHcMOTpa BO3JIe KPOBaTKN.
- JeTCKaJ KpOBaTKa IDOLJHb 6bITb yCTaHOBJIeHa B ΦHKCuPoBAHHOM NOLOXKeHH, KOrJa pe6eHka OCTaBJIAHOT 6e3 IIpHcMOTpa.
Bce 3JIeMeHTbI KpeIIeHnRA BcERda IOJXHbI 6bITb IpaBnIbHO 3aTAYtbi.
- Y6eIHTecb, YTO BnHTbI He OcJIa6JIeHbI, TaK KaK pe6eHOK MOKeT HMeTb C HmM KOHTaKT, OHN MOryT 3aNyTaTbCBA OJeKJDe HIn IpeIMetax (HaIpIMep, IIHypKaX, OKepeJIbAx, JeHToQkAX IJI PyCTbIIeK N T. D.), KOTOpBle MOryT CTaTB IIpruHHoY dyIbY.
MaKcHMaJIbHa TOLIuHa MaTpaca: 6 cm (coTlaCHO MapKnipOBKe TObapa).
- Помнhte о рнckax, CBЯЗаHHbIX C KypeHHeM, C OTKpbITbIM ORHem ИлиpyrHMn HCTOчнКamN TeIIla, HaIprHMeP, 3JIeKTprUeCKHe HaIpeBaTeJIbHbIe 3JIeMeHTbI, Ra3OBbie IIINTbI I T.Д. ряДOM C KPOBaTbI0.
3AIIPEIIAETCnHIOJIb3OBaTb KPOBaTKy,ecJIN KaKHe-JIbO deTaJIH OTCyTCTByOT, IOBpeJKeHbI HJN CJIOMaHbI. Iprn Heo6XoIHMOCTn 6paHTeCB B KOMIIaHHO 4Kraft Sp. Z o.o. JIJI POJIyEHHa3IaYacteH MaTePnaJIOB IIO c6OpKe H 06cJIyJxHBaHHIO. HE HCIOJIb3yIte Hepa3peIeHHbIe 3aMeHHTeJIH.
- IcnoJb3yIte TOLbKO MaTpac, npOdaBaembI C 3TOI KpOBaTKoI, He KlaIHTe BTOPOI MaTpac IOBepx OPHINHaJIbHOrO MaTpaca, TaK KaK CyIeCTByeT PnCK yDyIbI.
Bo BpeMa cHa B DeTcKo KPOBaTKe PdOM C KPOBaTbHO B3PocJIOr Heo6XoHMO HcNoJIb3OBA Tb peMHn (15) HnnKHHo YoacTb (16). 3AIIPEIIAETCn HcNoJIb3OBA Tb KPOBaTKy, ecJn KaKHe-JIn6o DeTaJIN OTCyTCTByOT, IOBpeJxIeHbI NIn CLOMaHbI. Iprn Heo6XoJIMOCTH No6paHTeCb B KomHaHHo 4Kraft Sp. zo.o. JIpyIoYueHn 3aIpuCTeH MaTePhaIOB IIc6OpKe H o6ClyXuBaHHIO. HE HCNoJIb3yIte Hepa3peIeHNbIe 3aMeHHTeJN.
Ha pncyHke K IOKa3aHo paCCTOJHHe OT JeTCKoK KPOBATKn Do IIOJa OTHOCHTeJIbHO KPOBAtn B3pOcJIoRo.
Ha pncyHke K IOKa3aHbI TnIbI KpOBaTei B3PoCJIbIX, IOxOJaIe IJIa JeTcKOJ KpOBaTKI.
- Плььбателов может Исторьогаь Касую Систему Креленя, КрOME TOI, КOTOPАВ BXODITВ KOMПLEKT.
HnkOrda He cTaBbTe KPOBaTKy B HaKIOHHom NOLOXeHN.
Bo n36eKanHe pncKa ydyuSeHn npn 3aNyTbIBaHn, KpOBaTKa dOJXHa 6bITb NaIeXaUm o6pa30m npNKpePJIeHa K KpOBaTN dJa B3pocJIbIX C NOMOUsBO CnCTeMbI KpePJIeHn. - Mejdy HnKHei CTOpOHoi DeTCKoI KpOBaTKn I MaTpacOM B3PocIoN KpOBaTH He DoJIxHO 6bITb 3a3Opa.
- Pered Kaqdbim nCnoB3ObaHne m npOBepaTe cncTeMy KpeJIeHna, OTTARBAKPOBaTKy OT KPOBaTN B3pocloro.
3APPEUCAETCnnoIb3OBA Tb n3dJIne,ecn MeKdy DeTCKo KPOBaTKo N B3pocIo NKoBaTbIO ecTb 3a3Op.
He 3aOpHnIte 3aOpbl npdykamn, OdeJ lamn nn dpyrmn npedmetamn. - ONACHOCTb! - Ecnn DeTcKa KpOBaTKa He npNKpeNJIeHa K KpOBaTH pOHTeJIe, Bcerda nOdHMaIte OncyKaemyIO CTOPHY / yCTaHaBnBaIe Te BbICOKYIO CTOPHY.
Bo n36eXaHne pncKa 3aUeMLeHnA weH pe6eHka 3a BepxHn KpaonycKaem/ HnKHe cToPOhbl, 3OT KpaH He dOJIKeH BbICTyNaTb HaD MaTpacOM KpOBaTH poAnTeIeN.
Bo n36eXaHne pncKa ydyuBja pe6eHka cnCTema KpePnIeHna DetCKoK kpoBaTKn KkpoBaTN B3pOcLOrO dOJIxHa HaxOdntbCra BHe KpoBaTu.
-Детсая кроватka должна IMetb pa3mep 90x60cm.Длина ишируна должна 6ытб takои,чTO6bl 3a3Op MeKdy MaTpacOM n 6OKOBbIMn Kpaamn n BepshHaMn He npeBbIwaI 30 MM.
I CINCOK EJEMEHTOB KPOBATKN 5-8 CTP.
| 1 | Ви nt M 6 * 40 (x22) | 7 | A-ножka (x2) & B- nожka (x2) | 13 | . / . |
| 2 | Ви nt M 6 * 30 (x12) | 8 | Изг olobbe(x2) | 14 | . / . |
| 3 | Втулka M 6 * 15 (x10) | 9 | Сторона A & Сторона B | 15 | Ремн (x2) |
| 4 | К liоч | 10 | Уд mini He nne St oponы A n B | 16 | Hизкая сторона |
| 5 | Шеши гранный к liоч (x2) | 11 | Дно | 17 | Матpac 90 x 60 cm |
II PnictaBna KpoBaTaKa
He cKlaIbIbTaB n He xpaHnTb npOdyKT, KOrda OH BlaJXhBi n HnKOrDa He xpaHnTb erO B yCIOBnaX IOBbIeHHoB BLaJXHOCTn, TAK KaK 3TO MoKeT npNBecTn K O6pa3OBAHnO PJIeCeHn.
VII「APAHTNIA
A. TapaHTnpaCnpocTpaHReTcToIbKOHa IpoDyKcuIO, npOdaHHyIO B nepeuNcJIeHHbIX cTpaHax: PhaHnra, NcnaHnra, TepMaHnra, Poblha, BeIIko6pTuHnra, NTaHnra.
B. B ctpaHax, He yka3aHHbIX Bblwe, ycIOBna rapaHTnOnpeJeIeIeT PpoIaBeu.
Bce npaba Ha 3TOT DOKyMeNT NOHocTbIO npHaadJeXaT 4Kraft Sp. Z O.O. JIo6oe HecaHKUHOHPOBaHNoE NCNoIb3OBAHne, npOTnBOpeuaJee Ha3NaueHIO, B qACTHOCTN: NcNoJIb3OBAHne, KOnIPoBaHne, BOCpON3BeDeHne, COBMeCTHOe NCNoJIb3OBAHne - NOHOCTbIO nIIu YacTHNuHO 6e3 corlacsra 4Kraft Sp. Z O.O. MoKeT npINBeCTN K IOpNDUeCKM NOCLeDCTBnAM.
Vázeny zákazník!
Dakujeme, ze ste si zakupili produkt značky Kinderkraft. Nasim ciełom je spokojnost vásho dietata - vždy dbáme o bezpečnost a kvalitu a garantujeme maximálne pohodlie.
DOLEZITÉ, USCHOVAJTE PRE BUDUCE POTREBY, CITAJTE POZORNE
BEZPECNOSTNÉ POKYNY A UPOZORNENIA VAROVANIE
Pristavná detská postielska + Detská postielska 90 x 60 cm:
In the interests of our Clients - we are at your disposal! If you have a problem with the product you received, contact us in the most convenient way for you!