Micromot LHW 28547 - Grinder PROXXON - Free user manual and instructions
Find the device manual for free Micromot LHW 28547 PROXXON in PDF.

| Product type | Grinder (Long neck angle grinder) |
| Brand | PROXXON |
| Model | Micromot LHW 28547 |
| Length | 250 mm |
| Disc diameter | 50 mm |
| Weight | Approx. 700 g |
| Power supply | 230 V, 50/60 Hz |
| Power | 100 Watts |
| No-load speed | 15,000 rpm |
| Noise emission | ≤ 78 dB(A) |
| Hand-arm vibration | ≤ 2.5 m/s² |
| Main functions | Grinding, sanding, cutting, deburring, roughing, sharpening, paint removal, rust removal, honing |
| Workable materials | Steel, non-ferrous metals, glass, wood, ceramic, plastic |
| Protection class | II (double insulation) |
| Protective guard | Adjustable (loosen screw, turn, tighten) |
| Maintenance and cleaning | Clean after each use with a soft cloth or brush; use mild soap; avoid solvents and alcohol; clean ventilation slots |
| Safety | Mandatory wearing of safety goggles, dust mask; use protective guard; never use damaged tool; unplug before maintenance |
| Spare parts | Use only original PROXXON spare parts; power cable replacement only by customer service or qualified professional |
| Repairability | Repairs only by qualified personnel; contact dealer for warranty claims |
| Included accessories | Flap disc (K100), corundum grinding disc (K60), woven cutting disc |
| General information | Use only in dry area; do not dispose with household waste; CE compliance declaration |
Frequently Asked Questions - Micromot LHW 28547 PROXXON
User questions about Micromot LHW 28547 PROXXON
0 question about this device. Answer the ones you know or ask your own.
Ask a new question about this device
Download the instructions for your Grinder in PDF format for free! Find your manual Micromot LHW 28547 - PROXXON and take your electronic device back in hand. On this page are published all the documents necessary for the use of your device. Micromot LHW 28547 by PROXXON.
USER MANUAL Micromot LHW 28547 PROXXON
natural_image
Exterior view of a power tool with attached cable and terminal block (no visible text or symbols)Manual
| DE | 4 ... 9 |
| GB | 10 ... 14 |
| FR | 15 ... 20 |
| IT | 21 ... 26 |
| ES | 27 ... 32 |
| NL | 33 ... 38 |
| DK | 39 ... 44 |
| SE | 45 ... 49 |
| CZ | 50 ... 54 |
| TR | 55 ... 60 |
| PL | 61 ... 66 |
| RU | 67 ... 72 |
text_image
Technical diagram of a power tool with numbered parts labeled for identification.Fig. 1
text_image
1 2 3 4 5 234Fig. 2
natural_image
Mechanical component diagram showing a lever and base mount (no text or symbols)Fig. 3
Translation of the Original Operating Instructions Long-neck angle grinder LHW
Dear customer!
Always keep these operating instructions and the enclosed safety guidelines within reach.
Only use this device with exact knowledge of it and comply with the instructions and safety guidelines!
This is necessary to ensure safe operation and, secondly, it simplifies familiarisation with the device and its functions.
Proxxon assumes no liability for the safe function of the device in the case of:
- handling that does not comply with normal intended use,
- use for other purposes not mentioned in the manual,
- incorrectly executed repairs,
- ailure to heed safety instructions,
- external influences for which the manufacturer is not responsible
We recommend using PROXXON original spare parts for all repair and maintenance work.
Repairs should only be performed by qualified skilled personnel!
Please note: All information contained in these operating instructions - especially the technical data - corresponds to the status at the time of printing.
We reserve the right to make further developments in the interest of technical progress. We wish you every success with the device.
WARNING!
Read all safety warnings and instructions. Failure to follow all safety warnings and instructions listed below may result in electric shock, fire and/or serious injury.
KEEP ALL SAFETY WARNINGS AND INSTRUCTIONS FOR THE FUTURE!
Safety guidelines for all operations
a) This power tool can be used as grinder, sander and abrasive cutting-off tool. Please observe all safety guidelines, instructions, illustrations and data provided with the device. Failure to follow instructions listed below may result in electric shock, fire and/or serious injuries.
b) This power tool is not suitable for working with wire brushes and polishing. Uses for which the power tool is not intended can cause hazards and injuries.
c) Do not use accessories which are not designed or recommended by the manufacturer specifically for this power tool. Just because the accessory can be attached to your power tool does not assure safe use.
d) The rated speed of the bits and cutters must be at least equal to the maximum speed specified on the power tool. Accessories that turn faster than their rated speed can break and fly apart.
e) The outside diameter and thickness of the bits and cutters must be within the capacity rating of your power tool. Incorrectly sized bits and cutters cannot be adequately guarded or controlled.
f) The arbour size of discs, flanges, grinding discs or other accessories must properly fit the grinding spindle of your power tool. Bits and cutters that do not fit the grinding spindle of the power tool properly will turn unevenly, vibrate very strongly and cause loss of control.
g) Do not use damaged bits and cutters. Before each use, inspect bits and cutters such as sanding discs for chips and cracks, grinding discs for cracks, strong wear or tear, wire brushes for loose or broken wires. If the power tool or bits and cutters are dropped, check for damage or install undamaged bits and cutters. After you have inspected and installed the bits and cutters, keep yourself and any other persons in the vicinity away from the plane of the rotating bits and cutters and run the device at maximum rotational speed for one minute. Damaged bits and cutters usually break during this test time.
h) Wear protective equipment. Depending on the application, use full face protection, eye protection or protective goggles. If appropriate, wear a dust mask, hearing protection, protective gloves or a special apron capable of stopping small abrasive and material particles. The eyes are to be protected from flying debris generated during various operations. Dust masks or respirators must filter the
dust generated during the operation. If you are exposed to loud noise for a long time, you may suffer hearing loss.
i) Keep other people at a safe distance away from your work area. Anyone who enters the working area must wear personal protective equipment.
Fragments of the work piece or broken bits and cutters can fly away and cause injuries even beyond the immediate area of work.
j) Hold the device only by its insulated grip surfaces if you perform work where the bits and cutters could contact hidden power cables or your own mains cable. Contact with a live cable can energize metal device parts and cause electric shock.
k) Keep the mains cable away from rotating bits and cutters. If you lose control of the device, the mains cable could be cut or snagged, and your hand or your arm could get pulled into the rotating bits and cutters.
I) Never set down the power tool until the bits and cutters come to a complete stop. Turning bits and cutters grab the depositing surface and pull the power tool out of your control.
m) Do not allow the power tool to run while you are carrying it. Your clothing could get snagged accidentally in the rotating bits and cutters, causing the power tool to pierce your body.
n) Regularly clean the ventilation slits of your power tool. The motor fan sucks dust into the housing and a strong accumulation of metal dust can cause electrical hazards.
o) Do not use the power tool in the vicinity of combustible materials. Sparks could ignite these materials.
p) Do not use bits and cutters that require liquid coolants. The use of water or other liquid coolants can cause electric shock.
Additional safety guidelines on grinding and abrasive cutting.
a) Special safety guidelines on grinding and abrasive cutting:
b) Use only the grinding tools approved for your power tool and the protective guard designed for these grinding tools. Grinding tools that are not designated for the power tool cannot be adequately guarded and are therefore unsafe.
c) The protective guard must be attached securely to the power tool and adjusted in such a way as to achieve maximum safety, i.e. the smallest possible part of the grinding tool is open to the operator. The
protective guard is meant to protect the operator from fragments and accidental contact with the grinding tool.
d) Grinding tools may only be used for the recommended applications. For example: Never grind with the lateral surface of a cutting disc. Cutting discs are intended for removing material with the edge of the disc. Lateral forces on these grinding tools can shatter them.
e) Always use undamaged clamping flanges in the correct size and shape for your selected sanding disc. Suitable flanges support the sanding disc and reduce the danger of sanding disc breakage. Flanges for cutting discs can differ from other sanding disc flanges.
f) Do not use worn sanding discs from larger power tools. Sanding discs for larger power tools are not designed for higher rotational speeds of smaller power tools and can shatter.
Further special safety guidelines on abrasive cutting:
a) Avoid jamming the cutting disc or applying too great contact pressure. Do not make excessively deep cuts. Overstressing the cutting disc increases its load and its susceptibility to twisting or jamming and thus the possibility of recoil or grinding tool breakage.
b) Avoid the area in front of and behind the rotating cutting disc. If you move the cutting disc in the work piece away from you, recoil may catapult the power tool with the rotating disc directly towards you.
c) If the cutting disc binds or if you interrupt work, switch off the device and hold it still until the disc has come to a complete stop. Never attempt to pull the running cutting disc out of the cut, otherwise recoil may occur. Determine and eliminate the cause for binding.
d) Do not switch the power tool back on as long as it is in the work piece. Allow the cutting disc to reach its full rotational speed before carefully continuing the cut. Otherwise, the disc can get snagged, jump out of the work piece or cause recoil.
e) Support sheets or large work pieces to minimize the risk of recoil caused by a jammed cutting disc. Large work pieces can sag under their own weight. The work piece must be supported on both sides of the disc; namely near the separating cut as well as at the edge.
f) Be especially careful when making "pocket cuts" in existing walls or other blind areas. The dipping
cutting disc can cause recoil when cutting into gas or water lines, electric cables or other objects.
Special safety guidelines on sanding:
a) Do not use any overdimensioned sanding disc papers, but comply with manufacturer's specifications on sanding paper size. Sanding papers that extend beyond the grinding disc can cause injuries as well as lead to binding, tearing of the sanding discs or recoil.
For use in dry environments only
Protection class II device
Please do not dispose off the machine!
Wear safety glasses!


Description of the machine:
The user who frequently uses his long-neck angle grinder in cramped spaces will appreciate the device. A slender shape, imposing power and a comprehensive range of accessories make the LHW the ideal tool for deburring, rough-machining, precision polishing, rounding off edges, colour removal, removing rust, separating small parts and sharpening of tools. The LHW can easily machine many materials, such as for example steel, non-ferrous metals, glass, wood and ceramics. Ideally suited for model, tool and mould construction, but also, for example, in the motor vehicle sector or for repairs to vehicles.
The deflection is achieved through the precise, double ball-bearing bevel gear. It is driven by a powerful special motor which is efficiently force-cooled against overheating. A sanding disc of high-grade corundum (grit 60), a fan sander (grit 100) and a fabric-reinforced cutting disc are included.
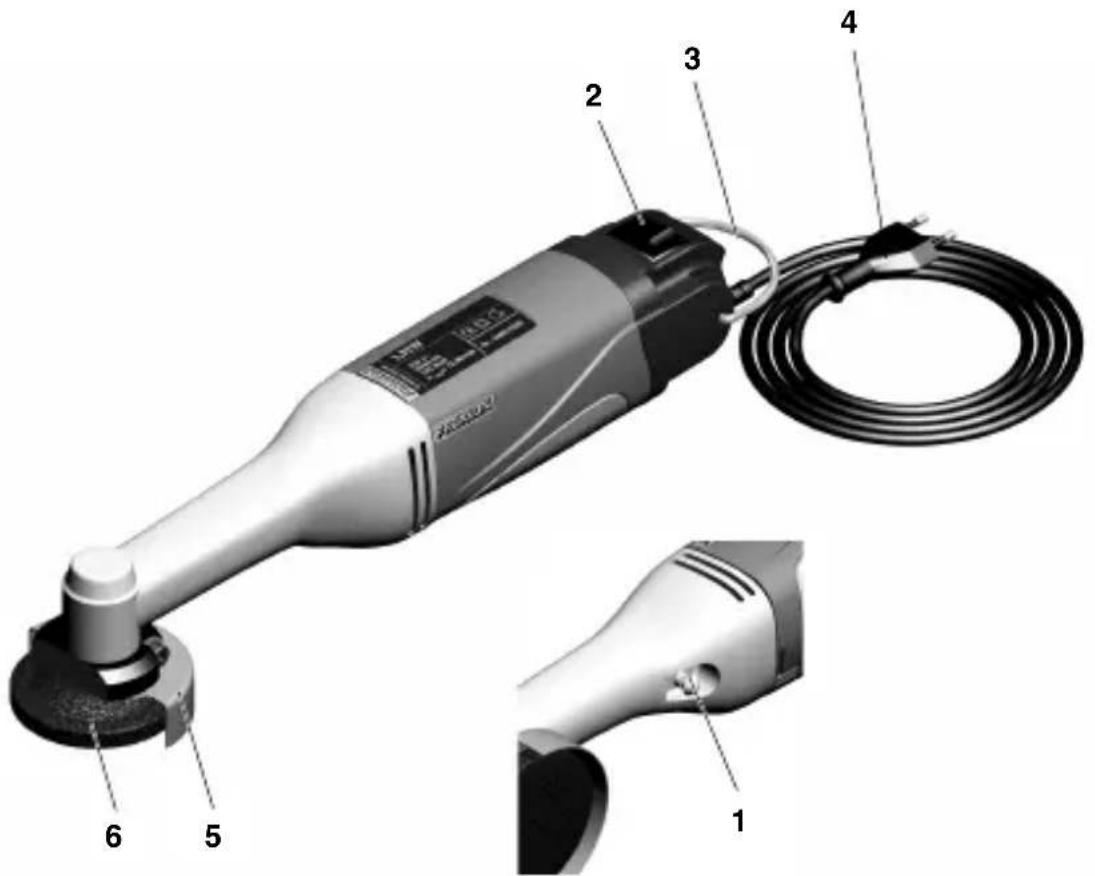
Key
- Locking button
- ON-OFF switch
- Unit handle
- Connection cable with mains plug
- Protective guard
- Grinding disc
Technical Data
Motor:
| Voltage | 230 V, 50/60 Hz |
| Output power | 100 Watt |
Unit:
| Rotational speed | 15000 rpm | |
| Disc diameter | 50 mm | |
| Length | 250 mm | |
| Weight | approx. 700 g | |
| Generated noise | ≤ 78 dB (A) | |
| Vibration at the handle | ≤ 2.5 m/s | ^2 |
Noise/vibration information
The information on vibration and noise emission has been determined in compliance with the prescribed standardised and normative measuring methods and can be used to compare electrical devices and tools with each other.
These values also allow a preliminary evaluation of the loads caused by vibration and noise emissions.
WARNING!
Depending on the operating conditions while operating the device, the actually occurring emissions could differ from the values specified above!
Please bear in mind that the vibration and noise emission can deviate from the values given in these instructions, depending on the conditions of use of the tool. Poorly maintained tools, inappropriate working methods, different work pieces, too high a feed or unsuitable work pieces or materials or unsuitable bits and cutters (here: saw blade) can significantly increase the vibration load and noise emission across the entire work period.
To more accurately estimate the actual vibration and noise load, also take the times into consideration where the device is switched off, or is running but is not actually in use. This can clearly reduce the vibration and noise load across the entire work period.
WARNING:
- Ensure regular and proper maintenance of your tool
- Stop operation of the tool immediately if excessive vibration occurs!
- Unsuitable bits and cutters can cause excessive vibration and noises. Only use suitable bits and cutters!
• Take breaks if necessary when working with the device!
Commissioning and operation
General handling of the device:
CAUTION!
- Do not work with damaged or worn bits and cutters! Make sure the tools are in perfect condition. Damaged or worn tools can break and cause injuries!
- Never press the lock button if the bits and cutters and are still rotating.
- Please note: The utilised bits and cutters may not exceed a maximum diameter of 50 mm!
- Make sure that the permissible maximum speed of the bits and cutters does not undershoot the speed of the device! The tool can break when the maximum permissible speed is exceeded. Flying parts can cause damage and severe injuries!
- Never work without dust protection mask and safety glasses. Some dusts have a hazardous effect! Materials containing asbestos may not be machined!
- Do not work with damaged tools!
- Ensure the work piece is fixed securely! Loose work pieces should be clamped in a suitable fixture. This prevents the work pieces from flying about.
- A correct and uniform speed achieves a high grinding performance, not excessive contact pressure! Excessive pressure is to be avoided: it only stresses the device and can even damage the bits and cutters!
- Hold the device without covering the ventilation slots. If it overheats, you absolutely must shut off the device and allow it to cool down.
- Do not use the cutting disc for rough-machining. Risk of fracture!
- Work only with a correctly adjusted protective guard!
- When storing the bits and cutters, make sure they are reliably protected from damage!
Hold the device by the insulated gripping surfaces, as the grinding surface can hit its own connecting cable.
Damage to a “live” wire can stress metal parts and cause an electric shock.
Replacing the Grinding Disc
Your LHW long-neck angle grinder is ready for operation on delivery.
Pre-assembled with a fan sander with grain 100 and 50 mm diameter, ideal for grinding and smoothing malleable cast iron, grey cast iron, stainless steel, steel, non-ferrous metal, wood and plastic.
The supplied high-grade corundum sanding disc is ideal for roughing, grinding, sharpening and removing rust from metal or non-ferrous metal, and the included corundum-bound cutting disc is perfect for abrasive cutting of steel, non-ferrous metal, plastic or wood.
We also have a great number of additional problem solvers in our comprehensive range of accessories.
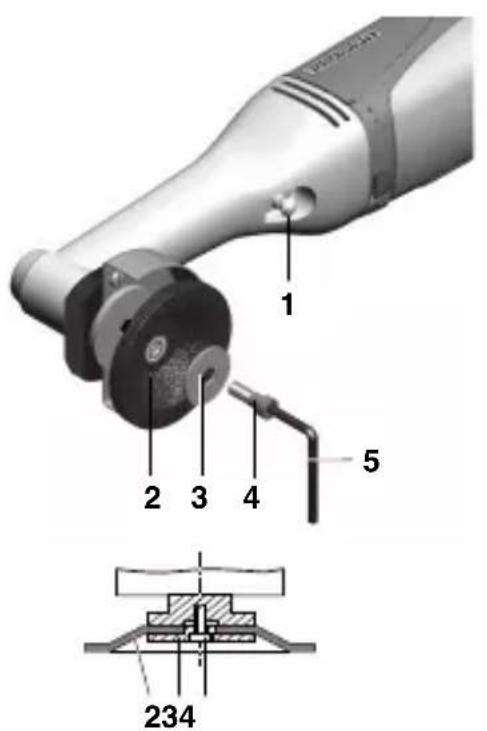
- Press the locking button 1 (Fig. 2).
- Turn the fastening screw 4 using an Allen key 5 until the locking button engages.
- Undo the fastening screw 4, remove the centring disc 3 and the grinding disc 2.
- Fit a new grinding disc.
- Press the locking button 1 and tighten the fastening screw 4.
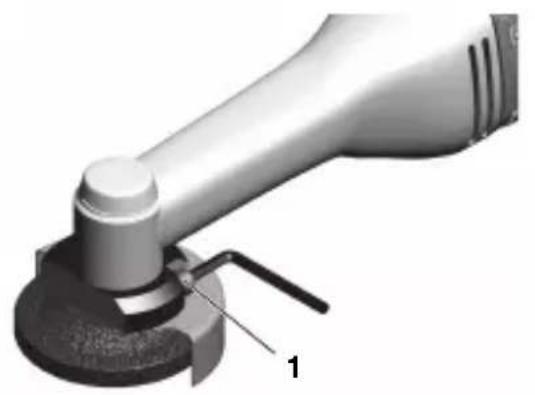
Adjust the protective guard.
IMPORTANT!
Disconnect the plug from the mains before the following.
- Release fastening screw 1 (Fig. 3) and turn the protective guard to the desired position.
- Retighten the fastening screw.
Using the unit
- Switch the unit on via the switch 3 (Fig. 1).
NOTE!
Do not press too hard when using the grinder. Good grinding performance can only be achieved using the correct and constant rotational speed.
To achieve the best results when roughening, apply the grinding disc to the grinding surface at an angle of between 30^ and 40^ and move evenly back and forth over the workpiece.
Do not bend the grinding disc into the cutting surface during cutting work.
IMPORTANT!
Do not use the cutting disc for roughening work. Risk of fracture!
IMPORTANT!
If the unit overheats, switch it off and allow it to cool.
Maintenance, cleaning and care
ATTENTION!
Disconnect the mains plug prior to every adjustment, maintenance measure or repair!
NOTE!
Every device is dirtied by dust when working. Cleaning is therefore essential. To ensure a long service life, however, the machine should be cleaned with a soft cloth or brush after each use.
Mild soap or other suitable cleaning agent may be used in this context. Solvents or cleaning agents containing alcohol (e.g. petrol, cleaning alcohols, etc.) should be avoided, since these can attack plastic casings.
The apertures required for cooling the motor must always be kept free of dust and dirt.
Accessories
For more detailed information on accessories, please request our device catalogue from the address specified on the last page in the warranty information.
Please note in general:
Proxxon bits and cutters have been designed to work with our machines, which makes them optimal for their use.
We will not assume any liability whatsoever for the safe and proper function of our devices when using third-party bits and cutters! Service note
Please note: The mains power input may only be replaced by our Proxxon Service Department or a qualified specialist!
Disposal
Please do not dispose of the device in domestic waste! The device contains valuable substances that can be recycled. If you have any questions about this, please contact your local waste management enterprise or other corresponding municipal facilities.
EC Declaration of Conformity
Name and address of the manufacturer:
PROXXON S.A.
6-10, Härebierg
L-6868 Wecker
Product designation: LHW
Article No.: 28547
In sole responsibility, we declare that this product conforms to the following directives and normative documents:
EU EMC Directive 2014/30/EC
EN 55014-1:2017/A11:2020
EN 55014-2:2015
EN 61000-3-2: 2019
EN 61000-3-3: 2013/A1:2019
EU Machinery Directive 2006/42/EC
EN 62841-1:2015
EN 62841-2-4:2014/AC:2015
Date: 11.08.2020
Machine Safety Department
The CE document authorized agent is identical with the signatory.
Cher client, chère cliente!
Dipl.-ing. Jörg Wagner
PROXXON S.A.
TYTO POKYNY DOBŘE USCHOVEJTE!
natural_image
Exploded view diagram of an electric motor assembly showing internal components like battery, rotor, and power plug (no text or labels present)All PROXXON products are thoroughly inspected after production. Should a defect occur nevertheless, please contact the dealer from whom you purchased the product. Only the dealer is responsible for handling all legal warranty claims which refer exclusively to material and manufacturer error.
Improper use, such as capacity overload, damage due to outside influences and normal wear are excluded from the warranty.
You will find further notes regarding "Service and Spare Parts Management" at www.proxxon.com.