
KGS 80 - Saw PROXXON - Free user manual and instructions
Find the device manual for free KGS 80 PROXXON in PDF.


| Product Type | Crosscut and Mitre Saw |
| Model | KGS 80 |
| Brand | PROXXON |
| Material Compatibility | Wood, non-ferrous metals, plastics |
| Base Dimensions (approx.) | 230 x 230 mm |
| Height (rest position) | 215 mm |
| Width (saw head far right) | 300 mm |
| Weight (approx.) | 6 kg |
| Motor Voltage | 220-240 V, 50/60 Hz |
| Power Consumption | 200 W |
| Rotational Speed (no load) | 6000 rpm |
| Cutting Speed | 17 m/s |
| Noise Level | < 82 dB(A) |
| Saw Blade Diameter | 80-85 mm |
| Saw Blade Bore | 10 mm |
| Vice Jaw Length | 80 mm |
| Max. Clamping Width | 45 mm |
| Turntable Rotation | ±45° with 15° detents |
| Cutting Capacity at 90° | Up to 65 mm width x 25 mm thickness; round material up to 25 mm |
| Cutting Capacity at 45° | Up to 50 mm width x 18 mm thickness; round material up to 20 mm |
| Length Stop | Adjustable, included |
| Safety Features | Locking lever, automatic blade guard, mechanical safety catch |
| Maintenance | Clean after use; replace saw blade via central screw (left-hand thread) |
Frequently Asked Questions - KGS 80 PROXXON
User questions about KGS 80 PROXXON
0 question about this device. Answer the ones you know or ask your own.
Ask a new question about this device
Download the instructions for your Saw in PDF format for free! Find your manual KGS 80 - PROXXON and take your electronic device back in hand. On this page are published all the documents necessary for the use of your device. KGS 80 by PROXXON.
USER MANUAL KGS 80 PROXXON
A-4224 Wartberg/Aist
natural_image
Mechanical device with clamping mechanism and wiring (no visible text or symbols)MANUAL
Deutsch D 6
Fold out the picture pages when reading the user instructions.
Français F 16
Fig. 1



-4-
-5
Operating instructions
KGS 80 Crosscut and mitre saw
Contents:
1 General safety notes....11
2 Specific safety notes....49
2 Specific safety notes....12
3 General view (fig. 1)....12
4 Description of machine 12
5 Technical data....13
6 Before beginning work....13
7 Working with the KGS 80 Crosscut and mitro cash
and litre saw 13
7.1 Cutting capacity 13
7.2 Sawing 13
7.2.1 General notes on setting the saw head 13
7.2.2 Straight and litre cuts 13
7.2.2.1 If you would like to produce straight cuts
(see fig. 2a)....13
7.2.2.2 If you would like to produce mitro auto:
1.2.2.2 If you would like to produce little cuts.
(See fig. 2b): 14
7.2.3 Working with the Length Stop (see fig. 4) 14
8 Care and Maintenance....14
8.1 Replacing the saw blade
(see fig. 5a and 5b):....14
8.2 Cleaning 14
9 Disposal 15
10 EU declaration of conformity 15
Dear Customer!
Using these instructions
• makes it easier to get familiar with the device
• prevents malfunctions caused by improper handling, and
•engthens the service life of your device.
Please keep these instructions readily accessible at all times. Use the device only when you have understood it exactly and always adhere to the instructions.
PROXXON is not liable for the safe functioning of the device in cases of:
- handling that does not conform to the usual usage,
- purposes of use not designated in the instructions.
• disregard of the safety instructions.
You are not entitled to guarantee claims in cases of:
- operator errors,
• inadequate maintenance.
For your own safety, please follow the safety instructions exactly. Use only genuine PROXXON replacement parts.
We reserve the right to make improvements in the sense of technical progress. We wish you much success with the device.
1 General safety notes
General Safety Information
CAUTION! When using electric power tools, the following safety measures must be observed for protection from electric shock, risk of injury, and fire hazards.
Read and take note of all these instructions before you start up the product. Keep these safety instructions in a safe place.
Safe working
Always keep your working area tidy.
- Disorder in the working area can lead to accidents.
Take account of surrounding influences.
-
Do not expose tools to the rain.
-
Do not use tools in damp or wet surroundings.
- Ensure that the lighting is good.
- Do not use tools in the vicinity of combustible liquids or cases.
- Avoid body parts from coming into contact with earthed parts.
Protect yourself from electric shocks.
Keep other people away.
- Do not let other people, especially children, touch the tool or the cable. Keep them well away from the working area.
Keep unused tools in a safe place.
- Unused equipment should be kept in a dry, closed location out of the reach of children.
Do not overload your tool.
- You will be able to work better and safer within the given power range.
Always use the correct tool.
- Do not use low power machines for heavy work.
- Do not use tools for purposes for which they were not designed. For example do not use manually-operated circular saws for cutting branches or firewood.
Wear suitable working clothing
- Do not wear loose clothing or jewellery, they can get caught up by moving parts.
- When working in the open air we recommend the use of non-slip footwear.
- Wear a hair net if you have long hair.
Use the protective equipment.
-
Wear safety glasses.
-
Wear a breathing mask when carrying out dust-generating work.
Connect to the dust extraction equipment.
- If connections are available to dust extraction and collection equipment, make sure that they are properly connected and used.
Do not use the cable for purposes for which it was not designed. 1. Do not use the cable to pull the plug out of its socket. Protect the cable from heat, oil and sharp edges.
Secure the tool.
- Use the clamping fixture or a vice to hold the tool tightly. It is thus held more safely than with your hand.
Avoid abnormal postures.
- Ensure that you are standing safely and always maintain your balance.
Take great care of your tools.
-
Keep the tools sharp and clean so as to be able to work better and safer.
-
Follow the maintenance instructions and the advice about tool changing.
-
Regularly check the tool cable and have it replaced by an authorized specialist if it is damaged.
-
Regularly check the extension cables and replace them if they are damaged.
-
Keep handles dry and free from oil and grease.
Pull the plug out of the socket:
- When the tool is not in use, before maintenance and when changing tools such as the saw blade, drill or milling cutters, always take the plug out of the socket.
Do not leave any tool spanners or setting keys in place.
- Before switching on always check that spanners, keys and setting too's have been removed.
Avoid unintentional starting.
- Always make sure that the switch is in the OFF position when you plug the tool into the socket.
Extension cables in the open air.
- In the open air always use extension cables which are authorized for the purpose and which are correspondingly marked.
Always be attentive.
- Be aware of what you are doing. Carry out your work sensibly. Do not use the tool if you are tired.
Check the tool for damage.
-
Before further use of the tool, examine protective devices or slightly-damaged parts to ensure that the function is perfect and meets the requirements.
-
Check that the moving parts function perfectly and do not stick and that parts are not damaged. All parts must be correctly mounted and all the conditions fulfilled to ensure trouble-free tool operation.
-
Damaged protective equipment and parts must be properly repaired or exchanged by an authorized specialist workshop if no other information is given in the instructions for use.
-
Arrange for damaged switches to be exchanged by a customer services workshop.
-
Never use tools on which the switch cannot be switched on and off.
WARNING!
- The use of other tool inserts and accessories can present a risk of injury.
Arrange for your tool to be repaired by a specialist electrician 1. This tool meets the relevant safety regulations. Repairs may only be carried out by electrical specialists and original spare parts must be used. Otherwise accidents can happen to the user.
2 Specific safety notes
Caution!
Damaged or deformed saw blades may not be used.
Use only saw blades recommended by the manufacturer and which correspond to EN 847.
Do not use any saw blades made of high-speed steel.
Use only saw blades that have been properly sharpened. Comply with the maximum rotational speed specified on the saw blade.
3 General view (fig. 1)
- Saw head
- Saw blade cover
- Locking lever
- Saw blade
- 6th class
- Device has
- Device base
- Clamping screw
- Clamping
- Tungtable
- fumtable
- = Spindle for clamping fixture
- Spinicle for 9. Limit stop
- Limit Stop
- Clamping fixture
- Clamp
- Scale
- Scale
- Fastening horses
- Fasting bores
- Adjusting screw for saw head
4 Description of machine
Thank you for purchasing the PROXXON KGS 80 Crosscut and mitre saw.
The saw is not only excellently suited for small yet fine applications for separating wood, non-ferrous metals and plastics, but also larger round and square materials can be easily cut in two no matter whether with a straight cut or with a precise and freely adjustable mtre.
The work piece is clamped in the integrated vice for sawing and separating. The centrically clamped jaws ensure that the imaginary centre line of the vice opening - therefore the centre of the work piece - will always "hit" the centre of the saw blade independent of the selected work piece width.
Clamping round materials is no problem. The prismatic groove ensures the safe and reliable clamping of round materials. For thin, yet relatively wide work pieces (up to 65 mm) there is another groove on the top of the clamping jaw.
The round table itself is swivel-mounted: An angle of plus/minus 45° produces all desired mitres and the scale on the right also enables exact and easy monitoring of the angle setting. The round table has serrations every 15°, but any and all "intermediate steps" can be set and fixed with a clamping fixture. Crosscutting work pieces by using the limit stop is also possible with this device.
The saw head is kept in its upper home position by spring tension. Important: For even greater flexibility, the saw head can also be laterally adjusted on the side using a knurled screw. This minimises the "free" length of the work piece outside the vice jaws, and for angle cuts this ensures that the saw blade does not collide with the vice jaws.
For saw head operation, i.e. to swivel the saw head down while working with the saw, the mechanical safety catch located on the saw head in its home position must be unlocked for your safety. To prevent accidental operation and therefore minimise the risk of in-
juries, the saw head is arrested in its upper position and can be unlocked with a small lever at the horizontal grip.
This also unlocks the mechanical safety catch for the swivelling saw blade protection: This folds itself up when the saw head is lowered to the work piece. The ergonomically placed on/off button can then be pressed easily and without risk.
5 Technical data
Dimensions and weights:
| Device base: | approx. 230 x 230 mm |
| Device base height: | approx. 50 mm |
| Height: | approx. 215 mm(in resting position of the separating head) |
| Width: | approx. 300 mm(saw head at far right) |
| Jaw length of vice: | 80 mm |
| Span width: | max. 45 mm |
| Weight: | approx. 6 kg |
| ∅ saw blade: | 80-85 mm |
| Saw blade drill hole: | 10 mm |
Motor
Voltage: 220 - 240 Volt.
50/60 Hz
Power consumption: 200 watt
Rotational speed: 6000/min
Cutting speed: approx. 17 m/sec
Noise development: < 82 dB(A)
For use in dry environments only
Please do not dispose off the machine!

6 Before beginning work
Note:
Safe and precise work is only then possible if the device has been properly fastened with screws to a worktop. There are drill holes in the heel plate for this purpose.
Caution!
When fixing or transporting the device, always disconnect the mains plug!
Danger!
Never operate the crosscut and mitre saw without wearing protective goggles!
Never use the crosscut and mitre saw to cut materials other than wood, non-ferrous metals or plastics.
Only choose saw blades suitable for the material to be cut.
7 Working with the KGS 80 Crosscut and mitre saw
7.1 Cutting capacity
Work can begin after the device has been fixed to a stable base. Additional preparations are not necessary and the work piece to be separated can be clamped into the vice and cut in two. Please note the following maximum sizes in dependence on the sawing angle:
| Cutting capacity at 90°(right-anged cut): | Cutting capacity at 45°(mlitre cut): | ||||
| For material thicknesses up to (in mm) | Maximum material width (in mm) | Round material: (in mm) | For material thicknesses up to (in mm) | Maximum material width (in mm) | Round material: (in mm) |
| 10 | 65 | 5 | 36 | ||
| 16 | 50 | 10 | 30 | ||
| 21 | 40 | 15 | 25 | ||
| 25 | 25 | ∅ max. 25 | 20 | 18 | ∅ max. 20 |
How to read the table:
If, for example, you would like to cut a 30 mm squared timber in two at a 45° angle, it may only have a maximum depth of 10 mm. Please note that these are only standard values.
7.2 Sawing
7.2.1 General notes on setting the saw head
To achieve the shortest possible clamping length of the clamped work piece, the position of the saw head can be adjusted by using the knurled screw 11 (fig. 2a/b). This enables the saw blade to be guided as close to the clamping fixture 6 as possible. Cuts will then be especially clean and precise if there is only a small gap between the restraint and the saw blade level.
Before every use, make certain that the saw head is not set so that the saw blade will collide with the jaws of the clamping fixture when ow/volling the saw head down (e.g. by shutting down the saw head when machine is off. Caution: disconnect the mains plug here)! Risk of injury!
1. 2017年
Caution!
Do not remove any cutting scraps or other work piece parts from the cutting area as long as the machine is running and the saw blade is not in its home position.
7.2.2 Straight and mitre cuts
7.2.2.1 If you would like to produce straight cuts (see fig. 2a)
-
Make sure that turntable 1 (see fig. 2a) is in the 0° position: Arrow marking 2 must point to the 0° marking on scale 3 in the device base. If not, then please set as follows: (Caution: Please make sure that knurled screw 13 is released!)
-
Release stop lever 4 by lifting it and guide turntable 1 to the corresponding position. Let go of stop lever 4. Caution! The turntable will lock in place at 0^ . If necessary, move turntable back and forth a bill with released stop lever until the stop lever catches
-
Insert work piece 5 in clamping fixture 6, align and tighten. Pay attention to the desired length of the "free" end!
-
For perfect alignment, saw head 7 of the switched off (!) device after locking lever 8 has been unlocked (pull to the front) can be swivelled down so far that saw blade 9 at the automatic swivelled-away saw blade protection 10 just barely touches the work piece (see also fig. 3). This enables a better estimation of the future length of the work piece.
-
For exact adjustment, saw head 7 can be finely toggled by using knurled screw 11.
Caution!
Please make sure here that the saw blade 9 will never collide with the jaws of clamping fixture 6!
Please note:
Crosscutting with the supplied length stop is no problem! How this works is described in "Working with the Length Step".
- See Fig. 3: After locking lever 8 has been released and the on/off button 12 has been pressed, swivel saw head 7 down and cut the work piece into two as shown in Fig. 3. The saw blade protection swivels up.
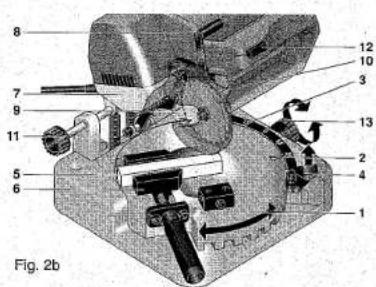
7.2.2.2 If you would like to produce mitre cuts: (See fig. 2b):
-
Release knurled screw 13 and lift up stop lever 4. Now set turntable 1 to the desired angle. Please use scale 3 and orient yourself using arrow marking 2 on turntable 1. The 15^ graduations are provided with serrations, and stop lever 4 must be released so that they can become effective. Intermediate settings can also be set and fixed using knurled screw 13.
-
Insert work piece 5 in clamping fixture 6, align and tighten. Pay attention to the desired length of the "free" end here as well!
-
For perfect alignment, saw head 7 of the switched off (1) device after locking lever 8 has been unlocked (pull to the front) can be swivelled down so far that saw blade 9 at the automatic swivelled-away saw blade protection 10 just barely touches the work piece (see also fig. 3). This enables a better estimation of the future length of the work piece. For exact adjustment, the saw head can be finely toggled by using knurled screw 11.
Caution!
Please make sure that the saw blade will never collide with the jaws of clamping fixture 6!
Please note:
Crosscutting with the supplied length stop is no problem! How this works is described in "Working with the Length Stop".
- After block lever 8 has been released and the on/off button 12 has been pressed, swivel saw head 7 down and cut the work piece in two as shown in fig. 3. The saw blade protection swivels up.
Caution!
The rotational speed, and not the contact pressure, generates the high cutting performance! Never work with force! This places an unnecessary load on the machine mechanics and leads to bad results and increased wear!
7.2.3 Working with the Length Stop (see fig. 4)
The KGS 80 crosscut and mitre saw is supplied with an adjustable length stop 1. Any number of work pieces of equal length can be cut off. Work piece 2 to be cut off is inserted in clamping fixture 3, pushed up to the limit plate 4 and then clamped. After the work piece has been cut off and the vice has been loosened, the material is pushed up to the limit stop again, clamped with the vice and then cut off. This can be repeated any number of times.
This is how to set the limit stop:
- Allen screw 5 is released using an Allen key (included in delivery). Limit stop 1 can then be pushed in guide 6 up to the desired length. Make sure that limit plate 4 is properly aligned and that it hits the work piece correctly when "limit stopped"!
2. Clamp limit stop 1 with Allen screw 5.
If the limit stop is not required, it can be completely removed after releasing screw 5.
The desired position of the limit stop can be determined, for example, by appropriately marking a work piece, clamping it so that the saw blade hits the marking exactly and then by aligning the limit stop accordingly. This enables the exact reproduction length for the desired number of the subsequent work pieces.
Caution!
After the work piece has been aligned and clamped, fold limit plate 4 away during work (see fig. 4) to prevent the separated work pieces from jamming!
8 Care and Maintenance
8.1 Replacing the saw blade (see fig. 5a and 5b):
If the saw blade is worn or you wish to use another type or a cutting disc, you can quickly and easily exchange them.
Please note:
Replacement saw blades and a corundum cutting disc for the machine can be obtained on the market.
Please see our device catalogue or consult your nearest dealer!
Caution!
Disconnect the mains plug for all care and maintenance works!
- Unscrew Allen screw 1 in saw blade protection 2 and fold saw blade protection up as shown in fig. 5a.
- Using an Allen key, unscrew screw 4 in the centre of saw blade 3 (see fig. 5b). Hold the shaft at the flat spot with an open-ended spanner, Attention: Left-handed-thread!
- Remove old saw blade. Mind flat washer 5 here.
- Attach new saw blade and tighten with flat washer 5 and screw 4.
Caution!
Pay close attention to the running direction of the saw blade. When viewed from the front side of the saw, the teeth must point downwards!
Be careful when using the corundum cutting disc (accessories, item no.: 28729):
The corundum cutting disc is very sensitive to bending. Do not touch the disc when releasing or tightening the fastening screw. The disc breaks very easily.
- Fold down saw blade protection 2 once more and tighten using Allen screw 1.
Caution!
Disconnect the mains plug for all care and maintenance works!
8.2 Cleaning
Caution!
Always disconnect the mains plug before doing any cleaning, setting, maintenance or repair works!
Note:
The machine is mostly maintenance free. For a long service life, the device should be cleaned after every use with a soft cloth, hand
brush or a soft brush. Even a vacuum cleaner can be recommended.
External cleaning of the housing can be carried out using a soft, possibly moist cloth. While doing so, a mild detergent or other suitable cleansing agent can be used. Do not use solvents or cleansing agents containing alcohol (e.g. benzene, cleaning alcohol, etc.) as these can corrode the plastic housings.
9 Disposal
Please do not dispose of the device in domestic waste! The device contains valuable substances that can be recycled. If you have any questions about this, please contact your local waste management enterprise or other corresponding municipal facilities.
10 EU declaration of conformity
We declare that the designated products meet
the requirements of the following EU directives
| EU Low Voltage Directive | 73/23/EWG |
| 93/68/EWG | |
| DIN EN 61029-1 / 12.2003 | |
| DIN EN 61029-2-9 / 07.2003 |
| EU EMC Directive | 89/336/EWG |
| DIN EN 55014-1 / 09.2002 | |
| DIN EN 55014-2 / 08.2002 | |
| DIN EN 61000-3-2 / 12.2001 | |
| DIN EN 61000-3-3 / 05.2002 |
| EU Machinery Directive | 98/37 EWG |
| DIN EN 61029-1 / 12.2003 | |
| DIN EN 61029-2-9 / 07.2003 |
15.03.05
Dipl-Inp. Jörg Wagner
PROXXON S.A
Machine Safety Department

- mangelfuld service.
58.
Ersatzteilliste

- Operating instructions
- KGS 80 Crosscut and mitre saw
- Contents:
- Dear Customer!
- Using these instructions
- General safety notes
- General Safety Information
- Safe working
- Always keep your working area tidy.
- Take account of surrounding influences.
- Protect yourself from electric shocks.
- Keep other people away.
- Keep unused tools in a safe place.
- Do not overload your tool.
- Always use the correct tool.
- Wear suitable working clothing
- Use the protective equipment.
- Connect to the dust extraction equipment.
- Secure the tool.
- Avoid abnormal postures.
- Take great care of your tools.
- Pull the plug out of the socket:
- Do not leave any tool spanners or setting keys in place.
- Avoid unintentional starting.
- Extension cables in the open air.
- Always be attentive.
- Check the tool for damage.
- WARNING!
- Specific safety notes
- Caution!
- General view (fig. 1)
- Description of machine
- Technical data
- Motor
- Before beginning work
- Note:
- Danger!
- Working with the KGS 80 Crosscut and mitre saw
- Cutting capacity
- How to read the table:
- Sawing
- General notes on setting the saw head
- 2017年
- Straight and mitre cuts
- If you would like to produce straight cuts (see fig. 2a)
- Please note:
- If you would like to produce mitre cuts: (See fig. 2b):
- Working with the Length Stop (see fig. 4)
- This is how to set the limit stop:
- Clamp limit stop 1 with Allen screw 5.
- Care and Maintenance
- Replacing the saw blade (see fig. 5a and 5b):
- Cleaning
- Disposal
- EU declaration of conformity
- Ersatzteilliste
Brand : PROXXON
Model : KGS 80
Category : Saw