DS 230E - Saw PROXXON - Free user manual and instructions
Find the device manual for free DS 230E PROXXON in PDF.
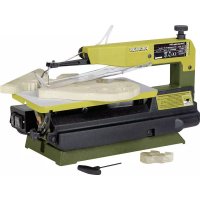
| Product type | Precision scroll saw |
| Brand | PROXXON |
| Model | DS 230E |
| Dimensions (support surface) | 160 x 160 mm |
| Reach | 300 mm |
| Weight | 2.8 kg |
| Power supply | 220-240 V, 50/60 Hz, 85 W |
| Speed | 150 to 2,500 rpm (electronically adjustable) |
| Stroke height | 7 mm |
| Noise level | ≤ 70 dBA |
| Effective acceleration | ≤ 2.5 m/s² |
| Cutting capacity (softwood) | Up to 40 mm thickness |
| Cutting capacity (hardwood) | Up to 10 mm thickness |
| Cutting capacity (panels) | Up to 4 mm thickness |
| Cutting capacity (non-ferrous metals) | Up to 2 mm thickness |
| Acceptable blade lengths | 80 to 140 mm |
| Adjustments | Blade height, speed, blade guide |
| Special functions | Integrated air blower for cleaning, vacuum cleaner connection |
| Included accessories | 5 blades, parallel guide, angle guide, 2 fixing screws, rubber adapter for vacuum cleaner, hex key |
| Safety | Double insulation (class II), on/off switch, detailed safety instructions |
| Maintenance | Replaceable blade, timing belt |
| Repairability | Spare parts available (belt, blades); repairs by qualified electrician |
| Usage | For dry locations only |
Frequently Asked Questions - DS 230E PROXXON
User questions about DS 230E PROXXON
0 question about this device. Answer the ones you know or ask your own.
Ask a new question about this device
Download the instructions for your Saw in PDF format for free! Find your manual DS 230E - PROXXON and take your electronic device back in hand. On this page are published all the documents necessary for the use of your device. DS 230E by PROXXON.
USER MANUAL DS 230E PROXXON
natural_image
Technical illustration of a DDXRON instrument with attached metal frame and control components (no text or symbols)Manual
Deutsch
When you are reading the instructions for use, please unfold the front and back pages.
Français
text_image
Labeled diagram of a mechanical device with numbered components for identificationFig. 1
natural_image
Technical line drawing of a mechanical assembly with a tool and component, no visible text or symbolsFig. 2 Fig. 3
text_image
Technical diagram of a mechanical assembly with labeled parts 1 and 2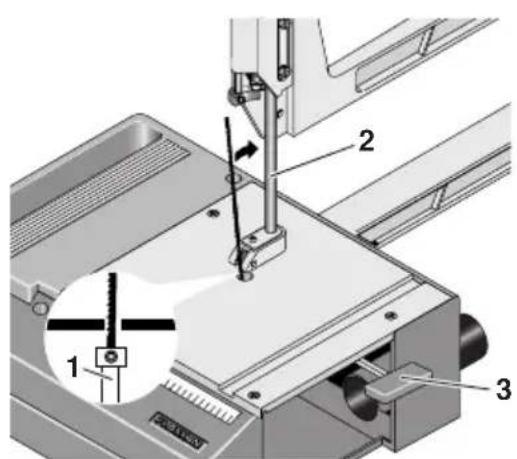
text_image
Technical diagram of a sewing machine with labeled parts and a magnified inset showing component 1.Fig. 4
text_image
Technical diagram of a sewing machine with numbered components labeled 1, 2, and 3Fig. 5
text_image
Handwritten signature or scribble on white backgroundThe PROXXON mechanical fret saw DS 230/E is the ideal device for curved cuts in wood, plastic or non-ferrous metals. To use the saw safely and correctly, please read the attached safety regulations and control note carefully before using the device.
General Safety Information
CAUTION! When using electric power tools, the following safety measures must be observed for protection from electric shock, risk of injury, and fire hazards.
Read and take note of all these instructions before you start up the product. Keep these safety instructions in a safe place.
Safe working
Always keep your working area tidy.
- Disorder in the working area can lead to accidents.
Take account of surrounding influences.
- Do not expose tools to the rain.
- Do not use tools in damp or wet surroundings.
- Ensure that the lighting is good.
- Do not use tools in the vicinity of combustible liquids or gases.
Protect yourself from electric shocks.
- Avoid body parts from coming into contact with earthed parts.
Keep other people away.
- Do not let other people, especially children, touch the tool or the cable. Keep them well away from the working area.
Keep unused tools in a safe place.
- Unused equipment should be kept in a dry, closed location out of the reach of children.
Do not overload your tool.
- You will be able to work better and safer within the given power range.
Always use the correct tool.
-
Do not use low power machines for heavy work.
-
Do not use tools for purposes for which they were not designed. For example do not use manually-operated circular saws for cutting branches or firewood.
Wear suitable working clothing.
-
Do not wear loose clothing or jewellery, they can get caught up by moving parts.
-
When working in the open air we recommend the use of non-slip footwear.
-
Wear a hair net if you have long hair.
Use the protective equipment.
- Wear safety glasses.
- Wear a breathing mask when carrying out dust-generating work.
Connect to the dust extraction equipment.
- If connections are available to dust extraction and collection equipment, make sure that they are properly connected and used.
Do not use the cable for purposes for which it was not designed.
- Do not use the cable to pull the plug out of its socket. Protect the cable from heat, oil and sharp edges.
Secure the tool.
- Use the clamping fixture or a vice to hold the tool tightly. It is thus held more safely than with your hand.
Avoid abnormal postures.
- Ensure that you are standing safely and always maintain your balance.
Take great care of your tools.
- Keep the tools sharp and clean so as to be able to work better and safer.
- Follow the maintenance instructions and the advice about tool changing.
- Regularly check the tool cable and have it replaced by an authorized specialist if it is damaged.
- Regularly check the extension cables and replace them if they are damaged.
- Keep handles dry and free from oil and grease.
Pull the plug out of the socket:
- When the tool is not in use, before maintenance and when changing tools such as the saw blade, drill or milling cutters, always take the plug out of the socket.
Do not leave any tool spanners or setting keys in place.
- Before switching on always check that spanners, keys and setting tools have been removed.
Avoid unintentional starting.
- Always make sure that the switch is in the OFF position when you plug the tool into the socket.
Extension cables in the open air.
- In the open air always use extension cables which are authorized for the purpose and which are correspondingly marked.
Always be attentive.
- Be aware of what you are doing. Carry out your work sensibly. Do not use the tool if you are tired.
Check the tool for damage.
- Before further use of the tool, examine protective devices or slightly-damaged parts to ensure that the function is perfect and meets the requirements.
- Check that the moving parts function perfectly and do not stick and that parts are not damaged. All parts must be correctly mounted and all the conditions fulfilled to ensure trouble-free tool operation.
- Damaged protective equipment and parts must be properly repaired or exchanged by an authorized specialist workshop if no other information is given in the instructions for use.
- Arrange for damaged switches to be exchanged by a customer services workshop.
- Never use tools on which the switch cannot be switched on and off.
WARNING!
- The use of other tool inserts and accessories can present a risk of injury.
Arrange for your tool to be repaired by a specialist electrician
- This tool meets the relevant safety regulations. Repairs may only be carried out by electrical specialists and original spare parts must be used. Otherwise accidents can happen to the user.
General view (Fig. 1):
- Saw blade
- Upper locking ring
- Tightening screw for saw blade
- Air hose
- Vertical adjustment
- Clamping screw for guide bar
- Saw bow
- Angle stop
- Clamping screw
- Hexagon key
- Sliding door with plug
- Longitudinal stop
- Clamping screw
- Scale for longitudinal stop
- On/off switch
- Speed regulation
- Saw blade guide and air duct
- Storage box for saw blades
- Pipe union for vacuum cleaner
- Holes for attachment
- Rubber adapter for vacuum cleaner connection
Description of the machine
The DS 230/E cuts soft wood up to max. 40 mm, hardwood up to 10 mm, boards up to 4 mm and non-ferrous metals up to 2 mm. Electronic speed regulation enables adaptation of the stroke rate to suit the material to be sawed. Thanks to the vertical adjustment, saw blades of different lengths can be used (80 to 140 mm). The integrated blowing device reliably ensures a clear view of the sawing line.
The basic equipment includes five saw blades with different teeth, a longitudinal stop, one angle stop, two fixing bolts, a rubber adapter for the vacuum cleaner connection as well as a hexagon key.
We recommend original PROXXON replacement saw blades.
Technical data
No. of strokes 150 - 2500/min
Vertical lift 7 mm
Generated noise ≤ 70dBA
Eff. Acceleration ≤ 2.5 m/s ^2
Weight 2.8
Dimensions
Bearing surface 160x160 mm
Projection 300
Motor
Rotational speed 8,000/min
Voltage
Power rating
220-240 Volt 50/60Hz
85 watt
For use in dry environments only
Protection class II device
Please do not dispose off the machine!


Operation
Before start-up
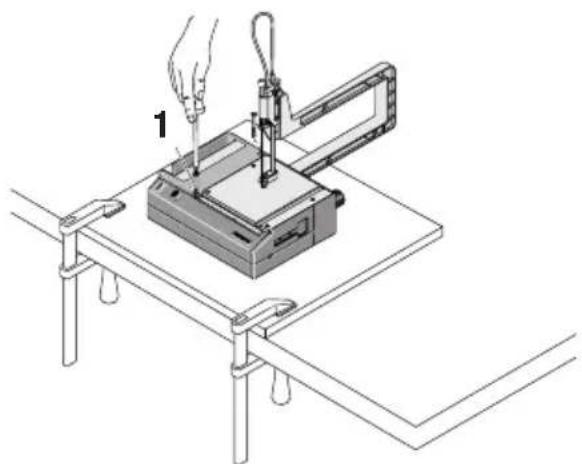
Mounting the machine
The mechanical fret saw must be fastened onto a sturdy woo-den board using the enclosed fixing bolts 1 (Fig.2) The board can then be fixed onto a sturdy table using two fastening clamps.
Fastening the saw bow
Fasten the saw bow with the two screws included onto the rear side of the machine.
Vertical adjustment
The DS 230/E has vertical adjustment, so saw blades of different lengths can be used (80 to 140 mm). Higher stability of the blade is achieved by using shorter saw blades (the blade does not deflect to the rear under pressure). This is particularly important when sawing boards or non-ferrous metals. In such cases, we recommend shortening the saw blade with pliers to a length of 80 mm (danger of injury – wear safety goggles) and fixing the vertical adjustment to the lower position.
- Release screws 1 (Fig. 3).
- Bring the vertical adjustment 2 into the required position.
- Re-tighten the screws 1.
Fitting the saw blade
- Open the sliding door 11 (Fig. 1).
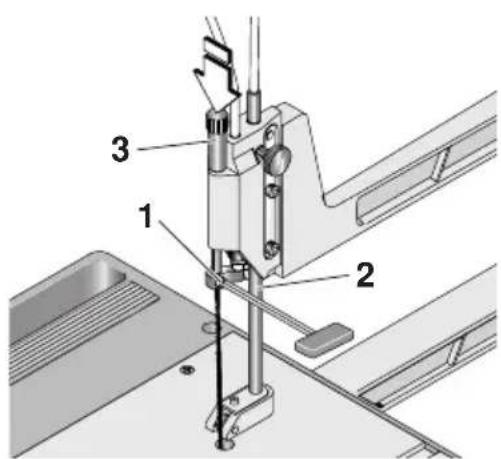
- Attach the device to the mains and briefly switch on. Switch off the device in such a way that the lower locking ring 1 (Fig. 4) remains in the top position. Several attempts may be necessary here.
- Pull out the mains plugs
- Unscrew the screw with the Allen key 3 at the lower locking ring by max. 2 turns.
- Insert the saw blade with teeth facing downward so far into the lower locking ring, until the first teeth are below the upper edge of the work surface.
- Align the saw blade perpendicularly at the saw blade guide 2 and tighten the screw at the locking ring.
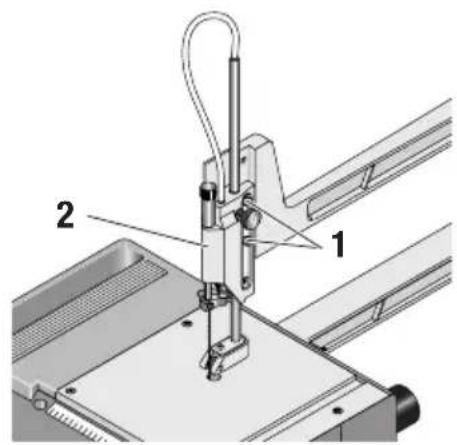
- Unscrew the screw at the upper locking ring 1 (Fig. 5) by max. 2 turns.
- Insert the saw blade into the upper locking ring.
- Push down the tightening screw for the saw blade 3 so far, that the saw blade is positioned approx. 10mm deep in the locking ring.
- Tighten the screw at the locking ring.
- Check that the saw blade guide 2 (Fig.5) kg positioned correctly against the saw blade.
- Tension the saw blade using the tightening screw 3. The necessary voltage is dependent on the thickness and type of material to be processed. It is best to find the correct voltage by trial and error.
- Close the sliding door 11 (Fig. 1).
- Insert the mains plug.
Connecting the vacuum cleaner
For longer periods of operation, we recommend connecting the saw to a
vacuum cleaner. To this end, connect the vacuum cleaner at the pipe union 19 (Fig. 1) using the attached rubber adapter.
Working with the mechanical fret saw
- Set the stroke rate with the speed regulation 16 (Fig. 1). High stroke rate for wood, aluminum, brass and boards. Low stroke rates for plastics, particularly thin materials and for extremely fine work.
- Adjust the saw blade guide. For this, release screw 6 (Fig. 1), set the saw blade guide 17 (Fig. 1) as deeply as possible and re-tighten the screw.
-
When sawing, press the work piece firmly onto the table, in order to avoid vibration. Then saw the work piece carefully and with little feed. Thus: high pressure against the base plate – little pressure against the saw blade.
-
When sawing with the longitudinal stop, release the clamping screw 1 (Fig. 6), set the stop and retighten the clamping screw.
-
When sawing with the angle stop, release the clamping screw 1 (Fig. 7), adjust the angles according to the scale and retighten the clamping screw. Then press the work piece lightly against the stop and slide the stop along the groove 2.
Note:
Please remember that with a mechanical fret saw, the saw blade fundamentally tries to follow the grain of the wood. For frequent even cuts a circular saw is there-fore always preferable to a mechanical fret saw.
Maintenance
Important
Pull out the mains plug prior to commencing all maintenance and repair work.
Replacing the toothed belt
If the toothed belt becomes worn it is possible to change it yourself. You can order replacement belts from the PROXXON central service team.
- Remove mains plug.
- Remove the saw blade.
- Unscrew screws 2 (Fig. 8) in the base plate 1.
- Unscrew screws 4 in the lower part of the housing 3.
- Unscrew screws 3 (Fig. 9) and remove the base plate 2 from the transmission 1.
- Unscrew screws 1 (Fig. 10) and remove the guide plate 2 with piston 3.
- Unscrew the motor attachment screws 4 inside the transmission case 8 and pull out the motor 5 with pinion.
- Unscrew the threaded pins of the pulley 6 using an Allen key and pull out the shaft with eccentric cam 7.
- Remove pulley 6 and insert new toothed belt.
- Position the pulley 6 with toothed belt in the transmission case in such a way that the shaft with eccentric cam can be re-inserted.
- Insert the motor 5 back into the transmission case and put the toothed belt on the motor pinion (this requires sensitive fingers and patience).
- Re-bolt the motor with the transmission case.
- Grease piston 3 with the eccentric cam, fasten guide plate 2.
- Tighten the threaded pin of the pulley 6.
- Re-screw the transmission to the base plate, attach the lower part of the housing and fasten the base plate to the housing.
Disposal:
Please do not dispose of the device in domestic waste! The device contains valuable substances that can be recycled. If you have any questions about this, please contact your local waste management
EC Declaration of Conformity
We assume sole liability for ensuring that this product conforms with the following EC guidelines:
• EC Low Voltage Guideline 73/23 EEC; 93/68 EEC
• DIN EN 61029 / 12.2003
• EC Machine Guideline 98/037 EEC
• DIN EN 61029 / 12.2003
• EC-EMC Guideline 89/336/EEC
• DIN EN 55014-1 / 09.2002
• DIN EN 55014-2 / 08.2002
• DIN EN 61000-3-2 / 12.2001
• DIN EN 61000-3-3 / 05.2002
text_image
Handwritten signature or scribble on white backgroundEquipment Safety Division
Cher client,
text_image
Handwritten signature or scribble on white background, possibly a signature or autographtext_image
Handwritten signature or scribble on white backgroundIng. Jörg Wagner
PROXXON S.A.
text_image
Handwritten signature or scribble in cursive scripttext_image
Handwritten signature or scribble on white backgroundtext_image
Handwritten signature or scribble on white backgroundCivilingeniør Jörg Wagner
PROXXON S.A.
Forretningsområde apparatsikkerhed
S Bruksanvisning Dekupersåg DS 230/E
Kära kund!
text_image
Handwritten signature or scribble on white backgroundtext_image
Handwritten signature with printed text below, likely a personal autograph or documenttext_image
Handwritten signature or scribble on white backgroundYük.-Müh. Jörg Wagner
PROXXON S.A.
text_image
Exploded view diagram of a mechanical device with numbered components for identificationErsatzteilliste
text_image
Technical diagram of a mechanical assembly with numbered components labeled 1, 2, and 3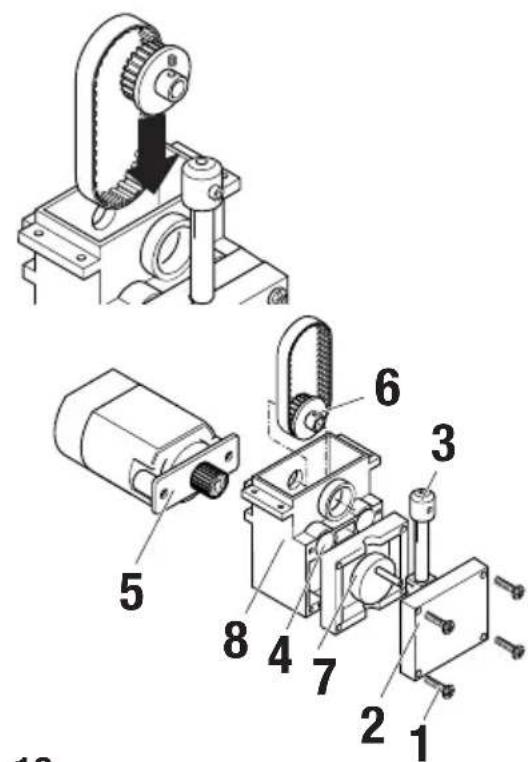
text_image
Technical diagram of a mechanical assembly with numbered parts for identificationFig. 9
Fig. 10