MBS 240E - Saw PROXXON - Free user manual and instructions
Find the device manual for free MBS 240E PROXXON in PDF.

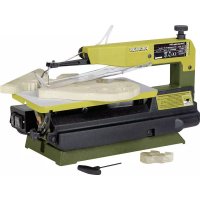
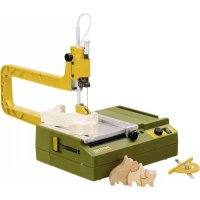
| Product type | Micro bandsaw |
| Brand | Proxxon |
| Model | MBS 240E |
| Supply voltage | 220-240 V, 50 Hz |
| Power | Approx. 85 W |
| Band speed | 120 to 250 m/min, variable speed |
| Table dimensions | 200 × 200 mm |
| Table tilt | 0 to 45° |
| Maximum cutting height | 80 mm |
| Throat (cutting width) | 150 mm |
| Saw blade dimensions | 1065 × 3 to 6 mm (standard 1065 × 5 × 0.4 mm, 14 teeth) |
| Weight (approx.) | Approx. 12 kg |
| Duty cycle | Limited to 15 minutes (intermittent duty) |
| Protection rating | IP 25 |
| Noise level | ≤ 70 dB(A) |
| Usage | Indoor use only, dry location |
| Cuttable materials (standard blade) | Steel, non-ferrous metals, wood, plastics |
| Cuttable materials (diamond blade, optional) | Glass, ceramic (with liquid cooling) |
| Optional accessories | Liquid cooling system, vacuum cleaner, diamond blade |
| Maintenance | Clean regularly, check blade tension, replace plastic pulley rings if worn |
| Safety | Use safety goggles, do not wear loose clothing, unplug before maintenance |
| Repairability | Original PROXXON spare parts, repair by qualified electrician |
| Warranty | Warranty void if used incorrectly or insufficient maintenance |
Frequently Asked Questions - MBS 240E PROXXON
User questions about MBS 240E PROXXON
0 question about this device. Answer the ones you know or ask your own.
Ask a new question about this device
Download the instructions for your Saw in PDF format for free! Find your manual MBS 240E - PROXXON and take your electronic device back in hand. On this page are published all the documents necessary for the use of your device. MBS 240E by PROXXON.
USER MANUAL MBS 240E PROXXON
The PROXXON micro band saw is a high performance tool for every model maker.
It is perfect for cutting steel, non-ferrous materials, wood and plastic materials and even glass and ceramic items when using a diamond saw band.
This manual comprises:
- safety regulations
- operating instructions
- spare parts list.
Please note!
Using this manual will help to
become acquainted with the machine,
- avoid malfunctions caused by unprofessional use,
prolong the lifetime of the machine.
Always keep this manual close at hand.
Do not operate the machine unless you are fully acquainted with it. Follow the instructions.
PROXXON does not assume liability for safe functioning:
- if the machine is used in a way which does not comply with the usual modes of operation,
- if it is used for purposes other than those mentioned in these instructions,
- if the safety regulations are not observed.
No warranty claims can be lodged for damage resulting from
- operating errors,
insufficient maintenance.
Please observe the safety regulations for your own safety.
Use only genuine PROXXON spare parts and recommended saw bands.
We reserve the right to make technical modifications without prior notification.
We wish you much success with your new micro band saw.
General Safety Information
CAUTION! When using electric power tools, the following safety measures must be observed for protection from electric shock, risk of injury, and fire hazards.
Read and take note of all these instructions before you start up the product. Keep these safety instructions in a safe place.
Safe working
Always keep your working area tidy.
- Disorder in the working area can lead to accidents.
Take account of surrounding influences.
- Do not expose tools to the rain.
- Do not use tools in damp or wet surroundings.
- Ensure that the lighting is good.
- Do not use tools in the vicinity of combustible liquids or gases.
Protect yourself from electric shocks.
- Avoid body parts from coming into contact with earthed parts.
Keep other people away.
- Do not let other people, especially children, touch the tool or the cable. Keep them well away from the working area.
Keep unused tools in a safe place.
- Unused equipment should be kept in a dry, closed location out of the reach of children.
Do not overload your tool.
- You will be able to work better and safer within the given power range.
Always use the correct tool.
- Do not use low power machines for heavy work.
- Do not use tools for purposes for which they were not designed. For example do not use manually-operated circular saws for cutting branches or firewood.
Wear suitable working clothing.
- Do not wear loose clothing or jewellery, they can get caught up by moving parts.
-
When working in the open air we recommend the use of non-slip footwear.
-
Wear a hair net if you have long hair.
Use the protective equipment.
- Wear safety glasses.
- Wear a breathing mask when carrying out dust-generating work.
Connect to the dust extraction equipment.
- If connections are available to dust extraction and collection equipment, make sure that they are properly connected and used.
Do not use the cable for purposes for which it was not designed.
- Do not use the cable to pull the plug out of its socket. Protect the cable from heat, oil and sharp edges.
Secure the tool.
- Use the clamping fixture or a vice to hold the tool tightly. It is thus held more safely than with your hand.
Avoid abnormal postures.
- Ensure that you are standing safely and always maintain your balance.
Take great care of your tools.
- Keep the tools sharp and clean so as to be able to work better and safer.
- Follow the maintenance instructions and the advice about tool changing.
- Regularly check the tool cable and have it replaced by an authorized specialist if it is damaged.
- Regularly check the extension cables and replace them if they are damaged.
- Keep handles dry and free from oil and grease.
Pull the plug out of the socket:
- When the tool is not in use, before maintenance and when changing tools such as the saw blade, drill or milling cutters, always take the plug out of the socket.
Do not leave any tool spanners or setting keys in place.
- Before switching on always check that spanners, keys and setting tools have been removed.
Avoid unintentional starting.
- Always make sure that the switch is in the OFF position when you plug the tool into the socket.
Extension cables in the open air.
- In the open air always use extension cables which are authorized for the purpose and which are correspondingly marked.
Always be attentive.
- Be aware of what you are doing. Carry out your work sensibly. Do not use the tool if you are tired.
Check the tool for damage.
- Before further use of the tool, examine protective devices or slightly-damaged parts to ensure that the function is perfect and meets the requirements.
- Check that the moving parts function perfectly and do not stick and that parts are not damaged. All parts must be correctly mounted and all the conditions fulfilled to ensure trouble-free tool operation.
- Damaged protective equipment and parts must be properly repaired or exchanged by an authorized specialist workshop if no other information is given in the instructions for use.
- Arrange for damaged switches to be exchanged by a customer services workshop.
- Never use tools on which the switch cannot be switched on and off.
WARNING!
- The use of other tool inserts and accessories can present a risk of injury.
Arrange for your tool to be repaired by a specialist electrician
- This tool meets the relevant safety regulations. Repairs may only be carried out by electrical specialists and original spare parts must be used. Otherwise accidents can happen to the user.
Legend
1 Cover for housing
2 Fastening screw
3 Housing
4 Adjustment screw
5 Clamping screw
6 Guide rod
7 Saw band cover
8 Saw band guide
9 Saw band
10 Working table
11 Socket
12 Machine base
13 Control knob
14 On-Off switch
15 Diagram
Description of machine
The micro band saw MBS 240/E cuts steel, nonferrous materials, wood and plastic materials and can also be used for glass and ceramics when fitted with a diamond saw band.
The MBS 240/E is driven by a 230V motor with electronic speed regulation for the adjustment of the correct band speed for excellent working results.
The possibility of adjusting the work table to any angle between 0^ and 45^ ensures clean and precise cuts.
The diagram shows the regulating ranges for most materials.
The micro band saw can be equipped with an optionally available liquid coolant system.
We recommend the use of original PROXXON saw bands.
Technical data
Nominal voltage: 220-240 Volt 50 Hz
Power: 85 Watt
Band speed: 120 - 250 m/min, infinitely variable
For indoor use only:
Short time operation: KB 15 min
Type of protection:
Noise level: ≤ 70dB (A)
Dimensions:
Work table: 200 × 200 ~mm adjustable from 0^ to 45^
Throat: 150 mm
Cutting height: max. 80 mm
For use in dry environments only
Please do not dispose off the machine!


Setting the machine up
Danger!
- Unpack the micro band saw and check for completeness.
Do not connect the machine to the 230V mains supply yet.
Note:
For safety reasons the machine should be fastened with the 5 wood screws to a strong work bench (fig. 2).
Checking tension and fit of the saw band
Note:
The machine is fitted with a saw band 1065 × 0.4 × 5,0 ~mm (14 Z) from the factory.
- Unscrew four socket head cap screws from the housing 2 (fig. 1) and take the cover off.
- Check the fit of the saw band in the lower band guide 1 (fig. 3). The guide slot must be exactly vertical. Adjust the band guide after loosening the clamping screw (2).
- When cutting aluminium, metal, glass, tiles etc. remove plate 1 (fig. 4) to avoid accumulation of chips inside the machine.
- Install the housing cover.
Note:
When cutting wood or plastic materials the machine should be connected to a dust extractor (vacuum cleaner) to avoid accumulation of saw chips inside the machine.
Using a vacuum cleaner
- Remove the housing cover 1 (fig. 1), slide the plate 1 (fig. 4) in and connect the vacuum cleaner to the socket 1 (fig. 5).
- Install the housing cover.
Mounting the work table
- Unscrew the brass screw from the sawing gap 1 (fig.6) in the working table.
- Slide the working table 3 (fig. 7) into the respective recess and fasten it with the star-shaped handle screw (2) with washer (1). Set the mark to "0".
- Screw the brass screw 1 (fig.6) back in.
Tensioning the saw band
Note:
The saw band is tensioned correctly when it runs quietly and without vibrations.
-
Loosen the clamping screw 2 (fig. 8) in direction A for half a turn.
-
Turn the set-screw (1) in direction (A) to tension or in direction (B) to loosen the saw band.
Caution!
An extremely tensioned saw band may break and damage the machine!
- Tighten the clamping screw (2).
Note:
The saw band must not run sideways off the wheels.
Checking the saw band guide
- Adjust the upper saw band guide 1 (fig.9) to the width of the respective saw band. The edge A must thereby be in line with line "5" on the scale (e.g. saw band 1065 × 5 × 0.4 ). The band must now touch the rear roller.
Attention!
Switch the machine off and disconnect it from the mains supply when working on the saw band guide.
Adjusting the saw band width
- Slightly loosen the socket head cap screw 3 (fig.9).
- Slide the adjusting piece (2) until it matches line "5" on the scale.
- Tighten the socket head cap screw (3), but not too tight!
- The saw blade thickness can be corrected by means of the set-screw 4 (fig. 9).
Starting operation
Attention!
The band saw must be connected to a dust extracting device.
The saw must not be operated with the housing door (saw band protection device) open.
The saw band guide must be adjusted as close as possible to the work piece.
- Set the On-Off switch 4 (fig. 11) to position "0".
- Connect the machine to the mains supply.
- Loosen the clamping screw (1) and lower the saw band guide (2) to just above the work piece. Tighten the clamping screw.
- Switch the machine on (4).
Attention!
Before starting work, adjust the appropriate speed for the saw band and the material.
5. Adjust the band speed with the regulator 3 (fig.11). Refer to the diagram (5) for optimal band speed. The values are, however, only reference values.
Note:
Generally applicable: High band speed for thin material and low band speed for thick material.
Sawing
- Mark the cut on the work piece. Never brake the band speed by pushing too hard. The saw band must "cut freely". In case of vibrations adapt the band speed respectively.
Free-hand sawing
Press the work piece onto the work table, guide it carefully and only with little force (fig.12a/b). More pressure against the work table, less pressure against the saw band.
Sawing with litre guide
Attention!
Adjustments must only be carried out with the machine switched off.
- Adjust the desired angle on the litre guide. Press the work piece lightly against the saw band (fig. 13).
Mitre cuts
For litre cuts the working table can be tilted to any angle between 0^ and 45^ .
- Loosen the clamping screw 1 (fig. 14) and tilt the table to the desired angle. Read the degrees on the scale (2).
- Tighten the clamping screw (1).
Caution!
Use only saw bands in good condition!
Replace blunt and deformed saw bands immediately!
Always disconnect the machine from the mains supply for cleaning and service work!
Do not run the machine unattended!
Operation with diamond saw band
Note:
A diamond saw band must only be used in combination with a correctly mounted liquid coolant system. This is available as an accessory.
Note:
For operation with a liquid coolant system we recommend the installation of a liquid collecting trough 3 (fig. 15). This trough is available as an accessory. To seal the screwing holes stand the band saw on a rubber plate and fasten it with the wood screws.
Attention!
To install the liquid cooling system follow the enclosed instructions exactly!
Working with a diamond saw band
Caution!
Cutting of radii smaller than 15mm is not possible (fig. 16).
Do not use diamond saw bands for metal, plastic materials or wood.
Notes on the coolant:
Use only commercially available, mineral or synthetic, water soluble coolants.
Concentration: 2 - 5%, depending on material.
Dispose of liquids after work according to instructions from the manufacturer.
- Switch the machine on.
- Open the shut-off valve 1 (fig. 17) and adjust the flow. Use enough coolant.
Note:
Only sufficient cooling of the diamond saw band ensures better and quicker cutting of glass and ceramics and prolongs the lifetime of the diamond band.
- Guide the work piece carefully and only with little force.
- Close the shut-off valve (1) after finishing work or during breaks.
Changing the saw band
Caution!
Switch the machine off and pull the plug out!
- Unscrew four socket head cap screws 2 (fig. 18) and take the housing cover (1) off.
- Unscrew the brass screw 1 (fig. 19).
- Loosen the clamping screw 3 (fig. 18) for half a turn.
- Turn the set-screw 4 (fig. 18) until the saw band can be removed from the wheels 2 and 3 (fig. 19).
- Insert the new saw band into the sawing gap with the non-toothed side forward and the teeth pointing downwards (towards the sawing table).
Note:
There is a possibility that the saw band has "turned over".
In such a case make sure to turn the saw band back. The teeth must point to the front and downwards.
Note:
When changing to a wider or narrower saw band the saw band guide must be adjusted accordingly (see "check the adjustment of the saw band guide").
-
Turn the set-screw 4 (fig. 19) until the saw band is lightly tensioned.
-
Tighten the clamping screw 3 (fig. 18) and reinstall the brass screw 1 (fig. 19).
Caution!
Extreme tensioning can cause damage to the machine and breaking of the saw band.
- Install the housing cover 1 (fig. 18) and fasten the socket head cap screws (2).
Note:
The saw band must not run sideways off the wheels.
Changing the plastic rings on the wheels
Each wheel is covered with a plastic ring to protect the saw band.
These plastic rings are wear items and must be replaced whenever necessary.
The plastic rings must therefore be examined regularly. In case of a 'hollow shape' caused by abrasion (fig. 20), the respective ring must be replaced immediately.
-
Cut the worn plastic ring (fig. 21) by using a sharp, heated knife.
-
Warm up the new plastic ring for 10 minutes in hot water (not boiling).
-
Press the plastic ring firmly onto the wheel, until it sits perfectly in the groove.
-
Install the wheel and the housing cover and fasten it with the 4 socket head cap screws.
Disposal:
Please do not dispose of the device in domestic waste! The device contains valuable substances that can be recycled. If you have any questions about this, please contact your local waste management enterprise or other corresponding municipal facilities.
EU declaration of conformity
We declare that the designated products meet the requirements of the following EU directives:
EU Low Voltage 73/23/EEC Directive 93/68/EEC
PROXXON S.A. Machine Safety Department
Préface
Cher client!
- No permitted to be placed in the house, especially for children.
No permitted to be placed in the house, except for children who are not under the supervision of a child care professional.
No permitted to be placed in the house, except for children who are not under the supervision of a child care professional.
- Lad参加会议的人员,is a member of the team, is a member of the team.
- Lad参加会议的人员,is a member of the team, is a member of the team.
Hlučnost: ≤ 70 dB (A)
Rozmery:
Pracovnf stul: 200x200mm
vyklapeni 0^ - 45^
Vylozeni: 150 mm
PruchozVyksa: max. 80 mm
Rozmery piloveho pasu: 1065 x 3 a2 6 mm