Microflam MGS - Welding machine PROXXON - Free user manual and instructions
Find the device manual for free Microflam MGS PROXXON in PDF.


| Brand | PROXXON |
| Model | Microflam MGS |
| Product type | Gas soldering iron |
| Power supply | High-quality butane gas or propane/butane mixture |
| Tank capacity | 20 ml (approx. 10 g of gas) |
| Dimensions (length) | Approx. 230 mm (with soldering tip) |
| Dimensions (diameter) | Approx. 25 mm |
| Weight (full) | 108 g |
| Soldering tip temperature | Approx. 500 °C |
| Hot air temperature | Approx. 640 °C |
| Naked flame temperature | Approx. 1300 °C |
| Ignition | Integrated piezoelectric |
| Temperature regulation | Via gas flow control (sliding regulator) |
| Interchangeable tips | Yes, 7 different tips supplied |
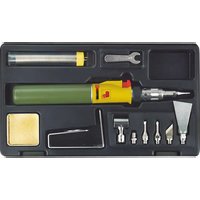
| Included accessories | 7 mm wrench, soldering tin, drain with sponge, base, mirror heat shrink sleeve, hot air nozzle, pyrography tips (oblique and flat), hot cutting tool, wax and paint scraper |
| Use with base | Yes, for stationary work (two positions) |
| Safety | Flame guard, On/Off switch, do not use near naked flames or flammable materials |
| Cleaning | Soft damp cloth (mild soap); soldering tip cleaned on damp sponge (distilled water) while hot |
| Recommended gas | High-quality lighter gas, ideally labeled "Near Zero Impurities" |
| Filling precautions | Switch OFF, fill in a ventilated area, wait 2 min after filling |
Frequently Asked Questions - Microflam MGS PROXXON
User questions about Microflam MGS PROXXON
0 question about this device. Answer the ones you know or ask your own.
Ask a new question about this device
Download the instructions for your Welding machine in PDF format for free! Find your manual Microflam MGS - PROXXON and take your electronic device back in hand. On this page are published all the documents necessary for the use of your device. Microflam MGS by PROXXON.
USER MANUAL Microflam MGS PROXXON
Fold out the picture pages when reading the user instructions.
Français FR 11
Fig. 3
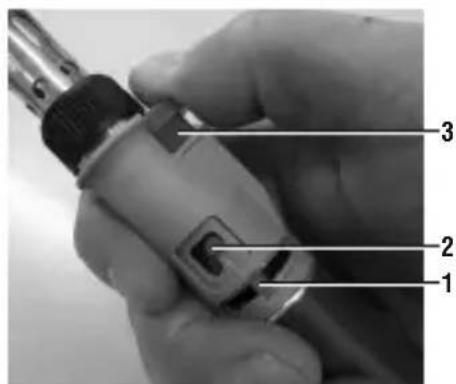
Fig. 4
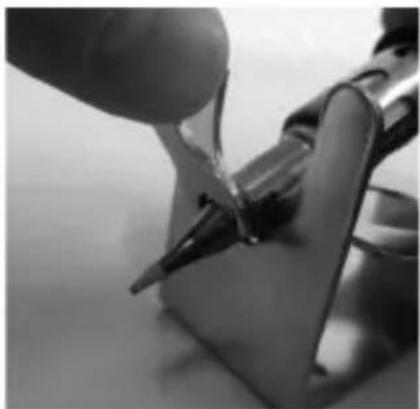
Fig. 5
Fig. 6
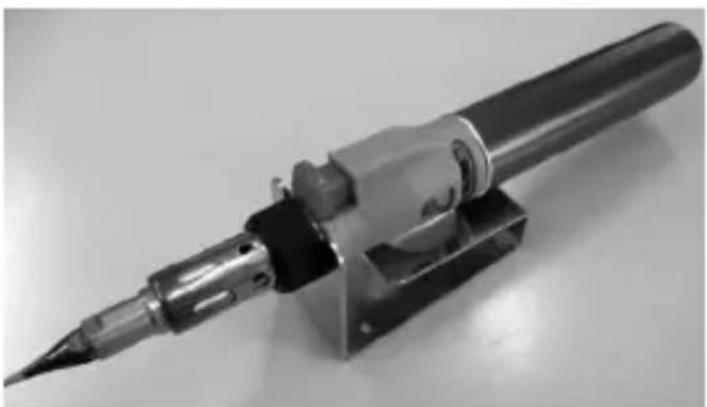
Fig. 7
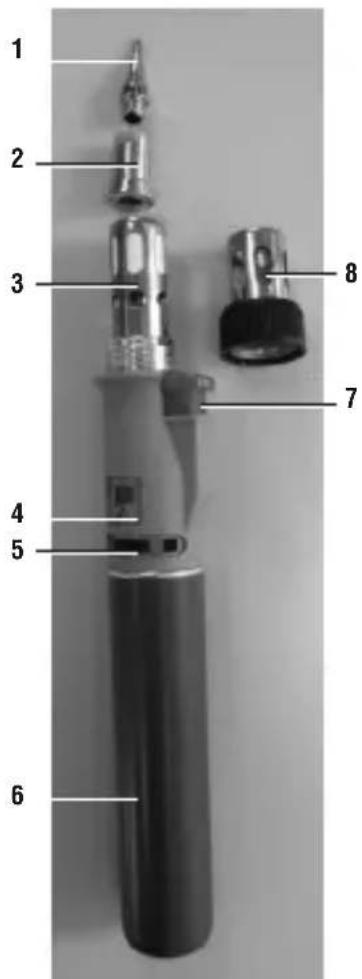
Fig. 2

Durchmesser: ca. 25 mm
Translation of the Original Operating Instructions Gas soldering set MGS
CAUTION!
Read all of the instructions. Failure to adhere to the following listed instructions can cause fire and/or serious injuries.

- Never fill in gas when near open flames, heaters or combustible materials and do not store the device in such an environment.
- Lighter gas is highly flammable - please handle with caution.
- Pay attention to leakage! If the device leaks (gas odour and/or hissing), do not use it and take it to a safe location (e.g. out o doors) to permit the gas to escape.
- If the gas container needs to be emptied (e.g. for dispatch) push the on-off switch (Fig. 2) to "On" without flame, push the flow controller to the maximum position and permit the gas to escape.
- Never attempt to open the device or manipulate the gas tank. This tank is pressurised and can explode. Risk of injury!
- Do not store or operate the device in places with temperatures over 50° C, or 122° F.
- Keep out of reach of children.
- Allow device to cool before storing.
Description:
The PROXXON gas soldering iron with its extensive accessories is ideal for all manner of work requiring high temperatures. Soldering, heat shrinking, hot cutting, wood burning, melting and more can be done independently of the mains.
Seven differently shaped attachments leave no task unsolved here. Configured sensibly and purposefully they can be easily exchanged, enabling the gas soldering iron to be used for any new task.
The gas soldering iron is operated with commercially available lighter gas. This is filled through a valve at the bottom of the 20 ml gas tank.
Ergonomic and thoughtfully arranged control elements make it simple and safe to work: With the built-in piezo igniter the device is easy to put into operation and the temperature is regulated by controlling the gas flow with the slider control.
The included 7 mm open-end spanner makes it easy to unscrew and exchange the attachments. Also included is solder, a drip tray with sponge and a practical base for stationary work.
Scope of delivery (Fig. 1)
- 7 mm open-end spanner
- Soldering tin
- Burner with soldering tip
- Drip tray with sponge
- Base
- Heat shrink tubing reflector
- Hot air
- Wood burning tip (angled)
- Wood burning tip (flat pointed)
- Hot knife
- Wax/varnish scraping knife
Control elements of the burner (Fig. 2)
- Attachment (preassembled as-supplied state: soldering tip)
- Catalyst
- Ceramic insulator
- On-off switch
- Flow controller
- Gas tank
- Ignition button
- Flame arrester
Technical data:
Length: approx. 230 mm (with soldering tip)
Diameter: approx. 25 mm
For operation with high quality lighter gas!
Temperatures:
Tips: approx. 500 °C.
Hot air: approx. 640 °C.
Open flame: approx. 1300 °C.
Weight (filled): 108 gr.
Gas filling: approx. 10 gr.
Operation of gas soldering iron:
Caution:
Use only high quality butane gas or a propane-butane mix! If possible, use gas labelled “Near Zero Impurities”. This is of particular purity and enables reliable operation of the gas soldering iron without impurities.
Refill the gas only in an area with sufficient ventilation!
Use distilled water preferably to soak the sponge in the drip tray!
Fill in or refill gas (Fig. 3)
- Before filling, make sure that the on-off switch is in the "OFF" position.
- Turn the device around. Place the connecting piece of the gas container vertically onto the filling valve and press.
- If gas escapes from the filling valve, remove the connecting piece from the filling valve. The tank is now filled. Caution: Once the gas has been filled, or refilled, wait for approximately 2 minutes to allow the gas to stabilise in the tank.
Switch on the device (Fig. 4)
- Set the flow controller 1 to the middle position.
- Set the on-off switch 2 to top right (to the "On" position).
- Press the ignition button 3 to ignite the device.
Switch off
- Set the on-off switch to the "Off" position.
Adjust the flame length or temperature
- After the ignition, turn the flow controller to the right to increase the length of the torch flame, or to increase the temperature of the soldering tip or hot air, or turn to the left to decrease the flame length or lower the temperature.
Attachments:
Screwing in or exchanging attachments:
Note:
The device must always cool down before removing or exchanging the attachments! Risk of injury!
The soldering tip is preassembled in the as-supplied state. It is quite simple to exchange the attachments:
- Push the supplied 7 mm open-end spanner onto the flat areas of the attachment and twist off the attachment.
- Screw in a new attachment and tighten with the 7 mm open-end spanner.
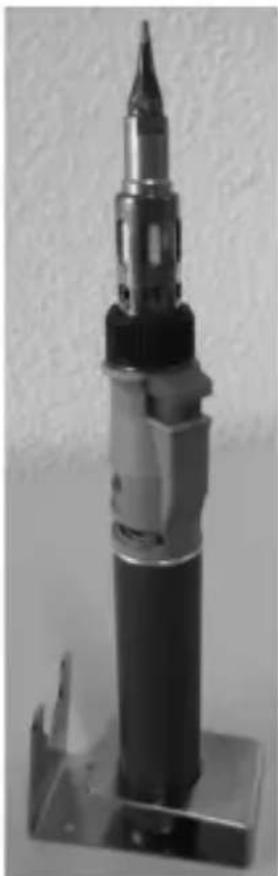
A tip: If the catalyst needs to be held, insert it with its flat areas into the corresponding cut-out in the base (see Fig. 5). The attachment can now be twisted off or tightened with the 7 mm open-end spanner.
Typical scopes of application of the attachments:
Soldering tip: For general soldering work. Caution: The soldering tip must be coated with tin before beginning work! To clean the soldering tip, draw it across the sponge in the drip tray. Please ensure that the sponge is always moist. Distilled water is excellent for this. Caution: The gas soldering iron may not be used for work on live components! Risk of electric shock here!
Wax scraping knife: Suitable for removing wax impurities or for repairs. Ideal for touching-up indentations such as scratches or such in e.g. wood. After applying the repair wax, the excess wax can be scraped off
Hot knife: For cutting plastic foil.
Wood burning tips: For inscribing and decorating various materials such as wood or leather. The gas soldering iron can be held like a pencil for this type of work. Two different attachments are available: One with an angled tip and one with a flat tip.
Hot air nozzle: For melting heat-sensitive materials such as e.g. plastics.
Heat shrink tubing level: For working with heat shrink tubing on electric lines
Working with open flame:
Sensible for removing old layers of paint or pre-aging wood. The attachment and the catalyst must be removed for this. To do so, twist off the serrated nut of the flame arrester and remove the flame arrester, catalyst and attachment.
Caution: Materials containing asbestos may not be machined!
Some types of wood or even varnish residues (or similar) can generate harmful dusts while working. If you are unsure of the harmlessness of your work piece, please wear a dust protection mask! In any case, ensure your working area is well ventilated while working!
Operation with the base (Fig. 6 and 7)
The included base is exceedingly helpful for stationary operation. The gas soldering iron can thus be operated as a burner in two different positions.
Caution: When you set the iron down or set it up-right, ensure that the flame or the attachment is at a sufficient distance to flammable objects!
Cleaning
Caution:
Before cleaning the housing, switch off the device and allow to cool down completely!
The outside of the housing can then be cleaned with a soft cloth, dampened if necessary. Mild soap or other suitable cleaning agent may be used in this context.
Remains of soldering tin on the soldering tip can be removed by wiping off the operationally hot soldering tip on the sponge in the drip tray. Caution: The sponge should be preferably soaked with with distilled water.

All PROXXON products are thoroughly inspected after production. Should a defect occur nevertheless, please contact the dealer from whom you purchased the product. Only the dealer is responsible for handling all legal warranty claims which refer exclusively to material and manufacturer error.
Improper use, such as capacity overload, damage due to outside influences and normal wear are excluded from the warranty.
You will find further notes regarding "Service and Spare Parts Management" at www.proxxon.com.


- FRANÇAIS FR 11
- TRANSLATION OF THE ORIGINAL OPERATING INSTRUCTIONS GAS SOLDERING SET MGS
- CAUTION
- DESCRIPTION
- SCOPE OF DELIVERY (FIG. 1)
- CONTROL ELEMENTS OF THE BURNER (FIG. 2)
- TECHNICAL DATA
- OPERATION OF GAS SOLDERING IRON
- FILL IN OR REFILL GAS (FIG. 3)
- SWITCH ON THE DEVICE (FIG. 4)
- SWITCH OFF
- ADJUST THE FLAME LENGTH OR TEMPERATURE
- ATTACHMENTS
- SCREWING IN OR EXCHANGING ATTACHMENTS
- TYPICAL SCOPES OF APPLICATION OF THE ATTACHMENTS
- WORKING WITH OPEN FLAME
- OPERATION WITH THE BASE (FIG. 6 AND 7)
- CLEANING
Brand : PROXXON
Model : Microflam MGS
Category : Welding machine