USER MANUAL PHD 135 E5 PARKSIDE
natural_image
Black outdoor water heater with attached hose and control panel (no visible text or symbols)


Translation of the original instructions
NL BE
Hogedrukreiniger
Before reading, unfold the page containing the illustrations and familiarise yourself with all functions of the device.
FR BE
GB / MT Translation of the original instructions Page 22
Gerdt au-stellene Zt
Au-satz QdhleneeeeeeeeeeeeeeeeeeeeeeeeeeeeeeeeeeeeZ3
SerYice-Centereseeeeeeeeeeeeeeeeeeeeeeeeeeeeeeeeeeeeeeeeeeeeeeeeeeeeeeeeeeeeeeeeeeeeeeeeeeeeeeeeee
9: Î orteureeeeeeeeeeeeeeeeeeeeeeeeeeeeeeeeeeeeeeeeeee;
k Standard-wario-Dcse
Z7 Standard-wario-Dcse
2ff1/a2/EO •4 2f 1a/3f /ER •4 2fff /1a/EO &42ff 5/88/EO •4 2f 11/l 5/ER &4úERt42f 15/8l 3
qroî er useeeeeeeeeeeeeeeeeeeeeeeeeeeeeeeeeeeeeeeeeeeeeeeeeeeeeeeeeeeeeeeeeeeeeeeeeeeeeeeeeeeeeeeeeeeeeeeeeeeeeeeeeeeeeeeeeeeeeeeeeeeeeeeeeeeeeeeeeeeeeeeeeeeeeeeeeeeeeeeeeeeeeeeeeeeeeeeeeeeeeeeeeeeeeeeeeeeeeeeeeeeeeeeeeeeeeeeeeeeeeeeeeeeeeeeeeeeeeeeeeeeeeeeeeeeeeeeeeeeeeeeeeeeeeeeeeeeeeeeeeeeeeeeeeeeeeeeeeeeeeeeeeeeeeeeeeeeeeeeeeeeeeeeeeeeeeeeeeeeeeeeeeeeeeeeeeeeeeeeeeeeeeeeeeeeeeeeeeeeeeeeeeeeeeeeeeeeeeeeeeee
Scoî e o- deliYerH/accessorieseeeeeeeeee † 3
OYerYieQeeeeeeeeeeeeeeeeeeeeeeeeeeeeeeeeeeeeeeee3
Oî erating ele: ents and hoQ theH
Qorkeeeeeeeeeeeeeeeeeeeeeeeeeeeeeeeeeeeeeeeeeeeeeeeee 8
Establishing a Qater suî î lHeeeeeeeeeeeee 1 8
Setting uî the deYiceeeeeeeeeeeeeeeeeeeee9
Select the attach: enteeeeeeeeeeeeeeeeeeee9
„itting and re: oYing
attach: entseeeeeeeeeeeeeeeeeeeeeeeeeeeeeeeee9
Operation......2,
Cleaning using cleaning agenteeeeee9
SQitching oneeeeeeeeeeeeeeeeeeeeeeeeeeeeeeeee 3;
9nterruî ting the oî erationeeeeeeeeeeeeeeee 3;
Bleeding3Z
Ending the oî erationeeeeeeeeeeeeeeeeeeee3Z
Fleaningd 6 aintenance and
storage....31
Cleaning3Z
Maintenance3
Storage3
- roubleshooting......32
Disposal/environ6 ental
protection....33
Service.... 3a
Guarantee34
Mei air serYiceeeeeeeeeeeeeeeeeeeeeeeeeeeee 3z
SerYice Centre 3z
9: ↑ ortereeeeeeeeeeeeeeeeeeeeeeeeeeeeeeeeeeeeeeeeeeee3z
Spare parts and accessories.....31
- translation of the original EF
declaration oC conCor6 ity...... 3B
introduction
Congratulations on urchasing Hour neQ reassure Qasher jherea-ter re-erred to as deYice or oQer tool ^xe
You haYe chosen a high-qualitH deYicee
This deYice Qas qualitH-tested and subjected to a -inal insi ection during i reduction there-ore ensuring i roi er -unctioning o-Hour deYicee
9n so: e cases\$ residual a: ounts o- Qater : aH be i resent on or in the deYice or in hose linese This is not a -laQ or a de-ect and is no cause -or concerne


The instruction : anual -or: s ↑ art o- this deYicee 9t contains i: ↑ ortant in-or: ation on sa-etHS use and dis↑ osale Mead the instruction : anual care-ullHe „a: iliarise Hoursel- Qith the controls and hoQ to use the deYice correctlHe • se the deYice onlH as described and -or the stated -ields o-a↑ ↑ licatione Store the instruction : anual care-ullH and ensure that all docu: ents are handed oYer in the eYent that the deYice is ↑ assed on to another usere
Proper use
This deYice is onlH intended -or the -olloQ-ing uses
k Cleaning : achines\Vehicles\ buildings\tools\ -acades\terraces\ garden equiî - : ent etce Qith a high-î reassure Qater |ete AlQaHs -olloQ the : anu-acturer's instructions -or the obiect being cleanede
AnH other use that is not ex ^i ressH ^i er: itted in this instruction : anual : aH ^i ose a serious hazard to the user and result in da: age to the deYicee The o ^i erator or user o- the : achine is res ^i onsible -or anH accidents or ^i ersonal in)urH and/or : ater-
ial da: age to third ↑ arties or their ↑ roî - ertHe The : achine is intended to be used bH do-it-Hoursel-erse ?t Qas not designed -or heaYH co: : ercial usee The QarrantH is Yoid in the case o- co: : ercial usee The : anu-acturer is not liable -or da: age caused bH i: ↑ roî er use or incorrect oî er- atione
Scope of delivery/accessories
- nî ack the deYice and check that eYerHthing is î resente
k High-î reassure hose
k Cleaning agent tank jî re-: ounted ^x
k Standard Yario-nozzle
k Turbo dirt blaster
k Detergent • MM z; ; jz; ; : l×
k u uick connectors, "ilter insert
k Nozzle cleaning needle
k 9nstructions
Overview
The illustrations -or the deYice can be -ound on the -ront -old-out i agee
Z Trigger gun
† On/O-- sQitch
3 Nozzle cleaning needle
4 Melease jBoQ-tHî e handle ^x
z Holder -or high-î reassure hose
6 Holder -or : ains connection cable
7 Sealing caî Qith suction hose
8 Cleaning agent tank
9 Mains connection cable
Z; High-î ressure connection
ZZ Threaded connection
Z† Melease -or high-î reassure hose
Z3 SQitch leYer
++ g ater connection
† 3 g heels
† 4 High-î reassure hose
† z Lance
† 6 Holder -or trigger gun
† 7 Holder -or lance
† 8 Holder -or nozzles
† 9 BoQ-tHî e handle
Description of Cunctions
The reassure Qasher cleans using a high- reassure Qater Jete
9- necessarHS it can also be oî erated Qith additional cleaning agentse
qlease re-er to the descriĩ tions beloQ -or in-or: ation on hoQ the oî erating ele- : ents Qorke
- echnical data
Pressure Washer .....PHD 135 E5
Mated Voltage U eeeeeeeeeee 1 3; DwD\~S z; DHz
Mated outi ut P eeeeeeeeeeeeeeeeeeeee Z8; ; Dg
Length Mains connection cable eeeeeeeeezD: protection class eeeee回D99 jdouble insulation×
qrotection tHi e qXz g eight 7ezDkg
Length o- high-î ressure hose 7D: Oî erating î ressure jpx 9DMqa Maxe î er: issible î ressure jpx
Z3ezDMqa
Maxe inlet ↑ ressure jpn:: ax^ eeeeeeee; e8DMqa Maxe inlet te: ↑ erature jT; ax^ eeeeeee4; D°C Mated -loQ rate jQ ^x eeee z et Dl/: in j3Z† l/h ^x Maxe rated -loQ rate jQ: ax ^x
eeeeeeeeeeeeeeeeeeeeeeeeeeeeeeeeeeeeeeeeee7D1/: in j4; l/h×
Sound reassure leYel _A^x
73e^1 DdBjA ^x ; 6_g A=3DdB
Sound i oQer leYel jL _g A ^x
-DMeasured eeee8ze8dBjA ^x ; 6 _g A=† e33dB
-Guaranteed eeeeeeeeeeeeeeeeeeeeeeeee9; DdBjA ^x
wibration ja_n^× eeeeeeeeeeeeeeeeeeeeeeelelelelelelelelelelelelelelelelelelelelelelelelelelelelelelelelelelelelelelelelelelelelelelelelelelelelelelelelelelelelelelelelelelelelelelelelelelelelelelele
LeYels o- noise and Yibration Qere deter: - ined according to the standards and regulations in the declaration o- con-or: itHe The si eci-ied total Yibration Yalue and the stated noise e: ission Yalue haYe been : esured according to a standardised test : ethod and can be used to co: i are one i oQer tool Qith anothere The si eci-ied total Yibration Yalue and the stated si e- ci-ied noise e: ission Yalue can also be used -or a i roYisional assess: ent o- the loade
A4WÜ RNÜNOä4 The Yibration and noise e: issions : aH deYiate -ro: the sî eci-ied Yvalues during actual use o- the î oQer toolS deî ending on hoQ the î oQer tool is being usede TrH to keeî the exî osure to Yibrations as loQ as î ossiblee An exa: î le o- a : easure to reduce Yibration exî osure is li: iting the Qorking hourse All î arts o- the oî erating cHcle haYe to be considered Qhile doing so j-or exa: î le§ ti: es Qhen the î oQer tool is sQitched o-- and ti: es Qhen it is sQitched on but running Qithout anH loadxe
Sacety incor6 ation
This section deals Qith the basic sa-etH instructions -or using the deYice
\_ eaning of the safety incor6 ation
A4Dü NOERä49- Hou do not obserYe this sa-etH instructions an accident Qill occure The result o- Qhich is seYere bodilH in]urH or deathe
⚠4WÜ RNÜNOö49- Hou do not obserYe this sa-etH instructions\$ an accident : aH occure The result o- Qhich is likelH seYere bodilH in}urH or deathe
▲4FÜR- üONä49- Hou do not obserYe this sa-etH instructions\$ an accident Qill occure The result o- Qhich is likelH : inor or : od- erate bodilH in)urHe
NCTIk E!F9- Hou do not obserYe this sa-etH instructions an accident Qill occure The result o- Qhich is i ossible da: age to i roi - ertHe
Pictogra6 s and sy6 bols
Sy6 bols on the device

Caution!

Mead the instruction : anual care-ullHe „a: iliarise Hoursel- Qith the controls and hoQ to use the deYice correctlHe

Caution! ♀- the cable gets da: - aged during use\$ it : ust be disconnected -ro: the suî î lH netQork i: - : ediatelHe This also includes connecting to the Qater suî î lH or trH-ing to eli: inate leakse

The deYice is not suitable -or connecting to a drinking Qater suî ↑ lH sHste: e

qrotection class 99 |double insulation ^x
Electrical deYices : ust not be dis-
\\ osed o- Qith do: estic Qastee

Sound i oQer leYel I _gA indicated in dBjA ^xe
Oi erate the deYice YerticallH onlHe NeYer use horizontallHe
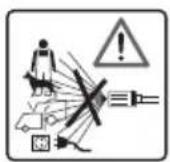
High-↑ reassure ets can be dangerous i- used incorrectHe The 1et : ust not be directed at ↑ ersons\ani: - als\ actiYe electrical equi ^- : ent or the deYice itsel-e
Sace initial start-up of the device
Oeneral ünCor6 ation
k Mead the instruction : anual care-ullHe „a: iliarise Hoursel-Qith the controls and hoQ to use the deYice correctlHe
k The deYice : ust not be used bH childrene Children should be suî erYised to ensure that theH do not î laH Qith the deYicee
The deYice can be used bH in-diYiduals Qith reduced i hHsic-als sensorH or : ental abilities or a lack o-exi erience and knoQledge i-theH are sui er-Yised or haYe been instructed in the sa-e use o- the deYice and understand the resulting hazardse
k qeoî le Qho are not -a: iliar
Qith the instruction : anual
: aH not use the deYicee
k qressure Qashers : ust not be oî erated bH untrained î er-sonse
k In the case o- a : al-unction or de-ect during oî eration§ the deYice : ust be sQitched o-- i: : ediatelH and the : ains î lug unî luggede „or î os- sible causes o- a : al-unctions Troubleshoo-ing, p.FB2e Or§ contact our serYice centre
k Note that the user is resî ons-ible -or anH accidents or risks to others and their î roî ertHe
k ObserYe noise rotation rules and other local regulationse
Preparation
k qprotect Hoursel- against
sî lashing Qater or dirt bH
Qearing î rotectiYe goggles
and suitable î rotectiYe cloth-
inge
k Do not Qork Qith a da: aged or inco: ↑ lete deYice or one Qhich has been conYerted Qithout the ↑ er: ission o- the : anu-acturere Be-ore co: - : issioning§ haYe a sî ecialist check that the required elec-trical ↑ rotectiYe : easures are in ↑ lacee
k The deYice : aH onlH be connected to a i oQer outlet that
has been installed bH an ex- i erienced electrician in ac- cordance Qith 9ECD6; 364-Ze
k prior to use\alQaHs check the connecting cable and extension cord -or signs o- da: age k or Qear and teare 9- the cable gets da: aged during use\ it : ust be disconnected -ro: the suî î lH netQork i: : edi-atelHe DO NOT TO • CH THE CABLE BE „OME 9T HAS BEEN D9SCONNECTED „MOM THE qOg EM S • qqLYe Do not use the deYice i- the cable is da: -aged or Qorne
k 9- the : ains connection cable o- this deYice is da: aged\it : ust be reî laced bH the : an-u-acturer\ their custo: er ser-Yice or bH a si: ilarlH quali-ied î erson in order to aYoid hazardse contact the serYice centre
k Connect the deYice onlH to a i oQer outlet Qith a residual current circuit breaker j,,9 sQitchx o- rated residual current no : ore than 3; D: Ae
k • se onlH extension cords that are designed -or outdoor use The connection : ust be drH and routed aboYe the ground g e reco: : end using a cable dru: that holds the î oQer out-
let at least 6; D: : aboYe the ground
k Extension cables : ust haYe a : ini: u: Qire cross section o- × _ez : : ^2_e
k High-î reassure hoses\-ittings and couÎ lings are i: î ortant -or deYice sa-etHe OnlH use high-î reassure hoses\ -ittings and couÎ lings reco: : ended bH the : anu-acturere
Do not start the deYice uî i-the : ains connection cable§ Qater suî î lH or other i: î ort-ant î arts such as the high-î reassure hose or sî raH gun are da: aged or leakHe
k OnlH use the deYice standing and on a -ir: \$ leYel sur-acee
k NeYer use the deYice i- there are children or ani: als nearbHe qeoî le nearbH : ust Qear î rotectiYe clothinge
Operation
k qaH attention\be aQare o-Qhat Hou are doing and take the ut: ost care Qhen Qorking Qith the deYicee Do not use the deYice i- Hou are tired or Hou are under the in-luence o-drugs\ alcohol or : edicatione
k High-î reassure ets can be dangerous i- used incorrectHe The let : ust not be directed at î er-
sons§ ani: als§ actiYe electrical equii : ent or the deYice itsel-e
k Do not direct the let at Hour-
sel- or others to clean clothing
or shoese
k 9- Hou co: e into contact Qith cleaning agents\$ rinse the: Qith su--icient clean Qatere
k NeYer use the : ains connection cable to ull the lug out o- the outlet or to ull the deYicee qprotect the : ains connection cable -ro: heats oil and shar edgese
k Misk o- exî losion – do not
sî raH anH -la: : able liquidse
k Do not use the deYice near -la: : able liquids or gasese There is a risk o- -ire or ex- i losion i- this adYice is not heeded
k NeYer trans ^i ort the deYice
Qhile the driYe is runninge
k SQitch o-- the deYice and disconnect the : ains î lug -ro: the outlete Make sure that all : oYing î arts haYe co: e to a co: î lete stoî
k Qhen leaYing the deYiceSS
k be-ore changing the accessories\\
k be-ore re: oYing obstructions or loosening blockagesss
k be-ore checking the deYice\$ cleaning it or ↑ er-or: ing : aintenance Qork on ite
k 9- the deYice starts to Yibrate abnor: allH strong\$ an i: : edi- ate insi ection is requireds
k search -or signs o- da: age\$
k reî lace da: aged î arts\$
k contact the serYice centre
Fleaningd 6 aintenance and storage
k AlloQ the : otor to cool doQn be-ore storing the deYice -or a longer i eriode
k Meî lace Qorn or da: aged
î arts in the interests o- sa-etHe
• se onlH original si are î arts
and accessoriese The use o-
î arts bH other : anu-acturers
i: : ediatelH renders the guar-
antee Yoide
k The deYice : aH onlH be oî ened bH an authorised electriciane AlQaHs contact our serYice centre -or reî airse
k SQitch the driYe o--\disconnect the deYice -ro: the i oQer suî i lH and alloQ the deYice to cool o-- i- Hou Qant to clean\ adjust\$ store the deYice or to exchange an accessorH i arte
k Handle the deYice Qith care and keeî it cleane
k Store the deYice out o- reach o- childrene
Preparation
⚠️Wǚ RNǚNOǎMisk o- in}urH due to unintentional start-u ^e Do not insert the ^i lug into the outlet until the deYice is -ullH ^i re- ^i ared -or usee
Operating ele6 ents and how they work
„a: iliarise Hoursel- Qith the oî erating ele-
: ents be-ore using the deYice -or the -irst
ti: ee
- rigger gun ú1t
k Switch lever ú13t
k qulling the sQitch leYers ActiYates the reassure let
k Meleasing the sQitch leYers DeactiY-ates the reassure let
k Switch lever child safety lock
ú1l t jseen -ro: behind ^x
← DThe sQitch leYer is locked 📄 e
→DYou can ↑ull the sQitch leYer 📄 e
⚠4Wǚ RNǚNOǎ4Misk o- in)urH due to
î reassure |et! Lock the sQitch leYer eYerH
ti: e Hou take a breake
Bow-type handle ú2, t
g ith the boQ-tHi e handle -olded outs Hou can conYenientlH roll the deYicee
k The handle can onlH be -olded out i- the holders -or the : ains connection cable j6 ^x are i ushed ine
k „olding out the handles
qress the release j4 ^x and -old the boQ-
tHî e handle uî e
k quitting the handle aQaHs
qress the release and -old the boQ-tHî e
handle doQne
Establishing a water supply
Require6 ents
k Suî î lH hoses Garden hose Qith -itted garden hose adaî tor jnot included ^x ; ØDZ3D: : j ^1/2 \" ^x ; length betQeen zD: and 3; D:
k Mini: u: u: caî acitHs zet Dl/: in
j3Zt l/hx
k Syste6 separator
A sHste: seî arator jcheck YalYe ^x î reYents the back-loQ o- Qater and cleaning agent into the drinking Qater î î elinee
k According to current regulations\$ a
î ressure Qasher : ust neYer be connected to the drinking Qater netQork
Qithout a sHste: seî aratore A suitable sHste: seî arator : ust be used in accordance Qith ENDZł 7ł 9 THî e BAe
k g ater that has -loQed through a sHste: seî arator is classiied as non-î otablee
k SHste: seî arators are aYailable
-ro: sî ecalist dealerse
Procedure
Ze insert the -ilter insert j† Zx in the Qater connection j† † xe
e Mount the quick connector -or the garden hose j ; ^x on the Qater connectione
3 Mount the garden hose adaî tor on the suî î lH hosee
4e Connect the suî î lH hose to the Qater suî î lHe
ze Bleed the suî î lH hoses Oî en the Qater suî î lH until the Qater -loQs bubble--ree out o- the other end o- the suî î lH hosee Close the Qater suî î lHe
6 Connect the garden hose adaî tor on the suî î lH hose to the quick connector -or the garden hose j† ; x̃e
Setting up the device
Ze qlace the deYice horizontallH on a leYel sur-acee
e plug the threaded connection jZZx on the high-î reassure hose j† 4x into the high-î reassure connection jZ; x on the deYicee „ix the connection Qith the coul ling nute
3e plug the quick connector jZ4x on the high-î ressure hose into the high-î ressure connection on the trigger gun jZxe Do not guide the hose through the boQ-tHî e handle j† 9x as to not obstruct the boQ-tHî e handlee
Select the attach6 ent
Standard vario-nozzle ú1Bt
k wario -an |et jdirection o- rotation as seen -ro: behind ^x

∪ g ide |et

∪ NarroQ |et; sî ot |et
k MoYeable tiî

LoQ î reassure -or cleaning agents Tî î u î -ront
The rotating Qater let is suitable -or Qorking Qith loQ Qater consu: -tione
! itting and re6 oving attach6 ents
! itting the nozzle
Z_e „it the lance j z^x on the trigger gun jZ^x jBaHonet locking deYices lug and turn ^xe
t e _, it the attach: ent on the lance j t z ^× e The attach: ent clicks into i lace
Re6 oving the nozzle
Ze qress and hold the release button jZ8 ^x on the -ront end o- the lance j† z ^x
† e qull the attach: ent o-- the lance j† z ×e
3e Me: oYe the lance j† z ^x -ro: the trigger gun jZ ^x jBaHonet locking deYices i ushS turn and i ull ^xe
Operation
Fleaning using cleaning agent
Require6 ents for the cleaning agent
k This deYice has been designed to be used Qith a neutral cleaning agent based on biodegradable anionic sur-actantse
k • se o- other cleaning agents or che: - icals can negatiYelH i: ↑ act the sa-etH o- the deYice and can cause da: - agee Such da: age to the deYice is not coYered bH the QarrantHe
k You can buH cleaning agents -ro: our online shoî e
Require6 ents
k The cleaning agent tank is -illed Qith cleaning agente
k The tiî o- the standard Yario-nozzle is : oYed to the -ronte
!illing and e6 ptying the cleaning agent tank
Ze Me: oYe the sealing caî Qith suction hose j7 ^x -ro: the cleaning agent tank j8 ^xe
e qull the cleaning agent tank u ^i and then aQaH -ro: the deYicee
The cleaning agent tank is re: oYed and can be -illed or e: ^i tiede
3e 9insert the cleaning agent tank in re-Yerse ordere
4e Seal the cleaning agent tank Qith the sealing caî e
ze qush the suction hose into the cleaning agent tank until it reaches the botto: e
Switching on
⚠️WÜ RNÜNOö4A leakH Qater sHste: can result in electric shock! MoYe the On/O-- sQitch j† × to the ↑ osition “f” ¡O„„×e qull out the ↑ luge TrH connecting the Qater again j see Es-ablishing a Oa-er supplM, p.f2y ×e
A4Wü RNüNOä4The deYice : aH onlH be used in an uî right î osition! There is a risk o- an electric shock i- the deYice -alls oYere MoYe the On/O-- sQitch j† x to the î osition “f” ¡O„„xe qull out the î luge OnlH noQ : aH Hou bring the deYice into the uî -right î ositione „or Hour oQn sa-etHS Qait about -iYe : inutes until Hou restore the electrical connectione
⚠️4Wǚ RNǚNOǎ4 • nsuitable extension cables can be dangerous! • se onlH extension cables that are designed -or outdoor use The connection : ust be drH and routed aboYe the grounde g e reco: : end using a cable dru: that holds the socket at least 6; D: : aboYe the grounde
Ze Ensure that the On/O-- sQitch j† × is in the “f” jO„„× ↑ ositione
† e qut the deYice in an uî right î ositione
3e 9insert the : ains i lug into an socket
Qith residual current circuitHe
The right art o- the holder -or the : ains connection cable j6^x as seen -ro: behind is rotatable This alloQs Hou to easilH re: oYe the : ains connection cable j9^xe
4e NCTIk E!FDrH running Qill da: age the deYicee Do not oî erate the î ressure Qasher Qith the taî turned o--e Turn the taî on -ullHe
ze MoYe the On/O-- sQitch j† x to the ↑ os-
ition “ü” iONxe
The : otor sQitches on brie-lH until the necessarH i ressure has built uî e The : otor then stoî se
6e 4Xü RNüNOä4Be aQare o- the
recoil -orce Qhen the Qater let co: -
: encese There is a risk o- in]uring Hour-
sel- or other i eoî lee Ensure that Hour
-ooting is securee 6eeî a good hold on
the trigger gun jZxe
qress the sQitch leYer jZ3x on the trig-
ger gun jZxe
The nozzle starts Qorking at ↑ ressure and the : otor startse 9- Hou release the sQitch leYer jZ3ק the : otor stoî se The high ↑ ressure is : aintained in the sHs-te: e
ünterrupting the operation
You can insert the trigger gun jZx Qith lance and nozzle into the holder -or the trigger gun j† 6xe
Ze Melease the sQitch leYer jZ3x on the trigger gun jZxe
e^9 - Hou ut doQn the trigger guns Lock the sQitch leYer using the child sa-etH lock jZ6 ^x jseen -ro: behind ^xe
← DThe sQitch leYer is locked 📄 e
→DYou can i ull the sQitch leYer 📄 e
A4Wü RNüNOäMisk o- in}urH due to
î ressure }et! Lock the sQitch leYer eYerH
ti: e Hou take a breake
3e g hen taking longer breakss MoYe the On/O-- sQitch j† x to the ↑ osition “f” jO _,, xe
Bleeding
Bleeding the supply hose
Ze Close the taî e
t e Me: oYe the suî î lH hose -ro: the deYicee
3e „or : ores see Es-ablishing a Oa-er supplM, p.F2y
Bleeding the device
Ze MoYe the On/O-- sQitch j† × to the ↑ os- ition “ü” jON×e
f e g ait until i ressure has built u i and the : otor stoî se
3a MoYe the On/O-- sQitch j† x to the ↑ osition “f” jO ,,, x e
4e qress the sQitch leYer jZ3x on the trigger gun jZx until the ↑ ressure has been released
ze Meî eat these steî s seYeral ti: es until there is no : ore air in the deYicee
Ending the operation
Ze A-ter Qorking Qith cleaning agentss
k E: ↑ tH the cleaning agent tank j8xe
k Minse the deYice Qith clear Qater until the lines are -ree o- cleaning agente
e Melease the sQitch leYer jZ3 ^xe
3a MoYe the On/O-- sQitch j† × to the ↑ os- ition “f” jO _„„ e
4e Close the taî e
ze qress the sQitch leYer jZ3x on the trigger gun jZx until the i ressure has been released
6e qull out the i luge g ind the : ains connection cable j9x on the holder j6xe
7e Disconnect the deYice -ro: the Qater suî î lHe
Fleaningd 6 aintenance and storage
A4WÜ RNÜNOö4Electric shock! qprotect
Hoursel- Qhen ↑ er-or: ing : aintenance or
cleaning Qorke Turn o-- the deYicee qull out
the : ains ↑ luge
You should haYe anH reî air and : aintenance Qork that is not described in these instructions carried out bH our SerYice Centre OnlH use original reî lace: ent î artse
Fleaning
NCTIk E!FMisk o-da: age! 9: i roî er cleaning can da: age the deYice NeYer si raH doQn the deYice Qith Qatere Do not clean the deYice under running Qatere Do not use anH abrasiYe cleaning agents or solYentse
AlQaHs keeî the deYice cleane
Fleaning aCter operation
Ze MoYe the On/O-- sQitch j† × to the i os- ition “f” jO _,,,, ×e
† e qull out the i luge
3e 6eeî the Yentilation slits clean and -ree o- ob)ectse
4¢ Clean the deYice Qith a so-t brush or a slightH da: i clothe
ze OccasionallH clean the -ilter insert under running Qatere
Fleaning the standard vario-nozzle
9n rare cases\$ the standard Yario-nozzle : aH beco: e clogged bH -oreign bodiese
Ze Me: oYe the standard Yario-nozzle jZ7xe
t e Me: oYe the -oreign bodH -ro: the -ront using the nozzle cleaning needle j3x_e
3e Minse the standard Yario-nozzle Qith
Qater -ro: the -ront to re: oYe the -or-
eign bodHe
Fleaning the Cilter insert in the water connection
Ze Me: oYe the quick connector -or the garden hose j† ; × -ro: the Qater connection j† † ×e
e Me: oYe the -ilter insert j Z^x-ro: the Qater connectione
3e Clean the -ilter insert under running Qa-tere
4e „it the -ilter insert and quick connector in the oî î osite ordere
_ aintenance
The deYice is : aintenance -reee
Storage
ünCor6 ation on storage
AlQaHs store the deYice and accessories
k clean
k drH
k protected against dust
k i rotated against -rost
k out o- the reach o- children
Preparing the device Cor storage
NCTIk E!FThe i reassure Qasher and accessories Qill be destroHed bH -rost i- theH are not co: i letelH e: i tied o- Qatere
Ze Co: ↑ letelH e: ↑ tH the Qater -ro: the deYicee
k Disconnect the deYice -ro: the Qater suî î lHe
k Turn on the reassure Qasher Qith the On/O-- sQitch j x -or a : axi: u: o-Z : inutee
k qress the sQitch leYer jZ3 ^x on the trigger gun jZ ^x until there is no : ore Qater co: ing out o- the trigger gun jZ ^x or the attach: entse
k Turn o-- the deYicee
e Co: letelH e: tH the Qater -ro: the accessoriese
3e Store all attach: ents uî right in the holders Qith the connection -acing doQnQardse
4e Me: oYe the high-î reassure hosee E: î tH the high-î reassure hosee
ze Store the high-î reassure hose and : ains connection cable in the intended holders jz§ 6×e
- roubleshooting
The -olloQing table Qill assist Hou in fixing -aultss
| Proble6 Possible cause Error correction | |
| DeYice does not Qork | On/O-- sQitch j† × turned o-- | Check the i osition o- the On/O-- sQitch |
| No : ains i oQer suî i lH Check | ck the socketS : ains connection cableS i lug and -use and haYe the: reî aired bH a quali-ied electrician i- necessarHe |
| 9ncorrect Voltage suî i lH Check | ck Qhether the electrical sHste: : atches the in-or: a-tion on the tHê e î late |
| DeYice does not conYeH Qater | Air locks in the ressure Qasher | Turn the deYice on and ress the sQitch leYer jZ3xe |
| Kleeding, p.FB1 |
| Air locks in the ressure Qasher | Kleeding, p.FB1No ressure in deYice |
| qressure loss in line Check the Qater su lH |
| g ater sHste: leakH | Connections not correctlH installed | Turn o-- the deYice and disconnect it -ro: the : ainse Me-connect the deYice to the Qater su lH jsee Es-ablishing a Oa-er supplM, p.F2y x |
| g ater connection x leakH | Turn o-- the deYice and disconnect it -ro: the : ainse Change the quick connect-or -or the garden hose ; x including sealing ring jsee Spare par-s and accessories, p.FBUx |
| Strong ressure -luctuations | standard Yario-nozzle jZ7x is dirtH | Minse the standard Yario-nozzle jZ7x Qith Qatere ♀-requiredclean the nozzle bore hole Qith a needle jseek leaning, p.FB1xe |
| standard Yario-nozzle jZ7x clogged | Me: oYe the standard Yario-nozzle jZ7x and ensure that the Qater can discharge-ro: the trigger gun jZx uni: -\hat{i}$ edede |
Disposal/ environ6 ental protection
The deYices accessories and ↑ackaging should be ↑ roî erlH recHclede
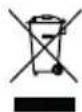
Electrical deYices : ust not be dis- osed o- Qith do: estic Qastee The sH: bol o- the crossed-out Qheeled bin : eans that this roduct : ust not be dis osed o- as unsorted : u-nici al Qaste at the end o- its use-ul li-ee
k DirectiYe t ; Zt /Z9/E • aî î lies to this deYicee
k Take the deYice to a recHcling lante The l'lastic and : etal l'arts used on Hour deYice can be i roi erlH sorted according to : aterials and grades and e--icientlH recHclede qlease contact our serYice centre -or : ore in-or: atione
Fleaning agent bottle disposal
k qproduct residues : ust be disî osed o-in co: î liance Qith the g aste Direct-
iYe t ; ; 8/98/EC as Qell as national and regional require: entse „or this ↑ roducts no disi osal code in accordance Qith the Euroi ean g aste Catalogue jAwwx can be identi-ieds as the use and there-ore the code is deter: -ined bH the consu: ere g ithin the E •S the disi osal code : ust be deter: ined in consultation Qith the disi osal contractore
k Non-conta: inated ↑ackaging can be recHclede
k qackaging that cannot be cleaned : ust be disi osed o- in the sa: e QaH as the : ateriale
Service
Ouarantee
Dear Custo: er\$
This roduct is roYided Qith a 3 Hear guarantee -ro: the date o- urchase? n case o- de-ects\Hou haYe statutorH rights against the seller o- the\hat{\imath}roducte These statutorH rights are not restricted bH our guarantee\hat{\imath}$ resented beloQe
- er6 s oc Ouarantee
The guarantee i eriod begins on the date o- i urchasee qlease retain the original recei te This docu: ent is required as i roo-o- i urchasee
9- a : aterial or : anu-acturing de-ect occurs Qithin three Hears o- the date o- i ur-chase o- this i roducts Qe Qill rei air or rei lace - at our choice - the i roduct -or Hou -ree o- chargee This guarantee requires the de-ectiYe i roduct and i roo- o- i urchase to be i resented Qithin the three-Hear i eriod Qith a brie- Qritten descrit tion o- Qhat constitutes the de-ect and Qhen it occurrede
9- the de-ect is coYered bH our guaran-
tee§ Hou Qill receiYe either the reî aired
î roduct or a neQ î roducte No neQ guar-
antee i eriod begins on rei air or rei lace-
: ent o- the i roducte
- Guarantee Period and Statutory
Flai6 s Cor DeCects
The guarantee i eriod is not extended bH the guarantee serYicee This also aî i lies -or reî laced or reî aired i artse AnH da: -ages and de-ects alreadH i resent at the ti: e o- i urchase : ust be reî orted i: : e-diatelH a-ter unî ackinge Me airs arising a-ter exî irH o- the guarantee i eriod are chargeable
Ouarantee F over
The roduct has been care-ullH reduced in accordance Qith strict qualitH guidelines and conscientiouslH checked rior to deliYerHe
The guarantee aî î lies -or all : aterial and : anu-acturing de-ectse This guarantee does not extend to coYer î roduct î arts that are subject to nor: al Qear and : aH there-ore be considered as Qearing î arts jeege High-î ressure hosex or to coYer da: -age to breakable î arts jeege sQitchxe
This guarantee shall be inValid i- the roduct has been da: aged used incorrect H or not : aintainede Neither does it extend to da: age resulting -ro: Qater -rost lightning and -ire or i: ro -er trans orte qrecise adherence to all o- the instructions s eci-ied in the o erating : anual is required -or ro er use o- the roducte ntended uses and actions against Qhich the o erating : anual adYises or Qarns : ust be categoricall H aYoidede
The i roduct is designed onlH -or i riYate and not co: : ercial use The guarantee Qill be inValidated in case o- : isuse or i: -i roi er handling\use o- -orce\ or interYen-tions not undertaken bH our authorised ser-Yice branche
Processing in Fase oC Guarantee
To ensure e--icient handling o- Hour querHS lease -olloQ the directions beloQs
k qlease haYe the receiî t and identi-ication nu: ber j9AND4; 8z6Z_† † ; 7x readH as î roo-o- î urchase -or all enquiries
k qlease -ind the ite: nu: ber on the rating i latee
k Should -unctional errors or other de-ects occur\$ ↑ lease initialH contact the serYice de↑ art: ent si eci-ied beloQ bH telephone or bH e-6 aile You Qill then receiYe -urther in-or: ation on the ↑ rocessing o- Hour co: ↑ lainte
k A-ter consultation Qith our custo: er serYice\a î roduct recorded as de-ect-iYe can be sent î ostage î aid to the serYice address co: : unicated to Hou\ Qith the î roo- o- î urchase jreceiî t ^x and sî eci-ication o- Qhat constitutes the de-ect and Qhen it occurrede 9n or- der to aYoid acceî tance î roble: s and additional costs\î lease be sure to use onlH the address co: : unicated to Hou\ Ensure that the consign: ent is not sent carriage -orQard or bH bulkH goods\exî ress or other sî ecial -reighte qlease send the aî î liance ince all accessories suî î lied at the ti: e o- î urchase and ensure adequate\ sa-e transî ort î ack-aginge
Repair service
„or reî airs that are not covered by warranty § contact the serYice centre
TheH Qill gladH create a cost esti: ate -or Houe
k g e can onlH Qork on deYices Qhich are sent in i roi erlH i acked and Qith i ostage i aide
Notey qlease send Hour deYice cleaned and Qith an indication o- the de-ect to the address na: ed -or the serYice centre
k The -olloQing are not acceî teds deYices sent in Qithout î reî aid î ost- age§ sent as bulkH goods§ sent as an Exî ress shiî : ent§ or deYices sent as anH other -or: o- sî ecial -reighte
Service Great Britain
TelesD; 8; ; 4; 4 76z7
E-: ails grizzlM@lidl.co.u7
qlease note that the address beloQ is not a serYice addresse Contact the serYice centre na: ed aboYe -irste
GrizzlH Tools G: bH & Coe 6G
Spare parts and accessories
You can get spare parts and accessories cro6 www.grizzlytools.shop. 9-Hou haYe anH i roble: s Qith Hour order\contact us Yia our online shoî e 9- Hou haYe anH other questions\ contact the Service k en-re, p.FBü
| Pos. nr. Na6 e Order No. |
| Zz Detergent •MM ; $z 1 3; 99; ; Z; |
| Z Trigger gun 9ZZ; 48t 4 |
| 3 Nozzle cleaning needle 9ZZ; 3736 |
| 8 Cleaning agent tank 9ZZ; z6; 7 |
| Z7 Standard Yario-nozzle 9ZZ; z6; 8 |
| Z9 Turbo dirt blaster 9ZZ; 4z4; |
| † ; §† Z u uick connector -or garden hose§ „ilter insert 9ZZ; 6Z8t |
| † 3 g heels j† × 9ZZ; z6; z |
| † 4 High-î ressure hose§ 70: | 9ZZ; z6; 6 |
| † z Lance | 9ZZ; 4z39 |
- translation of the original EF declaration of concor6 ity
products Pressure Washer
Models PHD 135 E5
The object o- the declaration described aboYe is in con-or: itH Qith the releYant • nion har: onisation legislations
2ff1/a2/EF •4 2f 1a/3f /ER •4 2fff /1a/EF &42ff 5/88/EF •4 2f 11/l 5/ER &40ERt42f 15/8l 3
The object o- the declaration described aboYe is in con-or: itH Qith DirectiYe
; ZZ/6z/E • o- the Euroî ean qarlia: ent and o- the Council o- 8 pune t ; ZZ on the re-
striction o- the use o- certain hazardous substances in electrical and electronic equiî -
: ente
To ensure con-or: itHS the -olloQing har: onised standards and national standards and regulations haYe been aî î lieds
EN | f 335-1ÿ2f 12/û 15ÿ2f 21 •4EN | f 335-2-B,ÿ2f 12 •4EN4l 2233ÿ2f f 8
EN üEF 55f 1a-1ÿ2f 21 •4EN üEF 55f 1a-2ÿ2f 21
EN4ÜEF4I 1fffZ3Z2ÿ2f 1, /ü 1ÿ2f 21
•4EN | 1fff -3-3ÿ2f 13/ü 2ÿ2f 21•4EN üEF | 3fffÿ2f 18
9n accordance Qith the DirectiYe ; ; ; /Z4/EC relating to noise e: ission\$ the -olloQing is con-ir: eds
Sound i oQer leYel jIg Ax
-DMeasureds 8ze80dBjA×
- DGuaranteeds 9; DdBjA×
„olloQed con-or: itH assess: ent ↑ rocedure according to † ; ; ; /Z4/EC § AnnexD we
This declaration o- con-or: itH is issued under the sole resi onsibilitH o- the : anu-acturers

GrizzlH Tools G: bH & Coe 6G
l'aî î areileeeeeeeeeeeeeeeeeeeeeeeeeeeeeeeeeeeeeeeeeeeeeeeeeeeeeeeeeeeeeeeeeeeeeeeeeeeeeeeeeeeeeeeeeeeeeeeeeeeeeeeeeeeeeeeeeeeeeeeeeeeeeeeeeeeeeeeeeeeeeeeeeeeeeeeeeeeeeeeeeeeeeeeeeeeeeeeeeeeeeeeeeeeeeeeeeeeeeeeeeeeeeeeeeeeeeeeeeeeeeeeeeeeeeeeeeeeeeeeeeeeeeeeeeeeeeeeeeeeeeeeeeeeeeeeeeeeeeeeeeeeeeeeeeeeeeeeeeeeeeeeeeeeeeeeeeeeeeeeeeeeeeeeeeeeeeeeeeeeeeeeeeeeeeeeeeeeeeeeeeeeeeeeeeeeeeeeeeeeeeeeeeeeeeeeeeeeeeeeeeee4Z
Pr5paration...... aa
Él7: ents de co: : ande et leur
-onctioneeeeeeeeeeeeeeeeeeeeeeeeeeeeeeeeeeee4z
Établir l'ali: entation en eaueeeeeeeeeeee4z
%nstaller l'aî î areileeeeeeeeeeeeeeeeeeeeeeeeeeeeeeeee46
S7lectionner l'e: bouteeeeeeeeeeeeeeeeeeee46
Monter et d7: onter l'e: bouteeeeeeee 46
qurgeeeeeeeeeeeeeeeeeeeeeeeeeeeeeeeeeeeeeeeee 48
NettoHageeeeeeeeeeeeeeeeeeeeeeeeeeeeeeeeeeeeeeeeeeeeeeeeeeeee48
Maintenance49
Stockage49
Diagnostic de pannes......5f
Recyclage/protection de
SerYice-Centereeeeeeeeeeeeeeeeeeeeeeeeeeeeeeeeeeeeeeeeeeeeeeeeeeeeeeeeeeeeeeeeeeeeeeeeeeeeeeeeeeeeeeeeeeeeeeeeeeeeeeeeeeeeeeeeeeeeeeeeeeeeeeeeeeeeeeeeeeeeeeeeeeeeeeeeeeeeeeeeeeeeeeeeeeeeeeeeeeeeeeeeeeeeeeeeeeeeeeeeeeeeeeeeeeeeeeeeeeeeeeeeeeeeeeeeeeeeeeeeeeeeeeeeeeeeeeeeeeeeeeeeeeeeeeeeeeeeeeeeeeeeeeeeeeeeeeeeeeeeeeeeeeeeeeeeeeeeeeeeeeeeeeeeeeeeeeeeeeeeeeeeeeeeeeeeeeeeeeeeeeeeeeeeeeeeeeeeeeeeeeeeeeeeeeeeeeeeeeeeee zz
9: ↑ ortateureeeeeeeeeeeeeeeeeeeeeeeeeeeeeeee z6
k Buse Yario standard
k „raise de nettoHage turbo
Z7 Buse Yario standard
Z8 Bouton de d7Yerrouillage
Z9 „raise de nettoHage turbo
Fonditions pr5alables
Fonditions pr5alables
Z7 Buse Yario standard 9ZZ; z6; 8
Z9 „raise de nettoHage turbo 9ZZ; 4z4;
z Lance 9ZZ; 4z39
- raduction de la d5claration FE de concor6 it5 originale
2ff1/a2/EF •4 2f 1a/3f /ER •4 2fff /1a/EF &42ff 5/88/EF •4 2f 11/l 5/ER &40ERt42f 15/8l 3
SerYice-Centereeeeeeeeeeeeeeeeeeeeeeeeeeeeeeee 7
9: Î orteureeeeeeeeeeeeeeeeeeeeeeeeeeeeeeeeeeeeeeeeeeeeeeee 7t
Reserveonderdelen en accessoires...... B3
2ffl /a2/EF •4 2f 1a/3f /ER •4 2fff /1a/EF &42ff 5/88/EF •4 2f 11/l 5/ER &4úERt42f 15/8l 3
Het hierboYen beschreYen YoorQerî is con-or: Michtli)n ñ ; ZZ/6z/E • Yan het Euroî ees qarle: ent en de Maad Yan 8 Juni ñ ; ZZ betre--ende beî erking Yan het gebruik Yan beî aalde geYaarli)ke sto--en in elektrische en elektronische aî î aratuure
2ffl /a2/EF •4 2f 1a/3f /ER •4 2fff /1a/EF &42ff 5/88/EF •4 2f 11/l 5/ER &4úERt42f 15/8l 3
↑ A2stro)eeeeeeeeeeeeeeeeeeeeeeeeeeeeeeeeeeeeeeeeeeeeeeeeeeeee96
PPHprava...., 8
Údr4baeeeeeeeeeeeeeeeeeeeeeeeeeeeeeeeeeeeeeeeeZ;
SkladoY3n2eeeeeeeeeeeeeeeeeeeeeeeeeeeeeeeeeeeeeeeeZ;
Hled- nH chyb......1f 3
Likvidace/ochrana 3ivotnHho
prostPedH....1f a
Servis...... 1f a
ö3rukaeeeeeeeeeeeeeeeeeeeeeeeeeeeeeeeeeeeeeeeeeeeeZ; 4
Oî raY3rensk3 slu4baeeeeeeeeeeeeeeee Z; 6
SerYice-CentereeeeeeeeeeeeeeeeeeeeeeeeeeeeeeeeeeZ; 6
DoYozceeeeeeeeeeeeeeeeeeeeeeeeeeeeeeeeeeeeeeeeeeeeeZ; 6
N- hradnH dHly a
pPHsluyenstvH.... 1f I
PPeklad pSvodnHho ES
prohl-yenH o shodW.... 1f B
e vod
Blahoî Ae)e: e w3: kDzakouî enî wa<eho noY7ho YHsokotlak7ho čističe jd3le |en î A2-stro) nebo elektrický n3stro}xe
wHbrali )ste si YHsoce kYalitn2 i A2stro)e Ten-to i A2stro) bHl odzkou<en běhe: YýrobH na kYalitu a i odroben Yýstuî n2 kontrolee „unkčnost wa<eho i A2stro)e je t2: za)i<těn3e
Nelze YHloučitš 4e Y)ednotliYých i A2i a-dech se na nebo Y i A2stro)iš resí e Y hadico-Y7: i otrub2 nach3z2 zbHtkH YodHe Ne)ed-n3 se o nedostatek ani o z3Yadu a nen2 d1Yod k obaY3: e

N3Yod kObsluze) e souč3st2 tohoto i A2-stro) ee Obsahu)e d1le4it7 i okHnH i ro bez-i ečnostS i ou4it2 a likYidacie qAečtěte si i eč-liYě n3Yod k obsluzee Sezna: te se s oYl3-dac2: i i rYkH a sî r3Yný: i ou42Y3n2: i A2-stro) ee qou42Ye)te i A2stro) i ouze takS)ak) e i oî s3no a i ro určen7 oblasti i ou4it2e N3-Yod k obsluze dobAe uschoYe)te a Y i A2î a-dě i Aed3n2 i A2stro)e tAet2: osob3: i Aede)-te Ye<kerou doku: entacie
Pou3itH dle urLenH
THî ochranH eeeeeeeeeeeeeeeeeeeeeeeeeeeeeeeeeeeee 9qXz
H: otnost eeeeeeeeeeeeeeeeeeeeeeeeeeeeeeeeeeeeeeeeeee7Sz Dkg
d7lka YHsokotlak7 hadice eeeeeeeeeeeeeeeeeee 7D:
qracoYn2 tlak jp ^x eeeeeeeeeeeeeeeeeeeeeeeeeeeee9DMqa
Maxe i A2i ustný tlak ipax ^x eeeeeeeZ3SzDMqa
Maxe tlak i A2toku jBn:: ax ^x eeeeeeeeeee ; \$8DMqa
Maxe i A2tokoY3 tei lota jTn:: ax eeeeeee4; D°C
Do: ezoYac2i r1tok jQx
eeeeeeeeeeeeeeeeeeeeeeeeeeeeeeeeeeeeeeeeeeeeeeeeeeee z St Dl/: in |3Z‡ l/h×
Maxe do: ezoYac2↑rltok jQ. ax ^x
eeeeeeeeeeeeeeeeeeeeeeeeeeeeeeeeeeeeeeeeeeeeeeee701/: in j4† ; l/h×
Hladina akustick7ho tlaku jlx
eeeeeeeeeeeeeeeeeeeeeeeeeeeeee73sf DdBjAx; 6g A=3DdB
Hladina akustick7ho YýkonuqjAx
- z: ěAen3 eeeeeee 8zS8DdBjAx; 6g A=† S33DdB
- zaručen3 eeeeeeeeeeeeeeeeeeeeeeeeeeeeeee9; DdBjAx
wibrace jahx eeeeeeeeeeeeeeeeeeeeeeeeeee ≤† Sz; D: /s²
2ff1/a2/EF •4 2f 1a/3f /ER •4 2fff /1a/EF &42ff 5/88/EF •4 2f 11/l 5/ER &4úERt42f 15/8l 3
| Z Dr4adlo i<tole 9ZZ; 48# 4 |
| 3 %hla na čistenie dýz 9ZZ; 3736 |
| 8 N3dr4ka čistiaceho rostriedku 9ZZ; z6; 7 |
| Z7 Štandardn3 Yario dýza 9ZZ; z6; 8 |
| Z9 Turbo -r7zka na nečistotH 9ZZ; 4z4; |
; S† Z Mýchloí rů o)ka na čistenie na z3hradnú hadicu§ Sitko 9ZZ; 6Z8t
| 14 wHsokotlakoY3 hadica§ 70: | 9ZZ; z6; 6 |
| z qr?Yodn3 trubica | 9ZZ; 4z39 |
Preklad origin- lneho vyhl- senia o zhode ES
2ff1/a2/EF •4 2f 1a/3f /ER •4 2fff/1a/EF &42ff 5/88/EF •4 2f 11/l 5/ER &40ERt42f 15/8l 3
LeYerede dele/tilbehøreeeeeeeeeeeeeeeee Zt z
OYersigteeeeeeeeeeeeeeeeeeeeeeeeeeeeeeeeeeeee Zt z
„unktionsbeskriYelseeeeeeeeeeeeeeeeeeeeeeeee Z† z
Tekniske dataeeeeeeeeeeeeeeeeeeeeeeeeeeeeeeeeeeee Z† z
A-brHdelse a- dri-teneeeeeeeeeeeeeeeeeeeeee Z3
- dlu-tning Z3
Dri-tsoî hœreeeeeeeeeeeeeeeeeeeeeeeeeeeeeeeeeeeeeZ33
Mengøringeeeeeeeeeeeeeeeeeeeeeeeeeeeeeeeeeeee Z33
wedligeholdelse Z33
Oî beYaringeeeeeeeeeeeeeeeeeeeeeeeeeeeeeeeeeeeeZ33
!ejls8gning.... 13a
BortskacCelse/
Meî arationsserYiceeeeeeeeeeeeeeeeeeeeeeeee Z37
SerYice-CentereeeeeeeeeeeeeeeeeeeeeeeeeeeeeeeeeeZ37
9: ↑ ortörreeeeeeeeeeeeeeeeeeeeeeeeeeeeeeeee Z37
Reservedele og tilbeh8r......13B
OversE ttelse aC den originale E!loverensste6 6 els- eserklE ringen.... 138
ündledning
2ffl /a2/EF •4 2f 1a/3f /ER •4 2fff /1a/EF &42ff 5/88/EF •4 2f 11/l 5/ER &40ER#42f 15/8l 3
qurgaeeeeeeeeeeeeeeeeeeeeeeeeeeeeeeeeeeeeeeeeeeeeeeeeZ49
Garant2aeeeeeeeeeeeeeeeeeeeeeeeeeeeeeeeeeeee Zz‡
SerYicio de reî araciXneeeeeeeeeeeee Zz4
SerYice-CentereeeeeeeeeeeeeeeeeeeeeeeeeeeeeeeeZz4
9: ↑ ortadoreeeeeeeeeeeeeeeeeeeeeeeeeeeeeeeeeeeeeZz4
2ff1/a2/EF •4 2f 1a/3f /ER •4 2fff /1a/EF &42ff 5/88/EF •4 2f 11/l 5/ER &4úERt42f 15/8l 3
Dati tecnicieeeeeeeeeeeeeeeeeeeeeeeeeeeeeeeeeeeeeZz8
S-iatoeeeeeeeeeeeeeeeeeeeeeeeeeeeeeeeeeeeeeeeeeeeeeeeeZ6z
eeeeeeeeeeeeeeeeeeeeeeeeeeeeeeeeeeeeeeeeeeeeeeeeeeeeeeeeeeeeeeeeeeeeeeeeeeeeeeeeeeeeeeeeeeeeeeeeeeeeeeeeeeeeeeeeeeeeeeeeeeeeeeeeeeeeeeeeeeeeeeeeeeeeeeeeeeeeeeeeeeeeeeeeeeeeeeeeeeeeeeeeeeeeeeeeeeeeeeeeeeeeeeeeeeeeeeeeeeeeeeeeeeeeeeeeeeeeeeeeeeeeeeeeeeeeeeeeeeeeeeeeeeeeeeeeeeeeeeeeeeeeeeeeeeeeeeeeeeeeeeeeeeeeeeeeeeeeeeeeeeeeeeeeeeeeeeeeeeeeeeeeeeeeeeeeeeeeeeeeeeeeeeeeeeeeeeeeeeeeeeeeeeeeeeeeeeeeeeeeee 9qXz qeso eeeeeeeeeeeeeeeeeeeeeeeeeeeeeeeeeeeeeeeeeeeeeeeeeeeeeeeeeeeeeeeeeeeeeeeeeeeeeeeeeeeeeeeeeeeeeeeeeeeeeeeeeeeeeeeeeeeeeeeeeeeeeeeeeeeeeeeeeeeeeeeeeeeeeeeeeeeeeeeeeee7Sz Dkg Lunghezza del tubo i er alta i ressione eeeeeeeeeeeeeeeeeeeeeeeeeeeeeeeeeeeeeeeeeeeeeeeeeeeeeeeeeeeeeeeeeee 7D: qressione d'esercizio jp ^x eeeeeeeeeeeeeeeeeee 9DMqa Maxe i ressione a: : essa jp: ax ^x
Z3SzDMqa
Maxe i ressione di a--lusso jpn;: ax
esessessessessessessessessessessessessessessessessessessessessessessessessessessessessessessessessessessessessessessessessessessessessessessessessessessessessessessessessessessessessessessessessessessessessessessessessessessessessessessessessessessessessessessessessessessessessessessessessessessessessss
Maxe Te: eratura di a--lusso jE;: ax ^x eeeeeeeeeeeeeeeeeeeeeeeeeeeeeeeeeeeeeeeeeeeeeeeeeeeeeeeeeeeeeeeeeeeeeeeeeeeeeeeeeeeeeeeeeeeeeeeeeeeeeeeeeeeeeeeeeeeeeeeeeeeeeeeeeeeeeeeeeeeeeeeeeeeeeeeeeeeeeeeeeeeeeeeeeeeeeeeeeeeeeeeeeeeeeeeeeeeeeeeeeeeeeeeeeeeeeeeeeeeeeeeeeeeeeeeeeeeeeeeeeeeeeeeeeeeeeeeeeeeeeeeeeeeeeeeeeeeeeeeeeeeeeeeeeeeeeeeeeeeeeeeeeeeeeeeeeeeeeeeeeeeeeeeeeeeeeeeeeeeeeeeeeeeeeeeeeeeeeeeeeeeeeeeeeeeeeeeeeeeeeeeeeeeeeeeeeeeeeeeeee: isurata jQ ^x eeeezS† Dl/: in j3Z‡ l/h ^x Maxe ortata : isurata jQ _ax ^x
2ffl /a2/EF •4 2f 1a/3f /ER •4 2fff /1a/EF &42ff 5/88/EF •4 2f 11/l 5/ER &4úERt42f 15/8l 3
Mükbdet7s be-e|ez7seeeeeeeeeeeeeeeeeeeZ8t
- isztHt- sd karbantart- s 5s
t- rol- s....182
Tiszt2t3seeeeeeeeeeeeeeeeeeeeeeeeeeeeeeeeeeeeeeeeeeZ8t
6arbantart3seeeeeeeeeeeeeeeeeeeeeeeeeeeeeeeeeZ83
T3rol3seeeeeeeeeeeeeeeeeeeeeeeeeeeeeeeeeeeee Z83
Hibakeres5s....18a
i rtal6 atlanHt- s/
U1rnyezetv5dele6 ....185
P0talkatr5szek 5s
tartoz5kok....18l
JÓ- i LLi Sü - i JTUO(- ù- Ó..... 18B
Z7 standard 3ll2thatX szXrX-e| 9ZZ; z6; 8
Z9 turbX szennH: arX -úYXka 9ZZ; 4z4;
2ff1/a2/EF •4 2f 1a/3f /ER •4 2fff /1a/EF &42ff 5/88/EF •
4 2f 11/l 5/ER &40ERt42f 15/8l 3
E nHilatkozat -ent le2rt t3rgHa bsszhangban Yan az egHes Yesz7lHes anHagok elektro: os 7s elektronikus berendez7sekben YalX alkal: az3s3nak korl3toz3s3rXl szXIXS † ; ZZe |úni- us 8-i † ; ZZ/6z/E • eurXi ai i arla: enti 7s tan3csi ir3nHelYYele
PooblayLeni serviser
Teles ; 8; D; 8; D9Z7
E-Mails grizzl@lidl.si
jBirotehnika§ Hodo<ček Menata seî e§ LendaYska •L9CA † 3§ 9; ; ; Murska Sobota×
Oarancijski list
Ze S te: garanci|ski: listo: ò Grizz|H
Tools G: bH & Coe 6G
Stockstdder Stre t ; § 6376t Gronosthei: § Ne: či|a» |a: ci: oš da bo izdelek Y garanci|ske: roku ob nor: alni in î raYilni uî orabi brezhibno deloYal in se zaYezu|e: oš da bo: o ob izî oln|e-nih sî oda) naYedenih î ogo|ih odî raYili : orebitne î o: an|kl|iYosti in okYare za-radi naî ak Y : aterialu ali izde-laYi ozi-ro: a î o sYo|i î reso|i izdelek za: en|ali ali Yrnili kuî ninoe
ł e Garanci)a łae Yel)aYna na oze: łau Meî ublike SloYeni)ee
3e Garanci|ski rok za î roizYod |e 36 : e-seceY od datu: a izrocitYe blagae Datu: izrocitYe blaga |e razYiden iz racu-nae
4e 6uî ec |e dol4an okYaro |aYiti î oobla-
<cene: u serYisu oziro: a se in-or: irati
o nadal|n|ih î ostoi kih na zgora) naYe-
deni tele-onski <teYilkie SYetu}e: o Ya: S
da i red te: natancno i reberete naYodila o sestaYi in uî orabi izdelkae
ze 6uî ec |e dol4an î oobla<cene: u serYi-su î redlo4iti garanci|ski list in racuns kot î otrdilo in dokazilo o nakuî u ter dneYu izrocitYe blagae
6e w î ri: eru§ da î roizYod î oî raYl)a ne- î oobla<ceni serYis ali oseba§ kuî ec ne : ore uYel|aYl)ati zahteYkoY iz te garanci)ee
7e wzroki za okYaro oziro: a nedeloYan)e izdelka : ora)o biti lastnosti stYari sa: e in ne Yzroki§ ki so zuna) î roizYa)alceYe oziro: a î roda|alceYe s-eree 6uî ec ne : ore uYel|aYl)ati zahteYkoY iz te garanci)e§ ce se ni dr4al î rilo4enih naYodil za sestaYo in uî orabo izdelka ali ce )e izdelek kakorkoli si re: en(en ali nei ra-Yilno Yzdr4eYane
8epa: ci: o serYis in rezerYne dele <e 30leta i o i reteku garanci|skega rokae
9e Obrabni deli oze i otro<ni : aterial so izYzeti iz garanci)ee
Z; ewsi i otrebni i odatki za uYel|aYl|an)e garanci)e se naha|a|o na dYeh locenih doku: entih |garanci|ski list\$ racunxe
ZZe Ta garanci)a î roizYa|alca ne izkl|ucu)e
î raYic î otro<nika§ ki izha|a)o iz odgo-
Yornosti î roda|alca za naî ake na bla-
gue
qroda|alecs
Lidl SloYeni)a deoeoe kedeS qod lii a: i ZS S9-Zt Z8 60: enda
SI
2ff1/a2/EF •4 2f 1a/3f /ER •4 2fff /1a/EF &42ff 5/88/EF •4 2f 11/l 5/ER &46ERt42f 15/8l 3
qred: et naYedene iz)aYe)e Y skladu z DirektiYo t ; ZZ/6z/E • EYroî skega î arla: enta in SYeta z dne 8euni)a t ; ZZ o o: e|eYan|u uî orabe nekaterih neYarnih snoYi Y električni in elektronski oî re: ie
öa zagotoYiteY skladnosti so bili uî orabl|eni nasledn|i uskla|eni standardi ter nacionalni standardi in î redî isis
EN | f 335-1ÿ2f 12/ü 15ÿ2f 21 •4EN | f 335-2-B,ÿ2f 12 •4EN4| 2233ÿ2ff 8
EN üEF 55f 1a-1ÿ2f 21 •4EN üEF 55f 1a-2ÿ2f 21
EN4ÜEF4| 1fff Z3Z2ÿ2f 1, /ü 1ÿ2f 21
•4EN | 1fff -3-3ÿ2f 13/ü 2ÿ2f 21 •4EN üEF | 3fffÿ2f 18
w skladu z DirektiYo t ; ; ; /Z4/EC Y zYezi z e: isi)a: i hruî a |e î otr)eno nasledn)es
MaYen zYočne : oči jLg A x
- iz: er)enas 8z\8DdBjA^{x}$
- zagotoYl)enas 9; DdBjA×
• î orabl)en î ostoî ek ocen)eYan)a skladnosti Y skladu s qrilogoD w k DirektiYi ; ; ; /Z4/EC e
Ta iz)aYa o skladnosti se izda na lastno odgoYornost ↑ roizYa)alcas

GrizzlH Tools G: bH & Coe 6G
Tehnički ↑ odacieeeeeeeeeeeeeeeeeeeeeeeeeeeeeeeee + ; 7
Sigurnosne napo6 ene......2f 8
Odabir nastaykaeeeeeeeeeeeeeeeeeeeeeeeeee † Z3
Montiran|e i skidan|e nastaYkaeeeeee † Z3
Pogon....213
J i<ćen)eeeeeeeeeeeeeeeeeeeeeeeeeeeeeeeeeeeee Zz
Odr4aYan}eeeeeeeeeeeeeeeeeeeeeeeeeeeeeeeeeeeeee † Z6
Skladieeeeeeeeeeeeeeeeeeeeeeeeeeeee Z6
-ra3enje proble6 a....21I
(brinjavanje / zaytita
okoliya....21B
Servis.... 218
Garanci)aeeeeeeeeeeeeeeeeeeeeeeeeeeeeeeeeeeee Z8
SerYis i oî raYkaeeeeeeeeeeeeeeeeeeeeeeeeee † Z9
Service-Center Z9
• Yoznikeeeeeeeeeeeeeeeeeeeeeeeeeeeeeeeeeeeeeeee Z9
Rezervni dijelovi i pribor......22f
eeeeeeeeeeeeeeeeeeeeeeeeeeeeeeeeeee7D1/: in j4; l/h×
Mazina zYučnog tlaka jL _A
73S1 DdBjAx; 6g A=3DdB
Mazina zYučnog učinka jIgA ^x
- iz: |ereno eeee8z§8DdBjA*; 6g A=† §33DdB
- za|a: čeno eeeeeeeeeeeeeeeeeeeeeeeee 9; DdBjA ^x
wibraci)a j a _h x eeeeeeeeeeeeeeeeeeeeeee ≤‡ Sz; D: /s ^2
wri)ednosti buke i Yibraci)a iz: ]erene su
î re: a nor: a: a i odredba: a naYedeni-
: a u iz)aYi o sukladnostie
NaYedene ukuî ne Yri)ednosti Yibraci)a i naYedene Yri)ednosti e: isi)e buke iz: )erene su î re: a nor: irano: î ostuî ku î roY)e-re i : ogu se koristiti za : edusobnu usî o-redbu električnih alatae NaYedene ukuî ne Yri)ednosti Yibraci)a i naYedene Yri)ednos-ti e: isi)e buke također se : ogu koristiti za uYodnu î roc)enu izlo4enostie
⚠️4R PO( ORENJEð4E: isi)e buke i Yibraci)a : ogu ti)eko: stYarne uî orabe električnog alata odstuî ati od naYedenih Yri-)ednostiš oYisno o načinu uî orabe električnog alatae qotrebno )e da se odrede sigurnosne : )ere u sYrhu za<tite î oslu4itel)aš koļe su : )ere te: el)ene na î roc)eni oî terećen)a usli)ed Yibraci)a ti)eko: stYarnih uY)eta kori<ten)a jî rito: : orate obratiti î ozornost na sYe sastaYne di)eloYe ciklusa radaš î ri: )erice razdobl)a u koļi: a )e električni alat iskl)učen i onaš u koļi: a )e ukl)učen ali radi bez oî terećen)a×e
Sigurnosne napo6 ene
OYa) od|el|ak obrađu)e osnoYne sigurnosne naî o: ene î riliko: uî orabe uređa|ae
OPRE(

RPO( ORENJEý Mogućnost stru) nog udara! Ne otYarati kući<te î roizYoda!
( naLenje sigurnosnih napo6 ena
2ff1/a2/EF •4 2f 1a/3f /ER •4 2fff /1a/EF &42ff 5/88/EF •4 2f 11/l 5/ER &4úERt42f 15/8l 3
Gore oî isan î red: et iz)aYe u skladu )e s DirektiYo: ț ; ZZ/6z/E • Euroî skog î arla: en-ta i wi)eća od 8e liî n)a ț ; ZZe O ograničaYan)u uî orabe određenih oî asnih tYari u elek-trično) i elektroničko) oî re: ie
Curățareaaeeeeeeeeeeeeeeeeeeeeeeeeeeeeeeeeeee 1 3t
Între*inereeeeeeeeeeeeeeeeeeeeeeeeeeeeeeeeeeeee 3t
Deî ozitareaaeeeeeeeeeeeeeeeeeeeeeeeeeeeeeeee33
SerYice-Centereseeeeeeeeeeeeeeeeeeeeeeeeeeeeeee36
9: ↑ ortatoreeeeeeeeeeeeeeeeeeeeeeeeeeeeeeeeeeeeeee 36
k Duză-wario-Standard
Z7 Duză-wario-Standard
Z8 Buton deblocare
z Lance 9ZZ; 4z39
2ffl /a2/EF •4 2f 1a/3f /ER •4 2fff /1a/EF &42ff 5/88/EF •4 2f 11/l 5/ER &4úERt42f 15/8l 3
O5omnRe5Bov50 f O TooBOv5OBO/
π-Ef OTRexf ooBEeeeeeeeeeeeeeeeeeeeeeeee 4;
-e/ReTeeeeeeeeeeeeeeeeeeeeeeeeeeeeeeeeeeeeeeee 4;
OnEoOf Ee f O φόf 5ôEEBeeeeeeeeeeeeee4Z
Texf Eñeo5E TOff Eeeeeeeeeeeeeeeeeeeeeeeee 4Z
B5RI ñBOf eeeeeeeeeeeeeeeeeeeeeeeeeeeeeeeeeeeee 48
-e5bof eBe -ОбоВОеeeeeeeeeeeeeeeeeeeee49
ОбезвъзТóшOf eeeeeeeeeeeeeeeeeeeeeee † 49
GπE-Of e f O e5οπRoOBOôEveeeeeeeeeeee49
GbX-Of ef Eeeeeeeeeeeeeeeeeeeeeeeeeeeeeeeeee z;
HomEf ORf of On-ежef Ee U
eeeeeeeeeeeeeeeeeeeeeeeeeeeeeeeeeee3; DwD\~S z; DHz
HomEf ORf O мощf ooB P eeeeeeeeeeeee Z8; ; Dg
ДъRжEf O M-ежовE 30x-Of вОщ 506eR
eeeeeeeeeeeeeeeeeeeeeeeeeeeeeeeeeeeeeeeeeeeeeeeeeeeeeeeeeeeeeeeeeeeeeeeeeeeeeeeeeeeeeeeeeeeeeeeeeeeeeeeeeeeeeeeeeeeeeeeeeeeeeeeeeeeeeeeeeeeeeeeeeeeeeeeeeeeeeeeeeeeeeeeeeeeeeeeeeeeeeeeeeeeeeeeeeeeeeeeeeeeeeeeeeeeeeeeeeeeeeeeeeeeeeeeeeeeeeeeeeeeeeeeeeeeeeeeeeeeeeeeeeeeeeeeeeeeeeeeeeeeeeeeeeeeeeeeeeeeeeeeeeeeeeeeeeeeeeeeeeeeeeeeeeeeeeeeeeeeeeeeeeeeeeeeeeeeeeeeeeeeeeeeeeeeeeeeeeeeeeeeeeeeeeeeeeeeeeeeeee z D:
KROo f O 3OшЕВО
еeeeeeeeeeeeeeeeeeeeeeeeeeeee回D99 jТвойf OBO E3oROôEvx
BET 30щEBO qXz
Te/Ro 7SzDkg
ДъRжEf O f O мО-5óñO 30 вEoo5o f ORv/O-f e eeeeeeeeeeeeeeeeeeeeeeeeeeeeeeeeeeeeeeeeeeeeeeeeeeeeeeeeeeeeeeeeeeeeeeeeeeeeeeeeeeeeeeeeeeeeeeeeeeeeeeeeeeeeeeeeeeeeeeeeeeeeeeeeeeeeeeeeeeeeeeeeeeeeeeeeeeeeeeeeeeeeeeeeeeeeeeeeeeeeeeeeeeeeeeeeeeeeeeeeeeeeeeeeeeeeeeeeeeeeeeeeeeeeeeeeeeeeeeeeeeeeeeeeeeeeeeeeeeeeeeeeeeeeeeeeeeeeeeeeeeeeeeeeeeeeeeeeeeeeeeeeeeeeeeeeeeeeeeeeeeeeeeeeeeeeeeeeeeeeeeeeeeeeeeeeeeeeeeeeeeeeeeeeeeeeeeeeeeeeeeeeeeeeeeeeeeeeeeeeeee7D:
PO6oBf o f ORv/Of e jp ^x eeeeeeeeeeeeeeeee 9DMqa
MO5oe TopóoBEmo f ORv/Of e jp. ax ^x
Z3SzDMqa
Z > EoBoReBf O T -ъж50 9ZZ; 48† 4
3 > oñEoBbOщO E/RO f O TI 3OBO 9ZZ; 3736
8 Резе-во0- 30 поёЕоВВОЩ п-епО-ОВ 9ZZ; z6; 7
Z7 GBOf TO-Bf O BO-Eo TI 30 9ZZ; z6; 8
| Позиция No Наименование Поръч-ков No |
| Z9 Тó-бо-ф-езо зо зомъ-оввOf Ev 9ZZ; 4z4; |
| † ; § † Z Åъ-зоТейоввОщо В-ъбf о оъeTEf ef Ee зо /-OTEf o5E м0--5óñ§ HO5-Ойf E5 о ôeT50 | 9ZZ; 6Z8‡ |
| † 3 KoReRO j‡ × 9ZZ; z6; z |
| † 4 MO-5óñ зо вЕоо5o f ORv/Of e§ 7D: 9ZZ; z6; 6 |
| † z GB-óйf E5 9ZZ; 4z39 |
U' &t Πž'. t . eeeeeeeeeeeeeeeeeeeeeeeeeeeeeeeee z7
í a#&y#CNt i a&Füx#vPCheeeeeeeeeeeeeeeee z8
pal v&N, I C#CNP. #&F&N, eeeeeeeeeeeeeeeee z8
Ct NCi aP Cheeeeeeeeeeeeeeeeeeeeeeeeeeeeeeeeeeeee z8
U&Püvüt úKáüi C NC&t úKáüi Ceeeeeeeeeeet z9
e† NCith bét . † a ia&Füx#γPC F. h
† x† Παxt heeeeeeeeeeeeeeeeeeeeeeeeeeeeeeeeeeee z9
Füxheeeeeeeeeeeeeeeeeeeeeeeeeeeeeeeeeeeeeeeeeeeeeeeee 63
o. K&üx#γPC F#üNüδüt PCh va#üüeee † 63
pü' üBéF. t . t xt Paxt heeeeeeeeeeeeeeee 64
U' &i üyt ' #üt C#Ft KCFüheeeeeeeeeeeeeeet 64
r xvC#Küi žγ. † . ΠC&
C' üt xvC#Küi žy. † .
' #üt C#Ft KCFüheeeeeeeeeeeeeeeeeeeeeeeeee 64
r xvFt #. t . eeeeeeeeeeeeeeeeeeeeeeeeeeeeeeeeeee 68
e' übt Paxt . eeeeeeeeeeeeeeeeeeeeeeeeeeeee 68
Z9 Uæ, #F. KC ΠCBC#&t Küú turbo 9ZZ; 4z4;
t ; s t Z pCl xt úvδat Küh γδC i , t Fäll ü Plt ' üxS y vbaKC t t FCh 9ZZ; 6Z8t
1 3 p#ül üP jt x 9ZZ; z6; z
14c, t F&l ü xh.ith 'Pat . hS 7D: 9ZZ; z6; 6
ł z d, v. aΠFżæax† . h 9ZZ; 4z39
FSC
www.fsc.org
MIX
Paper from
responsible sources
FSC® C142184

FSC
www.fsc.org
MIXTE
Papier issu
de sources
responsables
FSC® C142184