Espresso Gourmet 1820 - Coffee machine CASO - Free user manual and instructions
Find the device manual for free Espresso Gourmet 1820 CASO in PDF.

| Product type | Espresso coffee machine |
| Brand | CASO |
| Model | Espresso Gourmet 1820 |
| Power supply | 220-240 V, 50 Hz |
| Main functions | Espresso preparation (1 or 2 cups), pod coffee, milk froth, hot water |
| Pump pressure | 15 bar |
| Water tank capacity | 1.2 L |
| Housing material | Stainless steel and plastic |
| Safety | Automatic shut-off after 30 min, overheat protection, child safety (lock) |
| Maintenance | Regular cleaning, descaling after 500 cycles |
| Included accessories | 3 filters (1 cup, 2 cups, pods), tamper, measuring spoon, stainless steel milk jug |
| Warranty | 24 months |
| Pressure gauge | Yes, to control brewing pressure |
| Steam wand cleaning | Automatic rinse after each use |
| Water quantity adjustment | Yes, programmable for 1 or 2 cups |
Frequently Asked Questions - Espresso Gourmet 1820 CASO
User questions about Espresso Gourmet 1820 CASO
0 question about this device. Answer the ones you know or ask your own.
Ask a new question about this device
Download the instructions for your Coffee machine in PDF format for free! Find your manual Espresso Gourmet 1820 - CASO and take your electronic device back in hand. On this page are published all the documents necessary for the use of your device. Espresso Gourmet 1820 by CASO.
USER MANUAL Espresso Gourmet 1820 CASO
1 General 23
1.1 Information on this manual 23
1.2 Warning notices 23
1.3 Limitation of liability 24
1.4 Copyright protection 24
2 Safety 24
2.1 Intended use 24
2.2 General Safety information 25
2.3 Sources of danger 26
2.3.1 Danger of burns 26
2.3.2 Dangers due to electrical power 27
3 Commissioning 27
3.1 Packaging safety information 27
3.2 Delivery scope and transport inspection 28
3.3 Unpacking 28
3.4 Setup location requirements 28
3.5 Electrical connection 28
3.6 Warning notices 29
4 Design and Function 29
4.1 Overview 29
4.2 Control Panel 30
4.3 Appliance display manometer 30
4.4 Rating plate 30
5 Operation and Handing. 31
5.1 Before first use 31
5.2 Tips / recommendations for preparation 32
5.3 How to prepare espresso (espresso and caffe doppio) 32
5.4 How to prepare coffee using pads 33
5.5 How to froth milk 33
5.6 Adjusting the water quantity for the espresso function 34
6 Cleaning and Maintenance 35
6.1 Safety information 35
6.2 Cleaning 35
6.3 Dcscaling 36
7 Troubleshooting 36
7.1 Safety notices 36
7.2 Troubleshooting table 37
8 Disposal of the Old Device 38
8.1 Disposal of the packaging 39
9 Guarantee 39
1General
Please read the information contained herein so that you can become familiar with your device quickly and take advantage of the full scope of its functions.
Your Coffe maker will serve you for many years if you handle it and care for it properly.
We wish you a lot of pleasure in using it!
1.1 Information on this manual
This user's guide is part of the CASO Espresso Gourmet (referred to hereafter as the Device) and provide you with important information for the initial commissioning, safety, intended use and care of the device.
The Operating Instructions must be available at all times at the device. This Operating Manual must be read and applied by every person who is instructed to work with the device:
Commissioning, Operation,
- Troubleshooting and/or - Cleaning
Keep the Operating Manual in a safe place and pass it on to the subsequent owner along with the device.
1.2Warning notices
The following warning notices are used in the Operating Manual concerned here.

DANGER
A warning notice of this level of danger indicates a potentially dangerous situation. If the dangerous situation is not avoided, this can lead to death or serious injuries.
Observe the instructions in this warning notice in order to avoid the danger of death or serious personal injuries.

WARNING
A warning notice of this level of danger indicates a possible dangerous situation. If the dangerous situation is not avoided, this can lead to serious injuries.
Observe the instructions in this warning notice in order to avoid the personal injuries.

ATTENTION
A warning notice of this level of danger indicates a possible dangerous situation. If the dangerous situation is not avoided, this can lead to slight or moderate injuries.
Observe the instructions in this warning notice in order to avoid the personal injuries.
PLEASE NOTE
A notice of this kind indicates additional information, which will simplify the handling of the machine.
1.3 Limitation of liability
All the technical information, data and notices with regard to the installation, operation and care are completely up-to-date at the time of printing and are compiled to the best of our knowledge and belief, taking our past experience and findings into consideration. No claims can be derived from the information provided, the illustrations or descriptions in this manual. The manufacturer does not assume any liability for damages arising as a result of the following:
Non-observation of the manual
Uses for non-intended purposes
- Improper repairs
- Technical alterations, modifi cations of the device
- Use of unauthorized spare parts
Modifications of the device are not recommended and are not covered by the guarantee. All translations are carried out to the best of our knowledge. We do not assume any liability for translation errors, not even if the translation was carried out by us or on our instructions. The original German text remains solely binding.
1.4Copyrightprotection
This document is copyright protected.
Braukmann GmbH reserves all the rights, including those for photomechanical reproduction, duplication and distribution using special processes (e.g. data processing, data carriers, data networks), even partially.
Subject to content and technical changes.
2Safety
This chapter provides you with important safety notices when handling the device. The device corresponds with the required safety regulations. Improper use can result in personal or property damages.
2.1 Intendeduse
This device is only intended for use in households in enclosed spaces for
- Preparation of coff ee/espresso using freshly ground coff ee/espresso beans,
- Preparation of coff ee/espresso using coff ee/espresso pads,
- Preparation of hot water using the hot water/ steam wand and
- Frothing of milk using the hot water/ steam wand.
This appliance is intended to be used in household and similar applications, such as:
- in kitchens, for employees in shops, offices and other commercial areas,
in farms, - by customers in hotels, motels and other similar residential environments,
- in bed and breakfast establishments.
Uses for a different purpose or for a purpose which exceeds this description are considered incompatible with the intended or designated use.

WARNING
Danger due to unintended use!
Dangers can emanate from the device if it is used for an unintended use and/or a different kind of use.
Use the device exclusively for its intended use.
Observe the procedural methods described in this Operating Manual.
Claims of all kinds due to damages resulting from unintended uses are excluded. The User bears the sole risk.
2.2 General Safety information
PLEASE NOTE
Please observe the following general safety notices with regard to the safe handling of the device:
Use the appliance only as described in the user's guide to avoid possible injury from misuse.
This device may be used by children aged 8 and above, if they are supervised or have been instructed at to the safe use of the device and have understood the resulting hazards.
- Cleaning and maintenance by the user must not be performed by children unless they are at least 8 years old and are supervised.
The device and its connecting cable must be kept away from children who are less than 8 years old.
This appliance can be used by persons with reduced physical, sensory or mental capabilities or lack of experience and knowledge if they have been given supervision or instruction concerning the use of the appliance safely and they understand the hazards involved.
Children are not allowed to play with the device.
Operate the appliance only in dry indoor areas.
Do not operate the appliance unattended.
Do not use the appliance:
- if the appliance itself or parts are damaged,
- if the power cord or plug is damaged,
- if the appliance has been dropped.
Always unwind the power cord completely before use. When doing so, ensure the power cord is not damaged by sharp edges or hot objects.
PLEASE NOTE
Pull the plug out of the socket:
- when you are not using the appliance,
- after each use,
- before cleaning the appliance or putting it away,
- if there is an obvious malfunction during operation,
during a thunderstorm.
Do not make any modifications to the appliance or the power cord.
Only have repairs carried out by a specialist workshop, as appliances that have not been repaired properly endanger the user. Please also observe the enclosed warranty conditions.
- Place the appliance on a stable, level surface. Ensure sufficient distance between the appliance and strong heat sources such as hotplates, heating pipes, etc.
- Do not clean the appliance with hard, scratchy or abrasive cleaning agents such as steel wool or similar.
The appliance's water tank lid must be kept closed during operation.
Defective components must always be replaced with original replacement parts. Only such parts will guarantee that the safety requirements are fulfilled.
Only use the device with original accessories.
2.3 Sources of danger
2.3.1 Danger of burns
WARNING
Water which is heated in this appliance, the steam wand and the portafi Iter baskets and group head can become very hot. Please observe the following safety notices in order not to burn or scald yourself or others.
WARNING! The appliance's surfaces can become very hot during use. In particular the hot water/ steam wand, the cup warming tray, group head, the portafi liter baskets and the drip grid all become very hot.

WARNING
The steam wand emits hot steam when in use. Only touch the wand's handle.
- Never put your hand under the portafi liter or steam wand outlet spouts when the appliance is in use.
Always check the espresso's temperature before you drink it.
2.3.2 Dangers due to electrical power

DANGER
Mortal danger due to electrical power!
Mortal danger exists when coming into contact with live wires or subassemblies! Observe the following safety notices to avoid dangers due to electrical power:
If the power cord of this appliance is damaged, it must be replaced by the manufacturer or its customer service or a similarly qualified person in order to avoid hazards.
- Do not open the housing on the device under any circumstances. There is a danger of an electrical shock if live connections are touched and the electrical or mechanical structure is altered. In addition, functional faults on the device can also occur.
Do not immerse the appliance in water for cleaning.
WARNING! Risk of electric shock! Do not allow any liquid to run over the appliance connector.
3Commissioning
This chapter provides you with important safety notices during the initial commissioning of the device. Observe the following notices to avoid dangers and damages:
3.1 Packaging safety information

WARNING
Packaging materials may not be used for playing. There is a danger of suffocation.
3.2 Delivery scope and transport inspection
The device includes the following components:
- CASO Espresso Gourmet - 3 portafiter baskets (1 or 2 cups and for coffee pads)
- Tamper with wooden handle - Stainless steel measuring spoon
Stainless steel milk pitcher Quick guide - Operating manual
PLEASE NOTE
Examine the shipment to ensure the unit and manual are included and inspect the unit for any visible damage.
- Immediately notify the carrier and/or the supplier about an incomplete shipment or any damage as a result of inadequate packaging or mishandling.
3.3Unpacking
Carefully remove the packaging material and unit from the carton. Remove the protective film from the unit.
PLEASE NOTE
If possible, keep the original packaging for the duration of the guarantee period in the event a return is necessary.
3.4 Setup location requirements
In order to ensure the safe and trouble-free operation of the device, the setup location must fulfil I the following prerequisites:
- Only use this coffee maker on a flat, stable, heat-resistant surface away from water splashes and any heat sources.
- Choose the setup location in such a way that children cannot reach any hot surfaces on the device.
- Do not operate the device under delicate furniture as the escaping steam could damage them.
- Do not set up the device in a hot, wet or extremely damp environment or near flammable material.
- The electrical socket must be easily accessible so that the power lead can be disconnected easily, in the case of an emergency.
- The installation and assembly of this device in non-stationary setup locations (e.g. on ships) must be carried out by specialist companies / electricians, provided they guarantee the prerequisites for the safe use of this device.
- The device shall not be placed in a cabinet while it is in operation.
3.5 Electrical connection
In order to ensure the safe and trouble-free operation of the device, the following instructions must be observed for the electrical connection:
-
Before connecting the device, compare the connection data (voltage and frequency) on the rating plate with those of your electrical network. This data must agree in order that no damages occur in the device. If in doubt, ask your qualified electrician.
-
The connection between the device and the electrical network may employ a 3 meter long (max.) extension cable with a cross-section of 1.5mm^2 . The use of multiple plugs or gangs is prohibited because of the danger of fire that is involved with this.
Make sure that the power cable is undamaged and has not been installed under the device or over hot or sharp surfaces. - The electrical outlet must be protected by a 16A safety cut-out switch.
- The electrical safety of the device is only guaranteed if the device is connected to a properly installed protective conductor system. If in doubt, have the house installation checked over by a qualified electrician. The manufacturer cannot be made responsible for damages that are caused by a missing or damaged protective conductor.
3.6Warning notices

ATTENTION
Danger due to hot surface!
Do not touch the hot surfaces of the device. Danger of burns!

4 Design and Function
This chapter provides you with important information of the design and function of the device.
4.1 Overview

DE
EN
FR
ES
NL
RUS
PT
TR
SE
1 Portafili ter basket for coff ee pads
2 Portafili ter basket for 1 cup
3 Portafiliterbasketfor2cups
4 Portafllter
Drip grid
⑥ Drip tray
7 Manometer
8 Operating buttons
9 Cup warming tray
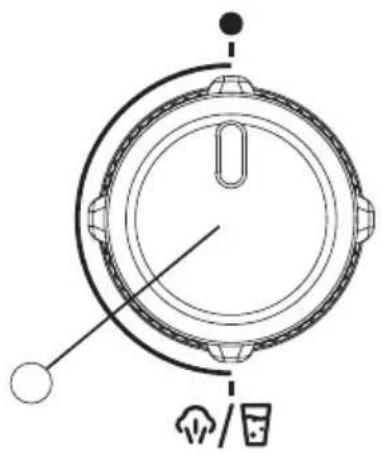
10 Control knob for steam/ water dispensing
11 Water tank lid
12 Water tank handle
13 Water tank
14 Group head
15 Steam wand handle
16 Steam wand
17 Milk pitcher
18 Tamper
19 Measuring spoon
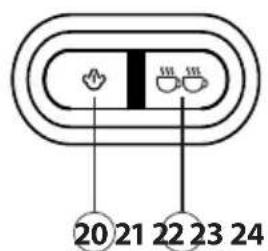
4.2 Control Panel

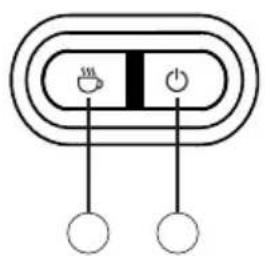
20 Button: Steam
2128 button: 2 cups
22 Button: 1 cup
23 Button: On/Off
Control knob for hot water/steam wand
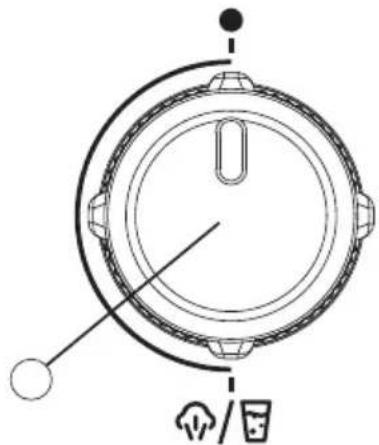
4.3 Appliance display manometer
The appliance has a manometer which shows the brewing pressure when preparing beverages. The brewing pressure depends on the amount of coffe grounds which are used and how firmly they are pressed down with the tamper. Depending on your personal preference, the brewing pressure can be adjusted by changing the amount of coffe grounds which are used and how firmly they are pressed down with the tamper.
4.4Ratingplate
The rating plate with the connection and performance data can be founded beneath the device.
5 Operation and Handing
This chapter provides you with important notices with regard to operating the device. Observe the following notices to avoid dangers and damages:

WARNING
Caution hot steam can escape at device. Risk of burns.
Do not leave the device unsupervised when it is in operation, so that you can intervene quickly in the event of dangers.
Always insert the portafi Iter before you use the appliance.
Do not fill hot water into the watertank.
The steam wand emits hot steam / hot water when in use. Only touch the wand's handle.
Never put your hand under the portafi liter or steam wand outlet spouts when the appliance is in use.
5.1 Before first use
Clean the appliance and accessories as described in the "Cleaning and care" section. You should also carry out a brewing process without coffe grounds as part of the cleaning process.
- Insert the drip grid in such a way that the red float can protrude out of the opening in the drip grid.
- Open the water tank lid, remove the water tank using its handle, remove the red plug on the appliance housing under the water tank and fill the tank with water up to the "MAX" mark. Replace the water tank into the appliance.
- Place the portafi liter on the appliance's group head, align the portafi liter to the "mark and then turn it anti-clockwise to the " position.
- Place a large cup on the drip grid. Make sure that the control knob for steam/water dispensing is set to the vertical position ("Off" position).
- Plug the appliance into the power socket and press the "ON/OFF" button.
- An acoustic signal will sound and the buttons will flash. The appliance will begin to heat up.
- The buttons will stop flashing as soon as it reaches its operating temperature and is ready to use.
- Move the steam wand to the side. When doing so, only touch its handle.
- Place a sufficiently large, empty container under the steam wand and turn the steam/water dispensing knob downwards in an anti-clockwise direction.
- Wait until water comes out of the wand and then turn the knob upwards to stop steam/water dispensing.
- Press the button.
- The appliance will begin the brewing process and stop automatically when the process is finished.
- Pour away the water in the cup.
- You can now use the appliance as you wish.
PLEASE NOTE
The appliance may make some noises the first time it is used. This is normal as it is releasing any air which is trapped inside it. The noise will stop after a short time.
5.2 Tips / recommendations for preparation
- We recommend using around 7g of coffe groundsto prepare one espresso (20 to 30~ml ). You will need around 14g of coffe grounds for two cups or a double.
espresso (40 to 60~ml - The coffee beans should be very finely ground. Use a coffee grinder which is suitable for espresso coffe to grind the beans.
- The coffee grounds must be pressed down firmly into the portafilter basket - i.e. they must be evenly tamped. Use the tamper to press the coffe ground down evenly, vertically and firmly.
It is important that your appliance, your portafilter and the cup are correctly heated before the brewing process begins to ensure that the water does not cool down. - The ideal pressure for espresso preparation is 9 bar. The recommended pressure of 8 to 10 bar is based on a deviation of one bar above or below this figure.
Cups should always be pre-warmed to ensure a perfect espresso. Store your cups upright on the appliance's cup warming tray. Be careful when you touch the cup warming tray as it becomes very hot. When grinding your coffe beans make sure that they are finely ground. If the beans are ground too coarsely, this will result in the espresso having a bitter aroma.
- Fill the water tank with fresh tap water up to the "MAX" mark.
- Make sure that the control knob for steam/water dispensing is set to the vertical position ("Off" position).
- Turn the appliance on and wait for it to heat up and for the symbols on the buttons to stop flashing.
- Place the portafi liter with the basket for your desired cup volume on the appliance's group head. Following this, align the portafi liter to the "O" mark and turn it anticlockwise to the "O" position. When doing so, hold onto the side of the appliance or the water tank.
- Place the desired cup/s on the drip grid under the outlet spout.
- To warm the portafi liter, basket, cup/s and group head, dispense the desired amount of water by selecting " 艹 " for one cup or " 艹 " for two cups.
- Following this, pour away the water and repeat the process again.
- Remove the portafiter by turning it in the opposite direction
- Remove the fi Iter basket from the portafi Iter by levering it out with a spoon. Warning! The portafi Iter and basket will be very hot!
- Dry the basket thoroughly and carefully insert it into the portafi Iter.
- Use the measuring spoon to evenly spread the freshly ground coffe into the desired portafi liter basket. We recommend using digital scales to precisely measure the amount of coffe grounds, particularly when you first start using the espresso machine. Use approx. 7 g of coffe grounds for 1 cup and approx. 14 g for 2 cups (1 heaped measuring spoon = approx. 7 g).
- Gently tap the portafi liter on the work surface or a tamping mat to spread the coffe e grounds as evenly as possible, thus ensuring that they are well compacted.
- Use the tamper to press the coffe grounds down evenly and vertically. When doing so, pay attention to the "MAX" marking on the portafi Iter.
- Skim off any excess coffe grounds from the edges of the portafi Iter.
-
Place the portafi liter on the appliance's group head and then turn it to "□" to attach it.
-
Place the desired number of cups (one or two) on the drip grid under the outlet spout.
- Select" for one cup or for two cups.
- The brewing process will begin in a few seconds and the selected button will flash.
- The appliance automatically stops the brewing process when it is fi nished.
- To remove the portafi ler from the group head, turn it away from the appliance to the "G" position.
- Place the portafi iter on the drip grid to cool down. The spout on the group head is designed to fit into the two notches on the drip grid for this.
- Remove the fi Iter basket from the portafi Iter by levering it out with a spoon.
- Make sure that you remove all coffe ground from the fi Iter basket after each use and clean it thoroughly under running water.
- Before drinking your espresso we recommend stirring it with a spoon to release all its aromas.
PLEASE NOTE
If there is no water in the water tank when you start the brewing process, then the ON/OFF button will flash and the appliance will not operate.
The appliance will automatically turn itself off after approx. 30 minutes.
Empty the drip tray regularly and/or when you see the red float protruding out of the opening in the drip grid.
5.4 How to prepare coffe using pads
Prepare the coff ee as described above but use a coff ee pad instead of freshly ground coff ee. When preparing coff ee with pads, use the portafi iter basket without the "MAX" marking on the inside and with the "pad" lettering on the outside. Make sure that the coff ee pad is completely inserted into the fi Iter basket before attaching the portafi iter to the device.
PLEASE NOTE
Do not use the tamper to press the coffe pad down.
5.5 How to froth milk
To make perfect frothed milk the milk should first be cooled. Please note that the consistency of frothed milk will vary depending on the temperature, type of milk or its fat content. Only use milk or plant-based milks such as soy milk. Please note that not all plant milks are suitable for frothing.
- When filling the milk pitcher with cold milk, do not fill it beyond the maximum 120 ml mark as the milk could otherwise boil over during frothing.
- Make sure that the control knob for steam/water dispensing is set to the vertical position ("Off" position).
- Move the steam wand to the side. When doing so, only touch its handle.
- Press the " " button and wait until the symbol stops flashing.
- Place a sufficiently large, empty container under the steam wand and turn the steam/water dispensing knob downwards in an anti-clockwise direction. This will empty the pipes and water vapour will come out.
-
Wait for a moment until only water vapour is coming out and then turn off the knob.
-
Insert the steam wand into the milk at the pitcher's pouring spout, keeping the wand parallel to the milk, and then hold the pitcher parallel to the work surface. The steam wand should be kept just below the surface of the milk.
- Slowly turn the control knob downwards.
- Use your other hand to touch the bottom of the milk pitcher to check the milk's temperature.
- When the pitcher is warm and froth is rising to the surface, insert the steam wand further into the milk so that it cannot draw in more air. The milk should come to a rolling boil.
- Turn the control knob off when the milk pitcher is hot and the milk has the desired froth consistency.
- Do not remove the steam wand from the milk until you have turned off the knob.
- Gently shake the milk pitcher in circular movements before carefully tapping it on the work surface to remove any large air bubbles and evenly distribute the froth.
- Use a damp cloth immediately after this to remove milk residues from the steam wand. This will prevent the milk from baking on.
- You can now use the frothed milk to make your desired beverage, such as cappuccino.
- To do this, press the " " button again, hold another container under the steam wand and turn the control knob downwards to dispense hot water. The pipes will immediately be re-fi lled with water.
- Turn the control knob off again.
- You can now continue as described in the "How to prepare espresso" section.
PLEASE NOTE
Make sure that the milk does not get too hot and burn.
It is essential that you clean the steam wand every time you use it with milk. See the instructions in the "Cleaning and care" section for this.
5.6 Adjusting the water quantity for the espresso function
When preparing espresso you can individually set the water quantity in line with your preferences. The water quantity per cup can be set from approx. 50ml to approx. 100 ml. When making two cups, the appliance can be set to dispense between approx. 80ml and 210ml .
PLEASE NOTE
These quantities refer solely to the quantity of water which is dispensed during the process.
If you change this quantity, then you must also adjust the amount of coff ee grounds which you use. We recommend a brewing ratio of 1 to 2. In other words, two grammes of espresso will be extracted from every gramme of coff ee grounds. 18g of coff ee grounds will thus, for example, produce 36g of espresso.
Preparation of a perfect espresso depends on many factors, such as the grinder setting for the coff ee beans, how they have been roasted and the water temperature and quantity. It is therefore a matter of personal taste. After just a short time using the appliance you will have no problems preparing your personal perfect espresso.
- Prepare the appliance for use.
- Place one or two cups under the portafi Iter's outlet spout as desired.
- Press the desired "Number of cups" button for which you want to change the water quantity until the acoustic signal sounds.
- The adjustment process for the selected button has now been activated.
- Press the button again to start the brewing process.
- If you press the button again, this will stop the brewing process and the appliance will store this water quantity in its memory.
- To re-set the water quantity to the default setting, press the " " and "按钮" simultaneously until the acoustic signal sounds. If you now use the appliance with the standard setting, then it will dispense the pre-set water quantity.
6 Cleaning and Maintenance
This chapter provides you with important notices with regard to cleaning and maintaining the device. Please observe the notices to prevent damages due to cleaning the device incorrectly and to ensure trouble-free operation.
6.1 Safety information
ATTENTION
Please observe the safety instructions, before cleaning your device:
The device must be cleaned at regular intervals and limescale should be removed.
Pull out the mains plug before cleaning the device.
Do not submerse the appliance in water or other liquids and do not put it in the dishwasher.
The appliance's surfaces can become very hot during use. There is a risk of burns. Wait until the appliance has cooled down.
Do not use any aggressive or abrasive cleaning agents or solvents.
Do not scrape off stubborn dirt with hard items.
6.2Cleaning
Appliance
The appliance can be wiped with a damp cloth. Following this, dry it thoroughly.
Hot water/steam wand
Milk residues must be removed from the steam wand after each use. To do this, use the hot water function to rinse out the steam wand. Carefully remove the stainless steel sleeve from the steam wand by unscrewing its thread. Clean it thoroughly under running water. Wipe the steam wand thoroughly with a damp cloth. Make sure that the outlet hole at the bottom is always unblocked. Following cleaning, screw the stainless steel sleeve back onto the steam wand.
Group head
Clean the group head after each use. After removing the portafi liter, wipe the entire surface with a damp cloth to remove any coffe grounds. Re-attach the portafi liter minus the basket to the appliance and rinse the group head by carrying out a brewing process without coffe grounds.
Accessories
Remove coff ee grounds from the portafi iter basket or throw the used coff ee pad away. Wash out the basket, portafi iter, milk pitcher and measuring spoon thoroughly in warm water. Remove the drip tray regularly and rinse it and the drip gad thoroughly under running water. Following this, dry the accessories thoroughly.
6.3Descending
PLEASE NOTE
Regularly decalcifying of your device will reduce the electricity used and prolong the life of the device.
The guarantee excludes devices which have stopped working or do not work properly due to lack of descaling.
A descending warning will be given after approx. 500 cycles - all the symbols on the buttons will flash simultaneously 5 times. If you do not switch off the descending warning, it will then appear again every time you turn on the appliance.
- Fill the water tank up to the "MAX" mark with water and a commercially available descaling agent which is suitable for espresso machines. Read the instructions given on the descaling agent packaging for the correct mixing ratio.
- Press the " 品 " button to start a brewing process.
- Following this, pour away the water.
- Wait a few minutes and then repeat Steps 1 and 2 again.
- You should also descale the hot water/ steam wand.
- Dispense hot water until the steam wand stops automatically.
- Rinse the water tank carefully.
- Following this, fi ll it with fresh water (without descaling agent) and carry out at least 2 brewing processes before you use the appliance again with coff ee grounds.
- To delete the descending warning press the " ", " and " " buttons simultaneously for approx. 3 seconds.
7Troubleshooting
This chapter provides you with important notices with regard to operating the device. Observe the following notices to avoid dangers and damages:
7.1 Safetynotices
ATTENTION
Repairs of electrical appliances must be carried out by qualified person who are trained by the manufacturer.
Repairs performed by untrained persons may result in considerable hazards for the user and damage the machine.
7.2Troubleshootingtable
The table below will help you to locate and solve small problems.
| Problem Possible cause Possible solution | ||
| Water is leaking out of the bottom of the appliance. | The drip tray is full. Empty the drip tray. | |
| The water tank is not inserted into the appliance correctly. | Insert the water tank into the appliance correctly. | |
| The appliance is defective. | Remove the plug from the socket. Do not continue to use the appliance. Contact our Customer Service. | |
| Water is leaking out over the edges of the portafi liter. | The portafi liter has not been attached correctly. | Attach the portafi liter correctly. |
| There are some coffe ground on the edge of the portafi liter. | Remove the leftover coffe ground from the edges of the portafi liter. | |
| The appliance does not work. | The plug has not been inserted into the power socket correctly. | Insert the plug into the power socket correctly. Contact our Customer Service if the appliance still does not start after this. |
| Milk does not froth. | The steam wand is blocked. Clean the steam wand. | |
| The milk is not cold enough. | Use cold milk from the fridge. | |
| The"♂"and"♀"buttons are fl ashing quickly. | The turning knob was not turned off after using the hot water/steam wand. | Turn the knob upwards to the "Off " position. |
| The"♂" and "♀" buttons are fl ashing quickly. | The appliance's brewing temperature is too high. | Turn the control knob on and dispense some water into a container. |
| The"♂" button is fl ashing quickly. | The turning knob is still turned on 180 seconds after using the hot water/steam wand. | Turn the knob upwards to the "Off " position. |
| All the symbols on the buttons fl ash simultaneously 5 times. | The appliance must be descaled. | Descale the appliance. |
| The espresso is cold. | The appliance and thus the pipes inside it have not been pre-warmed. | Warm up the appliance as described in the "How to prepare espresso" section. |
| The cups have not been pre-warmed. | Pre-warm cups by placing them on the cup warming tray. | |
| No crema. | The espresso beans have been ground too coarsely. | Use fi ner grounds. |
| The grounds have not been tamped enough or incorrectly. | Press the grounds down more firmly. | |
| The espresso is too weak. | The espresso beans have been ground too coarsely. | Use fi ner grounds. |
| Not enough coff ee grounds. | Use more coff ee grounds. Reduce the quantity which is dispensed. | |
| The espresso is too strong. | The espresso beans have been ground too finely. | Use coarser grounds. |
| Too many coff ee grounds. | Use less coff ee grounds. Increase the quantity which is dispensed. | |
PLEASE NOTE
If you cannot solve the problem by carrying out the steps described above, our Customer Service will help you free of charge.
Clean the device before you send it to customer service.
Pour away the water which is left in the water tank and use the "steam function" to rinse out the residual water in the pipes. Push the red plug into the opening on the appliance housing under the water tank.
8 Disposal of the Old Device
Old electric and electronic devices frequently still contain valuable materials. However, they also contain damaging substances, which were necessary for their functionality and safety. If these were put in the non-recyclable waste or were handled incorrectly, they could be detrimental to human health and the environment. Therefore, do not put your old device into the non-recyclable waste under any circumstances.
PLEASE NOTE
Utilise the collection point, established in your town, to return and recycle old electric and electronic devices. If necessary, contact your town hall, local refuse collection service or your dealer for information.
Ensure that your old device is stored safely away from children until it is taken away.
8.1 Disposal of the packaging
The packaging protects the device against damages during transit. The packaging materials are selected in accordance with environmentally compatible and recycling-related points of view and can therefore be recycled. Returning the
packaging back to the material loop saves raw materials and reduces the quantities of accumulated waste. Take any packaging materials that are no longer required to "Green Dot" recycling collection points for disposal.

9Guarantee
We provide a 24-month guarantee for defects caused by production or material faults, beginning on the date of purchase. Our guarantee is valid for Germany, Austria and the Netherlands. For all other countries, please contact us.
Your legal guarantee claims as per Art. 437 ff. German Civil Code (BGB) will remain unaffected by this. You may exercise your statutory guarantee rights free of charge. The guarantee does not cover damage caused by improper handling or use of the product or defects which have only a minor impact on the product's functionality or value. In addition to this, the guarantee also excludes parts which are subject to wear and tear; transport damages insofar as we are not responsible for them and damages caused by repairs which were not carried out by us.
This product has been constructed for non-commercial use (domestic use) and its performance is designed to meet the corresponding needs. The guarantee only covers commercial use insofar as it is comparable to domestic use. The product is not intended for any other type of commercial use.
In the case of legitimate complaints we may either repair the defective product or replace it with a defect-free product at our discretion. Obvious defects must be notified to us within 14 days of the product's delivery. Any further claims are excluded.
When making a guarantee claim please contact us before you return the product (always with the purchase receipt!). Our contact details ("Guarantor") are provided at the beginning of this instruction manual.
Table des matieres
1.3 OrpaHnueHne OTBETCTBeHHOCTN
Bce copejkaunecB daHHom PykoBoDCTBe no 3KcnnyatauN Texnueckne CbeDeHn, daHHbIe N yKa3aHnNo yCTaHOBKe, nCnoJIb3OBAHIO uYxOy 3a np6Opom aKtyaJIbHbHa MOMeHT neaTn UyNTbIAOT BeCb HaU ONbl T 3HaHn. CbeDeHn, pncyHKn INOCaHn, copejkaunecB daHHom PykoBoDCTBe NO 3KcnnyatauN, He MOrTy RAJIaTbc8 OCHOBAHnEM dJa KaKnx-JIn6o IpTeH3n. PpOn3BOJnteJIb He Hecet OTBcETBcHHOCTN 3a yUep6, BO3HNKUn BCJeDCTBVE:
- Heco6nIOeHn yKa3aHn, coepXaunxCB PykoBOcTBe nO kcnnyatau,
- nCNoJIb3OBaHnI npi6Opa He no Ha3HaueHnIO,
- HenpaBnIbHoro peMOHTa,
- TexHnueckx n3MeHeHn, MoDnΦnKauN niPn6opa,
- INCNoJIb3OBAHnI Hepa3peUeHHbIX 3aNuaCTeI.
MoDnΦkaun npnbopa He peKOMeHnyoTcN He NOKpbBaIoTc rapaHTnei.
IpebeoD ocuieCTBnaeTcra cambIM do6pocOBecTHbIM 6pa3OM. OHaKO mbI He Hecem OTBeTCTBeHHOCTn 3a Own6Kn B nepeBoJe, daKe ecIn nepeBoi 6bl BbIOJHeH Hamn nn IIO HaSeMy 3aKa3y. HauN 68aTeNbCTBa OrpaHnUBAIoTcra TOnbKO INCXODHbIM HemeKIM TEKCTOM.
1.4 3aunTa aBTopcKOr npaba
I P E D O C T E P E X E H N E
yanaKOBouHbI MaTePnAbI He npEHa3HaueHb I nrgbl. CyueCTByeT onaCHoctb yduBja.
3.2 06bem nocTaBkn n npOBepka nocJe TpaHcnpTnpoBkn
B cTaNdapThbI o6bem nocTabKn npnbopa BXoJrT CneJeUOuNe KOMnHOHeTbI:
- CASO Espresso Gourmet
- 3 Φильтугюцих лемента (1 поуашки и кофейнble Таблелки)
TempeCdepeBHHnoyko
-Порцонная loЖа n3 Нржавошс сталn - MoIouHnK n3 HepXkaBeIOuSei cTaJIi
-KpaTKoe pyKOBOdTO BO NO 3KcNpyTaunn
-PykoBoDCTBO NO 3KcPnyaTaun
ПРИМЕЧАНС
PpOBepeTe nocTaBky Ha npEaMeT KOMnIeKTHoCTn HaNuYBaNIMbIX NOBpeXdHn.
Cpa3y coo6uHTe 3KcneHITOpY, CtpaxOBoN KOMnAHn N NOCTaBUNky O HenoJHOI NOCTaBKe IINIOBpeXdEHNx BCJeCDTBnE HeyIDOBtBOpNTbHOJ yNaKOBKn IIN TpaHCnOPTIPOBKN.
3.3PacnaKobKa
Дя распakOBк npибopa n3BneKeTe ero n3 Kopo6Kn ydaJIte ynaKOBOчьm MaTePnAn. ChIMnte 3aunTHyU pIeHky c yCTpoiCTBa.
ПРИМЕЧАНЕ
EcnB03MOxHOb, coXpaHnIe opnHnHaJIbHyIO yNaKOBky B TeueHne rapaHTnHoro nepnoJa np6Opa, uTo6bI B rapaHTnHOM clyuae cHOBA MoXHO 6blIO yNaKOBaTb np6Op HndJeKaUIM o6pa3OM.
3.4Tpe6obHЯ K MeCTy yCTaHOBKn
Дя надекнои 6e3урpeчнoi pa6oТы пибopa MeCTO yCTaHOBKNdoJXHO OTBeuaTb cIeDyUOuM Tpe6ObaHnAМ:
- Pa3meaTe np6op TOnbKO Ha NIOCKO, yCTOuNBOI, kApOpnpOuHO pa6oey IOBepxHOctn BdaJIOn OT 6pbI3r BObl N IIO6bIX NCTOuHKnOB TeIIa.
- BbIbpaIte MeTo pa3MeueHn np6opa TaKIM o6pa3OM, UTO6bl DeTn He MoTIN DoTaNtBcA DO TROPaUx NOBepxHOCTe np6opa.
He nCnoB3yIte npIbOp noI HeTePmOcTOnKo Me6eJIbIO, NoCKoJIbKy BbIXOJaI npap MoJKe T NOBpeDITb ee.
He pa3meuante np6op B ropeyen, cbpoi nn ouehb BlaXhoI cpee, a taKxe B6n3n IerkoBocPnaMeHIOxxCra MaTePnaIOB. - YctaHOBky u MOHTaK npu6Opa Ha NOdBxHbIX MeCTax yCTaHOBKn (HaNPmep, Kopa6Jx) pa3pe7aetc BblONHrTb TOnbKO CneuaJIIN3nPOBaHHbIM npeInpraTnM/ cNeuaJIInCTam, eCNI OHN CMoYr OBeCneUrH Heo6XoDnMbIe ycNoBnI dJa 6e3OpacHOrO nCnoNb3OBaHnI npu6Opa.
He octabnIte npu6op B wkafo BVpeMa ero pa60tbl.
3.5 Побкlio ueHne KəJIeKtpocetn
IЯ obecneueHn 6eONacHoi n 6epepe6oHoi pa6Otb np6bopa npn noKIOUeHn K cetn Heo6xOdmo co6IouaTb HIXepeuNCHeHbIe yKa3aHnA:
- Прждуем покючьnpбopК сети,сравнite Тхиескne napametpbi пдкюченя (нарразжени и часту) на заюckо tabлочke прбopa c Тхиескимп.apametрамВашев сети.Bo n36жане nobржденпрбopa этNi пapametрbldoлжны COBпады.При BOЗнknOBeHи BONpocob cledehyet прOKHCyJBtupOBaTBСС KBaINФИцИРOBaHHbIM эЛeКТPNKOM.
- Покльецни рпбора К лесгосту Должно Вьлонятбсс C NOMOцью MaKcIMyM 3-MetpoBOrO, pa3mOTAHHOrO ydlnHHTeJbHOrO Ka6eЯ C nonepueHbIM ceehnem 1,5 MM². ИспьзOBaHne MHorOKoHTaKTHbIx WTeNCEJIbHbIX pa3beMoB nII NcTeBbIX pa3BeTbNTeNe 3anpeSeHO NO прUnHHe CBa3aHNo C 3TNM ONaCHOCTN NOXapa.
- YdOCTOBepbTecb, yTO Ka6eNb NITaHnI He NOBpeXJen I He nepe6poUeH uepe3 ropaue n/nnIOCTpOKoHeHbIe NOBepxHOCTn.
- Po3eTkaДолжна Иметь прEOxpaHnTeIb He MeHee 16A, OTdJIbHbI OТpyrnx Notpe6nteIeTOKa.
- 3neKtpueckaj 6e30nacHocTb np6opa MoKeT 6bItb o6ecneueHa TOnbKO B TOM cnUyae, ecn OH nOJKnUoyeh K ceni 3aunTbI, yCTaHOBLeHHoB B COOTBeTCTBnC DeiCTByuUMn npednncAHm. NtTaHne OT po3etkn 6e3 3aemJeHHa 3anpeHc. B cnUyae comHeHn npirIacnte KbannuOpBaHHoro 3neKtpka, KOtOpbl npOBepNT BHyTpEHIO npOBODky B MeCTe, rDe Bbl yCTaHaBnBAeTe np6op.
3.6PepdynpeDnTeNbHbIeyKa3aHn

BHIMAHHE
Onachoctb ot ropaynx nobepxhocte!
He npikacaiTecb K ropaym NOBepxHocTMy cTpoiCTBa. Onachoctb oXora!

4 UcTpoiCTBO n pa6Ota
B 308 rnaBe copejkaTcB baxHbIe yka3aHnI no yctpoiCTBy n pa6ote np6opa.
4.106üeemonmcannne

1 Φиьтуюши щлем ent Дя Кофейнов Табnettк.
2 Φиьтуюшй слем entдя 1чашки
3 Φиьтуюши щелемпдя 2 чашк
4 NopTaΦnIbTp
5 PeweTka noDoHa nIe c6opa KaIeJIb
6 POndoH dJa c6opa KapeJIb
7 MaHOMeTp
8 Khonkn ynpaBneHna
9 POnHoc dJa YaWeK
10 NOBOPHTbI peYJrTOp dJa BbIXOda npa/BOdbl
11 KpbIwka 6aUka IJIy BOJbI
12 Puyka 6auka nla BOdbI
13 BaoyokdnyBOdbI
14 Bapouha roIobka
15 Puyka Hacaikn nna npa
16 HacaKa nna npa
17 MoIouHnK
18 Temnep
19 POpuzoHna loXka
4.2 3neMeHTbI ynpaBHeHn

20 Khonka: nap
2124Honka:2aushkn
22 KhoIIka:1aWka
23 Khonka:Bk/BBIKn
O NobopoTHbI peRyJIaTOp IJa HacaIKn IJr ropaye BODbl /napa
4.3 Инданаць вannapate: MaHOMeTp
AnnapaT OchaueH MaHometpom, KOtOpBn NOKa3bIbAeT DaBHeHne npN 3aBapNBHn Kohe. DaBHeHne 3aBapNBaHn 3aBNCIT OT KOJIuYeCTBa NCIOB3yEmOro MOJOTORO Kohe n OT cINbl PrNXIMa MONOTORO Kohe c NOMOuTo TEMepa. B 3aBNCIMoCTn OT INDVBNDyAIBHO RkyCa MoXHO N3MeHrTb DaBHeHne 3aBapNBaHn, MeHra KOLUeCTBO MOJOTORO Kohe n DaBHeHne PrNXIMa TEMpepa.
4.43abodcKaJaTa6nUka
3aBODsKa Ta6nUka C nHΦOpMauNei O NOkIIOueHmN I TexHnueCKMn XapaKTePncTnKaMn HaxOJNTcHa HNXHei CTopoHe np6opa.
5 3KcPnyatauiaN yHKnOHpOBaHne
B daHno rnaBe npuBeHeBb BaxHbIe 3aMeuaHn no ekCnpyatau n np6opa. Co6nOaTe cneDuOune nx, uTo6bl n36ExaTb onaChOCTe n nobpeXdEHN:

ПЕДОCTEPEXEHNE
Onachoctb OT BO3MOXHOCTN BbIXOJa n3 npnbopa roprayero npa. Pnck oxora.
He octabnIte pa6oTaUoI np6op 6e3 npncMoTpa, TTo6bI Bbl MoIIN IerKOBMeMaTbcraBclyaeOnaCHOCTN.
AnnapaT Heo6xOIMO 3KcIpyaTupOBaTb C BCTaBneHHbIM NOpTaΦnJIbTpOM.
He 3aIbaiTe B pe3epByap Inra BObl ropayu BOdy.
IpnncnoIb3OBAHn Hacdkn dJa npa BbIeJraTcRopny nap / ropyraB Oda. Bepnte Hacdky Tolbko 3a pyky.
Bo Bpempa60bI aannapata He noctabnTe pyKn noB binyckHbIe OTBepCTna nopTaΦnltpa nnHaCdkn dJa napa.
5.1пекпервимиспьзованem
OuNCTb annapaT n npHaJneJxHocTn, KaK onncAoB pa3dene «UncTk a uXoJ».ДЯ OUnCTKn annapaTa dOnOpHInTeIbHO BblOpHInTe npOcecc 3abapKn 6e3 MOnOTOro KoΦe.
- BCTaBbTe peWeTky noDIOHa dIy c6opa KaIeIb taKIM o6pa3OM, yTO6bl KpaChbI nonlaBOK BbICTyn I3 OTBepCTnB peWeTke noDIOHa dIy c6opa KaIeIb.
- OtkpoiTe KpbIshky 6auchka dny BoIbI, n3BneKeITe 6aOcK dny BoIbI, depJa ero 3a pyuKy, ydaJIte KpaChyIO np6Ky Ha aannapate NOd 6aYKom dny BoIbI nHaONHInTe erO BOIo DO OTMeTKN «MAX» (MaKcImMaIbHbI yPOBeHb). ChOba BCTaBbTe 6aOcK dlya BoIbI b annapat.
- YCTaHOBHTe NOPTaΦnIbTp Ha BapOCHyIO rONOBky aIInapaTa, 3aTeM BblPOBHNrTe NOpTaΦnIbTp NO OTMeTKe «» I NOBepHnTe erO npOTNB yacOBoN CTpeKN B NOJoxKeHne «»
- NocTaBbTe 60JIbIyIO yauKHy Ha peWeTKy nOdoHa IJRA c6opa Kaenb. Y6eINTEcB B TOM, UTO NOBOPOTbI peYIaTOp IJRA BbIXOJa npa/BOIbI HaxoINTCB BEPTIKaJIbHOM NIOJOKeHN (BbIKIIOueHHoe NIOJOKeHne).
- Пордкючite annapat к олесгков роетке и нажмпгу «ON/OFF» (ВКЛ/BblKЛ).
- Pa3daCTc8 3ByKOBoi CnHai, N KHOKN HaHyT MuraTb. Annapat HauHet HarpeBaTbcra.
- KaK ToJbKO KhoNKn nepeCTaHyT MuraT, annapaT HarpeT I rOToB K 3aNyCKy.
- OToBnHbTe HacaKy InaI npa B cToPOHy. PpN 3Tom 6epnte ee TOnbKO 3a pyuKy.
- Пocтавытейн Насаду Дяпара пуctую Термосточую EMKOCtь ДОCTaTOUHO 6оьшoro obbeMa И NOВернite ретунлгор Дя BBIXOda па/BOДы BHN3 npOTINB Yacoboi CTpeKEN.
- Дождenteсь, пoka вoda стует, заlem сюва зakpoite peуларпя Выхда пара/ BOДbl.
- Haxmte KhoNky
- Annapat NaHET npoecc 3aBapKn n aBTOMaTnueckn OCTaHOBNTc, KOrda npoecc 3aBepuNTcra.
- BbneIte BoDy n3 yaUKN.
- Tenepb Bbl MOXeTe IcNoIb3OBaTb aIInapaT NO CBOemy yCMOTpeHIO.
ПРМЕЧАНС
Pn nepBOM nCnoIb3OBAHm MOrT Bo3HnKaTb 7yMbI. To HopMaIbHO, TaK KaK annapaT Bblnyckaet HaxoJusnC8 B HeM Bo3dyx. Upe3 HeKOTOpoe BpemA Wym NCye3HeT.
5.2 CoBeTbI/peKoMeHdaaunn no npNroTOBneHnIO
- Дя пи��овлени зспесо (20-30 m) мbl pekomehdyeem 6paTB okono 7 r kofo ToHKoro nOMona. Дя дByx уашek дBOHoro зспесо (40-60 m) notpe6yetcra OKOLO 14 r KofoToHKoro nOMona.
- Koфейнble зерпдддддддддддддддддддддддддддддддддддддддддддддддддддддддддддддддддддддддддддддддддддддддддддддддддддд徳ую дялгсpecco.
- MonotbI Kofe Heo6xOIMO DOCTaTOUHO NIOTHO CKaTb B OINbTpYIOUeM 3JIeMeHTe, B NOPTaΦNtpe, T. e. paBHomepHo yNtHTb (TemnepoBaTb).ДЯ 3TORO cNeDyET paBHomepHo I pOuHO pNkAusbKoΦe B BePTnKaJbHOM HAppaBHeHn C NOMOuTo TEMnepa.
Baxno npabnblho nporpeb annapaT, nopTaΦnbTp n yaShky neped npoeccom 3aBapKn, yTO6bI BODa He OXnaJdaJaacb. - IdeaIbHoe daBHeHne IJn npriROToBHeHna 3cnpecco - 9 6ap. C yueTOM donycka B Odn H 6ap B 6oJIbSyIO nnn MeHbSyIO CTOpOHy peKOMeHDoBaHHoe daBHeHne coCTaBnAeT OT 8 do 10 6ap.
7.2 PnHbI HeCpABHOCTeN INx yCTpaHeHne
HnKe npBedeHna Ta6nla nOMOxET npN BbIaBHeHn N yCTpaHHeHn MeKnx HeNCnpaBHOCTeN.