
Café Crema Touch 1882 - Coffee machine CASO - Free user manual and instructions
Find the device manual for free Café Crema Touch 1882 CASO in PDF.
| Product type | Fully automatic coffee machine |
| Brand | CASO |
| Model | Café Crema Touch 1882 |
| Power supply | 230 V ~, 50-60 Hz, 1350 W |
| Dimensions (W x D x H) | 180 x 335 x 405 mm |
| Net weight | 8.25 kg |
| Water tank capacity | 1200 ml |
| Milk tank capacity | 600 ml |
| Bean hopper | Integrated |
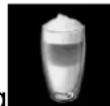
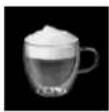
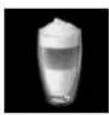
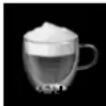
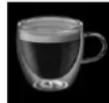
| Functions | Espresso, Café Crema, Cappuccino, Latte Macchiato, hot water, milk foam |
| Grind adjustment | Adjustable wheel (coarse to fine) |
| Quantity programming | Yes, for espresso, café crema, milk foam, hot water |
| Automatic rinsing | At power on and off |
| Automatic shut-off | Yes, programmable (10/20/30 min) |
| Operating modes | ECO, Quick, Standard |
| Maintenance and cleaning | Cleaning of brewing unit, descaling, cleaning of milk system, rinse program |
| Safety | Automatic shut-off, burn protection, electrical safety |
| Package contents | Appliance, descaling agent, cleaning brush, pin, microfiber cloth, milk container with hose, instruction manual |
| Warranty | 24 months |
| Spare parts and repairability | Original spare parts available, repairs by authorized service center |
Frequently Asked Questions - Café Crema Touch 1882 CASO
User questions about Café Crema Touch 1882 CASO
0 question about this device. Answer the ones you know or ask your own.
Ask a new question about this device
Download the instructions for your Coffee machine in PDF format for free! Find your manual Café Crema Touch 1882 - CASO and take your electronic device back in hand. On this page are published all the documents necessary for the use of your device. Café Crema Touch 1882 by CASO.
USER MANUAL Café Crema Touch 1882 CASO
You can find the latest version of the instruction manual on our website:
10 Technische Daten 44
11 Operating Manual 46
11.1 General 46
11.2 Information on this manual 46
11.3 Warning notices 46
11.4 Limitation of liability 47
11.5 Copyright protection 47
12 Safety 47
12.1 Intended use 47
12.2 General Safety information 48
12.3 Sources of danger 50
12.3.1 Danger of injury 50
12.3.2 Risk of burning and scalding 50
12.3.3 Dangers due to electrical power 52
13 Commissioning 52
13.1 Safety information 52
13.2 Delivery scope and transport inspection 53
13.3 Unpacking 53
13.4 Disposal of the packaging 53
13.5 Setup location requirements: 53
13.6 Electrical connection 54
13.7 Rating plate 54
14 Operation and Handing. 54
14.1 Overview 55
14.2 Assembly 58
14.3 Before first use 60
14.4 Control panel 62
14.5 Rinsing processes 63
14.6 Set the grinding degree 63
14.7 Preparations 64
15 Functions 64
15.1 Hot water function 64
15.2 Save the hot water quantity 65
15.3 Milk foam function 65
15.4 Adjust the amount of milk foam 65
15.5 Cappuccino function 66
5.6 Latte Macchiato function 66
15.6 Espresso & Café Crema function 67
15.7 Save the espresso quantity 67
15.8 Save the cafécrema quantity 67
15.9 Reset to factory settings 68
15.10 Change the mode 68
16.1 Safety information 69
16.2 Cleaning 69
16.3 Rinsing programme for the spout 70
16.4 Internal drip tray 70
16.5 Cleaning of the coffee chamber / brewing unit 70
16.6 Cleaning of components for milk foam 70
16.7 Descaling & the cleaning programme 72
16.8 Emptying the appliance 73
Fully automatic coffee machine
Café Crema Touch (1882)

CE

11 Operating Manual
11.1 General
Please read the information contained herein so that you can become familiar with your device quickly and take advantage of the full scope of its functions.
Your Café Crema Touch will serve you for many years if you handle it and care for it properly. We wish you a lot of pleasure in using it!
11.2 Information on this manual
These Operating Instructions are a component of the Café Crema Touch (referred to hereafter as the Device) and provide you with important information for the initial commissioning, safety, intended use and care of the device. The Operating Instructions must be available at all times at the device. This Operating Manual must be read and applied by every person who is instructed to work with the device: • Commissioning
- Operation - Troubleshooting and/or - Cleaning - Keep the Operating Manual in a safe place and pass it on to the subsequent owner along with the device.
11.3 Warning notices
The following warning notices are used in the Operating Manual concerned here.
▲GEFAHR
DANGER
A warning notice of this level of danger indicates a potentially dangerous situation. If the dangerous situation is not avoided, this can lead to death or serious injuries.
Observe the instructions in this warning notice in order to avoid the danger of death or serious personal injuries.
WARNING
WARNING
A warning notice of this level of danger indicates a possible dangerous situation. If the dangerous situation is not avoided, this can lead to serious injuries.
Observe the instructions in this warning notice in order to avoid the personal injuries.
AVORSICHT
ATTENTION
A warning notice of this level of danger indicates a possible dangerous situation. If the dangerous situation is not avoided, this can lead to slight or moderate injuries.
Observe the instructions in this warning notice in order to avoid the personal injuries.
HINWEIS
PLEASE NOTE
A notice of this kind indicates additional information, which will simplify the handling of the machine.
11.4 Limitation of liability
All the technical information, data and notices with regard to the installation, operation and care are completely up-to-date at the time of printing and are compiled to the best of our knowledge and belief, taking our past experience and findings into consideration.
No claims can be derived from the information provided, the illustrations or descriptions in this manual. The manufacturer does not assume any liability for damages arising as a result of the following: • Non-observation of the manual
- Uses for non-intended purposes - Use of unauthorized spare parts
- Improper repairs
- Technical alterations, modifications of the device
Modifications of the device are not recommended and are not covered by the guarantee.
All translations are carried out to the best of our knowledge. We do not assume any liability for translation errors, not even if the translation was carried out by us or on our instructions. The original German text remains solely binding.
11.5 Copyright protection
This document is copyright protected. Braukmann GmbH reserves all the rights, including those for photomechanical reproduction, duplication and distribution using special processes (e.g. data processing, data carriers, data networks), even partially. Subject to content and technical changes.
12 Safety
This chapter provides you with important safety notices when handling the device.
The device corresponds with the required safety regulations. Improper use can result in personal or property damages.
12.1 Intended use
This device is only intended for use in households in enclosed spaces for
- Preparation of coffee and espressos
- Preparation of hot water
- Preparation of milk foam
This device is intended for use in the household and for similar applications such as:
- in kitchens for employees in shops, offices, and other commercial areas;
- in agricultural estates; - in B&Bs.
- by customers in hotels, motels and other residential establishments.
Uses for a different purpose or for a purpose which exceeds this description are considered incompatible with the intended or designated use.
Do not chop very hard ingredients such as ice.
WARNING Warning
Danger due to unintended use! Dangers can emanate from the device if it is used for an unintended use and/or a different kind of use.
Use the device exclusively for its intended use.
Observe the procedural methods described in this Operating Manual.
Claims of all kinds due to damages resulting from unintended uses are excluded.
The User bears the sole risk.
12.2 General Safety information
HINWEIS Please note
Please observe the following general safety notices with regard to the safe handling of the device.
Read all these instructions before using the appliance.
This device may be used by children aged 8 and above, if they are supervised or have been instructed at to the safe use of the device and have understood the resulting hazards.
- Cleaning and maintenance by the user must not be performed by children unless they are at least 8 years old and are supervised. Children are not allowed to play with the device. The device and its connecting cable must be kept away from children who are less than 8 years old.
The device may be used by individuals with reduced physical, sensory or mental capabilities or a lack of experience and / or knowledge of their use if they are supervised or have been instructed at to the safe use of the device and have understood the resulting hazards.
- Examine the device for any visible external damages prior to using it. Never put a damaged device into operation.
Do not leave the device unsupervised when it is in operation.
- Do not operate the device if it is empty. This could damage the device.
- Never fill the water tank beyond max-marking. Do not use the device in case of overflowing.
Please note
- All operations other than cleaning and usual maintenance must be performed by an approved service centre.
- Use the device exclusively for the preparation of coffee and also for preparation of hot water and preparation of milk foam. Do not put any other liquids (other than cold water) into the water tank or other foods (other than coffee beans) into the device.
Do not leave the power cord hanging within children's reach. - Do not disconnect the plug from the socket by pulling on the cord. The power cord must never be near or in contact with the hot parts of the machine, near a source of heat or over a sharp edge.
- Only customer service departments authorized by the manufacturer may carry out repairs on the device, as otherwise the guarantee entitlements will be null and void in the event of any subsequent damages. Improperly performed repairs can cause considerable dangers for the user.
Defective components must always be replaced with original replacement parts. Only such parts will guarantee that the safety requirements are fulfilled.
No coffee powder may be filled into the bean container. - For your own safety, only use manufacturer accessories and spare parts suited to your device.
Device is not intended to be operated by means of an external timer or separate remote-control system.
The device is not intended for grinding liquid or hot ingredients.
Always remove the plug from outlet in case of any malfunction or before cleaning.
Switch off the device before pulling the plug.
HINWEIS
Please note
Make sure that the ambient temperature is above 0^ , otherwise the device does not function properly.
Always descale the device regularly to ensure optimum performance and prevent malfunction.
Make sure to cool down the device before cleaning or storing it.
The device may give off some smoke and smell when you use for the first times because of oil on some parts, this will disappear soon and is normal.
- Use the grinder to grind roasted coffee beans only. Grinding other food, such as nuts, spices or unroasted beans may dull the blades and cause poor grinding or injury.
- Do not use any caramelised or sugar-glazed coffee beans. Do not use green coffee (green or unroasted coffee beans) or blends with green coffee. This could damage the appliance.
12.3 Sources of danger
12.3.1 Danger of injury
▲WARNUNG
Warning
By careless use of the device risk of injury exist because of sharp edges. Note the following warnings to avoid injury.
Avoid contacting moving parts.
Do not touch the inside of the grinder - risk of injury!
Be careful during cleaning.
12.3.2 Risk of burning and scalding
▲WARNUNG
Warning
The water heated in this appliance, the coffee and the frothy milk can get very hot.
Please observe the following safety notices in order not to burn or scald yourself or others.
▲WARNING Warning
- Keep distance from the device when it is in operation. Do not hold any part of your body under or near the coffee and milk spout, hot liquid or steam can be splashed. Clean the device regularly, especially the coffee and milk spout.
During operation, the spout, brewing unit, coffee grounds container and drip trays can get very hot!
Never touch the hot parts of the device! - Please always try the temperature of the coffee/hot water/milk foam, before drinking. Temperature of the coffee /hot water / milk foam is high. Handle the container (cup) carefully to avoid scalding.
- Keep the brewing unit cap closed while the device is working. The brewing unit must not be removed during operation, and also shortly after the device has been operated.
- Caution: If you refill the water tank during the brewing process, the brewing process automatically resumes after the water tank has been replaced.
- Empty the drip trays carefully as the water contained therein can get very hot. Empty the coffee grounds container carefully as the coffee grounds contained therein can get very hot.
Beware of the escaping steam, milk foam and escaping water so that you do not burn yourself. Don't cover the spout and the steam outlet.
The device may only be used if the drip tray with the drip grid and the inner drip tray with coffee grounds container are correctly inserted.
12.3.3 Dangers due to electrical power
GEFAHR Mortal danger due to electrical power!
Mortal danger exists when coming into contact with live wires or subassemblies! Observe the following safety notices to avoid dangers due to electrical power:
- Do not operate this device if it has a damaged cable or plug, if it is not working properly or if it has been damaged or dropped. If the power cable or plug are damaged, then they must be replaced by the manufacturer or its service agent in order to avoid a hazard.
- Do not open the housing on the device under any circumstances. There is a danger of an electrical shock if live connections are touched and the electrical or mechanical structure is altered. In addition, functional faults on the device can also occur.
- Do not put the device, power cord or plug in water or any other liquid. Never clean the device in the dishwasher.
- Even when the device is switched off, voltage is present inside the device as long as the mains plug is plugged into the socket. The device is only disconnected from the power supply when the mains plug is unplugged.
- Unplug the device from the mains socket before cleaning, maintaining, dismantling or assembling the appliance.
- Never unscrew the device and do not make any technical changes to it.
13 Commissioning
This chapter provides you with important safety notices during the initial commissioning of the device. Observe the following notices to avoid dangers and damages:
13.1 Safety information
▲WARNING Warning
- Packaging materials may not be used for playing. There is a danger of suffocation.
13.2 Delivery scope and transport inspection
As a rule, the Café Crema Touch is delivered with the following components:
-
Café Crema Touch
-
microfiber cloth
-
cleaning brush
-
milk tank with hose
push pin
-
3 bags with descaler
-
operating instructions
HINWEIS
Please note
Examine the shipment for its completeness and for any visible damages.
Immediately notify the carrier, the insurance and the supplier about any incomplete shipment or damages as a result of inadequate packaging or due to transportation.
13.3 Unpacking
To unpack the device, proceed as follows:
Remove the device out of the carton and remove the packaging material.
Before first use: Remove the protective foil from the display.
13.4 Disposal of the packaging
The packaging protects the device against damages during transit. The packaging materials are selected in accordance with environmentally compatible and recycling-related points of view and can therefore be recycled.
Returning the packaging back to the material loop saves raw materials and reduces the quantities of accumulated waste. Take any packaging materials that are no longer required to "Green Dot" recycling collection points for disposal.
HINWEIS
Please note

If possible, keep the original packaging for the device for the duration of the guarantee period of the device, in order that the device can be re-packaged properly in the event of a guarantee claim.
13.5 Setup location requirements:
In order to ensure the safe and trouble-free operation of the device, the setup location must fulfil the following prerequisites:
- Only use this device on a flat, stable, heat-resistant surface away from water splashes and any heat sources. Never use the device outdoors and always place in a dry environment.
- Do not set up the device in a hot, wet or extremely damp environment or near flammable material.
- Choose the setup location in such a way that children cannot reach any hot surfaces on the device.
- Allow 150mm clearance around the device and 350mm above, so that you can remove the water tank.
-
The electrical socket must be easily accessible so that the power lead can be disconnected easily, in the case of an emergency.
-
The installation and assembly of this device in non-stationary setup locations must be carried out by specialist companies / electricians, provided they guarantee the prerequisites for the safe use of this device.
13.6 Electrical connection
In order to ensure the safe and trouble-free operation of the device, the following instructions must be observed for the electrical connection:
- Before connecting the device, compare the connection data (voltage and frequency) on the rating plate with those of your electrical network. This data must agree in order that no damages occur in the device. If in doubt, ask your qualified electrician.
- The connection between the device and the electrical network may employ a 3 meter long (max.) extension cable with a cross-section of 1.5mm^2 . The use of multiple plugs or gangs is prohibited because of the danger of fire that is involved with this.
- Make sure that the power cable is undamaged and has not been installed under the device or over hot or sharp surfaces.
- The electrical outlet must be protected by a 16A safety cut-out switch.
- The electrical safety of the device is only guaranteed if the device is connected to a properly installed protective conductor system. If in doubt, have the house installation checked over by a qualified electrician. The manufacturer cannot be made responsible for damages that are caused by a missing or damaged protective conductor.
13.7 Rating plate
The rating plate with the connection and performance data can be founded on the bottom of the unit.
14 Operation and Handing
This chapter provides you with important notices with regard to operating the device. Observe the following notices to avoid dangers and damages:
WARNING Warning
Do not leave the device unsupervised when it is in operation, so that you can intervene quickly in the event of dangers.
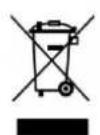
14.1 Overview
1a cover cap of the brewing unit
1b brewingingunit
1c coffee chamber
2 power cable
3 water tank
4 lid of the bean container
5 controller for the adjustment of the degree of grinding
6 control panel
7 cover of coffee and steam spout
8 cleaning brush
9 push pin
WARNING Warning
Do not touch the inside of the grinder - risk of injury!
WARNUNG Warning:Warning symbol: hot steam.
- Caution hot steam / hot liquid can escape at device. Risk of burns.
Be careful so that water will not run into the plug.
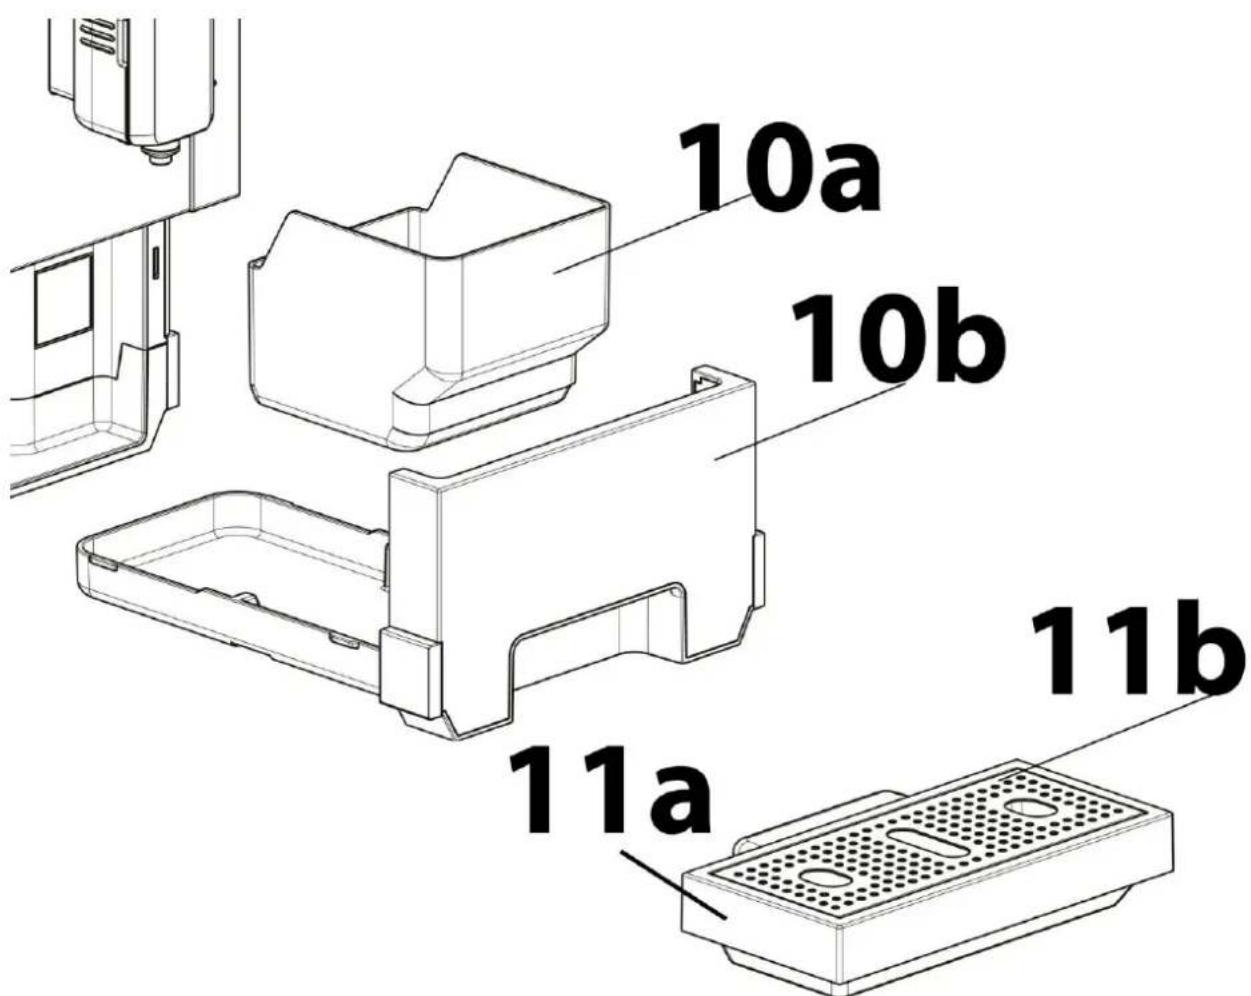
10a coffee grounds container
10b internal drip tray
11a drip tray
11b drip grid
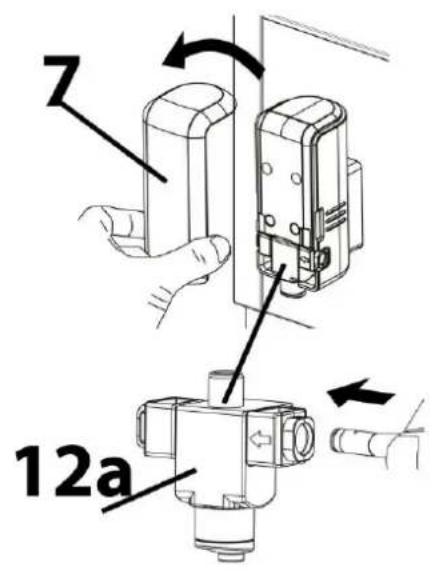
7 cover of coffee and milk spout
12a mik spout
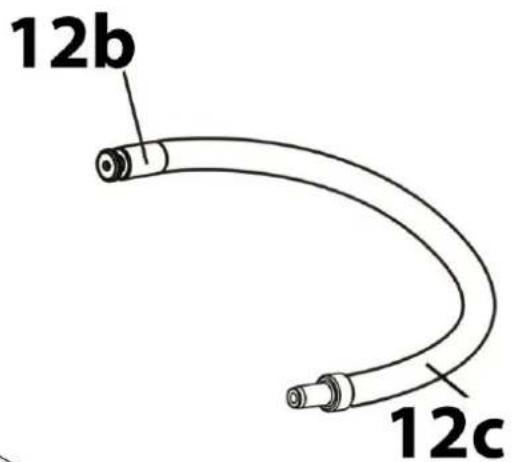
12b connection of hose at milk spout
12c connection of hose at milk tank
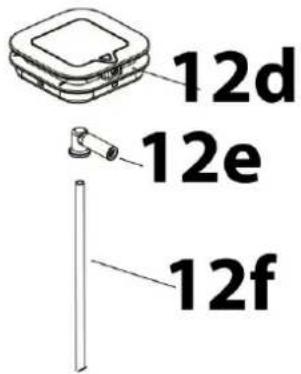
12d lid of milk tank
12e coupling of pipe
12f pipe
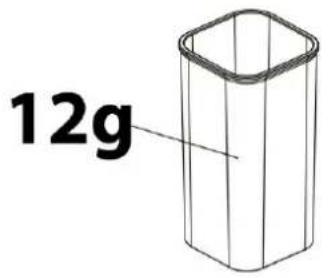
12g milk tank
HINWEIS
Please note
Only water or milk may be filled into the milk tank.
14.2 Assembly
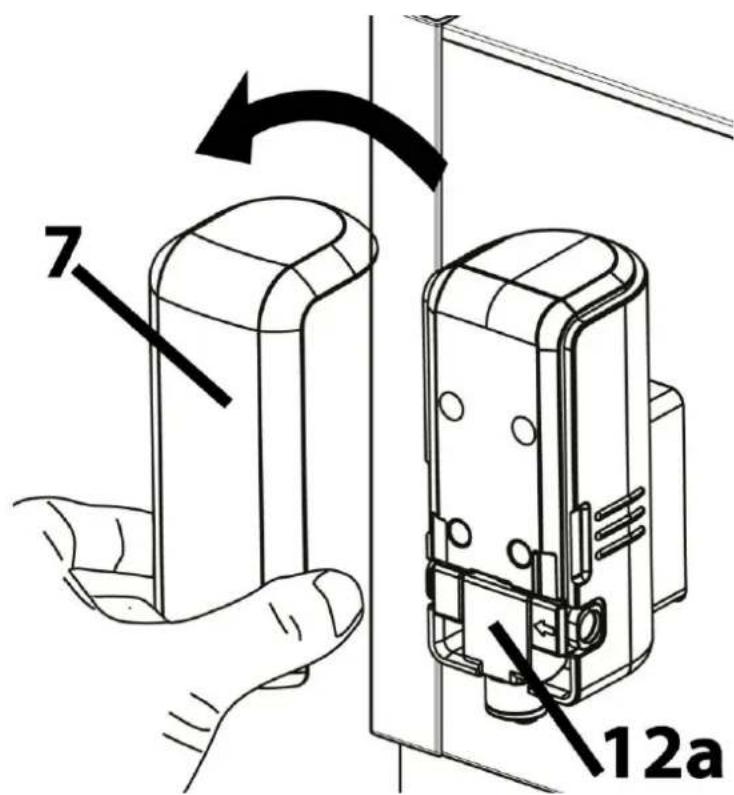
Remove the cover (7) and check that milk spout (12a) is placed correctly. Then replace the cover.
Place the coupling into the lid of milk tank and check that it is placed correctly.
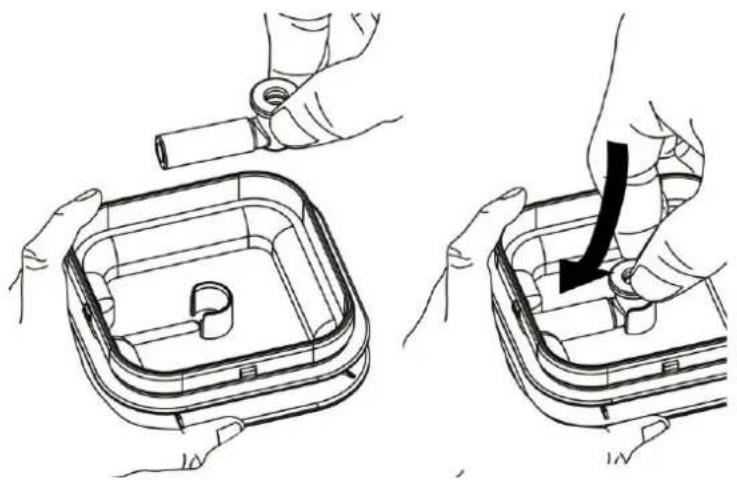
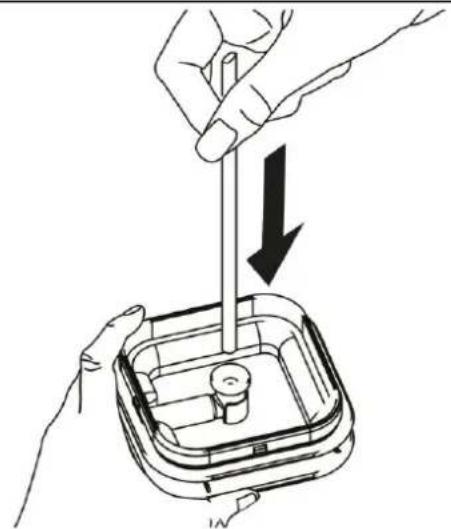
Place the pipe into the coupling at the lid of milk tank.
Place the lid with pipe into the milk tank.
Place the hose into the milk spout and the lid of milk tank.
HINWEIS
Please note
- When you want to process larger quantities of milk, you can also insert the pipe directly into the milk pack. To do this, connect the hose directly to the coupling and pipe (without the lid of milk tank) and place the pipe into the milk pack. This only works if there is enough milk in the milk pack.
Put the milk tank or milk pack back into the refrigerator after use.
The hose must not be inserted into the drip tray. Clean the hose when you do not want to use it any more.

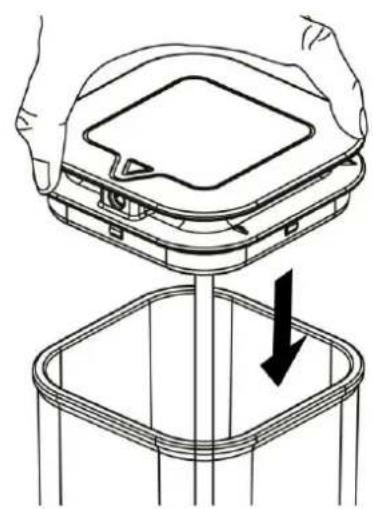
Place the coffee grounds container on to the inner drip tray and push it into the appliance. Then insert the drip tray with the drip grid.
Adjust the adjustable coffee and milk spout according to the selected cups / cup size. Fill the water tank with water and insert it.
WARNING Warning:Crushing hazard!
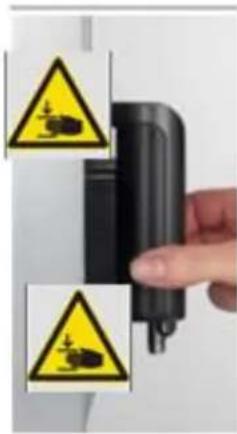
Do not touch the area behind and above or behind and beneath the adjustable spout. Exclusively adjust the spout as shown in the photo.
HINWEIS Please note
Empty the internal drip tray regularly.
Check that everything has been assembled correctly.
WARNING Warning: Risk of burns
- Only operate the device with assembled milk spout and cover, so that you will not have any contact with the hot water or splashes of water.
14.3 Before first use
- Clean the drip tray, drip grid, internal drip tray, coffee grounds container, water tank, brewing unit, milk tank and hose under running water. Thoroughly dry them. Remove the protective film on the control panel.
- Insert all parts correctly into the device. Push in the coffee grounds container as far as it will go.
- Fill the water tank with water up to the max mark.
- Remove the milk tank with hose and the drip tray with drip grid and place a large container under the coffee and milk spout.
-
Switch on the device. The device automatically rinses the coffee and milk spout with hot water. This process takes longer when the device is switched on for the first time,
-
We recommend a manual cleaning process: To do this, keep the button and
button pressed at the same time until the device beeps twice.

and Lightp. Confirm with .
o. Confirm with .
- Then flashes in the display and indicates that the device is performing the cleaning process. This process takes a few minutes (approx. 15 minutes), during which hot water is flushed through all pipes with short interruptions until the water tank is
empty. Then up.

flashes in the display and the button and
button lig
- Perform the following steps as soon as possible, otherwise the device could switch off: Empty the large container. Remove the water tank and fill it again up to the max mark. As soon as you put the water tank back in, the cleaning process continues automatically. Now there are 2 rinsing processes in which hot water are rinsed through.
- After the last cleaning process, the device switches off.
- Switch the device on again. The automatic rinsing process is arranged. Then connect the hose and the milk tank to the milk spout to clean the milk system. Fill the milk tank with water up to the max mark and use the milk foam function twice.
- Then empty the remaining water in the milk tank. If desired, add milk to the milk tank.
- Now you can completely reassemble and then use the device.
14.4 Control panel
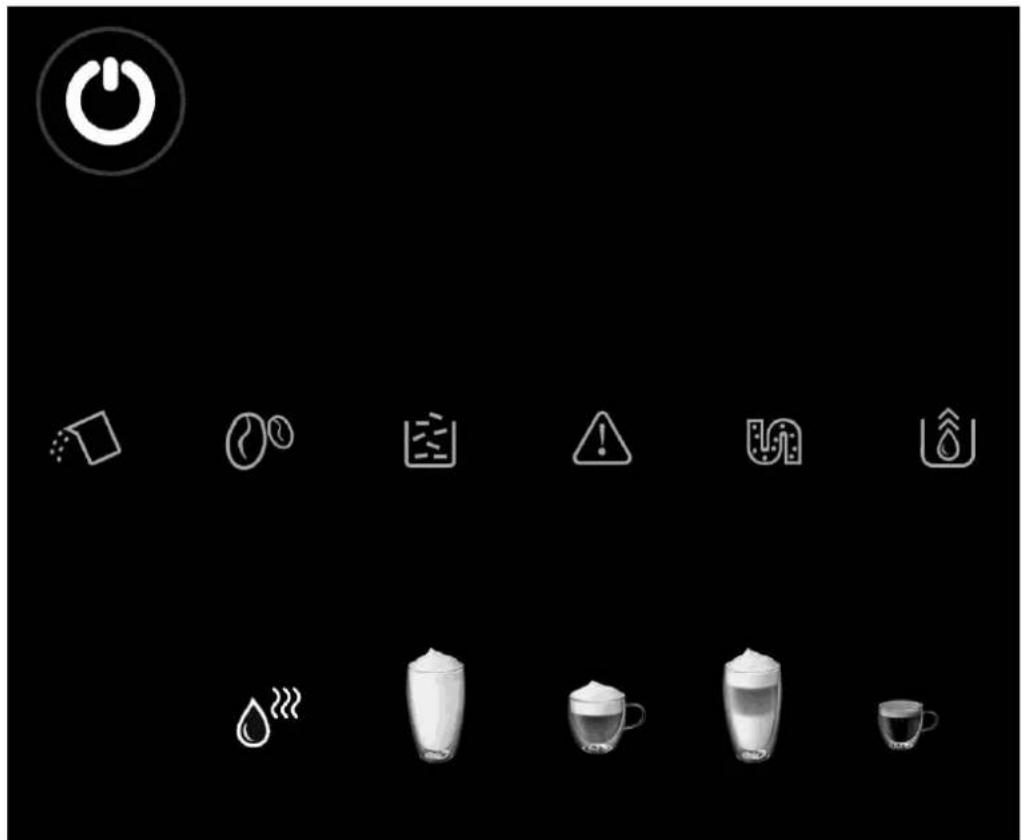
Buttons

On/off switch

hot water function

milk foam function
cappuccino function (small/ large)
latte macchiato function (small/ large)
espresso and café crema function
LED displays

Flashing: Water needs refilling or the water tank is not positioned correctly.

Flashing: Bean container is empty. Beans have to be refilled.

Constantly illuminated: Coffee grounds container is full, empty the container
Flashing: Coffee ground container and the drip tray are not placed correctly. Please place correctly.

Warning symbol, constantly illuminated: Brewing unit is not correctly inserted. Place
the brewing unit correctly.
Flashing: Cover cap of the brewing unit is not correctly closed. Please close correctly.

Constantly illuminated: The device must be descaled
Flashing: Descaling process is running

Constantly illuminated: The device is emptied and then switches off.
14.5 Rinsing processes
The device automatically rinses the coffee and milk spout with hot water when it is switched on and off.
▲WARNING
Warning: Risk of burns
- Keep distance from the device when it is in operation, so that you will not have any contact with the hot water or splashes of water.
Manual rinsing


Press and hold the and but the same time until the device beeps twice. The coffee and milk spout will be rinsed.
14.6 Set the grinding degree
HINWEIS
Please note
- Only adjust the grinding degree if the device is grinding coffee beans, otherwise the grinder may be damaged
A finer degree of grinding is recommended for a lighter roast. A coarser degree of grinding is recommended for a darker roast.
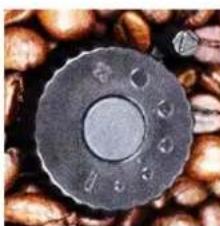
Place a vessel under the spout.
Open the bean container lid. Proceed as described in "Espressos & coffee function".
Wait until the device grinds the beans. Set the grinder knob to the desired level. For coarse grinding degree turn the knob clockwise (+) .
For fine grinding degree turn the knob counterclockwise (-) .
Reattach the lid of the bean container.
14.7 Preparations
Put the coffee beans into the bean container. Fill fresh water into the water tank.
If you want to use a function with milk foam then fill milk into the milk tank and connect it to the milk spout as described under assembly. Otherwise the small flap at the milk spout must be closed.
Place a vessel under the coffee and milk spout and adjust the height accordingly. The drip tray can be removed to allow tall glasses to be placed under the spout.
Press to turn on the device. The coffee and milk spout rinses.
Then pour the rinse water away. Clean your vessel and place it under the spout once more.
HINWEIS Please note
- Do not use any unroasted, caramelised or sugar-glazed coffee beans. Do not use any raw coffee or raw coffee blend.
Use only cold water.
Do not exceed the maximum amount of water indicated on the scale of water tank.
Tip: If you want to enjoy your coffee as hot as possible, preheat the cup. You can use the hot water function for this. Then pur the hot water away. - Fro all function, make sure that the container does not overflow. You can stop each function by pressing the selected button again.
If you are not goin to use the device for a long time, you must clean and empty the device completely, as well as remove and dry the water tank.
15 Functions
15.1 Hot water function
Place an empty vessel under the coffee and milk spout. Press water will be dispensed.
HINWEIS Please note
- Please ensure that the water does not overflow. You can stop the flow by pressing the button once more.
15.2 Save the hot water quantity

Press the 山 when hot water is rinsed then press again and leave your finger on the button until the desired amount of water is dispesend. Release the button. The device will beep twice. The quantity is saved.
Minimum quantity: 25 ml, maximum quantity: 250 ml
15.3 Milk foam function
Complete the preparations. Press generate the milk foam. It takes a moment then the device beeps and the milk foam is dispensed.
HINWEIS Please note
You can stop the flow by pressing the button once more.
- Use only milk, sojadrink or milk types suitable for the preparation of milk foam. Never froth cocoa or milk with cocoa powder, as this can block the milk spout and components and the device could be damaged.
The milk foam consistency varies depending on the temperature, type of milk or fat content.
Test different types of milk and temperatures to find the best result for you.
Always put the milk back in the refrigerator after use.
The cappuccino function and the latte macciato function also use the milk foam function. After a function with milk foam, use the rinsing function for the spout:

and at the same time until the device beeps twice. The spout is
WARNING Warning: Risk of burns
Steam escapes from the device during milk foam preparation.
- Keep distance from the device so that you will not have any contact with the hot steam or splashes of milk.
15.4 Adjust the amount of milk foam
and when milk
You can adjust the amount of milk foam. To do this, press and when milk foam runs through, then press button again and keep your finger on the button until the desired amount of milk foam has been dispensed. Release the button. The device will beep twice. The quantity of milk foam is saved.
Maximum quantity: 250 ml
15.5 Cappuccino function
Complete the preparations. Complete the preparations.
Press the once for a small cappuccino and twice in a row for a large one.
The espresso is dispensed first.
It takes a moment then the device beeps and the milk foam is dispensed.
| Nummer of button presses | Beverage | Number of espresso | Total amount |
| 1 x | Small cappuccino | 1 Shot Espresso | Approx. 200 ml |
| 2 x | Large cappuccino | 2 Shot Espresso | Approx 300 ml |
HINWEIS
Please note
The total amount can vary depending on the milk foam.
WARNING
Warning: Risk of burns
Steam escapes from the device during milk foam preparation.
- Keep distance from the device so that you will not have any contact with the hot steam or splashes of milk.
Complete the preparations. Press the once for a small Latte Macchiato and twice in a row for a large one.
It takes a moment then the device beeps and the milk foam is dispensed.
A double portion of espresso is then dispensed onto the milk foam.
| Nummer of button presses | Beverage | Number of espresso | Total amount |
| 1 x | Small Latte Macchiato | 2 Shot Espresso | Approx. 250 ml |
| 2 x | Large Latte Macchiato | 2 Shot Espresso | Approx 350 ml |
HINWEIS
Please note
The total amount can vary depending on the milk foam.
WARNING
Warning: Risk of burns
Steam escapes from the device during milk foam preparation.
- Keep distance from the device so that you will not have any contact with the hot steam or splashes of milk.
15.6 Espresso & Café Crema function
Complete the preparations.

Press the once for an espresso and twice in a row for a Café Crema.
HINWEIS
Please note
Please ensure that the espresso / coffee do not overflow. You can stop the flow by pressing the button once more.
15.7 Save the espresso quantity
You can adjust the amount of espresso to suit your taste. To do this, press the

button once and when espresso runs through, then press and leave your finger on the button until the desired amount of espresso has been brewed. Release the button. The device beeps twice The espresso quantity is saved.
Maximum quantity: 250 ml
HINWEIS
Please note
We recommend to use the factory settings for minimum quantity (approx. 25 ml).
- Only the amount of water with which the espresso is prepared is adjusted. The amount of coffee used remains the same.
15.8 Save the café crema quantity
You can adjust the amount of café crema to suit your taste.
To do this, press the

twice and when café crema runs through, then press
again and leave your finger on the button until the desired amount of café crema
has been brewed. Release the button. The device beeps twice. The café crema quantity is saved.
Maximum quantity: 250 ml, Minimum quantity: 50 ml
HINWEIS Please note
- Only the amount of water with which the café crema is prepared is adjusted. The amount of coffee used remains the same.
15.9 Reset to factory settings

but the same time, until the device beeps twice. This
resets the factory setting and your individual settings for the amount of water and milk foam are deleted.
15.10 Change the mode
You can set the device to different mode. The different mode are as follows:
| Function/mode | ECO (energy-saving mode) | Fast | Standard |
| Selected mode can be recognized as follows | Button continuously and the others are flashing | Button lights continuously and the others are flashing | Button lights continuously and the others are flashing |
| Illumination | - | + | + |
| Prebrewing* | + | - | + |
| Saving of filling level | + | + | + |
| Automatic switching off | After 10 minutes | After 30 minutes | After 20 minutes |
- Pre-brewing: With less water pressure, the ground coffee is moistened and pre-brewed. Then the device brews with normal water pressure and prepares the coffee.
Press and hold the until the device beeps twice. Then the button will flash and you can see which mode is already selected (look at the table). Press the respective button for the switch to the selected mode. For Example when switching to the Eco mode
press the . Two signal tones sound. If the mode should be retained then press or wait 5 seconds.
16 Cleaning and Maintenance
This chapter provides you with important notices with regard to cleaning and maintaining the device. Please observe the notices to prevent damages due to cleaning the device incorrectly and to ensure trouble-free operation.
16.1 Safety information
▲VORSICHT Attention
Please observe the following safety notices, before you commence with cleaning the device:
The device must be cleaned at regular intervals and limescale should be removed.
Switch the device off prior to cleaning it and unplug the plug from the wall power outlet.
- During operation the outlet, brewing unit, coffee grounds container and drip trays can get hot! Wait until the device has cooled down.
A device that is not kept in a clean state can have a negative impact upon the service life of the device and can lead to a dangerous condition of the device as well as fungal and bacterial contamination.
- Do not use any aggressive or abrasive cleaning agents or solvents. Do not scrape off stubborn dirt with hard items.
For the descending, use only the enclosed descending agent or commercially available decalcifiers for fully automatically coffee machines. Using the wrong descending agent could damage the device and cause you to lose your warranty claims.
Clean the device and empty it completely if you are not going to use it for a long time.
Change the water every day so that no germs can form.
16.2 Cleaning
Empty the drip tray, drip grid, inner drip tray, coffee grounds container, the water tank and brewing unit every day and clean them under running water. Thoroughly dry them after this. Then place all parts correctly into the device again. Push the coffee grounds container until it fits.
The cover cap of brewing unit, the drip tray, the inner drip tray, the coffee grounds container and the water tank can be cleaned in the dishwasher.
WARNING Warning
Do not clean the device when it is hot.
- Never put the device (besides above mentioned parts) into water or under running water.
Be sure to unplug the device before cleaning. To protect against electrical shock do not immerse cord, plug or unit in water or liquid.
16.3 Rinsing programme for the spout
Place a vessel under the spout. Press and at the time until the device beeps twice. The spout is rinsed. Empty and clean the vessel.
16.4 Internal drip tray
HINWEIS Please note
Empty the internal drip tray regularly as water is collected in it.
16.5 Cleaning of the coffee chamber / brewing unit
Clean the coffee chamber /brewing unit at least once a month, more often if you use it very frequently. Coffee powder can accumulate and settle in the coffee chamber. Then the coffee powder will no longer enter the brewing unit correctly.
Cleaning of brewing unit
- Unplug the mains plug.
- Remove cover cap of brewing unit.
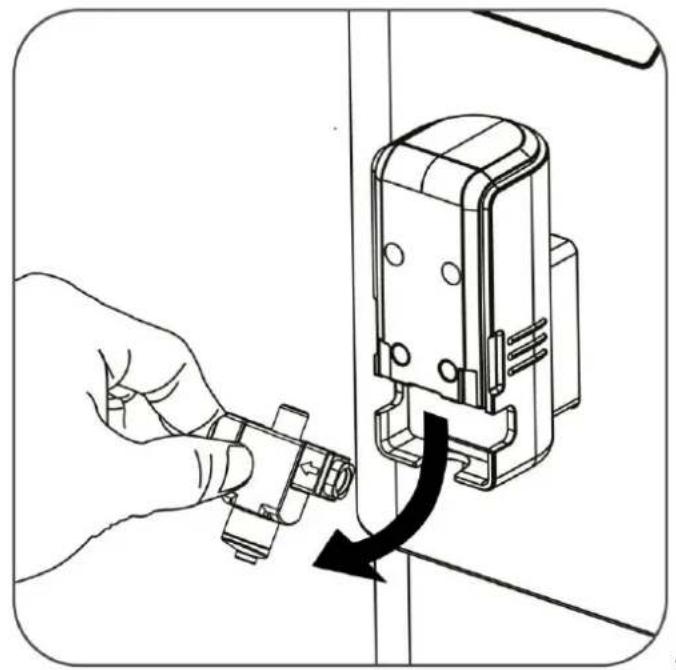
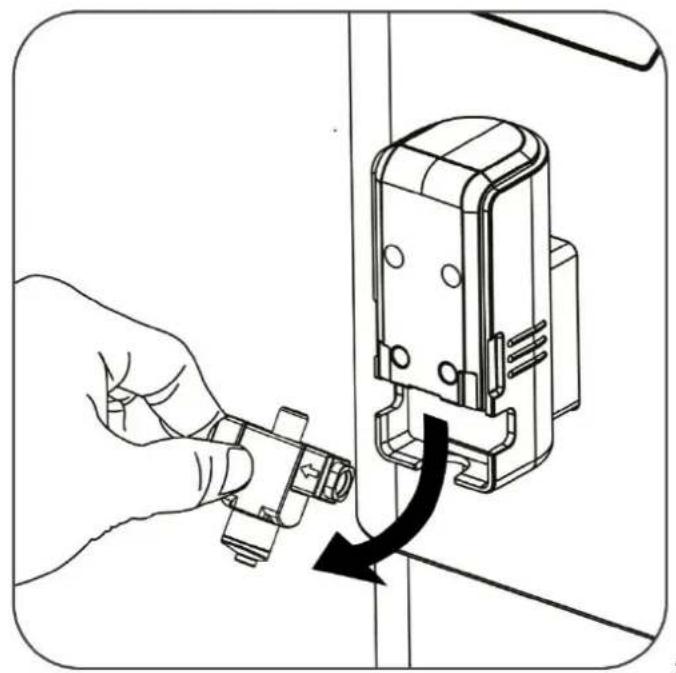
- Press the unlocking buttons (orange) of the brewing unit and remove the brewing unit.
- Rinse brewinging unit under running water and dry it thoroughly.
- Wipe the interior behind the cover with a damp cloth and then dry it.
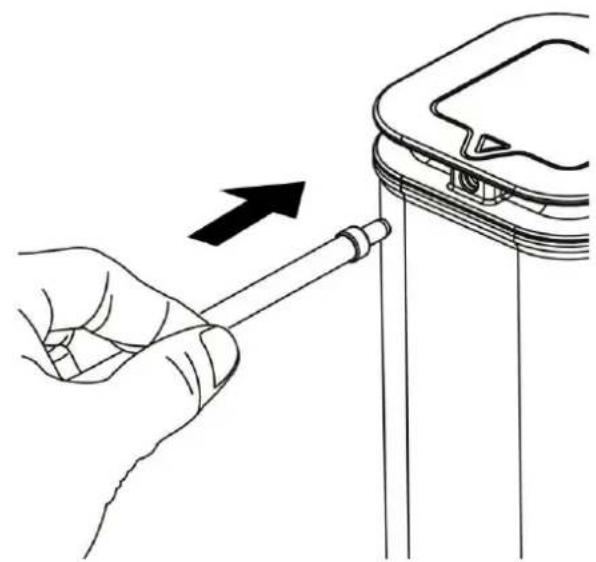
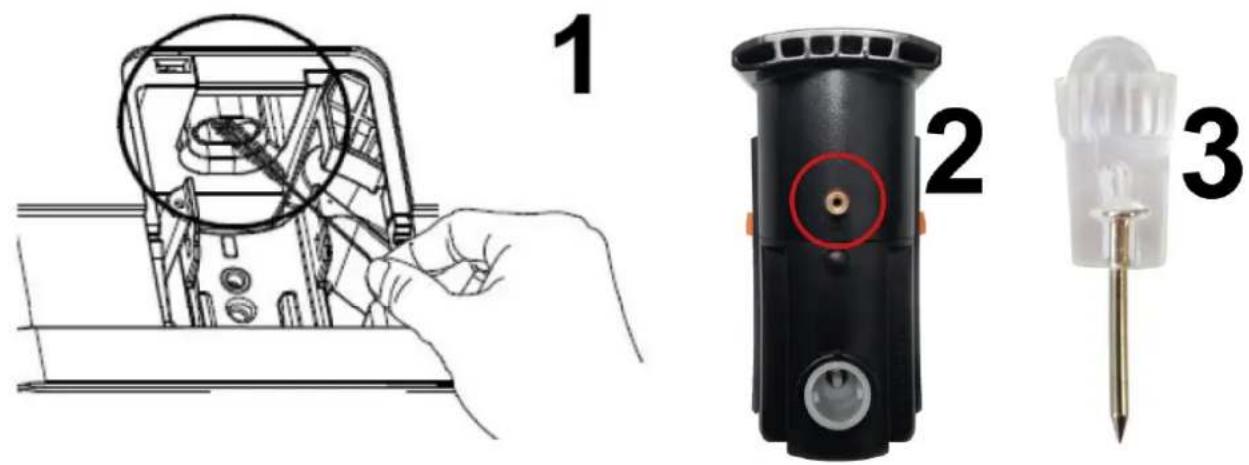
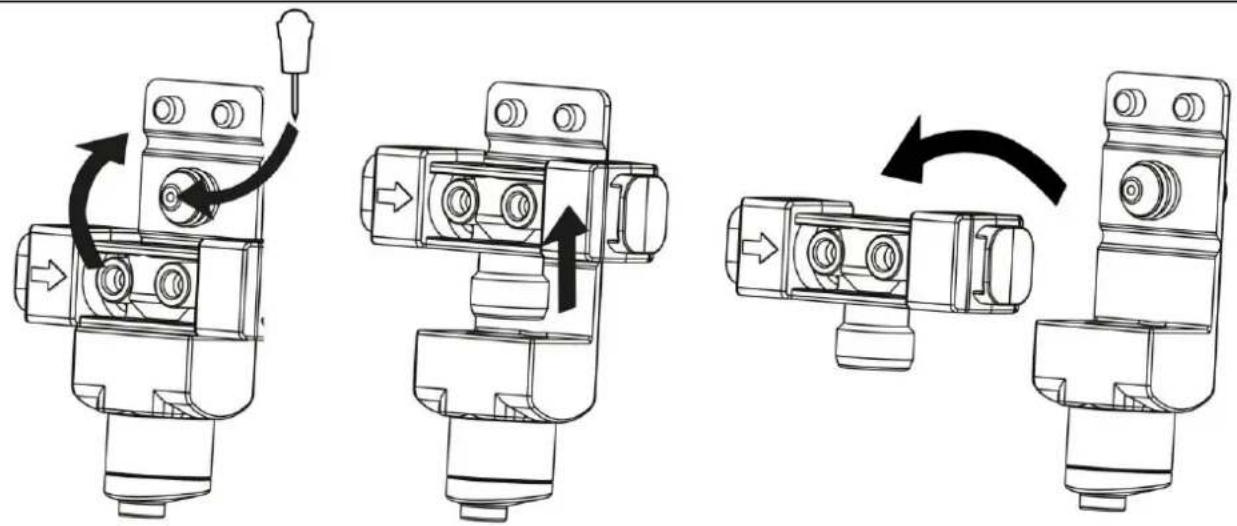
- Clean the coffee chamber and hole in the brewing unit with the supplied cleaning brush.
- Clean the hole in the brewing unit (pic. 2) with supplied push pin (pic. 3).
- Place brewing unit again correctly. Put the cover cap back again.
16.6 Cleaning of components for milk foam
You need to clean the components for the preparation of milk foam daily.
- Remove the cover.
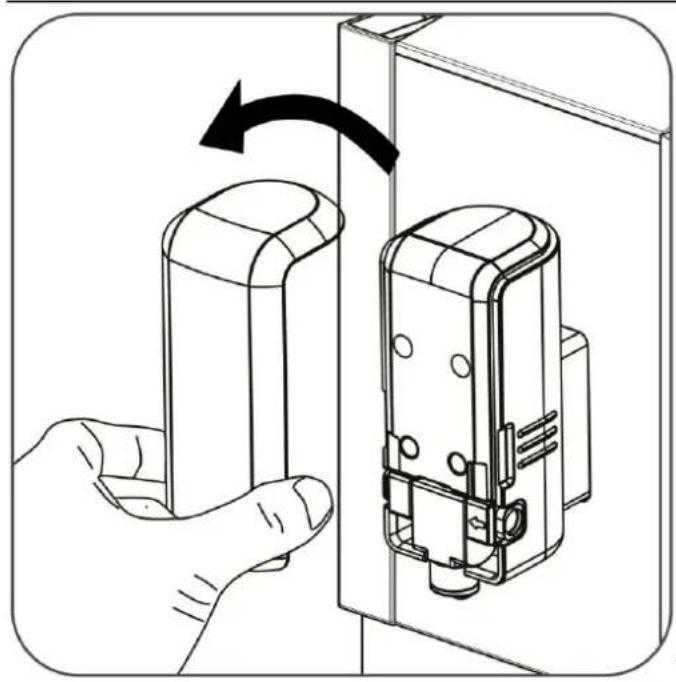
- Remove the milk spout.
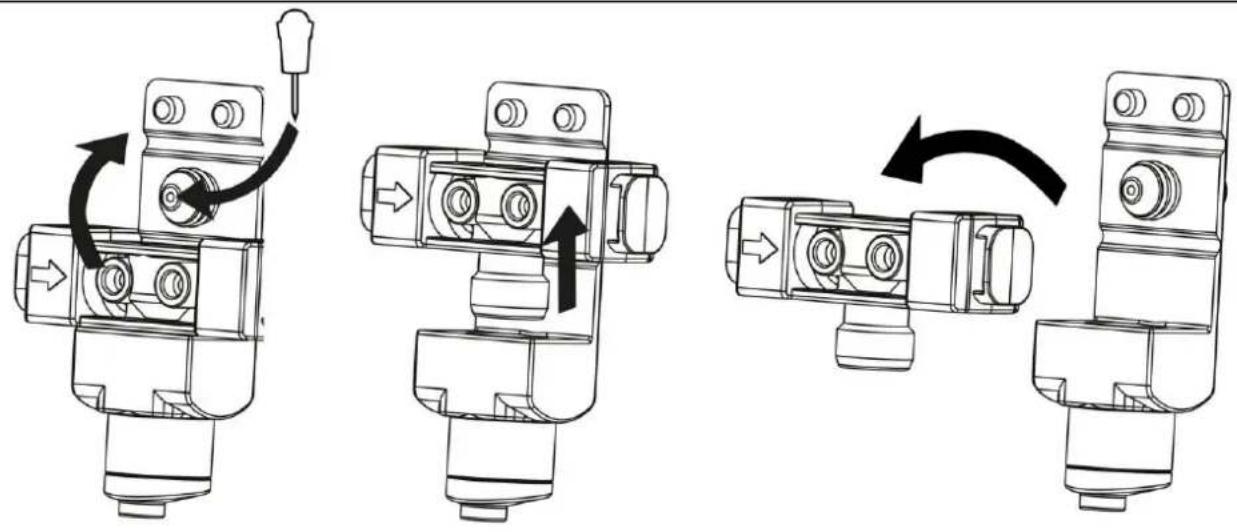
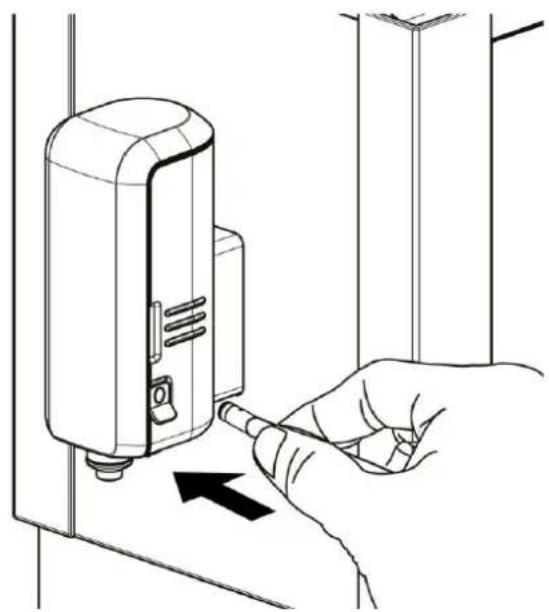
- Fold up the rubber of the milk spout as shown in the drawing. Remove the coupling of milk spout. Clean all components thoroughly under running water.
- Clean the hole in the milk spout (fig. left) with the supplied push pin.
- Reassembly the milk spout and replace into the device.
- Fill milk tank with water and use the milk foam function twice.
16.7 Descaling & the cleaning programme
The device has to be descaled regularly, otherwise the coffee taste will be affected and the
scale deposits can damage the device. Is constantly illuminated in the display, when approx. 20 liters of water have been used. This means that the device needs to be descaled.
The frequency of descending depends on the water hardness and how often the device is used.
You may want to descale the device more frequently depending on the water hardness and how often the device is used. We recommend:
- With soft water, descale at least every 3 month
- With hard water, descale every month
If you do not know your water hardness please contact your water company.
The fact that descending is required becomes most noticeable, for instance, by the following signs:
The noise level increases when making coffee.
- The brewing process takes longer.
- The device switches itself off before the water container is empty.
HINWEIS
Please note
- Solely use commercially available decalcifiers for fully automatic coffee machines. Never use vinegar or descending agent for kettles / normal coffee machines. This could damage the appliance.
Fill the water tank up to the Max mark. Enter descending agent into the water tank. Insert the water tank into the appliance. Plug in the mains plug. Place a large collecting vessel in such a way that it is positioned under the spout as water escapes from it. (If necessary remove the drip tray if the vessel would not otherwise fit under the spout.)
Press and hold the button and the butt at the same time until the device beeps twice. and flash display. Confirm descaling with .
The symbol flashes in the display and indicates that the device is performing the descending and cleaning process. This process takes a few minutes (approx. 15 minutes), during which hot water is flushed through with short interruptions until the water tank is empty.
▲WARNING WARNING
Be careful as hot water may spurt out of the device / vessel, risk of burning or scalding.
When the first step of the descending process has been performed, then flashes in
the display and the button and the butt up.
Perform the following steps as soon as possible, otherwise the device could switch off: Empty the large container. Remove the water tank. Remove all the remains of the descending agent from the water tank and thoroughly rinse it.
Fill the watertank again up to the max mark. As soon as you put the water tank back in, the cleaning process continues automatically. Now there are 2 rinsing processes in which hot water are rinsed through. After the last cleaning process, the device switches off.
Empty the collecting vessel and thoughly rinse the water tank once more.
The device can then be operated as usual.
HINWEIS Please note
Never interrupt the descending process.
The guarantee excludes devices which have stopped working or do not work properly due to lack of descending.
16.8 Emptying the appliance
A device that is not used for a long time, stored or sent to our customer service for repair must be completely emptied.
Press and the button at time until the device beeps twice. The LED
flashes. Remove the water tank. The LED now flashes constantly. The device is emptied and then switches itself off. Pull the mains plug. Store the device at a dry location. If you want to put the device back into operation, then proceed as described under "Before first use".
17 Troubleshooting
This chapter provides you with important notices with regard to operating the device. Observe the following notices to avoid dangers and damages:
▲VORSICHT Attention
Only qualified electricians, who have been trained by the manufacturer, may carry out any repairs on electrical equipment.
Improperly performed repairs can cause considerable dangers for the user and damages to the device.
17.1 Causes and rectification of faults
| Problem/display | Possible cause | Possible solution |
| Buttons do not react immediately to pressing them or react badly | The buttons are dirty. | Wipe the panel with a damp cloth and then dry it off. Put your finger completely on the key. |
| The LED flashes | The water tank is not correctly inserted. Not enough water in the water tank. | Place the water tank correctly. Refill water. |
| The LED flashes | Not enough beans in the bean container. | Refill the beans. |
| The LED lights up constantly. | Coffee grounds container is full. | Empty the container. |
| The LED flashes | The coffee grounds container is not correctly inserted. | Place the container correctly. |
| LED constantly illuminated | Brewing unit is not correctly inserted. Place the brewing unit correctly. | |
| The LED flashes | Cover cap of the brewing unit is not correctly closed. | Place and close the cover cap correctly. |
| LED constantly illuminated | The device needs to be descaled | Descale the device. |
| The device cannot be switched off. | The power cable is not plugged in correctly. | Place power cable correctly. |
| No coffee is dispensed from the spout or the coffee is flowing from the spout very slowly. Inner drip container has collected water. | The device was not correctly rinsed. Ground coffee clogs the brewing unit. | Perform the cleaning programme for the spout. Clean the components for milk foam. Clean the brewing unit and adjust the grinding degree. |
| Milk foam is not dispensed | Hose is not placed correctly into coupling at milk tank. Components for milk foam are clogged. | Place hose correctly at coupling of milk tank. Clean the components for milk foam. |
| Milk foam has too large bubbles or is not foamed enough | Milk is too cold or contains too little fat. Components for milk foam are clogged. | Use milk with a higher fat content at least with 5 °C. Clean the components for milk foam. |
| The coffee is too cald. | The vessel was not preheated. Milk was added to the coffee. Limescale in the device. | Preheat the vessel, for example with hot water function. Descale the device. |
| The coffee does not have any crème. | Coffee beans have lost their aroma. Coffee beans are not suitable. The degree of grinding is incorrectly set. Coffee ground is grinded too coarsely. | Replace the coffee beans. Use coffee beans for fully automatic coffee machines or espresso machines. Correct the degree of grinding. |
| The coffee is too thin. | The amount of water for espresso or café crema has been set too high. | Correct the amount of water as described in the chapter " Save the espresso quantity or café crema quantity" |
HINWEIS
Please note
If you are unable to solve the problem with the steps shown above, please contact Customer Service.
Clean and empty the device before sending it to the Customer Service.
18 Disposal of the Old Device
Old electric and electronic devices frequently still contain valuable materials. However, they also contain damaging substances, which were necessary for their functionality and safety. If these were put in the non-recyclable waste or were handled incorrectly, they could be detrimental to human health and the
environment. Therefore, do not put your old device into the non-recyclable waste under any circumstances.
HINWEIS Please note
Utilise the collection point, established in your town, to return and recycle old electric and electronic devices. If necessary, contact your town hall, local refuse collection service or your dealer for information.
Ensure that your old device is stored safely away from children until it is taken away.
19 Guarantee
We provide a 24 month guarantee for this product, commencing from the date of sale, for faults which are attributable to production or material faults. Your legal guarantee entitlements in accordance with § 439 ff. BGB-E remain unaffected by this. The guarantee does not include damages, which were incurred as a result of improper handling or use, as well as malfunctions which only have a minor effect on the function or the value of the device. Consumables, transit damages, inasmuch as we are not responsible for these, as well as damages, which were incurred as a result of any repairs that were not performed by us, are also excluded from the guarantee entitlements. This device is designed for use in domestic situations and has the appropriate performance levels. Any use in commercial situations is only covered under the guarantee to the extent that it would be comparable with the stresses of being used in a domestic situation. It is not intended for any additional, commercial use. In the event of justified complaints, we will repair the faulty device at our discretion or replace it with a trouble-free device. Any pending faults must be reported within 14 days of delivery. All further claims are excluded. To enforce a guarantee claim, please contact us prior to returning the device (always provide us with proof of purchase).
20 Technical Data
| Device | Fully automatic coffee machine |
| Name | Café Crema Touch |
| Item No.: | 1882 |
| Mains data | 230V~, 50-60Hz |
| Power consumption | 1350W |
| External measurements | 180 x 335 x 405 mm |
| maximum capacity of the water tank | 1200 ml |
| maximum capacity of the milk tank | 600 ml |
| Net weight | 8,25 kg |
42.3 IcToUHnKn ONaCHOCTN
42.3.1 Onachoctb TpaBM
▲WARNUNG ΠРЕДУПЕЖДЕΗΝΕ
HeoctopoXHoe nCnoIb3OBaHne npi6opa moKet npnBeCTN K TpaBMe BCJeDCTBNe HAnuYn OcTpBX KpaEB.
Оьрази Te BнIMанe Ha cIeDyUOuIe npeDyUpEckdEHHa, YTO6bI n36eKaTb TpaBM:
I36eRaIte KOHTaKTa C DnXkyuIMnCyaCTaMn np6opa.
He npikacaiTecb K BHyTpeHHm Yactram KofoemOJKN cyueCTByeT ONaCHOCTb NOLyueHnra TpaBM.
Будьт ecToPoxHbI pri uNcTke npn6opa.
42.3.2 Onachoctb oxora
▲WARNUNG ΠРЕДУПPEЖДЕΗΝΕ
Boda, Hargebaioaia B KoceBaapke, KoFe N BCpeHHeHoe MOLOKO MOryT 6bITb OyeHb ropaymN.
IoxaanyiCTa,co6JIouaIte cIeDyUOuIe npaBnla TeXHnKn 6e3oNaChocTn,HTo6bI n36exKaTb OxOrOB.
HaxoIntecb Ha paccToHHn ot pa6oTaIOUe Ipr6opa. He depKHTe KaKyIO-JIN6O YacTb TeJa NOD INN PRAOM C KpaHOM dIy KoPe I MOJOKA, NocKOJIbKY BepoTHO pa36pbI3rNBaHne npa IIIN rOpaye JxIDKocTN. PeryIparHO OUnuauTe np6Op, Oco6eHNO BbIXoHNbIE OTBepCTnI DaI KoPe I MoJOKa.
KpaH, 3aBapOuHbI MOdyNb, KOHTeHep dJa NCNoJIb3OBaHHOrO KoFe I NOdIOH MOrY T CnJIbHO HArpeBaTbcr BO Bpemra pa6oTb! HnkOrda He npNKacaiTeCb K rOpaym qactam np6opa.
Bcerda npOBepaTe Tempeatpy KoPe/ropey BoDbI/MoNoHOn NeHbI nepeD ynoTpe6JIeHnEM.
ПпгOTOBЛeHHbIe KoФe/roрЯя BAДa N MoJIoHа NeHa YBJIaHTc OueHb rOpaUMN. ByIbTe OueHb OCTopoXHbI C YaIshKoI, YTO6bl I36ExKaTb OxOroB.
Bo BpeMpa6ObI np6Opa depKnte KpbIshky 3aBapOuHoro MoUyJIa 3aKpItOn. 3aBapOuHbIMoDyJIb HeJIb3a CHImaTb BO BpeMnIcpa3y IocNe 3KcPlyaTaun np6Opa.
BHMaHne: EcIn Bbl 3aNoHNHe pe3epByap IJy BO DbI BO BpeM npOecca npnroTOBJIeHn, npoecC npnroTOBJIeHn BO306HOBNTcA BtOMaTUnCeKn IocNe IomeuEHH ne pe3epByapa IJy BOdI Ha MeCTO.
OCTOPOXHO ONUCTOUaTe POnDoHbI, TaK KaK CoDEpXaUaCBy HnX BODa MOKeT 6bITb OueHb rOpaye. AkkypaTHo ONOPOXHJaTE KOHTeHep DIny NcNoJb3OBaHHOrO KoFe, NocKOJIbKy CODePkaUaJcB Hem KoPeiHaYrUa MoKeT 6bITb OueHb rOpaye.
▲WARNUNG ΠРЕДУПЕЖДЕΗΝΕ
ObpaTnte BnImaHne Ha BbIXoHbIe OTBepCTnJa BODJHO npa, MoNoUHOI PeHbI N BbITeKaIOuSeI BODbl, YTO6bl n36eXaTb OxOroB. He 3aKpbBaIte BbIXoDHOe OTBepCTne dIpa.
Pnp6op cIeDyET nCNoJb3OBaTb TOnbKO B TOM Cnyae, ecn npabNtBHO yCTaHOBJIeHbI NOdON DnA c6opa KaIeJIb C peWeTKoI dJa c6opa KaIeJIb I BVHTpeHHN IOdON dJa c6opa KaIeJIb C KOHTeHepOM dJa nCNoJb3OBaHHoro KoOpe.
42.3.3 Onachoctb ot əJIeKtpnueckoro Toka
MirauOuN 3NaUOK: KoHTeHep InI NcNoB3OBaHHoro KoFe yCTaHOBJeH HePaBnBHO. YCTaHOBtE erO npaBnBHo.
IocToaHNO ropaun 3NaOc :3abapouhmyoynb yctaHOEN He npabnblHo.
3aTeM npi6op n3daCT 3ByKOBoCnHaJI NaHHeTcNoJaMoLoUHOI neHbI.
| Количес corroborating on the hanged on the khowonky | Hannitok | Kolniuchestbo Зспесо | Оьший объем нанитka |
| 1x | Маленьков порця калунно | 1 поця заrespecco | ok. 200 мл |
| 2x | Бовшиая поця калунно | 2 поця заrespecco | ok. 300 мл |
HINWEIS PIMMEUAHNE
O6uee KOJIuYeCTBO MOKeT N3MeHrTbcR B 3aBnCmOcTn OT KOJIuYeCTBa MOJIOUHOI neHbl.
46.4 BnHyTpEnHn IoDoH
HINWEIS PIMMEUAHNE
BHytpenHn noDOnCneDeyet OuNtapeyIpaHNo.
46.5 Ynctka KofoeHoro BaJa n 3aBapOuHOro MoDyJra

KofoeHyu 3aBapOuHb moyIb cJeDyET OuIaTb He pexe Ondoro pa3a B Mecau nn Yau, ecn np6op perynpno nCOnb3yeTc.
MonotbI KOFe MoKet HakaJIINBaTbCn OceDaTb B KOFeHOn JaxTe. B TAKOM cnyae OH nepeCTaET npaBnIbHO NOcTyNaTb B 3aBapOuH N6lOK.
UcTka 3aBapOuHOro MoDyJra:
- OtknIOuHTe npnbOp ot cetn.
- CHIMITE KpbiKcY c 3aBapOuHOro MoDyJIa.
- Haxmte Bmcte KhoNk paCzepnEHHaBapOuHOro MOnyJ (opaHXeBbIe) n CHMITE erO.
- Ppomoe ero nod ctpyeB Odbi N TuaTeNbHO npocuHnte.
- IpoTpnte BHyTpeHHIO NOBepxHocTb 3a KpbIkwO BJaXHO TkaHbO, a 3aTeM Bbltpnte HAcYxo.
- OuHCTnTe KoΦeHyU WaxTy N OTBepCTne B 3aBapOyHom MoDyIe C NOMOuBIO PpUNaRAeMOJ UeTOyKIN DnA OYNCTKN.
- OuHCTnTe OTBepCTne B 3aBapOCHOM MOyIe (pnc. 2) c NOMOUIIO npINlraeMOI CKpeKN (pnc. 3).
- BCTaBbTe 3aBapOHyb 6JIOK Ha MeCTo IpaBnIbHO. YcTaHObITE Ha Hero KpbIiKy.
46.6Чистka Komnoentob Ддя пirotoBleHЯ MJOOHOIпсbl
KOMNOHEHTbI DJIЯ nprirotOBnHn MOJouHOn neHbI CneDyET OUYUaT b EKeJHeBHO.

- CHIMMTE KpbIuKy
- BbTaunTe KpaH dJa MoNoka
- Cnoxnte pe3HOByIO npOKnaKy BbIXOa MOkOka, KaK noka3aHO Ha pncyHke. Chmnte CoedHnTeBHyI 3JIeMeHTC OTBepCTnIg MOnoKa. TuaTeJbHO OuNCTnIe KOMNoHeTbI NOd CTpyE WOdbI.
4.ПрочиTe OTBepTne B кран Дп MAJOKa (CM.pucyHOK CNeBa) C NOMOuIbIO npnilaraemoi cKpeKNДЯ OUcSTKn. - 3aONHnTe pe3epByap IJIa MOJOKa BOIOI IN DBaXDbI NCNOJb3yIte cyHKUHO MOIOuHOI neHbl.
Uactota ydaJIeHnHaKIN3aBNCNT OT XeCTKOCTN BOdbI N UactOTbI NCNoJIb3OBaHn np6opa.MbI peKOMeHdyem:
- Pn nCnoJb3OBaHnn MrgKoB BODbl: OunuataB np6op OT haknn KaK MNmym KkDble 3 Mecaua.
-При ИСПОЛБЗOBAHИЖЕСТКОВ BODы: OЧИДАТ ПИБОР OT HAKINI KAKДы MEСÄC.
B cnyae, ecn Bbl He 3haete kecKocTb BoDbl y BaWem Dome, o6paTntecb B KOMNaHIO, npedoctabnaioy uCnyrBoDOna6xhen.
YdaJIeHHe NaKIIH Heo6xOIMo npn noBLeHH CneDyUOUX npn3HaKOB:
- Ppi 3aBapnBaHn KofoyBeJInuHbaeTcYpOBeHb Wyma.
- Ipouecc 3aBapnBaHna KoFe NaHaJI 3aHmMaTb 6OJIbWe BpeMeHH, Yem O6bIHyO.
- Пибор оTKлчаetяdoTORO,кak pe3epByap ДЯВОдbl onyctTeeT.
HINWEIS PIMMEUAHNE
IcnoIb3yIte NMeIOUneC8 B npOaJKe cpeCTBa dJaJIeHnHaKINn dJa NOJHOCTbIO aBTOMaTNUeCKNX KOΦeMaUSHN.
HnKoIgHa He nCNoJIb3yIte yKcyc nIIN cpeICTBO dIy ydaJIeHna HauNII dJIaHnKOB/O6bIuHbIX KoΦeMaunH. Pnp6Op MoKeT 6bITb NOBpeJdeH.
3aONHnTe pe3epByap dny BObl DO MaKcImaIbHOJ OTMeTKN. IomeCTnte B Hero cpeDCTBO dny ydaJIeHnaKIN. IomeCTnte pe3epByap dny BObl B npIbOp. BCTaBbTe BNIKy B po3ETky. IomeCTnte 6oIbShyIO ncyTO eMKoCTb NOd HocNK TaKIM o6pa3OM, UTo6bl BOda nonaIana B Hee (ecNI eMKoCTb He 6yJeT NOMEuATbcra ND HOCNK CnBa,
CHIMITE NOIDOH).HaxMMTe OndHOBpeMeHHO KHOINu IN DEpXnTE INx HAXaTbIMN Do TEX nop, noka npnbop He n3dact 2 3ByKOBbIX CNrHaJa. Ha dincnJIee NaHyT
MnraTb 3NaKu N. POnTBePdnte OUnCTKy OT HaKnPi, HaxaB KHOk Ky MuraOuIHa dnCpIee 3NaUok OHauaet, UTO npnbOp BblonJeT cNKl OUnCTKn OT HaKnIi.
▲WARNUNG ПЕДУПЕЖДЕΗΝΕ
BybTe ocTopoXHbl, NockoIbky ropraa Boda MoKeT BblIpeChyTbcra n3 np6opa nnemKoCTn, cyueCTByeT onaCHOCTb OxOROB.
Iocne Toro, KaK npBbI 3TaN OunchKn OT HaKnn6yJeT BbINOnHeH,Ha DnCnnee 3aMnraeT
3HaOK a KHONoKa CBETbCra. KaK MOxHcCKopee BblOnHInTe CNeDuOuIe DeiCTBn, INaue np6op MoKET BblIOUHTc:
Onopoxhnte 60bwoon KOHTeHep.CHMnTe pe3epByap nB OdbI. YdaJIte BCE octaTkn CpeCTBa IJy ydaJIeHnHaKnNn N3 pe3epByapa nB OdbI n TuaTeNbHO npOMoIte erO. ChOba HanoHnTe pe3epByap nB OdbI DO MaKcMaJIbHoN OTMeTKn. KaTolbKO Bbl CHOBA BCTaHnte pe3epByap nB OdbI, PPOUecC ONUCTKN pOdoONXITcA BTOMaTHueCKN. Teepb 6ydet 2 uKna onoJaackBaHnra ropayeBBoDor.
IooHuaHn npocecca npnbop OTKnIOHTc aBtOMaTnueckn.
Onopoknhte emkoctb n cHOba TuaTeNbHO npomoi Te pe3epByap dIy BoIy. Tepeb np6op moKet pa6oTaB B obuHOM pexnme.
HINWEIS PIPMEUAHNE
He npepbBaIte npouecc ydaJIeHnHaKnII.
Пиборы, КOTОрье He pa6OtaIOTdoJXHbIM O6pa3OM BCJIeCTBHe He npOBeDEHnOuNCTKo OT HaKNII, TepaHTnIO.
46.8 Onycstowenne npnbopa
HencnoIb3yembl B TeueHne dInTeIbHoro BpeMeHn np6op, y6paHHbHa XpaHeHne nIIN NOdroTOBHeHb IaONOTpAeBNB aABTOpN3OBaHHb CepBnCHbI cHTp, DoJKeH 6bITb
HONHO ONOPOXHeH. HaxMITE BmecTe KhoNkN 1nIX HaxaTbIMBmecTe Do Tex nop, noka np6op He n3dact 2 3BykoBbix CunHana. Ha dinCnnee
Hauchet MuraTb 3NaOc . Chnmtpe pe3epByap dny BoDbl. Tenepb 3NaOcRopnt noctoHNO. Pnp6op 6ydt onopoxHeH, a 3aTeM BbIKJIOHTcR. OTKIOUHTe Ka6NTAHNA. XpaHtpe np6op B cyxom MeCTe.
EcnBbXOTHe cHOba 3aNyCTnTb np6Op, BblOnHnTe DeiCTBnA, ONuCAHHbIe B pa3dJe Ipeed nepBbIM nCNoJIb3OBaHNem HacToaJero pyKOBODCTBa.
47 YcTpaHHe HEnCnPaBHOCTeI
B daHno rnaBe coepkaTcBaKhble 3ameuHaNo oKcnIyataun npnbopa.
Co6nOaTe cneDyUoune yka3aHna, UTO6bI n36eXaTb onaChocTe n NOBpeXdeHn:
A VORSICHT OCTOPOXHO
Pemont 3neKtpnpnbopob pa3peuheo ocyuaceTBnTb TOnbKO KBaIINpUPOBaHHbIM cneuaJIncTam, npOweDm oByeHne y npOn3BOdnteJ.
HeKBaIINΦuIcPObAHHbI peMOHT moKeT npVBecTu K cepBe3HbIM ONaCHOCTM dJa NOJIb3OBaTeJI N IOBpeJdeHnU yCTpOJCTBa.


- Fully automatic coffee machine
- Café Crema Touch (1882)
- Operating Manual
- General
- Information on this manual
- Warning notices
- ▲GEFAHR
- DANGER
- WARNING
- AVORSICHT
- ATTENTION
- HINWEIS
- PLEASE NOTE
- Limitation of liability
- Copyright protection
- Safety
- Intended use
- WARNING Warning
- General Safety information
- HINWEIS Please note
- Please observe the following general safety notices with regard to the safe handling of the device.
- Sources of danger
- Danger of injury
- ▲WARNUNG
- Risk of burning and scalding
- ▲WARNING Warning
- Dangers due to electrical power
- GEFAHR Mortal danger due to electrical power!
- Commissioning
- Safety information
- Delivery scope and transport inspection
- Unpacking
- Disposal of the packaging
- Setup location requirements:
- Electrical connection
- Rating plate
- Operation and Handing
- Overview
- WARNUNG Warning:Warning symbol: hot steam.
- Assembly
- WARNING Warning:Crushing hazard!
- WARNING Warning: Risk of burns
- Before first use
- Control panel
- Buttons
- LED displays
- Rinsing processes
- ▲WARNING
- Warning: Risk of burns
- Manual rinsing
- Set the grinding degree
- Preparations
- Functions
- Hot water function
- Save the hot water quantity
- Milk foam function
- Adjust the amount of milk foam
- Cappuccino function
- Espresso & Café Crema function
- Save the espresso quantity
- Save the café crema quantity
- Reset to factory settings
- Change the mode
- Cleaning and Maintenance
- Safety information
- ▲VORSICHT Attention
- Cleaning
- Rinsing programme for the spout
- Internal drip tray
- Cleaning of the coffee chamber / brewing unit
- Cleaning of brewing unit
- Cleaning of components for milk foam
- Descaling & the cleaning programme
- Emptying the appliance
- Troubleshooting
- Causes and rectification of faults
- Disposal of the Old Device
- Guarantee
- Technical Data
- IcToUHnKn ONaCHOCTN
- Onachoctb TpaBM
- ▲WARNUNG ΠРЕДУПЕЖДЕΗΝΕ
- Onachoctb oxora
- ▲WARNUNG ΠРЕДУПPEЖДЕΗΝΕ
- Boda, Hargebaioaia B KoceBaapke, KoFe N BCpeHHeHoe MOLOKO MOryT 6bITb OyeHb ropaymN.
- Onachoctb ot əJIeKtpnueckoro Toka
- HINWEIS PIMMEUAHNE
- BnHyTpEnHn IoDoH
- Ynctka KofoeHoro BaJa n 3aBapOuHOro MoDyJra
- UcTka 3aBapOuHOro MoDyJra:
- 46.6Чистka Komnoentob Ддя пirotoBleHЯ MJOOHOIпсbl
- ▲WARNUNG ПЕДУПЕЖДЕΗΝΕ
- HINWEIS PIPMEUAHNE
- Onycstowenne npnbopa
- YcTpaHHe HEnCnPaBHOCTeI
- A VORSICHT OCTOPOXHO
Brand : CASO
Model : Café Crema Touch 1882
Category : Coffee machine