
Espresso Gourmet Latte 1821 - Coffee machine CASO - Free user manual and instructions
Find the device manual for free Espresso Gourmet Latte 1821 CASO in PDF.

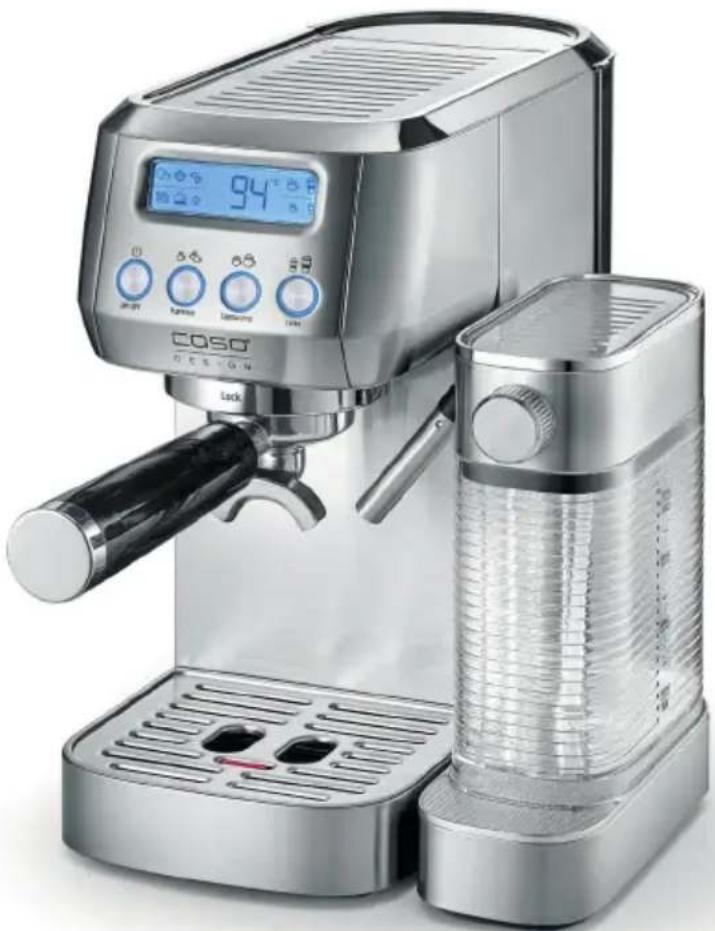
| Product type | Espresso coffee machine with integrated milk frother |
| Brand | CASO |
| Model | Espresso Gourmet Latte 1821 |
| Dimensions (W x D x H) | Approx. 30 x 25 x 35 cm |
| Weight | Approx. 5 kg |
| Power supply | 220-240 V ~ 50 Hz |
| Power | 1350 W |
| Water tank capacity | 1.4 L |
| Milk tank capacity | 0.5 L |
| Functions | Espresso (single/double), Cappuccino (Small/Large), Latte Macchiato (Small/Large), manual milk foam |
| Filter types | Double wall filters (Barista easy) and single wall (Barista professional) for 1 or 2 cups, E.S.E Pad filter |
| Frothing system | Integrated milk nozzle with removable milk tank |
| Control panel | Touch buttons and LED display |
| Safety | Automatic shut-off after 15 min, overheating protection, child safety |
| Maintenance | Rinsing of milk nozzle, cleaning of filters and portafilter, automatic descaling |
| Descaling | Warning after 500 cycles, automatic cycle |
| Included accessories | 2 double wall filters, 2 single wall filters, Pad filter, stainless steel portafilter, tamper with wooden handle, stainless steel dosing spoon, milk tank, quick guide |
| Warranty | 24 months |
Frequently Asked Questions - Espresso Gourmet Latte 1821 CASO
User questions about Espresso Gourmet Latte 1821 CASO
0 question about this device. Answer the ones you know or ask your own.
Ask a new question about this device
Download the instructions for your Coffee machine in PDF format for free! Find your manual Espresso Gourmet Latte 1821 - CASO and take your electronic device back in hand. On this page are published all the documents necessary for the use of your device. Espresso Gourmet Latte 1821 by CASO.
USER MANUAL Espresso Gourmet Latte 1821 CASO
Original-Bedienungsanleitung | Instruction Manual | Mode d'emploi Manual del usuario | Gebruiksaanwijzing | Руководство по эксплуатации Manual de instruções | Kullanım Kilavuzu | Bruksanvisning
Espressomaschine Espresso Gourmet Latte Espresso machine Espresso Gourmet Latte Machine à espresso Espresso Gourmet Latte Cafetera exprés Espresso Gourmet Latte Espressomachine Espresso Gourmet Latte Эспрессо-машина Espresso Gourmet Latte Máquina de café expresso Espresso Gourmet Latte Espresso Makinesi Espresso Gourmet Latte Espressomaskin Espresso Gourmet Latte
natural_image
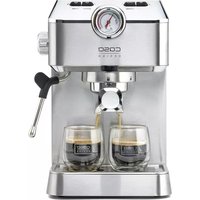
Exterior view of a modern espresso machine with digital display and side-mounted glass tube (no visible text or symbols)Technische Daten / Technical Data / Caractéristiques techniques / Datos técnicos / Technische gegevens / Технические характеристики / Especifi cações técnicas / Teknik Verirler / Tekniska data
| Gerät / Device / Appareil / Aparato / Aparaat / Прибор / Aparelho / Cihaz / Apparat | Espressomaschine, Espresso machine, Machine à espresso, Cafetera exprés, Espressomachine, Эспрессо-машина, Máquina de café expresso, Espresso Makinesi, Espressomaskin |
| Name / Name / Nom / Denominación / Name / Наименовани / Nome / Cihaz Adı / Namn | CASO Espresso Gourmet Latte |
| Artikel-Nr. / Item No. / N°. d'article / N. Articolo / Artikelnr. / N° артикула / N.° de artigo / Ürün No. / Artikel-nr. | 1821 |
| Anschlussdaten / Mains data / Données de raccordement / Dati connessione / Aansluitgegevens / Параметры подключения / Dados de ligação / Bağlanti verileri / Anslutningsdata | 220 - 240 V, 50 - 60 Hz |
| Leistungsaufnahme / Power consumption / Puissance consommée / Potenza assorbita / Vermogens / Мощность / Consumo de potência / Güç / Eff ektbehov | 1350 W |
| Außenabmessungen (B/H/T) / External measurements (W/H/D) / Dimensions extérieures (I/h/p) / Dimensiones exteriores (An/H/P) / Afmetingen (B/H/D) / Габаритные размеры (Ш/В/Г) / Dimensões externas (L/A/P) / Diş boyutlar (Uzunluk/Genişlik/Derinlik) / Yttermått (BxHxD) | 215 mm x 310 mm x 320 mm |
| Außenabmessungen mit eingespanntem Siebträger / External measurements with inserted portafi Iter / Dimensions extérieures avec porte-fi Itre fi xé / Dimensiones exteriores con el portafi Itro instalado / Afmetingen met ingeklemde zeefsteun / Наружные размеры указаны с закрепленным портафильтром / Dimensões exteriores com o porta-fi Itro colocado / Portafi Itre yerine takılı haldeyken diş ebatlar / Yttermätt med införd silbärare | 215 mm x 310 mm x 443 mm |
| Nettogewicht / Net weight / Poids net / Peso net / Nettogewicht / Bec / Peso líquido / Net ağırlık / Nettovikt | 4,6 kg |
natural_image
Diagram of a mechanical component with a handle and two circular ends, no text or symbols presentGerät
1.1 Information on this manual....26
1.2 Warning notices.... 26
1.3 Limitation of liability 27
1.4 Copyright protection....27
2 Safety....27
2.1 Intended use.... 27
2.2 General Safety information 28
2.3 Sources of danger.... 29
2.3.1 Danger of burns 29
2.3.2 Dangers due to electrical power 30
3 Commissioning....30
3.1 Packaging safety information.... 30
3.2 Delivery scope and transport inspection 30
3.3 Unpacking.... 31
3.4 Setup location requirements 31
3.5 Electrical connection 31
3.6 Warning notices.... 31
4 Design and Function 32
4.1 Overview 32
4.2 Control Panel 33
4.3 Rating plate 33
5 Operation and Handing 34
5.1 Before first use 34
5.2 Tips / recommendations for preparation.... 35
5.3 Portafilter baskets 35
5.3.1 Double-walled portafilter baskets (with pressure regulation) 36
5.3.2 Single-walled portafilter baskets (without pressure regulation)....36
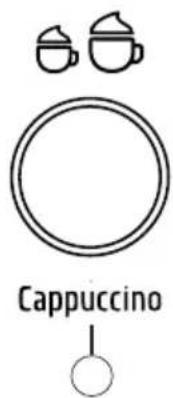
5.5 How to prepare cappuccino 37
5.6 How to prepare latte macchiato.... 38
5.7 How to prepare coffee using E.S.E Pads 38
5.8 How to add more frothy milk manually 38
5.9 Adjusting the quantities for the espresso, cappuccino and latte macchiato functions..... 38
5.9.1 Adjusting the water quantity for espresso 39
5.9.2 Adjusting the cappuccino quantity 39
5.9.3 Adjusting the latte macchiato quantity....40
5.9.4 How to reset the appliance to the standard quantities 40
6 Cleaning and Maintenance....40
6.1 Safety information 40
6.2 Cleaning 40
6.3 Descaling 42
7 Troubleshooting....42
7.1 Safety notices 42
7.2 Troubleshooting table....43
8 Disposal of the Old Device 44
8.1 Disposal of the packaging 45
9 Guarantee ....45
1General
Please read the information contained herein so that you can become familiar with your device quickly and take advantage of the full scope of its functions.
Your Coff ee maker will serve you for many years if you handle it and care for it properly.
We wish you a lot of pleasure in using it!
1.1 Information on this manual
This user's guide is part of the CASO Espresso Gourmet Latte (referred to hereafter as the Device) and provide you with important information for the initial commissioning, safety, intended use and care of the device.
The Operating Instructions must be available at all times at the device. This Operating Manual must be read and applied by every person who is instructed to work with the device:
- Commissioning, - Operation,
- Troubleshooting and/or • Cleaning
Keep the Operating Manual in a safe place and pass it on to the subsequent owner along with the device.
1.2 Warningnotices
The following warning notices are used in the Operating Manual concerned here.

DANGER
A warning notice of this level of danger indicates a potentially dangerous situation. If the dangerous situation is not avoided, this can lead to death or serious injuries.
Observe the instructions in this warning notice in order to avoid the danger of death or serious personal injuries.

WARNING
A warning notice of this level of danger indicates a possible dangerous situation. If the dangerous situation is not avoided, this can lead to serious injuries.
Observe the instructions in this warning notice in order to avoid the personal injuries.

ATTENTION
A warning notice of this level of danger indicates a possible dangerous situation. If the dangerous situation is not avoided, this can lead to slight or moderate injuries.
Observe the instructions in this warning notice in order to avoid the personal injuries.
PLEASE NOTE
A notice of this kind indicates additional information, which will simplify the handling of the machine.
1.3 Limitation of liability
All the technical information, data and notices with regard to the installation, operation and care are completely up-to-date at the time of printing and are compiled to the best of our knowledge and belief, taking our past experience and findings into consideration. No claims can be derived from the information provided, the illustrations or descriptions in this manual. The manufacturer does not assume any liability for damages arising as a result of the following:
• Non-observance of the manual
• Uses for non-intended purposes
- Improper repairs
- Technical alterations, modifications of the device
- Use of unauthorized spare parts
Modifi cations of the device are not recommended and are not covered by the guaran- tee. All translations are carried out to the best of our knowledge. We do not assume any liability for translation errors, not even if the translation was carried out by us or on our instructions. The original German text remains solely binding.
1.4 Copyright protection
This document is copyright protected. CASO GmbH reserves all the rights, including those for photomechanical reproduction, duplication and distribution using special processes (e.g. data processing, data carriers, data networks), even partially.
Subject to content and technical changes.
2Safety
This chapter provides you with important safety notices when handling the device. The device corresponds with the required safety regulations. Improper use can result in personal or property damages.
2.1 Intendeduse
This device is only intended for use in households in enclosed spaces for
- Preparation of café crema/espresso using freshly ground coff ee/espresso beans,
- Preparation of café crema/espresso using coff ee/espresso pads,
• Preparation of cappuccino and latte macchiato
• Preparation of frothy milk.
This appliance is intended to be used in household and similar applications, such as: - in kitchens, for employees in shops, offices and other commercial areas,
- in farms,
- by customers in hotels, motels and other similar residential environments,
- in bed and breakfast establishments.
Uses for a different purpose or for a purpose which exceeds this description are considered incompatible with the intended or designated use.

WARNING
Danger due to unintended use!
Dangers can emanate from the device if it is used for an unintended use and/or a different kind of use.
▶ Use the device exclusively for its intended use.
▶ Observe the procedural methods described in this Operating Manual.
Claims of all kinds due to damages resulting from unintended uses are excluded.
The User bears the sole risk.
2.2 General Safety information
PLEASE NOTE
Please observe the following general safety notices with regard to the safe handling of the device:
Use the appliance only as described in the user's guide to avoid possible injury from misuse.
This unit may be used by children as of 8 years old and anyone with reduced physical, sensory or mental capabilities or a lack of experience and knowledge if they are supervised or have been instructed in connection with the safe use of the appliance and the dangers resulting from it.
▶ Cleaning and maintenance by the user must not be performed by children unless they are at least 8 years old and are supervised.
The device and its connecting cable must be kept away from children who are less than 8 years old.
▶ Children are not allowed to play with the device.
▶ Operate the appliance only in dry indoor areas.
▶ Do not operate the appliance unattended.
▶ Do not use the appliance:
- if the appliance itself or parts are damaged,
- if the power cord or plug is damaged,
• if the appliance has been dropped.
▶ Always unwind the power cord completely before use. When doing so, ensure the power cord is not damaged by sharp edges or hot objects.
PLEASE NOTE
▶ Pull the plug out of the socket:
- when you are not using the appliance,
- after each use,
- before cleaning the appliance or putting it away,
- if there is an obvious malfunction during operation,
• during a thunderstorm.
▶ Do not make any modifications to the appliance or the power cord.
Only have repairs carried out by a specialist workshop, as appliances that have not been repaired properly endanger the user. Please also observe the enclosed warranty conditions.
Place the appliance on a stable, level surface. Ensure sufficient distance between the appliance and strong heat sources such as hotplates, heating pipes, etc.
Do not clean the appliance with hard, scratchy or abrasive cleaning agents such as steel wool or similar.
The appliance's water tank lid must be kept closed during operation.
▶ Defective components must always be replaced with original replacement parts. Only such parts will guarantee that the safety requirements are fulfilled.
▶ Only use the device with original accessories.
2.3 Sources of danger
2.3.1 Danger of burns
WARNING
Water which is heated in this appliance, the milk nozzle and the portafi Iter baskets and group head can become very hot. Please
observe the following safety notices in order not to burn or scald yourself or others.
WARNING! The appliance's surfaces can become very hot during use. In particular the milk nozzle, the cup warming tray, group head, the portafi Iter baskets and the drip grid all become very hot.
The milk nozzle emits hot milk when in use. Do not touch the milk nozzle when in use.
▶ Never put your hand under the portafi lter or milk nozzle outlet spouts when the appliance is in use.
2.3.2 Dangers due to electrical power

DANGER
Mortal danger due to electrical power! Mortal danger exists when coming into contact with live wires or subassemblies! Observe the following safety notices to avoid dangers due to electrical power:
If the power cord of this appliance is damaged, it must be replaced by the manufacturer or its customer service or a similarly qualified person in order to avoid hazards.
Do not open the housing on the device under any circumstances. There is a danger of an electrical shock if live connections are touched and the electrical or mechanical structure is altered. In addition, functional faults on the device can also occur.
▶ Do not immerse the appliance in water for cleaning.
▶ WARNING! Risk of electric shock! Do not allow any liquid to run over the appliance connector.
3Commissioning
This chapter provides you with important safety notices during the initial commissioning of the device. Observe the following notices to avoid dangers and damages:
3.1 Packaging safety information

WARNING
Packaging materials may not be used for playing. There is a danger of suffocation.
3.2 Delivery scope and transport inspection
The device includes the following components:
• CASO Espresso Gourmet Latte
- 2 single-walled portafi Iter baskets (Barista professional single & double)
- 2 double-walled portafi Iter baskets (Barista easy single & double)
- E.S.E pad fi Iter basket
- Tamper with wooden handle
- Stainless steel measuring spoon
- Stainless steel portafi Iter
- Quick guide
- Operating manual
PLEASE NOTE
Examine the shipment to ensure the unit and manual are included and inspect the unit for any visible damage.
Immediately notify the carrier and/or the supplier about an incomplete shipment or any damage as a result of inadequate packaging or mishandling.
3.3 Unpacking
Carefully remove the packaging material and unit from the carton. Remove the protective film from the unit.
PLEASE NOTE
If possible, keep the original packaging for the duration of the guarantee period in the event a return is necessary.
3.4 Setup location requirements
In order to ensure the safe and trouble-free operation of the device, the setup location must fulfil the following prerequisites:
- Only use this coffee maker on a flat, stable, heat-resistant surface away from water splashes and any heat sources.
- Choose the setup location in such a way that children cannot reach any hot surfaces on the device.
- Do not operate the device under delicate furniture as the escaping steam could damage them.
- Do not set up the device in a hot, wet or extremely damp environment or near flammable material.
- The electrical socket must be easily accessible so that the power lead can be disconnected easily, in the case of an emergency.
- The installation and assembly of this device in non-stationary setup locations (e.g. on ships) must be carried out by specialist companies / electricians, provided they guarantee the prerequisites for the safe use of this device.
- The device shall not be placed in a cabinet while it is in operation.
3.5 Electrical connection
In order to ensure the safe and trouble-free operation of the device, the following instructions must be observed for the electrical connection:
- Before connecting the device, compare the connection data (voltage and frequency) on the rating plate with those of your electrical network. This data must agree in order that no damages occur in the device. If in doubt, ask your qualified electrician.
- The connection between the device and the electrical network may employ a 3 meter long (max.) extension cable with a cross-section of 1.5 mm ^2 . The use of multiple plugs or gangs is prohibited because of the danger of fire that is involved with this.
- Make sure that the power cable is undamaged and has not been installed under the device or over hot or sharp surfaces.
- The electrical outlet must be protected by a 16A safety cut-out switch.
- The electrical safety of the device is only guaranteed if the device is connected to a properly installed protective conductor system. If in doubt, have the house installation checked over by a qualified electrician. The manufacturer cannot be made responsible for damages that are caused by a missing or damaged protective conductor.
3.6 Warningnotices

ATTENTION
Danger due to hot surface!
Do not touch the hot surfaces of the device. Danger of burns!
4 Design and Function
This chapter provides you with important information of the design and function of the device.
4.1Overview
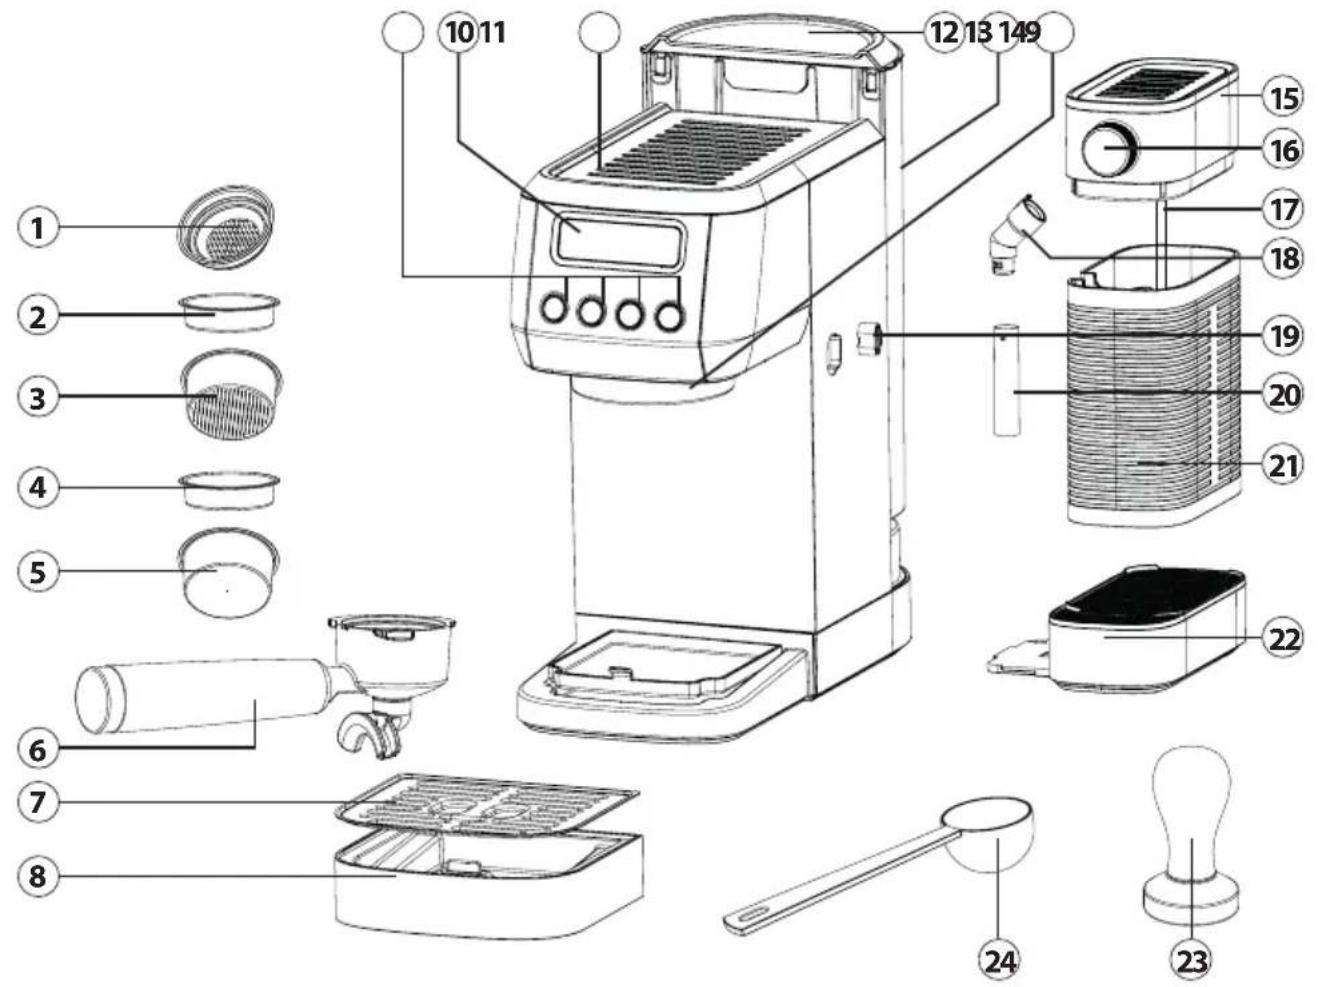
① E.S.E pad fi Iter basket
② Barista professional single (for 1 cup)
③ Barista professional double (for 2 cups)
④ Barista easy single (for 1 cup)
⑤ Barista easy double (for 2 cups)
⑥ Portafi Iter
⑦ Drip grid
⑧ Drip tray
⑨ Operating buttons
10 Control panel
⑪ Cup warming tray
12 Water tank lid
⑬ Water tank
⑭ Group head
⑮ Milk tank lid
⑯ Milk nozzle control knob
17 Silicone hose
⑱ Milk nozzle connector
⑲ Milk tank lock
20 Milk nozzle
21 Milk tank
22 Milk tank base
23 Tamper
24 Measuring spoon
4.2 Control Panel
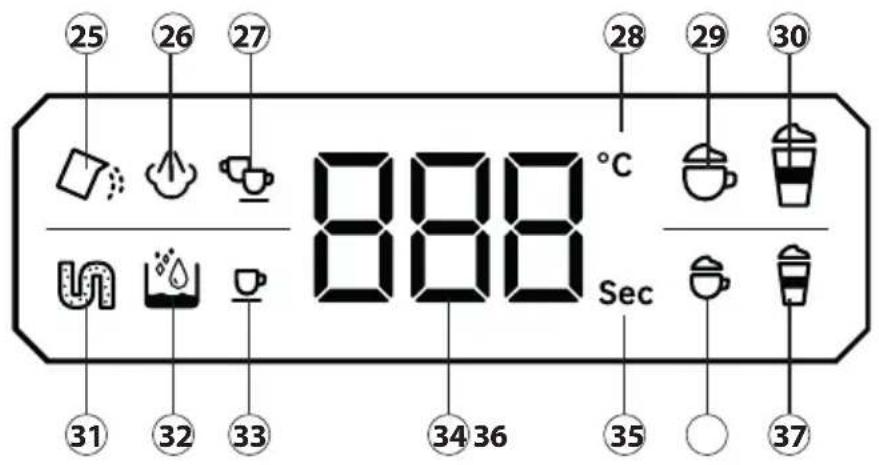


25 Water tank empty
26 Add more frothy milk
27 2 espressi / doppio espresso
28 Brewing temperature in C° (not adjustable)
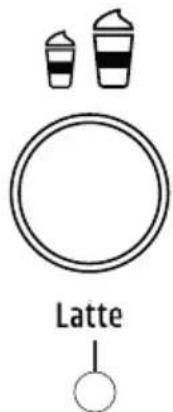
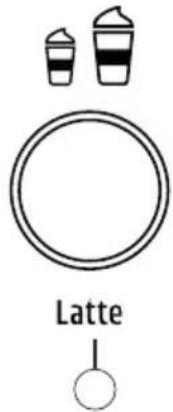
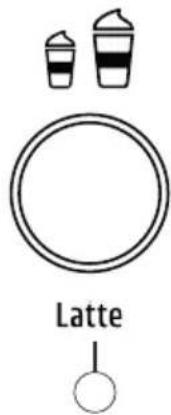
29 Cappuccino grande
30 Latte macchiato grande
31 Descaling reminder
32 Milk nozzle cleaning function
33 Single espresso
34 Brewing temperature/ brewing time indicator
35 Time in seconds
36 Small cappuccino
37 Small latte macchiato
Buttons:
The rating plate with the connection and performance data can be founded beneath the device.
5 Operation and Handing
This chapter provides you with important notices with regard to operating the device. Observe the following notices to avoid dangers and damages:

WARNING
▶ Caution hot steam can escape at device. Risk of burns.
Do not leave the device unsupervised when it is in operation, so that you can intervene quickly in the event of dangers.
▶ Always insert the portafi Iter before you use the appliance.
Do not fill hot water into the watertank.
The milk nozzle emits hot milk when in use. Do not touch the nozzle.
▶ Never reach under the outlet openings of the portafi Iter or the milk nozzle when the appliance is in operation.
PLEASE NOTE
If the water tank is empty when you start the brewing process, then the ON/OFF button will light up white; the other buttons will flash green and the symbol on the control panel will start to flash. Fill the water tank with water and press the "Espresso" button. The appliance pipes will fill with water and the appliance will heat up again. Repeat your desired brewing process.
The appliance will automatically turn to standby mode after approx. 15 minutes.
▶ Empty the drip tray regularly and/or when you see the red float protruding out of the opening in the drip grid.
5.1 Before first use
Clean the appliance and accessories as described in the "Cleaning and care" section. You should also carry out a brewing process without coffee grounds as part of the cleaning process.
- Insert the drip grid in such a way that the red float can protrude out of the opening in the drip grid.
- Remove the water tank and fill it with water up to the "MAX" mark. Replace the water tank into the appliance.
-
Push the milk tank base onto the right side of the appliance until you hear it click into place.
-
Fill the milk tank with water up to the "MAX" mark. Place the milk tank lid on the tank. Push the milk tank lock to the -symbol, place the milk tank on the base and push the milk tank lock to the -symbol.
-
Place the portafilter (with an empty portafilter basket) on the appliance's group head, align the portafi Iter to the Insert →" mark and then turn it anti-clockwise to the 'Lock" position. When doing so, hold onto the side of the appliance or the water tank.
-
Place a large cup on the drip grid.
-
Turn the milk nozzle control knob until the milk nozzle is pointed at the cup.
-
Plug the appliance into the power socket and press the "ON/OFF" button.
-
The appliance will begin to heat up. The buttons will flash white one after another.
-
The appliance will be heated up and ready to use as soon as all the buttons are lit up and the control panel shows a temperature of 94^ C. This procedure takes approx. 2 minutes.
-
Press the "Cappuccino" button for approx. 3 seconds. The appliance will dispense hot water from the milk nozzle. Allow the water to flow out of the nozzle for approx. 20 seconds, then press the "Cappuccino" button again to end the process.
- Where applicable, the appliance will heat up again.
- Pour away the water in the cup and replace the cup on the drip grid under the portafi lter's outlet spout.
- Press the "Espresso" button twice.
- The appliance will begin the brewing process; dispense the water quantity for 2 espressi and then automatically end the process when it is finished.
- Pour away the water in the cup.
- You can now use the appliance as you wish.
PLEASE NOTE
The appliance will make loud noises the first time it is used because of the water in its pipes. These noises are normal; the appliance will become quieter after a short time.
5.2 Tips / recommendations for preparation
- The coffee beans should be very finely ground. Use a coffee grinder which is suitable for espresso coffee to grind the beans.
- The coffee grounds must be pressed down firmly into the portafilter basket – i.e. they must be evenly tamped. Use the tamper to press the coffee grounds down evenly, vertically and firmly.
- It is important that your appliance, your portafilter and the cup are correctly heated before the brewing process begins to ensure that the water does not cool down.
5.3 Portafilterbaskets
The scope of delivery includes both double-walled portafi Iter baskets for one and two cups as well as single-walled portafi Iter baskets for one and two cups. Always use the correct portafi Iter basket for your desired number of cups or drink size and in line with your level of experience of using a portafi Iter espresso machine and the related preparation technology. The appliance is also supplied with an E.S.E pad fi Iter basket.
Double-walled portafi Iter baskets (Barista easy single & double)
| Basket | Amount | Quantity (g) | For use by | |
 | Single | 7-11 g | Beginners | Freshly ground coff ee and pre-ground coff ee |
Double | 14-17 g | |||
Single-walled portafi Iter baskets (Barista professional single & double)
| Basket Amount | Quantity (g) For use by | |||
 | Single | 11-12 g | Experts | Freshly ground coff ee |
Double | 18-19 g | |||
* 1 heaped measuring spoon = approx. 7 g
5.3.1 Double-walled portafi Iter baskets (with pressure regulation)
We recommend that beginners use the double-walled portafi iter baskets. These baskets have a fi iter wall and a wall with a small hole which assists pressure regulation. This is perfect for beginners as the design supports the extraction of the espresso and is largely independent of the coarseness of the beans; the amount of beans; the tamper pressure or the freshness of the coff ee grounds.
5.3.2 Single-walled portafi Iter baskets (without pressure regulation)
We recommend that advanced users and experts use the single-walled portafi iter baskets. They only have a fi iter wall and are thus not pressure regulating. The user can experiment with the setting parameters, such as the coarseness of the beans, tamper pressure and the amount of coffee, to find their optimal settings. This gives the user more control over the espresso preparation process. Beginners can also use these baskets to learn about the process and get to know the machine better.
Cups should always be pre-warmed to ensure a perfect espresso. Store your cups upright on the appliance's cup warming tray. Be careful when you touch the cup warming tray as it becomes very hot. When grinding your coffee beans make sure that they are finely ground. If the beans are ground too coarsely, this will result in the espresso having a bitter aroma.
- Fill the water tank with fresh tap water up to the "MAX" mark.
- Turn the appliance on and wait for it to heat up and all the symbols on the buttons to light up white and the control panel to show a temperature of 94^ C.
-
Place the portafi lter with the fi lter insert for the desired amount of cups on the brewing head of the appliance and tighten it.
-
Place the desired cup/s on the drip grid under the outlet spout.
-
To warm the portafil ter, basket, cup/s and group head, dispense the desired amount of water by pressing the "Espresso" button once for a single espresso and twice for two espressi or a doppio espresso.
-
Remove the portafi iter by turning it in the opposite direction.
-
Remove the fi Iter basket from the portafi Iter by levering it out, for example using a spoon. Warning! The portafi Iter and basket will be very hot!
-
Dry the basket and portafi Iter thoroughly before carefully re-inserting the basket into the portafi Iter.
-
Use the supplied measuring spoon to evenly spread the freshly ground coffee into the desired portafi liter basket. We recommend using digital scales to precisely measure the amount of coffee grounds, particularly when you first start using the espresso machine. Use the quantities recommended in the table.
-
Gently tap the portafi liter on the work surface or a tamping mat to spread the coffee grounds as evenly as possible, thus ensuring that they are well compacted.
-
Use the supplied tamper to press the coff ee grounds down evenly, holding it vertically when doing so.
-
Skim off any excess coffee grounds from the edges of the portafi liter.
-
Place the portafi Iter on the appliance's group head and then turn it to attach it.
-
Place the desired number of cups (one or two) on the drip grid under the outlet spout.
-
Press the "Espresso" button once for a single espresso and twice for two espresso or a doppio espresso.
-
The brewing process will begin in a few seconds and the selected button will flash white for a single espresso and green for 2 espresso or a doppio espresso.
-
The appliance automatically stops the brewing process when it is finished.
-
To remove the portafi Iter after the brewing process, hold the machine firmly with one hand and turn the portafi Iter away from the appliance with other.
-
Place the portafi Iter on the drip grid to cool down. The spout on the group head is designed to fit into the two notches on the drip grid for this.
-
Make sure that you remove all coff ee grounds from the filter basket after each use by knocking the grounds out over a container.
-
Remove the filter basket from the portafi iter by levering it out, for example using a spoon.
-
Clean the basket and the portafi Iter thoroughly under running water.
-
Before drinking your espresso we recommend stirring it with a spoon to release all its aromas.
PLEASE NOTE
You can end the brewing process at any time by pressing the "Espresso" button again.
The milk tank does not have to be attached to the appliance to prepare espresso.
5.5 How to prepare cappuccino
Always make sure that there is enough milk in the milk tank (between the "MIN" and "MAX" marks) and that the milk tank is correctly attached to the appliance. The milk tank lock must be set to the 🔒-symbol, otherwise the appliance will not be able to recognise the attached milk tank and you will not be able to select the "Cappuccino" and "Latte Macchia-to" buttons. For a "Small Cappuccino" use the single cup fi Iter; for a "Cappuccino Grande" use the double cup fi Iter.
- Follow Steps 1 – 14 in the "How to prepare espresso" section but use a cappuccino glass/cup in the desired size for preheating.
- Make sure that the milk nozzle is pointed at the glass/cup.
- Press the "Cappuccino" button once for a "Small Cappuccino" (button will light up white) and twice for a "Cappuccino Grande" (button will light up green).
- The appliance ends the brewing process automatically.
- Follow Steps 17 - 23 in the "How to prepare espresso" section.
PLEASE NOTE
You can use high glasses/cups with a max. height of 135 mm. When using high cups, remove the drip tray and grid from the appliance and then place your glass/cup directly under the outlet spout.
We recommend using cold milk for the preparation process.
When making cappuccino and latte macchiato, the frothy milk will be dispensed first, followed by the espresso.
Clean the milk nozzle after each use. See the instructions in the "Cleaning and care" section for this.
5.6 How to prepare latte macchiato
- Follow the steps and instructions in the "How to prepare espresso" and "How to prepare cappuccino" sections but use a latte macchiato glass/cup in the desired size for preheating.
- Press the "Latte macchiato" button once for a "Small Latte Macchiato" (button will light up white) and twice for a "Latte Macchiato Grande" (button will light up green).
- The appliance ends the brewing process automatically.
- Follow Steps 17 - 23 in the "How to prepare espresso" section.
5.7 How to prepare coff ee using E.S.E Pads
Prepare the coff ee as described above but use a coff ee pad instead of freshly ground coff ee. When preparing coff ee with pads, use the portafi Iter basket without the "MAX" marking on the inside and with the "pad" lettering on the outside. Make sure that the coff ee pad is completely inserted into the E.S.E Pad fi Iter basket before attaching the portafi Iter to the device.
PLEASE NOTE
Do not use the tamper to press the coff ee pad down.
5.8 How to add more frothy milk manually
- Place your drink or an empty cup on the drip grid.
- Make sure that the milk nozzle is pointed at the cup.
- Press the "Cappuccino" button for approx. 3 seconds.
- The appliance will begin to dispense frothy milk.
- When the desired amount of frothy milk has been dispensed, press the "Cappuccino" button again to end the process.
PLEASE NOTE
▶ Dispensing of frothy milk will automatically end after 130 seconds.
5.9 Adjusting the quantities for the espresso, cappuccino and latte macchiato functions
You can set the brewing water quantity individually in line with your preferences.
PLEASE NOTE
The information given only refers to the quantity of brewing water and/or milk which is dispensed during the process.
If you change this quantity, then you must also adjust the amount of coffee grounds which you use. We recommend a brewing ratio of 1 to 2. In other words, two grammes of espresso will be extracted from every gramme of coffee grounds. 18 g of coffee grounds will thus, for example, produce 36 g of espresso.
▶ Preparation of a perfect espresso depends on many factors, such as the grinder setting for the coffee beans, how they have been roasted and the water temperature and quantity. It is therefore a matter of personal taste. After just a short time using the appliance you will have no problems preparing your personal perfect espresso.
- Prepare the appliance for use.
- Press the "Espresso" button for 3 seconds.
- The buttons will light up alternately. (If nothing happens within 15 seconds, the appliance will turn back to standby mode.)
5.9.1 Adjusting the water quantity for espresso (20–200 ml):
- Place one or two cups under the portafi Iter's outlet spout as desired.
- To adjust the quantity for a single espresso, press the "Espresso" button once. To adjust the quantity for a two espressi or a doppio espresso, press the "Espresso" button twice.
- The appliance will begin the brewing process.
- When the desired amount of espresso has been dispensed, press the "Espresso" button again to end the brewing process. The appliance will beep 3 times to indicate that the quantity has been successfully adjusted.
- It will then turn back to standby mode.
5.9.2 Adjusting the cappuccino quantity (20–200 ml espresso, 6–130 seconds milk frothing):
- Place a glass/cup in the desired size under the portafi lter's outlet spout. Remove the drip tray and grid if your glass/cup does not fit under the portafi lter's outlet spout.
- To adjust the quantity for a "Small Cappuccino", press the "Cappuccino" button once. To adjust the quantity for a "Cappuccino Grande", press the "Cappuccino" button twice.
- The appliance will begin to dispense frothy milk.
- When the desired amount of frothy milk has been dispensed, press the "Cappuccino" button again to end the milk frothing process. The appliance will beep 3 times to indicate that the quantity has been successfully adjusted.
- The espresso brewing process will begin automatically.
- When the desired amount of espresso has been dispensed, press the "Cappuccino" button again to end the brewing process. The appliance will beep 3 times to indicate that the quantity has been successfully adjusted.
- It will then turn back to standby mode.
5.9.3 Adjusting the latte macchiato quantity (20–200 ml espresso, 6–130 seconds milk frothing):
- Place a glass/cup in the desired size under the portafi Iter's outlet spout. Remove the drip tray and grid if your glass/cup does not fit under the portafi Iter's outlet spout.
- To adjust the quantity for a "Small Latte Macchiato", press the "Latte Macchiato" button once. To adjust the quantity for a "Latte Macchiato Grande", press the "Latte Macchiato" button twice.
- The appliance will begin to dispense frothy milk.
- When the desired amount of frothy milk has been dispensed, press the "Latte Macchiato" button again to end the milk frothing process. The appliance will beep 3 times to indicate that the quantity has been successfully adjusted.
- The espresso brewing process will begin automatically.
- When the desired amount of espresso has been dispensed, press the "Latte Macchiato" button again to end the brewing process. The appliance will beep 3 times to indicate that the quantity has been successfully adjusted.
- It will then turn back to standby mode.
5.9.4 How to reset the appliance to the standard quantities:
Press the “Espresso” and “Cappuccino” buttons simultaneously for approx. 5 seconds. The control panel will show “000” and the appliance will beep once to indicate that the appliance has been reset to its original factory settings.
6 Cleaning and Maintenance
This chapter provides you with important notices with regard to cleaning and maintaining the device. Please observe the notices to prevent damages due to cleaning the device incorrectly and to ensure trouble-free operation.
6.1 Safetyinformation

ATTENTION
Please observe the safety instructions, before cleaning your device:
The device must be cleaned at regular intervals and limescale should be removed.
▶ Pull out the mains plug before cleaning the device.
Do not submerse the appliance in water or other liquids and do not put it in the dishwasher.
The appliance's surfaces can become very hot during use. There is a risk of burns. Wait until the appliance has cooled down.
Do not use any aggressive or abrasive cleaning agents or solvents.
Do not scrape off stubborn dirt with hard items.
6.2Cleaning
Milk system
The milk nozzle must be fl ushed out after each use.
If you would like to store the filled milk tank in the fridge, follow the steps below:
- Place a large empty cup on the drip grid and make sure that there is enough water in the water tank.
- Make sure that the milk nozzle is pointed at the cup.
- Press the "Latte Macchiato" button for approx. 3 seconds.
- The button will flash green and the appliance will dispense hot water from the milk nozzle. This procedure takes approx. 85 seconds and ends automatically.
- The appliance will heat up again.
- Repeat the procedure to make sure that all milk residues have been removed.
- You can now store the filled milk tank in the fridge.
If the milk tank is empty and must be fully cleaned, follow the steps below:
- Place a large empty cup on the drip grid and make sure that there is water in the water tank.
- Remove the milk tank from the appliance and fill the milk tank with clean water, before reattaching it to the appliance.
- Make sure that the milk nozzle is pointed at the cup.
- Press the "Cappuccino" button for approx. 3 seconds.
- The appliance will dispense steam from the milk nozzle. This procedure takes approx. 2 minutes and ends automatically.
- Press the "Latte Macchiato" button for approx. 3 seconds.
- The button will flash green and the appliance will dispense hot water from the milk nozzle. This procedure takes approx. 85 seconds and ends automatically.
- Use warm soapy water and a soft cloth to clean all the individual parts.
- Following this, dry the accessories thoroughly.
PLEASE NOTE
Remove the air inlet from the underside of the milk tank lid and clean it under running water.
natural_image
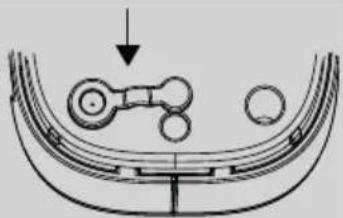
Diagram of a mechanical component with two circular features and an arrow indicating direction (no text or symbols)Appliance
The appliance can be wiped with a damp cloth. Following this, dry it thoroughly.
Group head
Clean the group head after each use. After removing the portafi Iter, wipe the entire surface with a damp cloth to remove any coff ee grounds. Re-attach the portafi Iter minus the basket to the appliance and rinse the group head by carrying out a brewing process without coff ee grounds.
Accessories
Remove coff ee grounds from the portafi Iter basket or throw the used coff ee pad away. Wash out the basket, portafi Iter, milk pitcher and measuring spoon thoroughly in warm water. Remove the drip tray regularly and rinse it and the drip gid thoroughly under running water. Following this, dry the accessories thoroughly.
6.3 Descaling
PLEASE NOTE
▶ Regularly decalcifying of your device will reduce the electricity used and prolong the life of the device.
The guarantee excludes devices which have stopped working or do not work properly due to lack of descaling.
A descaling warning will be given after approx. 500 cycles – the "On/Off" button will flash 5 times. If you do not descale the appliance immediately, the reminder will be displayed again the next 10 times the appliance is started. The reminder only disappears after 10 reminders or the descaling process has been completed.
- Fill the water tank up to the "MAX" mark with water and a commercially available descaling agent which is suitable for espresso machines. Read the instructions given on the descaling agent packaging for the correct mixing ratio.
- Place a container with a capacity equal to the entire water tank contents on the drip tray.
- Press the "Espresso" and "Latte Macchiato" buttons simultaneously for approx. 5 seconds. The appliance will begin the descaling procedure. This cycle takes approx. 6 minutes and ends automatically.
- Following this, pour away the water.
- Rinse the water tank carefully.
- Following this, fill the water tank with fresh water (without descaling agent) and carry out another descaling procedure before you use the appliance again with coff ee grounds.
7Troubleshooting
This chapter provides you with important notices with regard to operating the device. Observe the following notices to avoid dangers and damages:
7.1 Safetynotices
ATTENTION
Repairs of electrical appliances must be carried out by qualified person who are trained by the manufacturer.
Repairs performed by untrained persons may result in considerable hazards for the user and damage the machine.
7.2 Troubleshootingtable
The table below will help you to locate and solve small problems.
Problem Possible cause Possible solution
| Water is leaking out of the bottom of the appliance. | The drip tray is full. Empty the drip tray. | |
| The water tank is not inserted into the appliance correctly. | Insert the water tank into the appliance correctly. | |
| The appliance is defective. | Remove the plug from the socket. Do not continue to use the appliance. Contact our Customer Service. | |
| Water is leaking out over the edges of the portafi Iter. | The portafi Iter has not been attached correctly. | Attach the portafi Iter correctly. |
| There are some coff ee grounds on the edge of the portafi Iter. | Remove the leftover coff ee grounds from the edges of the portafi Iter. | |
| The appliance does not work. | The plug has not been inserted into the power socket correctly. | Insert the plug into the power socket correctly. Contact our Customer Service if the appliance still does not start after this. |
| Coff ee comes out of the portafi Iter outlet spout slowly. | The coff ee beans are ground too finely. | Pay attention to how coarsely you grind the beans. |
| Too much coff ee in the portafi I-ter basket. | Pay attention to the basket's "Max." mark. | |
| The ground coff ee is tamped too tightly. | Apply less pressure when tamping the ground coff ee. | |
| The portafi Iter basket is blo-cked. | Clean the basket with a needle. | |
| The coff ee is passing through the machine too quickly. | The coff ee beans are ground too coarsely. | Pay attention to how coarsely you grind the beans. |
| Not enough coff ee in the portafi Iter basket. | Pay attention to the basket's "Max." mark. | |
| The ground coff ee not tamped tightly enough. | Apply more pressure when tamping the ground coff ee. | |
| The espresso is cold. | The appliance and thus the pipes inside it have not been pre-warmed. | Warm up the appliance as described in the "How to prepare espresso" section. |
| The cups have not been pre-warmed. | Pre-warm cups by placing them on the cup warming tray. | |
| The coff ee is too weak. | The single cup portafi Iter basket was used for a double espresso. | Use the single cup portafi Iter basket for a double espresso. |
| You have not used enough ground coff ee. | Increase the quantity of ground coff ee. | |
| The grounds are too coarse. Grind | the beans more finely. | |
| The “Cappuccino” and “Latte Macchiato” buttons are not lit up. | The milk tank has not been attached. | Attach the milk tank to the appliance and push the milk tank lock to the position. |
| The milk tank has not been correctly attached. | If the milk tank is attached to the appliance, push it firmly towards the appliance and move the milk tank lock to the position until the “Cappuccino” and “Latte Macchiato” buttons light up. | |
| The “Espresso”, “Cappuccino” and “Latte Macchiato” buttons are fl ashing. | The water tank is empty. | Fill the water tank with clean tap water. Press one of the three buttons. |
| The milk is not cold enough. Use | pre-cooled milk. | |
| The milk nozzle is blocked. | Follow the instructions on how to clean the milk tank and the milk nozzle. | |
| The amount of cappuccino or latte macchiato varies each time you make coff ee. | The milk nozzle is blocked. | Follow the instructions on how to clean the milk tank and the milk nozzle. |
| An unpleasant smell is coming from the milk nozzle. | There are milk residues in the milk system. | Follow the instructions on how to clean the milk tank and the milk nozzle. |
PLEASE NOTE
If you cannot solve the problem by carrying out the steps described above, our Customer Service will help you free of charge.
Clean the device before you send it to customer service.
8 Disposal of the Old Device
Old electric and electronic devices frequently still contain valuable materials. However, they also contain damaging substances, which were necessary for their functionality and safety. If these were put in the non-recyclable waste or were handled incorrectly, they could be detrimental to human health and the environment. Therefore, do not put your old device into the non-recyclable waste under any circumstances.
PLEASE NOTE
Utilise the collection point, established in your town, to return and recycle old electric and electronic devices. If necessary, contact your town hall, local refuse collection service or your dealer for information.
▶ Ensure that your old device is stored safely away from children until it is taken away.
8.1 Disposal of the packaging
The packaging protects the device against damages during transit. The packaging materials are selected in accordance with environmentally compatible and recycling-related points of view and can therefore be recycled. Returning the packaging back to the material loop saves raw materials and reduces the quantities of accumulated waste. Take any packaging materials that are no longer required to "Green Dot" recycling collection points for disposal.

9Guarantee
We provide a 24-month guarantee for defects caused by production or material faults, beginning on the date of purchase. Our guarantee is valid for Germany, Austria and the Netherlands. For all other countries, please contact us.
Your legal guarantee claims as per Art. 437 ff . German Civil Code (BGB) will remain unaff ected by this. You may exercise your statutory guarantee rights free of charge. The guarantee does not cover damage caused by improper handling or use of the product or defects which have only a minor impact on the product's functionality or value. In addition to this, the guarantee also excludes parts which are subject to wear and tear; transport damages insofar as we are not responsible for them and damages caused by repairs which were not carried out by us.
This product has been constructed for non-commercial use (domestic use) and its performance is designed to meet the corresponding needs. The guarantee only covers commercial use insofar as it is comparable to domestic use. The product is not intended for any other type of commercial use.
In the case of legitimate complaints we may either repair the defective product or replace it with a defect-free product at our discretion. Obvious defects must be notified to us within 14 days of the product's delivery. Any further claims are excluded.
When making a guarantee claim please contact us before you return the product (always with the purchase receipt!). Our contact details ("Guarantor") are provided at the beginning of this instruction manual.
DE
EN
FR
ES
NL
RU
PT
TR
SE
Table des matières
1 Généralités....47
1.1 Informations relatives à ce manuel....47
1.2 Avertissements de danger......47

4.3Plaquesignalétique
natural_image
Diagram of a mechanical component with a handle and two circular features, no text or symbols present- Appareil
① Filtro para monodosis E.S.E.
② Barista professional single (para 1 taza)
③ Barista professional double (para 2 tazas)
④ Barista easy single (para 1 taza)
⑤ Barista easy double (para 2 tazas)
⑥ Portafi Itro
⑦ Rejilla de goteo
⑧ Bandeja de goteo
⑨ Botones de manejo
10 Pantalla
11 Placa para tazas
12 Tapa del depósito de agua
Filtros de pared simple (Barista professional single & double)
natural_image
Diagram of a mechanical component with three circular features and an arrow indicating direction (no text or symbols)Aparato

Enkelwandige fi Iterelementen (Barista professional single & double)
natural_image
Diagram of a mechanical component with three circular features and an arrow indicating direction (no text or symbols)Apparaat
natural_image
Diagram of a mechanical component with two circular parts and an arrow indicating direction (no text or symbols)- Аппарат
natural_image
Diagram of a mechanical component with three circular features and an arrow indicating direction (no text or symbols)DE
EN
FR
ES
NL
RU
PT
TR
SE
② Barista professional single (1 fi ncan)
③ Barista professional double (2 fi ncan)
④ Barista easy single (2 fi ncan)
natural_image
Diagram of a mechanical component with a handle and two circular holes, no text or symbols presentCihaz

natural_image
Diagram of a mechanical component with a curved base and two circular features, no text or symbols present.Enhet

- Gerät
- 1General
- Information on this manual
- Warningnotices
- DANGER
- WARNING
- ATTENTION
- PLEASE NOTE
- Limitation of liability
- Copyright protection
- 2Safety
- Intendeduse
- Danger due to unintended use!
- General Safety information
- Please observe the following general safety notices with regard to the safe handling of the device:
- Sources of danger
- Danger of burns
- Water which is heated in this appliance, the milk nozzle and the portafi Iter baskets and group head can become very hot. Please
- Dangers due to electrical power
- 3Commissioning
- Packaging safety information
- Delivery scope and transport inspection
- Unpacking
- Setup location requirements
- Electrical connection
- Warningnotices
- Design and Function
- Control Panel
- Buttons:
- Operation and Handing
- Before first use
- Tips / recommendations for preparation
- Portafilterbaskets
- Double-walled portafi Iter baskets (with pressure regulation)
- Single-walled portafi Iter baskets (without pressure regulation)
- How to prepare cappuccino
- How to prepare latte macchiato
- How to prepare coff ee using E.S.E Pads
- How to add more frothy milk manually
- Adjusting the quantities for the espresso, cappuccino and latte macchiato functions
- Adjusting the water quantity for espresso (20–200 ml):
- Adjusting the cappuccino quantity (20–200 ml espresso, 6–130 seconds milk frothing):
- Adjusting the latte macchiato quantity (20–200 ml espresso, 6–130 seconds milk frothing):
- How to reset the appliance to the standard quantities:
- Cleaning and Maintenance
- Safetyinformation
- 6.2Cleaning
- Milk system
- Descaling
- 7Troubleshooting
- Safetynotices
- Troubleshootingtable
- Disposal of the Old Device
- Disposal of the packaging
- 9Guarantee
- Table des matières
- 4.3Plaquesignalétique
- - Appareil
- Aparato
- Apparaat
- - Аппарат
- Cihaz
- Enhet
Brand : CASO
Model : Espresso Gourmet Latte 1821
Category : Coffee machine