
Classic 200 - Radio TECHNISAT - Free user manual and instructions
Find the device manual for free Classic 200 TECHNISAT in PDF.

| Product type | Analog FM radio |
| Dimensions (W x H x D) | 21 x 12 x 11.5 cm |
| Weight | 800 g |
| Power supply | DC 5V / 1A power adapter (included) |
| Power consumption | Max. 5W (operating), < 1W (standby) |
| Reception range | FM 87.5 - 108 MHz |
| Output power | 2.5 W RMS |
| Speaker | Built-in, 2.5 W |
| Headphone jack | 3.5 mm stereo jack |
| AUX input | 3.5 mm jack (AUX IN) |
| USB port | MP3 playback, up to 32 GB, FAT32 format |
| Station memory | 30 FM presets |
| Display | Backlit LCD |
| Alarms | 2 alarms with snooze |
| Sleep timer | Programmable sleep timer (10 to 90 minutes) |
| Antenna | Telescopic |
| Operating temperature | 0°C to 35°C |
| Operating humidity | 30% to 80% |
| Maintenance and cleaning | Clean with a soft, dry cloth. Do not use solvents. |
| Safety | Do not open the casing. Use only the provided adapter. |
| Spare parts and repairability | Repairs by certified professional. No spare parts provided. |
| General information | Brand: TechniSat. Model: Classic 200. Legal warranty 24 months. |
Frequently Asked Questions - Classic 200 TECHNISAT
User questions about Classic 200 TECHNISAT
0 question about this device. Answer the ones you know or ask your own.
Ask a new question about this device
Download the instructions for your Radio in PDF format for free! Find your manual Classic 200 - TECHNISAT and take your electronic device back in hand. On this page are published all the documents necessary for the use of your device. Classic 200 by TECHNISAT.
USER MANUAL Classic 200 TECHNISAT
3 Safety instructions
3.1 Foreword
Dear customers,
Thank you for choosing a TechniSat radio.
These operating instructions are intended to help you familiarise yourself with the functions of your new device and use them optimally. It will help you to use the radio safely and for its intended purpose. It is intended for anyone who installs, operates, cleans or disposes of the unit.
Keep the operating instructions in a safe place for future reference.
TechniSat team
3.2 Symbols and symbols used
In this manual:

Indicates a safety instruction, failure to follow which may cause serious injury or death. Observe the following signal words:
DANGER - Serious injury resulting in death.
WARNING - Severe personal injury that could lead to death.
NOTE - Injuries.

It indicates the caution to be observed to avoid device malfunctions, data loss/misuse or unintended operation. It also describes further functions of the device.

Warning against electrical voltage. Observe all safety instructions to avoid electric shock. Never open the appliance.
On the device:

Indoor use - appliances marked with this symbol are suitable for indoor use only.

Your device is CE marked and meets all required EU standards.

This appliance has been designed and manufactured with high-quality materials and components that are suitable for reuse. The symbol of the crossed-out wheeled bin indicates that this product is subject to separate collection in accordance with Directive 2012/19/EU of the European Parliament and of the Council and in accordance with Directive 2006/66/EC of the European Parliament and of the Council, and informs you that electrical and electronic equipment and batteries and accumulators have reached the end of their useful life,
must not be disposed of with other household waste. The user is obliged to hand it over to a waste electrical and electronic equipment and batteries and accumulators collection system operator.
including to an appropriate shop, local collection point or municipal unit. Waste equipment can have harmful effects on the environment and human health due to its potential content of hazardous substances, mixtures and components. The household plays an important role in contributing to the reuse and recovery, including recycling, of waste equipment. At this stage, attitudes are formed that influence the preservation of the common good, which is a clean environment. Households are also one of the biggest users of small equipment and rational management of this equipment influences the recovery of secondary raw materials.
In the event of improper disposal of this product, penalties may be imposed in accordance with national legislation At the end of the product's life cycle, it should not be disposed of with normal household waste but at a collection point for used electrical and electronic equipment. This is indicated by the symbol on the product, user manual or packaging. Materials are recyclable according to the label. By reusing, recycling or otherwise recycling your old equipment, you are making an important contribution to environmental protection.
3.3 Purpose
The TechniSat CLASSIC 200 is designed to receive UKW radio broadcasts. The device is intended for private use and is not suitable for commercial purposes.
3.4 Safe handling
Observe the following instructions to minimise safety risks, avoid damage to the equipment and contribute to environmental protection.
Read all safety instructions carefully and keep them for future reference. Always observe all warnings and instructions in this manual and on the back of the appliance.

DANGER!
Never open the appliance!
Touching live components is life-threatening!

WARNING!
Danger of suffocation! Do not leave packaging and its parts in the care of children. Danger of suffocation from foil and other packaging materials!

To ensure the correct use of the appliance and to avoid damage to the appliance and personal injury, all the following instructions must be followed.
- Do not repair the appliance yourself. Repairs should only be carried out by trained professionals. Contact
our customer service centres.
- The device must only be operated under the environmental conditions specified for it.
- Do not expose the appliance to dripping or splashing water. If water enters the appliance, switch it off and notify the service department.
- Do not expose the unit to heat sources that heat up the unit in addition to normal use.
In the event of a noticeable defect in the appliance, odour or smoke, significant faults or damage to the housing, contact the service centre immediately. - The device may only be operated at the specified mains voltage. Never attempt to operate the unit at any other voltage.
If the unit is damaged, it must not be operated. - Do not use the unit near bathtubs, showers, swimming pools or flowing/splashing water. There is a risk of electric shock and/or damage to the equipment.
- Do wnętrza urzadzenia nie mogą wpadcć obce przyedmioty, np. igly, monety itp. Do not touch the connection contacts with metal objects or fingers. This can cause a short circuit.
- The appliance is not intended for use by persons (including children) with reduced physical, sensory or mental capabilities, or lack of experience and/or knowledge, unless they have received supervision or instruction on the use of the appliance from a person responsible for their safety.
It is forbidden to make changes to the device.
3.4.1 Legal guidelines

TechniSat hereby declares that the radio device type CLASSIC 200 is compliant with Directive 2014/53/EU and RoHS. The full text of the EU Declaration of Conformity is available at the following web address:
TechniSat is not responsible for damage to the product caused by external influences, wear and tear or improper handling, unauthorised repairs, modifications or accidents.

This product is quality tested and comes with a statutory warranty period of 24 months from the date of purchase. Prosze zachowac paragon z faktury jako dowód zakupu. In the event of warranty claims, the cost of postage directly to the manufacturer will be paid by the customer.

For questions and information or if you have a problem with this device, our technical hotline is available: Monday. - to Friday, from 8:00 a.m. to 4:00 p.m. on telephone number: +71 310 41 48.

The guarantor, within the scope of the granted guarantee, undertakes to remove at its own expense any defects in the product. The removal of defects will take place by replacing the defective product with a new, defect-free one or by repairing it.

In order to make use of the guarantee, the purchaser must report the defective product to the point of sale where the product was purchased and deliver the defective product there. The product must be delivered complete.

- use or install the product in a manner inconsistent with the instructions for use,
- improper storage or maintenance of the appliance,
- repairs or modifications to the product carried out by unauthorised persons,
- ingress of liquids or foreign bodies,
- lightning strikes and power line surges

The provisions of the guarantee do not exclude, limit or suspend the rights of purchasers (consumers) under generally applicable law (warranty).

To obtain detailed information on a Product, including the rules and procedures for the guarantee procedure, the assignment of an RMA number, it is possible to by telephone 71 310 41 48 or email serwis@technisat.com , on working days, from 8 am to 4 pm. Z glo szenia serwisowe ON - LINE przye z strone: www .s erwis.te ch n isa t .com .
4 Description of the device
4.1 Contents of the device
Please check that the following are included: 1x TechniSat CLASSIC 200 1x Operating instructions 1x Power supply
4.2 Specialfeatures
The radio has the following special features:
FM radio reception.
UKW reception range 87.5-108 MHz (analogue).
Backlit display
- 2.5 W speaker
Programme memory for 30 FM stations
- MP3 player via USB connection
4.3 Preparing the device for operation
4.3.1 Telescopic antenna set-up
The number and quality of stations received depends on the reception conditions at the installation site. Excellent reception can be achieved with a telescopic antenna.
Position the telescopic antenna and extend it lengthways.

Accurate positioning of the telescopic antenna is often important, especially in peripheral FM reception areas.

Start your first search at the window towards the transmitter mast. In bad weather reception may be limited.

Do not touch the telescopic antenna during station playback. This may lead to reception interference and sound fading.
4.3.2 Connection to power supply

WARNING!
Do not touch the mains plug with wet hands, risk of electric shock!

NOTE!
Arrange the mains cable of the power supply so that no one trips over it.
Connect the mains plug of the power supply unit of the CLASSIC 200 to a mains socket (100-240V ~ 60/50 Hz).
Before connecting the appliance to a wall socket, ensure that the operating voltage of the appliance corresponds to the local mains voltage.

Pull the plug out of the socket when not in use. Pull the plug, not the cable. Unplug the device before a storm. Unplug the appliance if it is not going to be
used for a long time, e.g. before embarking on a long journey. The heat generated during operation must be dissipated by the adequate air circulation. Therefore, do not cover the appliance or place it in a closed cabinet. Ensure a free space of at least 10 cm around the appliance.
4.3.3 Use of headphones
Damage to hearing!
Do not listen to the radio at high volume through headphones. This may cause permanent damage to your hearing. Before using headphones, set the volume of the device to the minimum.

Only use headphones with a 3.5-millimetre plug.
Insert the headphone plug into the headphone socket of the device. The sound is now only played through the headphones, the speaker is muted.
If you want to listen through the speakers again, remove the headphone plug from the device's headphone socket.

The sound from the headphone output is stereo.

When headphones are connected, the speaker is disconnected.
4.4 General device functions
4.4.1 Switching on the device
To ensure good FM reception, please fully extend the telescopic antenna, which is located on the back of the unit.
Please connect the power supply to the DC power input.Press
POWER/FUNC

The device should only be used with the included power supply.

If the device is not going to be used for a long time, please unplug the power supply from the mains socket.
4.4.2 Switching off the device
To switch off the unit, please press and hold the POWER/ FUNC button for 3 seconds until "OFF" appears
4.4.3 Volume control
Adjust the volume by turning the volume knob on the unit.
- Turn clockwise - louder
- Turn left, counterclockwise - quieter.
5 Time setting
In order for the clock to work properly, it must be set before first use. When the radio is powered on, the LCD display is in time display mode and shows 0:00.

To access the time settings, the radio should be in standby mode. During FM, AUX or USB playback, it is not possible to change the displayed time.
To access the time settings please:
Switch off the radio by pressing and holding the POWER/FUNC button for 3 seconds.
The radio is now in standby mode. The current time is displayed on the screen.
Press and hold the TIME/SET button longer to start the time change.
The display will show "24H". Use the TU-// and TU+/ buttons. to set the 24H or 12H time display mode.
Press the TIME/SET button to confirm the selection. The time digits will start to flash on the display.
Use the TU-/- and T+/- buttons set the time correctly.
Press the TIME/SET button to confirm the selection. The minute digits will start to flash on the display.
Use the TU-/# and TU+ buttons to set the minutes correctly.
Press the TIME/SET button to confirm the selection and complete the time setting.

If there is no activity for about 8 seconds, the device will return for time display (standby mode).

Saved time settings are lost if power is lost.
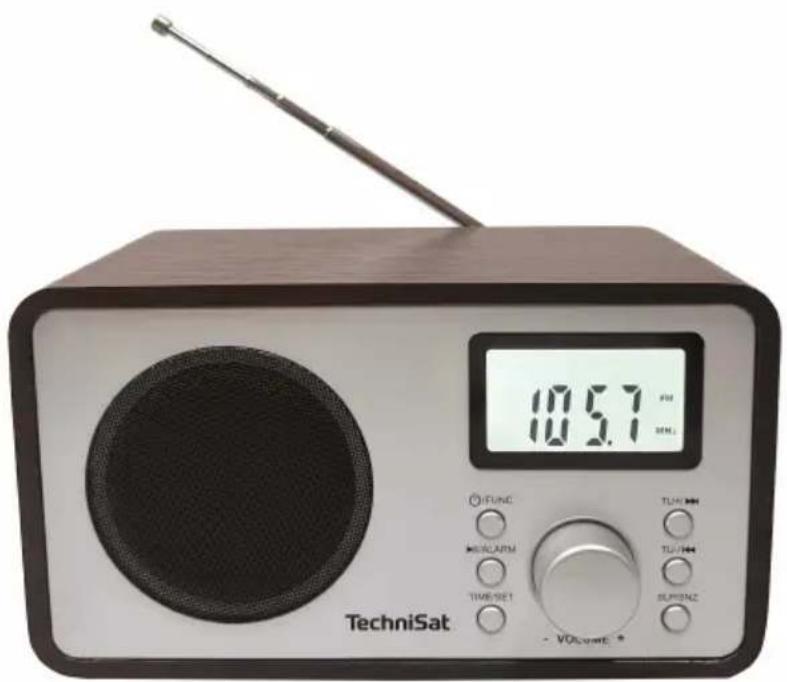
6 FM reception
To ensure good FM reception, please fully extend the telescopic antenna, which is located on the back of the unit.
Please press the POWER/FUNC button until the frequency appears. The radio is in FM playback mode.
6.2 Automatic station search
To start the automatic search for radio programmes, please press and hold the LARM button for 3 seconds.
The device automatically searches for and stores radio stations. During scanning, the display shows the number of radio stations found.

The device uses the AUTO SEARCH function during auto search, which automatically saves the first 30 stations found o strong FM signal to the favourites list. The first strong radio stations found will be stored in the presets, starting with 1 and ending with 30.

For best FM reception, extend the telescopic FM antenna fully. Avoid proximity to loudspeakers or other electrical equipment
6.3 Manual tuning
Use the TU-/ or TcI- button set the desired frequency.
Longer press of the TU- or TU+ buttons to automatically tune to the previous or next available station.
i Display shows frequency in 0.05 MHz steps
If the reception is too weak and there is noise on the received station, try to improve the reception by repositioning the telescopic antenna.
i Use manual tuning to select weaker stations that may be missed during automatic tuning.
If the automatic tuning does not stop at the exact frequency of the station, for example it stops at 88.9 MHz instead of 88.8 MHz, use the manual tuning method to 'tune in' to the exact frequency of the desired station.
For maximum FM tuner reception, extend the antenna fully for best FM radio reception.
6.4 Save stations to favourites
The unit allows up to 30 FM stations to be stored for easy recall at any time.
Use theTU-/or TU+ buttons to tune in the radio. to the desired station.
Press and hold the TIME/SET button for 3 seconds. The set channel number will flash on the LCD display.
Then select the number under which the station is to be stored using the TU- K r TU+/ons.
Press and hold the TIME/SET button for 3 seconds to confirm the selection.
6.5 Calling a saved programme
Preset stations can be called up by pressing one button at a time TIME/SET.
Then select the programme number using the TU- 四 r TU+/ 1 buttons.
7 Alarm function
The radio allows you to set two alarms at a predetermined time. It can function as an alarm clock or play a radio station.
7.1 Setting the alarm time
Alarm setting as well as alarm deactivation can only take place in standby mode.
Alarm1
POWER/FUNC button for 3 seconds.
Switch the unit to standby (sleep) mode by pressing and holding the
Press and hold the /ALARM button
Use the TU- and TU+ buttons to set the time correctly.
Press /ALARM to confirm the selection. The minute digits will start flashing on the display.
Use the TU- and TU+/ buttons to set the minutes correctly.
Press /ALARM to confirm the selection. Either "tune" or "buzz" will start flashing on the display. Depending on the setting, "tune" will allow you to wake with the most recently played radio station and "buzz" is to wake with the buzzer sound.
Use the TU-/- and TU+/ buttons to set the desired wake-up mode.
Press the /ALARM button to confirm the selection. "ON" or "OFF" will start flashing on the display. By selecting "ON" the alarm in question will be activated, by selecting "OFF" the alarm will be deactivated.
Press /ALARM to confirm the selection.
Alarm 2
For Alarm No. 2, please follow the above steps analogously.
7.2 Snooze function
When the alarm sounds (buzzer or radio station), you can press the SNZ/SLP button to get a few more minutes of sleep. The alarm will stop for about 9 minutes and then restart.
7.3 Alarm deactivation
To deactivate the alarm (also disables snooze), press any button apart from the SNZ/SLP button.
The alarm will sound the next day at the same time.
7.4 Alarm deactivation
To deactivate the alarm, please follow section 7.1. and select "OFF" in the last step of the setting of the respective alarm. The alarm will become inactive.
8 Auto switch-off function
This function allows you to programme the radio to switch off after a certain time. The time to switch off can be set while in the operating mode (Radio or AUX).
To activate the sleep function, press the SNZ/SLP button for a longer time, then the SNZ/SLP button on the unit repeatedly, the LCD display will show "90, 80, 70, 60, 50, 40, 30, 20, 10, OFF".
Example: if "40" is selected, the unit will switch off after 40 minutes. In the case of "OFF" the unit will continue to operate, the switch-off time will not be set.
9 AUX input
The CLASSIC 200 has an audio input socket (AUX IN, 3.5mm jack) for connecting external mp3 players, CD players.
A 3.5 mm jack cable is required to connect the radio to an external audio player (cable not supplied).
Connect one end of the cable to the AUX-IN socket on the rear of the unit and the other end to the AUX-OUT socket of the external audio device.
Switch on an external audio device (e.g. mp3 player).
Press the POWER/FUNC button until AUX appears. You can hear the audio playback from the external device through the speakers.
Use the volume control to select your preferred volume. Operate all other functions of the external device as usual.

If you have connected the AUX OUT jack of an external device, you only need to adjust the volume of the CLASSIC 200. If you have connected the headphone jack of an external device, you may need to adjust both the volume control of the external device as well as the volume control of the CLASSIC 200 to find the most desirable volume setting.
10 USB playback
The device allows mp3 files to be played from a connected USB memory stick.
Please connect the memory stick on the back of the device.
Please press /ALAF to start playback.
To skip to the next track, press the TU+/
To skip to the previous track, press the TU-
Longer pressing and holding of the TU + / ^* or TU-按钮 allows you to fast-forward or rewind a song.

The maximum USB memory size supported by the device is 32GB. The supported file format is FAT32.

The USB port is only used to play mp3 files. The USB port cannot be used to charge phones.

The device plays the files in alphanumeric order.
11Cleaning

To avoid the risk of electric shock, do not clean the appliance with a wet cloth or under running water. Before cleaning, pull out the mains plug and switch off the device!

Do not use any of the following: Salt water, insecticides, solvents containing chlorine or acid (sal ammoniacal).

Clean the housing with a soft cloth dampened with water. Do not use methylated spirits, thinners, etc.; these may damage the surface of the unit.
12 Problem solving
If the unit is not operating as intended, check it using the table below.
| Symptom | Possible cause |
| The device does not switch on. The device is not powered. | device is not powered. |
| There is no sound. Turn up the volume. | FM reception is poor Remove the antenna completely. Change the position of the antenna or the device itself |
| The device is not working, the device has crashed. | Disconnect the unit from the mains and reconnect the unit to the mains. |
| Noises are audible. There is a mobile phone or other device emitting interfering radio waves in the vicinity of the unit. Remove the mobile phone or device from the vicinity of the radio. | |
If the fault still cannot be rectified, contact the technical hotline.
13 Technical data
| Reception sources | FM, USB, AUX IN |
| Power supply DC 5.0 V /1A | |
| Frequency UKW: 87.5 - 108 MHz | |
| Power consumption | During operation max.: 5W, standby: < 1W |
| Output power 2.5 W RMS | |
| Ambient humidity | During operation: 30-80% |
| Ambient temperature During operation: 0 ~ | 35 °C |
| Weight (kg) | 800g |
| Dimensions (W x H x D) cm 21 x 12 x 11.5 | mm |
14 Technical specifications of the power supply
| Supplier TechniSat Digital Sp. z o.o. | |
| Model JF005WR-0500100VH | |
| Input voltage AC 100-240 V | |
| Input frequency | 50-60 Hz |
| Output voltage DC 5.0 V | |
| Output current 1,0 A | |
| Output power | 5 W |
| Average efficiency in operation mode | 74,82% |
| No-load power consumption | 0,07 W |
TechniSat
1 Zdjecia
1.1 Widok z przyodu
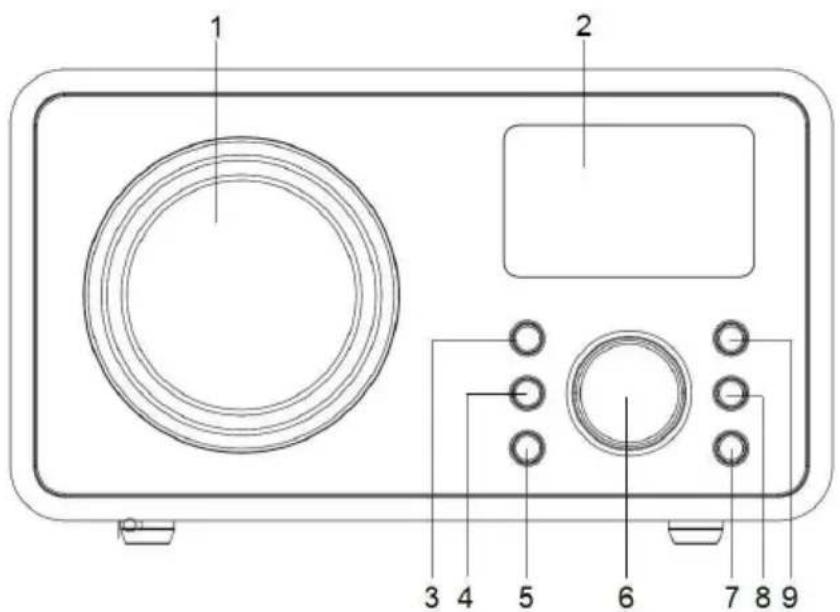
- Glośnik 6. VOLUME +/-
- Wyświetlacz 7. SLP/SNZ
- POWER/FUNC 8.TU-/
- /ALARM
-
TIME/SET
-
TU+/
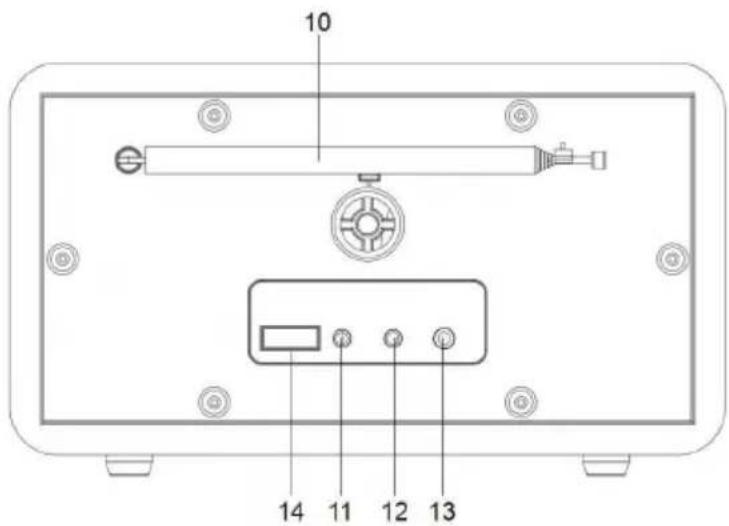
1.2 Widok z tylu
3.4 Manipulation sure
14 TExviKec TpoBiaaypaqEc Tou TpoPooTikoU
CEBaWeTo ycTpoiCTBO mMa MapKnipOBka CE n OTROBapr Ha BCnUKN Heo6xOdIMN cTaHapTN Ha EC.

To3n ypeE npoeKtupan H npoN3BeDeH C BnCOKokaeCTBHeH MaTePnaH N KOMnoHEHTN, KOINTO ca NOxOJaUN 3a NOBTOpHa yNoTpe6a. CmBOnbT Ha 3auepkHaTn KaHTeHep c KOJIua poka3Ba, Ye To3n npOdyKT NoIpeKn Ha pa3dJIHo cb6npaHe B cbOTBeTcTBne c DInpeKtNa 2012/19/EC Ha EbponeeCKn NaplameH n Ha Cbbeta n B cbOTBeTcTBne c DInpeKtNa
2006/66/EO Ha Ebponecknnapaent nHa CbBeta, n Bn HOpmnpa, ye eIektpnueckoto n eIektpoHnTo o6OpyDbAhe n 6aTepePnte n akymylaTopnPte ca DoCTnHaJI Kpaar Ha NoJe3HnCn XHBOT,
He Tp86Ba Da ce n3xBpIaT 3aeEHO C dpyuN 6bTOBn OTnaDbuN. IOTpe6nteJIaTe eДlbXeH Da ro npdaJe Ha onepaToP Ha cncTeMa 3a cb6npaHe Ha OTnaDbUcN OT eNEKtpueecko N eNEKTPoHHO 6OpUdbAhe N batepnN aKymyIaTopn. BKIOHTeHNO Do IOxOJaM MaRa3IN, MeCTe H nyHKT 3a cb6npaHe INI O6UHNCKO 3BeHO. OTpaBcIte OT 6OpUdbAhe MOrat Da IMaT BpeHOb B3DeIcTBHe Bbpx OKOJHaTa CpeDa N YOBeWKOTO 3dPaBe NopadN IOTeHuaHnO To CBbPkaHne Ha ONaCHN BeUeCTBa, CMEcN KOMNoHETN. OomaknHCTBOTo IGpaBaxHa PoJ, KaTO DOnpHacr 3a NOBTOHaTa yNOTpe6a N ONJ3OTBOPBAHe, BKIOHTeHNO pezuknnpaHe, Ha OTpaBuchOTo 6OpUdbAhe. Ha TO3N Etan Ce φOpMupat Harlacn, KOINTO OKa3BaT BnHHe Bbpx ONa3BaHeTo Ha 6Uto 6Jlaro, KaKbTO e UnCTaTa OKoHa CpeDa. OmaKinHCTBaTa ca N eDHi OT hain-rolMe NTpe6nteJIH Na DepeHo 6OpUdbAhe N paunOHnTO ynpabLeHne Ha TOBa 6OpUdbAhe BInRe Bbpx OONJ3OTBOPBAHeTo Ha BTOpuHHcypOBHH.
B cnyuahn Hnnpabunno n3Xbprna He Ha To3n npdykT Moar da 6bdaT haJIOxehn caHKcnn B cbOTBeTCTBne C hauNoHaHNOto 3aKHOdaTeJIcTBO B kpa Hn3HeHnra cIKbI Ha npOyKTa TOn He Tp8Ba Da ce N3XBbprr 3aeDHO c O6NKHOBEHnte 6NtOBn OTNaDbu, a B nyHKT 3a Cb6upane Ha yNOTpe6raHo eNeKTPnueecko n eJeKTPoHNO o6OpyDbAhe. Toba e 0603HaueHo Cbc CmB0J Bbpxy npOyKTa, pbKOBoCTBOTO 3a Notpe6nteYnI OnaKOBKaTa.
MaTePnAInTe nOJExaT Ha peuKInpaHe B CbOTBeTCTBHe C eTuKeTa. Upe3 NOBToHaTaNpOte6a, peuKInpaHe NnI Dpyr HauH Ha OOn3OTBopRAHe Ha CTapOTO Bn OobpyDbaHe BHe DOpnPnAc7e 3HaUHTeJIHO 3a ONa3BaHETo Ha OKoJHaTcpeDa.
3.3 Lien
TechniSat CLASSIC 200 e npedha3nueh 3a npieMahe Ha paDIOnpedabAHNA UKW. UcpoIcTBOTO e npedha3nueHc 3a yactHa ynoTpe6a n He e noxOJIo 3a TbpROBcN cJIJI.
34 Bezona p60ta
Cna3BaIte cIeHNITe IHCTpyKcH, 3a Da CBeJeTe Do MNHMym pNCKOBeTe 3a 6e3OnaChocTtA, Da n3BeHete NOBpeHa o6OpyDbaHeTo n Da dOpnpHeceTe 3a ONa3BaHeTo Ha OKoJHaTa cpeHa.
IpoyeTe BHNMaTeJIHO BCnKu INHCTpyKcN 3a 6e3OnacHocT n rN 3ana3eTe 3a 6bJeu cnpaBKn. BnHaru cna3BaIte BCnKu npdUnpeJxDHeNry INHCTpyKcN B TOBa pkoBOIDCTBO n Ha rbp6a Ha ypeDa.

ONACHOCT!
Hnkora He otBapraiTe ypea!
ДOKOCBaHETO Ha KINB KOMNoHEHTe KINBOTo3aCtpaWbAaUo!

NPEyPPEKDEHNE!
Onachoct OT 3aDywaBaHe! He octabrTe onakOBkata n HeHnTe qactn Ha rpnKte Ha deca. OnachocT OT 3aDywaBaHe ot fOJIO n dpyrN onakOBbHm MaTePnAIn!

3a da ce rapaHTnpa npabnHaTa ynoTpe6a Ha ypea n da ce n36erHe NOBpeHa Ha ypea n HapaHbAhe Ha xopa, Tp8Ba da ce cna3BaT BCNUKc CNeDbauu INHCTpyKcun.
He pemontpauTe ypea camn. Pnpabknte Tpr6Ba da ce n3BbPWBat camo ot obyuHn cneuaJIncTn. CbpxTe ce c
HaHTe 3a o6cnyXbaHe Ha KIneHTN.
- YcTpoiCTBOTo Tp8Ba Da ce n3NoJ3Ba cAmO npn onpeJeHne 3a Hero yCIOBnHa OKoJHaTa CpeJa.
He n3naaTe ypeHa ha kanea nn npckaa Boda.Ako BVpea nonaDne BOda, n3KIOUte ro n yBeDoMeTe cepBn3HaTa cny6a.
He n3naarTe yctpoiCTBOTo Ha n3TOUHnHa ToPnHa, KOnto ro HarpBaT B DoIbJIHeHne KbM HopMaJHaTa ynotpe6a.
B cnyaHa 3a6eJekma noBpeHa Ha ypeHa, Mnpn3Ma nIi DNIM, 3NaHTeJIHn DeΦeKtn IIN NOBpeNn NO KOpnyCa, He3a6abHO ce CBbpxKeTe Cbc cepBN3HnA ueHTbp. - YcTpoiCTBOTo MOKe Da pa6OTn Camo C NocOeHOTo MpeXoBO HAnpeXeHne. Hnkora He ce ONTBaIte Da n3NoJ3BaTe ycTpoiCTBOTo npn dpyro HAnpeXeHne.
Ako yctpoiCTBOTO e noBpeJeHO, To He Tp86Ba da ce n3noJ3Ba.
He n3noJ3BaIte yctpoiCTBOTO B 6Jn3OCT Do BAHN, dyoBE, npyBn 6aceHn nn Teuaa/pa3npbckBaa ce BoJa. CbIeCTByBa pNCK OT TOKOB yIap n/nn noBpeHa ha o6OpyDBAHeTO.
B yctpoiCTBOTo He Tp86Ba Da nonaadT uyxdi npedMeTu, Hanp. nIIN, MOHeTI n dp. He dOKocBaIe KOHTaKTITE 3a CBbp3BaHe C MeTaJIHn PpeDMETN
IINI npbCTn. ToBa MoKe Da DOBeDe Do KbCo CbeDInHeHne.
- YpeIbT He e npEHa3HaueH 3a n3NoJ3BaHe OT Iuca (BkIIOUHTeJIHO deua) c HamaJIeHN fN3nueCKn, CETNBH NII yMCTBeHn CnOCO6HOCTN IIN C HeIOCTaTbueH ONIT N/INn PO3HaHnA, OCBEN aKO He ca NOJyHn HaJ3Op IIN INHCTpyKcHn 3a n3NoJ3BaHeTo Ha ypeJa OT JInCe, OTROBOPHo 3a TjXHaTa 6e3oNaCHOCT.
3a6paHeNo e da ce npabT npomeH B yCTpoIcTBOTO.
3.4.1 Правно насоки
i C hactoIto TechniSat deKnapupa, ye paIoocToPcTBOTo TnCLASSIC 200 e B cBoTBcTbVe c DInpeKtNbA 2014/53/EC n RoHS. NblHnT TeKCT Ha EC DeKlapaunTa 3a cBoTBcTbVe e DocTbNeH ha cIeDnH y6 aDpec: hGp://kconf.tsat.de/?ID=24667
i TechniSat He Hocn OTROBOPHOCT 3a NOBpeDN Ha npOdyKta, npuHNHeN O T BbHsHn BnIyHn, n3HocBaHe nIi HenpaBnHo 6opabeHe, HeOTOpn3npaHn peMOHTn, MoDnΦnKaun nn 3JOnOJyKn.
Bb3MOxHn ca npomEn n rpeuKn npn otneuaTbaHeTo. Bb3npOn3BexJaHe n Dy6IipaHe cAmO c pa3peWeHHeTo Ha n3daTeJIa. NocneHaTa BepCna Ha pkoBoODCTBOTo e DoctbnHa B PDF fOpMaT B 30HaTa 3a n3TerJNa He Ha hauJHaT a cTpaHnca Ha TechniSat Ha adpec www.technisat.pl.
3.4.2 Информацnia за услугара
To3n npoDyKT e TectBaH 3a KaueCTBO n ce npeIna rca 3aKHOuycTaHOBeH rapaHcnoHEn cpoK ot 24 Meceua ot daTata Ha 3akynBaHe. MoJ, 3ana3eTe kacobata 6enjka ot kaKTypaTa KaTO doka3aTeJIcTBO 3a NOKyNkata. B cnyauHa rapaHcnoHHa npTeHcIpa3XoDInTe 3a noJeHcKn pa3XoDNi DnpeKTHO Do npOn3BODInTeJr Ce 3aIIaJat OT KJIneHTa.
3a Bbnpocn n HOpMaun aN aKO nMaTe np6Jem C TOBa yCTpoIcTBO, Haata ropeuTa texHnuecka JINHn e Ha pa3noJoxKeHne: noHeJeHNK. -do neTbk, ot 8:00 do 16:00 u. Na TelefoHHn Homep: +71 310 41 48.
i TapaHTbT ce 3aIbIjKabB paMKITe Ha npedocTaBeHaTa rapaHnra Da OTCTpaHn 3a CBOA CMeTKa BCnUKN DeΦeKTn Ha npOdykTa. OTCpaHnBaHeTo Ha DeΦeKTnTe Iue Ce n3BbPUn Upe3 3amHa Ha DeΦeKTnN npOdyKT c HOB, 6e3 DeΦeKTn, INIu Upe3 nonpaBkata My.
i 3a da ce Bb3no3Ba OT rapaHcHra, KynyBaYbT Tp6Ba Da cbo6uN 3a DeΦeKTHnI npOyKT B MAcTOTO Ha npOdaX6a, KbDeTo e 3aKynE npOyKTB, I Da DoCTaBn DeΦeKTHnI npOyKT TaM. PpOdyKbT Tp6Ba Da 6bDe DoCTaBeH B NbJEn KOMNJIeKT.
i TapaHnra He nokpna Ba depektn Ha npOdykta, npuHHeHn OT KnyBaHa nn npOn3TuHaaOn OT:
-ДаИЗПОЛЗВATE ИПИ ИНСТАЛРаTe ПрОдУКТa NO HAчИN, KOИTO He CьOTВETCTBa Ha
ИнСТPyKциTe 3a уNotpe6a,
- HenpaBnHNo cxbpaeHne nIe noDpBxka Ha ypea,
- peMOHTI INIIM MOINΦIKAUH NHa IPOyKTA, I3BbPseHN OT HeOTOp3npaHNIuca,
- npOHnKbaHe Ha TeuHocTn IJN CyjxDi Tena,
- ydapn O T MbHnn n npehanpexeHn no eJekTpponpoBODnTe.
i Pa3npoe6bTe Ha rapaHcnaTa He n3KlIOuBaT, He orpaHnuaBAt HnepeyctahOBraT npabaTa Ha KynyBaunTe (noTppe6nteIte) cbrlaacHO 06oONpNIIOXIMOTO 3akOHODaTeJIcTBO (rapaHcna).
3a da nojutyte noopobna nHopmaun 3a daen Ipoykt, BKIOHTeJIHO npabnIata n npoceDpynte 3a rapaHOnHHa npoeDypa, 3a npncB0raHe Ha RMA homep, moKeTe da
Ha Tepepon 71 310 41 48 no eIeKtroHna noa Ha aDpec serwis@technisat.com,В pa6oTHn dHn ot 8:00do 16:00u.3aBkn 3a obcnykbahe ON-LINE Ha aDpec: www.serwis.technisat.com.
4 OnncanHe Ha yctpoNCTBOTO
41 CbIbpxKaHHe Ha yctpoiCTBOTO
Molna, npOBepTe daJInc ca BKnIOueHn CneIHNte eIemEn: 1x TechniSat CLASSIC 200 1x INcTpyKuIN 3a ekCnloaTaun 1x 3axpaHbAHe
42 CneuaJIHHnФункциN
PaHnTo mMa cIeHNHe CneuaHn FyHKcHn:
- PpneMaHe Ha FM paIIO.
-Диаэзн Ha npiemeHa UKW 87,5-108 MHz (aHaIorOB). - DnCnnei C noDcBETka
BucOKorOBOpTeJc MoUHocT 2,5 W - Namet 3a nporpaMn 3a 30 FM ctaHcN
- MP3 nIeIbIp Upe3 USB Bpb3ka
43 IoproToBka Ha yctpoiCTBOTo 3a pa6ota
4.3.1 Hactpoika Ha TeleckonuHa aHTeHa
Бpoят И Каун CTaHцИ 3aBnCrt OT yCNoBnTa Ha npEmaHe Ha MЯCTOTO Ha nHCTaIIpaHe. OTIuH NoPmeHa MoKe Da ce noCTurHe C TeJeckOuNuHa aHTeHa.
IocTaBete TeIeCKOnuHaTa aHTeHa nЯ n3DbpnaITe NO DbJxHa.
i ToOHTo nO3nIOHnpaHe Ha TeNECKoNHyHaTa aHTeHa YecTo e BaXHo, oO6eHO B nepuΦepHnte paOHN Ha FM npneMaHe.
i 3aNoCHTe NpBBOTo CN TbpceHe OT npO3opeua KbMaHTaTa Ha npedabateJI. Pn loo BpeMe npHemaHeTo MoKe da 6bDe orpaHnueHo.
He doKocBaIte TeleckoNnHaTa aHTeHa nO BpeMe Ha Bb3npOn3BexKaHe Ha cTahCuYa. ToBa MoKe Da DoBeDe Do CMyUeHnB PpneMaHTo N 136JIeDNHBAHe Ha 3Byka.
4.3.2 Cbbp3BaHe KbM 3aXpaHbaHeTo

PPEdynpeXkdeHne!
He dokocBaIte uencela Ha eIektpnueckaT a Mpeka c MOKpn pbce, IMa onaCHOCT OT TOKOB ynap!

BHIMAHNE!
Pa3noJoxeTe 3axpaHbAunKa6eHa 3axpaHbHeTo TaKa, Ye HIKoJa He Ce npenbHe B Hero.
CbpxeTe 7enCeHa Ha 3axpaHbauu 6nok Ha CLASSIC 200 KbM KOHTaKT Ha eIeKtpnueckaTa Mpeka (100-240 V ~ 60/50 Hz).
Прелда CBьржeteуpeда Кьм CTehня KOHTaK, ce ybepeTe, ye pa60THoTo

HanpexeHne Ha ypeDa CbOTBETCTBa Ha HapexeHneTO B MeCTHaTa eJIekTpuecka MpeKa.
I3dIbpaIte 7e Icncela ot KOHTaKa, KOrato He ro I3noJI3BaTe. I3dbpnaIte 7e Ie IeKIOUeTe yCTPOINCTBOTo OT eJeKTPnueCKaTa MpeXa npEi6py. I3KIOUeTe yPeDa ot eJeKTPnueCKaTa MpeXa, aKO HMa Da ce I3NOJ3Ba IbIro BpeMe, Hanp. IpeDi Da TpbHHeTe Ha IbJIro NbTyBaHe. TonIIHaT, reHepnpaHa No BpeMe Ha pa6Ota, Tpr6Ba Da ce OTBeJda OT
Noxoada zpkyana Ha B3dyxa. 3aToBa He NOKpnaTe ypeHa n He ro NoCTabIe B 3aTbOpEn ukaΦ. Ocnpyete cbo6oJnO npocTpaHCTBO OT noHe 10 cm okolo ypeHa.