
PRM 1500 A1 - Lawn mower PARKSIDE - Free user manual and instructions
Find the device manual for free PRM 1500 A1 PARKSIDE in PDF.
| Product type | Electric lawn mower |
| Brand | Parkside |
| Model | PRM 1500 A1 |
| Power input | 1500 W |
| Mains voltage | 230 V~, 50 Hz |
| Cutting width | 360 mm |
| Cutting height | 25-75 mm (6 positions) |
| Grass collection box volume | 40 L |
| Weight | Approx. 14 kg |
| Protection class | II (double insulation) |
| Protection type | IPX4 |
| Guaranteed sound power level | 92 dB |
| Vibration at handle | ≤ 2.5 m/s² |
| Idle speed | 3400 min⁻¹ |
| Main functions | Mowing, mulching, collecting |
| Cutting height adjustment | Central lever, 6 notches |
| Safety system | Unlock button + start handle |
| Blade type | Rotary steel blade |
| Mulching kit | Included, allows grinding and distributing grass |
| Folding handle | Yes, for compact storage |
| Maintenance | Cleaning after use, greasing wheels, sharpening or replacing blade |
| Spare parts available | Grass collection bag, replacement blade, accessories at www.grizzlytools.shop |
| Warranty | 3 years (France/Belgium) |
| Intended use | Domestic lawns, non-commercial use |
Frequently Asked Questions - PRM 1500 A1 PARKSIDE
User questions about PRM 1500 A1 PARKSIDE
0 question about this device. Answer the ones you know or ask your own.
Ask a new question about this device
Download the instructions for your Lawn mower in PDF format for free! Find your manual PRM 1500 A1 - PARKSIDE and take your electronic device back in hand. On this page are published all the documents necessary for the use of your device. PRM 1500 A1 by PARKSIDE.
USER MANUAL PRM 1500 A1 PARKSIDE
Translation of the original instructions
NL BE
Before reading, unfold the page containing the illustrations and familiarise yourself with all functions of the device.
FR BE
Volumen Grasfangkorb ca. 40 I
Schalldruckpegel
(L_PA) 78,3dB;KpA=3dB
Schalleistungspegel
gemessen (LWA) 89,0 dB; KWA = 2,71 dB
garantiert. 92 dB
Intended purpose. 23
General Description 24
Scope of Delivery. 24
Function Description 24
Overview 24
Technical specifications. 24
Safety information. 25
Pictorial Diagrams on the Equipment .25
Symbols in the manual. 26
General safety information. 26
Residual risks. 30
Assembly 31
Assembling the Curved Handle...31
Mounting the grass collection box.....31
Operation 31
Hanging On/Removing the Grass Bag. 31
Level gauge 32
Adjusting the Cut Height 32
Mulching kit 32
Switching On and Off 32
Working with the Lawnmower 33
Difference between moving and mulching lawns. 33
Cleaning, Maintenance and
Storage 33
General Cleaning and Maintenance Work. 34
Changing the Blade 34
Storage. 34
Transport. 34
Trouble Shooting. 35
Waste disposal and environmental protection .36
Replacement parts / Accessories 36
Guarantee 37
Repair Service. 38
Service-Center. 38
Importer 38
Translation of the original EC declaration of conformity ....277
Exploded Drawing 293
Introduction
Congratulations on the purchase of your new device. With it, you have chosen a high quality product.
During production, this equipment has been checked for quality and subjected to a final inspection. The functionality of your equipment is therefore guaranteed. It cannot be ruled out that residual quantities of lubricants will remain on or in the equipment in isolated cases. This is not a fault or defect and it represents no cause for concern.
The operating instructions constitute part of this product. They contain important information on safety, use and disposal.
Before using the product, familiarise yourself with all of the operating and safety instructions. Use the product only as described and for the applications specified. Keep this manual safely and in the event that the product is passed on, hand over all documents to the third party.
Intended purpose
The equipment is designed only for mowing domestic lawns and grass areas. Any other use that is not expressly permitted in these instructions may result in damage to the equipment and represent a serious risk to the user.
The equipment is intended for use by adults. It is not to be used by children or people who are unfamiliar with these instructions. The use of the equipment is prohibited in the rain or a damp environment. The manufacturer will not be liable for damages caused by use other than for the intended purpose or by incorrect operation.
This equipment is not suitable for commercial use. Commercial use will invalidate the guarantee.
General Description
Scope of Delivery
Carefully remove the equipment from the packaging and check whether the following parts are complete:
- Electric lawnmower and U-shaped handle with appliance cable
- Lower bar
- Lawn bag
- 2 Wing nuts with washers and carriage bolts
- 2 wing screws for fastening the bar/ lawn mower housing
- 2 cable holders
- Mulching kit
- Instruction Manual
Function Description
The electric lawnmower has a cutting tool, which turns parallel to the cutting level. It is equipped with a high performance electric motor, robust plastic housing, release button, collision guard, and grass bag. The machine can also be adjusted to 6 different height levels and features smooth-running wheels.
For the function of the operating parts, please refer to the descriptions below.
Overview
1 Curved handle
2 Extension cable strain relief
3 Lower bar
3a Connecting caps
4 Impact protection
5 Handle
6 Lawn mower housing
7 Wheels
8 Wing screw and washer for fastening the bar
9 Machine cable
10 Grass collection box
1.1 Filling level indicator
12 Cable holder
13 Wing nut, screw and washer for fastening the bar
14 Outlet for extension cable
15 Release button
16 Bail bar
17 Mulching kit
18 Extension cable (not included)
B 19 Carriage bolt
E 20 Cutting height adjustment lever
E 21 Ratchet mechanism
F 22 Handle
H 23 Blade
H 24 Blade bolt
H 25 Motor spindle
Technical specifications
Electric Lawnmower..PRM 1500 A1
Motor input power 1500 W
Mains voltage. 230 V\~, 50 Hz
ldling speed 3400 min
Cutting circle.. Approx. 360 mm
Cut height 25-75 mm
Protection class 1
Protection type . IPX4
Weight ca. 14 kg
Lawn bag volume...ca. 40 I
Sound pressure specification
$$ \left(L _ {p A}\right) \dots 7 8, 3 d B; K _ {p A} = 3 d B $$
Noise level specification (L_WA)
$$ \text {m e a s u r e d} \dots \dots \dots \dots 8 9, 0 \mathrm {d B}; K _ {\mathrm {W A}} = 2, 7 1 \mathrm {d B} $$
$$ \text {g u a r a n t e e d} \dots 9 2 \mathrm {d B} $$
Vibration on the handle
$$ (a _ {H}) \dots \dots \dots \dots \dots \dots \dots \dots \dots \dots \dots \dots \dots \dots \dots \dots \dots \dots \dots \dots \dots \dots \dots \dots \dots \dots \dots \dots \dots \dots \dots \dots \dots \dots \dots \dots \dots \dots \dots \dots \dots \dots \dots \tag {a_H} $$
The stated vibration emission value was measured in accordance with a standard testing procedure and may be used to compare one power tool to another.
The stated vibration emission value may also be used for a preliminary exposure assessment.

Warning: The vibration emission value may differ during actual use of the power tool from the stated value depending on the manner in which the power tool is used.
Try to keep the exposure to vibrations as low as possible. Examples of measures to reduce vibration exposure are the wearing of gloves when using the tool and limiting the working hours. For this purpose all parts of the operating cycle have to be considered (for example, times when the electric tool is switched off and times when it is switched on but running without any load).
The noise and vibration values have been determined in accordance with the standards and regulations specified in the declaration of conformity.
Safety information
This section covers the basic safety regulations when working with the electric lawnmower.
Pictorial Diagrams on the Equipment
ution!
Read the operating instructions carefully.

Wear eye and ear protection.

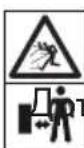
Risk of injury from parts being thrown up.
Keep nearby people away from the mower.

Do not expose the equipment to the damp. Do not work in the rain and do not cut wet grass.

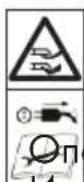
Caution - sharp cutting blade! Keep feet and hands away. Risk of injury!
Switch off the motor and disconnect the plug before adjustment or repair work or if the power cable is caught or damaged.

Danger of damaged power cable. Keep the power cable away from the cutting blade!

Caution! lawnmower blade continues to run after switching off.
Scale cutting height

Cutting circle

Noise level specification L_WA in dB.

Protection class II (Double insulation)
Do not dispose of electrical equipment in domestic waste.
Switching off - Let go of the bail bar
Starting - press the release button & pull the bail bar
Level gauge on grass catcher:

Flap open: grass catcher empty

Flap closed: grass catcher full
Symbols in the manual

Warning symbols with information on damage and injury prevention

Instruction symbols with information on preventing damage

Pull out the mains plug.

Wear hand protection.

Help symbols with information on improving tool handling
General safety information

This equipment may cause serious injury in the case of improper use. In order to avoid injury to people and damage to property, the fol
lowing safety information must be observed and users must familiarise themselves with all operating parts.
Preparation:
-
This device can be used by individuals with reduced physical, sensory or mental capabilities or a lack of experience or knowledge if they are supervised or have been instructed in how to use the device safely and understand the associated dangers.
-
Before using the unit, carefully read through the instruction manual and familiarise yourself with all of its controls.
-
Prior to use, always check the connecting cable and extension cable for signs of damage or wear and tear. If the cable gets damaged during use, it must be disconnected from the supply network immediately. DO NOT TOUCH THE CABLE BEFORE IT HAS BEEN DISCONNECTED. Do not use the machine, if the cable is worn or damaged. Damaged mains power cables increase the risk of electric shock.
-
Do not allow the use of this equipment by children or others who are unfamiliar with these operating instructions. Local regulations may specify the minimum age of the operator.
-
Do not use the equipment when people and particularly children or pets are nearby.
Children should be supervised to ensure that they do not play
with the appliance. Cleaning and user maintenance must not be carried out by children.
The operator or user is responsible for accidents, injuries to other people or damage to the property of others.
-
Check the terrain on which the equipment is to be used and remove stones, sticks, wires and other foreign objects that could become caught and thrown up. This can result in serious injury.
-
Wear suitable work clothing such as stable shoes with non-slip soles and robust, long trousers. Do not use the equipment when barefoot or when wearing open sandals. Avoid wearing loose clothing with hanging laces or belts. There is a risk of injury!
-
Before use, always perform a visual inspection to check whether the cutting blades, fastening bolts and the whole cutting unit are worn out or damaged. Do not use the equipment if protective devices (e.g. collision guard or grass bag), parts of the cutting device or bolts are missing, worn or damaged. To avoid imbalance, damaged tools and bolts are to be replaced only in sets. This ensures that the equipment remains safe.
-
Use only spare parts and accessories supplied and recommended by the manufacturer. The use of non-original parts will immediately invalidate the guarantee.
Working with the Equipment:

Do not place feet or hands near or under rotating parts when working. Risk of injury!

Observe the noise protection and local regulations.
-
Switch on the motor according to the instructions and only when your feet are at a safe distance from the cutting tools. Risk of injury from cuts.
-
Do not use the equipment in the rain, in poor weather, in a damp environment, or on wet grass. Water entry into the equipment increases the risk of electric shock.
Work only in daylight or with good lighting. Accident hazard!
-
Do not work with the equipment when tired, lacking concentration or under the influence of alcohol or drugs. Always take breaks in good time. Take a sensible approach to the work. A moment of carelessness when using the equipment can result in serious injury.
-
When working, ensure a firm stance, particularly on slopes. This enables you to control the equipment better in unexpected situations.
- Always work across the slope, never upwards or downwards.
-
Take particular care when changing the direction of travel on the slope. Do not work on excessively steep slopes.
-
Run the equipment only at a
GB MT
walking pace. Take particular care when turning the equipment around, pulling it towards you or going backwards. There is a risk of personal injury.
- Switch on the equipment carefully and in accordance with the directions in these instructions. Ensure sufficient distance between feet and the rotating blades. Contact with the cutter can result in injury.
- When starting or turning the motor on, the lawnmower must not be tilted, unless it is required to lift the lawnmower in the process. In doing so, tilt it only as far as absolutely necessary and lift it only on the side facing away from the user. In this case, tilt the equipment by pressing down the handle bar such that the front wheels of the equipment are raised. Always check that both hands are in the working position before returning the equipment to the ground.
- Do not work without the grass bag or collision guard. Keep away from the ejection hole at all times.
- Do not start the motor when standing in front of the emission duct.

Caution! Danger! The blade continues to run after switching off. There is a risk of injury.
- The equipment is not to be lifted or transported while the motor is running. Switch off the equip
ment if it has to be tilted in transit, when crossing surfaces other than grass, and when the equipment is being transported to and from the surfaces to be mowed.
Always keep the grass ejection hole clean and clear. Remove cut material only when the equipment is stopped.
- Do not leave the equipment unattended in the workplace.
- Do not work with equipment that is damaged, incomplete, or has been modified without the authorisation of the manufacturer. Do not use the equipment with damaged safety devices or screens or with missing safety equipment such as deflection and/or grass collection devices.
- Do not overload the equipment. Work only within the specified power range and do not change the regulator settings on the motor. Do not use low-powered machines for heavy work. Do not use your equipment for purposes other than those for which it is designed.
- Do not use the equipment near inflammable liquids or gases. Non-observance will result in a risk of fire or explosion.
- Do not lift or carry the equipment when the motor is running. Risk of injury from cuts.
- Switch off the equipment and disconnect the plug. Make sure that all moving parts have come to a complete stop:
- Whenever you leave the machine,
- Before cleaning the ejection hole or removing blockages,
- When the equipment is out of use,
- Before checking, cleaning or working on the equipment,
- If the power cable is damaged or frayed,
- if a foreign object has been hit by the device. Check for damage to the lawnmower and carry out the necessary repairs before switching on again and working with the lawnmower.
If the lawnmower starts to vibrate abnormally, an immediate check must be carried out.
- carry out a search for damage;
-
perform the necessary repairs of damaged parts;
make sure that all nuts, bolts and screws are properly tightened. -
Do not place feet or hands near or under rotating parts. Do not stand in front of the grass ejection hole during mowing.
Maintenance and Storage:
- Take care with equipment that has several cutting tools, as the movement of one blade may result in the rotation of the other blades.
- Ensure that all nuts, bolts and screws are tightened firmly and the equipment is in safe working condition.
- Do not attempt to repair the equipment yourself unless you have been trained to do so. Any work not specified in these instructions is to be carried out
only by customer service centres that we have authorised.
- Keep the equipment in a dry location and out of reach of children
- Handle the equipment with care. Keep tools sharp and clean, in order to facilitate better and safer work. Follow the maintenance instructions.
- Wear protective gloves when changing the cutting device.
Regularly check the grass collection device for wear and strains. For safety reasons, replace worn or damaged parts. When adjusting the blades, take particular care to avoid fingers being trapped between the rotating blades and fixed parts of the machine.
Many accidents are caused by poorly maintained equipment.
- Check that only replacement tools authorised by the manufacturer are used.
During maintenance of the cutting blades, be aware that they can be brought into motion even when the power supply is switched off. - Worn or damaged information signs must be replaced.
- Replace worn or damaged parts for safety reasons. Use only original spare parts and accessories.
- Allow the motor to cool down before you put the machine into storage. Risk of burns!
Electrical Safety:
- Ensure that the mains voltage matches the specifications on
the rating plate.
- Connect the equipment only to a socket that has a RCD (Residual Current Device) with a trip current of no more than 30mA .
- Avoid bodily contact with earthed parts (e.g. metal fences, metal posts). There is an increased risk of electric shock if your body is earthed.
- Use only authorised power cables of H05VV-F, which are no more than 75 m long and suitable for outdoor use. The power cable wire cross section must be at least 2 × 1,0 ~mm^2 . Always completely unroll cable drums before use. Check the cable for damage.
- To fix on the power cable, use the cable suspension intended for the purpose.
- Keep the power cable away from the cutting tool when working. The cutting blades may damage the power cable and result in contact with live parts. Always run the power cable behind the operator. The extension cable can be accidentally severed. Risk of electric shock!
- Do not use the power cable to pull the plug from the socket. Protect the power cable from heat, oil and sharp edges.
-
Switch off the equipment and disconnect the plug from the socket if the power cable is damaged. If the power cable is damaged, it must be replaced by the manufacturer, the customer services of the same, or a qualified person, in order to avoid hazards.
-
Do not connect a damaged power cable to the mains. Do not touch a damaged power cable when it is connected to the mains. A damaged power cable may result in contact with live parts.
Residual risks
Even if properly operating and handling this electric tool, some residual risks will remain. Due to its construction and build, this electric tool may present the following hazards:
a) Injuries caused by moving parts;
b) Ear damage if working without ear protection;
c) Lung damage, if suitable respiratory protection is not worn;
d) Damage to your health caused by swinging your hands and arms when operating the appliance for longer periods of time or if the unit is not held or maintained properly.

Warning! During operation, this electric tool generates an electromagnetic field which, under certain circumstances, may impair the functionality of active or passive medical implants. To reduce the risk of serious or lethal injuries, we recommend that persons with medical implants consult their doctor and the manufacturer of their medical implant before operating the machine.
Assembly

Disconnect the plug before any work on the equipment. There is a risk of injury.
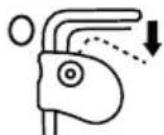
Assembling the Curved Handle

For a simple installation, select cutting height 25mm (see "Adjusting the cutting height").
(Fig. A)
- Pull the connecting caps (3a) over the tube ends on the lower bar (3). Slightly bend up the lower bar (3) and attach it with the connecting caps (3a) to the right and left of the machine housing (6). Screw on with the wing screws and washers (8).
(Fig.B)
- Thread the extension cable strain relief (2) onto the U-handle (1).
- Fix the U-handle (1) to the lower bar (3) using the enclosed carriage bolts (19) and two wing nuts with washers (13).
- Clip the cable holders (12) onto the lower bar (3) and U-handle (1) and use them to fix the machine cable in place (9).
- Adjust the angle of the U-handle (1) by undoing the wing screws with washers (8) and choosing the desired angle.

By releasing the two wing nuts with washers (13) for fastening the handle, you can fold the bow-type handle (1) downwards to store the device. Ensure that the appliance's cable (9) is not trapped.
Mounting the grass collection box (Fig. C)
- Put the plastic tabs over the grass collection box rod.
- Insert the handle of the grass collection box (10) into the receptacle provided for this on the top of the grass collection box (10).

Work may not be carried out using the electric lawn mower without the impact protection or grass collection box. There is a risk of injury.
Operation
Hanging On/Removing the Grass Bag (Fig. D)
- To hang on the grass bag (10), lift the collision guard (4) and hang on the grass bag. Fold the collision guard (4) onto the grass bag (10). It holds the grass bag in the correct position.
- To remove the grass bag (10), lift the collision guard (4) and detach the grass bag. Fold the collision guard (4) back onto the mower housing.

Do not work with the lawnmower without the collision guard or lawn box. There is a risk of injury.

For easier emptying of the grass collection box (10) you can grip it by the handle and additionally by the fabric handle at the back of the grass collection box (see fig. C)
Level gauge
The level gauge (11) is located on the side of the grass catcher (10).

Flap (11) open:
cher (10) empty

Flap (11) closed:
catcher (10) full

The level indicator (11) works when the device is in operation.
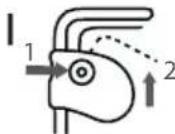
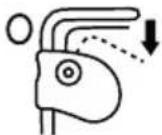
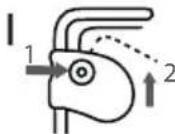
Adjusting the Cut Height (Fig. E)

Switch off the equipment, disconnect the plug and wait for the blade to stop. There is a risk of injury.
-
Press the cutting height adjustment lever (20) outwards and move it past the ratchet mechanism (21) to the desired cutting height..
-
The handle (5) may be used to help, in order to prevent to mower rolling away.
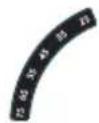
25 mm - Position 1
35 mm - Position 2
45 mm - Position 3
55 mm - Position 4
65 mm - Position 5
75 mm - Position 6
The correct height is around 25 - 40mm for a decorative lawn and around 30 - 60mm for a used lawn.

A higher cut height should be selected for the first cut of the season.

Observe the noise protection and local regulations.
Mulching kit (Fig. F)
Inserting the mulching kit
- Remove the grass collection box, if used.
- Lift the impact protection.
- Insert the mulching kit (17) into the ejection shaft.
- Fold the impact protection (4) onto the mulching kit (17).
Removing the mulching kit
- Lift the impact protection (4).
- Hold the mulching kit (17) by the handle (22).
- Squeeze the handle (22) to unlock the mulching kit (17).
- Lift the mulching kit (17) out of the ejection shaft.
Switching On and Off (Fig. G)
- Insert the extension cable plug (18) into the socket (14) on the curved handle (1).
- Make a loop in the end of the extension cable (18) and suspend this in the cable strain relief (2) to release the strain.
- Connect the equipment to the power supply.
- Before switching on, ensure that the equipment is not in contact with any objects.
- Press and hold the release button (15).
- Pull and hold the bail bar (16) towards the U-handle (1). You can let go of the release button (15).
- To switch off, let go of the bail bar (16).

After switching off the equipment, the blade continues to turn for several seconds. Do not touch the moving blade. There is a risk of injury.
Working with the Lawnmower
Regular mowing encourages increased foliation of the grass and kills off weeds at the same time. Therefore, not only does each mowing increase the density of the lawn, it also produces an evenly resilient lawn. The first cut is to be made in around April, at a growth height of 70 - 80mm . In the main vegetation period, the lawn is to be mowed at least once a week.
- Start mowing near the socket and work away from the socket.
Always keep the extension cable behind you and when you turn, move it to the side that has already been mowed. - Run the equipment at a walking pace, in tracks that are as even as possible. For gap-free mowing, the tracks should always overlap by a few centimetres.
- Adjust the cut height so the equipment is not overloaded. Otherwise, the motor may be damaged.
- On slopes, always work across the slope. Take particular care when going backwards and pulling the equipment.
- Clean the equipment after each use, as described in the chapter on "Cleaning, Maintenance and Storage".

Switch off the equipment after work and in order to transport it, disconnect the plug and wait until the blade stops. There is a risk of injury.
Difference between moving and mulching lawns
When using the mulching kit (17), the grass clippings are not captured in a collection box but are instead shredded and spread across the lawn. The nutrients contained in the clippings are thus left to be broken down by soil organisms and form a nutrient cycle. Mulched lawns therefore need to be fertilised much less frequently.
As a basic rule, the lawn has to be mowed relatively often so that only small amounts of mulch remain on the lawn.
It is therefore best to mulch the lawn at least once a week and to adjust the mower so that only about 40% of the total height of the lawn is left as mulch. If the mulch remains visible on the lawn (for example when cutting the lawn for the first time of the year or during strong growth), the grass collection box (10) should be used.
Cleaning, Maintenance and Storage

Have work that is not described in these instructions carried out by a customer service centre that we have authorised. Use only original parts.

Wear gloves when handling the blade.

Switch off the equipment before all maintenance and cleaning work, disconnect the plug and wait until the blade stops. There is a risk of injury.
General Cleaning and Maintenance Work

Do not hose down the lawnmower with water.
Always keep the equipment clean. To clean, use a brush or cloth but no detergent or solvent.
- After mowing, use a piece of wood or plastic to remove adherent plant remains from the wheels, ventilation holes, ejection hole and blade area. Do not use hard or pointed objects, as these may damage the blade.
- Oil the wheels from time to time.
- Before each use, check the lawnmower for obvious defects such as loose, worn or damaged parts. Check that all nuts, bolts and screws are sitting firmly.
- Check the covers and protective devices for damage and check that they are sitting correctly. Replace them if necessary.
Changing the Blade (Fig. H)
If the blade is blunt, it can be sharpened by a specialist workshop. If the blade is damaged or showing signs of imbalance, it must be replaced (see chapter on "Spare Parts").
- Switch off the equipment, disconnect the plug and wait until the blade stops.
- Turn the equipment over.
-
Use sturdy gloves and hold the blade firmly (23). Turn the blade screw (24) anticlockwise off of the motor spindle (25) using a screwdriver (AF 13 mm).
-
Install the new blade in the reverse order. Ensure that the blade is positioned correctly and the screw tightened firmly.

Correct order:
Motor spindle - blade - washer - clamping disk - blade bolt
Storage
- Keep the equipment dry and out of reach of children. Loosen the wing nuts and fold down the handle bar so the equipment takes up less space. Use illustration as a comparison. The machine cable must not be jammed when you do this.
- Allow the motor to cool before storing the equipment in a confined space.
- Do not cover the equipment with nylon bags as moisture could build up.
We will not be liable for damages caused by our equipment where these are caused by improper repair or the use of nonoriginal parts or by use other than for the intended purpose.
Transport

Before transporting the device, switch it off, pull out the mains plug and wait for the blade to come to a stop. There is a risk of personal injury.
- Use the handle (5) to transport or move the device.
Trouble Shooting
| Problem Possible | le Cause Fault Fixing | |
| Equipment does not start | Power is off | Check the socket, cable, wire and plug and have any repairs carried out by an electrician |
| Bail bar (16) defective | Repair by customer servicesWorn carbon b | |
| Defective motor | ||
| Grass too long | Set a greater cut height. Lift the front wheels slightly by pressing down on the handle bar. | |
| Motor stops Blockage | ge by foreign object Remove | the foreign object |
| Result unsatisfactory or motor labours | Cut height too low Set a higher cut height | |
| Blade (23) blunt | Have the blade (23) sharpened or replace it | |
| Blade area blocked Clean the equipment | ||
| Blade (23) assembled incorrectly | Install the blade (23) correctly | |
| Blade (23) fails to turn | Blade (23) blocked by grass Remove the grass | |
| Blade screw (24) loose Tighten the blade screw (24) | ||
| Strange noises, rattling or vibrations | Blade screw (24) loose Tighten the blade screw (24) | |
| Blade (23) damaged Replace the blade (23) | ||
| Level indicator (11) does not work | Contamination | Cleaning with a soft brush. The level indicator must close by itself, if it was opened. |
Waste disposal and environmental protection
Be environmentally friendly. Return the tool, accessories and packaging to a recycling centre when you have finished with them.

The apparatus can not be disposed of with regular household or bulk waste.
Directive 2012/19/EU on waste electrical and electronic equipment: Consumers are legally obliged to recycle electrical and electronic equipment in an environmentally sound manner at the end of its life. In this way, environmentally friendly and
resource-saving recycling is ensured. Depending on the implementation in national law, you may have the following options:
-
Return to a shop,
-
Hand over to an official collection point,
-
Return to the manufacturer/distributor. This does not affect accessories enclosed with the old devices or tools without any electrical components.
-
Throw the cut grass on the compost. Do not throw it in the normal household waste.
Replacement parts / Accessories
Spare parts and accessories can be obtained at www.grizzlytools.shop
If you have issues ordering, please use the contact form. If you have any other questions, contact the "Service-Center" (see page 38).
| Item | Item | Description | Order number | |
| Instruction Manual | Exploded Drawing | |||
| 10 | 86-91 | Grass bag | 91110158 | |
| 23 | 68-69 | Spare blade (manufacturer's designation: DT8231-440101) | 91110150 | |
Guarantee
Dear Customer,
This equipment is provided with a 3-year guarantee from the date of purchase.
In case of defects, you have statutory rights against the seller of the product. These statutory rights are not restricted by our guarantee presented below.
Terms of Guarantee
The term of the guarantee begins on the date of purchase. Please retain the original receipt. This document is required as proof of purchase.
If a material or manufacturing defect occurs within three years of the date of purchase of this product, we will repair or replace - at our choice - the product for you free of charge. This guarantee requires the defective equipment and proof of purchase to be presented within the three-year period with a brief written description of what constitutes the defect and when it occurred.
If the defect is covered by our guarantee, you will receive either the repaired product or a new product. No new guarantee period begins on repair or replacement of the product.
Guarantee Period and Statutory Claims for Defects
The guarantee period is not extended by the guarantee service. This also applies for replaced or repaired parts. Any damages and defects already present at the time of purchase must be reported immediately after unpacking. Repairs arising after expiry of the guarantee period are chargeable.
Guarantee Cover
The equipment has been carefully produced in accordance with strict quality guidelines and conscientiously checked prior to delivery.
The guarantee applies for all material and manufacturing defects. This guarantee does not extend to cover product parts that are subject to normal wear and may therefore be considered as wearing parts (e.g. blade) or to cover damage to breakable parts (e.g. switches).
This guarantee shall be invalid if the product has been damaged, used incorrectly or not maintained. Precise adherence to all of the instructions specified in the operating manual is required for proper use of the product. Intended uses and actions against which the operating manual advises or warns must be categorically avoided.
The product is designed only for private and not commercial use. The guarantee will be invalidated in case of misuse or improper handling, use of force, or interventions not undertaken by our authorised service branch.
Processing in Case of Guarantee
To ensure quick handling of you issue, please follow the following directions:
-
Please have the receipt and item number (IAN 420302_2207) ready as proof of purchase for all enquiries.
-
Please find the item number on the rating plate.
-
Should functional errors or other defects occur, please initially contact the service department specified below by telephone or by e-mail. You will then receive further information on the processing of your complaint.
GB MT
- After consultation with our customer service, a product recorded as defective can be sent postage paid to the service address communicated to you, with the proof of purchase (receipt) and specification of what constitutes the defect and when it occurred. In order to avoid acceptance problems and additional costs, please be sure to use only the address communicated to you. Ensure that the consignment is not sent carriage forward or by bulky goods, express or other special freight. Please send the equipment inc. all accessories supplied at the time of purchase and ensure adequate, safe transport packaging.
Repair Service
For a charge, repairs not covered by the guarantee can be carried out by our service branch, which will be happy to issue a cost estimate for you.
We can handle only equipment that has been sent with adequate packaging and postage.
Attention: Please send your equipment to our service branch in clean condition and with an indication of the defect.
Equipment sent carriage forward or by bulky goods, express or other special freight will not be accepted.
We will dispose of your defective devices free of charge when you send them to us.
Service-Center
GB Service Great Britain Tel.:08004047657
E-Mail: grizzly@lidl.co.uk
IAN 420302_2207
MT Service Malta Tel. 80062230
E-Mail: grizzly@lidl.com.mt
IAN 420302_2207
Importer
Please note that the following address is not a service address. Please initially contact the service centre specified above.
Garantie - France. 55
Chere cliente, cher client,
(L_pA) 78,3dB;K=3dB
Vymena noze (Obr. H)
Je-li nuz tupy, tak by jej mel nabrousit odborny servis. Je-li nuz poskozeny nebo se zdá nevyvaženy, tak musi byt vymenen (viz kapitolu Nahradni dily).
Reparationservice. 140
Service-center 140
Importor 140
malt.89,0 dB; KwA=2,71 dB
garanteret 92 dB
(L_pA) 78,3dB;K=3dB
(L_pA) 78,3dB;KpA=3dB
māsurat .89,0 dB; KWA = 2,71 dB
garantat. 92 dB
Vibratie la manerul cu maneta
(a_h) 2,5m/s²;K=1,5m/s²
Tbpche Ha nobpei.. 255
Tapaunna 256
PemohTeH cepBn3 / n3BbHrapaHcNoHHO 6cnyXBaHe .257
CepBn3Ho 06cIyXBaHe.....257
BnocHTeI 257
IpeboHaOpnHnHaHata CEdeKnapaun3a cbotBETCTBne.....290
TexHHueckn cepTex 293
yBOA
Cbpdeuho Bn ueCTHm 3akynybaheTo Ha Baun HOB ypeI. Io TaKbB HauHH Bne Cte n36paH eINH BncoKOKaueCTBeH npOdyKT. I0 BpeMe Ha npOn3BOdCTBO TyeDt e npObePraBaH 3a KaueCTBO H e NOdIOXeH Ha KpaHa npOBePKa. Taka fYHKUHOHaHATA npiroDoHCT Ha Baun ypeI e rapaHTnpaHa.

PbkoBOdCTBOTO 3a eknnoatauHa e Hepa3dennha qact ot npodukta.To cb-
Дьржвaxнуka3aHHa 3a 6e3onacHocTа, ynotpe6ataи n3xBbprJHeto.прдn ynotpe6ata ha npodykta ce 3ano3haite c BCNUKn yka3aHHa 3a obcnykBaHe n HnCTpykUnn 3a 6e3onacHocT.ИЗПОЛЗВaIte npodykta caMo cbrIacHO onncAHneTo n 3a NOcoUeHInTe oblaCTn Ha ynotpe6a.Па3ete ynbTbaHeto Do6pe n Korato npedabate npodykTa Ha TpeTH NIIca, npedabaiTe 3aeDHo C Hero n BCNUKn DOKymeHTN.
Ynotpe6a no
npeHa3Ha4eHne
YpeBt e npedHa3Haue cmo 3a Koche Ha Mopabn TpeBn PLOU B DOMAuHN YcNoBna. Bcya dpyra ynotpe6a, KOrTO He e onyChata n3pnuHO B TOBA pbKOBOdCTBO 3a ekCnloa-taun, MoKe Da DOBede Do ueTH no ypeDa H da npedctablaBa cepno3Ha onachOCT 3a notpe6ntela. YpeBt e npedHa3Haue H 3a ynotpe6a ot nblnolteHN Iua. Deua, KaKTo N BB3paCTHn, KOrTO He ca 3an03HATN C TOBA pbKOBoDCTBO, He Tpr6Ba Da H3noJ3BAT ypeDa. Ynotpe6ata Ha ypeDa npi DbxkI IN BIAxHa cpeDa e 3a6paHeHa.
BG
Pon3BODNTeTHe HOCN OTROBOPHOCT 3a
IETn, KOnTO Ca IpeDn3BnKaHn OT He npabnHa
yNoTpe6a nn He npabnHnO 6cnyXbaHe. To3n
yPeA He e nOxOJa 3a TbproBcKa yNoTpe6a.
PiN KOmepcnHa yNoTpe6a, rapaunraTa e
HeBaJIndHa.
O64o onncanne
OKOMNJIeKTOBka Ha doCTaBKtA
BHHMaTeHNO n3BaTe ypeDa ot onakOBkata n npobepete, daHn CneHnTe qactn ca Ha- nnuHn:
- EneKtpnuecka Kocauka 3a TpeBa n H3BnTa dpbXka c Ka6en Ha ypeda
-Доннадрьжka
-Top6a3acb6npaheHaTpeBa
-2IOCTa3a yctAHOBBAHe 3a 3akpenBaHe Ha dpbkkata/N3BHTATA dpbkKa CnoIIOXHH Wai6n KOLapcKn BoJTOBe
-2KpHnUaTHBnHTa3a3akpenBaHeHa dpbXkata/Kopnyca Ha Kocaykata
-2ka6eHnIbpxkaa - KomnneKT 3a MynuipaHe
- PbKOBOIDTOBa eKcnloatauia
Onncahne Ha yHKuHnTe
EneKtpnueckata Kocayka 3a TpeBa HMa BbptAe ce ycnpoeHNO Ha paBHHATA Ha pR3aHe pexeH INCTpyMeHT. Ta e obopydBaHa c MoUeH eNeKtpOMOTop, 3dpab NpactMacOB Kopnyc, 6yToH 3a De6JoknpaHe, 3aunTa Cpeu Pa3npbCKBaHe n Top6a 3a cb6npaHe Ha TpeBa. OcbEN TOBa ypeBt MoKe Da ce peryInpa Ha 6 CTeneHn NO BvcoUnHa HMa JleCHO IOdBHXHN KOJIeJa.
Функцята Ha KOHTpOlnHnte eIeMeENTn Ie OTKpneTe B cIeDbaIte OIncAHn.
Pperne4
1 N3BnTa DpbXkKa
2 3aunTa Cpeu ycykBaHe Ha yIbJkaBau n Ka6eI
3Доннадрьжka
3a CbeHHHTeHa kanaKa
4 Ptoektop cpeu ydapn 5 Pkoxbatka
6 Kopnyc Ha Kocaukata 7 Konela
8 KpnHuaT BnHT N noDIOXHa wa6a 3a 3aKpeINBaHe Ha dpBxKata
9 Ka6eJHa ypeJa
10 Kow 3a cb6npahe Ha TpeBa
11 Noka3aHHe 3a HNBOTo Ha NbJIHeHe
12 IbpxkaHa Ka6eI
13 Kpniluata raikka, BnHT n noIIOxHa 7aib6a 3a 3akpenBaHe Ha dpbKkata
14 KOHTAK 3a ydbjxkaaunKa6eI
15 ByToH 3a Je6NoKpaHe
16 Ctaptoba pbuka
17 KomnjeKT 3a MynupaHe
18 YdIbIaBau Ka6e (He e B 0xbata Ha doCTaBkata)
B 19 Kolapckn 6oNT
E 20 loct3a pergunpahe Ha BncounHata Ha p3aHe
E 21 OgrpaHnUHTeI
F 22 Dpbxxka
H 23 Hox
H 24 BnHT Ha HOXa
H 25 WnHdJI Ha MoTopa
TexHnueckn daHHN
Enektpuecka kocauka..PRM 1500 A1
Kohcymaun Ha MouHocT Ha Motopa....1500 W Mpeko HnpekeHne 230 V\~, 50 Hz O6opOn Ha npa3eH xo.. 3400 min
Диаметьр Ha рязаHe ...ok. 360 mm Bucouнha Ha рязаHe ...25-75mm
Klaac Ha 3aunTa.
Bn3aunra IPX4
Terno. 14 kg
O6em Ha Top6ata 3a
cb6pahe Ha TpeBa .ok. 401
HnBOHa3BykoHOHaIraHe
L 78,3dB;K=3dB PA
HnBO Ha 3ByKOba MouHocT (LwA)
H3MepeHo 89,0 dB; Kw=2,71 dB
rapaHTnpaHO 92 dB
Bn6paunHa pbkoxbatkata
(a) 2,5 m/s²; K=1,5 m/s²
Iocouhehata emncnoHha ctoHocT ha Bn6pa- uHnte e n3MepeHa no ctaHaptn3npaH MeToD Ha n3nHTBaHe H MoKe Da 6bJe n3NoJ3BaHa 3a cpabHeHne Ha eHN eNeKtpueeKn HnCTpyMeHT C dpyr.
Iocouehata emncnoHHa cTOnHOCT Ha Bn6pa- qHnte MoKe Da ce n3NoJ3Ba H 3a NpBBOHa- qAnHa OueHKa Ha n3NaRaHeTo Ha Bn6paun.

PpeynpekdeHne:EMnCHOHHTA
CTOHOCT HA Bn6paunte NO BpeMe Ha
IeHCTBnTeJIHATA ynotpe6a Ha eNeKTPoIHCTpyMeHTa MoKe Da ce pa3NIuAba OT NocOueHaTACToHOCCT B 3ABNCMOCT OT HerOBn Bn HauHH Ha ynotpe6a.
OHTaIe ce da noIbpxAte HATOBapBAHTo B pe3yIiTat Ha Bn6paunn Bb3MOxHO HanHnCKo. PnpMepn Mepkn 3a HamaJIaBaHe Ha HATOBapBAHTo OT Bn6paunn Ca HOceHTo Ha pbKABuNp nPi N3NoJ3BaHe Ha IHCTpyMeHa OrpanuHHeTo Ha pa60THOTo BpeMe. PnTOBa CNeDba Da ce B3EmT NOB HBMAnHe BCNUK eTANn Ha pa60THNzIKbl (Hanp.BpeMe, B KOeTo eNEkTpuecknT INCTpyMeHt e N3KJIIOUeH, N BpeMe, KOrATO e BKIOUeH, Ho pa60TN 6e3 HATOBapBAHe).
CtoHocHTe Ha Wyma N BnBpaunite ca onpe- deJeHH CnopeH Hopmte H npedncaHra T B deKnapaunTa 3a cbOTBETCTBHe.
Yka3aHna 3a 6e3oNachoct
To3n pa3delen cbIbpxka ochOBHnte npednncanna 3a be3onacnoct npn pa6oTata c eJektpnueckata Kocayka 3a TpeBa.
CnmboH Bbpxy ypea

BHHMaHHe!
Ipooyete BHNMaTeJHo pkoBOIDCTBOTO 3a ekCnloatau.

Hocete 3aunTHn Ounna n
wnemoooh.

He n3naTe ypeHa ha Bnara. He pa6oTe npn DbXkN He Kocete MOKpa TpeBa.
OnachocOT HapaHraBe OT 3XBbPJIeH Yuactn.
KTe daleu OKoJHnTe INuca OT eIeKtpnueckata Kocayka 3a TpeBa
BHHMaHHe - Octpn HoxKob!
IpbkTe daJeu pbcTe n KpaKaTa cn.
CHOCT OT HapaHraBaHe!
Houhe MOTopa H3Ba-DeTe 3axpaHbuaaIy Iepei npabOTn no hactpoKaTaH NOUcTBAHeTo Hn KOrato 3axpaHbauaIyKabeI ce e ONJIe Hn e NOBpeJeH
OnachocOT NOBpeH 3axpaHbau Ka6en.
KTe 3axpaHbau n Ka6eI daJeU OT ypeHa Hoxa

BHHMaHHe! BnXKeHne no HHePun Ha HOx.
BG
Ckana 3a BncounHa Ha p3aHe

Диаметьр Ha рязанe

aHHH 3a HHBOTO Ha 3ByKOba MOuHOCT LwB dB.

Klaac Ha 3aunTa II (DBOHHa nOJaun)
EneKtpoypeHnTe HmAT MrcTo B DOMAKHHCKATA CMeT.
N3KIOUBAHe - OTnycheTe CTAPTOBATA pBUka
IpoeDypa 3a cTaptnpa-He - HATnchete 6byToHa 3ade6noknpaHe n dpbHnheCTapTOBata pbka
Ioka3aHne 3a HNBOTO Ha nbJIHeHe Bbpxy Kowa 3a cb6npahe Ha TpeBa:

OTBOpeHO NOKa3aHHe 3a HnBOTO Ha nbLnHe: Ppa3eH Kow 3a Cb6nPaHe Ha TpeBa

3aTBopeHo Noka3aHne 3a HnBOTO Ha nblHeHe:Ha nblHeH KOw 3a Cb6npaHe HA TpeBa
Chmbonn B pkbKObOaCTBOTO

3нak 3a onachoct c инфорmaця 3a пpe- dOTbpatЯBaHe Ha Лчн ил MaTePnAlnH ξeTn

IpeDynpeDnteH 3nak C HOpMaun 3a npDoTbpaTaBAHe Ha uetn

I3BaTe 3axpaHbua nIe enceI.

Hocete pbkabn np np paobota c HOxa.

Yka3aTeJen 3Hak c HOpMa- Cnra 3a no-do6po 6opabeHe Cypeda
O6uynka3aHnna 3a 6e3oNaChocT

To3n ypeJ MoKe Da npEiN3BnKa cepNo3Hn HapaHbAHn npn HenpabInHa ynotpe6a. 3a da npEoTbpATHe JnUHN MATEpHaJIHN UETN, 3aDbJXHTeJHO npOyTe He CnA3BaIte CJeHN- Te Yka3AHN 3a 6e3OpacHOCT n Ce 3aNo3HaIte Do6pe CBcHKn qactn 3a ObcnykBaHe.
Pnoarotobka:
Ba OT Jnua C HamaJeHn 3n-ueckn, CETNBn nn yMCTBeHn Bb3MOxHOCTn nn JInca Ha ONHT n 3HaHn, cAmO aKO Te ca noJ ha6JIoJeHne nn ca 6nN HHCTpyKTHpaHn OTHOCHO 6e0-nachata ynotpe6a Ha ypeDa n pa3bnpat npOn3Jn3aunTe OT TOBa ONaCHOCTn.
BOIDCTBOTO 3a ynoTpe6a.3a- nO3HaIte ce c yactnte 3a HacTpoiKa n npabHnHata ynoTpe6a Ha MaunHata.
pЯBaTe CBbP3BaAunKa6eH yIbJxKabAunKa6eIa npn3Haun Ha nobpeDa Hn 3a n3HocBaHe. Ako Ka6eBt Ce nobpeHn no BpeMe Ha yNtpe6a, ToH He3a6abHo Tpr6Ba Da 6bDe n3KJIuoyeh OT 3axpaHbAaTa MpeXa. HE DO-KOCBAHTE KABELA, PPEIN TOI DA 6bDE N3KJIIOUeyH.
He n3noJ3BaIte MaunHaTa, aKO Ka6eIbTe n3Hocen nn NOpeDeH.
IobpeDeHnte 3axpaHbaun Ka-6enn yBennuabat pnca ot TOKOB ynap.
yBepnte,ye Te He cn nIgpaT C ype- da.
NouchBaHETO NODpBxKata OT Notpe6nteHa He Tpa6Ba Da ce H3BbPwBAT OT Deua.
HINI DpyrN Iuca, KOHTO He ca 3a-
No3HaTHn C pbKOBOdCTBOTO 3a ekCNI
Ioataun, Da H3NOJ3BAT ypeDa.
MeCTHnte pa3nope6n MORat da
perlameHTnpat Bb3pactTtHa onepaTopa.
dOKaTo 6n3o Do Hero Hma Xopa, Oco6eHo Deua N DoMaunn IIO- 6mnu.
e OTROBOpeH 3a 3JIOJOLyKN HIN UeTHn 3a DpyrN JInca HIN TExHata CO6CTBEHOCT.
ce H3NoI3Ba ypeDa n OTcTaPaHeTe KAmbHn, npbUKN, TeJ nn dpyrN uyKd N TeLa, KOHTo MoRat Da 6bDat yIOBEnn H3XbPLeHN. TOBa MoKe Da npuHHn TeKKn HapaHaBAHna.
60THo 06neKno, KaKTo n cTa6nHn
6yBcC yctOuHBn Ha Xlb3raHe NODMETKn 3dpabN, Dbln NaHTaIOnH. He n3noJ3BaIte ypeDa, KOrato CTe 6ocn nn Hocnte OTbopeHN caHaII. N36raIte HocheTo HA WnpOKn dpexn nn Ha dpexn C BncaIshypoBe nn KolaHn.
Ima onachoct ot hapaHbahe!
Upe3 Bn3yaleH KOHTpOJ Da Ce npOBepn, daJI npEeIte HOxOBe, 3aKpeBaaIte 6oITObe H cIeHNrT peXeI MEXAHN3bM He ca n3HOceH nnIOBpeDeH. He n3NoJ3BaIte yPeDa, aKO 3aUnTHHe TnpCnOCobEnHra (HaNP. 3aunTa Cpeu pa3npbCKBaHe nn Top6a 3a cb6bpAne Ha TpeBata), qactn Ha HOxa nn 6oLTobete LnNCBAT, n3HOceH Ca nn Ca NOBpeDeH. 3a npedotBpTaBAhe Ha De6a- IaHC, NOBpeDeHnte HHCTpyMeHTn N 6oTObe Tp8Ba Da 6bDat noDmeHHcAMo HA napTDn.
No To3n HauHH ce rapaHTnpa 3ana3BaHe Ha 6e3oNaacHocTtHa ypeDa.
actn npHaJnxKHOCTN, KOHTO ca doctabeHH npenopbuaHn OT npOn3BOAnTeJI. Ynotpe6ata Ha pa3nueHN qactn BOn Do He3a- 6abHo OTnadahe Ha rapaunraT.
Pabota c ypea:

He noctabraye kpaKaTa n pb- ceB 6n30CTdo nn noBbptaCce yactn no BpeMeHa pa6ota. Ma onachoct otHapaHBAhe!

Cn3BaTe pa3nope6nte 3a Wyma n MeCTHnTe pa3nope6n.
BG
Hnhtpykunnte n cmo toraba, KOrato Baunte kpaKa ce hAmnpaHa cnrypno pa3ctoHne ot pexeIuTe HnhtpymEnTH. Onachoct ot Iope3HN HapaHraBHHa.
Pn loo BpeMe, BbB BlaxHa CpeDa Hn BbpxMy Mokpa TpeBa.
IpoHnKbaHeTo Ha BOda B ypeDa yBeHHaBa pNcKa OT TOKOB yDap.
Pa6oTe cAmO npn dHeBHa CBETInHa Hn Do6po OCBeTneHne.
CbueCTByBa onaCHOCT OT 3JONOnyka!
ymopeH nn pa3KoHcEHTpnpaH nn
CneI npHeMaH Ha aKoxOJ nn
MeikamEn. BnHar npabete
peOBHN nouBKn npna60ta. b-
DeTe pa3ymn pn np60ta.
EHH MOMENT Ha HeBHMaHne npi pa6otata c ypeDa MoKe Da DoBeDe Do cepNo3H HapaHraBaHna.
6nHaTa cn no3nua, ocObeHo npn HAKIOHN.
Taka ue moxete da KOHTpOJInpate no-do6pe ypeDa B HeouaKbaHn cHTyaun.
Pa6oTe BnHaHn HappeHo Ha HAKNoHa, HNKOra HArOpE nn HaDony no HAKNoHa. BbTe ocObeHO BHIMATEJIHH, KOrato npomeHrTe NocOKata Ha DBNXeHne No HAKIOH. Hnkora He pa6oTe no npeKaIeHO CtpbMHN HAKNoHn.
poCT Ha HopMaJIeH XoI. BbTe OcObeHO BHNMaTeJHn, npEi Da ObbpHeTe NocOKaTa Ha DnKHeHne Ha ypeIa, da ro npnterIte KbM ceBe cn IIN Da XoIHTe Ha3aI.
CbueCTByBa onaCHOCT OT NnHn HapaHraBAHna.
cbrnacno HNCTpykunnte B TOBa pkoBooCTBO 3a ekcnloatau. BnMaBaHTe 3a DOCTaTbUHO pa3ctOHne Mekdy KpaKATA N BbptTuaNTe ce HOXOBe. KOHTAKTBt C peKeIooTO yCTPOINCTBO MOKe Da npuHH HaPahraBAnr.
Ha MToTopa Kocaukata He 6nBa Da 6bJe HAKNaHraHa, OCBeH aKO B 3a ueTa He 6bJe NOBdnrHa- Ta. B To3n CnyaH J HAKNoHete cAmO DOTOJkoBA, DOKoJKOto e Heo6xOdHMo n NOBdnHete cAmO cTpaHata, o6paTHa Ha cTpaHata Ha Notpe6nte. B To3n CnyaH HAKNoHete ypeDa Qpe3 HATNCKa- He Ha N3BVtata DpbXka Taka, Ye npedHnte KOJIeHa Ha ypeDa JeKO Da ce NobdnHat. BnHar Ce YBepaBaiTe, ye DBeTe pbue ce HAMnpaB pa6OTHO NoLOXeHne, ppeHi ypeDbT OTHOBO Da 6bJe NoCTABeH Ha 3emrTa.
3a c6bnpaHe Ha TpeBa Hn 3a-
uNTa CpeUy pa3npbckBaHe. BuHn CToIte DaIeU OT OTBopa 3a
n3XBbpJHne.
CTOnTe npeI n3XoJaunKaHaJ.

BHHMaHHe onaChoc! HoXbT npOdbJxaba da pa6oTn no Hnepu. CbueCTByBa onaCHOCT OT Hapahrahe.
HIN TpaHCnoptnpa, DOKATO MOTOPbT pa60tn. N3KJIoute ypeda,
KoratoToTp86BaDa6bDeHaKIoHEn3a TpaHCnOpTnpaHe, Korato Ce npecuatdpytnILOU,pa3JIuHn OTIINBAiN,IKORATOypeDbTce PnIDBVXkBaKbM NOTIPOUHTe3a Kocene.
n3XBpIHe Ha TpeBaTa BnHaIy nCTn CBO6OJeH. OTCpaHraBaIte OKoCeHata TpeBa cAmO npn N3KIOueH n CnpaI ypeI.
Hau3Op Ha pa6oTHOTO MxCTO.
ypei nn ypei, npepa6oTeH 6e3 CbIacneTo Ha npOn3BOAnTeJI. Hnkora He n3noJ3BaIte ypeia c NOBpeDeHH 3aunTHn CbOpBXKeHn IIN ekpAHnpOBKn, INN JInNCBAuN CbOpBXKeHn 3a 6e3OanachocT KATO OTKIOHRAaUN MexAHN3Mn N/nn MEXAHN3Mn 3a Cb6HpAHe Ha TpeBATA.
Pa6oTe cAmO B nocouhenia dHa a30n Ha MouHcT n He npoMeHnTe HacToKnTe Ha peryIaTopa Ha Motopa. He n3NoI3BaIte Maunn C hAmaleHa MoUHcT 3a TeKKn pa6oTH. He n3NoI3BaIte ypeDa 3a cei, 3a KOHTo He e npedHa3Hauen.
ДО ВьзпламенMu TeuHocTh Ии ra3OBe. Прн HeCnA3BaHe CB- ьecTByBa onaCHOCT OT NOxap Ии ekCnIIO3NЯ.
Te ypeda, KORATO MOTOpbT pa60TH. OnachocT OT nope3HN HapaHraBaHHa.
Ie enceia. YBepete ce, ye BCnukn NOdBHXHN qactn ca DoCTnHaJIH
CbCTOHNHe Ha NbJeH NOKOJ:
- BnHaH, KOrato OCTABrTe Maun-Hata 6e3 Ha3Op,
-праздд поочиTe OTbopa 3a нзхврлгHe Илдд OTстранITE блokирOBКITE, - KOraTo He H3NoJ3BaTe ypeJa,
- npeDn Da npOBepBAte, no- qHCTBaTe nIu pa6OTne no ypeDa,
- Korato 3axpaHbauT Ka6eI e NobpeDeH nIy cYkaH,
- KORATO e 6nlo cpeuHato yXdo TnIo. NOrbpcTe nobpeN IO Kocaukata 3a TpeBa n N3BbPwete Heo6xOIMnTe peMOHTn, npEi Da CTapTnpate OTHOB NoI da pa6OTnte c Kocaukata 3a TpeBa.
B clyaaye kocaukata 3a TpeBa 3anoyhe da Bn6pnpa HeoohuaHcNlHO, e Heo6xOHaMa He3a6abHn npOBepka.
-Notbpcete NOBpei;
- H3BbPwTe Heo6xOaHmnte peMoHTn Ha NOBpeDeHnTe qactn;
- NorpnjkeTe ce 3a TOBa, BCnUKN raikn, BoNTOBe n BnHTOBe da ca do6pe 3aTeHATn.
HIN KpaKaTa Cn B 6In3OcT Do HIN NOB BbPTaUc Ce qactN. Hnkora He 3aCTaBaIte nped OTbopa 3a HxBbPnaHe Ha TpeBaTa.
Poaepbxxka n cbxpanenHe:
C HЯКОЛКO peXeUHnHCTpyMeHTa, 3aIOTO DnIXeHNHeTO Ha eINH HOK MOKe Da IOBeDe Do 3aBbPtaHe Ha OCTaHaJIte HOKObE.
raikn,6oITOBe n BInTOBe da ca 3aPABO 3aTeHATn upeBt da e B 6e3ynpeuHo ekCnloatauOnHHcBCTOAHne.
ypeda,ocBeH aKO HMaTe Heo6xO
dHMOTO 3a ceTAt o6pa3OBaHne.
BcnKn pa60TH, KOHTo He ca nocoueHN B TOBA pBkoBOcTB0 3a ekCnloatau, Tp6Ba Da 6bDat
N3NbHRAHn cAmO OT yNbHNO
MOseHn OT HAc ueHTPOBE 3a
cepBn3HO 6cnyXbaHe.
MRCTO, KOETO He MoKe Da 6bDe DOCTHHTO OT Deua.
ypeI. POnDbpKaaTe HNCTpyMeHTe OCTPN uHCTn, 3a Da MoXeTe da pa6oHTe no-do6pe n no-6e30-nacHo. CneBaAte ppeDnncAHnraTa 3a TexHnuecka nOdpbXka.
rato cmeHare pexeIOTO cbOpbXeHne.
cb6bpahe Ha TpeBa peoBHO 3a
n3HocBaHe n DeOpMaun. OTo
cb6paXeHHa 6e3oNaChOCT
cMeHnTe n3HocEHnTe Hn NOBpe-
deHNte Yactn. Pn HAcTpoNkata
Ha HOXOBete 6bDete OC6eHo
BHnMaTeHN, 3a Da He 6bDat npHTnCHATn NpbCTnTe Bm Meky BbpTn
IHTe Ce HOXOBe HEnoDBNXHO
CToAHTe Yactn Ha MaunHata.
IoWATA NoDpBxKa Ha ypeHnTe e
PnUnHa 3a MHOrO 3JOnOlyKn.
pe3epBHN peXeUHnCTpyMeHTN, KOnto ca ODo6peHn OT npOn3BOOn-TeJI.
HOXOBE BHIMABaIte 3a TOBa, Ye DOpH TOraBA, KOrATo H3TOUHNKbT Ha HAppeXeHHe e N3KJIoueH, peXeIHTe HOXOBe Moat Da Ce DnXkAT.
3aTeHn Ta6eKn Tpr6Ba Da 6bDat CMeHeH.
CMeHnTe H3HOceHnTe Hn NOBpe- DeHnTe qactn. 3noJ3BaIte eHNcTBeHoOpHnHaJIHn pe3epBn qactn n npHaJnxHOCTn.
npei Da npheMaunHata 3a cbxpanHe. OnachocOT n3raPpne!
EneKtpnuecka 6e3onacchoct:
IOTO HAnpeXeHne Da CbOTBcTCTBa HA daHHnTe Bbpxy TInOBata Ta-6enka.
KoHTaKT c RCD (Residual Current Device) c HOMHaJIeH yTeueH TOK He noBeue ot 30 mA.
3a3eMeHnte yactn (Ha np. MeTaJIHn OrpaI, MeTALHn cToiKN). Korato TAnoto Bn e 3a3eMeHo, PnCKbT OT TOKOB yAp e NO-ROJAM.
3axpaHbAsn Ka6eHm MoJeH05VV-F, KOHTO ca DblrMaKc.75 M n ca npedHa3NaueHn 3aynotpe6a Ha otKpHTo. HanpeuHTo ceueHne Ha npoBODnUte Ha3axpaHbAsn Ka6eT Tpr6Ba dae MNHMym 2x1,0 mm². PpeHnyotpe6a BnHa rna pa3BbAayTe MaKapata c Ka6eHa n3zraNo. PpoBepete 3axpaHbAsn Ka6eN 3aIeTu.
ka6eI n3noJ3BaIte npedBndeHOTO 3a ceJIta OKaUBAHe 3a 3axpaHbA- una Ka6eI.
Kaben daenu ot pexeun Hnctpyment. Hoxobete morat da NOBpeT 3axpaHbaun Ka6en N da DOBeaT Do DOKOCBaHe Ha npOBexdaun HappeXeHne qactn. No npHHuBte 3axpaHbaun Ka6en 3ad onepatopa.
YbIIXTeHnT Ka6e MoKe Da 6bJe npeKbCHaT No HeBHMaHne. ONaCHOCT OT TOKOB yap.
6en,3a da n3BaAnTe uencela ot KOHTaTa. Na3eTe 3axpaHbauN KabeI OT ropeuHa, Ma3HnHa N OCTpn Pb6OBe.
Te 3axpaHbuaT KabeI e NobpeDeH. Ako 3axpaHbuaa Ka6eHa To3n ypeI e NobpeDeH,ToI Tp8Ba Da 6bJe 3aMeHen OT pOn3BOAnTeJI nn He rOBn OTeJ 3a 0cCnyKBA-He Ha KIneHTN nIOT NoOboHO KBaIIuΦnUpaHO IInCe,3a da ce H36erHAT 5eTI.
3axpaHbau Ka6eI c eIeKtpn-ueckata MpeXa. He DokocBaIte NOBpeDeH 3axpaHbau Ka6eI,doKATO e Cbbp3AH c eIeKtpnueckata MpeXa. NOBpeDeH 3axpaHbau Ka6eI MoKe Da DoBeIe Do DokocBaHe Ha npobexdaun HappeKeHne qactn
OctatbUHH pCKOBe
Iopn npn ynoptpe6a cbrnacho yka-3aHnraHa To3n eJektpoypeBnHarn octabat octatbUHN pNCKOBe. CneHnTe ONaCHOCTM MORAT Da HAcTbIANT BBB
Bpb3Ka C n3nblHeHHeTo Hn3pa6oTba-HeTo Ha To3n eNeKTPoypeI:
a) YBpeKdAHe Ha cIyxa aKO He ce Hocn POnxOJaIO o6OpyDBAHe 3a npEtna3BaHe Ha cIyxa.
b) YBpeKdHa Ha OHTe, aKO He ce HOCn IOxOJa 3aHTa 3a OHTe.
c) HapaHraBaHe ype3 nopra3BaHe
d) YBpeKdaHe Ha 3dpabeto, npOn3Tu aIoo OT Bn6paunn pbka-pamo, aKO ypeDbT ce n3noJ3Ba 3a no-db- IbI nepNoD ot BpeMe Hn He ce N3NOJ3BA n NOJdbPjKa npabHnHO
IpeDynpexKdHne!To3n eJektpoHHCTpyment rHeepnpa eJektpomarHHTHO NOle NO BpeMe Ha ekCnloatau. Pn onpeJeHn 06ctOraTeJICTBa TOBa NOle MOKe Da IOBNIRe OTpuCaTeJIHO HA AKTINBHN Hn IACNBHN MeNCHCN NmPAAHTN.3a Da Ce HAMAn ONACHOCTTA OT cePno3HN Hn CMBpTOHOCHn HapAHBAHn, Hne npenOpbYbAME Ha JIncATA C MeNCHCN NmPAAHTN Da Ce KOHCyTtupat Cbc CBO8 JeKap Hn Ipon3BOndTeJI Ha MeNCHCKN NmPAAHT, PpeDN DA N3NoJ3BAT MaunHATA.
MONTAX

IpeH BcHKn pa6Otn n3KJIIOUBAHTe ypeHa ot KOHTaTa. CbIeCTByBa onachOCT OT IHH HapAHBaHH
MOnTnpeHa m3BnTata ApbXkKa

3a neceH MOHTaK Ha DoJIHaT a DpbXka H36epete No3uIg 3a BnCOunHata Ha p3aHe 25 mm (Bx. "HacToiKa Ha BnCOUnHata Ha p3aHe").
(φnr. A)
- Ⅲдьрпаite cbeинITEлнITE kanaчkn (3a) NaK pAnuata Ha Tpb6nte Bbpxy DoHATA dpBXka (3). JIeKO ObHete DoHATA dpBXka (3) n BaKapaiTe Cbc CbeHNHTeHNTe KaNauchn (3a) OTЯCHO n OTЯBO B KOpnyca Haypeda (6). 3aBnHTeC KpInuATte BnHToBe n noJIOxHnTE Wai6n (8).
(Φnr.B)
- П配电а Te 3aunTa cpeu ycykBaHe Ha yIbIkaBau n Ka6e1 (2) Bbpxy I3BnTaTa IpbKka (1).
3.ФИКСИРаTe I3BHTaTaДрБЖKa (1)c npHIOXeHInTe KOnapCkn BoTObe (19) n DBete KpHuaTH RaIKn C NOIOnxHa WaIb6a (13) KbM DOJIHATA DpBxKa (3). - 3aKaayete Ka6eHnTe Dbpxaun (12) Bbpyx ydoHNata dpBxxka (3) n Bbpyx N3BnTata dpBxxka (1) n fNkCnpaute c Tnx Ka6ena Ha ypeDa (9).
- Hactpoite haknoha Ha n3BHTata dpbka (1), kato ocbobodte Kpnuatnte BnHTOBe c noIIOxHnte wai6n (8) n 36epete keJahnHaHKIOH.

Korato Ocbo6oHTe Dbata loCTa 3a yctahOBrahe 3a 3akpenBaHe Ha dpBXkata c noDIOXHa wa6a (13), Moxete Da CbHete H3BHTATA dpBXka (1) haoLy 3a cbxpanHe Ha ypeDa. BnIMabaTe 3a TOBa Ka6eIbT Ha ypeDa (9) da He ce npeunne.
MOnTHpaHe Ha Kowa 3a cb6HpaHe Ha TpeBa (ФИR.С)
- NocTabete nactmacobnte nactHH Bbpxy noctOBm MEXAHn3bM Ha KOWa 3a cb6npaHe Ha TpeBa.
- BkapaTe pBkoXBatkata Ha Kowa 3a cb-6npaHe Ha TpeBa (10) B npedBndeHna 3a ceNTa DbpXau B rOpHata qact Ha Kowa 3a cb6npaHe Ha TpeBa (10).

C eIeKtpnueckata Kocauka 3a TpeBa He Tp86Ba Da ce pa60Tu 6e3 npoteKtopa cpeu ydapn nn 6e3 kow 3a cb6upane Ha TpeBa. CbuecTByBa onachoct ot HapahraBe.
06cnykbahe
OkaBaHe/H3BaXKaHe Ha Top6ata 3a cb6mpaHe Ha TpeBa (pnr. D)
- 3a okaybahe Ha Top6ata 3a cbbpahe Ha TpeBa (10) noBnHte 3auHata Cpeuy pa3npbckBaHe (4) n Okaute Top6ata 3a cbbpahe Ha TpeBa (10).
CbHete 3aunata cpeuy pa3npckbahe (4) Bbpxy Top6ata 3a cb6npahe Ha TpeBa (10).TЯДьpxn Top6ata 3a cb6npahe Ha TpeBa B npabnHa no3nua.
- 3a cbaJHe Ha Top6ata 3a cb6paHe Ha TpeBa (10) NOBdHHeTe 3auNTata CpeUy pa3npbCKBaHe (4) n OTKaueTe Top6ata 3a cb6paHe Ha TpeBa (10). CbHete o6pato 3auNTata CpeUy pa3npbCKBaHe (4) Bbpxy Kopnyca Ha KocauKata 3a TpeBa (6).

C e neektpnueckata kocayka 3a TpeBa He Tp86Ba Da ce pa60Tu 6e3 3aunTata cpeu y pa3npbckBaHe Hn Top6a 3a cb6npahe Ha TpeBa. CbuecTByBa onachoct ot HapahraBe.

3a da n3npa3HnTe no-Necho KoWa 3a cb6npaHe Ha TpeBa (10), Moxete da ro XbaHete 3a dpbXkata N DOnbHnTeNo 3a TEKCTnHaTApbXka OT 3aHATA CtpaHa Ha KoWa 3a cb6npaHe Ha TpeBa (Bx. qnr. C).
Noka3aHne 3a HMBOTO Ha NbJIHeHe
CtpaHnUHO Bbpxy Top6ata 3a cb6npahe Ha TpeBa (10) e pa3noIoxKeHO noka3aHne 3a HNBOTO Ha IIbIHeHe (11).

OTBOpeHO NOKa3AHne 3a HNBOTO Ha NbHHeHe (11):Top6ata 3a cb- 6npaHe Ha TpeBa (10)e npa3Ha

3aTBopeHO NOKa3aHHe 3a HHBOTO Ha nJIHe He (11):Top6aTa 3a Cb6paHe Ha TpeBa (10)e HAnbJIHeHa

Ioka3aHHeTo 3a HnBoto Ha nBnHeHe (11) yHKuOHnpa cMo TOraba, KOrato ypeDbT pa60t.
Hactpoika Ha Bncoounhata Ha pa3ane (ФИR.E)

I3KIOUeTe ypeDa, n3BaJeTe 3axpaHbAunu IeN H3yakaiTe nbHOTo cnpaHe Ha HOxa. CbueCTByBA ONACHOCT OT NUNH HapAHBaHnra.
-
Hatnchete locta 3a perylnpae Ha BncounHata Ha p3ahe (20) HABbH n ro npemeCTe NOKpaN orpaHnHTeJra (21) Do XeJahata HactpoiKa Ha BncounHata Ha p3aHe.
-
Moxete Da n3no3Bate nomoata Ha pkoxbatkata (5), 3a da npedotbpatnte npdBnKbaHTo Ha eIektpueckata Kocauka 3a TpeBa.
25 mm -Позцяя 1
35mm-Nozua 2
45mm-03nua 3
55mm-No3n4
65mm-03nua 5
75mm-03n6 6
IpaBnHaTa BncoUHa Ha p3aHe npi DeKoPapHBa TpeBHa nloe oKOIo 25-40 mm, a npi noI3BaAca ce TpeBHa nloe oKOIo 30-60mm

3a npbpoTO KOceHe npe3 ce3OHa Tp6Ba Da ce H36epTe BnCOKa BnCOuHa Ha p3aHe.

Cn3BaIte pa3nope6nte 3a wyma MeCTHInTe pa3nope6n.
Komnnekt 3a mylunpane (phr.F)
Ynotpe6a Ha KomnneKta 3a Mynu pahe
- Otrpahe Kowa 3a cbbpahe Ha TpeBa, aKO e nocTabeH.
- Повдигн elect npotektopa cpeу уdapn (4).
- Nocabete KOMnJIeKtA 3a MyIuHpaHe (17) B WaxTata 3a OTBeXkaHe.
- CbHete npoteKTopa cpeuy yapn (4) Bbpxy KOMnEKA 3a Myunipahe (17).
I3BaXdAne Ha KOMnIeKTa 3a myUnpaHe
- Повднгенте пotingа сршу удаши (4).
- XbaHete KOMnIeKta 3a MyIuHpaHe (17) Ha npbXkata (22).
- Hatachete dpbkkata (22) 3a de6noKpaHe Ha KOMnEKA 3a MyuHpaHe (17).
4.ПOBdHrHeTe KOMnIeKtTa 3a MyuNpuHa (17)OT WaxTata 3a OTbExKaHe.
BkIIOUbaHe m n3KlIOUbaHe (phr. G)
- BkHouTe 7eNceHa 3axpaHbuaKa6en B KOHTaTa 3a 3axpaHbuaKa6en (14) Bbpxy H3BHTata DpbXka (1).
- 3a npedna3BaHe ot orbBaHe, oOpMeTe ot kpar Ha 3axpaHbua nka6e1 (18) knyn Iro OKaueTe B npncnoc6neHneTo 3a
BG
npea3BaHe Ha 3axpaHbuaa Ka6en ot onbBaHe (2).
- CbpxeTe ypea KbM eJektpo3axpaHbaHeTo.
4.ПрдИВКЛЮУBAHeBHIMABAHTeурдТа HeДOKOCBAпрdmETn. - HattincheTe n 3aApbXte 6yToHa 3a De6No-KnpaHe (15).
- 13aBpnaTe n3aDpBxTe npckOBata pBka (16)Ha h3BnTa Ta DpbXka (1). MoKeTe da ocBo6oAnTe 6yToHa 3a De6noknpaHe (15).
- 3a n3KIOUBAHe IyChete CTapTOBata pbyka (16).

Cnei n3KIOUBAHe Ha ypeda HOXbT Ce BbPTN OSe HraKOJIKO cekyHn. He dOKoBaIte DnJxueaCe HOX. CbIeCTByBa ONaCHOCT OT IInuHn HapAHyaBHn.
Pabota c ypeda
PeIOBHOTo KOceHe CTmUynpa 3aChnHeHH paCTeK Ha IInCTATA npn TpeBHata pactH ToHocT, KATO B CbIcTO BpeMe CNOMara 3a yHnOxKaBaHeto Ha nIeBeHnTe. IpopaN ToBa CNeD BCaKO KOceHe MOpABATA CTABA No-rcTa H ce NOnyUba paBHomepHo 3aTpeBeHa MoPaba.
PbBOTO KOceHe Ce N3BpWBA KbM CpeaTa Ha anpnil npn BnCOUHa Ha pactHtEnHOCTTa ot 70 - 80 mm.
Ipe3 nepnoa Ha rnaBnata Beretauia IINBaAATA Tpa6Ba Da ce Kocn Nohe BeHbX CeMnUHO.
KoHTaKaI Na ce npOdbJxKeTe paBoTa Ha daJeU OT KOHTaKaT.
ce6e cn n eBa cnei o6pbuane ro noctaBete Bbpxy Beue OKoceHaTa CtpaHa.
JenXoI NO Bb3MOxHOCB I npabN pa60THN
noBbpxHOCTn.3aKoCeHe 6e3 npOnyckn, pa6OthnTe NOBbpxHOCTn Tp8Ba BnHaT Da ce npEnOKpNBat HAKONKO caHTmEtpa.
Taka, ye ypeBbTa He ce npetOBapBa. B npotInBeH CnyaMOTOpbT MoKe Da 6bJe NOBpeDeH.
Ha HAKHOHa. BbTe OcOBeHO BHIMaTeHNo npn obpaTeH XoN terHe Ha ypeHa.
ynoTpe6a KaKTo e onncaHO B rIabe, NOnuHCTBaHe/NoDpBxKa/CbXpaHeHne".

H3KIOUBAIte ypeDa cIeI pa6ota H 3a TpaHCnOpTHpAne, H3BaXJaTe UENCEla OT KOHTAKTA N I3uAKBaIte NbIHOTO CNIPAHe Ha HOxa. CbIeCTBy- BA ONACHOCT OT IINH HapaHABAHNA.
Pa3nka MeKdy Koche Ha TpeBata m Myunpane Ha TpeBata
Korato ce n3noJ3Ba KOMnIeKT 3a MyunHpaHe (17), Okocehata TpeBa He ce cb6npa B KOw 3a cb6npahe Ha TpeBa, a ce pa3dpo6raBa n pa3npedeBbpxy TpeBHata NIOU. XpaHInTeHNHTe BeueCTBa, cbDpKaun Ce B OKocehata TpeBa, ce pa3rpaXDat OT NOuBeHnte opraHHmN O6pa3yBat xpaHntenE h cIKbl. CneobateJIHO MyUnpaHata TpeBHa NIOU. Tpr6Ba Da ce Topn MHoro No-pAko.
No npnucn Tpebata Tp6ba da ce kocn OTHOcHTeHNO yeCTo, Taka ye Bbpxy TpeBHATA NLOU OCTaBAT cAmo MaKKn KOHueCTBa Myu.
Iopadn TOBa e Hau-dO6pe Tpebata da ce Myunpa NOHE BeHNbX CeMnHOn I da ce perylnpa Kocaykata Taka, ye cAmo OKoLo 40% ot o6aata BncoounHa Ha Tpebata da ce Myunpa.AKO MynbT OctaHe BNIM Ha TpeBHATA NIOU (Hanp. npn Koche Ha TpeBa-
Ta 3a nbpBn nbT npe3 roDnHata nn npn 6bp3 pactek), Tp8Ba da ce paBOTn c KOWa 3a cb6npaHe Ha TpeBa (10).
Почистван/пордрьжka/ CBхсан.

IobepTe n3BbPwBaHeto Ha DeHocHTe, KOHTo He ca ONNCAHN B TOBA pbKOBOCTBO, Ha yNBJIHOMOueH ceHTbp 3a cepBN3HO 6cnyXbaHe. N3noJ3BaTecamOpnHaHnHuaCTn.

Hocete pbkabn npn pa6otata c Hoxka.

N3KIOUBAIte ypea npeIN BCNUKN DeHOCTH NO TEXHnuecka NODpBxKa INOuHCTBaHe, N3BaXdaIte 7eIncela OTKoHTAKTA I N3yakBaIte PbHOTOCnIPAHe Ha HOxa. CbIeCTByBa onaCHOCT OT JInuHn HapAHRAHn.
O6uN DeHocTn npn nouchTBaHe N TexHHueCKa nOapbXkA

He npbckaite enektpnuecka-ta Kocauka 3a TpeBa C Boda. CbuectByBa onachoct ot enektpnueckn ydap.
HCTBAHe H3NON3BaIte YeTka Hn Kbpna, HO He n NouchTBaun npenapatn nn pa3TBOpHTeJI.
OCTaTbU O T pacteHn C npue DbpBO Hn HnactMaca OT KOJIeNATA, BeHTINaCNoHHnTe OTBOPn, OTBOPa 3a N3XBpIaN He n O6NaCTTa Ha HOXOBete. He n3NOJ3BaIte TBbpDn Hn NOcTpN PpeMeTH, 3aIoTO Taka MOKeTe Da NOBpeDInTe ypeDa.
KoJenata.
TpeBa npedn BcKa ynotpe6a 3a oueBnHn DeΦeKTH, Kato pa3xla6eHN, n3HOceHN nIN NOBpeHn qactN. PpOBepTe 3aTgAHeTo Ha BCNUK rAKn, BoNTOBe u BNHTOBe.
yctpoiCTBa 3a NOBpeHn DaHn ca Ha npabHnHte Mecta. Pn Heo6xOAnMoC Tn CMeHeTe.
CmHa Ha HOXa (pnr.H)
Ako HOxbTe TbI, ToM MoKe Da 6bJe 3aTo-ueH OT CneuHaN3npaH cepBn3. Ako HOxbTe NOBpeH NIN NOKa3Ba DnC6aJAHc, ToTp8Ba Da 6bJe CmeHeH (Bx. rnaBa Pe3epBHu actn/npHaDJIeXHOCTn).
1.ИЗкlioуete 3axpaHbaunia quencen n I3yaKaIte nbHOTOCnnpaHe Ha HOka.
2.Obbpeypeia.
3.ИэползваиTe 3dpaBn pbkabuHnДрьхTe HOxa(23)3dpaBO.Pa3BnIte BnHTa Ha HOxa(24)cpeu yacOBHKOBaTa CTpeKKa c NOMOHTa Ha raeueh KIOU (pa3Mep Ha KIOUa 13)OT WINHdeHa MoTopa (25).
- MoHTnpaIte HOBnHO B O6paTHata nocJeIOBaTeHIOCT.BHIMAbaIte 3a TOBa HOXbT Da e N03nOHHpAH npABnH0 IN BnHTbT Da e 3aTeHAT 3dpBO.

PpabnHa nocneIOBATEHNOCT: WnHdEn Ha MOTopa-HOX-
noJIOxHa 7aHb - cTgAa 7aHbBnHT Ha HOka
CbxpaaheHne
aenee ot obcera ha daea. Ocbo6oede Te IocTa 3a yctAHOBRAhe 3a 3akpenBaHe Ha dpbkKaTn CbHete n3BHTata dpbkKa, 3a Da MoKe ypeIbT da 3aema No-MaIKO MrcTo. CpaBHeTe c cnypata I. Pn TOBa Ka6eJIbT
Ha ypeHa He Tpa6Ba Da 6bJe 3aXbaaH.
OCTABYTe ypeD A B 3aTBopeH NOMeUeHHa.
Be, TbK KATO MOKe Da Ce O6pa3yBa BJaRa.
He noeMaMe OTROBOPHOCT 3a npEi3BnKaHn OT HAHTe ypeN IeTH, aKO cBHTe ca npEi3Bn KaHn OT HeNPABHIneH peMOHT nIyNoTpe6ata Ha HeOpHnHaHn Pe3epBn Yactn nIyOT yNoTpe6a, KOrTo He e no npEiHa3NaueHne.
TpaHcnopt

3a tpaHcnpT n3Klouye ypeda,
n3BaJeTe 3axpaHbAunr uencel n
n3uKaIte nbHOTo cnpaHe Ha HOxa.
CbIeCTByBa ONaCHOCT OT IINHn HapaHRAHnR.
TpaHcnpntpate Hnn npemecTBaTe ypeJa.
N3xBbplnHe/3aunHaHd okonhata cpeda
IpeaTe ypeDa, npHaJnxHocHTe n onaKOBkata 3a ekONorocbO6pa3Ho peuNKnnpaHe
YpeBt He Tp6Ba Da ce H3XBpna CDOMAKINCKHTe Hn O6emHnte OTnab-
InpekTnBa 2012/19/EC OTHOCHO OTnabuTe OT eEeKtpueecko H eEeKtpoHNO obOpyDbaHe: Iotpe6nteIte 3a 3akOHOB 3aBjKeHnDa Ipeabat eEeKtpoHHte ypeN B KpaHaTexHnI pone3eHN XHBOT 3a ekOlorocbO6pa3Ho peuknipane. NTo3n HaunH ce rapaHTnpaekolorocbo6pa3Ho n uadApopecypcn npedabahe 3a OTnabu.
B 3aBnCmOcT OT npnlarHeto B HauNoHaHHO TO 3aKoHOaTeJCTBO, IMATE CneHIne OOnuN:
NYHKT,
dntprnytopa.
OT TOBA N3NCKBAHe He ca 3acerHATn npNKpe- nEHnte KbM CTapHTe ypeDN npHaJNeXHOCTn H NOMOuHcpeDCTBa 6e3 eEKeTpueeKn CbCTABH YACTN.
3a OTnadbci, a npedeAte 3a KOMNocTHIpaH e nn pa3npedeneKATO MyuHpaCNoi nOxpactn nn Dpbeta.
Pe3epBn qactn / npHadJIeXHoCTn
Pe3epBn qactn n npHaadJeXHoCTn Moxete da noLyunte Ha aDpec www.grizzlytools.shop
Ako Hmate npo6nemc npbukata, n3noJ3BaIte foopmyra 3a KOHTaK. Ako Hmate npyRn Bbpocn, o6bpHeTe ce KbM „CepBn3HO obcnykBaHe" (Bx. cTpaHnca 257).
P03nua B P03nua Ha O3haueHne Homep 3a pbkoBODCTBOTO c6OpHna cepTeK nopb4ka.
| 10 86-91 Top6a за сбihupane на Трева | 91110158 | |
| 23 68-69 Peэрвен пох (peф. Homep на позьодenteя: DT8231-440101) | 91110150 |
TbpcheHa nobpeAn
| ПюбLEM Вьзможа | пожима Ост相对较аяха | наблесma |
| Урémonг не с的对象 | Линсва наpopжени на[elektрическatingа мрека | Пробerte Контакta, захсанения кабел, повODиka, церета,[eveNT. ремонт ot[elektropotexнik |
| Повреedingа с的对象(16) | Ремонт чөз отдени за облухвае на клиенти | |
| ГразфигнITE четки са ИЗно-сяни | Настоide погалma височина на ряазане.Чөз нат检дане на ИЗвитата дрьжka лесо подигнete п徳нite кoleл. Колentу. | |
| Повреeding Motorop | ||
| Повреeding Motorop | Настоide погалma височина на ряазане | |
| Моторг Бл_OKира Блэо | Кинаре OT чухди тews ATСТРANETe | Чждende тews ATСТРANETe |
| Решунтг OT равOTа He e Задоволи-telen Или моторг равOTи TrpvДно | Повреeding Н sticka Височина на ряазане | Настоide погалma височина на ряазане |
| Затлени HOX (23) Hatoчete пл | Сmedене HOXa (23) | |
| Осыста на HOXа e-bokni-pana | Почисте урда | |
| Гразшо мontран HOX (23) Могшаге HOXa (23) Pravilno | ||
| Hoxьг (23) He se bypгИ | Hoxьг (23) e-bokран OT trpeBa | Осторане Трава |
| Винтуг на HOXa (24) e xla6ab 3a | Тернete Виnta на HOXa (24) | |
| Ненормални shu-move, Trapkanе Или Вибраци | Винтуг на HOXa (24) e xla6ab | Зaterнete Виnta на HOXa (24) |
| Hoxьг (23) e постеден Смени | Тернete HOXa (23) | |
| Показанною за и-bOTO на пьлени (11) He Функционира | Замьраяха | Почистаяс мека четка. Показанною за иьOTO на пьлени Трава за саддente OT co6ctbehata си сиа,[ako e bnilo OTbopiho. |
Tapanua
YBaKaemn KIneHTn, 3aTo3n ypei nOnyuaBate 3 roDHHrnapHnra OT DaTATA Ha NOKynkata. B CnyauHa HeCbOTBeCTBHe HA npOdyKTA c DOrOBopa 3a npOdaX6a BHe HMaTe 3akOHNo npABo Da npEraBtpeeklamaun nped npOdaBauHa npOdyKTA npu ycNobnTa n B CpokOBete, onpeJeHn B rnaBa Tpeta, pa3deI I n III n rnaBa YetBbptA ot 3akoha 3a npedocTabaHne Ha uPPOBO cbDbpxHne n uPPOBn ycLyHn 3a npOdaX6a Ha cToKn (3PLCUYNC) *
Baunte npaba, npo3nuau ot nocouhnte pa3nped6n, He ce orpaHuaBAT OT hawata no-dony npedctabeha Tbprobcka rapaHcna, He ca cBbP3aHn C pa3xOAn 3a notpe6nteHne Hne3aBNCMO OT He npoDaBaYbT Ha npoDyKTA OTROBapr 3a LInCATA Ha cbOTbETCTBHe Ha notpe6nteLckata CToka C doROBopa 3a npoJaX6ba cbflacHo 3IUCUYNC.
TapaHcnoHHyCNOBna
TapaHnOHnT cPOK 3AnOyBa Da Teue ot
DaTata Ha NOKynkata. PAsete Do6pe opnHnHaHATA KACOBa 6EnEcka. To3n DOKymeT e
Heo6xOanM KATO DOKa3aTeJCTBO 3a NOKynkata. Ako B pAMKITE Ha TPNr OdoHHOT dATata
Ha 3akynyBaHe Ha To3n npOdyKT Ce NOBn
DeΦeKT Ha MATEpHana Hnn IpOn3BODCTBeH
DeΦeKT, npOdyKbT ige 6bJe 6e3nPaTHo
peMOHTpan Hnn 3aMeHen - no Hau n36Op.
TapaHnIra npEdnonara B pAMKITE Ha TprHO
DnHnra rapaHcNoHcPok Da ce npedctabrt
DeΦeKTHnT yPeN KacOBaTa 6EnEcka (KacoBnT BoH) nncMeHo Da ce obacn B KaKBO
ce cbCTOn DeΦeKbT N Kora e Bb3HnKhan. Ako
DeΦeKbT e NOKpHt OT Hauata rapaHcN, Bne
Ue npolyuhte o6paTHo peMOHTpanHn Hn HO
npOdyKT. CpeMOHTa Hnn cmHata Ha npO
dykTA He 3aNoOBA Da Teue HOB rapaHcNoHc
cPOK.
TapaHcnoHeH cPok n 3aKoHObN npTeHcnn np DeΦeKTH
IapauHnOHnTa ycLyra He ydbJxKaba ra- paHnOHnCpok. ToBa BaxKn CbIo n 3a cMeHeHnte n peMOHTnpaHn Yactn. 3a eBeHTyaJHo HAnuHnte NOBpeDN NdeΦeKTn OSe npn noKynkata Tp6Ba Da ce Cbo6uN BeDHara CneD pa3oNaKOBaHeto. EBeHTyaJHnTe peMOHTn CLei n3TuHaHe Ha rapaHnOHnCpok ca CpeUy 3aJIaUaHe.
06XBaT Ha rapaHcyaTa
UpeBt e npOn3BeDeH rpnKJlnBO cnopeI CTpornte H3NCKBAHN 3a KaueCTBO n Do6poCbBecTHO H3NHTAH PpeH DoCTABKa. RaPanhuaT Baxn 3a DeFeKTn Ha MATEpHaIa IIN npOn3BOdCTBeHn DeFeKTn. FapAnuYraTHe O6Xbaa qactHte Ha npOdykTa, KOTo NODexkat Ha HopMaJIHO H3HOCBaHe, nopAdi KoEtO MoRat Da 6bDat pa3rJekDaHn KATO 6bp30 H3HocBaAaH Ce qactn (HanpImep HoK) IIN NOBpeIte Ha yynHBn qactn (HanpImep pKeKcbaun).FapAnuYraT Otnada, aKO UpeBt e NOBpeHnopadn HEnpabUNHO H3NOI3-BAHe IIN B pe3yNTAT Ha HeocbSeCTBRAHe HA TexHnuecka noDpBXka. 3a npabInHata yNoTpe6a Ha npOdykTa Tp8Ba ToUHO da ce CNa3BAT BCNUKN Yka3AHNA B yNbTBaHETO 3a O6cnykBaHe. PpeHa3HaueHne n DeiCTBnK, KOTo He CE npenOpbUbat OT yNBtBAHeto 3a EKcnloatauHa IIN 3a KOTo TO npEduynpeXdaBa, Tpr6Ba 3aDbLnKhteJHo Da ce H36yRBat. PpOdykTbE npEdHa3HaueHcMo 3a qactHa, a He 3a CTonancka ynotpe6a. Ppi 3IoY-notpe6a HEnpabUNHO TpeTnpaHe, ynotpe6a Ha Cnla n npn INTEpbENu, KOTo He ca N3BbpseHn OT KIOHa Ha HauNn OToPi3npan cepBn3, rapaunraT oTnada.
IpoeDypa npi rapaHcnoHcn cyua
3a da ce rapaHTnpa 6bP3a o6pa6oTKa Ha Ba- Wnra cnya, cneBaIte cneHNTE yka3aHnra:
COBATA6eKKaHnHeHTnKauOHHHa
Homep (IAN 420302_2207) KaTo DoKa-3aTeJIcTBo 3a NOKyNkata.
φa6pnuHaTa Ta6eNka.
dpyn depektn npbpo ce cBbpxke Te no TenefoHa Hn Yupe3 HmEn C dOynocouHn cepBn3eH OTen. CneToba ue NOnyunTe DoNbHnTeHn HnΦopMaun 3a ypeKdaHTo Ha BaWata peKnaMaun.
XeTe Da H3npaTnTe DeΦeKTHnI npOdyKT Ha Nocouehn Bn aDpec Ha cepBn3a 6e3nlatHO 3a Bac, KATO npINOxHte KacoBata 6eJexKa (KACOBn 60H) n NocouHTe B KAKBO Ce CbCTOn DeΦeKTBt N KORA e BB3HNKHa. 3a Da ce H36erHAT npo6JeMn C npHeMaHTo I DOJIbHInTeJIHn pa3xo- Dn, 3aDbJnxHTeJIHO H3NOJ3BaIte Camo aDpeca, KOTo Bn e Nocoueh. Ocnypete H3npaUaHTo Da He e KATO ekCnPcecen TOBap Hn KATO dpyr CneuAen ToBap. H3npaTe Te UpeDa 3aeJHo C BCNUKn npHnADnExKHOCTN, DOCTABEHn npNOKkata, HOCnypTe DoCTaTbUHO CNyPHa TpaHCnOPTHa ONAKOBka.
Pemonten cepBn3 / m3BbHrapaHcNoHHO6cIyXBaHe
Pemontn n3BbH rapaHcnaTa Moxete da B3IOXHTe Ha KLOHa Ha HauNc cepBn3 cpeUy 3aIaAHe.ToC ydoBOJCTBHe ue Bn HapBaBn npEdbapntHa KaKyuAun. Moxem da o6pa6oTbame caMo ypeDn, KOtO ca DoctaTbUHO ONAKOBAHn N3npaTeHN C PnATEHn TpaHCnOpTHn pa3xoDi.
BHMaHHe: N3npaTe BaunypeHa KNoHa Ha Hauu cepBn3 noUcTeH c yka3aHne 3a deΦeKta.
YpeHnte, n3npaTeHn C HennataTeHn TpaHC-nopTHn pa3XoHn - C HanoJKeH PntExK, KATO
eKcnpcehen nn npy r cneuaen TOBap - He ce npheMaT.
Hne 3BbPm 6e3nAto HxBpnaHeTo Ha nPaTeHnte ot Bac depeKTHypei.
CepBn3Ho 06cnyXbaHe
BG 00800114920
E-meɪn: grizzly@lɪdʒ.
IAN 420302_2207
BnoCNTen
MOnr,ObbphTe BnMaHne,Ye CNeiBaunr aDpec He e aDpec Ha cepBn3a.
PbBO ce CbpxKeTe c ropenocouHn cepBn-3eH ueHTbp.
Tpn33nn Tyync Tm6X & Ko.Kr
Uoketep Upace 20
63762 TpococtxaM
Германня
*Kato 3nuecko nue - notpe6nten, he3aBnmo OT hactoata TbproBcKa rapaHnra, Bne ce no3BaTe OT npabata Ha 3akohobata rapanu, npedocabaHa OT 3akoha 3a npedocTabre Ha cnpobo CbDpXaHne Hcnpobn ycnyr n 3a npodax6ata Ha cTOK / 3lCUYNC/. Po-cneuaHno Bne imate npaBO npn HecbOTBeCTBne Ha cTOKata Da 6bJe N3Bbpweh peMOHT nn 3amHa No BaW n36op, OCBEN AKO TOBa e HeBb3MOxHO nn e CbP3aHO C HEPONOPUHO RoJEMn pa3XoAn 3a npodabau. Bne imate npabo Ha nponopunoHahno Hamalbahe Ha ueHATA nn Ha pa3BaJIHe Ha dOrOBopa npn HAIyHe Ha yCNOBnTa Ha qI. 33, aI. 3 ot 3lCUYNC. YcNoBnra n cPokOBete Ha 3akOHobata rapaHnra ca perlaMeHTnpAHn B flABA TpeTa, pa3dE I n III n B flABA qETBbptHa 3lCUYNC
περιεχόμενα
Eioaywy 258
Ekonooc xpnoan 258
「eviknpiippa.. 259
Opate yavta kata Tny evaoxoln oac me to paiaipi

UuBoLo uTooEiNc Me Pnpo- oopieC yia Tov kautepo Xeipio Tns ouokue
Tevikc uno6eic aopaaiaac

Autn n oukeun mnopei va npokaleoei oopouc tpau paioouc ae akataaennxpnan. Poc anopuyn bawe atoua kai uikow nguiw, diaabeTE kai tnpeite OTWOSNIOTE TIC akolouce c UTOEIEIG aospaleiaC kai Egoikeiwte KaAe Oa Ta Eapntmuata Xepiou.
Pnoetoiagia:
moTIOIEiTai aTO aToqa ME MEIWUEc
OomegaKEc, aiOHTnpiakec n TVEU
muAtIKEc IKavOTNTEC n ME EALeIyN
EETeIPiAc kai yywoewv EPOoov
ETIeTovTai n Exouv EKTAIDeutei
OTNV aOpAln XpOnn Tns OuaKeuNC
kAI KATAVOOV TOUC TIAVouc KIV
SUVouc.
I toupyiaC. Eoikeweitemu ta opyava eeyxou kai tn owtn xpn- on Tou nXavnmuToC.
Tavta to kaawio ouvdeoans kai to Kaawio npoektaoans yia onuadia Znuiac n oopac. Eav unooTei ZnuiA to kaawio kat a Tn xphon, TpETeI va atoouvdetheta i qeoos Canto siktuo tropoodosaic.
MHN AITIZETTO KAANIO IIN ANO THN ANOZYNAE- H TOY.
Mn xpnooiotoe to nxaavna a ev to kaawosiv aapueo n exu utoe i
Ta apuva kaawia ouvdeoans
siktuou auavouv tokivuvo nKtpoanlqiac.
wote va diaopalizetai otEv naiZouv me Tn oukeun.
O kaapioaos kai n ouvtnpn on xpnoTn dev eTTpETeTai va SIEcayovtai aTn piaidia.
aaaa atoua, nou yywpiZouv TIC oyniec I toupyia,c, va xpnoi- ptoiouov tn oukeun. ToTikoi kaVoviaoui mnpei va kaOopiZouv Tnv Elambdaiotn nlikia tou xepiotn.
TAI TOTE O'TAV EIVAL KOVTA aToa, KAI EIDIKA TAIISIA, n oIKOITa Zwa.
uTneuvoi yia atuxneta n 3aBec
oe aLouc avOpwTouc n otnv idioKtnoia touc.
| Translation of the original EC declaration of conformity | |
| We hereby confirm that the Electric Lawnmower model PRM 1500 A1 serial number 000001 - 045000 conforms with the following applicable relevant version of the EU guidelines: | |
| 2006/42/EC • 2014/30/EU • 2000/14/EC & 2005/88/EC 2012/19/EC • 2011/65/EU* & (EU) 2015/863 | |
| In order to guarantee consistency, the following harmonised standards as well as national standards and stipulations have been applied: | |
| EN 60335-1:2012/A15:2021 • EN 60335-2-77:2010EN 55014-1:2017/A11:2020 • EN IEC 55014-1:2021EN 55014-2:1997/A2:2008 • EN IEC 55014-2:2021EN 61000-3-2:2014 • EN IEC 61000-3-2:2019/A1:2021EN 61000-3-3:2013 • EN 61000-3-3:2013/A2:2021EN IEC 63000:2018 | |
| We confirm the following in accordance with the 2000/14/EC emissions guideline: Sound power level: guaranteed: 92 dB measured: 89 dB Compliance evaluation process carried out in accordance with Appendix VI / 2000/14/EC Registered Office: TÜV SÜD Industrie Service GmbH, Westendstrasse 199, 80686 München, Germany (NB 0036) | |
| This declaration of conformity is issued under the sole responsibility of the manufacturer: | |
| CE Grizzly Tools GmbH & Co. KGStockstäder Straße 2063762 GroßostheimGermany25.12.2022 | Christian FrankDocumentation Representative |
- The object of the declaration described above satisfies the provisions of Directive 2011/65/EU of the European Parliament and the Council of 8 June 2011 on limiting the use of certain harmful substances in electrical and electronic appliances.


- FR BE
- Introduction
- Intended purpose
- General Description
- Scope of Delivery
- Function Description
- Overview
- Technical specifications
- Safety information
- Pictorial Diagrams on the Equipment
- Level gauge on grass catcher:
- Symbols in the manual
- Warning symbols with information on damage and injury prevention
- General safety information
- Preparation:
- Working with the Equipment:
- GB MT
- Maintenance and Storage:
- Electrical Safety:
- Residual risks
- Assembly
- Assembling the Curved Handle
- (Fig. A)
- (Fig.B)
- Mounting the grass collection box (Fig. C)
- Operation
- Hanging On/Removing the Grass Bag (Fig. D)
- Level gauge
- Adjusting the Cut Height (Fig. E)
- Mulching kit (Fig. F)
- Inserting the mulching kit
- Removing the mulching kit
- Switching On and Off (Fig. G)
- After switching off the equipment, the blade continues to turn for several seconds. Do not touch the moving blade. There is a risk of injury.
- Working with the Lawnmower
- Difference between moving and mulching lawns
- Cleaning, Maintenance and Storage
- General Cleaning and Maintenance Work
- Do not hose down the lawnmower with water.
- Changing the Blade (Fig. H)
- Storage
- Transport
- Trouble Shooting
- Waste disposal and environmental protection
- Replacement parts / Accessories
- Spare parts and accessories can be obtained at www.grizzlytools.shop
- Guarantee
- Terms of Guarantee
- Guarantee Period and Statutory Claims for Defects
- Guarantee Cover
- Processing in Case of Guarantee
- Repair Service
- Service-Center
- Importer
- Vymena noze (Obr. H)
- yBOA
- Ynotpe6a no
- npeHa3Ha4eHne
- BG
- O64o onncanne
- OKOMNJIeKTOBka Ha doCTaBKtA
- Onncahne Ha yHKuHnTe
- Pperne4
- TexHnueckn daHHN
- Enektpuecka kocauka..PRM 1500 A1
- PpeynpekdeHne:EMnCHOHHTA
- Yka3aHna 3a 6e3oNachoct
- CnmboH Bbpxy ypea
- BHHMaHHe!
- Ioka3aHne 3a HNBOTO Ha nbJIHeHe Bbpxy Kowa 3a cb6npahe Ha TpeBa:
- Chmbonn B pkbKObOaCTBOTO
- O6uynka3aHnna 3a 6e3oNaChocT
- Pnoarotobka:
- Pabota c ypea:
- Poaepbxxka n cbxpanenHe:
- EneKtpnuecka 6e3onacchoct:
- OctatbUHH pCKOBe
- MONTAX
- MOnTnpeHa m3BnTata ApbXkKa
- (φnr. A)
- (Φnr.B)
- MOnTHpaHe Ha Kowa 3a cb6HpaHe Ha TpeBa (ФИR.С)
- 06cnykbahe
- OkaBaHe/H3BaXKaHe Ha Top6ata 3a cb6mpaHe Ha TpeBa (pnr. D)
- Noka3aHne 3a HMBOTO Ha NbJIHeHe
- Hactpoika Ha Bncoounhata Ha pa3ane (ФИR.E)
- Komnnekt 3a mylunpane (phr.F)
- Ynotpe6a Ha KomnneKta 3a Mynu pahe
- I3BaXdAne Ha KOMnIeKTa 3a myUnpaHe
- BkIIOUbaHe m n3KlIOUbaHe (phr. G)
- Cnei n3KIOUBAHe Ha ypeda HOXbT Ce BbPTN OSe HraKOJIKO cekyHn. He dOKoBaIte DnJxueaCe HOX. CbIeCTByBa ONaCHOCT OT IInuHn HapAHyaBHn.
- Pabota c ypeda
- Pa3nka MeKdy Koche Ha TpeBata m Myunpane Ha TpeBata
- Почистван/пордрьжka/ CBхсан.
- O6uN DeHocTn npn nouchTBaHe N TexHHueCKa nOapbXkA
- CmHa Ha HOXa (pnr.H)
- CbxpaaheHne
- TpaHcnopt
- N3xBbplnHe/3aunHaHd okonhata cpeda
- Pe3epBn qactn / npHadJIeXHoCTn
- Pe3epBn qactn n npHaadJeXHoCTn Moxete da noLyunte Ha aDpec www.grizzlytools.shop
- P03nua B P03nua Ha O3haueHne Homep 3a pbkoBODCTBOTO c6OpHna cepTeK nopb4ka.
- TbpcheHa nobpeAn
- Tapanua
- TapaHcnoHHyCNOBna
- TapaHcnoHeH cPok n 3aKoHObN npTeHcnn np DeΦeKTH
- 06XBaT Ha rapaHcyaTa
- IpoeDypa npi rapaHcnoHcn cyua
- Pemonten cepBn3 / m3BbHrapaHcNoHHO6cIyXBaHe
- CepBn3Ho 06cnyXbaHe
- BnoCNTen
- Tpn33nn Tyync Tm6X & Ko.Kr
- περιεχόμενα
- Tevikc uno6eic aopaaiaac
- Pnoetoiagia:
- MHN AITIZETTO KAANIO IIN ANO THN ANOZYNAE- H TOY.
Brand : PARKSIDE
Model : PRM 1500 A1
Category : Lawn mower