RP350YDM - Handheld vacuum HiKOKI - Free user manual and instructions
Find the device manual for free RP350YDM HiKOKI in PDF.
| Product type | Table vacuum (water and dust) |
| Brand | HiKOKI |
| Model | RP350YDM |
| Power supply voltage | 220-240 V ~, 50/60 Hz |
| Rated power | 1200 W |
| Max power | 1400 W |
| Max air flow (at fan) | 263 m³/h |
| Max vacuum (at fan) | 270 hPa |
| Sound level | 69.5 dB(A) |
| Weight | 14.4 kg |
| Filter area | 8400 cm² |
| Dust class | M and H categories |
| Filter cleaning function | Automatic by vibration (iPulse) |
| Fill level indicator | Visual and audible |
| Liquid suction | Yes, with automatic shut-off by level sensor |
| Power tool socket | Yes, with standby mode (AR) |
| Included accessories | Non-woven filter bag, filter cassette, PE disposal bag |
| Maintenance | Regular filter cleaning, emptying the tank, annual inspection (category H) |
| Safety | Protection against hazardous dust, automatic liquid shut-off, motor protection |
| Spare parts | Filter cassettes FK 4300/FKP 4300, filter bags, PE bags |
| Repairability | Repair only by authorized after-sales service |
Frequently Asked Questions - RP350YDM HiKOKI
User questions about RP350YDM HiKOKI
0 question about this device. Answer the ones you know or ask your own.
Ask a new question about this device
Download the instructions for your Handheld vacuum in PDF format for free! Find your manual RP350YDM - HiKOKI and take your electronic device back in hand. On this page are published all the documents necessary for the use of your device. RP350YDM by HiKOKI.
USER MANUAL RP350YDM HiKOKI
natural_image
Exterior view of a black industrial vacuum cleaner with wheels and control panel (no visible text or symbols)
de Bedienungsanleitung (original)
en Handling instructions
fr Mode d'emploi
es Instrucciones de manejo
pt Instruções de uso
it Istruzioni per l'uso
nl Gebruiksaanwijzing
da Brugsanvisning
sv Bruksanvisning
no Bruksanvisning
fi Käyttöohjeet
el Οδηγίες χειρισμού
tr Kullanım talimatları
pl Instrukcja obsługi
hu Kezelési utasítás
cs Návod k obsluze
sk Pokyny na manipuláciu
ro Instructiuni de utilizare
s| Navodila za rokovanje
hr Upute za rukovanje
bg Инструкция за експлоатация

text_image
Diagram of a vacuum cleaner with numbered parts and an inset control panel showing mode selection and status indicators.| de Beschreibung | ||
| 1 Griff Deckel 7 Einstellung Saugschlauch-Durchmesser | 13 Rad | |
| 2 Griff 8 Riegel 14 Verschluss | ||
| 3 Schalterplatte 9 Ansaugstutzen 15 Motorgehäuse | ||
| 4 Drehschalter 10 Drehschieber 16 Trägerplatte | ||
| 5 Füllanzeige 11 Lenkrolle 17 Deckel | ||
| 6 Steckdose 12 Behälter | ||
| en Description | ||
| 1 Cover handle 7 Adjustment of the vacuum hose diameter | 13 Wheel | |
| 2 Handle 8 Latch 14 Lock | ||
| 3 Switch plate 15 Vacuum spigot 15 Motor housing | ||
| 4 Rotary switch | 10 Rotary slider | 16 Support plate |
| 5 Fill level indicator | 11 Steering roller | 17 Cover |
| 6 Plug socket | 12 Container | |
| fr Description | ||
| 1 Poignée couvercle | 7 Réglage du diamètre du fl exible d'aspiration | 13 Roue |
| 2 Poignée | 18 Verrou | 14 Fermeture |
| 3 Panneau des interrupteurs | 9 Tubulure d'aspiration | 15 Carter de moteur |
| 4 Interrupteur rotatif | 10 Régulateur rotatif | 16 Plaque support |
| 5 Indicateur de niveau de remplissage | 11 Roue directrice | 17 Couvercle |
| 6 Prise | 12 Cuve | |
| es Descripción | ||
| 1 Asa de la tapa 7 Ajuste del diámetro de la man-guera de aspiración | 13 Rueda | |
| 2 Asa 8 Enclavamiento 10 Cierre | ||
| 3 Placa de conmutadores 9 Toma de aspiración 11 Carcasa del motor | ||
| 4 Conmutador giratorio 10 Corredera giratoria 11 Placa de soporte | ||
| 5 Indicador de recipiente lleno 12 Ruedas giratorias 13 Tapa | ||
| 6 Caja de enchufe 14 Recipiente | ||
| pt Descrição | ||
| 1 Pega da tampa 7 Ajuste do diámetro da manguei-ra de aspiração | 15 Roda | |
| 2 Pega 8 Trinco 10 Fecho | ||
| 3 Placa de interruptores 9 Bocal de aspiração | 16 Caixa do motor | |
| 4 Interruptor rotativo | 17 Interruptor rotativo | 18 Placa de suporte |
| 5 Indicador do enchimento | 19 Roda direccional | 17 Tampa |
| 6 Tomada | 20 Recipiente | |
| it Descrizione | ||
| 1 Impugnatura coperchio | 7 Impostazione diametro tubo flessibile di aspirazione | 19 Ruota |
| 2 Impugnatura | 8 Blocco | 14 Chiusura |
| 3 Interruttore ON/OFF | 9 Bocchettone di aspirazione | 15 Carter motore |
| 4 Manopola | 10 Valvola a maschio | 16 Piastra di supporto |
| 5 Indicatore serbatoio 11 Ruota di guida | 17 Coperchio | |
| 6 Presa di corrente | 12 Serbatoio | |
| nl Beschrijving | ||
| 1 Handgreep deksel | 7 Instelling zuigslangdiameter | 18 Wiel |
| 2 Handgreep | 8 Vergrendeling | 19 Slot |
| 3 Bedieningspaneel | 9 Aanzuigopening | 15 Motorbehuizing |
| 4 Draaischakelaar | 10 Draaischuif | 16 Dragerplaat |
| 5 Niveau-indicatie | 11 Zwenkweltje | 17 Deksel |
| 6 Stopcontact | 12 Container | |
| da Beskrivelse | ||
| 1 Greb, dæksel | 7 Indstilling af sugeslanges diameter | 18 Hjul |
| 2 Greb | 8 Spærre | 19 Lukkemekanisme |
| 3 Kontaktplade | 9 Indsugningsstuds | 15 Motorhus |
| 4 Drejekontakt | 10 Drejeventil | 16 Bæreplade |
| 5 Fyldningsindikator | 11 Styrehjul | 17 Dæksel |
| 6 Stikdåse | 12 Beholder | |
| sv Beskrivning | ||
| 1 Handtag till lock | 7 Inställning sugslangens diameter | 18 Hjul |
| 2 Grepp 8 Regel | 19 Lås | |
| 3 Kopplingsplatta | 9 Uppsugningstappar | 15 Motorhölje |
| 4 Vridbrytare | 10 Vridslid | 16 Bärplatta |
| 5 Fyllnadsindikering | 11 Styrhjul | 17 Lock |
| 6 Stickkontakt | 12 Behållare | |
| no Beskrivelse | ||
| 1 Håndtak deksel | 7 Innstilling sugeslangediameter | 18 Hjul |
| 2 Håndtak | 8 Sperre | 19 Lås |
| 3 Bryterplate | 9 Sugestuss | 20 Motorhus |
| 4 Dreiebryter | 10 Dreieskiver | 21 Bærerplate |
| 5 Fyllingsindikator | 11 Styretrinse | 22 Deksel |
| 6 Stikkontakt | 13 Beholder | |
| fi Kuvaus | ||
| 1 Kahvan suojus 7 Letkun läpimitan säädin 3 Pyörä | ||
| 2 Kahva 8 Lukitsin 10 Kiinnitin | ||
| 3 Kytkinlevy 9 Imuistukka 10 Moottorin kotelo | ||
| 4 Kiertokytkin 10 Suljin 15 Tukilevy | ||
| 5 Täyttötason osoitin 16 Ohjauspyörä 17 Kansi | ||
| 6 Pistorasia 17 Säiliö | ||
| el Περιγραφή | ||
| 1 Λαβή στο καπάκι 7 Púθμιση της διαμέτρου του εύκα-μπτου σωλήνα αναρρόφησης | 13 Tροχός | |
| 2 Λαβή 8 Μηχανισμός ασφάλισης 10 Ασφάλεια | ||
| 3 Πλάκα διακοπτών | 9 Στόμιο αναρρόφησης | 15 Περίβλημα μοτέρ |
| 4 Περιστρεφόμενος διακόττης | 10 Περιστρεφόμενος σύρτης | 15 Πλάκα φορέα |
| 5 Ενδείξη πληρότητας | 10 Tροχός οδήγησης | 17 Καπάκι |
| 6 Υποδοχή ρεύματος | 12 Κάδος | |
| tr Açıklama | ||
| 1 Kapak tutamagi | 7 Emiş hortumu çap ayarı | 13 Tekerlek |
| 2 Tutamak | 8 Kilit sürgüsü | 14 Kilit |
| 3 Şalter plakası | 9 Emiş manşonu | 15 Motor gövdesi |
| 4 Çevirmeli şalter | 10 Döner sürgü | 15 Taşıγίci plaka |
| 5 Dolum göstergesi | 11 Manevra tekerleği | 17 Kapak |
| 6 Priz | 12 Depo | |
| pl Opis | ||
| 1 Uchwyt pokrywa | 7 Ustawienie średnicy węża ssącego | 13 Koło |
| 2 Uchwyt | 10 Zasuwa | 14 Zamek |
| 3 Płyta łącznika | 9 Końcówka ssąca 15 Obudowa silnika | |
| 4 Przełącznik obrotowy | 10 Zasuwka obrotowa 16 Płyta nośna | |
| 5 Wskaźnik wypełnienia | 11 Rolka kierownicy 17 Pokrywa | |
| 6 Gniazdo wtykowe | 12 Pojemnik | |
| hu leírás | ||
| 1 Fogantyú fedél | 7 Szívócső átmérő beállítás | 13 Kerék |
| 2 Fogantyú | 10 Retesz | 14 Zár |
| 3 Kapcsoló lap | 9 Szívócsonkok | 15 Motorház |
| 4 Forgókapcsoló 16 Forgó tolattyú | 17 Tartólap | |
| 5 Tõltés kijelző | 11 Vezető görgő | 17 Fedél |
| 6 Dugaszoló aljzat | 12 Tartály | |
| cs Popis | ||
| 1 Rukojeť víka 7 Nastavení průměru sací hadice 13 Kolo | ||
| 2 Rukojeť | 10 Západka | 14 Uzávěr |
| 3 Ovládací panel | 9 Sací hrdlo 15 Kryt motoru | |
| 4 Otočný spínač | 10 Otočné šoupátko 16 Víko | |
| 5 Indikace stavu naplnění 17 Řídící kolečko | 17 Madlo | |
| 6 Zásuvka | 12 Zásobník | |
| sk Popis | ||
| 1 Držadlo krytu | 7 Nastavenie priemeru sacej trubice | 13 Koleso |
| 2 Držadlo | 10 Západka | 14 Uzáver |
| 3 Spínací panel | 9 Sacie hrdlo | 15 Puzdro motora |
| 4 Otočný spínač | 10 Otočný posúvač | 15 Nosná doska |
| 5 Indikátor stavu naplnenia | 11 Otočné koliesko | 17 Kryt |
| 6 Zásuvka | 12 Nádoba | |
| ro Descriere | ||
| 1 Capac mâner 7 Ajustarea diametrului furtunului de aspirare | 13 Roată | |
| 2 Mâner 8 Sistem de blocare 14 Sistem de închidere | ||
| 3 Placă de comutare 9 Racorduri de admisie 15 Carcasa motorului | ||
| 4 Comutator rotativ 10 Supapa rotativă 16 Placă portantă | ||
| 5 Indicator nivel umplere 11 Rolă de ghidare 17 Capac | ||
| 6 Priză 12 Container | ||
| sl Opis | ||
| 1 Ročaj pokrova 7 Nastavitev premera sesalne cevi 13 Kolo | ||
| 2 Ročaj 8 Zapah 14 Zapiralo | ||
| 3 Stikalna plošča 9 Sesalni nastavek | 15 Ohišje motorja | |
| 4 Vrtljivo stikalo | 10 Vrtljivi drsnik | 16 Nosilna plošča |
| 5 Prikaz polne posode | 11 Vrtljivo kolesce | 17 Pokrov |
| 6 Vtičnica | 12 Posoda | |
| hr Opis | ||
| 1 Ručka poklopca | 17 Postavke usisnog crijeva-promjer | 18 Kotač |
| 2 Ručka 8 Zapor | 14 Brava | |
| 3 Ploča sklopke | 19 Usisni oslonci | 15 Kućište motora |
| 4 Okretna sklopka | 10 Okretni kliznik | 16 Nosiva ploča |
| 5 Prikaz punjenja | 11 Upravljački valjak | 17 Poklopac |
| 6 Utičnica | 12 Posuda | |
| bg Описание | ||
| 1 Дръжка на капака | 17 Настройване диаметъра на смукателния маркуч | 18 Колело |
| 2 Дръжка | 18 Ключалка | 19 Затвор |
| 3 Панел с ключове | 19 Всмукващ щущер 15 Корпус на двигателя | |
| 4 Въртящ се ключ | 10 Въртящ се шибър | 16 Носеща плоча |
| 5 Индикатор за напълване | 11 Направляващо колело | 17 Капак |
| 6 Контакт | 12 Резервоар | |
text_image
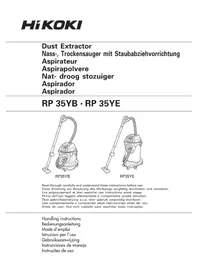
A* B C D E* F G* H I| de Zubehör en Description fr Accessoires es Accesorios | |||
| A Fahrbügel* A Driving handle* A Etrier de conduite* A Barra de transporte* | |||
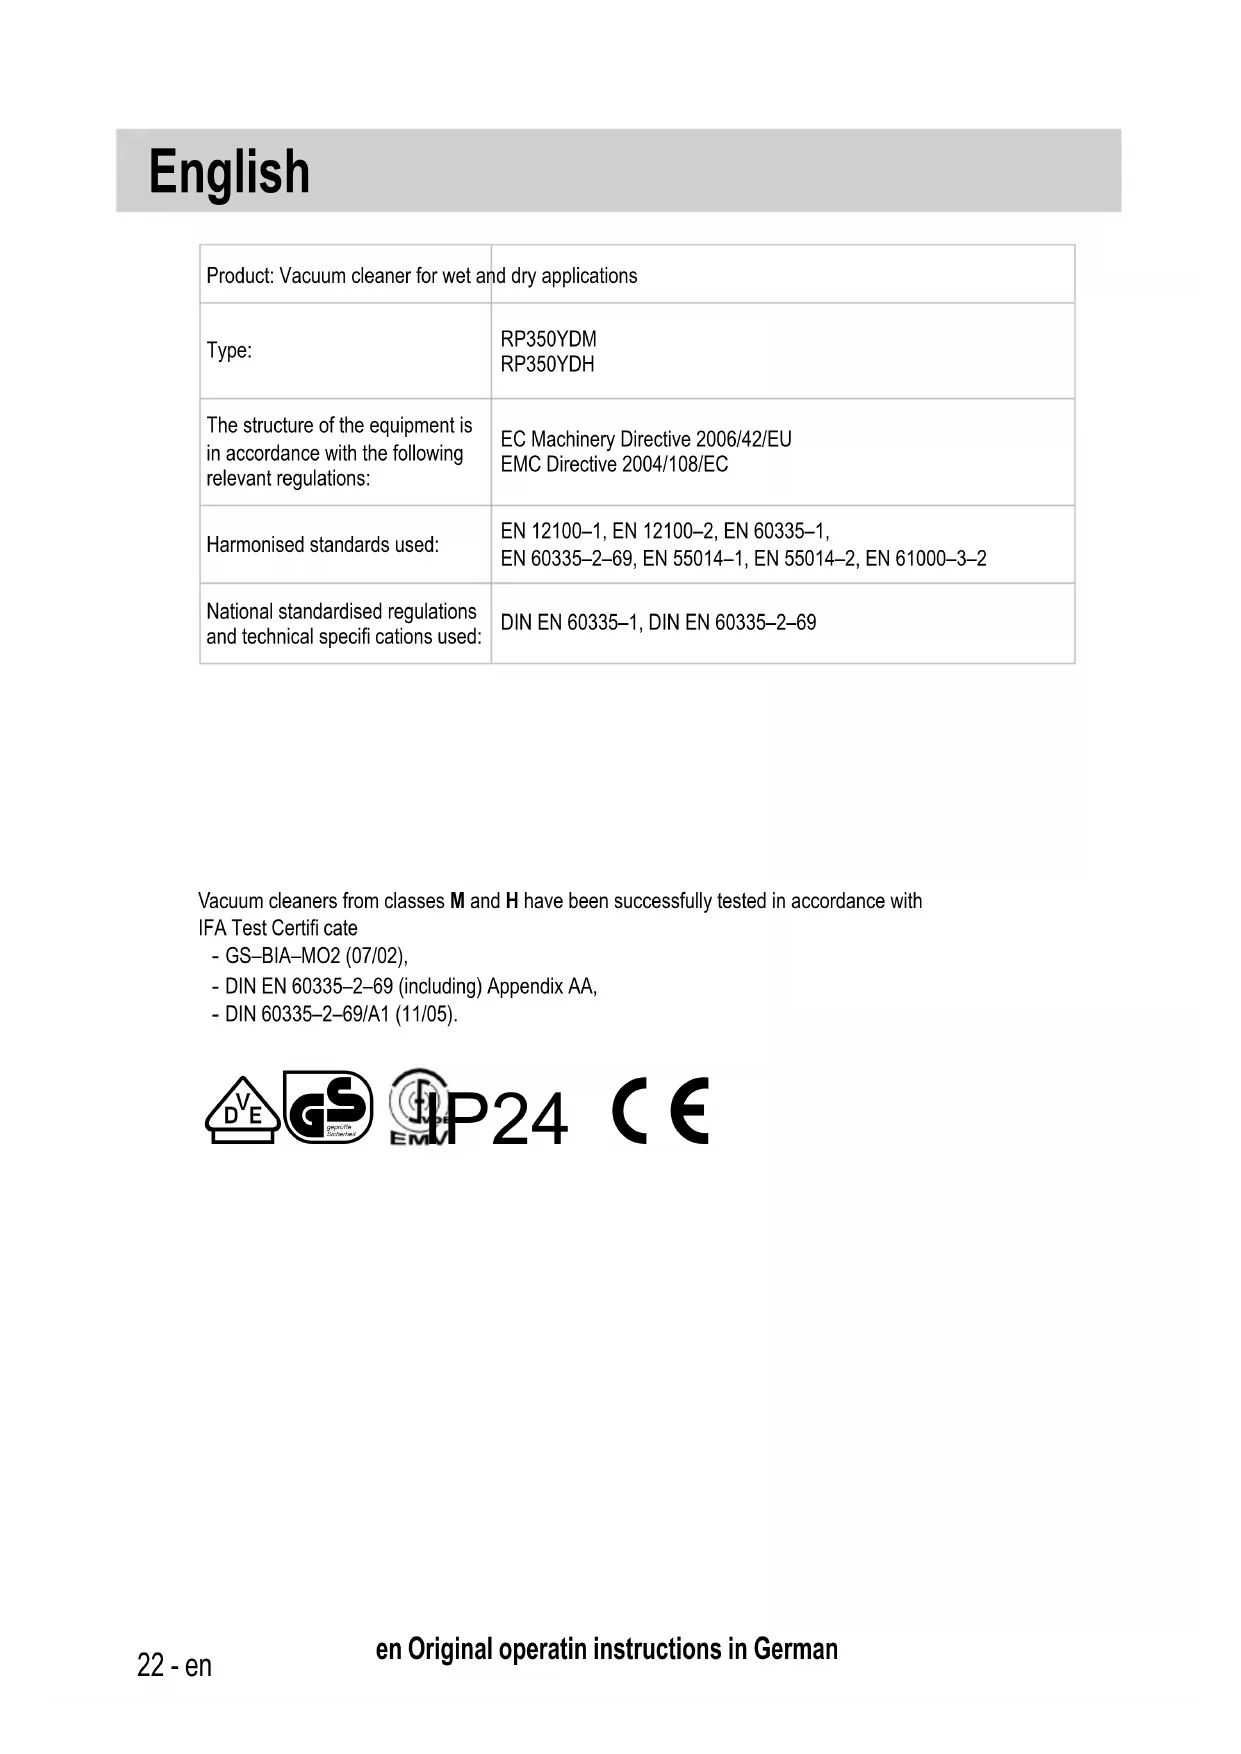
| B Saugschlauch B Suction hose B Flexible d'aspiration B Manguera de aspiración | |||
| C Faltenfi Iterkassetten C Folding fi Iter cartridges C Cassettes à fi Itre plissé C Cartuchos de fi Itro en fuelle | |||
| D Motorschutzfilter | D Motor protection filter | D Filtre de protection-moteur | D Filtro protector del motor |
| E Gummidüse* | E Rubber nozzle* | E Buse caoutchouc* | E Tobera de goma* |
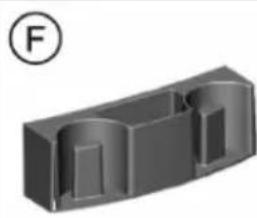
| F Zubehördepot | F Accessory storage | F Porte-accessoires | F Soporte para accesorios |
| G Vlies-Filterbeutel* | G Fleece filter bag* | G Sac filtre non tissé* | G Bolsa de filtro de fieltro* |
| H PE-Entleer- und Entsorgungsbeutel | H PE emptying and disposal bag | H Sac PE de vidange et d'élimination | H Bolsa de vaciado y eliminación de PE |
| I Reduzierstück | I Reducer | I Pièce réductrice | I Pieza reductora |
| * getrennt zu verkaufen * sold separately * vendus séparément | * de venta por separado | ||
| pt Acessórios | it Accessori | nl Toebehoren | da Tilbehør |
| A Estribo de condução* | A Maniglione* | A Duwbeugel* A Kørebøjle* | |
| B Mangueira de aspiração | B Tubo flessibile di aspirazione | B Zuigslang | B Sugeslange |
| C Cassete de filtros plissados | C Cartucce filtro pieghettato | C Vouwfiltercassette | C Filterkassetter til foldefilter |
| D Filtro de protecção do motor | D Filtro di protezione motore | D Motorfilter | D Motorfilter |
| E Bocal em borracha* | E Bocchetta di gomma* | E Rubbermondstuk* | E Gummidyse* |
| F Depósito de acessórios | F Porta accessori | F Toebehorenhouder | F Tilbehørsdepot |
| G Saco de filtro de vlies* | G Sacchetto filtrante in vello* | G Vlies-filterzak* | G Vlies-filterpose* |
| H Saco em PE para esvaziamento e eliminação | H Sacchetto PE per svuota-mento e smaltimento | H PE-zak voor legen en afvoer | H PE-tømnings- og bortskaf-felsespose |
| I Redutor | I Giunto di riduzione | I Reduceerstuk | I Reduktionsstykke |
| * vendidos separadamente | * venduti a parte | * los verkrijgbaar | * sælges separat |
| sv Tillbehör | no Tilbehør | fi Lisätarvikkeet | el Εξοπλισμός |
| A Körhandtag* | A Kjørebøyyle* | A Ohjaustanko* | A Λαβή οδήγησης σχήματος U* |
| B Sugslang | B Sugeslange | B Imuletku | B Εύκαμπος σωλήνας αναρρόφησης |
| C Veckfilterkassetter | C Foldefilterkassetter | C Suodatinkasetteja | C Kaσέτες πτυχωτών φίλτρων |
| D Motorskyddsfilter | D Motorbeskyttelsesfilter | D Moottorin suojasuodatin | D Φίλτρο προστασίας μοτέρ |
| E Gummimunstycke* | E Gummidyse* | E Kumisuutin* | E Ακροφύσιο από καουτσούκ* |
| F Tillbehörsförvaring | F Tilbehørsdepot | F Lisätarviketeline | F Θήκη εξαρτημάτων |
| G Fiberduk filterpåse* | G Fleece-filterpose* | G Kuitukangaspölypussi* | G Φλις σακούλα σκόνης* |
| H PE-tömnings- och bortskaff - ningspåse | H PE-tømme- og avfallspose | H PE-tyhjennys- ja hävi-tyspussi | H Σάκος απόρριψης πολυεστέρα |
| I Reduceringsdel | I Reduksjonsstykke | I Sovitin | I Συστολικός σύνδεσμος |
| * säljs separat | * solgt separat | * myydään erikseen | * πωλούνται ξεχωριστά |

text_image
Ⓐ*
natural_image
Coiled flexible hose with black connectors, labeled B (no text or symbols on the hose itself)
natural_image
Two black rectangular blocks with white borders, one labeled with a circled number C (no text or symbols on the blocks themselves)
natural_image
Two parallel rounded rectangular shapes with a circled number D in the top-left corner (no text or symbols on shapes)
natural_image
3D rendered mechanical part with a curved top and two internal cutouts, labeled with the letter F (no text or symbols on the object itself)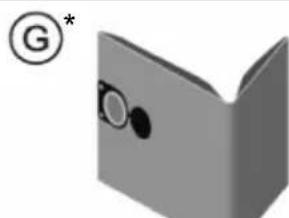
natural_image
3D rendered mechanical part with a V-shaped groove and circular features, no text or symbols visible
natural_image
Simple geometric shape with a crescent and a circle labeled H, no text or symbols present.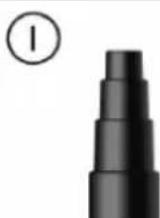
| tr Aksesuar pl Akcesoria hu Kiegészítő tartozékok cs Příslušenství | |||
| A Tutma demiri* A Uchwyt do przenoszenia* A Mozgó kengyel* A Madlo* | |||
| B Emiş hortumu B Wąż ssący B Szívótömlő B Sací hadice | |||
| C Katlanmış fi ltre haznesi C Kasety fi ltra skladanego C Redőzött szűrő kazetta C Kazety se skládaným fi ltrem | |||
| D Motor koruma fi ltresi D Filtr ochronny silnika D Motorvédő szűrő D Ochranný fi ltr motoru | |||
| E Plastik nozül* E Dysza gumowa* E Gumi fúvóka* E Pryžová hubice* | |||
| F Aksesuar deposu F Pojemnik na akcesoria F Tartozék tároló F Přihrádka na příslušenství | |||
| G īpek elyaf filtre torbasí* G Worek filtrujący z włókniny* G Fátyolszűrő zacskó* G Rounový filtrační sáček* | |||
| H PE boşaltma ve imha kesesi H Worki H PE úrítő és hulladékkezelő tasak H Polyetylenový sáček pro vyprazdňování a likvidaci prachu | |||
| I Redüksiyon parçası I Reduktor I Csökkentő idom I Redukční kus | |||
| * ayrı olarak satılır * sprzedawane oddzielnie * külön értékesítve * prodává se samostatně | |||
| sk Príslušenstvo ro Accesorii sl Oprema hr Pribor | |||
| A Oblúková rukovát* A Måner de tracțiune* A Ročaj za vožnjo* A Vozni stremen* | |||
| B Sacia trubica B Furtun de aspirare B Sesalna cev B Usisno crijevo | |||
| C Kazety so skladaným filtrom C Cartuşe filtru cu pliuri C Kasete z nagubanim filtrom C Kasete za nabrani filter | |||
| D Ochranný filter motora D Filtru protecție motor D Zaščitni filtri za motor D Filter za zaštitu motora | |||
| E Gumová hubica* E Ajutaj din cauciuc* E Gumijasta šoba* E Gumena sapnica* | |||
| F Miesto na uloženie príslušenstva F Suport accesorii F Shranjevalnik za opremo F Spremište za pribor | |||
| G Tkaninové filtračné vrecko* G Sac filtrant din vlies.* G Filtrirna vrečka iz flisa* G Vrećica filtra od flisa* | |||
| H PE vyprázdňovacie a likvidačné vrecko H Sac colector PE H PE-vrečka za praznjenje in odstranjevanje H PE vrečica za pražnjenje i uklanjanje | |||
| I Redukčný kus I Reductor I Reducirni kos I Redukcijski komad | |||
| * predáva sa samostatne * vândute separat * se prodaja posebej * prodaje se odvojeno | |||
| bg Принадлежности | |||
| A Желязна дръжка* | |||
| B Смукателен маркуч | |||
| C Касети с нагънат филтър | |||
| D Предпазен филтър на двигателя | |||
| E Гумен накрайник* | |||
| F Кутия за принадлежности | |||
| G Филтърна торба от кече* | |||
| H Полиетиленова торбичка за изпразване и изхвърляне | |||
| I Редуцираща муфа | |||
| * продават се отделно | |||
| Deutsch English | Français Español | |||
| Symbole⚠️WARNUNGDie folgenden Symbole werden für diese Maschine verwendet. Achten Sie darauf, diese vor der Verwendung zu verstehen. | Symbols⚠️WARNINGThe following show symbols used for the machine. Be sure that you understand their meaning before use. | Symboles⚠️AVERTISSEMENTLes symboles suivants sont utilisés pour l’outil. Bien se familiariser avec leur signifi cation avant d’utiliser l’outil. | Símbolos⚠️ADVERTENCIAA continuación se muestran los símbolos usados para la máquina. Asegúrese de comprender su signifi cado antes del uso. | |
 | Der Anwender muss die Bedienungsanleitung lesen, um das Risiko einer Verletzung zu verringern.Wenn die Warnungen und Anweisungen nicht befolgt werden, kann es zu Stromschlag, Brand und/oder ernsthaften Verletzungen kommen. | To reduce the risk of injury, user must read instruction manual.Failure to follow the warnings and instructions may result in electric shock, fi re and/or serious injury. | Pour réduire les risques de blessures, l’utilisateur doit lire le manuel d’utilisation.Tout manquement à observer ces avertissements et instructions peut engendrer des chocs électriques, des incendies et/ou des blessures graves. | Para reducir el riesgo de lesiones, el usuario deberá leer el manual de instrucciones.Si no se siguen las advertencias e instrucciones, podría producirse una descarga eléctrica, un incendio y/o daños graves. |
 | Nur für EU-Länder Werfen Sie Elektrowerkzeuge nicht in den Hausmüll!Gemäss Europäischer Richtlinie 2012/19/EU über Elektro- und Elektronik- Altgeräte und Umsetzung in nationales Recht müssen verbrauchte Elektrowerkzeuge getrennt gesammelt und einer umweltgerechten Wiederververtung zugeführt werden. | Only for EU countries Do not dispose of electric tools together with household waste material! In observance of European Directive 2012/19/EU on waste electrical and electronic equipment and its implementation in accordance with national law, electric tools that have reached the end of their life must be collected separately and returned to an environmentally compatible recycling facility. | Pour les pays européens uniquementNe pas jeter les appareils électriques dans les ordures ménagères!Conformément à la directive européenne 2012/19/UE relative aux déchets d’équipements électriques ou électroniques (DEEE), et à sa transposition dans la législation nationale, les appareils électriques doivent être collectés à part et être soumis à un recyclage respectueux de l’environnement. | Sólo para países de la Unión Europea¡No deseche los aparatos eléctricos junto con los residuos domésticos!De conformidad con la Directiva Europea 2012/19/UE sobre residuos de aparatos eléctricos y electrónicos y su aplicación de acuerdo con la legislación nacional, las herramientas eléctricas cuya vida útil haya llegado a su fin se deberán recoger por separado y trasladar a una planta de reciclaje que cumpla con las exigencias ecológicas. |
| Português Italiano | Nederlands Dansk | |||
| Símbolos⚠ AVISOA seguir aparecem os símbolos utilizados pela máquina. Assimile bem seus signifi cados antes do uso. | Simboli⚠ AVVERTENZADi seguito mostriamo i simboli usati per la macchina. Assicurarsi di comprenderne il signifi cato prima dell’uso. | Symbolen⚠ WAARSCHUWINGHieronder staan symbolen afgebeeld die van toepassing zijn op deze machine. U moet de betekenis hiervan begrijpen voor gebruik. | Symboler⚠ ADVARSELDet følgende viser symboler, som anvendes for maskinen.Vær sikker på, at du forstår deres betydning, inden du begynder at bruge maskinen. | |
 | Para reduzir o risco de lesão, o utilizador deve ler o manual de instruções.Se não seguir todas as instruções e os avisos, pode provocar um choque eléctrico, incêndio e/ou ferimentos graves. | Per ridurre il rischio di lesioni, l’utente deve leggere il manuale delle istruzioni.La mancata osservanza degli avvertimenti e delle istruzioni potrebbe essere causa di scosse elettriche, incendi e/o gravi lesioni. | Om het risico op verwondingen te verminderen, moet de gebruiker de instructiehandleiding lezen.Nalating om de waarschuwingen en instructies op te volgen kan in een elektrische schok, brand en/of ernstig letsel resulteren. | Brugeren skal læse betjeningsvejledningen for at mindske risikoen for skader.Det kan medføre elektrisk stød, brand og/eller alvorlig personskade, hvis alle advarslerne og instruktionerne nedenfor ikke overholdes. |
 | Apenas para países da UE Não deite ferramentas eléctricas no lixo doméstico!De acordo com a directiva europeia 2012/19/UE sobre ferramentas eléctricas e electrónicas usadas e a transposição para as leis nacionais, as ferramentas eléctricas usadas devem ser recolhidas em separado e encaminhadas a uma instalação de reciclagem dos materiais ecológica. | Solo per Paesi UENon gettare le apparecchiature elettriche tra i rifi uti domestici.Secondo la Direttiva Europea 2012/19/UE sui rifi uti di apparecchiature elettriche ed elettroniche e la sua attuazione in conformità alle norme nazionali, le apparecchiature elettriche esauste devono essere raccolte separatamente, al fi ne di essere reimpiegate in modo eco-compatibile. | Alleen voor EU-landen Geef elektrisch gereedschap niet met het huisvuil mee!Volgens de Europese richtlijn 2012/19/EU inzake oude elektrische en elektronische apparaten en de toepassing daarvan binnen de nationale wetgeving, dient gebruikt elektrisch gereedschap gescheiden te worden ingezameld en te worden afgevoerd naar een recycle bedrijf dat voldoet aan de geldende milieu-eisen. | Kun for EU-lande Elværktøj må ikke bortskaff es som almindeligt aff ald!I henhold til det europæiske direktiv 2012/19/EU om bortskaff else af elektriske og elektroniske produkter og gældende national lovgivning skal brugt elværktøj indsamles separat og bortskaff es på en måde, der skåner miljøet mest muligt. |
 | Svenska Norsk Suomi Ελληνικά | |||
| Symboler⚠️ VARNINGNedan visas de symbolersom används förmaskinen. Se till att duförstår vad de betyderinnan verktyget används. | Symboler⚠️ ADVARSELFølgende symbolerbrukes for maskinen. Sørgfor å forstå betydningenav disse symbolene førmaskinen tas i bruk. | Symbolit⚠️ VAROITUSSeuraavassa on näytettykoneessa käytetytsymbolit. Varmista,että ymmärrät niidenmerkityksen ennen kuinaloitat koneen käytön. | Σύμβολα⚠️ ΠΡΟΣΟΧΗΤα παρακάτω δείχνουντα σύμβολα πουχρησιμοποιούνται στομηχάνημα. Βεβαιωθείτε ότικατανοείτε τη σημασίαςτους πριν τη χρήση. | |
   | ||||
 | Användaren måste läsabruksanvisningen föratt minska risken förpersonskador.Underlåtenhet attfölja varningarna ochinstruktionerna nedan kanresultera i elstötar, brandoch/eller allvarliga skador. | For å minske faren forskade må brukeren leseinstruksjonsboken.Hvis du ikke følger alleadvarsler og instruksjonerkan bruk av utstyretresultere i elektrisk støt,brann og/eller alvorligpersonskade. | Loukkaantumisriskinvähentämiseksikäyttäjän on luettavakäyttöopas.Jos varoituksia jaohjeita ei noudateta, onolemassa sähköiskun,tulipalon ja/tai vakavanhenkilövahingon vaara. | Για τον περιορισμό τουκινδύνου τραυματισμού,ο χρήστης πρέπει ναδιαβάσει το εγχειρίδιοοδηγιών χρήσης.Η μη τήρηση τωνπροειδοποιήσεων και οδηγιώνμπορεί να προκαλέσειηλεκτροπληξία, πυρκαγιάκαι/ή σοβαρό τραυματισμό. |
   | ||||
 | Gäller endast EU-länderElektriska verktyg får intekastas i hushållssoporna!Enligt direktivet 2012/19/EUsom avser äldre elektriskoch elektronisk utrustningoch dess tillämpningenligt nationell lagstiftningska uttjänta elektriskaverktyg sorteras separatoch lämnas till miljövänligåtervinning. | Kun for EU-landKast aldri elektroverktøy ihusholdningsavfallet!I henhold til EU-direktiv2012/19/EU om kasserteelektriske og elektroniskeprodukter og direktivetsiverksetting i nasjonalrett, må elektroverktöysom ikke lengerskal brukes, samlesseparat og returnerestil et miljøvennliggjenvinningsanlegg. | Koskee vain EU-maitaÄlä hävitä sähkötyökaluatavallisen kotitalousjätteenmukana!Vanhoja sähkö- jaelektroniikkalaitteita koskevanEU-direktiivin 2012/19/EUja sen maakohtaistensovellusten mukaisestikäytetyt sähkötyökalut ontomitettava ongelmajätteenkeräyspisteeseen ja ohjattavympäristöystävälliseenkierrätykseen. | Μόνο για τις χώρες της ΕΕΜην πετάτε τα ηλεκτρικάεργαλεία στον κάδοοικιακών απορριμμάτων!Σύμφωνα με την ευρωπαϊκήοδηγία 2012/19/ΕΕ περίηλεκτρικών καιηλεκτρονικών συσκευώνκαι την ενσωμάτωσήτης στο εθνικό δίκαιο, ταηλεκτρικά εργαλεία πρέπεινα συλλέγονται ξεχωριστάκαι να επιστρέφονται γιαανακύκλωση με τρόποφιλικό προς το περιβάλλον. |


text_image
Diagram showing three vertical sections with a diagonal line and two open book icons, one with crossed-out symbols.| Slovenčina | Română | Slovenščina | Hrvatski | |
| Symboly⚠VYSTRAHANižšie sú zobrazené symboly, ktoré sa v prípade strojného zariadenia používajú. Pred použitím náradia sa oboznámte s významom týchto symbolov. | Simboluri⚠AVERTISMENTÎn cele ce urmează sunt prezentate simbolurile folosite pentru maşină.Înainte de utilizare, asigurați-vă că înțelegeti semnificația acestora. | Simboli⚠OPOZORILOV nadaljevanju so prikazani simboli, uporabljeni pri stroju. Pred uporabo se prepričajte, da jih razumete. | Simboli⚠UPOZORENJEZa uređaj se koriste sljedeći simboli. Uvjerite se da prije uporabe razumijete njihovo značenje. | |
 | Aby sa znížilo riziko zranenia, musí si užívatel’ prečítať návod na obsluhu.Nedodržanie výstrah a pokynov môže viesť k zasiahnutiu elektrickým prúdom, požiaru a/alebo vážnemu poraneniu. | Pentru a reduce riscul de accidente, utilizatorul trebuie să citească manualul de utilizare.Nerespectarea avertismentelor și a instrucțiunilor poate avea ca efect producerea de șocuri electrice, incendii și/sau vătămări grave. | Da ne bi prišlo do poškodb, mora uporabnik prebrati navodila.Z neupoštevanjem opozoril in navodil tvegate električni udar, požar in/ali resne telesne poškodbe. | Kako bi smanjio opasnost od ozljede, korisnik mora pročitati priručnik za uporabu.Nepoštivanje upozorenja i uputa može uzrokovati strujni udar, požar i/ili teške ozljede. |
 | Iba pre krajiny EÚElektrické náradie nelikvidujte spolu s domácim odpadom!Aby ste dodržali ustanovenia európskej smernice 2012/19/EÚ o odpadových elektrických a elektronických zariadeniach a jej implementáciu v zmysle národnej legislatívy, je potrebné elektrické náradie po uplynutí jeho doby životnosti separovať a doručiť na environmentálne prijatel’né miesto recyklovania. | Numai pentru țările membre UE Nu aruncați această sculă electrică împreună cu deșeurile menajere!În conformitate cu Directiva Europeană 2012/19/UE referitoare la deșeurile reprezentând echipamente electrice și electronice și la implementarea acesteia în conformitate cu legislațiile naționale, sculele electrice care au ajuns la fi nalul duratei de folosire trebuie colectate separat și duse la o unitate de reciclare compatibilă cu mediul înconjurător. | Samo za države EU Električnih orodij ne zavržite skupaj z gospodinjskimi odpadki! V skladu z evropsko direktivo 2012/19/EU o odpadni električni in elektronski opremi in izvedbi v skladu z državnimi zakoni, je treba električna orodja, ki so dosegla življenjsko dobo ločeno zbirati in vrniti v z okoljem združljivo ustanovo za recikliranje. | Samo za zemlje EU Električni alat ne bacajte zajedno s ostalim kućnim otpadom! Sukladno europskim direktivama 2012/19/EU o otpadnoj električnoj i elektroničkoj opremi, te provedbi u skladu s nacionalnim zakonima i propisima, električni alat i baterije koji su dostigli kraj korisnog radnog vijeka potrebno je prikupljati odvojeno i predati u ustanove za recikliranje. |
text_image
MH D E GS securities EMM JP24 CE⚠️ GEFAHR!
▶Erstickungsgefahr
text_image
Technical diagram showing a warning sign and a close-up of a mechanical assembly with labeled components.text_image
dif. = max.text_image
3 OPEN CLOSE| Product: Vacuum cleaner for wet and dry applications | |
| Type: | RP350YDMRP350YDH |
| The structure of the equipment is in accordance with the following relevant regulations: | EC Machinery Directive 2006/42/EUEMC Directive 2004/108/EC |
| Harmonised standards used: | EN 12100–1, EN 12100–2, EN 60335–1,EN 60335–2–69, EN 55014–1, EN 55014–2, EN 61000–3–2 |
| National standardised regulations and technical specifications used: | DIN EN 60335–1, DIN EN 60335–2–69 |
Vacuum cleaners from classes M and H have been successfully tested in accordance with IFA Test Certifi cate
- GS-BIA-MO2 (07/02),
- DIN EN 60335-2-69 (including) Appendix AA,
- DIN 60335-2-69/A1 (11/05).


24
C €
⚠️ DANGER!
▶Danger of suffocation
- Keep packaging material such as plastic bags away from children.
▶Never stand or sit upon the vacuum device.
▶ Particular caution is advised when ascending stairs. Pay attention to standing safely.
▶ Do not pull the suction hose and connection line over sharp edges, kink it or shut it.
▶ Always lay the suction hose and connection line so that nobody may trip over them.
In case of any leakage of foam or liquid, immediately switch off the vacuum device.
▶Always keep dry the inside of the lid.
▶Do not start the vacuum device including its accessories if:
- the vacuum device shows detectable damage (fissures/cracks);
- the power connection line is defective or shows fissuring or ageing; or - any invisible defect is suspected (after a fall).
- Do not allow the rotating brushes to get into contact with the power connection line.
⚠️ DANGER!
▶ Do not operate the vacuum device where there is danger of explosions.
- Keep away the vacuum device from inflammable gases and substances.
⚠️ DANGER!
▶ Do not aspirate any combustible or explosive solvents, materials soaked in solvents, explosive dusts, liquids such as petrol, oil, alcohol, diluents or materials hotter then 60 °C (140 °F).
▶ Otherwise there will be danger of fire and explosions!
⚠️ DANGER!
- Have repairs been made only by experts, e. g. the producer's service. Use original spare parts only.
▶Improperly repaired devices pose a hazard for the user.
⚠️ DANGER!
▶ Use the socket of the vacuum device only for the purposes defined in the instruction manual.
▶ In case of any inappropriate usage, improper operation or repair, the producer shall be exempt from liability.
▶Do not use any damaged extension lines.
▶ If the connector line of the vacuum device has been damaged, it must be replaced with a special connector line which is available from the producer or their service.
▶ Electric brushes: Do not allow the rotating brushes to get into contact with the power connection line.
▶ The voltage on the type sign must correspond to the grid voltage.
▶ After every use and before any maintenance, switch off the vacuum device and pull the power plug.
▶Pull on the plug only, not on the line.
▶ Never plug or pull the power plug with wet hands.
▶ The socket must be secured via a household fuse with a suitable current rating.
▶Never open the vacuum device outdoors in rain or storm.
⚠ WARNING!
- Class M vacuum devices are suitable for aspiration/clearing of dry, non-combustible dusts, non-combustible liquids, wood dusts and hazardous dusts with workplace limit values of ≥ 0.1mg / m^3 .
- Class H vacuum devices are suitable for aspiration/clearing of dry, non-combustible dusts, carcinogenic and pathogenic particles as well as non-combustible liquids, wood dusts and toxic dusts with all occupational exposure limit values.
▶ Vacuum cleaner for dust class L suitable for up/exhausting of dry, non-flammable, hazardous dust with occupational exposure limit values (AGWS) > 1 mg/m ^3 .
WARNING!
▶ Persons (including children) who are, due to their physical, sensory or intellectual abilities or lack of experience or knowledge, unable to safely use the vacuum device should not use it without supervision or instruction by a responsible person.
▶ Particular caution is advised with children, elderly or infirm persons.
▶Do not point nozzle, tube or hose at people or animals.
⚠ WARNING!
▶ Use only the brushes supplied with the vacuum device or defined in the instruction manual. Use of any other brushes may pose a safety hazard.
- Clean and disinfect the vacuum device immediately after use to prevent microbial contamination due to long-term failure to clean it, especially when using the device in food-processing.
▶ Do not use any steam jets or high-pressure cleaners for cleaning.
▶ Acids, acetone and solvents may corrode parts of the vacuum device.
▶ Do not leave the device without supervision. In case of longer interruptions of work, pull the power plug.
▶ Do not clean filter cassettes with compressed air
▶ Use the dust extractor suitable for the work. Use the appliance only for the specified applications.
Read the operating manual carefully before starting to use the vacuum cleaner. It provides important instructions for the operation, safety, care and maintenance. Keep the operating manual in a safe place and, in case you sell the unit, hand it on to the next owner.
The manufacturer reserves the right to carry out modifications to the design and equipment.
Any other work not covered by this operating manual must not be carried out.
1 Before use
- When unpacking, check that the delivery is complete and that there is no transport damage.
Before using, the operators should be provided with information, instructions and training for the use of the vacuum cleaner and the substances that it is to be used for, including the safe procedure for the removal of the gathered material.

text_image
Technical diagram showing a warning symbol and a close-up of mechanical components with an arrow pointing to a component.2 Indicator and operating elements
Select from the following functions and settings:
| 0 |  | Vacuum cleaner is switched off | - Plug socket current-conducting |
| I |  | Vacuum cleaner is running | - Plug socket current-conducting- Automatic shaker function off |
| IR |  | Vacuum cleaner is running | - Plug socket current-conducting- Automatic shaker function on |
| AR |  | Ready for operation | - Plug socket curren-conducting- Automatic shaker function on- The vacuum cleaner is switched on and off via the connected electrical/ compressed air tool at the plug socket. |
| Automatic shaker function | - During suction, the folding filter cassettes are cleaned alternately when a specific negative pressure is reached, at which there is still adequate suction air. | ||
| Fill level indicator | - When the container is full and/or there is a blockage in the suction hose, the full indicator lights up. On the M and H vacuum cleaners, an acoustic signal is also emitted. | ||
| Setting the suction hose diameter | - Determine the maximum negative pressure for automatic shaking. |
3 Commissioning
3.1 Switching on and off
The plug socket on the vacuum cleaner will always be live when the mains plug is plugged in, irrespectively of the position of the switch.
⚠️ CAUTION!
Electric tools and compressed air tools must be switched off when they are connected
NOTE
If the switch is in the >0< position, the plug socket on the vacuum cleaner can be use as an extension lead.
△ Connection value: Vacuum cleaner + connected unit, maximum 16 A.
▶ Insert the plug into socket
0 < Vacuum cleaner is switched off
I < Vacuum cleaner switched on without shaker function
IR < Vacuum cleaner switched on with automatic shaker function
AR< Vacuum cleaner on standby
The vacuum cleaner only switches on when the tool is switched on.
After the tool is switched off, the vacuum cleaner runs on for approx. 10 sec to prevent any residue from collecting in the hose.
▶ Set the vacuum cleaner to the switch position >0<.
▶ Pull out the plug after you have finished.
- Fix the suction hose in the accessory storage location* on the back of the container for storage.
The ends of the hose can be pushed into each other to prevent particles of dirt from coming out.
⚠️ CAUTION!
Selector switch for minimum material flow (horn and light) on vacuum cleaners classes "M" and "H"
In the modes >AR< and >IR< the following setting is made, depending on the diameter of the hose:
Inside diameter of the hose Switch position
∅ 35 mm ∅ 35
∅ 27 mm | ∅ 27
∅ 21 mm | ∅ 21
No speed regulation is carried out.
The vacuum cleaner always runs at max. speed.
▶ Push the plug of the vacuum cleaner into the plug socket.
Set the switch for normal operation without shaker function to "I" and set it to "IR" for normal operation with shaker function and to "AR" for standby mode.
The vacuum cleaner is ready for suction.
▶ After vacuum cleaning, set the switch to "O".
→ The vacuum cleaner is switched off.
▶ Pull the mains plug of the vacuum cleaner out of the plug socket.
▶ Secure the mains cable.
Remove the electric/compressed air tool.
(* depending on the equipment variant)
4 Operating modes
- When using the grip handle you can adapt the suction performance by using the slider to control access of air into the hose.
4.1 Dry vacuum cleaning
You should only use the vacuum cleaner with a dry filter and appropriate accessories to prevent dust from accumulating and forming encrustations.
When using the vacuum cleaner to remove soot, cement, plaster, flour or similar dust we recommend using fleece filter bags. Always use filter bags in combination with folding filter cassettes.
NOTE
M, H and H Asbestos class vacuum cleaners should be preferably used as dry vacuum cleaners.
4.2 Wet vacuum cleaning
CAUTION!
Switch the vacuum cleaner off immediately if foam or liquid starts to come out.
▷ Empty the container and, if necessary, the folding filter cassette.
NOTE
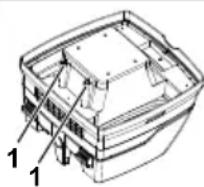
Clean the water level sensors (1) regularly and examine for signs of damage.
▶ Vacuum cleaning without paper filter bags.
The folding filter cassettes are designed for wet vacuum cleaning.
The fitted sensor switches the motor off when the container is full. The handling of the vacuum cleaner can be compromised by a full container.
▶ Empty the vacuum clean(see "6 Emptying the container").
⚠️ CAUTION!
If the vacuum cleaner is not switched off, the re-start protection unit remains operative. Only after switching off and re-starting is the vacuum cleaner ready for use again.
Remove the suction hose from the liquid before emptying.
After switching off, a small quantity of water can flow back out of the hose, as a result of the high suction level and the favourable flow condition in the container.
If you use it as a dry vacuum cleaner, you must insert dry filters.
NOTE
If you change between dry and wet vacuum cleaning frequently, we recommend using a second set of filters, preferably polyester folding filter cassettes.
5 Permanent fi Iter cleaning

The vacuum cleaner is fitted with an electromagnetic filter cleaning unit which can be used to shake the dust off the folding filter cassettes.
The folding fi Iter cassettes are cleaned alternately
so that continuous working can be guaranteed.

- Continuous monitoring of the filter filling level through differential pressure measurement, for an absolutely precise on-demand filter cleaning during the operation
- Thereby constant high air flow cleaning guaranteed during the operation, even for critical types of dust

text_image
dif. = 0 →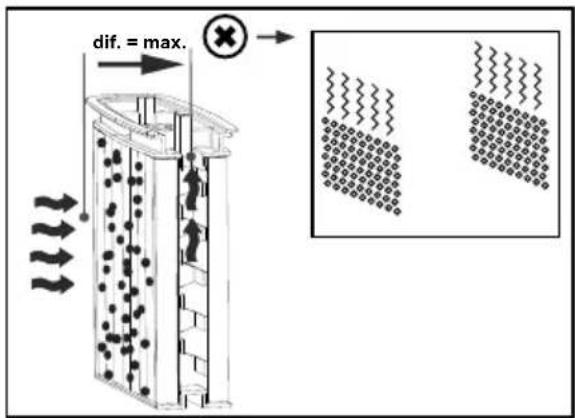
text_image
dif. = max. ×6 Emptying the container
NOTE
Only permitted for dust with AGW's > 1mg/m³
Switch the vacuum cleaner off, pull the mains plug out.
▷ Open the latches.
Remove the cover and suction hose from the container.
▶ Empty the container by pouring out.
6.1 Dispose of the fleece filter bag
▶ Pull the mains plug out (see short-form instructions).
▶ Fit mouth protection.
Remove suction hose, close off the suction spigot with a plug*.
▶ Open the side latches, remove the top section.
Carefully pull the flange off the suction spigot and close off the flange.
▷ Dispose of the vacuumed up material in accordance with legal requirements.
6.2 Dispose of the PE emptying and disposal bag
PE emptying and disposal bag: Switch the vacuum cleaner on, shake the folding filter cassettes. Switch off the vacuum cleaner (see short-form instructions
▶ Fit mouth protection.
Remove suction hose, close off the suction spigot with a plug*.
▶ Open the side latches, remove the top section.
Before setting aside the top section, switch to >IR< position, to draw up any floating dust which may exist.
- Close off the PE emptying and disposal bag carefully with the tape provided.
Carefully pull the flange off the suction spigot and close it off.
Remove the PE emptying and disposal bag carefully from the container.
▷ Dispose of the vacuumed up material in accordance with legal requirements.
6.3 Insert fleece filter bag iPulse LMH
NOTE
Only use fleece filter bags for dry vacuum cleaning.
▶ Slide the flange completely over the intake socket (see short-form instructions)
NOTE
Operating the rotary slide
▶ Turn the red rotary slide inside to position CLOSE to the stop on the marker ▲.

text_image
3 OPEN CLOSE6.4 Insert PE emptying and disposal bag
iPulse MH
NOTE
Only the vacuum cleaners class M and H with special containers and rotary slider in the suction aperture of types RP350YDM and RP350YDH are suitable for the use of PE Emptying and disposal bags.
NOTE
Operating the rotary slide
▶ Turn the red rotary slide inside to position OPEN to the stop on the marker ▲.
- Slide the flange completely over the intake socket. - Place the upper bag opening over the container rim.

text_image
3 OPEN7 Changing the fi Iter
7.1 Changing the folding fi Iter
(See short-form instructions

▶ Shake the folding filter cassettes before changing them.
Turn the lock on the latch through 90° in a counter-clockwise direction with a coin or similar object and push the latch to the rear.
▶ Fold the hood up
▶ Immediately isolate the folding filter cassettes that you have removed in a dust-tight plastic bag and dispose of properly in accordance with the stipulations.
▶ Insert new folding filter cassettes.
Lift the locking bracket up, fold the hood down and click in place with light pressure.
8 Changing the motor protection fi Iter
(See short-form instructions)

NOTE
If motor protection filter is contaminated, this indicates defective filter cartridges.
▶ Replace folded filter cartridges.
- Replace motor protection filter or wash the motor protection filter under flowing water, dry and re-insert.
9 Transport
▶ Remove suction hose.
▶ Close off intake socket with cap.
- Securely fix the motor head to the container (close the side latches).
- Place the accessories in a suitable plastic bag and seal the plastic bag or place it in the tool storage compartment.
- Put the suction hose ends together so that no dirt particles leak out.
▶ Place the hose around the vacuum cleaner and clamp onto the handle (see short-form instructions).
10 Maintenance
NOTE
Switch off the vacuum cleaner and pull out the mains plug before carrying out any maintenance work.
For maintenance by the user, the vacuum cleaner must be
- dismantled,
- cleanded and
- maintained,
as far as possible without creating any danger to the maintenance personnel or other.
Precautionary measures
Suitable precautionary measures include:
- Cleaning before dismantling
- Provision of local filtered positive ventilation where the vacuum cleaner is to be dismantled
- Cleaning of the maintenance area
- Suitable personal protection equipment
Precautionary measures with vacuum cleaners class H and M
The outside of the vacuum cleaner should be cleaned by dust extraction procedures and wiped down, or should be treated with a sealing agent before being removed from the hazardous area. All parts of the vacuum cleaner must be considered to be contaminated when they are removed from the hazardous area, and suitable handling must be used to prevent dust distribution.
Contaminated items
When carrying out maintenance or repair work, all contaminated items which have not been adequately cleaned, must be disposed of. Such items must be disposed of in impermeable bags in accordance with the applicable regulations concerning the disposal of such waste.
10.1 Testing the effectiveness of the vacuum cleaner
NOTE: In addition, the effectiveness of the vacuum cleaner class H must be checked at least once a year.
There must be an adequate air exchange rate L in the room if the exhaust air returns to the room. Further information can be taken from your national regulations.
If the suction of the vacuum cleaner reduces and the cleaning procedure of the folding filter cassettes increases, the suction performance is not adequate (provided that the container is empty and the fleece filter bag has been replaced) then it is necessary to replace the folding filter cassettes (see short-form instructions and Section 7.1).
10.2 Cleaning
NOTE
Acids, acetone and solvents can damage parts of the vacuum cleaner.
▶ Clean container and accessories with water.
▶ Wipe the top section with a damp cloth.
▶ Allow the container and accessories to dry.
10.3 Repair
⚠️ DANGER!
▶ Inappropriately repaired vacuum cleaners present a danger to the operator.
▶ Have repairs carried out by specialists, e. g. customer service. Use only genuine spare parts.
11 First aid in the event of a fault
| NOTE | |||
| Malfunctions cannot always be traced back to defects in the vacuum cleaner. | |||
| Fault Possible cause Remedy | |||
| Reduction in suction Filter contaminated Clean. | |||
| fl eece fi Iter full Change. | |||
| Container full Empty. | |||
| Nozzle, pipes or hose blocked Clean. | |||
| Vacuum cleaner will not start Mains plug plugged in? | |||
| Mains power missing? | |||
| Mains cable OK? | |||
| Cover closed properly? | |||
| Water sensor switched off? | |||
| Vacuum cleaner in readiness for operation "AR"? | Set to "I" or "IR" (see "2 Indicator and operating elements"). | ||
| The vacuum cleaner does not start when the tool is switched on in the >AR< mode | Is the mains plug of the unit in the plug socket? | Put the mains plug in the vacuum cleaner plug socket | |
| Solenoid valve of compressed air automatic switch-on* contaminated? | Flush the compressed air automatic switch-on* with alcohol | ||
| PE emptying and disposal bag is sucked against the fi Iter | Position of rotary slider incorrect Set rotary slider to OPEN (see "6.4 Insert PE emptying and disposal bag"). | ||
| Vacuum cleaner classes M or H: with inserted paper filter dust in filter | Position of rotary slider incorrect Set rotary slider to CLOSE (see "6.3 Insert fl eece fi Iter bag"). | ||
Do not take any other action and contact the central customer service workshop.
12 Genuine accessories
| NOTE | ||
| Use genuine accessories. | ||
| Article designation Properties/material Order quantity | (1 set) | |
| Fleece filter bag FBV 25/35 | for 30 litre plastic container, IFA class M approved | 5 Number |
| Filter cassette FK 4300 | Cellulose material, IFA class M approved | 2 Number |
| Filter cassette FKP 4300 | Polyester material, IFA class M approved | 2 Number |
| Filter cassette FKP 4300 HEPA (H 14) | 3 layer filter cassette, IFA class H approved | 2 Number |
| PE emptying and disposal bag | only for RP vacuum cleaners class M and H | 5 Pieces |
13 Technical Data
| RP350YDM RP350YDH | |||
| Voltage 220-240 V~ 220-240 V~ | |||
| Frequency 50/60 Hz 50/60 Hz | |||
| Rated power Watt 1200 1200 | |||
| Max. power Watt 1400 1400 | |||
| Air flow* m | ^3 /h 151 151 | ||
| Air flow** | m^3 /h 263 263 | ||
| Negative pressure* hPa 235 235 | |||
| Negative pressure** | hPa 270 270 | ||
| Noise level db(A) | 69.5 | 69.5 | |
| Weight | kg | 14.4 | 14.4 |
| Filter surface | cm^2 | 8400 8400 | |
* at the hose, ** at the fan
Connection line on vacuum cleaners with plug socket: H07RN-F 3 x 1.5
14 Tests and approvals
Electro-technical tests must be carried out in accordance with the accident prevention regulations (BGV A3) and in accordance with DIN VDE 0701 Part 1 and Part 3. These tests are required in accordance with DIN VDE 0702 at regular intervals and after repair or modification.
The vacuum cleaners are successfully tested in accordance with IEC/EN 60335-2-69.
NOTE
Old equipment contains valuable materials which are designed for re-processing. The vacuum cleaners must not be thrown away in the normal household waste, but should be disposed of at a suitable proper collection system, e.g. via your communal disposal location.
GUARANTEE
We guarantee HiKOKI Power Tools in accordance with statutory/ country specific regulation. This guarantee does not cover defects or damage due to misuse, abuse, or normal wear and tear. In case of complaint, please send the Power Tool, undismantled, with the GUARANTEE CERTIFICATE found at the end of this Handling instruction, to a HiKOKI Authorized Service Center.
Français
text_image
Technical diagram showing a warning sign and a close-up of a mechanical assembly with labeled components.natural_image
Technical line drawing of a rectangular container with internal components and labeled parts (no text or symbols)text_image
dif. = 0 →
text_image
dif. = max. ×6 Vidange de la cuve
REMARQUE
text_image
3 OPEN CLOSEtext_image
Technical diagram showing a warning symbol and a close-up of mechanical components with an arrow pointing to a component.text_image
dif. = max. ×6 Vaciado del recipiente
NOTA
text_image
3 OPEN CLOSEtext_image
Technical diagram showing a warning symbol and a close-up of a mechanical assembly with labeled components.text_image
dif. = 0 →
text_image
dif. = max. ×text_image
3 OPEN CLOSEtext_image
Diagram showing a warning sign and mechanical assembly with magnified detail viewnatural_image
Technical line drawing of a 3D rectangular container with internal components and labeled parts (no text or symbols present)text_image
dif. = 0 →
text_image
dif. = max. × → ← ← ← ← ← ← ← ← ← ← ← ← ← ← ← ← ← ← ← ← ← ← ← ← ← ← ← ← ← ← ← ← ← ← ← ← ← ← ← ← ← ← ← ← ← ← ← ← ← ← →text_image
3 OPEN CLOSEtext_image
Technical diagram showing a warning sign and a magnified view of a mechanical assembly with labeled components.▶ Stekker in stopcontact steken
text_image
dif. = max. ×6 Reservoir legen
AANWIJZING
text_image
3 OPEN CLOSEtext_image
Technical diagram showing a warning sign and a magnified view of mechanical components with a tool, likely illustrating a hazard or inspection.text_image
dif. = 0 →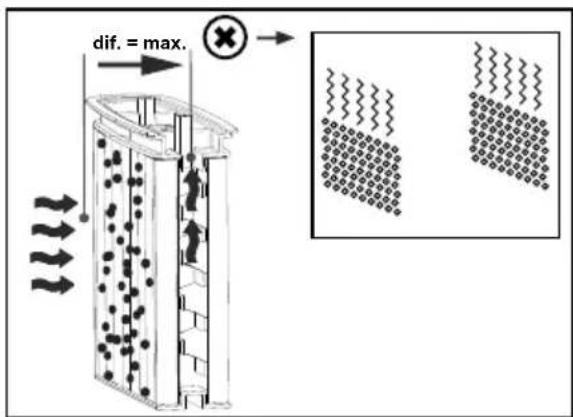
text_image
dif. = max. ×text_image
OPEN CLOSE 3text_image
Diagram showing a warning symbol and mechanical assembly with magnified detail of internal componentstext_image
dif. = 0 →
text_image
dif. = max. ×6 Töm behållaren
HÄNVISNING
text_image
3 OPEN CLOSEtext_image
Technical diagram showing a warning symbol and a close-up of mechanical components with a tool, likely illustrating a repair or inspection process.▷ Sug uten fleece-filterpose.
text_image
dif. = 0 →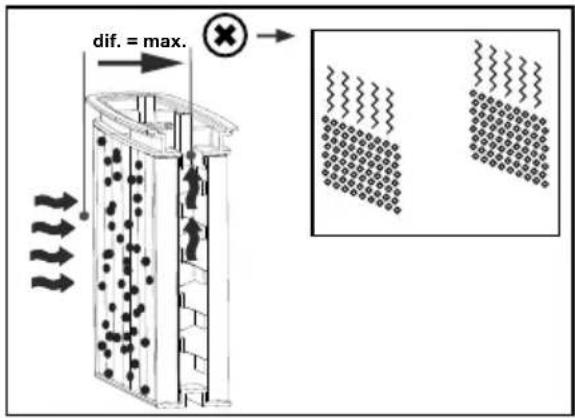
text_image
dif. = max. ×6 Tømme beholderen
ANVISNING
6.1 Bortskaff fleece-filterposen
6.3 Sett inn fiberduk-filterpose iPulse LMH
MERK
text_image
3 OPEN CLOSE▷ Sett inn nye foldefilterkassetter.
Løft opp läsebøylen, klapp ned panseret og lås det med et lett trykk.
text_image
Diagram showing warning about a mechanical component with an explosion symbol and magnified detail viewtext_image
dif. = 0 →
text_image
dif. = max. × → → → → → → → → → → → → → → → → → → → → → → → → → → → → → → → → → → → → → → → → → → → → → → → → → → ←text_image
3 OPEN CLOSEtext_image
Technical diagram showing a warning symbol and mechanical assembly with magnified detail viewtext_image
dif. = max. ×6 Εκκένωση κάδου
ΥΠΟΔΕΙΞΗ
text_image
3 OPEN CLOSEtext_image
3 OPEN FLOGtext_image
Technical diagram showing a warning symbol and a close-up of mechanical components with an arrow pointing to a component.text_image
dif. = 0 →
text_image
dif. = max. ×text_image
3 OPEN CLOSEtext_image
Diagram showing a warning sign and a magnified view of mechanical components with an arrow pointing to a component.text_image
dif. = 0 →
text_image
dif. = max. molecular structuretext_image
3 OPEN CLOSEtext_image
Diagram showing a warning sign and a magnified view of mechanical components with a warning symboltext_image
dif. = 0 →
text_image
dif. = max. ×text_image
3 OPEN CLOSEtext_image
Technical diagram showing a warning symbol and a close-up of mechanical components with an arrow pointing to a component.text_image
dif. = max. ×text_image
3 OPEN CLOSEtext_image
Diagram showing a warning sign and a magnified view of mechanical components with a warning symbolnatural_image
Technical line drawing of a boat hull with numbered components (no text or symbols)text_image
dif. = max. ×text_image
3 OPEN CLOSEtext_image
Technical diagram showing a warning sign and mechanical assembly with magnified detail viewtext_image
dif. = 0 →
text_image
dif. = max. ×text_image
3 OPEN CLOSEtext_image
Diagram showing a warning symbol and a magnified view of mechanical components with a tool, likely illustrating a safety or inspection process.2 Elementi za prikaz in upravljanje
text_image
dif. = 0 →
text_image
dif. = max. ×6 Praznjenje posode
OPOMBA
text_image
3 OPEN CLOSEtext_image
Technical diagram showing a warning symbol and mechanical assembly with magnified detail view2 Elementi prikaza i rukovanja
Odaberite sljedeće funkcije i postavke:
| 0 |  | Usisivač isključen | - Utičnica pod naponom |
| I |  | Usisivač uključen | - Utičnica pod naponom- Isključena automatska funkcija trešnje |
| IR |  | Usisivač uključen | - Utičnica pod naponom- Uključena automatska funkcija trešnje |
| AR |  | Pogon pripravnosti | - Utičnica pod naponom- Uključena automatska funkcija trešnje- Usisivač uključuje i isključuje na utičnici se preko priključenog električnog alata i alata komprimiranog zraka |
| Automatska funkcija trešnje | - Kasete za nabrani filter se prilikom usisavanja izmjenično čiste čim je dostignuta određena vrijednost podtlaka kod kojeg postoji dovoljno usisnog zraka. | ||
| Prikaz punjenja | - Kod pune posude i/ili začepljenosti na usisnom crijevu upali se lampica prikaza punjenja. Kod usisivača klase M i H dodatno se može čuti akustični signal. | ||
| Reguliranje promjera usisnog crijeva | - Odredite maksimalne vrijednosti podtlaka za automatsku trešnju. |
3 Puštanje u pogon
text_image
dif. = 0 →
text_image
dif. = max. × → → → → → → → → → → → → → → → → → → → → → → → → → → → → → → → → → → → → → → → → → → → → → → → → → → ←6 Pražnjenje posude
UPUTA
Dozvoljeno samo kod prašina s graničnim vrijednostima na radnom mjestu > 1 mg/m³
Isključite usisivač, povucite mrežnu utičnicu
text_image
3 OPEN CLOSEtext_image
Diagram showing a warning sign and mechanical assembly with magnified detail viewtext_image
dif. = 0 →
text_image
dif. = max. ×text_image
3 OPEN CLOSEClass L vacuum devices are suitable for aspiration/clearing of dry, non-combustible dusts and hazardous dusts with occupational exposure limit values (AGW) > 1 mg/m ^3 .
Class M vacuum devices are suitable for aspiration/clearing of dry, non-combustible dusts, non-combustible liquids, wood dusts and hazardous dusts with workplace limit values of ≥ 0.1 mg/m ^3 .
Siemensring 34, 47877 willich, Germany
Tel: +49 2154 49930
Fax: +49 2154 499350
URL: http://www.hikoki-powertools.de
Hikoki Power Tools Netherlands B.V.
Brabanthaven 11, 3433 PJ Nieuwegein, The Netherlands
Tel: +31 30 6084040
Fax: +31 30 6067266
URL: http://www.hikoki-powertools.nl
Hikoki Power Tools (U.K.) Ltd.
Precedent Drive, Rooksley, Milton Keynes, MK 13, 8PJ,
United Kingdom
Tel: +44 1908 660663
Fax: +44 1908 606642
URL: http://www.hikoki-powertools.uk
Hikoki Power Tools France S.A.S.
Hikoki Power Tools Belgium N.V./S.A.
Koningin Astridlaan 51, B-1780 Wemmel, Belgium
Tel: +32 2 460 1720
Fax: +32 2 460 2542
URL http://www.hikoki-powertools.be
Hikoki Power Tools Italia S.p.A
Via Piave 35, 36077, Altavilla Vicentina (VI), Italy
Tel: +39 0444 548111
Fax: +39 0444 548110
URL: http://www.hikoki-powertools.it
Hikoki Power Tools Ibérica, S.A.
C/ Puigbarral, 26-28, Pol. Ind. Can Petit, 08227 Terrassa
(Barcelona), Spain
Tel: +34 93 735 6722
Fax: +34 93 735 7442
URL: http://www.hikoki-powertools.es
Kjeller Vest 7, N-2007 Kjeller, Norway
Tel: (+47) 6692 6600
Fax: (+47) 6692 6650
URL: http://www.hikoki-powertools.no
Hikoki Power Tools Sweden AB
Rotebergsvagen 2B SE-192 78 Sollentuna, Sweden
Tel: (+46) 8 598 999 00
Fax: (+46) 8 598 999 40
URL: http://www.hikoki-powertools.se
Hikoki Power Tools Denmark A/S
Lillebaeltsvej 90, 6715 Esbjerg N, Denmark
Tel: (+45) 75 14 32 00
Fax: (+45) 75 14 36 66
URL: http://www.hikoki-powertools.dk
Hikoki Power Tools Finland Oy
Tupalankatu 9, 15680 Lahti, Finland
Tel: (+358) 20 7431 530
Fax: (+358) 20 7431 531
URL: http://www.hikoki-powertools.fi
Hikoki Power Tools Hungary Kft.
Hikoki Power Tools Romania S.R.L.
Ring Road, No. 66, Mustang Traco Warehouses, Warehouse
No.1, Pantelimon City, 077145, Ilfov County, Romania