RP35YB - Handheld vacuum HiKOKI - Free user manual and instructions
Find the device manual for free RP35YB HiKOKI in PDF.
| Product type | Table vacuum (liquids and dust) |
| Brand | HiKOKI |
| Model | RP35YB |
| Power supply | 230 V, 50/60 Hz, single-phase |
| Power | 1200 W |
| Control socket | 2300 W max |
| Max airflow | 3,5 m³/min |
| Max vacuum | 25,5 kPa |
| Dust capacity | 25 L |
| Liquid capacity | 22 L |
| Dimensions (L × W × H) | 410 mm × 435 mm × 539 mm |
| Weight | 8,4 kg (without cord or accessories) |
| Cord length | 8 m |
| Filter type | Cloth filter (standard) + paper filter (optional) |
| Filter cleaning | Manual (tap the filter) |
| Safety mechanism | Float (auto stop in case of water overflow) |
| Usage | Indoor use only |
| Included accessories | Flexible hose (3 m), 2 rigid pipes, handle, main nozzle, flat nozzle, liquid nozzle, round brush nozzle, adapter |
| Operating mode | Manual (M) and automatic (A) with power tool control |
| Maintenance | Clean the filter regularly, drain the tank at least once a day |
| Spare parts | Paper filter (code 329-639), nylon filter (code 326-187) |
Frequently Asked Questions - RP35YB HiKOKI
User questions about RP35YB HiKOKI
0 question about this device. Answer the ones you know or ask your own.
Ask a new question about this device
Download the instructions for your Handheld vacuum in PDF format for free! Find your manual RP35YB - HiKOKI and take your electronic device back in hand. On this page are published all the documents necessary for the use of your device. RP35YB by HiKOKI.
USER MANUAL RP35YB HiKOKI
natural_image
Line drawing of a vacuum cleaner with attached hose and control panel (no text or symbols)RP35YB

natural_image
Line drawing of a vacuum cleaner with handle and control panel (no text or symbols)RP35YE
Read through carefully and understand these instructions before use.
text_image
Labeled diagram of a vacuum cleaner with numbered parts for identificationRP35YE
2

text_image
Labeled diagram of a 16-pin vacuum cleaner with numbered parts for identificationRP35YE
3

text_image
Labeled diagram of a vacuum cleaner with numbered parts for identificationRP35YB
4
text_image
Labeled diagram of a mechanical device with numbered parts for identificationRP35YB
5

text_image
Technical diagram showing mechanical component with numbered parts and directional arrows indicating movement or force6

text_image
⑱ ⑲ ⑳ ⑳ ⑳7

text_image
Diagram of a vacuum cleaner with numbered parts and directional arrows indicating assembly or installation steps.8

text_image
Technical diagram of a mechanical device with numbered components for assembly or maintenance reference.9

text_image
Technical diagram showing a hand holding a component with numbered parts labeled ②, ③, and ③3.10

text_image
Diagram of a vehicle front panel with numbered components for identification11

text_image
Technical diagram of a mechanical device with numbered parts and an upward arrow indicating motion or assembly.12

natural_image
Technical line drawing of hands operating a mechanical device with a bag, labeled with number 15 (no text or symbols on the diagram itself)
text_image
13 ⑯ ⑮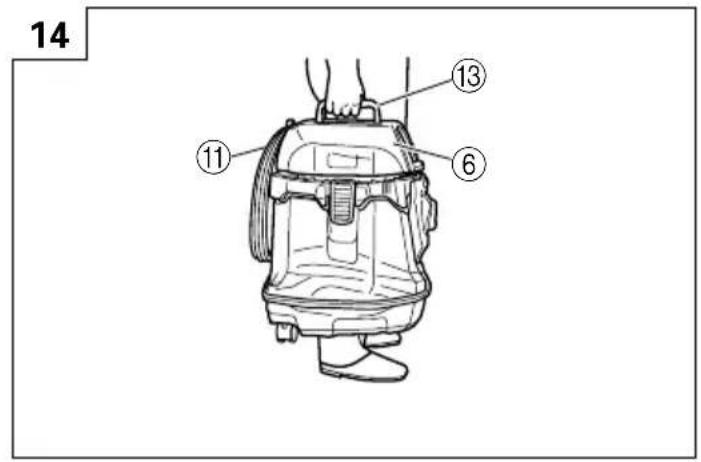
text_image
14 ⑪ ⑬ ⑬
text_image
15 16 ④1 ④2 ③9 ④0 ⑮
text_image
Technical diagram of a vacuum cleaner with numbered parts labeled 11, 12, 12, 43, and 24.
text_image
17 18 ⑮ ⑭ ④4 ④5 ④7 ④6
text_image
48 50 49 90°
text_image
19 51 44 46 45 52
text_image
20 44 45 4621 22
text_image
Diagram of a hand holding a device with numbered parts labeled 53 and 18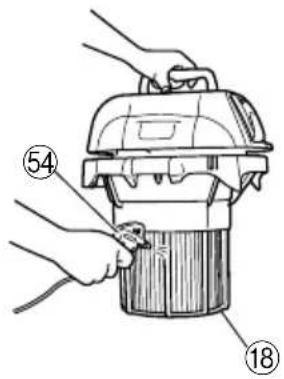
text_image
Diagram showing hands installing or adjusting a device with numbered parts labeled 18 and 5423

natural_image
Line drawing of a person adjusting a helmet, no text or symbols present24
text_image
Technical diagram of a mechanical assembly with numbered components and an arrow indicating a process or assembly step.| English | Deutsch Français | Italiano | ||
| 1 | Suction opening | Saugöffnung | Orifice d'aspiration | Bocchetta di aspirazione |
| 2 | Interlocking electric outlet | Interlocking-Anschluss | Prise électrique d'asservissement | Presa elettrica di collegamento |
| 3 | Operation panel | Bedienfeld | Tableau d'exploitation | Pannello di comando |
| 4 | Mode selection switch | Moduswahlschalter | Sélecteur de mode | Interruttore di selezione modalità di funzionamento |
| 5 | Vacuum switch | Saugschalter | Interrupteur de l'aspirateur | Interruttore aspirazione |
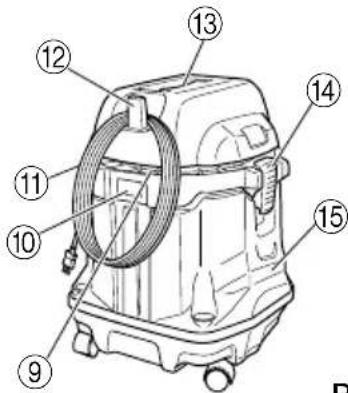
| 6 | Head | Oberteil | Tête | Unità principale |
| 7 | Filter cleaning switch | Filterreinigungsschalter | Interrupteur de nettoyage du filtre | Interruttore pulizia filtro |
| 8 | Caster | Fußröllchen | Roulette | Rotella |
| 9 | Suction opening / Exhaust opening | Saugöffnung / Abluftöffnung | Orifice d'aspiration / orifice d'extraction | Bocchetta di aspirazione / Bocchetta di scarico |
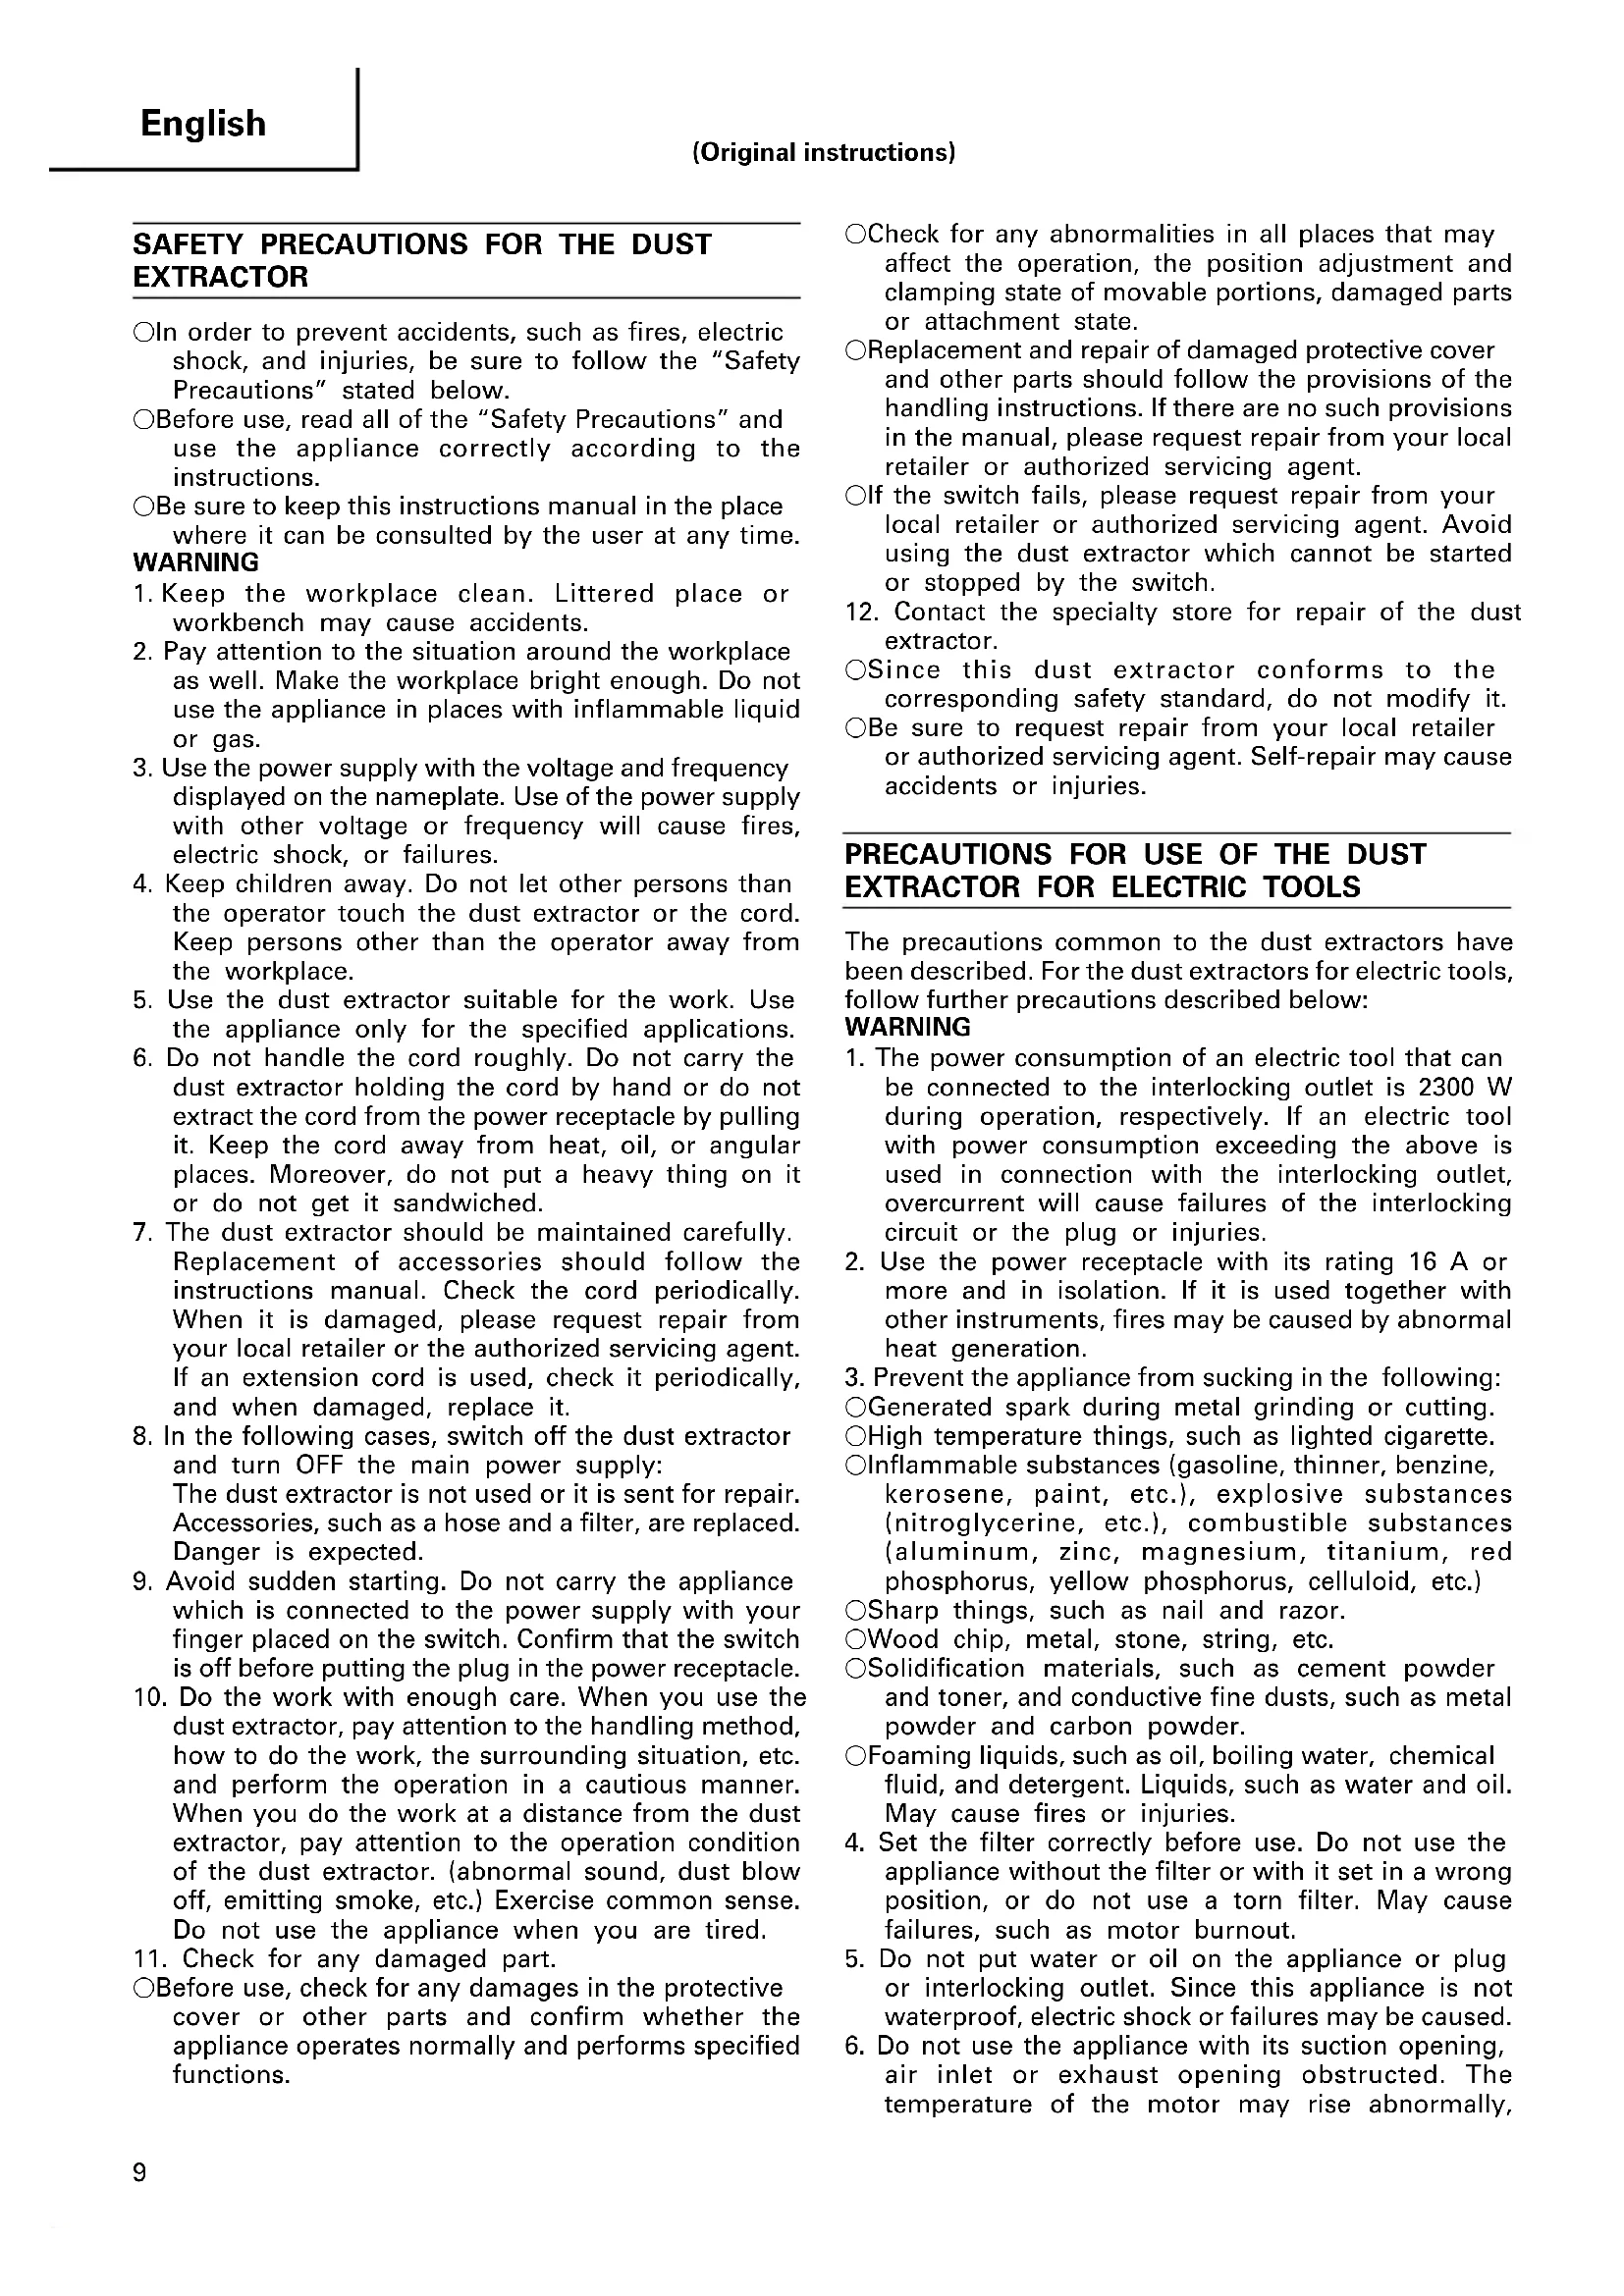
| 10 | Name plate | Typenschild | Plaque signalétique | Targhetta di identificazione |
| 11 | Cord | Kabel | Cordon | Cavo |
| 12 | Hook | Haken | Crochet | Portacavo |
| 13 | Handle | Griff | Poignée | Maniglia |
| 14 | Clamp | Klemme | Dispositif de serrage | Morsetto |
| 15 | Tank | Tank | Réservoir | Bidone |
| 16 | Base | Sockel | Base | Base |
| 17 | Button | Knopf | Bouton | Pulsante |
| 18 | Filter | Filter | Filtre | Filtro |
| 19 | Filter packing | Filterdichtung | Garniture de filtre | Guarnizione del filtro |
| 20 | Filter cage | Filtergehäuse | Cage de filtre | Gabbia del filtro |
| 21 | Mouth of the tank | Tanköffnung | Bouche du réservoir | Bocchetta del bidone |
| 22 | Hose (id 38 mm × 3 m long) | Schlauch (ID 38 mm × 3 m lang) | Tuyau flexible (Di 38 mm x 3 m long) | Tubo (id 38 mm × 3 m lunghezza) |
| 23 | Joint handle | Verbindungsstückgriff | Poignée de raccord | Maniglia del giunto |
| 24 | Pipe | Rohr | Tuyau rigide | Tubo |
| 25 | Master Nozzle | Hauptdüse | Suceur principal | Spazzola principale |
| 26 | Adapter (Standard Accessory) | Adapter (mitgeliefertes Zubehör) | Adaptateur (accessoire standard) | Adattatore (accessorio standard) |
| 27 | Joint (Optional Accessory) | Verbindungsstück (Sonderausstattung) | Raccord (accessoire en option) | Giunto (accessorio opzionale) |
| 28 | Dust collection adapter (Optional Accessory) | Staubabsaugungsadapter (Sonderausstattung) | Adaptateur de récuperation de poussière (accessoire en option) | Adattatore di aspirazione (accessorio opzionale) |
| 29 | Power tool | Elektrowerkzeug | Outil électrique | Utensile elettrico |
| 30 | Dust exhaust opening | Staubauslassöffnung | Orifice d'extraction de poussière | Scarico della polvere |
| 31 | Power tool | Elektrowerkzeug | Outil électrique | Utensile elettrico |
| 32 | Cover | Deckel | Couvercle | Coperchio |
| 33 | Plug of the power tool | Stecker des Elektrowerkzeugs | Fiche de l'outil électrique | Presa per utensile |
| 34 | A (Auto) | A (Automatik) | A (Automatique) | A (Automatico) |
| 35 | M (Manual) | M (Manuell) | M (Manuel) | M (Manuale) |
| 36 | ON | ON (Ein) | ON (Marche) | ON (Attivato) |
| 37 | OFF | OFF (Aus) | OFF (Arrêt) | OFF (Disattivato) |
| 38 | Float holder | Schwimmerhalterung | Porte-flotteur | Supporto galleggiante |
| 39 | Caster (with Stopper) | Fußröllchen (mit Stopper) | Roulette (avec frein) | Rotella (con blocco) |
| 40 | Lever | Hebel | Bras | Levetta |
| 41 | Release | Lösen | Libérer | Sblocca |
| 42 | Fix | Feststellen | Bloquer | Blocca |
| 43 | Pipe holder | Rohrhalterung | Porte-tuyau | Supporto per tubo |
| 44 | Suction opening | Saugöffnung | Bouche d'aspiration | Bocchetta di aspirazione |
| 45 | Suction hole | Saugloch | Orifice d'aspiration | Foro di aspirazione |
| 46 | Paper filter | Papierfilter | Filtre en papier | Filtro in carta |
| 47 | Vertical direction | Vertikale Richtung | Direction verticale | Senso verticale |
| 48 | Cardboard | Pappe | Carton | Cartoncino |
| 49 | Fold | Falz | Pli | Piega |
| 50 | Bend | Biegung | Plier | Piegare |
| 51 | Stopper | Stopper | Cale | Blocco |
| 52 | Rubber packing | Gummidichtung | Garniture en caoutchouc | Imballaggio in gomma |
| 53 | Brush | Bürste | Brosse | Spazzola |
| 54 | Air duster gun | Druckluftreinigungspistole | Pistolet de dépoussiérage à l'air | Pistola ad aria compressa |
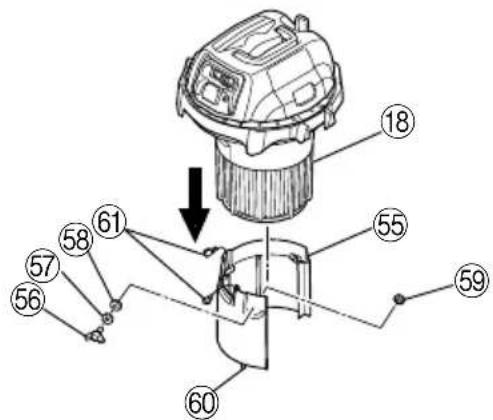
| 55 | Water guard | Wasserschutz | Protection antiéclaboussures | Protezione idrica |
| 56 | Wing bolt | Flügelschraube | Boulon à oreilles | Bullone ad alette |
| 57 | Spring washer | Federring | Rondelle élastique | Rondella elastica |
| 58 | Washer | Beilegescheibe | Rondelle | Rondella |
| 59 | Nut | Mutter | Ecrou | Dado |
| 60 | Sensor shaft | Sensorschaft | Arbre du capteur | Barra del sensore |
| 61 | Connector | Steckverbinder | Connecteur | Connettore |
| Nederlands Español | Português | ||
| 1 | Aanzuigopening | Apertura de succión | Abertura da sucção |
| 2 | Automatisch aan/uit stopcontact | Salida eléctrica interconectada | Tomada eléctrica protegida |
| 3 | Bedieningspaneel | Panel de funcionamiento | Painel de operação |
| 4 | Moduskeuzeschakelaar | Interruptor de selección de modo | Interruptor de seleção de modo |
| 5 | Vacuümschakelaar | Interruptor de aspirado | Interruptor de aspiração |
| 6 | Bovenstuk | Cabezal | Cabeça |
| 7 | Filterreinigingsschakelaar | Interruptor de limpieza del filtro | Interruptor de limpeza do filtro |
| 8 | Zwenkwieltje | Ruedecita | Roda |
| 9 | Aanzuigopening / Uitlaatopening | Apertura de succión / Apertura de escape | Abertura da sucção / abertura da saída |
| 10 | Naamplaatje | Placa de identificação | Placa de identificação |
| 11 | Netsnoer | Cable | Cabo |
| 12 | Haak | Gancho | Gancho |
| 13 | Handvat | Asa | Pega |
| 14 | Klem | Abrazadera | Engate |
| 15 | Reservoir | Depósito | Depósito |
| 16 | Voetstuk | Base | Base |
| 17 | Knop | Botón | Botão |
| 18 | Filter | Filtro | Filtro |
| 19 | Filterpakking | Embalaje del filtro | Elemento filtrante |
| 20 | Filterkooi | Caja del filtro | Compartimento do filtro |
| 21 | Reservoirmondstuk | Boca del depósito | Boca do depósito |
| 22 | Slang (38 mm binnëndiam. × 3 m lengte) | Manguera (id 38 mm × 3 m de largo) | Tubo flexível (id 38 mm × 3 m comprimento) |
| 23 | Verbindingshandvat | Asa de la junta | Pega de união |
| 24 | Buis | Tubo | Tubo |
| 25 | Hoofdzuigmond | Boquilla principal | Bocal principal |
| 26 | Adapter (standaard accessoire) | Adaptador (Accesorio estándar) | Adaptador (Acessório de série) |
| 27 | Verbindingsstuk (optioneel accessoire) | Junta (Accesorio opcional) | Junta (Acessório opcional) |
| 28 | Stofopvangadapter (optioneel accessoire) | Adaptador colector del polvo (Accesorio opcional) | Adaptador de recolha de pó (Acessório opcional) |
| 29 | Elektrisch gereedschap | Herramienta eléctrica | Ferramenta eléctrica |
| 30 | Stofuitlaatopening | Apertura de salida del polvo | Abertura da saída de pó |
| 31 | Elektrisch gereedschap | Herramienta eléctrica | Ferramenta eléctrica |
| 32 | Deksel | Tapa | Tampa |
| 33 | Stekker van elektrisch gereedschap | Enchufe de la herramienta eléctrica | Ficha da ferramenta eléctrica |
| 34 | A (Automatisch) | A (Automático) | A (Automático) |
| 35 | M (Handbediening) | M (Manual) | M (Manual) |
| 36 | ON (Aan) | ON (Encendido) | ON (Ligado) |
| 37 | OFF (Uit) | OFF (Apagado) | OFF (Desligado) |
| 38 | Vlotterhouder | Soporte flotante | Suporte da bóia |
| 39 | Zwenkwieltje (met aanslag) | Ruedecita (con tope) | Roda (com bloqueio) |
| 40 | Hendel | Palanca | Patilha |
| 41 | Ontgrendelen | Soltar | Soltar |
| 42 | Vastzetten | Fijar | Fixar |
| 43 | Buishouder | Soporte del tubo | Suporte do tubo |
| 44 | Aanzuigopening | Apertura de succión | Abertura de sucção |
| 45 | Aanzuiggat | Orifício de succión | Orifício de sucção |
| 46 | Papierenfilter | Filtro de papel | Filtro de papel |
| 47 | Verticale richting | Dirección vertical | Direcção vertical |
| 48 | Karton | Cartón | Cartão |
| 49 | Vouwen | Plegar | Dobrar |
| 50 | Buigen | Doblar | Dobra |
| 51 | Aanslag | Tope | Batente |
| 52 | Rubberpakking | Embalaje de plástico | Empanque de borracha |
| 53 | Borstel | Cepillo | Escova |
| 54 | Luchtdrukpistool | Pistola pulverizadora de aire | Pistola de ar comprimido |
| 55 | Waterafscherming | Cubierta de agua | Protecção de água |
| 56 | Vleugelbout | Tornillo de mariposa | Parafuso de orelhas |
| 57 | Veerring | Arandela elástica | Anilha-mola |
| 58 | Vulring | Arandela | Anilha |
| 59 | Moer | Tuerca | Porca |
| 60 | Sensoras | Eje sensor | Veio do sensor |
| 61 | Stekker | Conector | Conector |
| Symbols⚠ WARNINGThe following show symbols used for the machine. Be sure that you understand their meaning before use. | Symbole⚠ WARNUNGDie folgenden Symbole werden für diese Maschine verwendet. Achten Sie darauf, diese vor der Verwendung zu verstehen. | Symboles⚠ AVERTISSEMENTLes symboles suivants sont utilisés pour l'outil. Bien se familiariser avec leur signification avant d'utiliser l'outil. | Simboli⚠ AVVERTENZADi seguito mostriamo i simboli usati per la macchina. Assicurarsi di comprenderne il significato prima dell'uso. | |
 | Read all safety warnings and all instructions.Failure to follow the warnings and instructions may result in electric shock, fire and/or serious injury. | Lesen Sie sämtliche Sicherheitshinweise und Anweisungen durch.Wenn die Warnungen und Anweisungen nicht befolgt werden, kann es zu Stromschlag, Brand und/oder ernsthaften Verletzungen kommen. | Lire tous les avertissements de sécurité et toutes les instructions.Tout manquement à observer ces avertissements et instructions peut engendrer des chocs électriques, des incendies et/ou des blessures graves. | Leggere tutti gli avvertimenti di sicurezza e tutte le istruzioni.La mancata osservanza degli avvertimenti e delle istruzioni potrebbe essere causa di scosse elettriche, incendi e/o gravi lesioni. |
 | Always wear eye protection. | Tragen Sie immer einen Augenschutz. | Toujours porter des verres de protection. | Indossate sempre le protezioni oculari. |
 | Always wear hearing protection. | Stets Gehörschutz tragen. | Porter des protections anti-bruit en permanence. | Indossare sempre i dispositivi di protezione acustica. |
 | Only for EU countriesDo not dispose of electric tools together with household waste material!In observance of European Directive 2002/96/EC on waste electrical and electronic equipment and its implementation in accordance with national law, electric tools that have reached the end of their life must be collected separately and returned to an environmentally compatible recycling facility. | Nur für EU-Länder Werfen Sie Elektrowerkzeuge nicht in den Hausmüll!Gemäss Europäischer Richtlinie 2002/96/EG über Elektro- und Elektronik- Altgeräte und Umsetzung in nationales Recht müssen verbrauchte Elektrowerkzeuge getrennt gesammelt und einer umweltgerechten Wiederververitung zugeführt werden. | Pour les pays européens uniquementNe pas jeter les appareils électriques dans les ordures ménagères!Conformément à la directive européenne 2002/96/EG relative aux déchets d'équipements électriques ou électroniques (DEEE), et à sa transposition dans la législation nationale, les appareils électriques doivent être collectés à part et être soumis à un recyclage respectueux de l'environnement. | Solo per Paesi UENon gettare le apparecchiature elettriche tra i rifiuti domestici.Secondo la Direttiva Europea 2002/96/CE sui rifiuti di apparecchiature elettriche ed elettroniche e la sua attuazione in conformità alle norme nazionali, le apparecchiature elettriche esauste devono essere raccolte separatamente, al fine di essere reimpiegate in modo eco-compatible. |
 | Symbolen⚠ WAARSCHUWINGHieronder staan symbolen afgebeeld die van toepassing zijn op deze machine. U moet de betekenis hiervan begrijpen voor gebruik. | Símbolos⚠ ADVERTENCIAA continuación se muestran los símbolos usados para la máquina.Asegúrese de comprender su significado antes del uso. | Símbolos⚠ AVISOA seguir aparecem os símbolos utilizados pela máquina. Assimile bem seus significados antes do uso. | |
 | Lees alle waarschuwingen en instructies aandachtig door.Nalating om de waarschuwingen en instructies op te volgen kan in een elektrische schok, brand en/of ernstig letsel resulteren. | Lea todas las instrucciones y advertencias de seguridad.Si no se siguen las advertencias e instrucciones, podría producirse una descarga eléctrica, un incendio y/o daños graves. | Leia todas as instruções e avisos de segurança.Se não seguir todas as instruções e os avisos, pode provocar um choque eléctrico, incêndio e/ou ferimentos graves. | |
 | Draag altijd oogbescherming. | Utilice siempre una protección ocular. | Utilize sempre protecção para os olhos. | |
 | Draag altijd gehoorbescherming. | Utilice siempre protecciones auriculares. | Use sempre proteção auditiva. | |
 | Alleen voor EU-landen Geef elektrisch gereedschap niet met het huisvuil mee!Volgens de Europese richtlijn 2002/96/EG inzake oude elektrische en elektronische apparaten en de toepassing daarvan binnen de nationale wetgeving, dient gebruikt elektrisch gereedschap gescheiden te worden ingezameld en te worden afgevoerd naar een recycle bedrijf dat voldoet aan de geldende milieu-eisen. | Sólo para países de la Unión Europea¡No deseche los aparatos eléctricos junto con los residuos domésticos!De conformidad con la Directiva Europea 2002/96/CE sobre residuos de aparatos eléctricos y electrónicos y su aplicación de acuerdo con la legislación nacional, las herramientas eléctricas cuya vida útil haya llegado a su fin se deberán recoger por separado y trasladar a una planta de reciclaje que cumpla con las exigencias ecológicas. | Apenas para países da UENão deite ferramentas eléctricas no lixo doméstico!De acordo com a directiva europeia 2002/96/CE sobre ferramentas eléctricas e electrónicas usadas e a transposição para as leis nacionais, as ferramentas eléctricas usadas devem ser recolhidas em separado e encaminhadas a uma instalação de reciclagem dos materiais ecológica. |
SAFETY PRECAUTIONS FOR THE DUST EXTRACTOR
○In order to prevent accidents, such as fires, electric shock, and injuries, be sure to follow the "Safety Precautions" stated below.
Before use, read all of the "Safety Precautions" and use the appliance correctly according to the instructions.
○Be sure to keep this instructions manual in the place where it can be consulted by the user at any time.
WARNING
- Keep the workplace clean. Littered place or workbench may cause accidents.
- Pay attention to the situation around the workplace as well. Make the workplace bright enough. Do not use the appliance in places with inflammable liquid or gas.
- Use the power supply with the voltage and frequency displayed on the nameplate. Use of the power supply with other voltage or frequency will cause fires, electric shock, or failures.
- Keep children away. Do not let other persons than the operator touch the dust extractor or the cord. Keep persons other than the operator away from the workplace.
- Use the dust extractor suitable for the work. Use the appliance only for the specified applications.
- Do not handle the cord roughly. Do not carry the dust extractor holding the cord by hand or do not extract the cord from the power receptacle by pulling it. Keep the cord away from heat, oil, or angular places. Moreover, do not put a heavy thing on it or do not get it sandwiched.
- The dust extractor should be maintained carefully. Replacement of accessories should follow the instructions manual. Check the cord periodically. When it is damaged, please request repair from your local retailer or the authorized servicing agent. If an extension cord is used, check it periodically, and when damaged, replace it.
- In the following cases, switch off the dust extractor and turn OFF the main power supply: The dust extractor is not used or it is sent for repair. Accessories, such as a hose and a filter, are replaced. Danger is expected.
- Avoid sudden starting. Do not carry the appliance which is connected to the power supply with your finger placed on the switch. Confirm that the switch is off before putting the plug in the power receptacle.
- Do the work with enough care. When you use the dust extractor, pay attention to the handling method, how to do the work, the surrounding situation, etc. and perform the operation in a cautious manner. When you do the work at a distance from the dust extractor, pay attention to the operation condition of the dust extractor. (abnormal sound, dust blow off, emitting smoke, etc.) Exercise common sense. Do not use the appliance when you are tired.
- Check for any damaged part.
Before use, check for any damages in the protective cover or other parts and confirm whether the appliance operates normally and performs specified functions.
○Check for any abnormalities in all places that may affect the operation, the position adjustment and clamping state of movable portions, damaged parts or attachment state.
○Replacement and repair of damaged protective cover and other parts should follow the provisions of the handling instructions. If there are no such provisions in the manual, please request repair from your local retailer or authorized servicing agent.
○If the switch fails, please request repair from your local retailer or authorized servicing agent. Avoid using the dust extractor which cannot be started or stopped by the switch.
12. Contact the specialty store for repair of the dust extractor.
○Since this dust extractor conforms to the corresponding safety standard, do not modify it.
○Be sure to request repair from your local retailer or authorized servicing agent. Self-repair may cause accidents or injuries.
PRECAUTIONS FOR USE OF THE DUST EXTRACTOR FOR ELECTRIC TOOLS
The precautions common to the dust extractors have been described. For the dust extractors for electric tools, follow further precautions described below:
WARNING
- The power consumption of an electric tool that can be connected to the interlocking outlet is 2300 W during operation, respectively. If an electric tool with power consumption exceeding the above is used in connection with the interlocking outlet, overcurrent will cause failures of the interlocking circuit or the plug or injuries.
- Use the power receptacle with its rating 16 A or more and in isolation. If it is used together with other instruments, fires may be caused by abnormal heat generation.
- Prevent the appliance from sucking in the following:
○Generated spark during metal grinding or cutting.
○High temperature things, such as lighted cigarette.
○Inflammable substances (gasoline, thinner, benzine, kerosene, paint, etc.), explosive substances (nitroglycerine, etc.), combustible substances (aluminum, zinc, magnesium, titanium, red phosphorus, yellow phosphorus, celluloid, etc.)
○Sharp things, such as nail and razor.
○Wood chip, metal, stone, string, etc.
Solidification materials, such as cement powder and toner, and conductive fine dusts, such as metal powder and carbon powder.
○Foaming liquids, such as oil, boiling water, chemical fluid, and detergent. Liquids, such as water and oil. May cause fires or injuries. - Set the filter correctly before use. Do not use the appliance without the filter or with it set in a wrong position, or do not use a torn filter. May cause failures, such as motor burnout.
- Do not put water or oil on the appliance or plug or interlocking outlet. Since this appliance is not waterproof, electric shock or failures may be caused.
- Do not use the appliance with its suction opening, air inlet or exhaust opening obstructed. The temperature of the motor may rise abnormally,
causing troubles such as deformation of parts or motor burnout.
- Do not operate the appliance when its float is operating or when its hose or suction mouth, etc. is clogged with foreign matter. The temperature of the motor may rise abnormally, causing troubles such as deformation of parts or motor burnout (in the case of RP35YB).
- Do not topple the appliance or do not use it on its side. May cause electric shock or failures.
- To prevent deformation or breakage of the appliance due to toppling etc., the appliance should be moved calmly. Breakage, crack, or deformation may cause injuries.
- When you drop or bump the appliance accidentally, check for breakage, crack, or deformation in the appliance. Breakage, crack or deformation may cause injuries.
-
When the appliance is out of condition or emits abnormal sound during use, immediately turn off the switch and request repair from your local retailer or authorized servicing agent. If you continue to use the appliance as it is, it may lead to injuries.
-
When you use an extension cord, use a triplex cabtyre cable equipped with an earth wire. Duplex cable without earth wire may cause electric shock.
- This appliance is only used indoors. Never use it outdoors. Insulation deterioration may cause electric shock or electrical fire.
SPECIFICATIONS
| Item\Model | RP35YB RP35YE | |
| Power supply used Single phase AC | 50/60 Hz common use, Voltage 230 V | |
| Motor Single phase series commutator motor | ||
| Application Wet and Dry type | ||
| Power input*1 | 1200 W | |
| Interlocking electric outlet 2300 W | ||
| Max. Airflow 3.5 m | ^3/min | |
| Max. Vacuum 25.5 kPa | ||
| Details-Dry 25 L 32 L | ||
| Details-Wet 22 L 16 L | ||
| Filter cleaning motor – DC motor (12 V) | ||
| Dimensions (W × D × H) | 410 mm × 435 mm × 539 mm | 395 mm × 460 mm × 699 mm |
| Weight*2 | 8.4 kg | 12.4 kg |
| Cord | 8 m | |
*1 Be sure to check the nameplate on product as it is subject to change by areas.
*2 Excluding cord and accessories.
STANDARD ACCESSORIES
(1) Hose (id 38 mm × 3 m long)....1
(2) Pipe 2
(3) Joint handle .... 1
(4) Master nozzle .... 1
(5) Crevice nozzle 1
(6) Wet nozzle 1
(7) Round Brush nozzle 1
(8) Adapter ...... 1
Standard accessories are subject to change without notice.
OPTIONAL ACCESSORIES (sold separately)
(1) Paper filter (RP35YE) ...... Code No. 329-638
(2) Paper filter (RP35YB) ...... Code No. 329-639
(3) Nylon filter (wet) (RP35YB) ..... Code No. 326-187
Optional accessories are subject to change without notice.
APPLICATIONS
○ General cleaning in workplaces and others.
○ Collection of fine dusts generated during grinding, cutting or drilling of concrete or wood using power tools.
○ Suction of liquid such as water spilt on the floor.
UNPACKING
○Carefully unpack the power tool.
○Take out the accessories in the tank before work.
PRIOR TO OPERATION
WARNING
Before use, check the following. 1 to 3 should be checked before putting the plug in the power receptacle.
1. Confirm the power supply used.
Be sure to use the appliance with the voltage indicated on the nameplate. If it is used with the voltage exceeding the indication, the rotation of the motor may be abnormally fast, damaging the appliance. Moreover, do not use the appliance with transformers, such as a DC power supply, an engine generator, and a booster, or not only the appliance will be damaged, but accidents may be caused.
2. Confirm that the vacuum switch is OFF.
If, without knowing that the vacuum switch is ON, the plug is put in the power receptacle, the appliance will start suddenly, causing unexpected accidents. The vacuum switch will be turned on by pushing "ON" and it will be turned off by returning it to "OFF". Be sure to check that the vacuum switch is OFF. (Fig. 10)
3. Check the filter
Referring to "2. Attaching the Filter" the filter should be correctly attached.
4. Inspection of the power receptacle
If, when the plug is inserted, the power receptacle is shaky or the plug readily comes off, repair is required. Consult the electrical work shop nearest you. If such a power receptacle is used as it is, it will be overheated, and causing accidents.
5. Extension cord
WARNING
○Use undamaged extension cord. If the power supply is distant, use an extension cord which is thick enough to pass an electric current and is as short as possible.
HOW TO USE
CAUTION
○Do not use the head top as a footstool or do not sit on it. Otherwise the appliance begins to move suddenly, causing an injury.
NOTE
Handle the hose with care. Do not bend the hose by force, or do not trample it, or do not pull it to move the dust extractor. Moreover, do not put away the hose as it is bent. Otherwise troubles such as its deformation may be caused.
1. Connecting the hose
Press the attached hose into the suction opening of the tank until it clicks and connect it. When removing the hose, pull out the hose while pushing the button of the suction opening. (Fig. 5)
2. Attaching the filter (Fig. 6)
WARNING
○Be sure to attach the filter. (cloth filter or filter for dusts) Otherwise the motor will be damaged.
When you collect fine dusts, such as siding powder and stone powder, use the optional paper filter. [in the case of RP35YB]
○Since it is a filter for dry and wet suction, do not remove it when you suck up liquids, such as water. [in the case of RP35YB]
NOTE
○If the filter is wet, leave it to dry out of direct sunlight. Using the filter when wet will conspicuously reduce the suction power.
(1) Check that the filter packing is put on the mouth of the tank.
(2) Check that the filter cage is on the bottom of the filter. [in the case of RP35YB]
3. Attach the master nozzles, pipes, etc.
When it is used as a cleaner (Fig. 7)
Connect in order of Hose (id 38 mm × 3 m long), Joint handle, Pipes, and Master nozzle. Connection is done by pressing in the direction of the arrow. The suction mouth for crevices can also be attached depending on the application.
4. Connect power tools (Fig. 8)
Connect in order of Hose (id 38 mm × 3 m long) and Adapter (Standard Accessory). Connection is done by pressing in the direction of the arrow.
5. How to use the interlocking electric outlet
WARNING
○Voltage is applied to the interlocking electric outlet irrespective of the position of the vacuum switch or mode selection switch in this appliance. When you put the plug of a power tool in the interlocking electric outlet, check that the switch of the power tool is OFF. If, without knowing that the vacuum switch is ON, the plug is put in the power receptacle, the appliance will start suddenly, causing unexpected accidents.
☐Do not connect the power tool exceeding the following power consumption to the interlocking electric outlet. Otherwise an overcurrent will cause failures of the interlocking circuit or plug or an injury. Connect the power tool exceeding the following power consumption to an outlet other than the power receptacle to which the plug of this appliance is connected. 2300 W of the power consumption for the power tool.
NOTE
If a product containing a winding transformer is connected to the interlocking electric outlet, the appliance will be interlocked for about 5 seconds, which does not mean any failure.
(1) Check the power consumption of the power tool to be connected
This appliance can be connected to a power tool whose power consumption is 2300 W. Check the power consumption of the power tool to be connected. For a power tool exceeding the above, connect it to an outlet other than the power receptacle to which the plug of the appliance is connected. In this case, the appliance cannot be operated or stopped by the operation of the switch of the power tool.
(2) Connect the plug of a power tool (Fig. 9)
Raising the cover, put the plug of the power tool in the interlocking electric outlet.
6. Operation of mode selection switch, vacuum switch, and filter cleaning switch (Fig. 10)
(1) Mode selection switch
By pushing "A"(Auto) this appliance can be operated and stopped by the operation of the switch of the power tool connected. By pushing "M" (Manual) this appliance can be operated and stopped by the operation of its switch.
(2) Vacuum switch
By pushing "ON" the appliance will be operated. By returning the switch to "OFF" the appliance will stop. When the mode selection switch is in "M" (Manual) the appliance will operate and stop by the operation of the vacuum switch.
(3) Filter cleaning switch [in the case of RP35YE]
NOTE
If, during running of the filter cleaning device, the vacuum switch is put in "ON" or the operation interlocked with the power tool is started, the operation of the filter cleaning device will stop. In the following cases, the filter cleaning device does not operate:
○When the vacuum switch is in "OFF".
○Until the motor stops by putting the vacuum switch in "OFF".
○When more than 15 minutes have passed after putting the vacuum switch in "OFF".
(Once the filter cleaning device is stopped by putting the vacuum switch in "ON", it can be operated.)
○When the plug is inserted.
(Once the filter cleaning device is stopped by putting the vacuum switch in "ON" it can be operated.) Even if the filter cleaning switch is not pressed, since this machine always monitors its suction power, when the suction power declines to some extent, the filter cleaning device will operate automatically and the suction power will recover. If the vacuum switch is in "OFF" and the filter cleaning switch is pressed, the filter cleaning device will operate for several seconds, allowing dusts to be dropped from the filter.
(4) Procedure of operation of each switch
(a) When using the appliance with a power tool interlocked
①Push "A"(Auto) of the mode selection switch.
②Push "ON" of the vacuum switch.
③By operation of the switch of the connected power tool, this appliance also operates and stops interlockedly. In addition, in order to suck up the dusts remaining in the hose, the appliance runs for several seconds even after turning off the switch of the power tool, and then the appliance stops.
(b) When using the appliance as a cleaner
①Push "M" (Manual) of the mode selection switch.
②If "ON" of the vacuum switch is pushed, the appliance will operate. To stop it, return the switch to "OFF".
In the case that the filter cleaning device will be operated automatically, push "A"(Auto) of the mode selection switch.
7. Filter cleaning
WARNING
Be sure to turn off the vacuum switch and disconnect the plug from the power receptacle.
CAUTION
If the tank is filled with dusts, the suction power declines. Dump dusts as early as possible when they reach the half of the tank height.
In the case of RP35YB
When the suction power declines during use, remove dusts in the following procedure:
(1) Remove the clamp and detach the head. For the procedure, refer to "8. Dump dusts".
(2) Remove attached dusts by striking the inner side of the filter several times with the filter mounted in the tank. The suction power will be recovered.
(3) Attach the head and the clamp in the original position. For the method of attachment, refer to "8. Dump dusts".
In the case of RP35YE
This appliance is equipped with a device which automatically filter cleaning from the filter when the suction power declines to some extent.
NOTE
Since the filter cleaning device operates when the suction power declines to some extent, it also operates in the following cases:
○When the suction mouth at the tip of the hose is closed.
○When the hose is clogged with foreign matter.
(1) When the suction power of the appliance declines to some extent during use, its filter cleaning device will operate automatically and its suction power will be recovered as follows:
(a) When using the appliance as a cleaner
After the motor is stopped by putting the mode selection switch in "A" (Auto) the filter cleaning device operates for several seconds.
(b) When using the appliance with a power tool connected
Put the switch of the power tool in "OFF" and run the appliance in full operation for several seconds. Then, after the motor is stopped, the filter cleaning device operates for several seconds. Depending on the power tool connected and the thickness of the attachment adapter at the tip of the hose, the filter cleaning device may operate whenever the switch of the power tool is put in "OFF". This is not a failure, however.
(2) When removing dusts from the filter each time, after putting the vacuum switch in "ON", push the filter cleaning switch. (Fig. 10) Whenever it is pushed, the filter cleaning device will operate for several seconds. Even if the filter cleaning switch is pushed, the filter cleaning device may not operate. Refer to "6. (3) Filter cleaning switch".
(3) If the filter cleaning device is repeatedly operated and the suction power is not recovered, the tank is almost filled with dusts. Dump dusts in the tank.
8. Dump dusts
WARNING
○Be sure to turn off the vacuum switch and disconnect the plug from the power receptacle.
○In the case of RP35YE after the operation of the filter cleaning device, be sure to turn off the vacuum switch and disconnect the plug from the power receptacle.
CAUTION
○Do not impact the tank, the filter, or the head. Otherwise they will be deformed or damaged.
Although it is based on the amount of suction of dusts and liquids, dump dusts and liquids in the tank at least once a day and keep the appliance, the filter, etc. clean. Otherwise suction power fall, motor failure, bad smell or rusting may be caused.
○Do not hold the clamps when you dump dusts in the tank. Otherwise the clamps may be damaged.
NOTE
☐Do not tilt the tank with accessories (Pipe, Master nozzle, etc.) inserted in the base or in the tank. Otherwise any part may be damaged.
In the case of RP35YB
WARNING
○If the appliance is pushed on its side while the tank contains liquid, the liquid will get inside the motor or switch region, causing an electric shock or motor failure.
(1) Remove the clamps (2 pieces) and raise the handle of the head. (Fig. 11)
(2) Lightly striking the inner side of the filter several times, remove dusts attached to the filter.
(3) Tilt the tank and dump dusts. (Fig. 12)
(4) Attach the filter, the filter cage, the head, and the clamp in the initial positions.
In the case of RP35YE
CAUTION
- Put the vacuum switch in "OFF" and push the filter cleaning switch to remove dusts from the filter. Then, after waiting about 1 minute, dump dusts of the tank.
(1) Detach the clamps (2 pieces) and raise the handle of the head. (Fig. 11)
(2) Dump dusts in the tank. (Fig. 13)
(3) Attach the head and the clamps in the original positions.
9. Transportation and storage
(1) How to use the handle
When carrying or moving the appliance, hold the handle of the head part as shown in the Fig. 14. When you do not use the handle, put it in the head part.
(2) Fixation and release of the caster
By lowering the lever of the caster with the brake, the rotation of the wheel is fixed. When releasing the fixed wheel, raise the lever. (Fig. 15) When moving with the appliance on a vehicle, fix the caster to retain the appliance. However, when you move the appliance, check that the caster is released, or the caster will be damaged.
(3) When the appliance is stored
When you want to interrupt cleaning for a moment, you can hook the pipe holder of the pipe. The appliance can be then stored. The cord can also be bundled and hooked. (Fig. 16)
10. Suction shutoff device
In the case of RP35YE
WARNING
○Avoid sucking in foaming liquids such as detergent or foam. Before the suction shutoff device operates, foam may spurt from the air outlet. If you continue to use the appliance as it is, it will lead to electric shock or failure.
This appliance is equipped with a suction shutoff device to prevent water from entering the motor when it sucks in more than a specific quantity of water. When the suction shutoff device operates, the motor stops automatically and suction stops.
When the suction shutoff device operates to stop the motor, turn off the switch promptly, disconnect the plug from the power receptacle and throw away the water in the tank.
11. How to attach the paper filter (Optional) WARNING
○Be sure to turn off the appliance and remove the plug from the electric outlet.
When using a paper filter, use it in combination with the standard cloth filter. [In the case of RP35YE, use in combination with the standard dust filter.] If the paper filter gets torn, dust may get inside the motor, causing abnormal noise or fire due to overheating.
CAUTION
○When using a paper filter, avoid sucking in liquids such as water or wet dust, as this may lead to tearing of the filter.
[RP35YE]
(1) Open the paper filter vertically so that the suction hole in the paper filter is over the top of the tank. (Fig. 17)
(2) Before attaching the filter to the appliance, bend the two folds in the cardboard approx. 90° in the direction of the arrow. (Fig. 18)
(3) Match the suction hole in the paper filter with the suction opening of the appliance. Insert the filter in the direction of the arrow as shown in the illustration, so that the cardboard of the paper filter goes past the stopper on the suction opening. (Fig. 19)
[RP35YB]
(1) Open the paper filter horizontally so that the suction hole in the paper filter is over the top of the tank. (Fig. 17)
(2) Before attaching the filter to the appliance, bend the two folds in the cardboard approx. 90° in the direction of the arrow. (Fig. 18)
(3) Match the suction hole in the paper filter with the suction opening of the appliance. Insert the filter in the direction of the arrow as shown in the illustration, so that the cardboard of the paper filter goes past the stopper on the suction opening. (Fig. 20)
FLOAT MECHANISM
In the case of RP35YB
This appliance is equipped with a float mechanism to prevent water from entering in the motor when it sucks in more than a specific quantity of water. When the float operates not to suck in water, turn off the switch promptly and throw away water in the tank.
WARNING
With the float working, do not continue operation. Otherwise the temperature of the motor may rise abnormally causing troubles such as deformation of parts or motor burnout.
○Avoid sucking in foaming liquid such as detergent or foams. Before the float works, foams may spurt from the air outlet. If you continue to use the appliance as it is, it will lead to electric shock or failure.
MAINTENANCE AND INSPECTION
WARNING
○For inspection and maintenance, be sure to turn off the vacuum switch and disconnect the plug from the power receptacle.
○Do not work with wet hands. May cause electric shock or injuries.
1. Maintenance of filter NOTE
○Since a filter is a consumable, we recommend you to prepare spares.
○The cloth filter should simply be tapped even if it is considerably clogged. (in the case of RP35YB) Strong brushing will shorten its life.
○Do not hurl a filter. (in the case of RP35YE) May break its resin part.
In the case of RP35YB
A clogged filter will decrease the suction power remarkably. Tap the inner side of the filter to drop off dusts regularly.
In the case of RP35YE
Any dust caught between the water guard and the filter will not be removed by the dust removing device. Detach the connectors (2), loosen the wing bolts (3), pull the water guard in the direction of the arrow to disassemble it, and remove any dust. Reassemble by following the above instructions in reverse order. When connecting the connectors, push them in until they click into place. (Fig. 24)
NOTE
○Tighten the wing bolt securely when attaching the water guard. Failure to do so may result in the water guard falling off during use.
When removing the water guard, keep the wing bolt, spring washer, washer and nut in a safe place so that they do not get lost. Use them again to assemble the water guard.
Before connecting the connectors (2), remove any dust or dirt on the connecting parts. If dust or dirt gets inside the connectors, it may prevent the parts connecting properly.
If the filter is badly clogged, the filter cleaning device cannot remove dusts enough and the suction power will decline. Clean the filter by brushing and compressed air blowing periodically. (at least once per month) As shown in Fig. 21 and Fig. 22, the filter should be subjected to brushing and compressed air blowing in order to remove clogging dusts with a view to recovery of suction power and retention of performance. Hold the filter up to the light and check that there are no tears or holes in it. (Fig. 23)
Be sure to check the filter and the sensor shaft after use.
If the filter or the sensor shaft is dirty, wash it with water, being careful not to get any water on the head as this may cause electric shock.
After washing, leave to dry out of direct sunlight. If dirt has dried on the filter, brush it off gently.
2. Inspecting the mounting screws
Regularly inspect all mounting screws and ensure that they are properly tightened. Should any of the screws be loose, retighten them immediately. Failure to do so could result in serious hazard.
3. Maintenance of the motor
The motor unit winding is the very "heart" of the power tool.
Exercise due care to ensure the winding does not become damaged and/or wet with oil or water.
4. Check for Dust
Dust may be removed with a soft cloth or a cloth dampened with soapy water. Do not use bleach, chlorine, gasoline or thinner, for they may damage the plastics.
5. Service and repairs
All quality power tools will eventually require servicing or replacement of parts because of wear from normal use. To assure that only authorized replacement parts will be used, all service and repairs must be performed by a HiKOKI AUTHORIZED SERVICE CENTER, ONLY.
If the supply cord is damaged, it must be replaced by the manufacturer, its service agent of similarly qualified persons in order to avoid a hazard.
6. Service parts list
A: Item No.
B: Code No.
C: No. Used
D: Remarks
CAUTION
Repair, modification and inspection of HiKOKI Power Tools must be carried out by a HiKOKI Authorized Service Center. This Parts List will be helpful if presented with the tool to the HiKOKI Authorized Service Center when requesting repair or other maintenance. In the operation and maintenance of power tools, the safety regulations and standards prescribed in each country must be observed.
MODIFICATIONS
HiKOKI Power Tools are constantly being improved and modified to incorporate the latest technological advancements. Accordingly, some parts (i.e. code numbers and/or design) may be changed without prior notice.
GUARANTEE
We guarantee HiKOKI Power Tools in accordance with statutory/country specific regulation. This guarantee does not cover defects or damage due to misuse, abuse, or normal wear and tear. In case of complaint, please send the Power Tool, undismantled, with the GUARANTEE CERTIFICATE found at the end of this Handling instruction, to a HiKOKI Authorized Service Center.
NOTE
Due HiKOKI's continuing program of research and development, the specifications herein are subject to change without prior notice.
8. Despeje as poeiras ADVERTÊNCIA
natural_image
Line drawing of a quill pen with inkwell (no text or symbols)RP35YB

text_image
Exploded view diagram of a cleaning or spray cleaning device with numbered parts and labeled componentsRP35YB
| A | B | C | D | A | B | C | D |
| 1 325869 1 | 50 328766 1 | ||||||
| 2 325626 1 | 51 313687 2 | D3×16 | |||||
| 3 949216 3 | M4×10 | 52 328685 1 | |||||
| 4 321075 1 | 53 301653 1 | D4×20 | |||||
| 5 311839 4 | M4 | 54 321041 1 | |||||
| 6 949453 4 | M4 | 55 328686 1 | |||||
| 7 949423 6 | M4 | 56 975144 2 | |||||
| 8 325867 2 | 57 305095 2 | D4×20 | |||||
| 9 949217 4 | M4×16 | 58 995063 1 | |||||
| 10 325972 1 | 59 959141 1 | ||||||
| 11 325862 1 | 60 ———— | 1 | |||||
| 12 325926 1 | 61 325929 2 | D4×10 | |||||
| 13 325871 1 | 62 328765 1 | ||||||
| 14 307811 3 | D4×16 | 63 325893 1 | |||||
| 15 321014 1 | 64 328688 1 | "63, 65-68" | |||||
| 16 325864 1 | 65 325891 1 | ||||||
| 17 325860 1 | 66 325892 1 | ||||||
| 18 325906 1 | 67 325890 1 | ||||||
| 19 949433 3 | M8 | 68 325889 2 | |||||
| 20 325859 1 | 69 325882 1 | ||||||
| 21 325870 1 | 70 325881 1 | ||||||
| 22 325858 2 | 71 325876 1 | ||||||
| 23 949554 3 | M4 | 72 325879 1 | |||||
| 24 325901 1 | 73 949218 4 | M4×14 | |||||
| 25 320986 1 | 74 326221 1 | ||||||
| 26 321065 2 | 75 326229 1 | ||||||
| 27 321066 1 | 76 360817 1 | 230V | |||||
| 28 328684 1 | "25-27, 29" | 77 326222 1 | |||||
| 29 320985 1 | 79 326223 1 | ||||||
| 30 326218 1 | 80 326224 1 | ||||||
| 31 326225 1 | 81 326215 1 | ||||||
| 32 326226 1 | 82 326216 1 | ||||||
| 33 326217 1 | 83 999102 2 | ||||||
| 34 326227 1 | 84 326231 1 | ||||||
| 35 326228 1 | 85 340710 1 | 230V | |||||
| 36 949568 1 | M8 | 86 326230 1 | |||||
| 37 325880 1 | 87 326219 2 | M5×70 | |||||
| 38 325875 1 | 88 326220 2 | ||||||
| 39 325872 1 | 89 328689 1 | "30-36, 73-88" | |||||
| 40 307811 3 | D4×16 | 501 321068 2 | M5 | ||||
| 41 325873 1 | 502 320990 2 | ||||||
| 42 325866 1 | 503 949431 4 | M5 | |||||
| 43 325865 1 | 504 302316 2 | M5×25 | |||||
| 44 ———— | 1 | 505 321067 1 | |||||
| 45 301653 6 | D4×20 | 506 320994 1 | |||||
| 46 325874 1 | 507 320993 1 | ||||||
| 47 994810 4 | D4×16 | 508 320992 1 | |||||
| 48 325931 1 | 509 326127 1 | ||||||
| 49 325931 1 | 510 321984 1 |

text_image
Exploded view diagram of a washing machine with numbered parts and Chinese labelsRP35YE
| A | B | C | D |
| 1 325947 | 1 | ||
| 2 949455 | 1 M6 | ||
| 3 949556 | 1 M6 | ||
| 4 329359 | 1 | ||
| 5 994810 | 3 D4×16 | ||
| 6 949555 | 3 M5 | ||
| 7 329360 | 1 | ||
| 8 949424 | 3 | ||
| 9 949454 | 3 M5 | ||
| 10 949393 | 3 M5×15 | ||
| 11 307811 | 3 D4×16 | ||
| 12 311839 | 4 M4 | ||
| 13 949453 | 4 M4 | ||
| 14 325867 | 2 | ||
| 15 323211 | 4 M4×8 | ||
| 16 | —— | 1 | |
| 17 326361 | 1 | ||
| 18 325862 | 1 | ||
| 19 325905 | 1 | ||
| 20 321014 | 1 | ||
| 21 325864 | 1 | ||
| 22 325904 | 1 | ||
| 23 325906 | 1 | ||
| 24 949433 | 10 M8 | ||
| 25 325859 | 1 | ||
| 26 325858 | 4 | ||
| 27 325901 | 1 | ||
| 28 320986 | 1 | ||
| 29 321065 | 2 | ||
| 30 321066 | 2 | ||
| 31 328684 | 1 "28-30, 32" | ||
| 32 320985 | 1 | ||
| 33 326218 | 1 | ||
| 34 326225 | 1 | ||
| 35 326226 | 1 | ||
| 36 326217 | 1 | ||
| 37 326227 | 1 | ||
| 38 326228 | 1 | ||
| 39 949568 | 1 M8 | ||
| 40 325880 | 1 | ||
| 41 325875 | 1 | ||
| 42 975144 | 2 | ||
| 43 325950 | 2 | ||
| 44 329363 | 1 | ||
| 45 329698 | 1 | ||
| 46 325952 | 1 | ||
| 47 307811 | 3 D4×16 | ||
| 48 325873 | 1 | ||
| 49 | —— | 1 | |
| 50 | —— | 1 | |
| 51 301653 | 6 D4×20 | ||
| 52 329699 | 1 | ||
| 53 325874 | 1 | ||
| 54 | —— | 1 | |
| 55 | —— | 1 "59" | |
| 56 | —— | 1 | |
| 57 | —— | 2 M2.6×6 | |
| 58 | —— | 1 | |
| 59 994806 | 4 D4×20 | ||
| 60 325931 | 1 | ||
| 61 325931 | 1 |
| A | B | C | D |
| 62 | 326106 | 1 | |
| 63 | 313687 | 2 D3×16 | |
| 64 | 328685 | 1 | |
| 65 | 326107 | 1 | |
| 66 | 301653 | 1 D4×20 | |
| 67 | 321041 | 1 | |
| 68 | 328686 | 1 | |
| 69 | 975144 | 2 | |
| 70 | 305095 | 2 D4×20 | |
| 71 | 995063 | 1 | |
| 72 | 959140 | 10 | |
| 73 | —— | 1 | |
| 74 | 959141 | 1 | |
| 75 | 975144 | 2 | |
| 76 | 301295 | 2 M4×20 | |
| 77 | 328687 | 1 | |
| 78 | 949568 | 1 M8 | |
| 79 | 975144 | 1 | |
| 80 | 328109 | 1 | |
| 81 | 325929 | 2 D4×10 | |
| 82 | 329366 | 1 | |
| 83 | 949554 | 2 M4 | |
| 84 | 325893 | 1 | |
| 85 | 328688 | 1 "84, 86-89" | |
| 86 | 325891 | 1 | |
| 87 | 325892 | 1 | |
| 88 | 325890 | 1 | |
| 89 | 325889 | 2 | |
| 90 | 325882 | 1 | |
| 91 | 329367 | 1 | |
| 92 | 329388 | 1 | |
| 93 | 325876 | ||
| 94 | 325879 | 1 | |
| 95 | 949218 | 4 M4×14 | |
| 96 | 326221 | 1 | |
| 97 | 326229 | 1 | |
| 98 | 360817 | 1 230V | |
| 99 | 326222 | 1 | |
| 100 | 326223 | 1 | |
| 101 | 326224 | 1 | |
| 102 | 326215 | 1 | |
| 103 | 326216 | 1 | |
| 104 | 999102 | 2 | |
| 105 | 326231 | 1 | |
| 106 | 340710 | 1 230V | |
| 107 | 326230 | 1 | |
| 108 | 326219 | 2 M5×70 | |
| 109 | 326220 | 2 | |
| 110 | 328689 | 1 "33-39, 97-111" | |
| 111 | 328690 | 1 "1-3, 49, 54, 55, 57, 58" | |
| 501 | 321068 | 2 M5 | |
| 502 | 320990 | 2 | |
| 503 | 949431 | 4 M5 | |
| 504 | 302316 | 2 M5×25 | |
| 505 | 321067 | 1 | |
| 506 | 320994 | 1 | |
| 507 | 320993 | 1 | |
| 508 | 320992 | 1 | |
| 509 | 326127 | 1 | |
| 510 | 321984 | 1 |

natural_image
Line drawing of a quill pen with inkwell (no text or symbols)| English | Nederlands | ||
| GUARANTEE CERTIFICATE1Model No.2Serial No.3Date of Purchase4Customer Name and Address5Dealer Name and Address(Please stamp dealer name and address) | GARANTIEBEWIJS1Modelnummer2Serienummer3Datum van aankoop4Naam en adres van de gebruiker5Naam en adres van de handelaar(Stempel a.u.b. naam en adres vande de handelaar) | ||
| Deutsch | Español | ||
| GARANTIESCHEIN1Modell-Nr.2Serien-Nr.3Kaufdaturn4Name und Anschrift des Kunden5Name und Anschrift des Händlers(Bitte mit Namen und Anschrift des Handlers abstempeln) | CERTIFICADO DE GARANTIA1Número de modelo2Número de serie3Fecha de adquisición4Nombre y dirección del cliente5Nombre y dirección del distribudor(Se ruega poner el sellú del distribudor con su nombre y dirección) | ||
| Français Português | |||
| CERTIFICAT DE GARANTIE1No. de modèle2No de série3Date d'achat4Nom et adresse du client5Nom et adresse du revendeur(Cachet portant le nom et l'adresse du revendeur) | CERTIFICADO DE GARANTIA1Número do modelo2Número do série3Data de compra4Nome e morada do cliente5Nome e morada do distribuidor(Por favor, carímbe o nome e morada do distribuidor) | ||
| Italiano | |||
| CERTIFICATO DI GARANZIA1Modello2N° di serie3Data di acquisto4Nome e indirizzo dell'acquirente5Nome e indirizzo del rivenditore(Si prega di apporre il timbro con questi dati) | |||
HiKOKI
| 1 | |
| 2 | |
| 3 | |
| 4 | |
| 5 |
Siemensring 34, 47877 willich, Germany
Tel: +49 2154 49930
Fax: +49 2154 499350
URL: http://www.hikoki-powertools.de
Hikoki Power Tools Netherlands B.V.
Brabanthaven 11, 3433 PJ Nieuwegein, The Netherlands
Tel: +31 30 6084040
Fax: +31 30 6067266
URL: http://www.hikoki-powertools.nl
Hikoki Power Tools (U.K.) Ltd.
Precedent Drive, Rooksley, Milton Keynes, MK 13, 8PJ,
United Kingdom
Tel: +44 1908 660663
Fax: +44 1908 606642
URL: http://www.hikoki-powertools.uk
Hikoki Power Tools France S.A.S.
Hikoki Power Tools Belgium N.V./S.A.
Koningin Astridlaan 51, B-1780 Wemmel, Belgium
Tel: +32 2 460 1720
Fax: +32 2 460 2542
URL http://www.hikoki-powertools.be
Hikoki Power Tools Italia S.p.A
Via Piave 35, 36077, Altavilla Vicentina (VI), Italy
Tel: +39 0444 548111
Fax: +39 0444 548110
URL: http://www.hikoki-powertools.it
Hikoki Power Tools Ibérica, S.A.
C/ Puigbarral, 26-28, Pol. Ind. Can Petit, 08227 Terrassa
(Barcelona), Spain
Tel: +34 93 735 6722
Fax: +34 93 735 7442
URL: http://www.hikoki-powertools.es