
Smart Gateway - Smart Home GARDENA - Free user manual and instructions
Find the device manual for free Smart Gateway GARDENA in PDF.

User questions about Smart Gateway GARDENA
0 question about this device. Answer the ones you know or ask your own.
Ask a new question about this device
Download the instructions for your Smart Home in PDF format for free! Find your manual Smart Gateway - GARDENA and take your electronic device back in hand. On this page are published all the documents necessary for the use of your device. Smart Gateway by GARDENA.
USER MANUAL Smart Gateway GARDENA
natural_image
Line drawing of a device rear panel with labeled ports and connectors (no text or symbols)Open Source Software
text_image
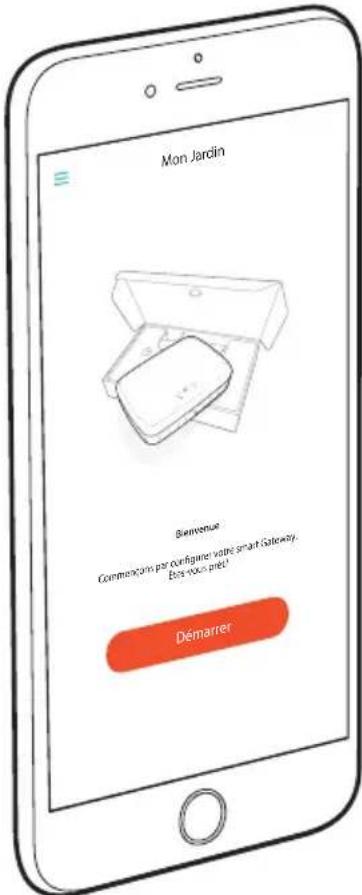
My Garden Welcome Let's start by setting up your smart gateway. Are you ready! StartCongratulations!
You have chosen a top-quality product.
If you have any questions about installing or using your product, please contact GARDENA Support on www.gardena.de/service
Included in delivery: 1 x smart Gateway
1 x power supply unit
1 x LAN cable
Getting started
The Gateway has two options for connecting to the Internet; using the LAN cable or via Wi-Fi.
-
Download the free GARDENA smart system app from the Apple App Store or the Google Play Store.
-
Follow the instructions in the App.

Download on the
App Store

ANDROID APP ON
Google Play
To commission the smart Gateways
An Internet connection is required for installation of the Gateway. The Gateway can be connected to the Internet via ethernet or Wi-Fi.
natural_image
Line drawing of a device rear panel with labeled ports and connectors (no text or symbols)-
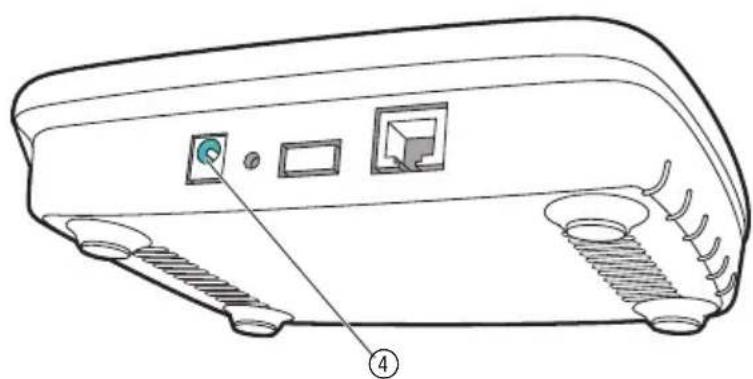
Connect the power supply unit to a mains socket.
-
Connect the power supply cable to the plug socket ④ of the Gateway.
-
Select one of the following options: To connect via ethernet cable / To connect to a Wi-Fi network

To connect via ethernet cable (recommended)
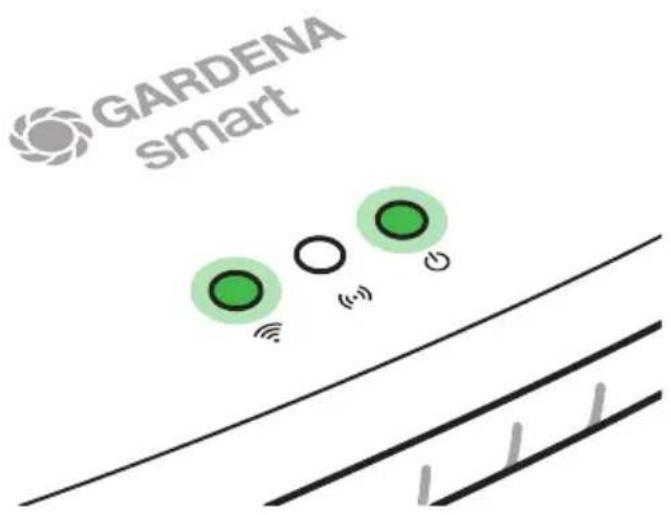
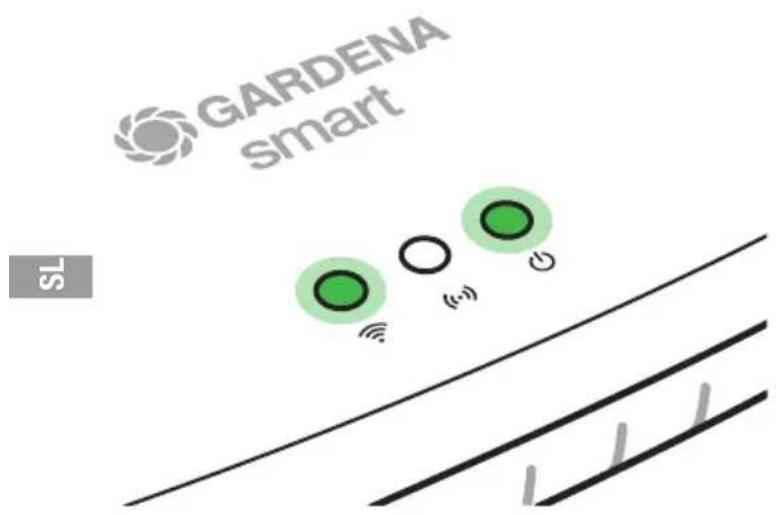
- Connect the Gateway with the provided network cable to your router. The software for your Gateway is now being updated. This process can take up to 15 minutes (depending on your Internet connection). Once the Internet-LED and the Power LED illuminate green permanently, the Gateway is up to date. It can now be included in the App.
- Download the GARDENA smart system app from the Apple App Store or the Google Play Store.
- Follow the instructions in the App.
text_image
GARDENA smart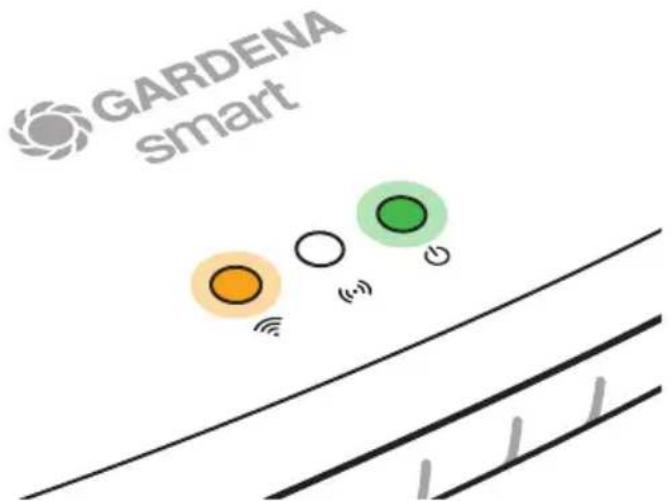
text_image
GARDENA smartTo connect to a Wi-Fi network
If the Gateway is neither connected to the router via a LAN cable nor integrated into another Wi-Fi network, the Gateway automatically provides a configuration network after approx. 1 to 2 minutes after startup.
The configuration network is activated as long as the Internet LED permanently illuminates yellow.
The configuration network remains active for 15 minutes. After the 15 minutes have elapsed (or if the Gateway was previously configured to another Wi-Fi network that is no longer available), the configuration network can be reactivated by briefly pushing the reset button ⑦.
N
To configure the Wi-Fi network with an iOS device (iPhone, iPad)
Wait until the Internet LED illuminates yellow permanently (the configuration network is activated).
- Open the Apple Home App (this is located by default on your mobile iOS device).
- Select "Add accessory".
- Scan the HomeKit label on the bottom side of the Gateway.
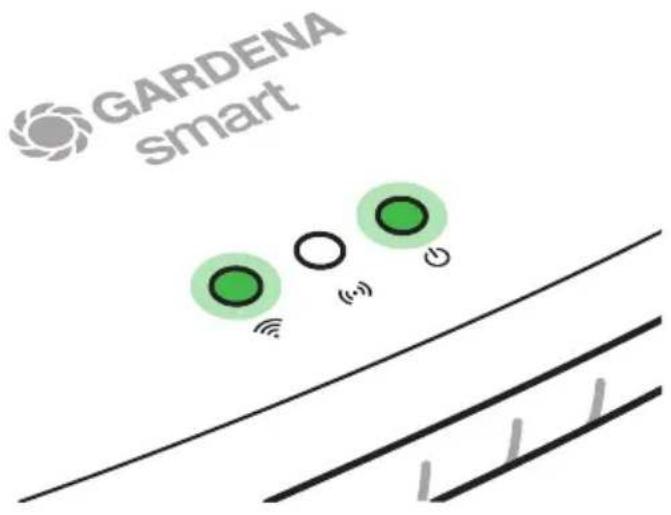
- Wait until the Internet LED illuminates green permanently.
The software for your Gateway is now being updated. This process can take up to 15 minutes (depending on your Internet connection). Once the Internet LED and the Power LED illuminate green permanently, your Gateway is up to date. It can now be included in the App.
- Download the GARDENA smart system app from the Apple App Store.
- Follow the instructions in the App.
text_image
GARDENA smartTo configure the Wi-Fi network with another device
Wait until the Internet LED illuminates yellow permanently (the configuration network is activated).
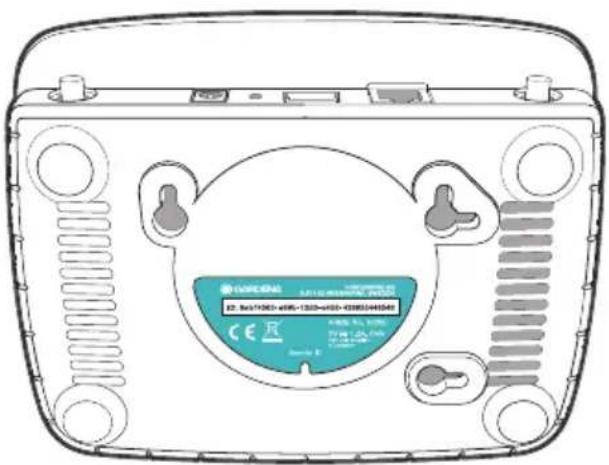
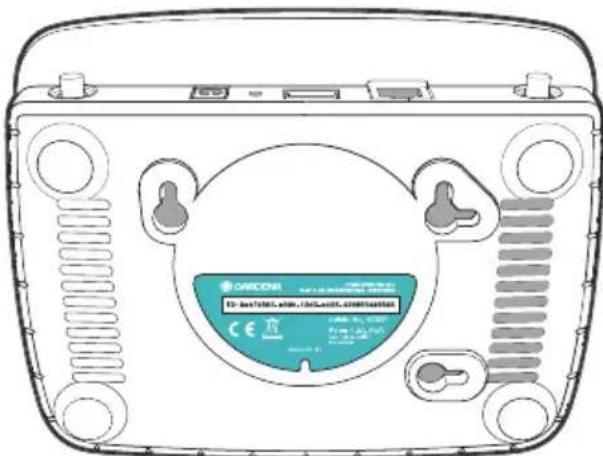
To establish a connection via Wi-Fi, you need your Gateway ID. The Gateway ID can be read on the sticker on the underside of the Gateway. You will also need the password for your Wi-Fi network.
text_image
CE R 2017-03-20 400-1300+000-43885346588 ISO: 1997-03-20 400-1300+000-43885346588-
Connect to the GARDENA configuration network. To do this, go to the Wi-Fi settings on your smartphone, tablet, or computer. The Gateway should now be displayed there as an available Wi-Fi network. The network name starts with "GARDENA_config".
-
Open the URL:
http://10.0.0.1
in your preferred Internet browser.
You should now see the Gateway Interface.
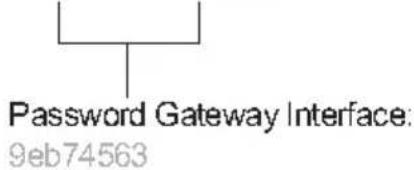
- Login using the first eight digits of your Gateway ID as the password (see graphic).
The Gateway ID is located on the bottom side of the Gateway.
- Select your home Wi-Fi network under Wi-Fi Network.
Then your Gateway is connected with the Internet.
Gateway ID: 9eb74563-e89b-12d3-a456-426655446548

text_image
Password Gateway Interface: 9eb74563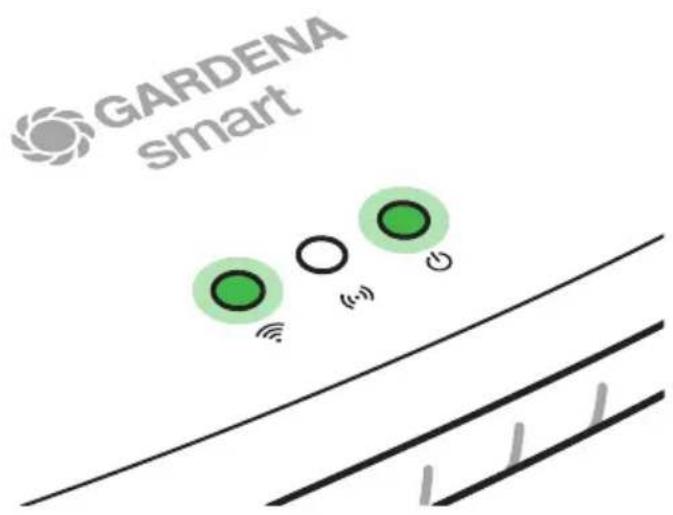
text_image
GARDENA smart- Enter your network password and confirm your settings. Wait until the Internet LED illuminates green permanently.
The software for your Gateway is now being updated. This process can take up to 15 minutes (depending on your Internet connection).
Once the Internet LED and the Power LED illuminate green permanently, your Gateway is up to date. It can now be included in the App.
-
Download the GARDENA smart system App from the Google Play Store.
-
Follow the instructions in the App.
Note: Because the GARDENA configuration network does not have its own Internet access, your device may automatically leave the GARDENA configuration network or may displays an error message. In this case, you must allow a connection without Internet access to be maintained in the settings of your device.
Also, make sure JavaScript is activated and browser cookies are accepted, in order to display the page correctly. Connecting the Gateway is not supported by Internet Explorer.

Open Source Software
This device contains open source software. GARDENA hereby offers to deliver, upon request, a copy of the complete corresponding source code for the copyrighted open source software packages used in this product for which such offer is requested by the respective licenses. This offer is valid up to three years after product purchase to anyone in receipt of this information.
To obtain the source code, please write in English, German or French to:
smart.open.source@husqvarnagroup.com
natural_image
Line drawing of a device rear panel with labeled ports and connectors (no text or symbols)natural_image
Line drawing of a device rear panel with labeled ports and connectors (no text or symbols)text_image
SCCDA EN 10.00000000000000000000000000000000000000000000000000000000000000000000000000000 EN 12.12.24.25.26.27.28.29.30.31.32.33.34.35.36.37.38.39.40.41.42.43.44.45.46.47.48.49.50.51.52.53.54.55.56.57.58.59.60.61.62.63.64.65.66.67.68.69.70.71.72.73.74.75.76.77.78.79.80.81.82.83.84.85.86.87.88.89.90.91.92.93.94.95.96.97.98.99.100.Open-source-software
Download on the App Store

natural_image
Line drawing of a device rear panel with labeled ports and connectors (no text or symbols)text_image
Min have Velkommen Lut ou started at configurre de smart-gateway. Enduklar? StartTillykke!
natural_image
Line drawing of a device rear panel with labeled ports and connectors (no text or symbols)Open Source software
Download on the App Store

natural_image
Line drawing of a device rear panel with labeled ports and connectors (no text or symbols)Open Source Software
Download on the App Store

natural_image
Line drawing of a device rear panel with labeled ports and connectors (no text or symbols)- Koble pluggadapteren til en stikkontakt.
- Koble adapterledningen til kontakten ④ på Gatewayen.
- Velg en av følgende muligheter: Koble til med LAN-kabel / Koble til med WLAN (Wi-Fi)-nettverk.
Download on the App Store

natural_image
Line drawing of a device rear panel with labeled ports and connectors (no text or symbols)Download on the App Store

natural_image
Line drawing of a device rear panel with labeled ports and connectors (no text or symbols)Download on the App Store

natural_image
Line drawing of a device rear panel with labeled ports and connectors (no text or symbols)Download on the App Store

natural_image
Line drawing of a device rear panel with labeled ports and connectors (no text or symbols)Open Source Software
natural_image
Line drawing of a device rear panel with labeled ports and connectors (no text or symbols)Open Source Software
natural_image
Line drawing of a device rear panel with labeled ports and connectors (no text or symbols)natural_image
Line drawing of a device rear panel with labeled ports and connectors (no text or symbols)text_image
Diagram showing three green circular icons above a diagonal line with Wi-Fi signal, plus a circled '(-)'text_image
My Garden Welcome Let's start be setting up your smart gateway. Ile you ready! StartIskrene čestitke!
natural_image
Line drawing of a device rear panel with labeled ports and connectors (no text or symbols)Password Gateway Interface:
9eb74563
text_image
GARDENA smart SLtext_image
My Garden Welcome Let's start by scrolling up your smart gateway. Are you ready? StartČestitamo!
Odlučili ste se za proizvod vrhunske kvalitete. Za sva vaša pitanja o instalaciji i uporabi vašeg proizvoda obratite se GARDENA servisnoj službi na stranici www.gardena.de/service
Sadržaj isporuke: 1 x smart Gateway 1 x jedinica za napajanje 1 x LAN kabel
Puštanje u rad
Download on the App Store

natural_image
Line drawing of a device rear panel with labeled ports and a numbered annotation (4), no text or symbols present.- Utaknite jedinicu za napajanje u strujnu utičnicu.
- Utaknite kabel jedinice za napajanje u priključnicu ④ Gateway.
- Odaberite neku od opcija: povezivanje pomoću LAN kabela ili povezivanje putem WLAN mreže.
品
text_image
way. GARDENA smartKonfiguriranje WLAN mreže pomoću nekog drugog uređaja
Pričekajte da indikator koji signalizira povezanost s internetom počne trajno svijetliti žuto (što znači da je konfiguracijska mreža aktivirana).
Za uspostavljanje konekciju putem WLAN mreže potrebna vam je ID oznaka Gateway. Nju možete očitati s naljepnice koja se nalazi na donjoj strani Gateway. Uz to vam je potrebna i zaporka vaše WLAN mreže.
text_image
ORICOM 10-24/2015, type: 36Laser, capacitance CE PAP No. 10-200 PAP No. 10-200 PAP No. 10-200 PAP No. 10-200 PAP No. 10-200 PAP No. 10-200 PAP No. 10-200 PAP No. 10-200 PAP No. 10-200 PAP NO. 10-200 PAP No. 10-200 PAP No. 10-200 PAP No. 10-200 PAP No. 10-200 PAP No. 10-200 PAP No. 10-200 PAP No. 10-200 PAP No. 15-200 PAP No. 15-200 PAP No. 15-200 PAP No. 15-200 PAP No. 15-200 PAP No. 15-200 PAP No. 15-200 PAP No. 15-200 PAP No. 15-201 PAP No. 15-201 PAP No. 15-201 PAP No. 15-201 PAP No. 15-201 PAP No. 15-201 PAP No. 15-201 PAP No. 15-201 PAP No. 15-201 PAP NO. PAP NO. PAP NO. PAP NO. PAP NO. PAP NO. PAP NO. PAP NO. PAP NO. PAP NO. PAP NO. PAP NO. PAP NO. PAP NO. PAP NO. PAP NO. PAP NO. PAP NO. PAP NO. PAP NO. PAP NO. PAP NO. PAP NO. PAP NO. PAP NO. PAP NO.-
Uspostavite vezu s GARDENA konfiguracijskom mrežom. U tu svrhu na svom pametnom telefonu, tabletu ili osobnom računalu otvorite postavke WLAN mreže. Tu sada treba biti prikazan Gateway kao dostupna WLAN mreža. Naziv mreže započinje s „GARDENA_config“.
-
Otvorite URL:
http://10.0.0.1
u proizvoljnom internetskom pregledniku. Naći ćete se na sučelju Gateway.
- Prijavite se zaporkom koja sadrži prvih osam znakova ID oznake vašeg Gateway ( pogledajte grafički prikaz). ID oznaka Gateway nalazi se na njegovoj donjoj strani.
- Kao WLAN mrežu odaberite svoju kućnu WLAN mrežu. Tim putem će se Gateway povezati na internet.
Gateway ID: 9eb74563-e89b-12d3-a456-426655446548
text_image
Password Gateway Interface: 9eb74563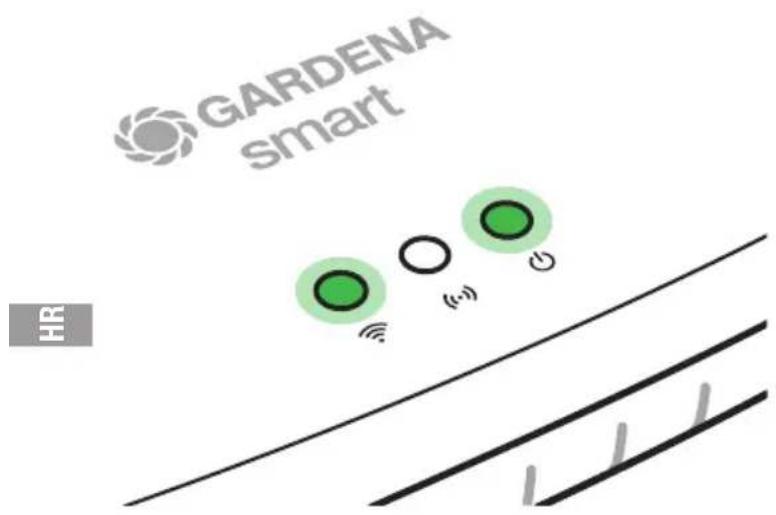
text_image
GARDENA smart HRtext_image
My Garden Welcome Let's start by scrolling up your smart gateway. Are you ready? StartFelicitări!
natural_image
Line drawing of a device rear panel with labeled ports and connectors (no text or symbols)text_image
Diagram showing three green circular icons above a diagonal line with Wi-Fi signal, plus a circled '(-)'text_image
My Garden Welcome Let's start by scrolling up your smart gateway. Are you ready? StartПоздравления!
natural_image
Line drawing of a device rear panel with labeled ports and connectors (no text or symbols)text_image
Diagram showing three green circular icons above a diagonal line with Wi-Fi signal, plus a circled '(-)'text_image
ORCCON To be/are, use, check, connection CE 100% 100% 100% 100%Download on the App Store

natural_image
Line drawing of a device rear panel with labeled ports and connectors (no text or symbols)Download on the App Store

natural_image
Line drawing of a device rear panel with labeled ports and connectors (no text or symbols)Download on the App Store

natural_image
Line drawing of a device rear panel with labeled ports and connectors (no text or symbols)We reserve the right to make changes without notice.
All rights reserved.