
HD 6/15 M PU - Pressure washer Kärcher - Free user manual and instructions
Find the device manual for free HD 6/15 M PU Kärcher in PDF.
| Product type | High-pressure cleaner |
| Brand | Kärcher |
| Model | HD 6/15 M PU |
| Operating pressure | 15 MPa (150 bar) |
| Maximum overpressure | 22.5 MPa (225 bar) |
| Water flow rate | 9.3 l/min |
| Power supply | 230 V, 50 Hz, 3.1 kW, 16 A |
| Protection type | IPX5 |
| Operational weight | 25 kg |
| Dimensions (L × W × H) | 290 × 300 × 565 mm |
| Maximum supply temperature | 60 °C |
| Maximum suction height | 0.5 m |
| Sound pressure level | 76 dB(A) |
| Guaranteed sound power level | 92 dB(A) |
| Hand-arm vibrations | 2.4 m/s² |
| Oil quantity | 0.25 l (type 15W40) |
| Water filter | Yes, in the water supply fitting |
| Safety | Safety valve, pressure switch, safety catch |
| Included accessories | Spray lance, high-pressure gun EASY!Force, high-pressure hose EASY!Lock, high-pressure nozzle |
| Detergent use | Yes, with optional foam lance |
| Wall mounting possible | Yes (PU model) |
| Warranty | According to country conditions, material/manufacturing defects |
Frequently Asked Questions - HD 6/15 M PU Kärcher
User questions about HD 6/15 M PU Kärcher
0 question about this device. Answer the ones you know or ask your own.
Ask a new question about this device
Download the instructions for your Pressure washer in PDF format for free! Find your manual HD 6/15 M PU - Kärcher and take your electronic device back in hand. On this page are published all the documents necessary for the use of your device. HD 6/15 M PU by Kärcher.
USER MANUAL HD 6/15 M PU Kärcher
natural_image
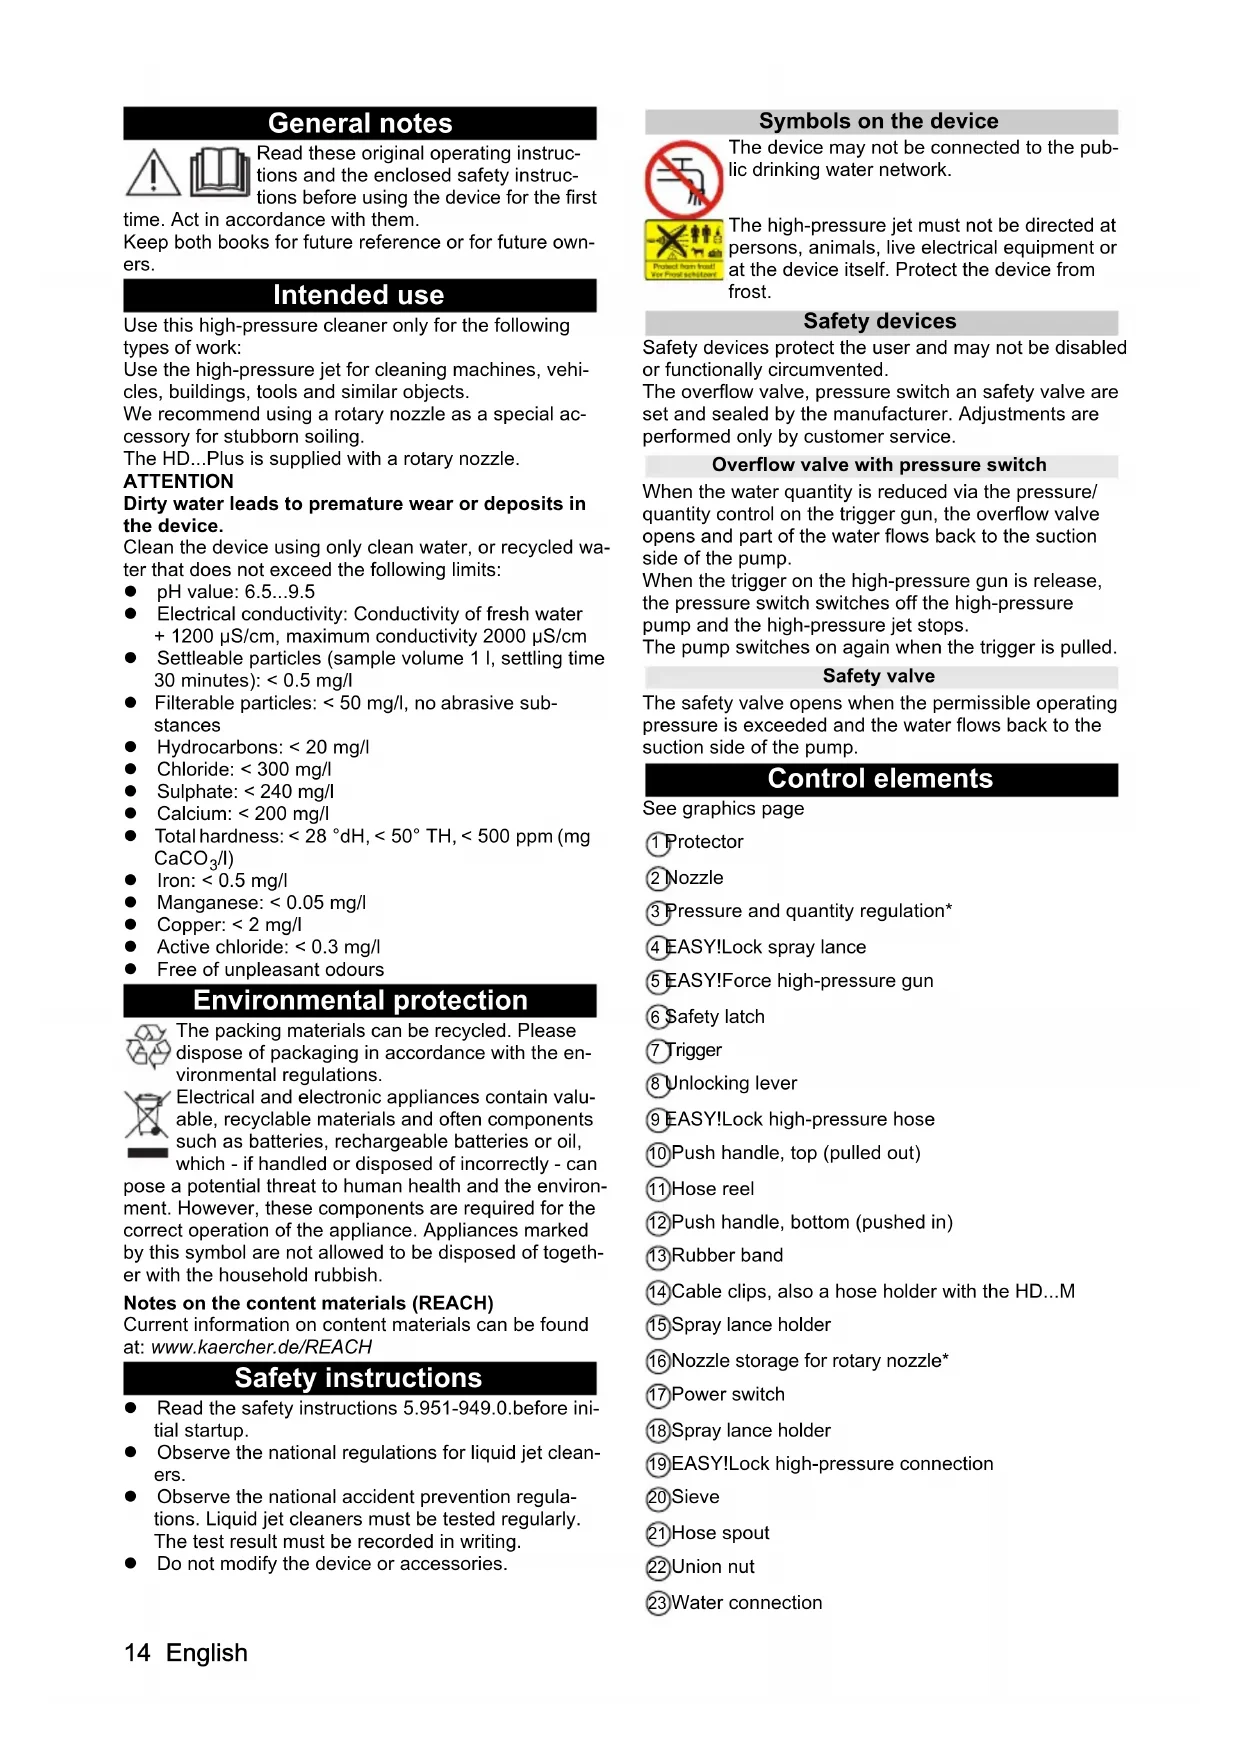
Line drawing of a portable industrial machine with control panel and fan (no text or symbols)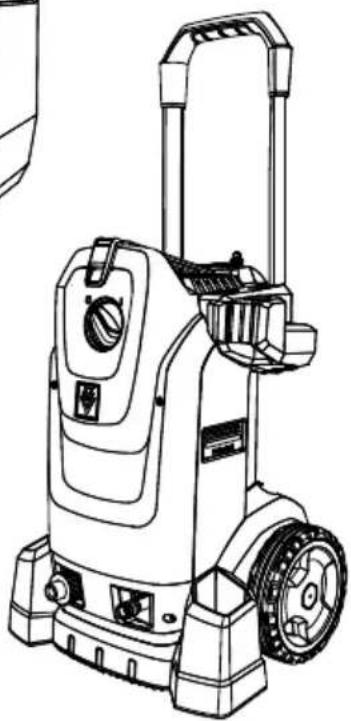
natural_image
Line drawing of a pressure water heater device (no text or symbols)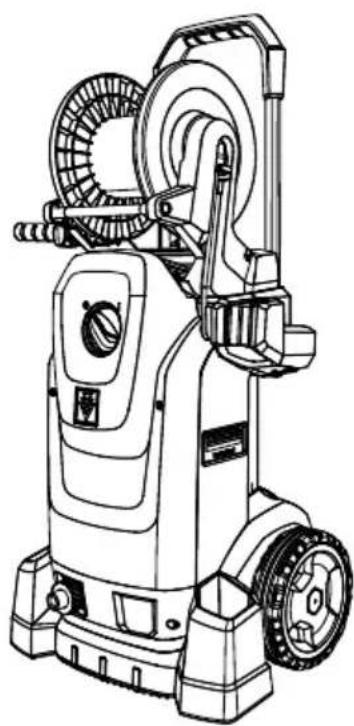
natural_image
Line drawing of a mechanical power tool with wheels and control panel (no text or symbols)Deutsch 7
English 14
Français 20
Italiano 27
Nederlands 34
Español 41
Português 48
Dansk 55
Norsk 62
Svenska 68
Suomi 75
Ελληνικά 81
Türkçe 89
Русский 96
Magyar 103
Čeština 110
Slovenščina 117
Polski 123
Românește 131
Slovenčina 138
Hrvatski 144
Srpski 151
Български 158
Eesti 165
Latviešu 172
Lietuviškai 178
Українська 185
中文 193
199 العربيه
text_image
Technical diagram of a water purifier with numbered parts for identification and assembly reference.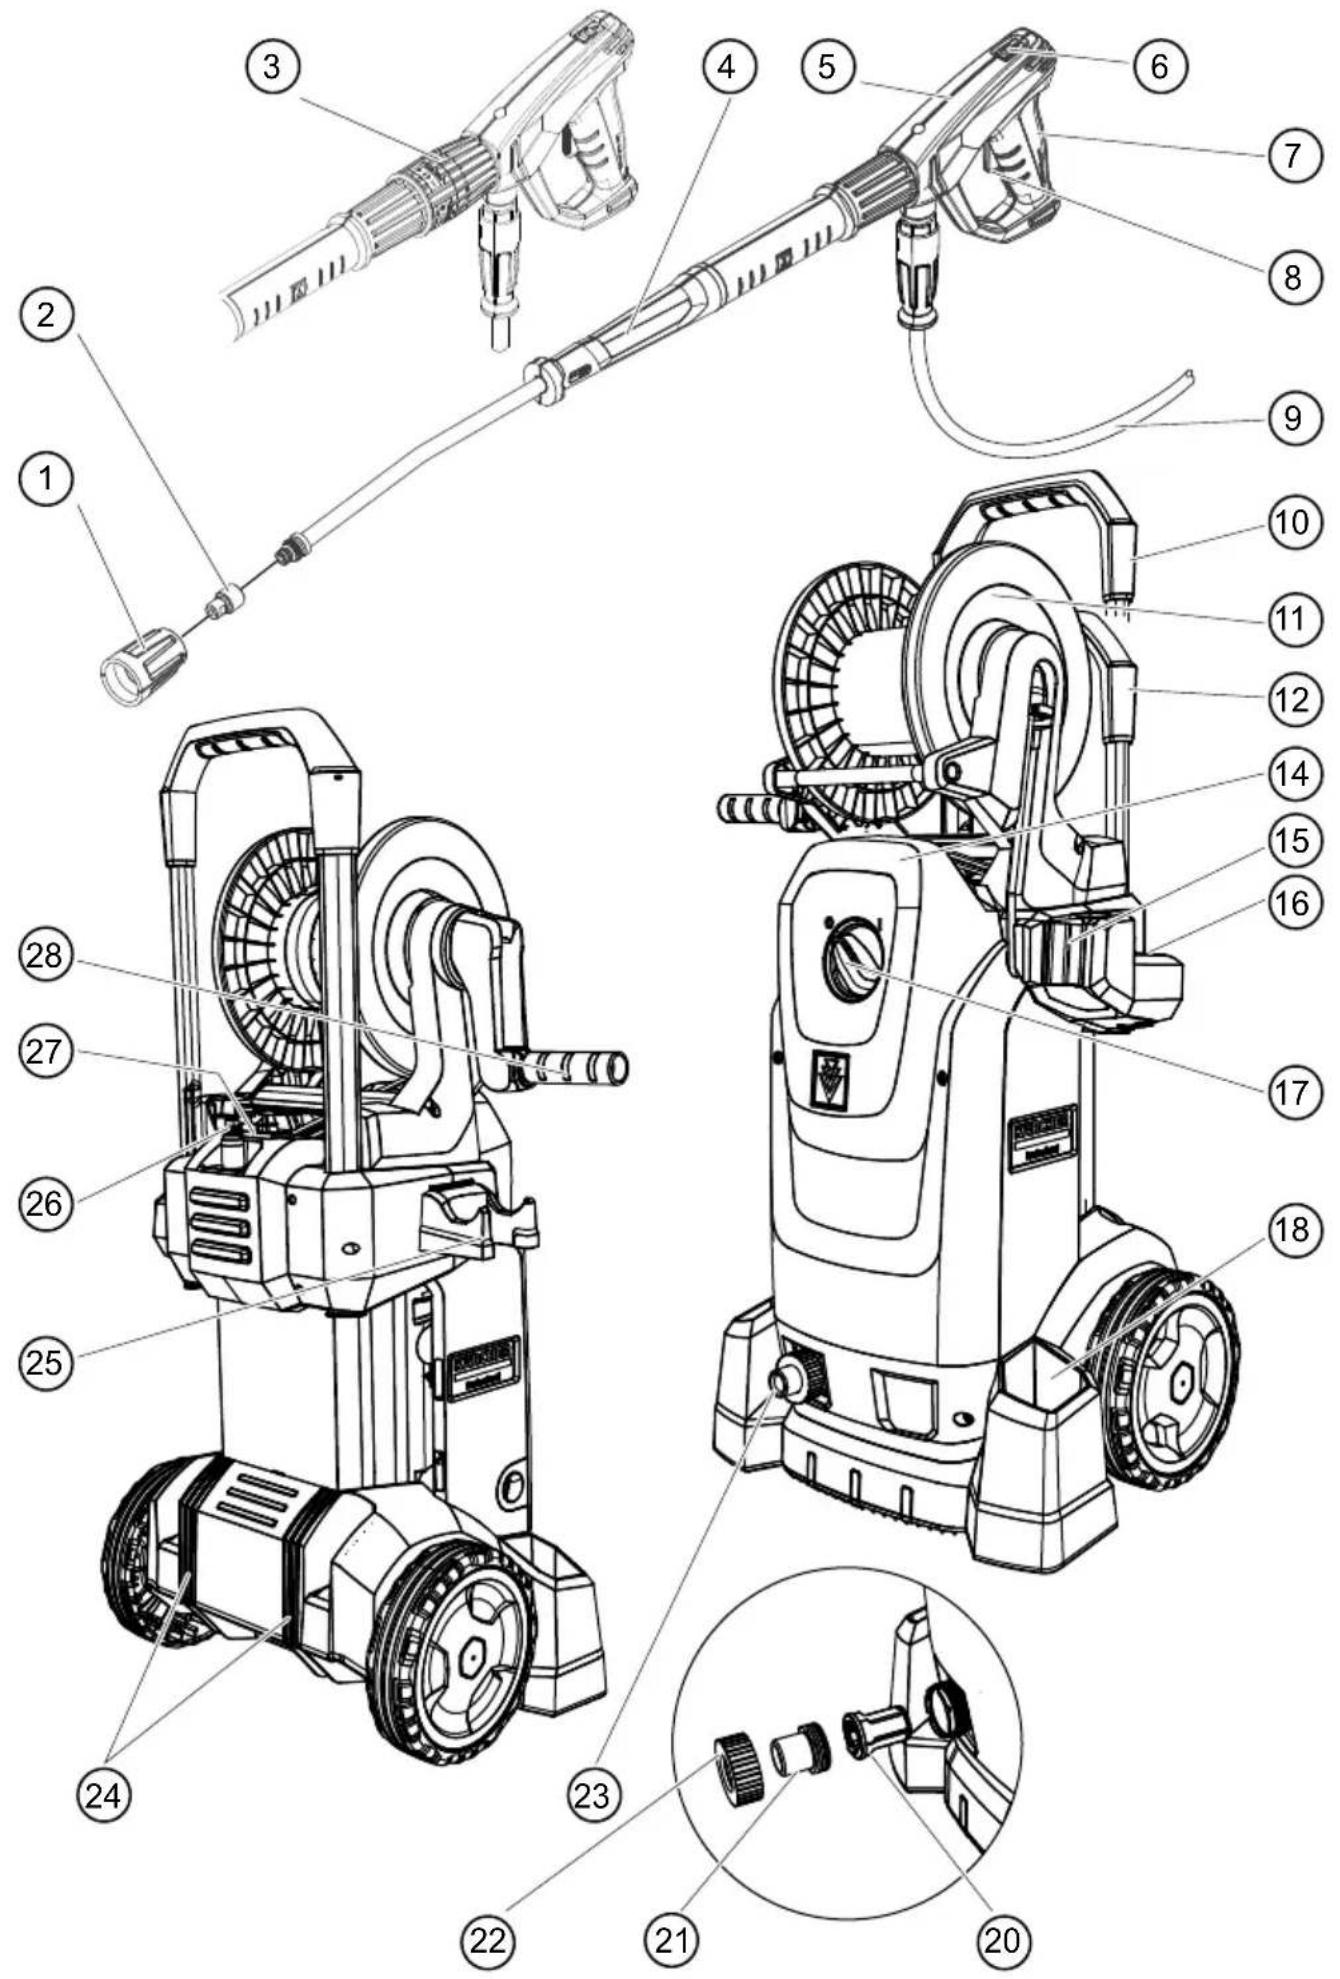
text_image
Technical diagram of a water purifier with numbered parts for identification and assembly reference.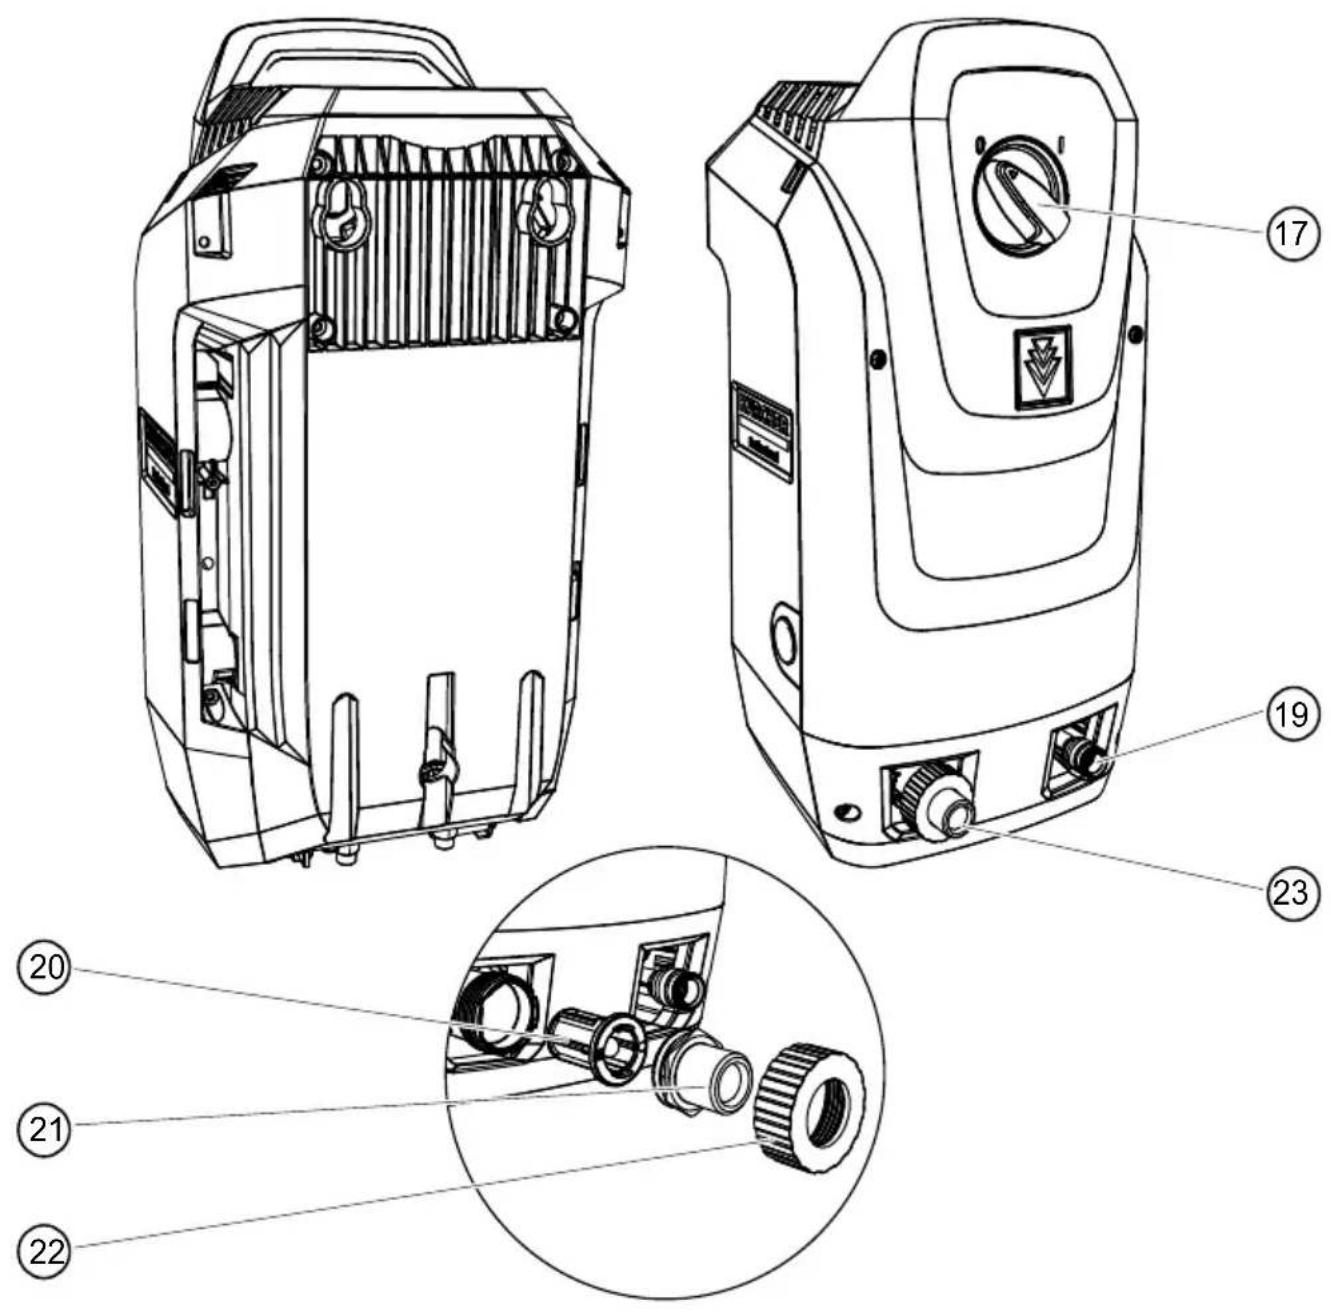
text_image
Technical diagram of a portable device with numbered parts, showing internal components and exploded views.
text_image
A 1. 2.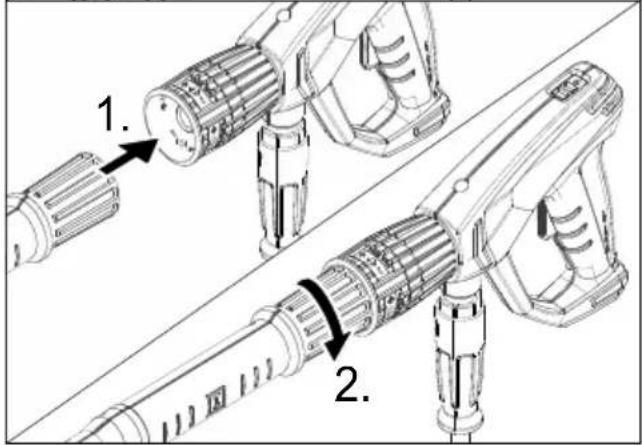
text_image
Technical diagram showing two mechanical assembly steps with numbered components and directional arrows indicating process flow.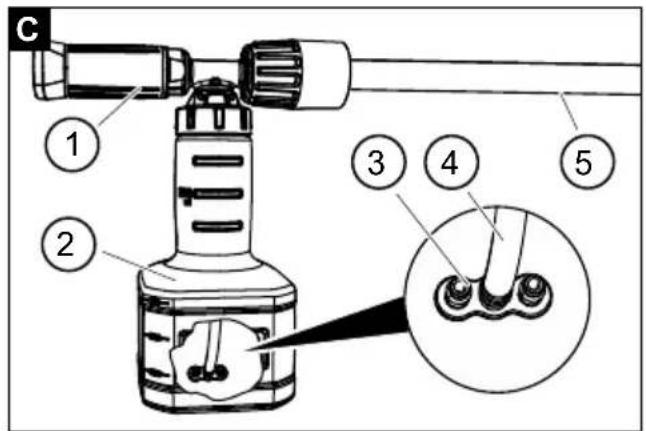
text_image
C ① ② ③ ④ ⑤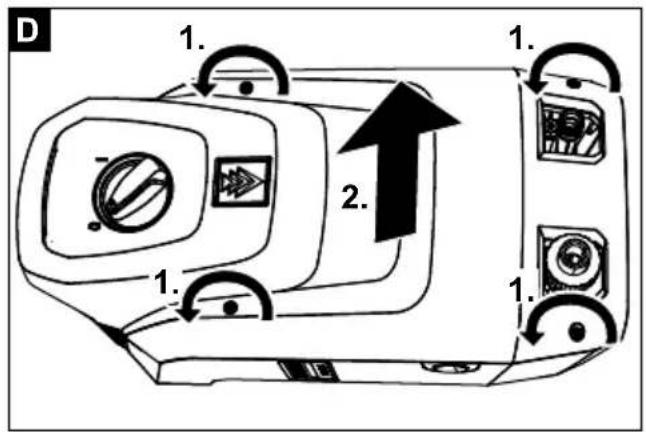
text_image
D 1. 2. 1. 1.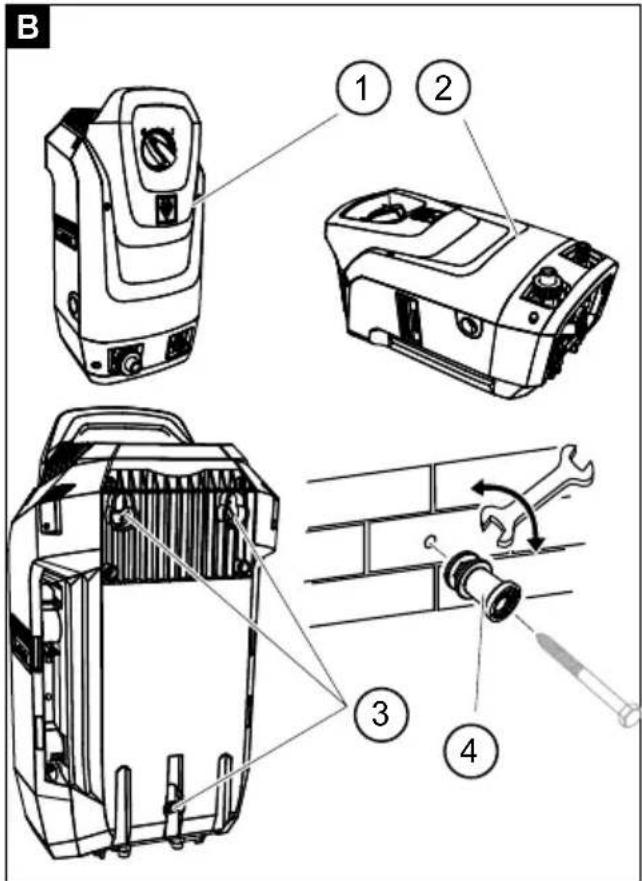
text_image
B ① ② ③ ④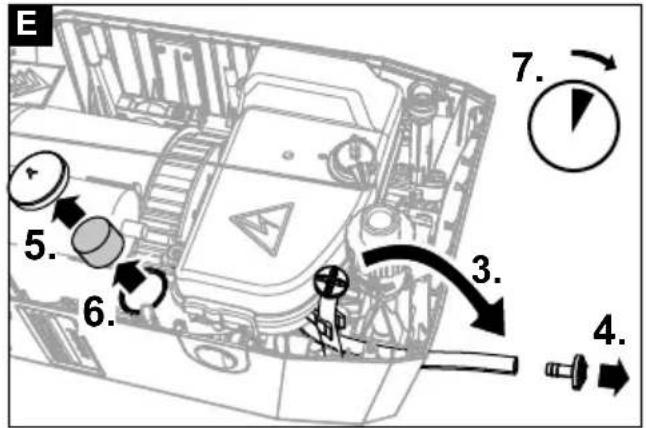
text_image
E 5. 6. 7. 3. 4.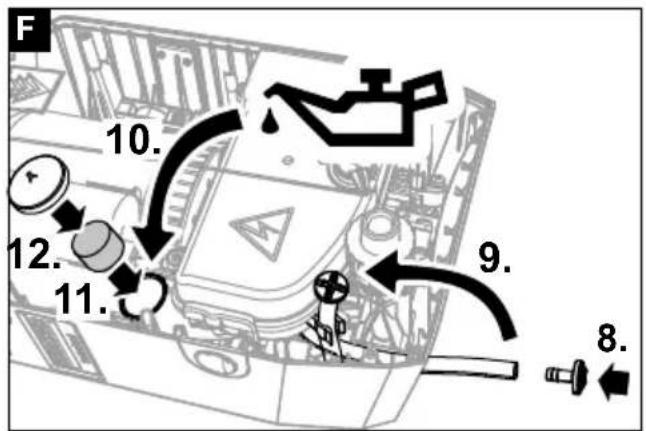
Chief Executive Officer
Head of Approbation
71364 Winnenden (Germany)
Tel.: +49 7195 14-0
Fax: +49 7195 14-2212
Winnenden, 2017/07/01
Contents
| General notes. | 14 |
| Intended use | 14 |
| Environmental protection | 14 |
| Safety instructions | 14 |
| Control elements | 14 |
| Colour coding | 15 |
| Unpacking | 15 |
| Installing accessories | 15 |
| Initial startup | 15 |
| Operation | 16 |
| Interrupting operation | 16 |
| Finishing operation | 16 |
| Only with HD...M, HD...MX: Storing the device | 17 |
| Frost protection | 17 |
| Transport | 17 |
| Storage | 17 |
| Care and service | 17 |
| Troubleshooting guide | 17 |
| Accessories and spare parts | 18 |
| Warranty | 18 |
| Technical data | 18 |
| EC Declaration of conformity | 20 |
General notes


Read these original operating instructions and the enclosed safety instructions before using the device for the first
time. Act in accordance with them.
Keep both books for future reference or for future owners.
Intended use
Use this high-pressure cleaner only for the following types of work:
Use the high-pressure jet for cleaning machines, vehicles, buildings, tools and similar objects.
We recommend using a rotary nozzle as a special accessory for stubborn soiling.
The HD...Plus is supplied with a rotary nozzle.
ATTENTION
Dirty water leads to premature wear or deposits in the device.
Clean the device using only clean water, or recycled water that does not exceed the following limits:
- pH value: 6.5...9.5
● Electrical conductivity: Conductivity of fresh water + 1200 μS/cm, maximum conductivity 2000 μS/cm - Settleable particles (sample volume 1 l, settling time 30 minutes): < 0.5 mg/l
- Filterable particles: < 50 mg/l, no abrasive substances
● Hydrocarbons: < 20 mg/l
● Chloride: < 300 mg/l
● Sulphate: < 240 mg/l
● Calcium: < 200 mg/l
● Total hardness: < 28 °dH, < 50° TH, < 500 ppm (mg CaCO _3 /l) - Iron: < 0.5 mg/l
● Manganese: < 0.05 mg/l
● Copper: < 2 mg/l
● Active chloride: < 0.3 mg/l
● Free of unpleasant odours
Environmental protection

The packing materials can be recycled. Please dispose of packaging in accordance with the environmental regulations.

Electrical and electronic appliances contain valuable, recyclable materials and often components such as batteries, rechargeable batteries or oil, which - if handled or disposed of incorrectly - can
pose a potential threat to human health and the environment. However, these components are required for the correct operation of the appliance. Appliances marked by this symbol are not allowed to be disposed of together with the household rubbish.
Notes on the content materials (REACH)
Current information on content materials can be found at: www.kaercher.de/REACH
Safety instructions
- Read the safety instructions 5.951-949.0.before initial startup.
- Observe the national regulations for liquid jet cleaners.
- Observe the national accident prevention regulations. Liquid jet cleaners must be tested regularly. The test result must be recorded in writing.
- Do not modify the device or accessories.
Symbols on the device
The device may not be connected to the public drinking water network.
The high-pressure jet must not be directed at persons, animals, live electrical equipment or at the device itself. Protect the device from frost.
Safety devices
Safety devices protect the user and may not be disabled or functionally circumvented.
The overflow valve, pressure switch an safety valve are set and sealed by the manufacturer. Adjustments are performed only by customer service.
Overflow valve with pressure switch
When the water quantity is reduced via the pressure/quantity control on the trigger gun, the overflow valve opens and part of the water flows back to the suction side of the pump.
When the trigger on the high-pressure gun is release, the pressure switch switches off the high-pressure pump and the high-pressure jet stops.
The pump switches on again when the trigger is pulled.
Safety valve
The safety valve opens when the permissible operating pressure is exceeded and the water flows back to the suction side of the pump.
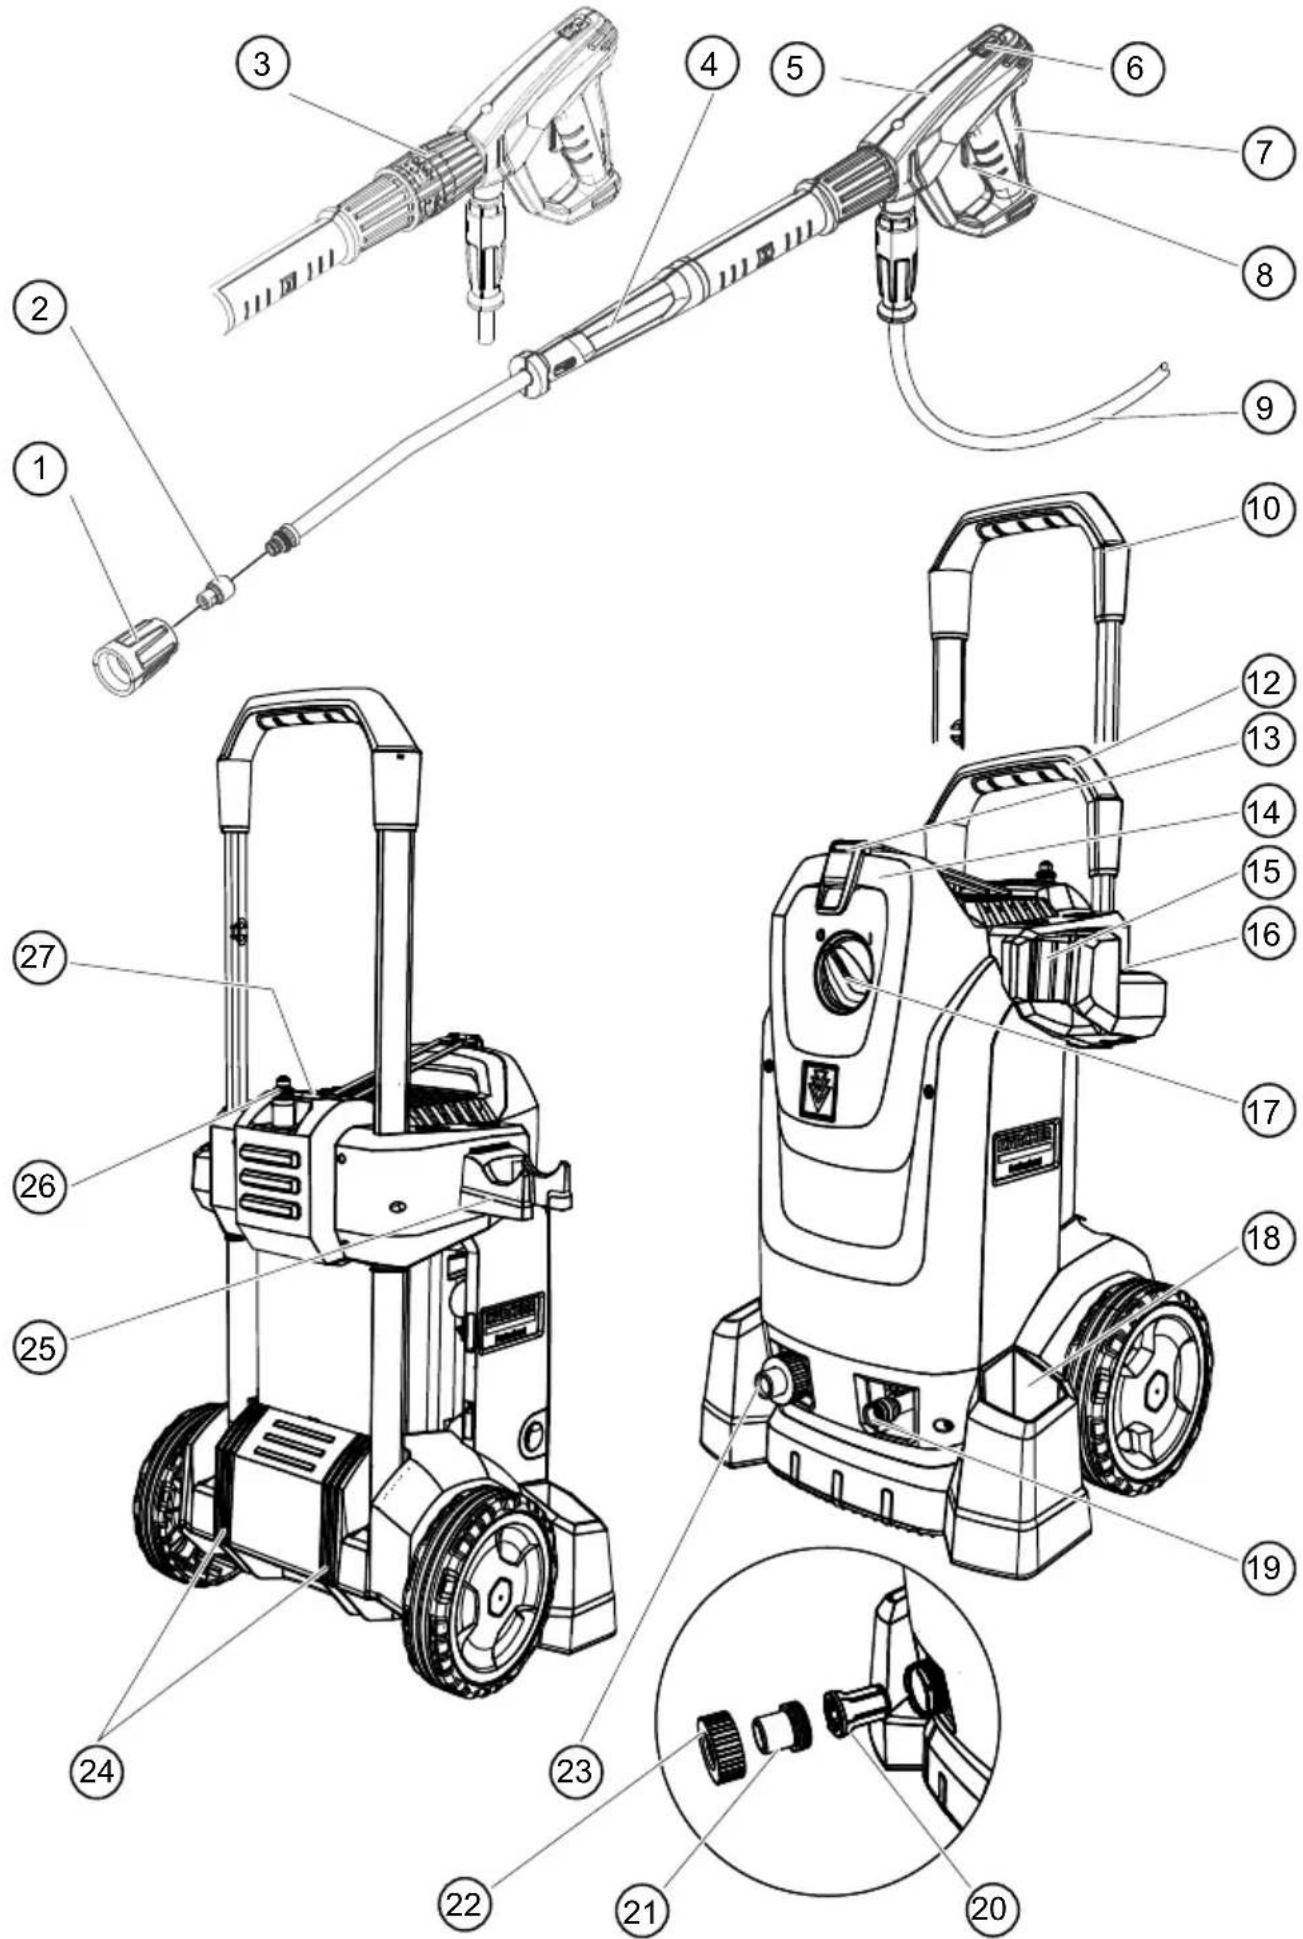
Control elements
See graphics page
① Protector
② Nozzle
③ Pressure and quantity regulation*
④ EASY!Lock spray lance
⑤ EASY!Force high-pressure gun
⑥ Safety latch
⑦Trigger
⑧ Unlocking lever
⑨ EASY!Lock high-pressure hose
⑭ Cable clips, also a hose holder with the HD...M
⑮ Spray lance holder
⑯ Nozzle storage for rotary nozzle*
⑰Power switch
⑱ Spray lance holder
⑲EASY!Lock high-pressure connection
20Sieve
21 Hose spout
22 Union nut
23 Water connection
⑳Skid, stand
25 Holder for foam nozzle*
②6 Transport retainer for surface cleaner*
27 Push handle lock
28Crank
* not in the scope of delivery for all device variants
Colour coding
● Control elements for the cleaning process are yellow.
● Control elements for maintenance and servicing are light grey.
Unpacking
- Check the contents of the package when unpacking.
- Notify the dealer immediately in the case of shipping damage.
- Only with HD...M PU: Store the drilling template on the packaging for mounting the device on the wall.
Installing accessories
Note
No accessories are supplied in the scope of delivery for the HD...M PU.
Note
The EASY!Lock system connects components quickly and safely via a single turn of the quick-release thread.
Figure A
- Plug the high-pressure nozzle onto the spray lance.
- Fit the union nut and hand-tighten (EASY!Lock).
- Connect the spray lance to the high-pressure gun and hand-tighten (EASY!Lock).
- Release the push handle lock.
- Pull the push handle out to the end position.
For devices without a hose reel:
- Connect the high-pressure hose to the high-pressure gun and high-pressure connection of the device and tighten hand-tight (EASY!Lock).
For devices with a hose reel:
- Remove the cable ties from the pre-installed high-pressure hose and carefully unroll the hose from the drum.
- Lay the high-pressure hose on the ground in a straight line.
- Turn the crank clockwise and wind the high-pressure hose onto the hose reel in evenly distributed layers. Take care to ensure that the hose does not become kinked.
- Connect the high-pressure hose to the high-pressure gun and hand-tighten (EASY!Lock).
Initial startup
Installation of HD...M PU
⚠️DANGER
Danger of injury from electric shock
Only allow authorised technical specialists to install the water supply, electrical connections and high-pressure network.
Ambient conditions
● Dry, frost-free environment.
● No danger of explosion.
● Solid, level floor or wall of sufficient loading capacity.
- Do not install in the vicinity of residential spaces or offices (noise emission).
- Accessibility for maintenance work.
● Water drain at installation location.
Fastening the device
Note
Screws and dowels for fastening the holder are not provided in the scope of delivery. The must be selected to suit the requirements of the installation location and must be procured separately. Required screw diameter of 6...8 mm.
DANGER
Risk of injury from a falling device
Take the weight of the device and the loading capacity of the installation location into account when selecting the fasteners.
Figure B
① Wall mounting
② Floor installation
③ Mounting opening
④ Holder
- Mark the mounting holes on the wall or floor using the drilling template.
- Drill the holes.
- Attach the holder but only tighten the screws lightly.
- Adjust the holder clearance by turning with an open-end wrench.
- Tighten the fastening screws.
- Mount the device.
Electrical connection
⚠️DANGER
Risk of injury from electric shock
Use a plug to connect the device to the mains grid. Permanent connection to the mains grid is prohibited. The plug is used for disconnection from the mains.
HD...M PU: The power supply used for operating the unit must be able to supply enough power for continuous operation.
HD...M PU: All live parts, cables and devices in the work area must be protected against water jets.
- Plug the mains plug into the socket.
Water connection
Connection to a water line
⚠ WARNING
Health risk from return flow of contaminated water into the drinking water network.
Observe the regulations of your water supply company. According to applicable regulations, the device must never be used with the drinking water network without a system separator. Use a system separator from KÄRCHER or a system separator as per EN 12729
Type BA. Water that has flowed through a system separator is classified as undrinkable. Always connect the system separator to the water supply and never directly to the water connection on the device.
- Check the feed pressure, input temperature and input amount of the water supply. See the "Technical data" section for the requirements.
- Connect the system separator and water connection of the device with a hose (minimum length 7.5 m, minimum diameter 1").
The supply hose is not included in the scope of delivery.
- Open the water inlet.
Suck water from the container
- Screw the suction hose (order number 4.440-207.0) and filter (order number 4.730-012.0) onto the water connection.
- Vent the device.
Vent the device
- Unscrew the nozzle from the spray lance.
- Allow the device to run until the escaping water is free of air bubbles.
- In the case of venting problems, allow the device to run for 10 seconds and then switch it off. Repeat the procedure several times.
- Switch off the device.
- Screw the nozzle back in place.
Only with HD...M PU: High-pressure installation
The applicable national regulations for permanently installed high-pressure cleaning systems must be observed.
- Connect the device to the permanently installed piping using a high-pressure hose line.
- Route the permanently installed piping with as few changes in direction as possible.
- Route the piping using padded loose and fixed clips to compensate for pressure and thermal expansion.
- Minimum line cross-sections: a Pipelines: Nominal width DN 15 (1/2"). b Hose lines: Nominal width DN 6.
Operation
⚠️DANGER
Risk of injury from the high-pressure water jet
Never fasten the trigger and safety lever in the actuated position.
Do not use the high-pressure gun when the safety lever is damaged.
Push the safety latch of the high-pressure gun forwards every time before starting work with the device.
Opening/closing the high-pressure gun
- Opening the high-pressure gun: Actuate the safety lever and trigger.
- Closing the high-pressure gun: Release the safety lever and trigger.
High-pressure operation
The device can be operated in a standing or lying position.
Note
The device is equipped with a pressure switch. The motor only starts up when the high-pressure gun is open.
- Device with a hose reel: Completely unroll the high-pressure hose from the hose reel.
- Set the power switch to "I".
- Unlock the high-pressure gun by pushing the safety latch of the high-pressure gun to the rear.
- Open the high-pressure gun.
- For devices with pressure and volume regulator: Set the working pressure by turning the pressure and volume regulator.
Operation with detergent
Note
A cup foam lance (optional) is needed for operating with detergent.
⚠ WARNING
Health risk through incorrect handling of deter- gents
Observe the safety instructions on the detergent.
ATTENTION
Unsuitable detergents can damage the device and the object to be cleaned.
Use only detergents approved by KÄRCHER.
Observe the dosing recommendations and notes provided with the detergent.
Use detergents sparingly to help conserve the environment.
KÄRCHER detergents ensure fault-free operation. Ask us for a consultation, request our catalogue or our detergent information sheets.
Figure C
① Foam nozzle
② Container
③ Blender
Detergent mixing: 3=high, 2=medium, 1=low
④ Suction hose
⑤ Spray lance
- Unscrew the container.
- Plug the desired blender into the suction hose.
- Fill the detergent into the container.
- Screw the container onto the foam nozzle.
- Remove the nozzle from the spray lance.
- Connect the foam nozzle to the high-pressure gun and hand-tighten.
- Start up the high-pressure cleaner.
Recommended cleaning method
- Spray the detergent sparingly on the dry surface and let it work for a while (do not let it dry).
- Rinse off the loosened dirt with the high-pressure jet.
Rinsing out the foam lance
The foam lance must be flushed after use to prevent the formation of detergent deposits.
- Unscrew the container.
- Pour the remaining detergent back into the original packaging.
- Fill the container with clear water.
- Screw the container onto the foam nozzle.
- Operate the foam nozzle for approx. 1 minute to flush the detergent residue.
- Empty the container.
Interrupting operation
- Close the high-pressure gun, the device will switch off.
- Lock the high-pressure gun by pushing the safety latch of the high-pressure gun to the front.
Note
The water pressure in the high-pressure hose is reduced by approx. 70% when the device is switched off. This reduces the actuating force of the high-pressure gun and extends the service life of the device.
Continuing operation
- Unlock the high-pressure gun by pushing the safety latch to the rear.
- Open the high-pressure gun, the device will switch on again.
Finishing operation
- Close off the water inlet.
-
Open the high-pressure gun.
-
Set the power switch to "I" and allow the device to run for 5 to 10 seconds.
- Close the high-pressure gun.
- Turn the power switch to "0/OFF".
- Pull the mains plug out of the socket only when your hands are dry.
- Disconnect the water inlet.
- Open the high-pressure gun until the device is completely depressurised.
- Lock the high-pressure gun by pushing the safety latch of the high-pressure gun to the front.
Only with HD...M, HD...MX: Storing the device
- Fit the spray lance with high-pressure gun into the spray lance holster and latch into position in the spray lance holder.
- Wind the mains cable onto the cable clips.
- HD...M: Wind on the high-pressure hose, hang it over the hose storage compartment and secure with the rubber band. HD...MX: Wind the high-pressure hose onto the hose reel and fold over the crank handle.
- Press the push handle lock and slide in the push handle.
Frost protection
ATTENTION
Frost destroys the device if it is not completely drained of water.
Store the device in a frost-free location.
If frost-free storage is not possible:
- Drain the water.
- Pump commonly available anti-freeze through the device.
- Allow the device for run for a maximum of 1 minute until the pump and lines are empty.
Note
Use commonly available, Glycol-based vehicle anti-freeze. Observe the handling instructions of the anti-freeze manufacturer.
Transport
△CAUTION
Risk of injury, risk of damage
Be aware of the weight of the device during transportation.
ATTENTION
Risk of damage
Protect the trigger of the high-pressure gun from damage.
- When transporting in vehicles, secure the device against slipping and tipping over according to the applicable guidelines.
- Pull the device behind you via the push handle for transporting over longer distances (not with HD...M PU).
- Pull the device step by step when ascending stairs. The skids protect the casing from damage (not with HD...M PU).
Only with HD...M, HD...MX: Transport retainer for surface cleaner
- Plug the connection nozzle of the surface cleaned onto the transport bracket on the high-pressure cleaner.
- Screw on the union nut by approximately 1 turn.
Storage
△CAUTION
Risk of injury, risk of damage.
Be aware of the weight of the device during storage.
- Store the device indoors only.
Care and service
⚠️DANGER
Risk of injury due to inadvertently starting up device and also due to electric shock.
Switch off the device immediately and unplug the mains plug before performing work.
Safety inspection/maintenance contract
You can agree on regular safety inspections or close a maintenance contract with your dealer. Please seek advice on this.
Each time before use
- Check the power cable for damage and have a damaged cable replaced immediately by the authorised Customer Service or a qualified electrician.
- Check the high-pressure hose for damage and replace a damaged high-pressure hose immediately.
- Check the device for leaks. 3 drops of water per minute are permissible. Contact Customer Service in the case of more serious leaks.
Weekly
- Clean the sieve in the water connection.
Clean the sieve in the water connection
- Unscrew the union nut.
- Pull out the hose union with sieve.
- Externally clean and rinse the sieve.
Note: Align the hex-head of the hose union for connection to the device.
- Fit the hose union with sieve.
- Tighten the union nut.
Every 500 operating hours, at least annually
- Have the device maintained by Customer Service.
- Changing oil.
Changing oil
Note
See the "Technical data" section for the oil volume and type
- Unscrew the 4 screws.
- Remove the cover.
Figure D
- Pivot the oil drain hose downwards over an oil catch pan.
- Pull the plug out of the oil drain hose.
- Remove the cap.
- Remove the foam from the oil tank.
- Wait until the oil has drained completely.
Figure E
- Insert the plug into the oil drain hose.
- Pivot the oil drain hose upwards and latch in place.
- Fill with the measured correct quantity of oil.
- Insert the foam into the oil tank.
- Fit the cap and press firmly in place.
Figure F
Troubleshooting guide
DANGER
Risk of injury due to inadvertently starting up device and also due to electric shock.
Switch off the device immediately and unplug the mains plug before performing work.
Have electrical components checked and repaired by the authorised Customer Service. In case of any malfunctions not mentioned in this chapter, contact the authorised Customer Service when in doubt or when you have been explicitly advised to do so.
Device does not start
- Check the power cable for damage.
- Check the mains voltage.
- If the device overheats:
a Set the power switch to "0".
b Allow the device to cool for at least 15 minutes.
c Set the power switch to "1". - Contact Customer Service in the case of electrical faults.
Device does not reach required pressure
- Check the size of the nozzle and compare with the required size specified in the "Technical data" section.
- Vent the device, see section "Venting the device".
● Clean the sieve in the water connection.
- Check the water supply volume and compare with the required volume specified in the "Technical data" section.
- Clean the nozzle.
- Contact Customer Service if necessary.
Pump leaking
Up to 3 drops of water per minute are permissible.
- In case of more serious leaks, have the device checked by Customer Service.
Pump knocking
- Check the water supply line for leaks.
- Vent the device, see section "Venting the device".
- Contact Customer Service if necessary.
Detergent dosing volume too low
● Refill the foam nozzle cup.
- Plug a larger blender onto the suction hose.
- Check the suction hose and foam nozzle for detergent deposits. Remove deposits using lukewarm water.
Accessories and spare parts
Only use original accessories and original spare parts. They ensure that the appliance will run fault-free and safely.
Information on accessories and spare parts can be found at www.kaercher.com.
Warranty
The warranty conditions issued by our relevant sales company apply in all countries. We shall remedy possible malfunctions on your appliance within the warranty period free of cost, provided that a material or manufacturing defect is the cause. In a warranty case, please contact your dealer (with the purchase receipt) or the next authorised customer service site. (See overleaf for the address)
Technical data
| HD 6/15 | HD 6/15MX | HD 6/15M PU | HD 7/17M | HD 7/17MX | HD 7/17M PU | HD 7/14-4 M | |||||
| M | |||||||||||
| Electrical connection | |||||||||||
| Mains voltage V 230 230 230 400 400 400 230 | |||||||||||
| P | h | a | s | e | ~ | 1 | 1 | 3 | 3 | ||
| Power frequency | Hz | 50 | 50 | 50 | 50 | 50 | 50 | 50 | |||
| Connection output | kW | 3.1 | 3.1 | 3.1 | 4.2 | 4.2 | 4.2 | 3.4 | |||
| Protection class | IPX5 | IPX5 | IPX5 | IPX5 | IPX5 | IPX5 | IPX5 | ||||
| Power protection (slow-blowing) | A | 16 | 16 | 16 | 16 | 16 | 16 | 16 | |||
| Extension cable, 30m | mm^2 | 2.5 | 2.5 | 2.5 | 2.5 | 2.5 | 2.5 | 2.5 | |||
| Water connection | |||||||||||
| Feed pressure (max.) | MPa | 1 | 1 | 1 | 1 | 1 | 1 | ||||
| Input temperature (max.) | °C | 60 | 60 | 60 | 60 | 60 | 60 | 60 | |||
| Input amount (min.) | l/min | 12 | 12 | 12 | 12 | 12 | 12 | 12 | |||
| Suction height (max.) | m | 0.5 | 0.5 | 0.5 | 0.5 | 0.5 | 0.5 | 0.5 | |||
| Performance data of device | |||||||||||
| Nozzle size of standard nozzle | -- 033 033 033 038 038 038 043 | ||||||||||
| Operating pressure | MPa | 15 | 15 | 15 | 17 | 17 | 17 | 14 | |||
| Operating pressure (max.) | MPa | 22.5 | 22.5 | 22.5 | 25.5 | 25.5 | 25.5 | 21 | |||
| Water flow rate | l/min | 9.3 | 9.3 | 9.3 | 11.5 | 11.6 | 11.6 | 11.5 | |||
| High-pressure gun recoil force | N | 21.3 | 21.3 | 21.3 | 21.3 | 21.3 | 21.3 | 21.3 | |||
| Dimensions and weights | |||||||||||
| Typical operating weight | kg | 30 | 33 | 25 | 32 | 35 | 27 | 39 | |||
| Length | mm | 455 455 | 290 455 | 455 290 455 | |||||||
| Width | mm | 400 400 | 300 400 | 400 300 400 | |||||||
| Height of push handle, bottom, (top) | mm | 700(970) | 890(970) | 565 700(970) | 890(970) | 565 700(970) | |||||
| HD 6/15M | HD 6/15MX | HD 6/15M PU | HD 7/17M | HD 7/17MX | HD 7/17M PU | HD 7/14-4 M | ||
| Oil volume l 0.25 0.25 0.25 0.20 0.20 0.20 0.35 | ||||||||
| Oil type Type 15W40 15W40 15W40 15W40 15W40 15W40 0W40 | ||||||||
| Determined values in acc. with EN 60335-2-xx | ||||||||
| Hand-arm vibration value m/s | ^2 | 2.4 | 2.8 | 2.4 | 3.0 | 2.9 | 3.0 | 2.7 |
| K uncertainty m/s^2 | 0.7 | 0.8 | 0.7 | 0.8 | 0.8 | 0.8 | 0.8 | 0.8 |
| Sound level dB(A) | 74 | 74 | 76 | 79 | 78 | 79 | 68 | |
| K uncertainty _pA | dB(A) | 3 | 3 | 3 | 3 | 3 | 3 | 3 |
| Sound power level L_WA + K uncertainty_WA | dB(A) | 90 | 90 | 92 | 95 | 94 | 95 | 84 |
| HD 7/14-4 MX | HD 7/16-4 M | HD 7/16-4 MX | HD 8/18-4 M | HD 8/18-4 MX | HD 8/18-4 M PU | ||
| Electrical connection | |||||||
| Mains voltage | V | 230 | 400 | 400 | 400 | 400 | 400 |
| Phase | ~ | 1 | 3 | 3 | 3 | 3 | 3 |
| Power frequency | Hz | 50 | 50 | 50 | 50 | 50 | 50 |
| Connection output | kW | 3.4 | 4.2 | 4.2 | 4.6 | 4.6 | 4.6 |
| Protection class | IPX5 | IPX5 | IPX5 | IPX5 | IPX5 | IPX5 | |
| Power protection (slow-blowing) | A | 16 | 16 | 16 | 16 | 16 | 16 |
| Extension cable, 30m | mm^2 | 2.5 | 2.5 | 2.5 | 2.5 | 2.5 | 2.5 |
| Water connection | |||||||
| Feed pressure (max.) | MPa | 1 | 1 | 1 | 1 | 1 | 1 |
| Input temperature (max.) | °C | 60 | 60 | 60 | 60 | 60 | 60 |
| Input amount (min.) | l/min | 12 | 12 | 12 | 12 | 12 | 12 |
| Suction height (max.) | m | 0.5 | 0.5 | 0.5 | 0.5 | 0.5 | 0.5 |
| Performance data of device | |||||||
| Nozzle size of standard nozzle | -- | 043 | 042 | 042 | 042 | 042 | 042 |
| Operating pressure | MPa | 14 | 16 | 16 | 18 | 18 | 18 |
| Operating pressure (max.) | MPa | 21 | 24 | 24 | 27 | 27 | 27 |
| Water flow rate | l/min | 11.5 | 11.6 | 11.6 | 12.5 | 12.5 | 12.5 |
| High-pressure gun recoil force | N | 21.3 | 21.3 | 21.3 | 21.3 | 21.3 | 21.3 |
| Dimensions and weights | |||||||
| Typical operating weight | kg | 42 | 40 | 43 | 41 | 44 | 36 |
| Length | mm | 455 | 455 | 455 | 455 | 455 | 290 |
| Width | mm | 400 | 400 | 400 | 400 | 400 | 300 |
| Height of push handle, bottom, (top) | mm | 890 (970) | 700 (970) | 890 (970) | 700 (970) | 890 (970) | 565 |
| Oil volume | l | 0.35 | 0.35 | 0.35 | 0.35 | 0.35 | 0.35 |
| Oil type | Type 0W40 | 15W40 15W40 | 15W40 15W40 | ||||
| Determined values in acc. with EN 60335-2-xx | |||||||
| Hand-arm vibration value | m/s^2 | 2.7 | 2.4 | 2.5 | 2.3 | 2.3 | 2.3 |
| K uncertainty | m/s^2 | 0.8 | 0.7 | 0.7 | 0.7 | 0.7 | 0.7 |
| Sound level | dB(A) | 69 | 70 | 72 | 75 | 73 | 76 |
| K uncertainty _pA | dB(A) | 3 | 3 | 3 | 3 | 3 | 3 |
| Sound power level L_WA + K uncertainty_WA | dB(A) | 85 | 86 | 88 | 91 | 89 | 92 |
Subject to technical modifications.
EC Declaration of conformity
We hereby declare that the machine described below complies with the relevant basic safety and health requirements of the EU Directives, both in its basic design and construction as well as in the version put into circulation by us. This declaration shall cease to be valid if the machine is modified without our prior approval.
Product: High-pressure cleaner
Type: 1.150-xxx
Currently applicable EU Directives
2000/14/EC
2006/42/EC (+2009/127/EC)
2011/65/EU
2014/30/EU
Harmonised standards used
EN 60335-1
EN 60335-2-79
EN 50581
EN 55014-1: 2006+A1: 2009+A2: 2011
EN 55014-2: 2015
EN 62233: 2008
EN 61000-3-2: 2014
HD x/xx
EN 61000-3-3: 2013
HD x/xx
EN 61000-3-11: 2000
Applied conformity evaluation method
2000/14/EG: Appendix V
Sound power level dB(A)
| Measured Guaranteed | |
| HD 6/15 M 87 90 | |
| HD 6/15 MX 87 90 | |
| HD 6/15 M PU 90 92 | |
| HD 7/17 M 92 95 | |
| HD 7/17 MX 91 94 | |
| HD 7/17 M PU 92 95 | |
| HD 7/14-4 M 81 84 | |
| HD 7/14-4 MX 82 85 | |
| HD 7/16-4 M 83 86 | |
| HD 7/16-4 MX 86 88 | |
| HD 8/18-4 M 88 91 | |
| HD 8/18-4 MX 87 89 | |
| HD 8/18-4 M PU 90 92 |
The undersigned act on behalf and under the power of attorney of the company management.
Chief Executive Officer

Head of Approbation
Documentation supervisor: S. Reiser
71364 Winnenden (Germany)
Tel.: +49 7195 14-0
Fax: +49 7195 14-2212
Winnenden, 2017-07-01
Contenu
2006/42/CE (+2009/127/CE)
2011/65/EU
2014/30/EU
Chief Executive Officer
Head of Approbation
Responsable de la documentation : S. Reiser
71364 Winnenden (Germany)
Tel.: +49 7195 14-0
Fax: +49 7195 14-2212
Winnenden, le 01/07/2017
Indice
Chief Executive Officer
Head of Approbation
71364 Winnenden (Germany)
Tel.: +49 7195 14-0
Fax: +49 7195 14-2212
Winnenden, 01/07/2017
Inhoud
● chloride: < 300 mg/l
● sulfaat: < 240 mg/l
● calcium: < 200 mg/l
- totale hardheid: < 28 °dH, < 50° TH, < 500 ppm (mg CaCO₃/l)
- ijzer: < 0,5 mg/l
- mangaan: < 0,05 mg/l
- koper: < 2 mg/l
Chief Executive Officer
Head of Approbation
71364 Winnenden (Germany)
Tel.: +49 7195 14-0
Fax: +49 7195 14-2212
Winnenden, 2017/07/01
2006/42/CE (+2009/127/CE)
2011/65/UE
2014/30/UE
text_image
H. Jenner Chief Executive Officer i.V. Reiser S. Reiser Head of Approbation71364 Winnenden (Germany)
Tel.: +49 7195 14-0
Fax: +49 7195 14-2212
Winnenden, 2017/07/01
Índice
2006/42/CE (+2009/127/CE)
2011/65/UE
2014/30/UE
text_image
H. Jenner Chief Executive Officer i.V. Reiser S. Reiser Head of Approbation71364 Winnenden (Germany)
Tel.: +49 7195 14-0
Fax: +49 7195 14-2212
Winnenden, 01/07/2017
Indhold
2006/42/EF (+2009/127/EF)
2011/65/EU
2014/30/EU
Chief Executive Officer
Head of Approbation
71364 Winnenden (Germany)
Tel.: +49 7195 14-0
Fax: +49 7195 14-2212
Winnenden, 2017/07/01
Indhold
Generelle merknader 62
②6 Transportholder for flaterenser*
⑳Opplåsing skyvehåndtak
28 Sveiv
Kun HD...M, HD...MX: Transportholder for flaterenser
2006/42/EF (+2009/127/EF)
2011/65/EU
2014/30/EU
Anvendte harmoniserte standarder
NEK EN 60335-1
NEK EN 60335-2-79
NEK EN 50581
NEK EN 55014-1: 2006+A1: 2009+A2: 2011
NEK EN 55014-2: 2015
NEK EN 62233: 2008
NEK EN 61000-3-2: 2014
HD x/xx
NEK EN 61000-3-3: 2013
HD x/xx
NEK EN 61000-3-11: 2000
2000/14/EF: Vedlegg V
Lydeffektnivå dB(A)
| målt | garantert | |
| HD 6/15 M | 87 | 90 |
| HD 6/15 MX | 87 | 90 |
| HD 6/15 M PU | 90 | 92 |
| HD 7/17 M | 92 | 95 |
| HD 7/17 MX | 91 | 94 |
| HD 7/17 M PU | 92 | 95 |
| HD 7/14-4 M | 81 | 84 |
| HD 7/14-4 MX | 82 | 85 |
| HD 7/16-4 M | 83 | 86 |
| HD 7/16-4 MX | 86 | 88 |
| HD 8/18-4 M | 88 | 91 |
| HD 8/18-4 MX | 87 | 89 |
| HD 8/18-4 M PU | 90 | 92 |
Chief Executive Officer
S. Reiser
Head of Approbation
71364 Winnenden (Germany)
Tel.: +49 7195 14-0
Fax: +49 7195 14-2212
Winnenden, 01/07/2017
Innehåll
Allmän information 68
text_image
H. Jenner Chief Executive Officer i.V. Reiser S. Reiser Head of Approbation71364 Winnenden (Germany)
Tel.: +49 7195 14-0
Fax: +49 7195 14-2212
Winnenden, 2017/07/01
Sisältö
Yleisiä ohjeita 75
text_image
H. Jenner Chief Executive Officer
Dokumentointivastaava: S. Reiser
71364 Winnenden (Germany)
Tel.: +49 7195 14-0
Fax: +49 7195 14-2212
Winnenden, 2017/07/01
Περιεχόμενα
text_image
H. Jenner Chief Executive Officer
71364 Winnenden (Germany)
Tel.: +49 7195 14-0
Fax: +49 7195 14-2212
Winnenden, 2017/07/01
İçindekiler
Yağ cinsi Tip 0W40 15W40 15W40 15W40 15W40 15W40
2006/42/AT (+2009/127/AT)
2011/65/AT
2014/30/AT
Chief Executive Officer
S. Reiser
Head of Approbation
71364 Winnenden (Germany)
Tel.: +49 7195 14-0
Fax: +49 7195 14-2212
Winnenden, 2017/07/01
Содержание
Общие указания 96
Chief Executive Officer
Head of Approbation
71364 Winnenden (Germany)
Tel.: +49 7195 14-0
Fax: +49 7195 14-2212
text_image
H. Jenner Chief Executive Officer
71364 Winnenden (Germany)
Tel.: +49 7195 14-0
Fax: +49 7195 14-2212
Winnenden, 2017/07/01
Obsah
2006/42/ES (+2009/127/ES)
2011/65/EU
2014/30/EU
text_image
H. Jenner Chief Executive Officer i.V. Reiser S. Reiser Head of ApprobationZmocněnec pro dokumentaci: S. Reiser
71364 Winnenden (Germany)
Tel.: +49 7195 14-0
Fax: +49 7195 14-2212
Winnenden, 2017/07/01
Kazalo
2006/42/ES (+2009/127/ES)
2011/65/EU
2014/30/EU
Chief Executive Officer
Head of Approbation
71364 Winnenden (Germany)
Tel.: +49 7195 14-0
Fax: +49 7195 14-2212
Winnenden, 2017/07/01
Spis treści
2006/42/WE (+2009/127/WE)
2011/65/UE
2014/30/UE
text_image
H. Jenner Chief Executive Officer i.V. Reiser S. Reiser Head of Approbation71364 Winnenden (Germany)
Tel.: +49 7195 14-0
Fax: +49 7195 14-2212
Winnenden, 2017/07/01
Cuprins
Directive UE respectate
2000/14/UE
2006/42/UE (+2009/127/UE)
2011/65/UE
2014/30/UE
Norme armonizate utilize
EN 60335-1
EN 60335-2-79
EN 50581
EN 55014-1: 2006+A1: 2009+A2: 2011
EN 55014-2: 2015
EN 62233: 2008
EN 61000-3-2: 2014
HD x/xx
EN 61000-3-3: 2013
HD x/xx
EN 61000-3-11: 2000
text_image
H. Jenner Chief Executive Officer i.V. Reiser S. Reiser Head of Approbation71364 Winnenden (Germany)
Tel.: +49 7195 14-0
Fax: +49 7195 14-2212
Winnenden, 2017/07/01
Obsah
2006/42/ES (+2009/127/ES)
2011/65/EÚ
2014/30/EÚ
71364 Winnenden (Germany)
Tel.: +49 7195 14-0
Fax: +49 7195 14-2212
Winnenden, 01.07.2017
Sadržaj
Opće napomene.... 144
2006/42/EZ (+2009/127/EZ)
2011/65/EU
2014/30/EU
Chief Executive Officer
S. Reiser
Opunomoćenik za dokumentaciju: S. Reiser
71364 Winnenden (Germany)
Tel.: +49 7195 14-0
Fax: +49 7195 14-2212
Winnenden, 1.7.2017.
Sadržaj
Opšte napomene 1 5
Namenska upotreba.... 151
| M | MX | M PU | M | MX | M PU | 14-4 M |
Električni priključak
Napon električne mreže V 230 230 230 400 400 400 230
| F | a | z | a | ~ | 1 | 1 | 1 | 3 | 3 | 3 | 1 |
Mrežna frekvencija Hz 50 50 50 50 50 50 50
2006/42/EZ (+2009/127/EZ)
2011/65/EU
2014/30/EU
Srodne harmonizovane norme
EN 60335-1
EN 60335-2-79
EN 50581
EN 55014-1: 2006+A1: 2009+A2: 2011
EN 55014-2: 2015
EN 62233: 2008
EN 61000-3-2: 2014
HD x/xx
EN 61000-3-3: 2013
HD x/xx
EN 61000-3-11: 2000
text_image
H. Jenner Chief Executive Officer i.V. Reiser S. Reiser Head of ApprobationLice ovlašćeno za dokumentaciju: S. Reiser
71364 Winnenden (Germany)
Tel.: +49 7195 14-0
Fax: +49 7195 14-2212
Winnenden, 2017/07/01
Съдържание
Общи указания ..... 158
Употреба по предназначение. 158
Chief Executive Officer
Head of Approbation
71364 Winnenden (Germany)
Tel.: +49 7195 14-0
Fax: +49 7195 14-2212
Виненден, 2017/07/01
Sisukord
Üldised juhised. 165
Sihtotstarbeline kasutamine....165
Keskkonnakaitse 166
Ohutusjuhised 166
Tarvikute monteerimine
Märkus
Vee sisseimemine mahutist
Toode: Körgsurvepesurid
Tüüp: 1.150-xxx
2006/42/EÜ (+2009/127/EÜ)
2011/65/EL
2014/30/EL
text_image
H. Jenner Chief Executive Officer i.V. Reiser S. Reiser Head of Approbation71364 Winnenden (Germany)
Tel.: +49 7195 14-0
Fax: +49 7195 14-2212
Winnenden, 2017/07/01
Saturs
Ellas veids Tips 0W40 15W40 15W40 15W40 15W40 15W40
71364 Winnenden (Germany)
Tel.: +49 7195 14-0
Fax: +49 7195 14-2212
Vinendene (Winnenden), 01.07.2017.
Turinys
Bendrieji nurodymai 178
Chief Executive Officer

S. Reiser
Head of Approbation
71364 Winnenden (Germany)
Tel.: +49 7195 14-0
Fax: +49 7195 14-2212
Vinendenas, 2017-07-01
3Mict
text_image
H. Jenner Chief Executive Officer i.V. Reiser S. Reiser Head of Approbation71364 Winnenden (Germany)
Tel.: +49 7195 14-0
Fax: +49 7195 14-2212
text_image
H. Jenner Chief Executive Officer i.V. Reiser S. Reiser Head of Approbation文档全权代表:S. Reiser
71364 Winnenden (Germany)
Tel.: +49 7195 14-0
Fax: +49 7195 14-2212
Winnenden, 2017/07/01
.3 . youth men who are in the way to go to the school of the school.
natural_image
Icon of a gear and wrench inside a square frame (no text or symbols)http://www.kaercher.com/dealersearch

text_image
QR code image with a central logo, likely linking to a digital resource or website.
natural_image
Warning symbol with exclamation mark inside a triangle over an open book, indicating document or warning (no text present)Deutsch 2
English 5
Français 7
Italiano 9
Nederlands 11
Español 14
Português 16
Dansk 18
Norsk 20
Svenska 22
Suomi 24
Ελληνικά 26
Türkçe 28
Русский 30
Magyar 33
Čeština 35
Slovenščina 37
Polski 39
Românește 42
Slovenčina 44
Hrvatski 46
Srpski 48
Български 50
Eesti 53
Latviešu 55
Lietuviškai 57
Українська 59
中文 61
繁體中文 63
ไทย 64
한국어 66
Viêt 68
Indonesia 70
Қазақша 73
natural_image
Abstract black-and-white geometric diagram with diagonal lines and a triangular shape (no text or symbols)
59519490 (04/22)
natural_image
Symbol of a trash bin crossed with no visible text or labelsSafety instructions High-pressure cleaner

Read these safety instructions and the original instructions before using the device for the first time. Act in accordance
with them. Keep the two booklets for future reference or for future owners.
- In addition to the notes in the operating instructions, you also need to take into consideration the general safety regulations and accident prevention guidelines applicable by law.
- Warnings and information notices attached to the device provide important information for hazard-free operation.
Hazard levels
⚠️DANGER
- Indication of an imminent threat of danger that will lead to severe injuries or even death.
⚠ WARNING
- Indication of a potentially dangerous situation that may lead to severe injuries or even death.
⚠CAUTION
- Indication of a potentially dangerous situation that may lead to minor injuries.
ATTENTION
- Indication of a potentially dangerous situation that may lead to damage to property.
Protective gear
⚠️ CAUTION • Wear suitable gloves when working with the device. • Wear hearing protection whenever a sound pressure level over 80 dB(A) is specified in the operating instructions. See chapter Technical data in the operating instructions. • Wear suitable protective clothing and safety goggles to protect yourself from water or dirt backsplash. • Aerosols can be formed when using high-pressure cleaners. Inhaling aerosols can be harmful for your health. Employers are obliged to perform a hazard assessment in order to define, depending on the surface to be cleaned and the environment, protective measures necessary to prevent inhalation of aerosols. Respiratory protection masks of class FFP 2 or above are suitable for protection against aqueous aerosols. • Exhaust gases and soot may be produced during the use of hot water high-pressure cleaners with combustion engines. Inhaling exhaust gas and touching soot can cause damage to health. Necessary protective measures against inhalation of exhaust gases and contact with soot shall be specified. Please use a suitable respiratory mask for protection from exhaust gas and suitable gloves for protection from soot.
General safety instructions
⚠️ DANGER • Risk of asphyxiation. Keep packaging film out of the reach of children.
⚠ WARNING • Only use the device for its proper use. Take into account the local conditions and beware of third parties, in particular children, when working with the device. • The device is not intended for use by persons with restricted physical, sensory or mental abilities or those lacking in experience and / or lacking in knowledge. • Only people who have been instructed on how to use the device, or have proven their ability to operate it, and have been explicitly instructed to use it, must use the device. • Children must be supervised to prevent them from playing with the appliance. • Children and minors must not use the device.
⚠️ CAUTION • Safety devices are provided for your own protection. Never modify or bypass safety devices.
Risk of electric shock
⚠️ DANGER • Only connect protection class I devices to properly earthed power sources. • The voltage indicated on the type plate must match the voltage of the power source. • Take into account the minimum protection required for the socket, see chapter Technical data in the operating instructions. • Only operate the device via a fault current protection switch (maximum 30 mA). • Never touch the mains plug and socket with wet hands. • The mains plug and coupling of the extension cable must be water tight and may not be placed in water. The coupling may not be on the floor. Use cable drums to ensure that the sockets are at least 60 mm above the floor. • All live parts in the work area must be protected against water jets.
⚠ WARNING • Only connect the device to an electrical connection which has been set up by a qualified electrician as per IEC 60364-1. • Check the power supply cable with mains plug for damage before operation each time. Do not put the device into operation with a damaged power supply cable. Have a damaged power supply cable replaced immediately by the authorised customer service / qualified electrician. • Do not damage the power supply and extension cable by running over it, crushing or yanking
it or similar. Protect the power supply cable from heat, oil and sharp edges. ● Only use the mains connection cable prescribed by the manufacturer, including when replacing the cable. For order no. and type see operating instructions. ● Unsuitable electrical extension cables can be dangerous. Only use approved and appropriately marked electrical extension cables with a sufficient cable cross section for outdoors. ● Only replace couplings on the power supply or extension cable using those with the same water density and the same mechanical strength.
⚠️ CAUTION • In case of longer breaks in operation and after use, switch off the device at the main switch / device switch and pull the mains plug.
ATTENTION • Switch-on procedures will generate short-term voltage drops. • Unfavourable mains conditions may cause other devices to be impaired. • In case of a network impedance of less than 0.15 ohms, no malfunctions are to be expected.
Water connection
⚠ WARNING • The device must not be started up if the high-pressure hose is damaged. Replace a damaged high-pressure hose at once. Only those hoses and connections recommended by the manufacturer may be used. For order no. see operating instructions. • The screw connections of all connection hoses must be leak-tight.
ATTENTION • Observe the regulations at your water distribution company.
Operation
⚠️ DANGER • When using the device in hazard zones (e.g. service stations), adhere to the respective safety regulations. • Operation in explosive atmospheres is prohibited. • Never suction solvents, liquids containing solvents or undiluted acids. This includes e.g. petrol, paint thinner or heating oil. The spray mist is highly flammable, explosive and poisonous. • Damaged wheels / tyre valves are extremely dangerous. Damaged wheels / tyre valves can be damaged by the high-pressure jet and explode. The first sign of this is discolouration of the tyres. Keep a spray distance of at least 30 cm when cleaning the wheels / tyre valves.
⚠ WARNING • Do not use the device if people without the proper protective clothing are in its reach. • With short spray lances, your hand may come into contact with the high-pressure jet. Never use a spotlight nozzle or rotary nozzle with steel tubes that are shorter than 75 cm. • A recoil force will arise due to the water stream ejecting from the spray lance. An angular spray lance produces a force that acts in upward direction. Make sure you grip the gun and spray lance firmly. • When using angular spray units, recoil forces and twisting forces may alter. • Do not aim the high-pressure jet at yourself, e.g. to clean clothes or shoes. • Do not direct the high-pressure jet at persons, animals, live electrical equipment or at the device itself. • Do not spray any objects which contain harmful substances (e.g. asbestos). • Check the device and the accessories, such as the high-pressure hose, high-pressure gun and safety devices, to make sure they are in proper safe and reliable condition before each operation. Do not use the device if it is damaged. Replace damaged components immediately. • Only use high-pressure hoses, control panels and couplings specified by the manufacturer.
⚠️ CAUTION • Never leave the device unsupervised while it is in operation. • Never open the cover
while the motor is running. ● Never clamp the lever of the high-pressure gun during operation. ● Allow the hoses to cool down after hot water operation or operate the device briefly using cold water operation. ● The device must be placed on an even, firm subsurface. ● Before cleaning, carry out a risk assessment of the surface to be cleaned to determine any health and safety protection requirements. The necessary protective measures must be taken accordingly.
ATTENTION • Do not operate the device at temperatures below 0 °C. • Only clean the motor at washing stations with an oil separator.
Operation with detergent
⚠️ CAUTION • Keep the detergent out of the reach of children. • When using detergents, observe the safety data sheet of the detergent manufacturer, in particular instructions on protective gear. • Only use the detergents supplied or specified by the manufacturer. The use of other detergents or chemicals can impair the safety of the device. • Never use the recommended detergents undiluted. These products are operationally safe since they do not contain any acids, alkali or substances that are harmful to the environment. Should detergents come into contact with eyes, rinse these out immediately and thoroughly using water and seek medical attention immediately. The same applies if detergents are swallowed.
Device with a hand-arm vibration value > 2.5 m/s ^4 (see chapter Technical Data in the operating instructions)
△CAUTION
- Using the device for longer periods can cause poor circulation in the hands due to vibrations. A general period of use cannot be set, because this depends on several influencing factors:
- Personal tendency to suffer from poor circulation (frequently cold fingers, tingling sensation in the fingers)
- Low ambient temperature. Wear warm gloves to protect your hands.
- Holding the device too tightly hindering blood circulation.
- Continuous operation is more harmful than operation interrupted by work breaks.
You should see a doctor if using the device regularly and for lengthy periods of time, and in the event of repeated occurrences of symptoms such as tingling in the fingers or cold fingers.
Devices with pneumatic tyres
⚠️ CAUTION • In case of devices with screw-in wheel rims: Make sure that all wheel rim bolts are tightened securely before setting the tyre filling pressure. • Make sure that the pressure reducer is set correctly on the compressor before setting the tyre filling pressure. • Never exceed the maximum permissible tyre filling pressure. The tyre filling pressure needs to be read on the tyre and if necessary on the wheel rim. If these values differ, use the smaller value.
Hot water and petrol-driven devices, devices with a combustion engine
⚠️ DANGER • Explosion hazard due to unsuitable fuel. Only fill the fuel specified in the operating instructions.
⚠ WARNING • Exhaust gases are toxic. Never breathe in the exhaust gases. Ensure rooms where the device is operated are sufficiently ventilated and that exhaust gases can be conducted away. • During tanking, make sure that no fuel gets on hot surfaces.
⚠️ CAUTION • Risk of burns. Never bend down over the exhaust gas opening and never reach inside it. Do not touch the heating boiler while the burner is in operation. • Never close off exhaust gas openings.
- Make sure that no exhaust gases are emitted close to air vents. ● Observe the safety instructions for petrol-driven devices in the operating instructions.
Care and service
⚠ WARNING • Prior to cleaning, maintenance and replacement of parts, the device needs to be switched off and the mains plug removed with mains operation devices. • Depressurise the high-pressure system prior to all work on the device or its accessories.
⚠️ CAUTION • Repairs may only be carried out by approved customer service sites or staff qualified in this area who are familiar with all relevant safety instructions.
ATTENTION • Pay attention to the safety inspection for mobile devices for industrial use in accordance with the locally applicable regulations • Short-circuits or other damage. Do not clean the device with a hose or high-pressure water jet. • Do not use acetone, undiluted acids or solvents, as they corrode the materials used on the device.
Accessories and spare parts
⚠️ CAUTION • Only use accessories and spare parts which are approved by the manufacturer. Only original accessories and original spare parts ensure that the appliance will run fault-free and safely. • Only have repairs and installation of spare parts performed by the approved Customer Service in order to prevent any hazards.
Transportation
CAUTION • Switch off the device prior to transport. Secure the device, taking into account its weight. See chapter Technical Data in the operating instructions.
- Risk of accidents and injuries. Take into account the weight of the device for transportation and storage. See chapter Technical data in the operating instructions.


