FP 658D - Food Processor MOULINEX - Free user manual and instructions
Find the device manual for free FP 658D MOULINEX in PDF.

| Product type | Food processor |
| Brand | MOULINEX |
| Model | FP 658D |
| Power supply | 220-240 V ~ 50/60 Hz |
| Speeds | Pulse (intermittent operation), speed 1, speed 2, stop (0) |
| Chopper bowl capacity | Up to 600 g (meat, fish, hard vegetables, cheese, dried fruits) |
| Kneading capacity | Up to 1 kg heavy dough, 800 g special dough, 1.2 kg light dough, 1 L pancake batter |
| Mixer bowl capacity | 1 L for dry mixtures, 0.8 L for liquid mixtures |
| Functions | Chopping, kneading, mixing, blending, grating, slicing, emulsifying, beating, whisking, chopping herbs, mincing meat (with mincer head) |
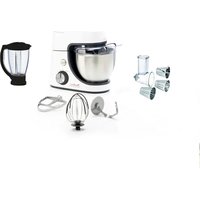
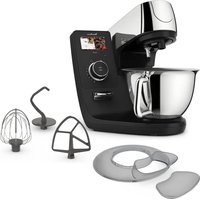
| Supplied accessories | Stainless steel chopper blade, kneading blade, emulsifying disc, 2 vegetable cutting discs (grater/slicer), mixer bowl, herb mill, mincer head with grids, reducer, pusher, spatula, storage box |
| Vegetable cutting discs | Coarse grater/thick slicer, fine grater/fine slicer, French fry cutter, Reibekuchen (depending on model) |
| Safety | Bowl and lid lock, pusher to guide food, motor stop before removing accessories |
| Cleaning | Dishwasher-safe accessories (except mincer head and motor unit); wipe motor unit with damp sponge |
| Blade maintenance | Handle with care (very sharp blades); oil the mincer head after washing |
| Storage | Storage box integrated into the bowl for small accessories; cord cavity |
| Repairability | Spare parts available at authorized centers; do not disassemble yourself |
| Mincer head | Small hole grid (fine mince) and large hole grid (coarse mince); 4-blade knife |
Frequently Asked Questions - FP 658D MOULINEX
User questions about FP 658D MOULINEX
0 question about this device. Answer the ones you know or ask your own.
Ask a new question about this device
Download the instructions for your Food Processor in PDF format for free! Find your manual FP 658D - MOULINEX and take your electronic device back in hand. On this page are published all the documents necessary for the use of your device. FP 658D by MOULINEX.
USER MANUAL FP 658D MOULINEX
The accessories included with the model you have just purchased are illustrated on the label on the bottom of the packaging.
SAFETY RECOMMENDATIONS
- Always read the instructions for use carefully before using your appliance for the first time: any use which does not conform to these instructions will absolve the manufacturer from any liability.
- Check that your electrical mains supply corresponds to that of the appliance.
- Any error in connection will annul the guarantee. Your appliance is designed solely for domestic use within the home. Any commercial use, inappropriate use or failure to comply with the instructions, the manufacturer accepts no responsibility and the guarantee will not apply.
- This appliance is not intended to be used by persons (including children), with reduced or impaired physical, mental or sensory capacities, or persons lacking appropriate knowledge or experience, unless a person responsible for their safety provides either supervision or appropriate instructions concerning use of the appliance prior to its use.
- Children should be supervised to ensure that they do not play with the appliance.
- Unplug your appliance as soon as you have finished using it (even in the event of a power cut) and when you are cleaning it.
- Do not use your appliance if it is not functioning correctly or if it is damaged. In this case, consult an approved service centre (see list in the service booklet).
- Any intervention other than cleaning and normal maintenance by the customer must be carried out by an approved service centre (see list in the service booklet).
- Do not place the appliance, the power cable or the plug in water or any other liquid.
- Do not allow the power cable to hang down within reach of children.
- The power cable must never be in proximity to, or in contact with, hot parts of the appliance or sources of heat, or left on any sharp edges.
- Do not use your appliance if the power cable or the plug is damaged, to avoid all possible danger, have them replaced at an approved service centre (see list in the service booklet).
- For your own safety, only use accessories and spare parts which are suitable for your appliance, sold by an approved retailer.
-
Always use the pushers to guide the food in the feeder tubes, never use your fingers, a fork, a spoon, a knife or any other object.
-
Always handle the chopping blade, the mixing bowl blade, the blade of the fine herb mill and the vegetable cutting disks with care, as they are extremely sharp. You must remove the chopping blade (d) by its spindle (c) before emptying out the contents of the bowl.
- Do not run your appliance empty.
- Always use your blender jug (h3) with its lid (h2).
- Never touch the parts when they are moving, wait for the appliance to stop completely before removing the accessories.
- Do not use the accessories as recipients (for freezing - cooking - hot sterilisation).
- Do not heat the accessories in a microwave oven.
- Do not use the pestle (h4) without the blender jug (h2) since this could result in it touching the blades.
- Do not allow long hair, scarves, ties, etc to hang down over the bowl and the accessories when they are in use.
DESCRIPTION
a Motor unit
a1 Motor unit slow accessory drive
a2 Motor unit rapid accessory drive
a3 Speed selector: Pulse position - 0-1-2
a4 Power cable storage cavity
b Chopping bowl assembly
b1 Pusher with measuring section
b2 Lid with feeder tube
b3 Bowl
c Spindle
d Stainless steel chopping blade
e Dough blade (depending on model)
f Emulsifying disk
g Vegetable cutting disks
C/H Coarse grating or Slicing
A/D Fine grating or Slicing (depending on model)
G Reibekuchen (depending on model)
E Chip cutter (depending on model)
h Blender jug (depending on model)
h1-1 Measuring cap
h2-1 Lid with filter
h3 Blender jug
h4 Pestle
h5 Juice filter
OR
h1-2 Measuring cap
h2-2 Lid
h3 Blender jug
i Fine Herb Mill (depending on model)
i1 Lid
i2 Bowl for fine herb mill
j Adapter for mincer head (depending on model)
k Mincer head (depending on model)
k1 Pusher
k2 Detachable tray
k3 Body
k4 Food guide
k5 Screw
k6 4-blade cutter
k7* Grilles
k7-1 Small hole grille: fine mincing
k7-2 Large hole grille: coarse mincing
k8 Nut
Spatula
m Storage box
USING YOUR APPLIANCE
- Before using for the first time, wash all the accessories in hot water and washing up liquid. Rinse and dry them.
- Place the motor unit (a) on a flat, clean and dry surface.
- Plug in your appliance.
- Pulse: turn button (a3) to the Pulse position in successive 'pulses' for improved control of certain preparations.
- Continuous operation: turn button (a3) to position 1 or 2.
- Stop: turn button (a3) to position 0.
The numbering of the paragraphs corresponds with the numbering of the accompanying illustrations.
1: SETTING UP THE CHOPPING BOWL AND LID
- Accessories used:
- Bowl assembly (b).
- Assembling the accessories:
- Place the bowl (b3) on the motor unit (a), with the bowl handle positioned slightly to the right of the speed selector (a3).
- Lock the bowl in place by turning it to the right.
- Insert your chosen accessory in the bowl.
- Place the lid (b2) on the bowl. Lock it in place by turning it to the right in the bowl handle
It is essential to lock the bowl (b3) on to the motor unit (a) before locking the lid (b2).
2: REMOVING THE CHOPPING BOWL AND LID
- Unlock the lid (b2) by turning it in a clockwise direction to release it from the bowl handle. You can then lift and remove it.
- Unlock the bowl, also by turning it in a clockwise direction.
- Only then will you be able to lift up and remove it from the motor unit.
3: CHOPPING/MIXING / KNEADING/ BLENDING
- CHOPPING
- Accessories used:
- Bowl (b3).
- Spindle (c).
- Stainless steel chopping blade (d).
- Assembling the accessories:
- Place the bowl (b3) on the motor unit (a) and lock it in place on its base.
- Slide the chopping blade (d) onto the spindle (c), and place it in position on the accessory drive (a1).
- Place the ingredients in the bowl.
- Position the lid (b2) in place and lock it on to the bowl (b3).
Usage and practical tips:
- Turn the speed selector (a3) to position 2 to start the appliance, or select the Pulse setting for greater control of the chopping process.
You can chop up to 600g of food in 1 minute such as: - Raw or cooked meat (boned, sinew removed and diced).
- Raw or cooked fish (skin and bones removed).
- Hard produce: firm cheese, dried fruits, certain vegetables (carrots, celeriac, etc).
- Soft produce: certain vegetables (onions, spinach, etc).
- Before emptying the bowl, remove the chopping blade (d) carefully, it is
extremely sharp.
-
KNEADING/MIXING
-
Accessories used:
-
Bowl (b3).
-
Spindle (c).
-
Chopping blade (d) or dough blade (e).
-
Assembling the accessories:
-
Place the bowl (b3) on the motor unit (a) and lock it in place on its base.
-
Slide the chopping blade (d) or the dough blade (e) onto the spindle (c), and place it in position on the accessory drive (a1).
-
Place the ingredients in the bowl.
-
Position the lid (b2) in place and lock it on to the bowl (b3).
Usage and practical tips:
- Turn the speed selector (a3) to position 2 to start the appliance.
You can knead up to:
-
1 Kg of heavy dough, such as white bread dough or short crust pastry, in 60 seconds.
-
800 g of speciality bread dough such as rye-bread, wholemeal bread, or cereal bread in 60 seconds.
You can mix up to:
- 1.2 kg of light mixture, such as biscuit dough, sponge cake or yoghurt cake, in 1 1/2 minutes to 3 minutes.
You can also mix up to 1 litre of light batter, such as pancake or waffle batter, in 1 minute to 1 1/2 minutes.
-MIXING
-
Turn the speed selector (a3) to position 2 to start the appliance. You can mix up to 1 litre of soup or fruit puree in 45 seconds.
-
Before emptying the bowl, remove the chopping blade (d) carefully, it is extremely sharp.
4:GRATING/SLICING
- Accessories used:
- Bowl (b3).
- Spindle (c).
- Vegetable cutting disks (g).
- Assembling the accessories:
- Place the bowl (b3) on the motor unit (a) and lock it in place.
- Lock the vegetable cutting disk to the spindle (c) then place it in position on the accessory drive (a1).

- Position the lid (b2) in place and lock it on to the bowl (b3).
Usage and practical tips: - Put the food through the feeder tube and guide it using the pusher (b1).
- Turn the speed selector (a3) to position 1 for slicing or to position 2 for grating.
With the vegetable cutting disk you can prepare up to 600g in 1 minute.
- Coarse grating (C) / fine grating (A): celeriac, potatoes, carrots, cheese etc.
- Thick slicing (H) / thin slicing (D): potatoes, onions, cucumbers, beetroot, apples, carrots, cabbage etc.
- Chip cutter (E): chips
- Reibekuchen (G): parmesan, potatoes etc.
- Before emptying the bowl, remove the vegetable cutting disk carefully, it is extremely sharp.
5: EMULSIFYING / BEATING / WHISKING
-
Accessories used:
-
Bowl (b3).
- Emulsifying disk (f).
-
Spindle (c).
-
Assembling the accessories:
-
Place the bowl (b3) on the motor unit (a) and lock it in place on its base.
- Insert the emulsifying disk (f) correctly, as shown in illustration 5.a, and lock it onto the spindle (c), then place it in position on the accessory drive (a1).
- Place the ingredients in the bowl.
- Position the lid (b2) in place and lock it on to the bowl (b3).
Usage and practical tips:
- Turn the speed selector (a3) to position 1 or 2 to start the appliance.
You can prepare: mayonnaise, aioli, sauces, whipped egg whites (1 to 6), whipped cream, Chantilly cream (up to 0.2L ), in 30 seconds to 3 minutes.
- Do not use these accessories to knead heavy dough (bread dough etc.) or to mix light dough or batter (biscuits, sponge cake etc.).
6 : HOMOGENIZING / BLENDING/ MIXING FINELY
6.1 Accessories used:
- Blender jug assembly (h).
- Assembling the accessories:
- Place the ingredients in the blender jug (h3) taking care not to exceed the maximum volume of 1 litre.
- Position the lid (h2) with its measuring cap (h1) and lock it in place by
turning in a clockwise direction.
- Place the blender jug assembly (h) on the motor unit (a), with the handle facing the speed selector.
- Wait for the appliance to stop completely before removing the blender jug from the motor unit.
Usage and practical tips:
- Turn the speed selector (a3) to position 1 or 2 to start the appliance. Maximum usage time: 3 minutes.
You can use the Pulse setting for maximum control over blending.
- Never fill the blender jug with boiling liquid.
- Always use your blender jug with its lid.
- Never use the blender jug with dry products only (hazelnuts, almonds, peanuts, sugar etc.).
- Always place the liquid ingredients in the jug before adding the solid ingredients, taking care to avoid exceeding the following maximum levels:
- 1 litre for thick mixtures.
- 0.8 litres for liquid mixtures.
- To add ingredients during blending, remove the measuring cap (h1) from the lid and pour in the ingredients through the opening.
Tips:
- If any ingredients adhere to the sides of the blender jug, stop and unplug the appliance. Remove the blender jug assembly from the motor unit. Dislodge the ingredients using the spatula (l). Never put your hands or fingers in the blender jug or near to the blades.
- Be careful when emptying the jug, as the blades are extremely sharp. You can:
- prepare finely blended soups, thick creamy soups, fruit puree, milk shakes, cocktails, etc.
- mix all types of liquid batters (pancake, Yorkshire pudding, fritter, doughnut, clafoutis, etc.).
6.2 To prepare soya milk, fruit juice, cocktails without pips or skin, you can use the juice filter (h5).
Place the filter (h5) in the blender jug (h3) with the metal grills at the bottom, taking care to ensure that filter slots are placed on the inner ribs of the jug.
- Put the lid (h2-1) on the blender jug to fix the filter in place.
- Insert foods or liquids via the opening for the measuring cap (h1-1). Replace the measuring cap and turn the selector (a3) to position 1 or 2, or use the Pulse setting.
Tip: To make carrot or apple juice, dice the fruit and add a small quantity of water.
- The pestle (h4) enables you to homogenize and pack your preparations (especially thicker mixtures) into the blender jug. Insert the pestle through the central hole in the blender jug lid (h2). When the appliance is functioning, push the food towards the blade with the pestle.
CAUTION: Never use the pestle (h4) without the lid (h2), as it could touch the blades. Do not use the pestle with other accessories. You can pour liquids directly into the jug without removing the lid (h2-1) via the filter integrated into the lid.
Do this by turning the lid to the filter position (fig 6-2b).
7:FINELYCHOPPINGSMALLQUANTITIES
- Accessories used:
- Fine herb mill (i).
- Assembling the accessories:
- Place the ingredients in the bowl for the fine herb mill (i2).
- Place the lid (i1) on the fine herb bowl (i2) and lock it in place by turning in a clockwise direction.
- Place the assembly on the motor unit (a).
Usage and practical tips: - Turn the speed selector (a3) to position 2 to start the appliance, keeping the fine herb mill on the motor unit at all times during functioning.
You can use the Pulse setting for greater control of chopping. - With the fine herb mill (i) you can:
- Chop in seconds:
- Garlic, parsley, onion, dried bread (for crumbs), ham, etc. Quantity/Maximum time: 50 g/10 seconds.
- Dried apricots, dried figs, stoned prunes: Quantity/Maximum time: 80 g/5 seconds.
- Be careful when emptying the bowl, as the blade is extremely sharp.
8:MINCER HEAD
- Accessories used:
-Adapter(j) - Mincer head assembly (k).
- Assembling the accessories:
8.1 Installing the adapter on the motor unit
- Place the adapter (j) on the motor unit (a), carefully lining up the markers on the adapter and the motor unit (a). Lock it in place by turning it to the right.
8.2 Assembly of the mincer head
- Take the body (k3) by the feeder tube with the largest opening uppermost. Next insert the screw (k5) (long axis first) into the body.
- Fit the cutter (k6) on the short shaft, ensuring the sharp edges are facing outwards.
- Place your chosen grille (k7-1 or k7-2) on the cutter, fitting the lugs into the corresponding notches on the head (k3).
- Tighten the nut (k8) firmly on the body (k3) in a clockwise direction, avoiding over-tightening.
- Check the assembly. The shaft should be tight-fitting and not pivot or rotate. If this is not the case, then repeat the preceding steps.
- Clip the food guide (k4) under the mincer head (k3).
8.3 Fitting the mincer head to the appliance
- With the appliance switched off and unplugged, join the mincer head (k), with its feeder tube tilted to the right, to the adapter. Push the mincer head as far as it will go onto the adapter (j).
- Bring the feeder tube back up to a vertical position until it locks in to place. The mincer head (k) will lock automatically onto the adapter (j) as soon as it is switched on.
- Attach the detachable tray (k2) to the chimney.
- Plug in the appliance.
Usage and practical tips: - Prepare all the ingredients you wish to mince. Remove all bones, cartilage and sinews.
- Chop the meat into chunks (approximately 2 × 2 cm) and place them on the tray (k2).
- Place a container under the mincer head fitted with the food guide (k4).
- Turn the speed selector (a3) to position 1 or 2 to start the appliance.
- Insert the meat into the feeder tube piece by piece using the pusher (k1).
- Never push food with the fingers or any other utensils.
Do not use your appliance for more than 15 minutes when mincing meat. - Always ensure that frozen meat is completely defrosted.
9:STORAGE OF ACCESSORIES
Your food processor is equipped with a storage box (m) which fits inside the chopping bowl assembly (b). You can use it to store the stainless steel chopping blade (d), the dough blade (e), 2 disks: vegetable cutting (g) or emulsifying (f).
10:LENGTH OF POWER CABLE
For ease of use and storage, you can reduce the length of the power cable by
pushing it inside the motor unit (a) via the opening located at the rear (a4).
CLEANING
- Unplug the appliance.
- For easier cleaning, rinse the accessories immediately after use.
- Wash and dry the accessories: you can clean them all in the dishwasher, in water, or under the tap, except for the mincer head assembly (j + k3 + k6 + k7 + k8) and the motor unit (a), which should be wiped with a damp sponge.
- Once you have dried them, wipe the 4-blade cutter (k6) and the grilles (k7) with vegetable oil to avoid them rusting.
- Pour hot water with a few drops of washing up liquid into the blender jug (h3). Close the lid (h2) with the measuring cap (h1) and Pulse briefly. Unplug the appliance and rinse the jug.
- The accessory blades are extremely sharp. Handle them with care.
Tip: If the accessories become discoloured by foods (carrots, oranges, etc.), rub them with a cloth dipped in vegetable oil and then wash them as normal.
STORAGE
Avoid storing your food processor in a damp environment.
PROCEDURES IN THE EVENT OF MALFUNCTION
If your appliance malfunctions, check that
- Your appliance is plugged in correctly.
- The accessories are fitted correctly.
Your appliance still isn't working? Consult an approved service centre (see list in the service booklet).
DISPOSAL OF PACKAGING MATERIALS AND THE APPLIANCE

All the packaging materials used are safe for the environment and may be disposed of in accordance with the recycling regulations in force. For the disposal of the appliance, please consult the relevant authorities in your local area.
DISPOSAL OF ELECTRICAL APPLIANCES
Let's all help protect the environment!
① Your appliance contains valuable materials which can be recovered or recycled.
Take them to a local civic waste collection point so that they can be processed.
If you have any product problems or queries, please contact our Customer Relations
Team first for expert help and advice:
Helpline:-
0845 602 1454 - UK
01 677 4003 - ROI
or consult our web site: www.moulinex.co.uk

ACCESSORIES
You can personalise your appliance and purchase the following accessories at your local retailer or at an approved service centre:
- Stainless steel chopping blade
- Dough blade
- Emulsifying disk
- Vegetable cutting disks
C/H: Coarse grating / Thick slicing
A/D: Fine grating / Thin slicing
G: Parmesan - Reibekuchen
E: Chip cutter
- Blender jug
- Juice filter + pestle
- Fine herb mill
- Mincer
Important: accessories can only be sold upon presentation of the instructions or the appliance itself.
BASIC RECIPIES
White bread
500g of flour - 300ml of warm water - 2 sachets of dried yeast - 10g of salt Place the flour, salt and yeast in the bowl with the chopping blade (d) or the dough blade (e).
Set the appliance on speed 2 and immediately begin to add the warm water via the feeder tube in the lid. As soon as the dough forms a ball (roughly 60 seconds), stop the appliance. Set the dough aside to rise to double its volume in a warm place, and then work the dough once again before placing it on a
buttered and floured baking tray. Leave it to rise once again. Preheat your oven to 240 C. As soon as the dough has doubled in volume, place it in the oven with a glass of water in order to encourage the formation of a crust. Cook for 30 to 40 minutes.
For the UK only
Use 500 g strong white bread flour. Substitute 2 sachets of dried yeast with 1 teaspoon of Easy Bake or Fast Action dried yeast and add to the bowl with the flour plus 1 teaspoon salt. Add 300 ml warm water and process as above. After processing, shape the dough into a ball and place on a greased baking tray. Leave to rise for about 1 hour in a warm place until doubled in size. Shape and cook for about 20 min in a preheated oven at 220^ , UK gas mark 7 and then reduce to 180^ /UK Gas mark 4 for a further 15 mins.
Pizza dough
150g of flour - 90ml of warm water - 2 tablespoons of olive oil - 12 sachet of dried yeast - salt
Place the flour, salt and yeast in the bowl with the chopping blade (d) or the dough blade (e).
Set the appliance on speed 2 and immediately add the warm water and the olive oil via the feed tube in the lid. As soon as the dough forms a ball (15 to 20 seconds), stop the appliance. Set the dough aside to rise to double its volume in a warm place. Preheat your oven to 240C . While it's heating, roll out the dough and garnish with the pizza topping of your choice: onions and tomato puree, mushrooms, ham, mozzarella, etc. Add a few anchovies and black olives, then sprinkle with oregano and grated gruyere cheese, and finally drizzle with a few drops of olive oil. Place the pizza on a floured and greased baking tray and cook for 15 to 20 minutes, checking regularly.
For the UK only
Use strong white bread flour. Substitute half sachet of bakers yeast with half teaspoon of Easy Bake or Fast Action dried yeast and add to the bowl with the flour, 12 teaspoon salt and 12 teaspoon sugar. Then prepare as directed above with 90 ml warm water and 1 tablespoon olive oil. Roll out to a 28 cm circle and cover with the topping of your choice. Bake in a preheated oven at 220^ , UK gas mark 7 for about 15 - 20 mins or until crisp.
Rich shortcrust pastry
280g of plain flour – 140g of softened butter cut into pieces (do not substitute margarine) – 70ml of water – a pinch of salt
Place the flour, salt and butter in the bowl with the chopping blade (d) or the dough blade (e).
Set the appliance on speed 2 for a few seconds then add the water via the
feed tube in the lid. Continue until the dough forms a ball (25 to 30 seconds). Set the dough aside to rest in a cool place for at least 1 hour, before rolling out and garnishing.
Pancake batter (in bowl (b) with the chopping blade (d) or in the blender jug (h))
160g of plain flour - 1/3 of a litre of milk - 2 eggs - 12 a teaspoon of fine salt - 2 tablespoons of sunflower oil - 15g of caster sugar (optional) - Rum or orange blossom or vanilla according to taste
Using chopping blade: Place all the ingredients in the bowl with the chopping blade (d). Start the appliance on speed 1 for 20 seconds, and then increase to speed 2 for 25 seconds.
Using blender: Place all the ingredients except the flour in the blender jug. Set the appliance on speed 2, and after a few seconds begin gradually adding the flour via the central hole in the blender jug lid. Continue blending for 45 seconds.
Sponge cake
200g of plain flour, 200g of softened butter cut into pieces, 200g of caster sugar, 4 whole eggs, 1 sachet of baking powder or 3 teaspoons baking powder, 1 pinch of salt
Place all the ingredients in the bowl with the chopping blade (d) or the dough blade (e). Start the appliance on speed 2 and continue mixing for 2 1/2 minutes. Preheat your oven to 180 C. Put the mixture in a cake tin and cook for about 1 hour.
Spice cake
200g of plain flour, 100g of softened butter cut into pieces, 100g of caster sugar, 4 eggs, 60ml of milk, 1 teaspoon of runny honey, 1 teaspoon of cinnamon, 1 teaspoon of ginger, 1 teaspoon of grated nutmeg, grated zest of 1 orange, 1 pinch of pepper, 1 sachet of baking powder or 3 teaspoons baking powder.
Place all the ingredients in the bowl with the chopping blade (d) or the dough blade (e). Start the appliance on speed 2 and continue mixing for 2 minutes. Place the mixture in a floured and buttered tin and cook for about 50 minutes at oven to 180C .
Serve warm or cold with compote or marmalade.
Chocolate cake
5 eggs, 200g of caster sugar, 3 tablespoons of plain flour, 200g of melted butter, 200g good quality plain chocolate (at least 65% cocoa solids), 1 sachet of baking powder or 3 teaspoons baking powder, 100ml of milk.
Cut the chocolate into pieces. place in a heatproof basin with 2 tablespoons
of water and melt over a pan of simmering water. Add the butter and stir until the mixture is completely melted. Place the sugar and the eggs in the bowl with the chopping blade (d) or the dough blade (e) and operate the appliance on speed 2 for 45 seconds until the mixture becomes frothy. Reduce to speed 1 without stopping the appliance and add the melted chocolate, the flour, the baking powder and the milk via the feed tube in the lid.
When all the ingredients are incorporated, continue mixing for another 15 seconds on speed 2.
Pour the mixture into a greased tin and cook for approximately 1 hour at 160C
Chantilly cream
200ml of chilled whipping cream, 30g of icing sugar
Place the bowl in the fridge for a few minutes to ensure that it is completely chilled. Place the cream and the icing sugar in the bowl fitted with the emulsifying disk. Select speed 2 and mix for approximately 1 minute.
Mayonnaise
1 or 2 egg yolks (depending on size), 1 teaspoon mild mustard, 1 tablespoon of wine vinegar, 14 of a litre of oil, salt, pepper
Place all the ingredients except the oil in the bowl fitted with the emulsifying disk. Select speed 2 and mix for 5 seconds, and then start adding the oil slowly via the feed tube in the lid. When the mayonnaise begins to reach the proper consistency, it turns pale.
Important: to succeed, your ingredients should all be at room temperature. Note: keep your mayonnaise in the fridge and consume within 24 hours.
- AMASSAR / INCORPORAR
-
x i0 (b3).
-
Baoon ot npitnc (c).
9:ΦYΛAΕH TΩN EAPTHMATΩN
H ouakeun oac diaoetei eva kouti pfuaeic (m), to onio toonoteetitai evtoc tou oukykpoTnmuatoc doxiou (b). Mnpoeite va alete meoa to avoEieDwto maiaipoi konnc (d), to cuiuwn (e), 2 iokouc: kofntc laaxavikwv (g) n ooioyevonointnf (f).
10:KAOPIESMOZ MHKOYKALQIOY
Tia nio avetn xipon n yia eukolotepn taktonoioiou mnopeite va eiwoseto unkoc tou kalwdiou niéovtac to evtoc tnc kevtpiknc movadac (a) meowtou avoiymuatoc nou pkioketai oto niow mepoc (a4).
KAOAPI\SMA
9:OPBEVARING AF TILBEHØRSDELENE
9:OPPBEBARING AV DELENE
1: SÄTTA PÅ HACKSKÄL OCH LOCK
- Tillbehör:
a a a a a a a a a a a a a a a a a a a a a a a a a a a
2015 15
S
Ss - 70-0000000000000000000000000000000000000000000000000000000000000000
(e)j(d)≤rds
1 2 1
jI jI 30 25)
1 1 1 1 1 1 1 1 1 1 1 1 1
S = 12
0845 602 1454 - UK
(01) 677 4003 - ROI
www.moulinex.co.uk- :LdSLoLgWg
#
45 1u 1u 1u 1u 1u 1u 1u 1u 1u 1u 1u 1u 1u 1u 1u 1u 1u 1u 1u 1u 1u 1u 1u 1u 1u 1u 1u
aai 1, olauiu Li g laia
yjgus
500 300-500
( e) jy d (d) jy d y k J L J L J L J L J L J L J L J L J L J L J L J L J L J L J L J L J L J L J L J L J L J L J L J L J L J L J L J L J L J L J L J L J L J L J L J L J L J L J L J L J L J L J L J L J L J L J L J L J L J L J
#
$$ \therefore \frac {1}{2} \frac {1}{2} \frac {1}{2} \frac {1}{2} \frac {1}{2} \frac {1}{2} \frac {1}{2} \frac {1}{2} \frac {1}{2} \frac {1}{2} \frac {1}{2} \frac {1}{2} \frac {1}{2} $$
$$ \therefore \lim _ {j \rightarrow \infty} \frac \log_ {1 0} (1 + \log_ {2 0} (1 + \log_ {2 0} (1 + \log_ {2 0} (1 + \log_ {2 0} (1 + \log_ {2 0} (1 + \log_ {2 0} (1 + \log_ {2 0} (1 + \log_ {2 0} (1 + \log_ {2 0} (1 + \log_ 2 $$
$$ \left. \right.\left. \right.\left. \right.\left. \right.\left. \right.\left. \right.\left. \right.\left. \right.\left. \right.\left. \right.\left. \right.\left.\left.\left.\left.\left.\left.\left.\left.\left.\left.\left.\left.\left.\left.\left.\left.\left.\left.\left.\left.\left.\left.\left. \text {的} \right]\right]\right]\right]\right]\right]\right]\right]\right]\right]\right]\right]\right]\right]\right]\right]\right]\right]\right]\right]\right]\right]\right] $$
$$ \left(j + k 3 + k 6 + k 7 + k 8\right) \text {c} j \dot {c} \dot {j} \dot {j} \dot {j} \dot {j} \dot {j} \dot {j} \dot {j} \dot {j} \dot {j} \dot {j} \dot {j} $$
$$ \therefore \quad \int_ {a} ^ {b} \leq \int_ {a} ^ {b} \frac {\sin x}{x - 1} d x \leq \int_ {a} ^ {b} \frac {\sin x}{x - 1} d x \leq a (a) $$
$$ \left. \right.\left. \right.\left. \right.\left. \right.\left. \right.\left. \right.\left. \right.\left. \right.\left. \right.\left. \right.\left. \right.\left. \right.\left. \right.\left. \right.\left. \right.\left.\left.\left.\left.\left.\left.\left.\left.\left.\left.\left.\left.\left.\left.\left.\left.\left.\left.\left. \text {s i g m a} ^ {\prime} \right] _ {j} ^ {\prime} \right] _ {j} ^ {\prime} \right] _ {j} ^ {\prime} \right] _ {j} ^ {\prime} \right] _ {j} ^ {\prime} \right] _ {j} ^ {\prime} \right] _ {j} ^ {\prime} \right] _ {j} ^ {\prime} \right] _ {j} ^ {\prime} \right] _ {j} ^ {\prime} \right] _ {j} ^ {\prime} \right] _ {j} ^ {\prime} \right] _ {j} ^ {\prime} \right] _ {j} ^ {\prime} \right] _ {j} ^ {\prime} \right] _ {j} ^ {\prime} \right] _ {j} ^ {\prime} - 1\right) + 1\right) $$
$$ \therefore \text {i} _ {1} \text {i} _ {2} \text {i} _ {3} \text {i} _ {4} \text {i} _ {5} \text {i} _ {6} \text {i} _ {7} \text {i} _ {8} \text {i} _ {9} \text {i} _ {1 0} (k 7) (\text {s l a t}) $$
$$ \left. \right.\left. \right.\left. \right.\left. \right.\left. \right.\left. \right.\left. \right.\left. \right.\left. \right.\left. \right.\left. \right.\left.\left.\left.\left.\left.\left.\left.\left.\left.\left.\left.\left.\left.\left.\left.\left.\left.\left.\left.\left.\left.\left.\left. \text {的} \right]\right]\right]\right]\right]\right]\right]\right]\right]\right]\right]\right]\right]\right]\right]\right]\right]\right]\right]\right]\right]\right]\right] $$
$$ \left. \right.\left. \right.\left. \right.\left. \right.\left. \right.\left. \right.\left. \right.\left. \right.\left. \right.\left. \right.\left.\left.\left.\left.\left.\left.\left.\left.\left.\left.\left.\left.\left.\left.\left.\left.\left.\left.\left.\left.\left.\left.\left.\left. \text {的} \right]\right]\right]\right]\right]\right]\right]\right]\right]\right]\right]\right]\right]\right]\right]\right]\right]\right]\right]\right]\right]\right]\right]\right] $$
$$ \therefore \text {d i a l} _ {i} \leqslant \frac {1}{2} \text {d i a l} _ {j} \geqslant \frac {1}{2} \text {d i a l} _ {k} \geqslant \frac {1}{2} \text {d i a l} _ {l} \geqslant \frac {1}{2} \text {d i a l} _ {m} $$
$$ \therefore \text {a l l} \quad \text {l a l} \quad \text {b l a l} \quad \text {l} \quad \text {l} \quad \text {l} \quad \text {l} \quad \text {l} \quad \text {l} \quad \text {l} \quad \text {l} \quad \text {l} \quad \text {l} \quad \text {l} \quad \text {l} \quad \text {l} $$
$$ \left. \right. \cdot \left( \right.\left. \right.\left. \right.\left. \right.\left. \right.\left. \right.\left. \right.\left. \right.\left. \right.\left. \right.\left. \right.\left. \right.\left. \right.\left. \right.\left. \right.\left. \right.\left. \right.\left. \right.\left. \right.\left. \right.\left. \right.\left. \right.\left. \right.\left. \right.\left. \right.\left. \right.\left.\left.\left.\left.\left.\left.\left.\left.\left. \text {i} _ {\text {i}} ^ {\text {i}} = 1, 0, 0, 0, 0, 0, 0, 0, 0, 0, 0, 0, 0, 0, 0, 0, 0, 0, 0, 0, 0, 0, 0, 0, 0, 0, 0, 0, 0, 0, 0, 0, 0, 0, 0 \right) ^ {\text {i}} = 1, 0, 0, 0, 0, 0, 0, 0, 0, 0, 0, 0, 0, 0, 0, 0, 0, 0, 0, 0, 0, 0, 0 \right) ^ {\text {i}} = 1, 0, 0, 0, 0, 0, 0, 1 \right) ^ {\text {i}} = 1, 1 \right) ^ {\text {i}} = 1, 1 \right) ^ {\text {i}} = 1, 1 \right) ^ {\text {i}} = 1, 1 \right) ^ {\text {i}} = 1, 1 \right) ^ {\text {i}} = 1, 1 \right] $$
$$ \therefore \text {i} _ {l} \text {a} _ {l} \text {a} _ {l} \text {a} _ {l} \text {a} _ {l} \text {a} _ {l} \text {a} _ {l} \text {a} _ {l} \text {a} _ {l} \text {a} _ {l} \text {a} _ {l} \text {a} _ {l} \text {a l} \text {a l} \text {a l} \text {a l} \text {a l} \text {a l} \text {a l} \text {a l} \text {a l} $$
S_1 = 12 × ( n - 2m) × 2m
1
JSLJSLdJSLLaolss
Lai JjS, jSi JS Lai o Si
-
L 1
(2) AD = AQ, B^ O = AQ
0kun gssu nnr 2
Lg yjy jy 4y 4y 4y 4y 4y 4y 4y 4y 4y 4y
2.(e)S S S S S S S S S S S S
Jai Jai (f) jai Lg (g)
J 1 J 1 J 1 J 1 J 1 J 1 J 1 J 1 J 1 J 1 J 1 J 1 J 1 J 1 J 1 J 1 J 1 J 1 J 1 J 1 J 1 J 1 J 1 J 1 J 1 J 1 J 1 J 1 J 1 J 1 J 1 J 1 J 1 J 1 J
Jaiui 1
J (h2) (h4) d:
(b2-6)
7
:Jaiu Jgclab
(i)
:clalajugai jilga
(i2)j j 1
423 1 (i2) 423 423 423 423 423 423 423 423 423 423 423 423 423 423 423 423 423 423 423 423 423 423 423 423 423 42
Lai jia jia jia jia jia jia jia jia
a a a a a a a a a a
Sjys
2 2a3 a3
a 1
5/80 1j j JJ J J J J J J J J
1 1 1 1 1 1 1 1 1 1 1 1 1 1 1 1 1 1
wgs y8y:8
:Jdaiu JgcoLabo
(j)
S APQ = S AOB + S OBC - S PQR
:labajugai jiaog
8.1
gaaa aagaaa aaaaa aaaaa aaaaa aaaaa aaaaa aaaaa
a
()
a a
J 1 J
Sgysglslalal, gouolcd
21 1 (a3)
- 0000000000000000
Jai jai jai jai jai jai jai jai jai jai
-
-
Laii aiai aiai jia jia jia
[{\log }{b}c = {\log }{a}c]
0.8
1 (h1) 5
Lai Lai Jgao Lai
山
1 1
a a a a a a a a a a a a a a a a a a a a a a a a a a a a
:
1slo 1slo s0s0s0s 1s col 1s colu 1s 1s 1s
Laiolaoollgds
(,)g
6.2
..5ai ooiiei (h5) ogai j
J (h3) 100
L 1
(h2-1)
(h1-1)(d)
a3 1
12 1
h) 沿 l2l1 ②
:labajugai jiaogo
1 j 1 (h3)
(h1)(204
Lai Jaa aJg 1000
$$ \dot {z} \dot {z} \dot {z} / \dot {z} \dot {z} \dot {s} \dot {s} \dot {b} \dot {g} \dot {d} - $$
$$ \therefore \text {d i s t a t e} \cup \text {d i s t a t e} \cup \text {d i s t a t e} \bullet $$
$$ \therefore (b 3) \omega \omega \leq - $$
$$ \therefore (C) \quad 2 0 0 - $$
$$ \left. \right.\left. \right.\left. \right.\left. \right.\left. \right.\left. \right.\left. \right.\left.\left.\left.\left.\left.\left.\left.\left.\left.\left.\left.\left.\left.\left.\left.\left.\left.\left.\left.\left.\left.\left.\left.\left.\left.\left.\left.\right.\right.\right.\right.\right.\right.\right.\right.\right.\right.\right.\right.\right.\right.\right.\right.\right.\right.\right.\right.\right.\right.\right.\right.\right.\right.\right\rangle_ {j} ^ {j} j = 1, 2, 3, 4, 5, 6, 7, 8, 9, 1 0, 1 1, 1 2, 1 3, 1 4, 1 5, 1 6, 1 7, 1 8, 1 9, 2 0, 2 1, 2 2, 2 3, 2 4, 2 5, 2 6, 2 7, 2 8, 2 9, 3 0, 3 1, 3 2, 3 3, 3 4, 3 5, 3 6, 3 7, 3 8, 3 9, 4 0, 4 1, 4 2, 4 3, 4 4, 4 5, 4 6, 4 7, 4 8, 4 9, 5 0, 5 1, 5 2, 5 3, 5 4, 5 5, 5 6, 5 7, 5 8, 5 9, 6 0, 6 1, 6 2, 6 3, 6 4, 6 5, 6 6, $$
$$ \therefore \quad a _ {1} = a _ {2} = a _ {3} = a _ {4} = a _ {5} = a _ {6} = a _ {7} = a _ {8} = a _ {9} = a _ {1 0} = a _ {1 1} = a _ {1 2} = a _ {1 3} = a _ {1 4} = a _ {1 5} = a _ {1 6} = a _ {1 7} = a _ {1 8} = a _ {1 9} = a _ {2 0} = a _ {2 1} = a _ {2 2} = a _ {2 3} = a _ {2 4} = a _ {2 5} = a _ {2 6} = a _ {2 7} = a _ {2 8} = a _ {2 9} = a _ {3 0} = a _ {3 1} = a _ {3 2} = a _ {3 3} = a _ {3 4} = a _ {3 5} = a _ {3 6} = a _ {3 7} = a _ {3 8} = a _ {3 9} = a _ {4 0} = a _ {4 1} = a _ {4 2} = a _ {4 3} = a _ {4 4} = a _ {4 5} = a _ {4 6} = a _ {4 7} = a _ {4 8} = a _ {4 9} = a _ {5 0} = a _ {5 1} = a _ {5 2} = a _ {5 3} = a _ {5 4} = a _ {5 5} = a _ {5 6} = a _ {5 7} = a _ {5 8} = a _ {5 9} = a _ {6 0} = a _ {6 1} = a _ {6 2} = a _ {6 3} = a _ {6 4} = a _ {6 5} = a _ {6 6} $$
$$ \therefore \Delta_ {2} = \frac {1}{2} \Delta_ {1} + \Delta_ {3} $$
$$ \therefore \text {d i s t a t e} (b 3) \omega \omega k _ {\left{g _ {2} \right}} \left| \omega_ {1} \right| \omega_ {2} \left| \omega_ {3} \right| \omega_ {4} \left| \omega_ {5} \right| \omega_ {6} \left| \omega_ {7} \right| \omega_ {8} \left(b 2\right) $$
$$ \left. \right.\left. \right.\left. \right.\left. \right.\left.\left.\left.\left.\left.\left.\left.\left.\left.\left.\left.\left.\left.\left.\left.\left.\left.\left.\left.\left.\left.\left.\left.\left.\left.\left.\left.\left.\left.\left.\right.\right.\right.\right.\right.\right.\right.\right.\right.\right.\right.\right.\right.\right.\right.\right.\right.\right.\right.\right.\right.\right.\right.\right.\right.\right.\right.\right.\right.\right. $$
$$ \therefore \lim _ {a \rightarrow + \infty} \left| k _ {1} \right| = \frac {1}{2} \left| k _ {2} \right| = \frac {1}{2} \left| k _ {3} \right| = \frac {1}{2} \left| k _ {4} \right| = \frac {1}{2} \left| k _ {5} \right| = \frac {1}{2} \left| k _ {6} \right| = \frac {1}{2} \left| k _ {7} \right| = \frac {1}{2} \left| k _ {8} \right| = \frac {1}{2} \left| k _ {9} \right| = \frac {1}{2} \left| k _ {1 0} \right| = \frac {1}{2} \left| k _ {1 1} \right| = \frac {1}{2} \left| k _ {1 2} \right| = \frac {1}{2} \left| k _ {1 3} \right| = \frac {1}{2} \left| k _ {1 4} \right| = \frac {1}{2} \left| k _ {1 5} \right| = \frac {1}{2} \left| k _ {1 6} \right| = \frac {1}{2} \left| k _ {1 7} \right| = \frac {1}{2} \left| k _ {1 8} \right| = \frac {1}{2} $$
$$ \therefore \int_ {a} ^ {b} \int_ {c} ^ {d} \int_ {e} ^ {f} \int_ {g} ^ {h} \int_ {i} ^ {j} \int_ {k} ^ {l} \int_ {m} ^ {n} \int_ {o} ^ {p} \int_ {q} ^ {r} \int_ {s} ^ {t} $$
$$ 6 0 \mu_ {j} \mu_ {j} \mu_ {j} \mu_ {j} \mu_ {j} \mu_ {j} \mu_ {j} \mu_ {j} \mu_ {j} \mu_ {j} \mu_ {j} \mu_ {j} \mu_ {j} \mu_ {j} \mu_ {j} \mu_ {j} \mu_ {j} \mu_ {\mathrm {一}} \mu_ {j} \mu_ {j} \mu_ {j} \mu_ {j} \mu_ {j} \mu_ {j} \mu_ {j} \mu_ {j} \mu_ {j} \mu_ {j} \mu_ {j} \mu_ {j} \mu_ {j} \mu_ {j} \mu_ {j} \mu_ {j} \mu_ {- 1} $$
$$ \therefore \text {d i f} 6 0 \text {d} \text {d} \text {d} \text {d} \text {d} \text {d} \text {d} \text {d} \text {d} \text {d} \text {d} \text {d} \text {d} \text {d} \text {d} \text {d} \text {d} \text {d} \text {d} \text {d} \text {d d} \text {d} \text {d} \text {d} \text {d} \text {d} \text {d} \text {d} \text {d} \text {d} \text {d} \text {d} \text {d} \text {d} \text {d} \text {d} \text {d} \text {d} \text {d} \text {d} \text {f l a r s o u r c e} $$
$$ \therefore \lim _ {x \rightarrow 0} \left| \frac {\partial f}{\partial x} \right| = \lim _ {x \rightarrow 0} \left| \frac {\partial f}{\partial x} \right| $$
$$ \leq 1, 2 - $$
$$ 3 \text {七} 3 0, $$
$$ j a l g \leq s i g j a n d j i l o, a l l a l b g l i s s u w j a n d j i d 1 l i a l g i n o j i n $$
$$ \therefore \text {a l l} 3 0 g \text {d a t a} 1 \text {d a t a} 1 \text {d a t a} $$
$$ 0 0 5 b g l 2 0 - $$
$$ \therefore \lim _ {a \rightarrow + \infty} \frac {\left(a - 1\right) ^ {2}}{a ^ {2}} = \frac {1}{a ^ {2}} $$
$$ \therefore \text {L a} \quad 4 5 \quad \text {L a} \quad \text {L a} \quad \text {L a} \quad \text {L a} \quad \text {L a} \quad \text {L a} \quad \text {L a} \quad \text {L a} \quad \text {L a} \quad \text {L a} \quad \text {L a} \quad \text {L a} \quad \text {L a} \quad \tag {1} $$
$$ j _ {i} j _ {j} j _ {k} j _ {l} j _ {m} j _ {n} j _ {o} j _ {p} j _ {q} j _ {r} j _ {s} j _ {t} j _ {u} j _ {v} j _ {w} j _ {x} j _ {y} j _ {z} - $$
$$ \therefore \dot {L} = \frac {1}{2} L $$
$$ \therefore \frac {1}{2} \frac {1}{2} \frac {1}{2} \frac {1}{2} \frac {1}{2} \frac {1}{2} \frac {1}{2} \frac {1}{2} \frac {1}{2} \frac {1}{2} \frac {1}{2} \frac {1}{2} \frac {1}{2} \frac {1}{2} \frac {1}{2} \dots 4 $$
$$ \therefore \text {d i s t a t e} \cup \text {d i s t a t e} \cup \text {d i s t a t e} \bullet $$
$$ \therefore (b 3) \omega \leq - $$
$$ \therefore (C) \quad 2 0 0 0 - $$
$$ \cdot (g) \div \frac {1}{2} \div \frac {1}{2} \div \frac {1}{2} \div \frac {1}{2} \div \frac {1}{2} - $$
$$ : \ddot {c} l a b s j u g a j j i g o $$
$$ \therefore \text {a l a} \int_ {0} ^ {1} \int_ {0} ^ {1} \int_ {0} ^ {1} \int_ {0} ^ {1} \int_ {0} ^ {1} \int_ {0} ^ {1} \int_ {0} ^ {1} \int_ {0} ^ {1} \int_ {0} ^ {1} \int_ {0} ^ {1} \int_ {0} ^ {2} \int_ {0} ^ {2} \int_ {0} ^ {2} \int_ {0} ^ {2} \int_ {0} ^ {2} \int_ {0} ^ {2} \int_ {0} ^ {2} \int_ {0} ^ {2} \int_ {0} ^ {2} \int_ {0} ^ {2} \int_ {0} ^ {3} \int_ {0} ^ {3} \int_ {0} ^ {3} \int_ {0} ^ {3} \int_ {0} ^ {3} \int_ {0} ^ {3} \int_ {0} ^ {3} \int_ {0} ^ {3} \int_ {0} ^ {3} \int_ {0} ^ {3} \int_ {0} ^ {4} \int_ {0} ^ {4} \int_ {0} ^ {4} \int_ {0} ^ {4} \int_ {0} ^ {4} \int_ {0} ^ {4} \int_ {0} ^ {4} \int_ {0} ^ {\prime 4} \int_ {\prime 4} (a) $$
$$ \left. \right.\left. \right.\left. \right.\left. \right.\left. \right.\left.\left.\left.\left.\left.\left.\left.\left.\left.\left.\left.\left.\left.\left.\left.\left.\left.\left.\left.\left.\left.\left.\left.\left.\left.\left.\left.\left.\left.\right.\right.\right.\right.\right.\right.\right.\right.\right.\right.\right.\right.\right.\right.\right.\right.\right.\right.\right.\right.\right.\right.\right.\right.\right.\right.\right.\right.\right\rangle_ {0} ^ {1} = 0, 0, 0, 0, 0, 0, 0, 0, 0, 0, 0, 0, 0, 0, 0, 0, 0, 0, 0, 0, 0, 0, 0, 0, 0, 0, 0, 0, 0, 0, 0, 0, 0, 0, $$
$$ \therefore \quad \text {d} \left(a 1\right) $$
$$ \therefore \text {d i s t a t e} (b 3) \omega \omega k _ {\left{g _ {2} \right}} \left| \omega_ {1} \right| \omega_ {2} \left| \omega_ {3} \right| \omega_ {4} \left| \omega_ {5} \right| \omega_ {6} \left| \omega_ {7} \right| \omega_ {8} \left(b 2\right) $$
1
:Jdssu JgocLab
(b)
:labjugai jiligo
(a3) 200000000000000000000000000000000000000000000000
a (a) 1
Jai Jia jia jia jia jia jia jia jia jia jia
-
1j1,4kssssssr j 1j jdsdla 1. 1s 1 (b2) -
Lai Jia jia gla
jll (b2) 10000000000000000000000000000000000000000000000000000
.
2
jds gdsai dssu wsi j1 jciu cui (b2) uuii
Lai Jia jiu li jil jiu jiu jiu
Lai jiu jiu 1 jia Lue yue cuyu Jiu liyue ly
-
jdp/gyjz/0ydslog1/0yds:3
0000
:Jdssu Jgoclab
.(b3)ωls
C)
(d)
:labajugai jiaogo
a aaa aaa aaa aaa aaa aaa aaa aaa
aaij j (C) j 1 (d)
$$ \therefore \lim _ {k \rightarrow \infty} \frac {\log_ {1 0} k}{\log_ {2 0} 2} = \frac {\log_ {1 0} k}{\log_ {2 0} 2} - $$
$$ \dots \text {l a l} _ {\alpha} \text {d i f f i e d} j (h 2) \text {w r t h e} \text {l a l} _ {\alpha} \text {r a n g} (h 3) j s b _ {\alpha} \text {d i f f i e d} j (h 2) - $$
$$ \begin{array}{l} \Delta \mathrm {i} a l y \mathrm {j} k i i o \mathrm {o} l a b s j d g a i j l j k i i o \mathrm {s} a l l r o l s i w s S _ {j k i i o} S _ {l g i a w} O l s \ \therefore \Delta G H S \cong \Delta G H D \ \end{array} $$
$$ \begin{array}{l} \left. \right.\left. \right.\left. \right.\left. \right.\left. \right.\left. \right.\left. \right.\left. \right.\left. \right.\left. \right.\left. \right.\left. \right.\left. \right.\left. \right.\left. \right.\left. \right.\left. \right.\left. \right.\left. \right.\left. \right.\left. \right.\left. \right.\left. \right.\left. \right.\left. \right.\left. \right.\left. \right.\left. \right.\left. \right.\left. \right.\left. \right.\left.\left.\left. \text {i} _ {j} ^ {j} = j + 1 - j + 1 - j + 1 - j + 1 - j + 1 - j + 1 - j + 1 - j + 1 - j + 1 - j + 1 - j + 1 - j + 1 - j + 1 - j + 1 - j + 1 - j + 1 - j + 1 - j + 1 - j + 1 - j + 1 - j + 1 = j + 1 - j + 1 - j + 1 - j + 1 - j + 1 - j + 1 - j + 1 - j + 1 - j + 1 - j + 1 - j + 1 - j + 1 - j + 1 - j + 1 - j + 1 - j + 1 - j + 1 - j + 1 - j + 1 - j + 0 = j + 1 - j + 1 - j + 1 - j + 1 - j + 1 - j + 1 - j + 1 - j + 1 - j + 1 - j + 1 - j + 1 - j + 1 - j + 1 - j + 1 - j + 1 - j + 1 - j + 1 - j + 1 - j + 1 - j + 2 = j + 1 - j + 1 - j + 1 - j + 1 - j + 1 - j + 1 - j + 1 - j + 1 - j + 1 - j + 1 - j + 1 - j + 1 - j + 1 - j + 1 - j + 1 - j + 1 - j + 1 - j + 1 - j + 1 - j + 3 = k _ {j} ^ {k} = k _ {j} ^ {k} = k _ {j} ^ {k} = k _ {j} ^ {k} = k _ {j} ^ {k} = k _ {j} ^ {k} = k _ {j} ^ {k} = k _ {j} ^ {k} = k _ {j} ^ {k} = k _ {j} ^ {k} = k _ {j} ^ {k}\right)\right]\right] \ \therefore \left(\sum_ {i = 1} ^ {n} a _ {i}\right) = \sum_ {i = 1} ^ {n} a _ {i} \ \end{array} $$
$$ \therefore \Delta A D C \sim \Delta A B C \sim \Delta A D C \sim \Delta A B C \sim \Delta A D C \sim \Delta A B C $$
$$ \begin{array}{l} \left. \operatorname {s a l a t} \left(\frac {1}{2}, \frac {1}{2}, \frac {1}{2}, \frac {1}{2}, \frac {1}{2}, \frac {1}{2}, \frac {1}{2}, \frac {1}{2}, \frac {1}{2}, \frac {1}{2}, \frac {1}{2}, \frac {1}{2}, \frac {1}{2}, \frac {1}{2}, \frac {1}{2}, \frac {\sqrt {3}}{2}, \frac {\sqrt {3}}{2}, \frac {\sqrt {3}}{2}, \frac {\sqrt {3}}{2}, \frac {\sqrt {3}}{2}, \frac {\sqrt {3}}{2}, \frac {\sqrt {3}}{2}, \frac {\sqrt {3}}{2}, \frac {\sqrt {3}}{2}, \frac {\sqrt {3}}{2}, \frac {\sqrt {3}}{\sqrt {3}}, \frac {\sqrt {3}}{\sqrt {3}}, \frac {\sqrt {3}}{\sqrt {3}}, \frac {\sqrt {3}}{\sqrt {3}}, \frac {\sqrt {3}}{\sqrt {3}}, \frac {\sqrt {3}}{\sqrt {3}}, \frac {\sqrt {3}}{\sqrt {3}}, \frac {\sqrt {3}}{\sqrt {3}}, \frac {\sqrt {3}}{\sqrt {3}}, \frac {\mathrm {i n t e r n a l}}{\sqrt {3}}, \right. \right] (h 2) j s b p d j o j j j j j j j j j j j j j j j j j j j j j j j j j j j j j j j j j j j j j j j j j j j j j j j j j j j j j j j j j j j j j j j j j j j j j j j j j j j j \ \therefore \Delta = \Delta_ {1} + \Delta_ {2} + \Delta_ {3} + \dots \ \end{array} $$
$$ \begin{array}{l} \left. \right.\left. \right.\left. \right.\left. \right.\left.\left.\left.\left.\left.\left.\left.\left.\left.\left.\left.\left.\left.\left.\left.\left.\left.\left.\left.\left.\left.\left.\left.\left.\left.\left.\left.\left.\left.\left.\right.\right.\right.\right.\right.\right.\right.\right.\right.\right.\right.\right.\right.\right.\right.\right.\right.\right.\right.\right.\right.\right.\right.\right.\right.\right.\right.\right.\right.\right. \ \dot {s} \dot {s} \dot {s} \dot {s} \dot {s} \dot {s} \dot {s} \dot {s} \dot {s} \dot {s} \dot {s} \dot {s} \dot {s} \dot {s} \dot {s} \dot {s} \dot {s} \dot {s} \ \end{array} $$
#
aaii 1 aaii iiaaii 1 1 1 1 1 1 1 1 1 1 1
aJLw, gJgJgJgJgJgJgJgJgJgJgJgJgJgJgJgJgJgJgJgJgJgJgJgJgJgJgJgJgJgJgJgJgJgJgJgJgJgJgJgJgJgJg
J 1 J
J 1
450 golsu woslaiu 2ggo gao bpa sulwul y
aaii i aiaiaiaiaiaiaiaiaiaiaiaiaiaiaiaiaiaiaiaiaiaiaiaiaiaiaiaiaiaiaiaiaiaiaiaiaiaiaiaiaiaiaiaiaiaiaiaiaiaiaiaiaiaiaiaiaiaiaia
suluJgJjooJusil
a a a a a a a a a a a a a a a a a a a a a a a a a
jolal olaie. lalil jolol jolol jolol jolol 2
a
a
L 1
alcs lccs 2 - sly p1y y... - aed alldaed aee eaae dae y y... - jabp1y
-1
a0. 6(afofofofo)6pfofofofofofofofofofofofofofofofofofofofofofofofofofofofofofofofofofofofofofofofofofofofofofofofo
Jaiy jiyj yj 100000000000000000000000000000000000000
dysgaas
( 1,2,·s ,10) ( 1,2,·s ,10) ( 1,2,·s ,10) ·s ( 1,2,·s ,10) ( 1,2,·s ,10) ·s ( 1,2,·s ,10)
- S_ ACD = 12 · CD · AC = 12 × AC × 5
a 1
a a a a a a a a a a a a a a a a a a a a a a
15
- 2ecfllg (g) 2a10 aal cull, oll
11)6/5p2aiolegeolaleoalaoalaoaiyjzssallll
.
4
ailllllsslll 1
y
a aol 2e alil yaiyai gllgall lglll
= 1.5g
Jusaaal aolal aai lal jlll 1
aill sclll gl
:
0845 602 1454 - UK
(01) 6774003 - ROI
www.moulinex.co.uk-2jzjyIg liuagaa jia
g jn lue Lusall Js y gllg aal aai alal all aai alal
$$ " j ^ {j} \text {s i g m a} ^ {j} \text {s i g m a} ^ {j} \text {s i g m a} ^ {j} \text {s i g m a} ^ {j} \text {s i g m a} ^ {j} \text {s i g m a} ^ {j} \text {s i g m a} ^ {j} \text {s i g m a} ^ {j} \text {s} - j ^ {j} \text {s i g m a} ^ {j} \text {s i g m a} ^ {j} \text {s i g m a} ^ {j} \text {s i g m a} ^ {j} \text {s i g m a} ^ {j} \text {s i g m a} ^ {j} \text {s i g m a} ^ {j} \text S I S I S I S I S I S I S I S I S I S I S I S I S I S I S I S I S I S I S I S I S I S I S I S I S I S I S I S I S I S I S I S I S I S I S I S I S I S I S I S I S I S I S I S I S I S I S I S I S I S I S I $$
$$ \text {e l l} \text {i j} \text {j i} \text {j i} \text {j i} \text {j i} \text {j i} \text {j i} - $$
$$ \begin{array}{c c} \text {a n d} & \text {e l s e} \ \text {a n d} & \text {e l s e} \end{array} : E $$
$$ j _ {i} = \text {a l l} j _ {i} = \text {a l l} - $$
$$ b y \dot {z} 1 1 c _ {0} - $$
$$ \omega \mathrm {s i n} \gamma \mathrm {i} \mathrm {i} \mathrm {g} \mathrm {s} \omega - $$
$$ \overline {{z}} _ {i j} \overline {{z}} _ {j i} + \overline {{z}} _ {i j} \overline {{z}} _ {j i} - $$
$$ \left. \int_ {0} ^ {1} \frac {d x}{x - 1} \right| _ {0} ^ {1} = \frac {\pi}{2} $$
$$ i _ {a c l l} \downarrow i _ {c l l} \downarrow i _ {b s} - $$
$$ \leqslant \sum_ {i = 1} ^ {n} a _ {i} \sum_ {j = 1} ^ {m} b _ {i j} \frac {\partial f _ {i j}}{\partial x _ {j}} / \sum_ {j = 1} ^ {m} \frac {\partial f _ {i j}}{\partial x _ {j}}: H / C $$
$$ \ddot {a} _ {0} \dot {a} _ {0} \dot {a} _ {1} - $$
$$ \begin{array}{l} \text {a a} \ \text {a a} \ \text {a a} \ \text {a a} \ \text {a a} \ \text {a a} \ \text {a a} \ \text {a a} \ \text {a a} \ \text {a a} \ \text {a a} \ \text {a a} \ \text {a a} \ \text {a a} \ \text {a a} \ \end{array} A / D $$
Aaiiaai 1i i 1i j 1j 1j
auiuui 56b c10g
1
$$ \left. \right.\left. \right.\left. \right.\left. \right.\left. \right.\left.\left.\left.\left.\left.\left.\left.\left.\left.\left.\left.\left.\left.\left.\left.\left.\left.\left.\left.\left.\left.\left.\left.\left.\left.\left.\left.\left.\left.\right.\right.\right.\right.\right.\right.\right.\right.\right.\right.\right.\right.\right.\right.\right.\right.\right.\right.\right.\right.\right.\right.\right.\right.\right.\right.\right.\right.\right. $$
$$ \therefore J a x i s y N l \text {a d} c _ {i} \text {c o n n e c t i o n} \text {l a w} \text {j}, j \text {i} \text {i} \text {i} \text {i} \text {i} \text {i} \text {i} \text {i} \text {i} \text {i} $$
$$ \therefore \text {a l l} \quad \text {a l l} \quad \text {a l l} \quad \text {a l l} \quad \text {a l l} \quad \text {a l l} \quad \text {a l l} \quad \text {a l l} \quad \text {a l l} \quad \text {a l l} \quad \text {a l l} \quad \text {a l l} \quad a _ {1} = 0, b _ {1} = 0, c _ {1} = 0 $$
$$ \left. \right.\left. \right.\left. \right.\left. \right.\left. \right.\left. \right.\left. \right.\left.\left.\left.\left.\left.\left.\left.\left.\left.\left.\left.\left.\left.\left.\left.\left.\left.\left.\left.\left.\left.\left.\left.\left.\left.\left.\left.\right.\right.\right.\right.\right.\right.\right.\right.\right.\right.\right.\right.\right.\right.\right.\right.\right.\right.\right.\right.\right.\right.\right.\right.\right.\right.\right\rangle_ {j} ^ {j} (a) j _ {j} ^ {j} j _ {j} ^ {j} j _ {j} ^ {j} j _ {j} ^ {j} j _ {j} ^ {j} j _ {j} ^ {j} j _ {j} ^ {j} j _ {j} ^ {j} j _ {j} ^ {j} j _ {j} ^ {j} j _ {j} ^ {j} j _ {j} ^ {j} $$
$$ i i j k l m n o p q r s t $$
$$ \left. \right.\left. \right.\left. \right.\left. \right.\left. \right.\left. \right.\left. \right.\left. \right.\left. \right.\left. \right.\left. \right.\left.\left.\left.\left.\left.\left.\left.\left.\left.\left.\left.\left.\left.\left.\left.\left.\left.\left.\left.\left.\left.\left.\left. \text {k} 7\right)\right]\right]\right]\right]\right]\right]\right]\right]\right]\right]\right]\right]\right]\right]\right]\right]\right]\right]\right]\right]\right]\right] $$
$$ i \text {w a l l} j \text {c i t} \text {j} \text {j} $$
$$ \therefore \text {l b} \text {i l l} (h 3) \text {上} \text {l b} \text {i l l} \text {j i} \text {j i} \text {j i} \text {j i} \text {j i} \text {j i} \text {j i} \text {j i} \text {j i} \text {j i} \text {j i} \text {j i} \text {j i} \text {j i} \text {j i} \text {j i} \text {j i} \text {\Delta} $$
$$ \left. \right.\left. \right.\left. \right.\left. \right.\left. \right.\left. \right.\left. \right.\left. \right.\left. \right.\left. \right.\left. \right.\left. \right.\left. \right.\left. \right.\left. \right.\left. \right.\left. \right.\left. \right.\left. \right.\left. \right.\left. \right.\left. \right.\left. \right.\left. \right.\left. \right.\left. \right.\left. \right.\left.\left.\left.\left.\left.\left.\left. \text {d} _ {1} ^ {2} + 1, 0, 0, 0, 0, 0, 0, 0, 0, 0, 0, 0, 0, 0, 0, 0, 0, 0, 0, 0, 0, 0, 0, 0, 0, 0, 0, 0, 0, 0, 0, 0, 0, 0, 0 \right) ^ {2} + 1, 0, 0, 0, 0, 0, 0, 0, 0, 0, 0, 0, 0, 0, 0, 0, 0, 0, 0, 0, 0, 0, 0, 0 \right) ^ {2} + 1, 0, 0, 0, 0, 0, 0, - 1, - 1, - 1, - 1, - 1, - 1, - 1, - 1, - 1, - 1, - 1, - 1, - 1, - 1, - 1, - 1, - 1, - 1, - 1, - 1, - 1, - 1, - 1, - 1, - 1, - 2 + 1 + 1 + 1 + 1 + 1 + 1 + 1 + 1 + 1 + 1 + 1 + 1 + 1 + 1 + 1 + 1 + 1 + 1 + 1 + 1 + 1 + 1 + 1 + 1 + 1 + 1 + 1 + 1 + 1 + 1 + 1 + 1 + 1 + 1 = h (h) ^ {2}\right) ^ {2} + h (h) ^ {2}\right) ^ {2} + h (h) ^ {2}\right) ^ {2} + h (h) ^ {2}\right) ^ {2} + h (h) ^ {2}\right) ^ {2} $$
$$ \therefore \text {d i f f} \text {g a m m a} \text {f o r} \text {f o r} \text {f o r} \text {f o r} \text {f o r} \text {f o r} \text {f o r} \text {f o r} \text {f o r} $$
$$ \therefore \text {d} _ {\text {d}} \text {d} _ {\text {d}} \text {d} _ {\text {d}} \text {d} _ {\text {d}} \text {d} _ {\text {d}} \text {d} _ {\text {d}} \text {d} _ {\text {d}} \text {d} _ {\text {d}} \text {d} _ {\text {d}} \text {d} _ {\text {d}} $$
$$ a l a b e \cdot c u s \cdot (\dots \text {g} \text {l}, \text {l} \text {l} \text {l} \text {l} \text {l} \text {l} \text {l} \text {l} \text {l} \text {l} \text {l} \text {l} \text {l} \text {l} \text {l} \text {l} \text {l} \text {l} \text {l} \text {l} \text {l l} \text {l l} \text {l l} \text {l l} \text {l l} \text {l l} \text {l l} \text {l l} \text {l l} \text {l l} \text {l l} \text {l l} \text {l l} \text {l l} \text {l l} \text {l l} \text {l l} $$
$$ \therefore \text {l i a l l} \text {d} \text {i} \text {j} \text {a} \text {b} \text {c} \text {d} \text {e} \text {f} \text {g} \text {h} \text {i} \text {j} \text {k} \text {l} \text {m} \text {n} \text {o} \text {p} \text {q} \text {r} \text {s} \text {t} \text {u} \text {v} \text {w} \text {x} \text {y} $$
1
aee eae aee
iill Jusu no sai p1 1jss llo
$$ : \quad \therefore \quad \text {d i s t} \quad \text {i g} ^ {\prime}, \quad \text {c i l l} \quad \text {j e t} \quad \text {j e t} \quad \text {j e t} \quad \text {j e t} \quad \text {j e t} \quad \text {j e t} \quad \text {j e t} \quad \text {j e t} \quad \text {j e t} $$
$$ \left. \right.\left. \right.\left. \right.\left.\left.\left.\left.\left.\left.\left.\left.\left.\left.\left.\left.\left.\left.\left.\left.\left.\left.\left.\left.\left.\left.\left.\left.\left.\left.\left.\left.\left.\left.\left.\right.\right.\right.\right.\right.\right.\right.\right.\right.\right.\right.\right.\right.\right.\right.\right.\right.\right.\right.\right.\right.\right.\right.\right.\right.\right.\right.\right.\right.\right.\right. $$
$$ \therefore \lim _ {y \to 0} \frac {\sin {y}}{y + 1} = \frac {\sin {y}}{y} $$
$$ \left. \right.\left. \right.\left. \right.\left.\left.\left.\left.\left.\left.\left.\left.\left.\left.\left.\left.\left.\left.\left.\left.\left.\left.\left.\left.\left.\left.\left.\left.\left.\left.\left.\left.\left.\left.\left.\right.\right.\right.\right.\right.\right.\right.\right.\right.\right.\right.\right.\right.\right.\right.\right.\right.\right.\right.\right.\right.\right.\right.\right.\right.\right.\right.\right.\right.\right.\right. $$
$$ . (\ddot {a} _ {0} \dot {a} _ {1}) $$
aalal alal alal alal
aill jay gllg 1y
diabio gaiisill 15g jyssll 1yj ygi ygi ygi ygi ygi ygi ygi ygi ygi ygi ygi ygi ygi ygi ygi ygi ygi ygi ygi ygi ygi ygi ygi ygi ygi ygi ygi ygi ygi ygi ygi ygi ygi ygi ygi ygi ygi ygi ygi ygi ygi ygi ygi ygi ygi ygi ygi ygi ygi ygi ygl

AR
yall aayll yraaal 1000
pssll (yj lssb) (k5)
gll gaaa aal l jn jn n 11 11 11 11 11
1 1 (k7-2j k7-1)
.(k3)
bJzll (k3) 1 (k8) jolll
algoall
-
a
.(k3) a0a j (k4) 1abla a
8.3
.(k) 2020111111111111111111111111111
y
(j) = lg
-
Jai jai (j) sallgai loggi Jgw (k) aajal
aill (k2) 1ill
ylll ylll lgl
:alas ciuig JaauiyI
j 1 j 1 j 1 j 1 j 1 j 1 j 1 j 1 j 1 j 1 j 1 j 1 j 1 j 1 j 1 j 1 j 1 j 1 j 1 j 1 j 1 j 1 j 1 j 1 j 1 j 1 j 1 j 1 j 1 j 1 j 1 j 1 j 1 j 1 j
.(k2) aaiyall yaa (yyaa yaa YxY) baa ll aalll
.(k4) pabla algeale yj 10000000000000000000000000000000
2 1 (a3)
(k1) jldll Jlaaewy aebaae baaee aee aee eae ee ae
-
aaii 1
Lolai jllgicjddailljstill
9
pall lclg k jj j j j j j j (m) j j j j j j j j j j j j j j j j j j j j j j j j
.(i2) aoccll l 10000000000000000000000000000
a a a a a a a a a a a a a a a a a a a a a a a a a a a a
.(a) 1234567890
:alas ciuig JaauiyI
2 2000 2000
i
aill aal y Jk 1 k 1 k 1 k 1 k 1 k 1 k 1 k
: L o L a c i k . (i) 1
| x - 1| = | x - 2| = | x - 3|
...(j)
| 12 - 1| = | 12 - 1| = | x - 1|
0/1 1 A.
1 1
j/8
:alaaalal
· (j) = _i = 1^n1i!
.(k) 20jzall wJzSjzgao
:dlal
8.1
aall lalll jj j (a) aall sglc (j)
a
a a a a a a a a a a a a a a a a a a a
c. 1000
aJd a d 1000000000000000000000000000000000000000
:alas ciuig Jaauiy
2gagol 1gagol (a3) a
gla 1
aaii aai iiaai
J 1
aBb bI I aI Jaa
()
a a a a a a a a a a a a a a a a a a a a a a a a a a a a
1
...sblblll.1: (G)"jssk"z
1 1
f //y/1:5
:
.(b3) LgJL
(f) -
(C) 1213141516171819110111112113114115116117118119120121122123124125126127128129130131132133134135136137138139140141142143144145146147148149150151152153154155156157158159160161162163164165166167168169170171172173174175176177178179180 -
:al all
aieill 1c aagaa (a) dall sglb3) cllg
alglg 5.a JyJ (f) JyJ
(a1) aIgall jol o lqklo qo
.
(b3) 1cIgllgcllglg20g (b2).111
:alas ciuig JiauiyI
2 13
Lalolalolalolalolalolalolalolalolalolalolalol
.
gaii i jol. (jill i: lio) aiil iie jnl 1all oia
(Lggy...gaiy)
pcljfo/fo/a:6
:alaaalalalal:6.1
b1b2·s b_n = 12
:aiJalll
yI yI yI yI yI yI yI yI yI yI yI yI yI yI yI yI yI yI yI yI yI yI yI yI yI yI yI yI yI yI yI yI yI yI yI yI yI yI yI yI yI yI yI yI yI
1 1
a h1) 1 (h2).
acwallj
$$ \begin{array} { c } \text { ~ j ~ } \ \text { ~ j ~ } \ \text { ~ j ~ } \ \text { ~ j ~ } \ \text { ~ j ~ } \ \text { ~ j ~ } \ \text { ~ j ~ } \ \text { ~ j ~ } \ \text { ~ j ~ } \ \text { ~ j ~ } \ \text { ~ j ~ } \ \text { ~ j ~ } \ \text { ~ j ~ } \ \text { 1 } \ \text { ~ j ~ } \ \text { ~ j ~ } \ \text { ~ j ~ } \ \text { ~ j ~ } \ \text { ~ j ~ } \ \text { ~ j ~ } \ \text { ~ j ~ } \ \text { ~ j ~ } \ \text { ~ j ~ } \ \text { ~ j ~ } \ \text { ~ j ~ } \ \text { ~ j ~ } \ \mathrm { a l p h a } _ { 2 } = \frac { 1 } { 2 } ( b ) ^ { 2 } + 1 - 1 + 1 + 1 + 1 + 1 + 1 + 1 + 1 + 1 + 1 + 1 + 1 + 1 + 1 + 1 + 1 + 1 + 1 + 1 + 1 + 1 + 1 + 1 + 1 + 1 + 1 + 1 + 1 + 1 + 1 + 1 + 1 + 1 + 1 + \dots . \ \text { ~ j ~ } \ \text { ~ j ~ } \ \text { ~ j ~ } \ \text { ~ j ~ } \ \text { ~ j ~ } \ \text { ~ j ~ } \ \text { ~ j ~ } \ \text { ~ j ~ } \ \text { ~ j ~ } \ \text { ~ j ~ } \ \text { ~ j ~ } \ \text { ~ j ~ } \ \text {\scriptsize i g o n t e r m s : } & \frac { 1 } { 2 } ( b ) ^ { 2 } + 1 - 1 + 1 + 1 + 1 + 1 + 1 + 1 + 1 + 1 + 1 + 1 + 1 + 1 + 1 + 1 + 1 + 1 + 1 + 1 + 1 + 1 + 1 + 1 + 1 + 1 + 1 - 1 - 1 - 1 - 1 - 1 - 1 - 1 - 1 - 1 - 1 - 1 - 1 - 1 - 1 - 1 - 1 - 1 - 1 - 1 - 1 - 1 - 1 - 1 - 1 - 1 - 1 - 1 - 1 - 1 - 1 - 1 - 1 - 1 - \dots . \ \text { ~ j ~ } \ \text { ~ j ~ } \ \text { ~ j ~ } \ \text { ~ j ~ } \ \text { ~ j ~ } \ \text { ~ j ~ } \ \text { ~ j ~ } \ \text { ~ j ~ } \ \text { ~ j ~ } \ \text { ~ j ~ } \ \text { ~ j ~ } \ \text { ~ j ~ } \vdots \ \text { ~ j ~ } \ \text { ~ j ~ } \ \text { ~ j ~ } \ \text { ~ j ~ } \ \text { ~ j ~ } \ \text { ~ j ~ } \ \text { ~ j ~ } \ \text { ~ j ~ } \ \text { ~ j ~ } \ \text { ~ j ~ } \ \text { ~ j ~ } \ \text { ~ j ~ } \ \text {(a) a l p h a ) a l p h a ) a l p h a ) a l p h a ) a l p h a ) a l p h a ) a l p h a ) a l p h a ) a l p h a ) a l p h a ) a l p h a ) a l p h a ) a l p h a ) a l p h a ) a l p h a ) a l p h a ) a l p h a ) a l p p s q u e t o f d e f i c i e n c y , d e f i c i e n c y , d e f i c i e n c y , d e f i c i e n c y , d e f i c i e n c y , d e f i c i e n c y , d e f i c i e n c y , d e f i c i e n c y , d e f i c i e n c y , d e f i c i e n c y , d e f i c i e n c y , d e f i c i e n c y , d e f i c i e n c y , d e f i c i e n c y , d e f i c i e n c y , d e f i c i e n c y , d e f i c i e n c y , d e f i c i e n c y , d e f i c i e n c y , d e f i c i e n c y , d e f i c i e n c y , d e f i c i e n c y , d e f i c i e n c y , d e f i c i e n c y , d e f i c i e n c y , d e f i c i e n c y , d e f i c i e n c y , d e f i c i e n c y , d e f i c i e n c y , d e f i c i e n c y , d e f i c i e n c y , d e f i c i e n c y , d e f i c i e n c y , d e f i c i e n c y , d e f i c i e n c y , d e f i c i e n c y , d e f i c i e n c y , d e f i c i e n c y , d e f i c i e n c y , d e f i c i e n c y , d e f i c i e n c y , d e f i c i e n c y , d e f i c i e n c y , d e f i c i e n c y , d e f i c i e n c y , d e f i c i e n c y , d e f i c i e n c y , d e f i c i e n c y , d e f i c i e n c y , d e f i c i e n c y , d e f i c i e n c y , d e f i c i e n c y , d e f i c i e n c y , d e f i c i e n c y , d e f i c i e n c y , d e f i c i e n c y , d e f q u a s q u a s q u a s q u a s q u a s q u a s q u a s q u a s q u a s q u a s q u a s q u a s q u a s q u a s q u a s q u a s q u a s q u a s q u a s q u a s q u a s q u a s q u a s q u a s q u a s q u a S Q A L E P R O D I F T O R M S C H A N G L E S T O F T O T H E A L F A L F T O T H E A L F A L F T O T H E A L F A L F T O T H E A L F A L F T O T H E A L F A L F T O T H E A L F A L F T O T H E A L F A L F T O T H E A L F A L F T O T H E A L F A L F T O T H E A L F A L E P R O D I F T O R M S C H A N G L E S T O F T O T H E A L F A L F T O T H E A L F A L F T O T H E A L F A L F T O T H E A L F A L F T O T H E A L F A L F T O T H E A L F A L F T O T H E A L F B I G R U P P R O D I F T O R M S C H A N G L E S T O F T O T H E A L F A L F T O T H E A L F A L F T O T H E A L F A L F T O T H E A L F A L F T O T H E A L F A L F T O T H E A L F A L F T O T H E A L F A L F S Q U S Q U S Q U S Q U S Q U S Q U S Q U S Q U S Q U S Q U S Q U S Q U S Q U S Q U S Q U S Q U S Q U S Q U S Q U S Q U S Q U S Q U S Q U S Q U S Q U S Q U S Q U S Q U S Q U S Q U S Q U S Q U S Q U S Q U s Q U S Q U S Q U S Q U S Q U S Q U S Q U S Q U S Q U S Q U S Q U S Q U S Q U S Q U S Q U S Q U S Q U S Q U S Q U S Q U S Q U S Q U S Q U S Q U S Q U S Q U S Q U S Q U S Q U S Q U S Q U S Q U S Q U S q u s q u s q u s q u s q u s q u s q u s q u s q u s q u s q u s q u s q u s q u s q u s q u s q u s q u s q u s q u s q u s q u s q u s q u s q u s q u s q u s q u s q u s q u s q u s q u s q u s q u s qu s q u s q u s q u s q u s q u s q u s q u s q u s q u s q u s q u s q u s q u s q u s q u s q u s q u s q u s q u s q u s q u s q u s q u s q u s q u s q u s q u s q u s q u s q u s q u s q u s q u}s ] = [ ] = [ ] = [ ] = [ ] = [ ] = [ ] = [ ] = [ ] = [ ] = [ ] = [ ] = [ ] = [ ] = [ ] = [ ] = [ ] = [ ] = [ ] = [ ] = [ ] = [ ] = [ ] = [ ] = [ ] = [ ] = [ ] = [ ] = [ ] = [ ] = [ ] = [ ] = [ ] = [ ] = [ ] \end{array} $$
[ = \left{ {{1.5},5,7,9}\right} ]
:alaaalal
(b)
:alall
J 1 (a) dss sglb3) cglg
(a3) ayy
-
-
a 100000000000000000000000000000000000000
b_c = 1
(b2) 1a (a) a a (b3) a a
111 2
j 1 k 1. aegll jao no aieaill aiee (b2) aell
A
acllll jlracoljla lai jdl aolglll
. 1
13/2j/cj/j:3
1
:alaaalall
(b3)
(C) -
(d)
:dlalll
aieill 1e aee (a) dall s (b3) cllg
J (Pulse) (a3) (Pulse)
2"g aJ 1"g aJ (a3) jJ J:
0' (a3) (Stop)
$$ \therefore \text {i} _ {\text {j}} \text {j} _ {\text {k}} \text {k} _ {\text {l}} \text {l} _ {\text {m}} \text {m} _ {\text {n}} (\mathfrak {h} 2) \text {上} _ {\text {n}} \text {n} _ {\text {m}} \text {m} _ {\text {n}} (\mathfrak {h} 3) \text {m} _ {\text {n}} \text {n} _ {\text {m}} \text {m} _ {\text {n}} (\mathfrak {h} 3) - $$
$$ \left. \right.\left. \right.\left. \right.\left. \right.\left.\left.\left.\left.\left.\left.\left.\left.\left.\left.\left.\left.\left.\left.\left.\left.\left.\left.\left.\left.\left.\left.\left.\left.\left.\left.\left.\left.\left.\left.\right.\right.\right.\right.\right.\right.\right.\right.\right.\right.\right.\right.\right.\right.\right.\right.\right.\right.\right.\right.\right.\right.\right.\right.\right.\right.\right.\right.\right.\right. $$
aegaae aagaae aee aee aee
-
- ai = ai - 1 + b_i
g bai jiall Jaiuuiuuiiai lai pao. aaiaiai yaiyjuyj
Jzll Jjiall
J 1
a a a a a a a a a a a a a a a a a a a a a a a a a a a
J 1000000000000000000000000000000000000000000000000000
p_1 = 20
-
J 1 J 1 J 1 J 1 J 1 J 1 J 1 J 1 J 1 J 1 J 1 J 1 J 1 J 1 J 1 J 1 J 1 J 1 J 1 J 1 J 1 J 1 J 1 J 1 J 1 J 1 J 1 J 1 J 1 J 1
JlaljI Jllg jS
eall jlll laiiaaiaiy jlll bgs yalalbaa Jaiu
aaiiaaii i jil
aLo 150gJ,clauL JaaWu, pailll yll plalll gil lalldl Jaoi
5
aaii iilalw y laiyai jiao ayai bai all. aeg ayai ayai ayai yai yai yai
aIgIgIgIgIgIgIgIgIgIgIgIgIgIgIgIgIgIgIgIgIgIgIgIgIgIgIgIgIgIgIgIgIgIgIgIgIgIgIgIgIgIgIgIg
A. ( C)
| : www.moulinex.com | |||
| 1 | |||
| ALGERIA | GROUPE SEB EXPORTChemin du Petit Bois, Les 4M69130 ECULLLY - FRANCE | 213-41-28-18-53 | 1 year |
| ARGENTINA | GROUPE SEB ARGENTINA S.A.Billinghurst 1833 3°C1425DTKCapital FederalBuenos Aires | 0800-122-2732 | 2 años |
| 2U8UUSULARMENIA | «Фг��цшуUbF-«Unuunlɪ»ФFC, 119180Unullɪqu, ÜnlüuuunuulUnuupnubɪtɪnɪh lpp., un.14, 2,2 | (010) 55-76-07 | 2unwɪh/years |
| AUSTRALIA | GROUPE SEB AUSTRAILAPO Box 7535.Silverwater NSW 2128 | 02 97487944 | 1 year |
| OSTERREICH | SEB OSTERREICH HmblCampus 21 - Businesspark Wien SüLiebermannstr. A02 7022345 Brunn am Gebirge | 01 866 70 299 00 | 2 Jahre |
| BELGIQUE /BELGIE | GROUPE SEB BELGIUM SA NV25 avenue de l'Espèrance - ZI6220 Fleurus | 32 70 23 31 59 | 2 ans /years |
| BELAPYCb /BELARUS | 3AO «Гушина СБ-Бовток, 119180 Москов,РоссяСtrapомонецпор. д.14ст.2 | 017 2239290 | 2 roda/years |
| BOSNA IHERCEGOVINA | SEB DÉveloppementPredstavnišvo u BiHVrazova 8/II71000 Sarajevo | Info-linja za potrošače033 551 220 | 2godine |
| BRASIL | GRUPO SEB DO BRASIL PRODUTOSDOMESTICOS LTDAAvenida Arno, 146 Mocaa03108-900 São Paulo SP | 0800-119933 | 1 ano |
| Былгария/BULGARIA | 「ЧУЛСЕ Былгария EOODУн. Борove 52 Г. er. 1, офис 1,1680 Соб�я | 0700 10 330 | 2rodienvi |
| CANADA | GROUPE SEB CANADA345 Passmore AvenueToronto, ON M1V 3N8 | 1-800-418-3325 | 1 year |
| CHILE | GROUPE SEB CHILE Comercial Ltda Avda.Nueva Los Leones 0252Providencia, Santiago | +56 2 232 77 22 | 2años |
| COLOMBIA | GROUPE SEB COLOMBIAApartado Aero 172, Kilometro 1ViaZipaquia Cajica Cundinamarca | 18000919288 | 2años |
| HRVATSKACroatia | SEB DÉveloppement S.A.S.Vodnjanská 261000 Zagreb | 01 30 15 294 | 2godine |
| ČESKA REPUBLIK/CZECH REPUBLIC | GROUPE SEB ČR spel. s r.o.Jankovcova 1569/2c170 00 Praha 7 | 731 01 111 | 2 roky |
| DENMARK | GROUPE SEB NORDIC ASTempovej 272750 Ballerup | 44 663 155 | 2 ār |
| DEUTSCHLAND | GROUPE SEB DEUTSCHLAND GmbH /KRUPS GmbHHerrmarweg 563067 Offenbach | 0212 387 400 | 2 Jahre |
| EESTI/ ESTONIA | GROUPE SEB POLSKA SP Z O.O. ul. Ostrobramska 79 04-175 Warszawa | 5 800 3777 | 2 aastat |
| SUOMI / FINLAND | GROUPE SEB Finland Kutojanie 7 02630 Espoo | 09 622 94 20 | 2 Vuotta |
| FRANCE Inclus Martinique, Guadeloupe, Réunion & St. Martin | GROUPE SEB France SAS Place Ambroise Courtois 69355 Lyon Cedex 08 | 09 74 50 10 14 | 1 an |
| GREECE / ΕλλΑΔΑ | SEB GROUPE ΕλλΑΔΑΟ E.A. Μόδς φαγκοκλλησις 7 T.K. 151 25 Μραδειος Αμαρουοίου | 2106371251 | 2 χρόνιa |
| HONG KONG | SEB ASIA Ltd. Room 901, 9/F, North Block, Skyway House 3 Sham Mong Road, Tai Kok Tsui, Kowloon | 852 8130 8998 | 1 year |
| MAGYARORSZÄG/ Hungary | GROUPE SEB CENTRAL-EUROPE Kft. Taviro koz 4 2040 Budárs | (1) 8018434 | 2 év |
| INDONESIA | Groupe SEB Indonesia (Representative office) Sudirman Plaza, Plaza Marein 8th Floor JL Jendral Sudirman Kay 76-78, Jakarta 12910, Indonesia | +62 21 5793 6881 | 1 year |
| ITALIA | GROUPE SEB ITALIA S.p.A. Via Montefeltro, 4 20156 Milano | 1 99 207 892 | 2 anni |
| JAPAN | GROUPE SEB JAPAN Co. Ltd. 1F Takanawa Muse Building, 3-14-13, Higashi Gotanda, Shinagawa-Ku, Tokyo 141-0022 | 0570-077772 | 1 year |
| KA3AKCTAH KAZAKHSTAN | «Гуллma СБВ-БOSTOK»ЖАК, 119180 Масkey, Ресь CBтамонец Тейьбк Кш, 14-у,,2-чрлььс | 727 378 39 39 | 2 жыл / years |
| KOREA | (辱)그름 썸부 친리어 춙울지 콘류상품 88 셶류일 3 씼 110-790 | 1588-1588 | 1 year |
| LATVJA / LATVIA | GROUPE SEB POLSKA SP Z O.O. ul. Ostrobramska 79 04-175 Warszawa | 6 716 2007 | 2 gadi |
| LIETUVA/LITHUANIA | GROUPE SEB POLSKA SP Z O.O. ul. Ostrobramska 79 04-175 Warszawa | 6 470 8888 | 2 metai |
| MACEDONIA | Groupe SEB Bulgaria EOOD Office 1, floor 1, 52G Borovo St., 1680 Sofia - Bulgaria ГУП CBБ БИЛТAPМДОЕЛ Ул. Боров 52 Г, с. 1, офис 1, 1680 Сcodи, БИлгаря | (0) 2 20 50 022 | 2 говли / years |
| MALAYSIA | GROUPE SEB MALAYSIA SDN. BHD Lot No.C/3A/001 & 002, Block C, Kelana Sq. No.17, Jalan SS7/26, 47301 Kelana Jaya Petaling Jaya, Selangor | 65 6550 8900 | 1 year |
| MEXICO | Groupe SEB México, S.A. de C.V. Goldsmith 38 Desp. 401 Col. Polanco Delegacion Miguel Hildalgo 11 560 Mexico D.F. MEXICO | (52-55) 52 83 93 00 | 1 años |
| MOLDOVA | TOB «Гун СЕВ Украина» Бун. Дагоманова 31 Б, орic 1 02068 КИВ, Украина | (22) 929249 | 2ani / years |
| NEDERLAND | GGROUPE SEB NEDERLAND BV Generatorsstraat 6 3903 LJ Veenendaal | 0318 58 24 24 | 2jaar |
| NEW ZEALAND | GROUPE SEB NEW ZEALAND Unit E, Building 3, 195 Main Highway, Ellerslie, Auckland | 0800 700 711 | 1 year |
| NORGE | GROUPE SEB NORDIC AS Tempovej 27 2750 Ballerup DANMARK | 815 09 567 | 2är |
| PERU | GROUPE SEB COLOMBIA Av. Camino Real N' 111 of. 805 B San Isidro - Lima - Perú | +511 441 4455 | 1 años |
| POLSKA/ POLAND | GROUPE SEB POLSKA SP Z O.O. ul. Ostrobamska 79 04-175 Warszawa | 0 801 300 423 koszt jak za polączenia lokalne | 2 lata |
| PORTUGAL | GROUPE SEB IBÉRICA SA Urb. da Matinha Rua Projectada à Rua 3 Bloco1 - 3° B/D 1900 - 796 Lisboa | 808 284 735 | 2anos |
| REPUBLIC OF IRELAND | GROUPE SEB IRELAND Unit B3 Aerodrome Business Park, College Road, Rathcoole, Co. Dublin | 01 677 4003 | 1 year |
| ROMÁNÍA/ ROMANIA | GROUPE SEB ROMÁNÍA Str. Daniel Constantin nr. 8 010632 Bucuresti | 0 21 316 87 84 | 2ani |
| POCCNIA/ RUSSIA | 3AO «Гунина СЕВ-Бост_OK», 119180 Мсква, Pocswá Сtrapomонтуль的答案. d.14ст.2 | 495 213 32 29 | 2 roda/ years |
| SRBIJA Serbia | SEB Developpement Antifasistisce borbe 17/13 11070 Novi Beograd | 060 0 732 000 | 2 godine |
| SINGAPORE | GROUPE SEB SINGAPORE Pty Ltd. 59 Jalan Pemipin, #04-01/02 L&Y Building Singapore 577218 | 65 6550 8900 | 1 year |
| SLOVENSKO/ SLOVAKIA | GROUPE SEB SLOVENSKO s.r.o. Rybnica 40 831 07 Bratislava | 233 595 224 | 2 roky |
| SLOVENIJA | SEB d.o.o Gregorčiceva ulica 6 2000 MARIBOR | 02 234 94 90 | 2 leti |
| ESPÁÑA | GROUPE SEB IBÉRICA S.A. Almagáyers, 119-123, Complejo Ecurban 08018 Barcelona | 0902 31 22 00 | 2años |
| SVERIGE | TEFAL SVERIGE SUBSIDIARY OF GROUP SEB NORDIC Truckvagen 14 A, 194 52 Uplands Väsby | 08 594 213 30 | 2är |
| SUSSE SCHWEIZ | GROUPE SEB SCHWEIZ GmbH Thurgauerstrasse 105 8152 Glattbrugg | 044 837 18 40 | 2 ans / Jarhre |
| TAIWAN | SEB ASIA Ltd. Taipei International Building, Suite B2, 6F-1, No. 216, Tun Hwa South Road, Sec. 2 Da-an District Taipei 106, R.O.C. | 886-2-27333716 | 1 year |
| THAILAND | GROUPE SEB THAILAND 2034/66 Italhai Tower, 14th Floor, n° 14-02, New Phetchburi Road, Bangkapi, Huaykwang, Bangkok, 10320 | 02723 4488 | 2 years |
| TÜRKIYE | GROUPE SEB ISTANBUL AS Beybi Giz Plaza Dereboyu Cad. Meydan Sok. No. 28 K. 12 Maslak | 216 444 40 50 | 2 YIL |
| U.S.A. | GROUPE SEB USA 2121 Eden Road Millville, NJ 08332 | 800-395-8325 | 1 year |
| Украина/ UKRAINE | TOB «Гун СБЕ Украина» Вун. Дагоманова 31 Б, obic 1 02068 КИ, Украина | 044 492 06 59 | 2 рожи/ years |
| UNITED KINGDOM | GROUPE SEB UK Ltd. 11-49 Station Road Langley, Slough Berkshire SL3 8 DR | 0845 602 1454 | 1 year |
| VENEZUELA | GROUPE SEB VENEZUELA Av Eugenio Mendoza, Centro Leptonia, Torre ING Bank, Piso 15, Ofc 155 Urb. La Castellana, Caracas | 0800-7268724 | 2 anno |
| VIETNAM | GROUPE SEB VIETNAM (Representative office) 127-129 Nguyen Hue Street District 1, Ho Chi Minh City, Vietnam | +84-8 3821 6395 | 1 year |
MOULINEX INTERNATIONAL GUARANTEE
Date of purchase: / Date d'achat / Fecha de compra / Data da compra / Data d'acquisto / Kaufdatum / Aankoopdatum / Købsdatum / Inköpsdatum / Kjopsdatum / Ostopävi / Data zakupu / Data vanzari / Isigijimo data/ Ostukupaäe / Datum nakupa / Sorozatszam / Datum nakuju / Pirkuma datums / Datum Kupovine / Datum kupnej / Data cumpararii / Datum nakuju / Tarikh pembelian / Tanggal pembelian / Ngay mua hang/ Satin alma tarihi / Дата поради / Дата пораду / Дата на захунвае / Датун ha Кунвае / Catbilfam megimi / Hερομηνία γοράς / ζυδιαυπρ opnp / Συνησα / 買购日期/購入日/購入日/購入日/購入日/購入日/購入日/購入日/購入日/購入日/購入日/購入日/購入日/購入日/購入日/購入日/購入日/購入日/購入日/購入日/購入日/購入日/購入日/購入日/購入日/購入日/購入目/购入目/购入目/购入目/购入目/购入目/购入目/购入目/购入目/购入目/购入目/购入目/购入目/购入目/购入目/购入目/购入目/购入目/购入目/购入目/购入目/购入目/购入目/购入目/购入目/购入目/
Product reference: / Référence du produit / Referencia del produit / Nome do produits / tipo de produits / Typnummer des Gerätes / Artikelnummer van het apparaat / Referencenummer / Produktrefereens / Artikkelnummer / Tuotenumero / refeceriaj produitu / Model / Gaminio numeris / Toote viitenumber / Tip aparata / Vásárlás kelte / Typ výrobku / Produktura atsaues numurs / Model proizvoda / Oznaka proizvoda / Cod produs / Produkt rujukan / Referensi produk / Ma san pham/ Ürün kodu / Moŋelb / Moŋelb / Moŋen ha ypeda / Moŋeni / Kɔdɪkɔs προίντος / Unŋl/ qɪnənɪnɪy/ 產品模型/製品レフアLENs番号/創吾明/Jaljklj jjJj
/ Nom et adresse du vendre / Nombre y direccion del minorista / Nome e enderego do revendedor / Nome e indirizzo delnegozzio / Name und Anschrift des Handlers / Naam en adres van de dealer / Forhandler navn & adresse / Aterforsäljarens namn och adress / Forhandler navn og adresse / Jällenmyyyän nimi ja osoite / nazwa i adres sprzedawy / Numele.si adresa vanzatorului / Parduotuvés pavadinimas ir adresas / Mūja kauplus ja Aadress / Naziv in naslov trgovine / Tipusszam / Nazov a adresa predajcu/ Veikala nosaukums un adres / Naziv i adresa maloproduaje / Naziv i adresa prodavca / Naziv i adresa prodajng maja / Nume si adresa vanzator / Název a adresa prodejece / Nama dan alanat peruncit / Nama Toko Penjual dan alamat / Tén va dja chi cra hang bán/ Satci firmanin adi ve adresi / Ha3BaHne n aDpec npoDaBaCu / Ha3Ba i aDpeca npoDaBaCu / TpbroKn obekt/Ha3Bn H aDpeca Ha npoDaBnCuTa/CatybHbHn atb KHe MeKeH-KaBl/ EnuVuaia kai δeθθνηκ καταστμαος / quAùwnnnh wuiuWunuH u huaqlu/ qouwauuueyua/kuuue/零售商的店名和地址/贩壳店の名前、住所/全部登言和春全/
Distributer stamp /Cachet distributeur /Sello del distribuidor / Carimbo do revendedor / Timbo del negozio / Händlerstempel / Stempel van de dealer / Forhandler stempel / Aterforsäljarens stämpl / Forhandler stempel / Jällenemyyyän leima / pieczec sprzedawy / Stampila vanzatorului / Antspaudas / Tempel / Zig trgovine / Eladé neve, cime/ Razitko predajcu / Zimogs / Pecat maloproduaje/ Pecat prodavca / Pecat prodajnog mjesta / Stampila vanzatorului / Razitko prodeje/Cap perunci / Cap dari Toko Penjual/Cūra hang bàn dong dai/ Satcii Firmanin Kasesi / Neuath npodabua/ Neuata knpodabua/ Neuat ha tprpobckna oebk/ Neuat ha npodabnucata / CatyushinbH mepi / Σφρayidα kataostniatoç / Yuaunnnh huhpp/零售商的盖印/贩店壳印/示遍款具/心zjll jy
Moulinex®
masterchef 5000
FR P.7-20
EN P. 21-34
DE P. 35-48
NL P. 49-62
ES P.63-76
PT P. 77-90
P. 91-104
EL P. 105-118
TR P. 119-132
DA P. 133-146
NO P. 147-160
SV P. 161-174
PI P. 175-188
FA P. 189-202
AR P. 203-216