Odacio FP740127 - Food Processor MOULINEX - Free user manual and instructions
Find the device manual for free Odacio FP740127 MOULINEX in PDF.

| Product type | Multifunction food processor |
| Brand | Moulinex |
| Model | Odacio FP740127 |
| Main functions | Blending, chopping, kneading, grating, slicing, beating, whisking, citrus juicing, centrifugal juicing, meat grinding, emulsifying, pureeing, pressing, mashing, sausage making, cookies and kibbeh preparation |
| Capacities | Main bowl: up to 1.2 kg heavy dough or 1.5 kg light dough; Blender bowl: up to 1.5 L; Grinding: up to 600 g meat; Juicer: up to 0.5 kg fruit per operation |
| Controls and speeds | Electronic speed control from 1 to 5 + Pulse function (electronic model); Selector 1-2 + Pulse (two-speed model) |
| Included accessories | Main bowl, blender bowl, vegetable cutter with discs (fine/coarse grater, fine/coarse slicer, french fry cutter, grater, shredder), beater, emulsifier, citrus juicer, centrifugal juicer with pouring spout or filter basket, mini chopper, grinder, Maxipress, meat grinding head with reducer, sausage funnel, cookie maker, kibbeh accessory, spatula, storage box |
| Power | Not specified |
| Power supply | 220-240 V, 50/60 Hz (standard estimate) |
| Dimensions (estimated) | Approximately 35 x 25 x 40 cm |
| Weight (estimated) | Approximately 5 kg |
| Care and cleaning | Removable parts dishwasher safe (except beater drive unit, juicer receptacle body, grinding head, motor block and reducer). Easy cleaning: quick rinse after use, cleaning the blender bowl by pulsing with warm soapy water |
| Safety | High output cover with locking, automatic stop if accessory or cover is mispositioned, locking lever on juicer, child safety (not specified) |
| Spare parts and repairability | Additional accessories available from retailers or Moulinex approved service centers (discs, grinder, bowls, etc.). Repairs by authorized center. |
| General information | Detailed manual (63 pages) available online. Robust and versatile model for daily culinary preparation. |
Frequently Asked Questions - Odacio FP740127 MOULINEX
User questions about Odacio FP740127 MOULINEX
0 question about this device. Answer the ones you know or ask your own.
Ask a new question about this device
Download the instructions for your Food Processor in PDF format for free! Find your manual Odacio FP740127 - MOULINEX and take your electronic device back in hand. On this page are published all the documents necessary for the use of your device. Odacio FP740127 by MOULINEX.
USER MANUAL Odacio FP740127 MOULINEX
natural_image
Line drawing of a kitchen blender with handle, side panel, and side lid (no text or symbols)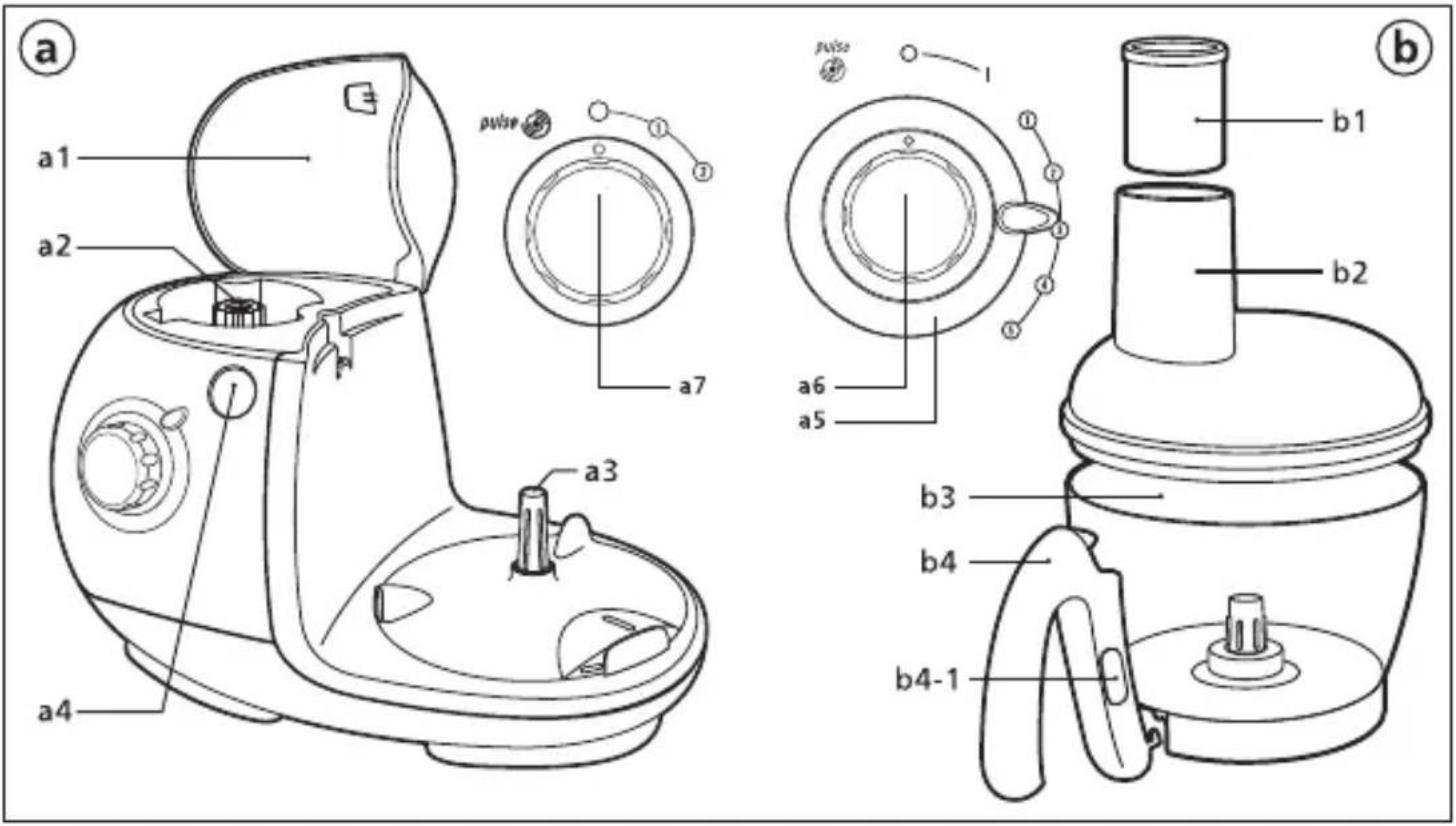

natural_image
Technical line drawing of a cylindrical mechanical component with a pointed tip and flange (no text or symbols)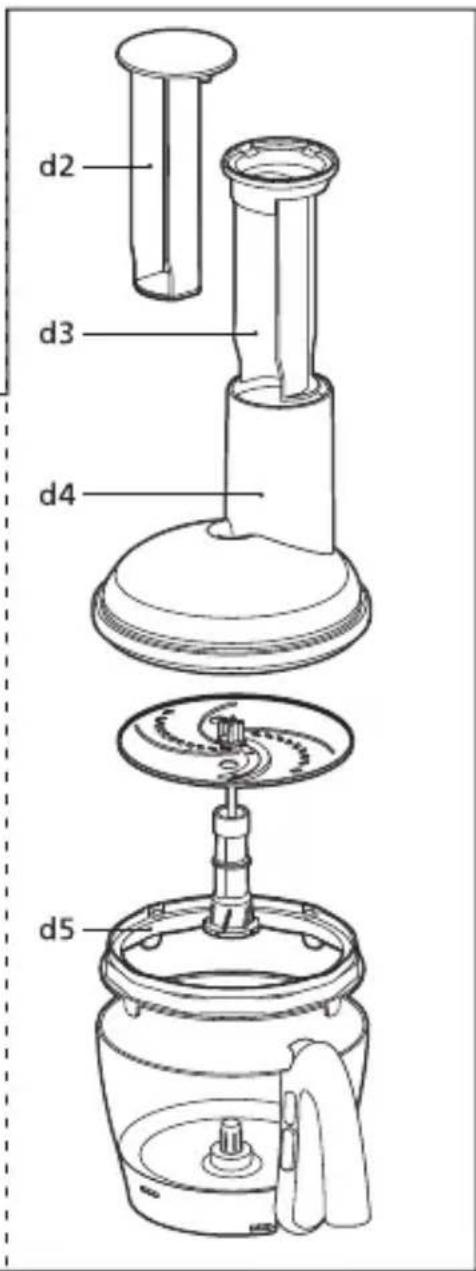
natural_image
Technical line drawing of a mechanical component with no visible text or symbols
text_image
o o5-1 o5-2 o7 o2 o1 o6 o5 o4 o3| p |
| q | q1 | q2 |
| r | r1 | r2 |
| S |
| t | ||
 |  | |
 | ||
 |  | |
 |  | |
 | ||
 |  |

text_image
① b3.1 b3.2 b3.3 b4.1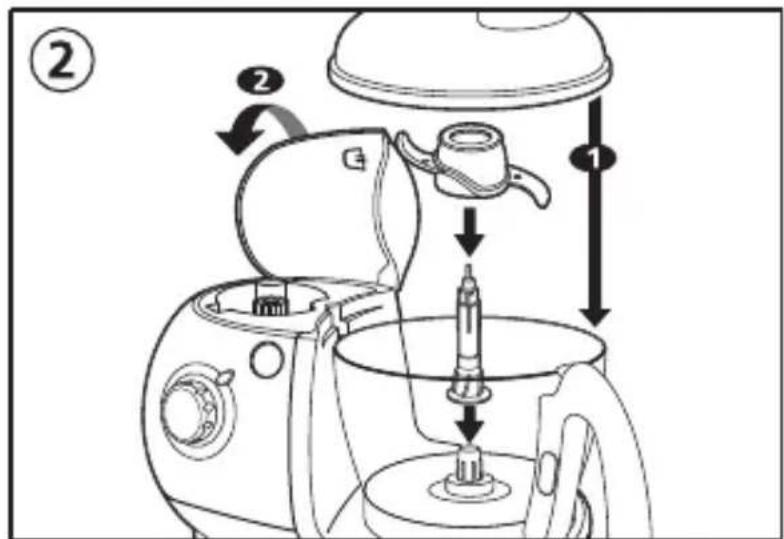
text_image
Diagram of a kitchen mixer with labeled parts and directional arrows indicating assembly steps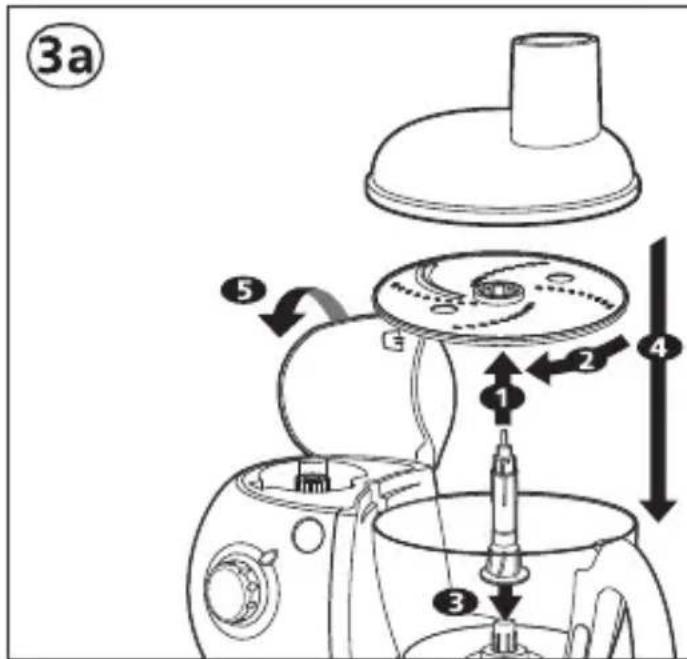
text_image
3a ③a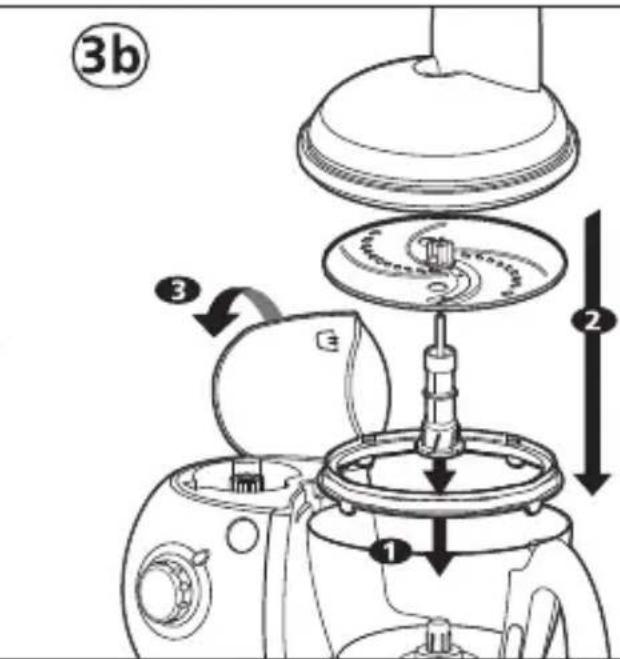
text_image
3b ① ② ③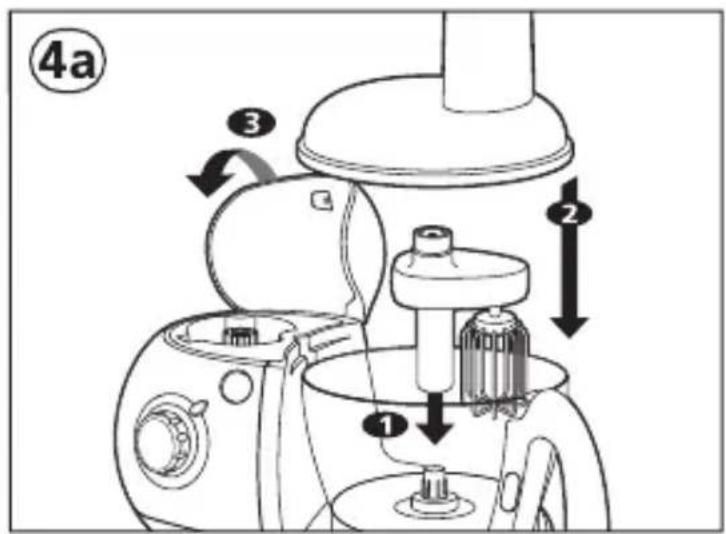
text_image
4a 1 2 3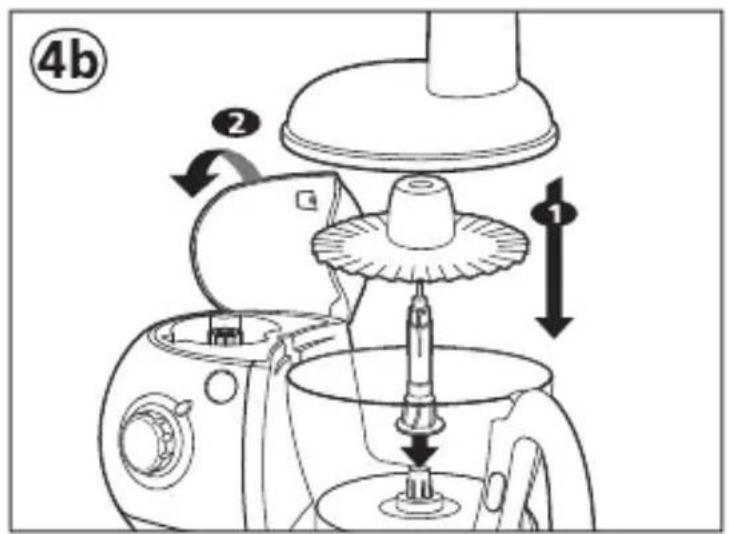
text_image
4b 2 1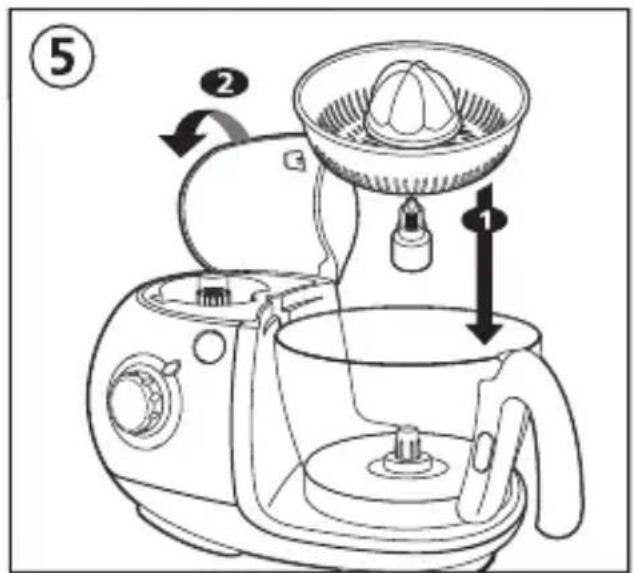
text_image
Diagram of a kitchen appliance with labeled parts and directional arrows indicating process flow
text_image
6a1 ① ② ③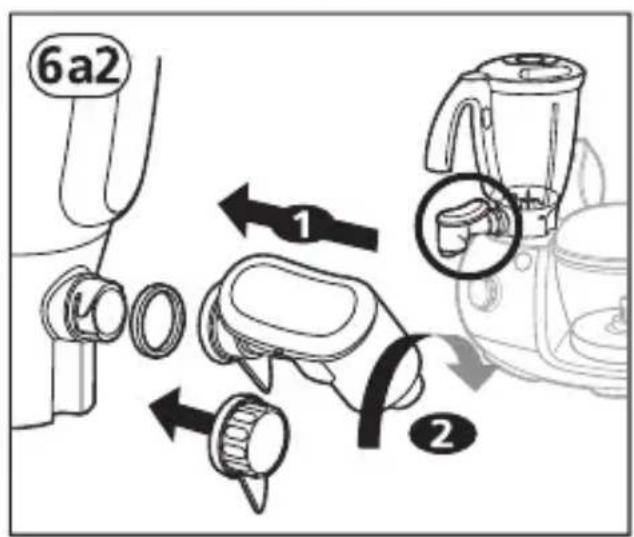
text_image
6a2 1 2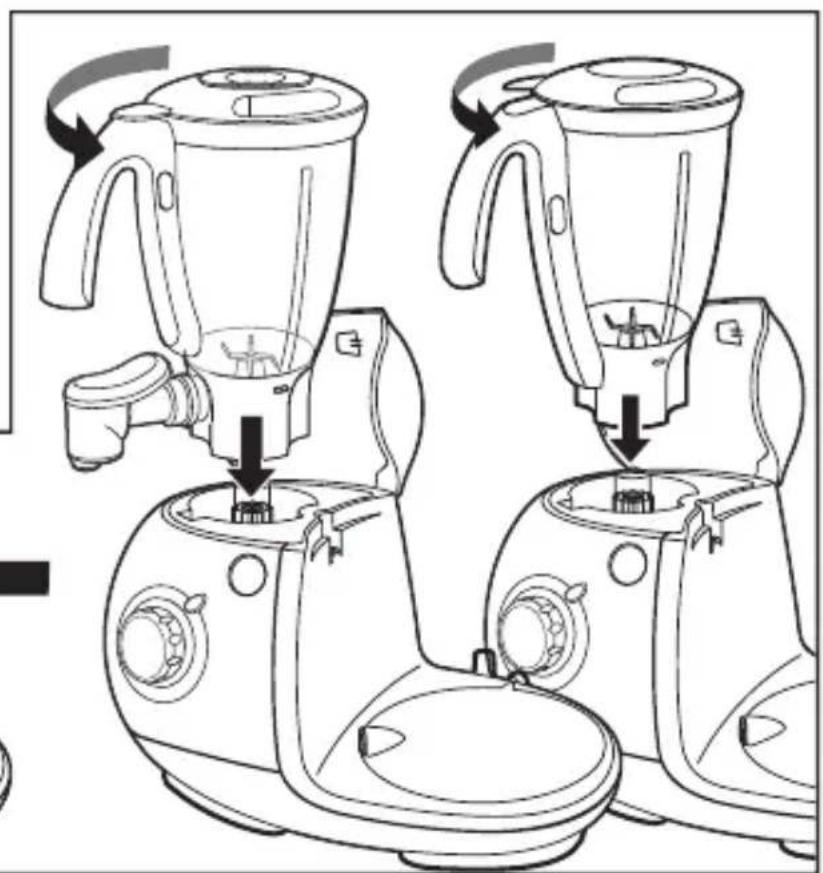
natural_image
Line drawing of a kitchen blender with three variants and a handle, showing step-by-step assembly (no text or symbols)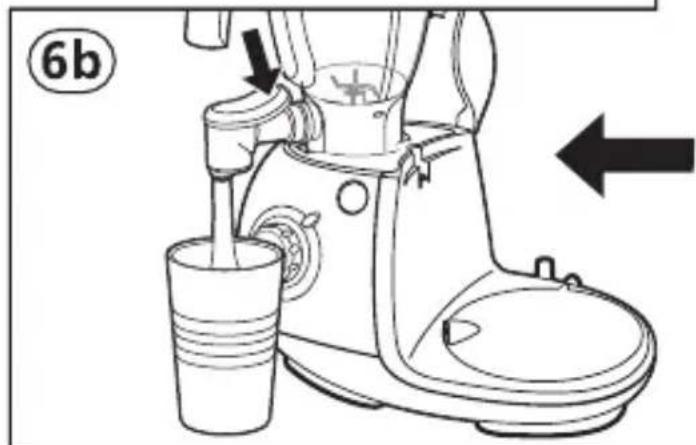
text_image
6b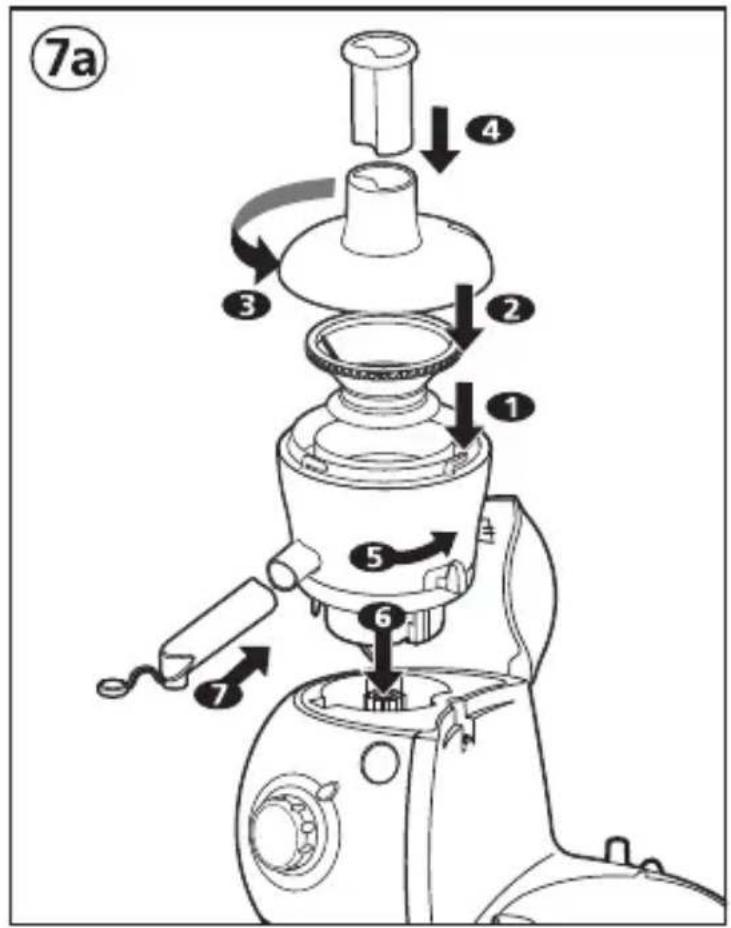
text_image
⑦a 1 2 3 4 5 6 7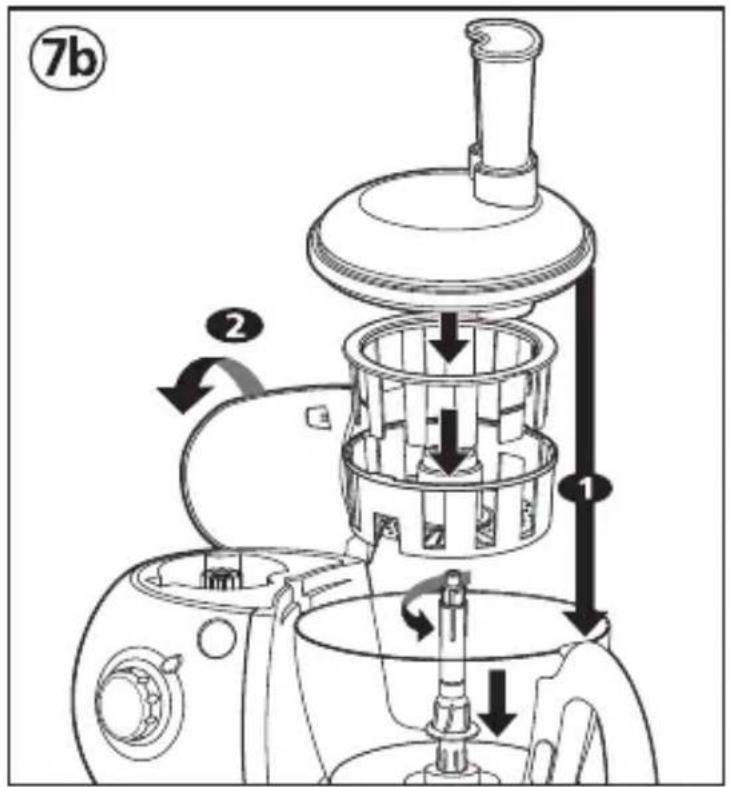
text_image
7b 1 2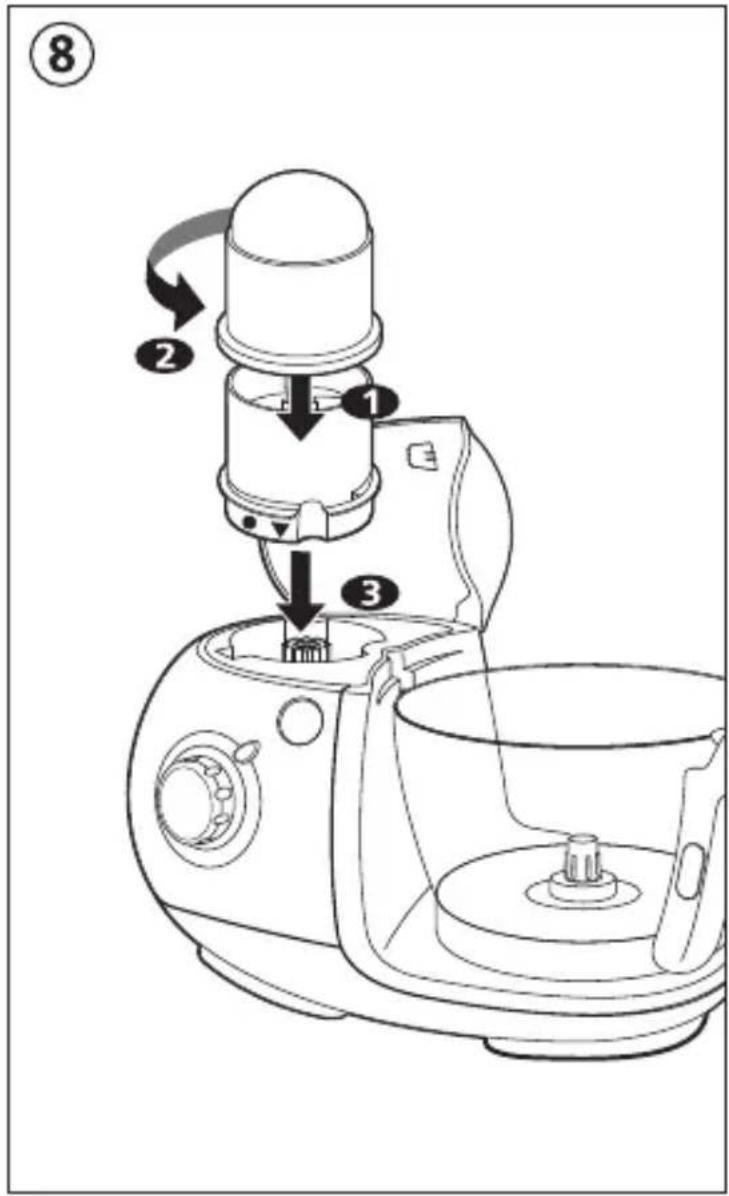
text_image
Diagram of a kitchen mixer with numbered parts and directional arrows indicating working principle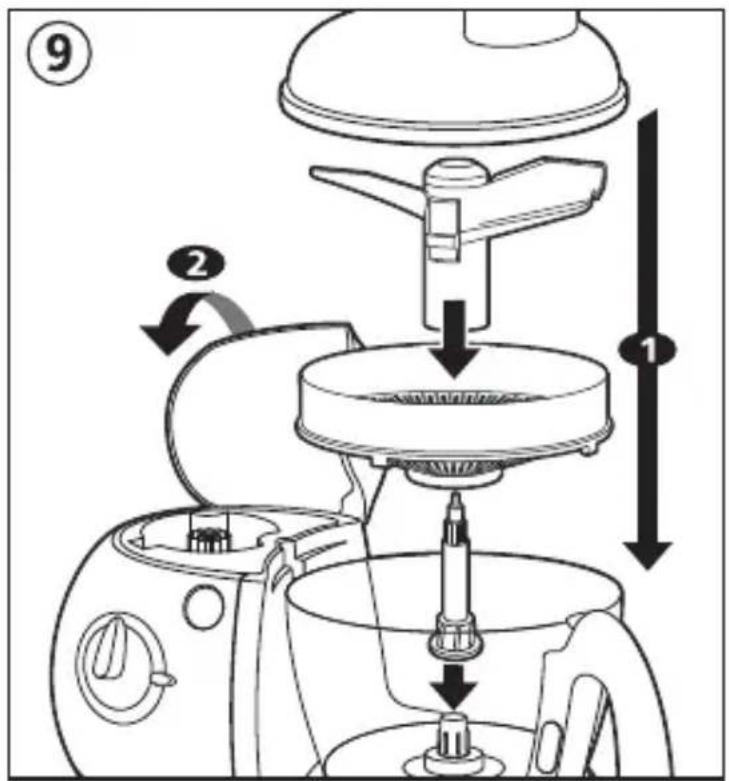
text_image
Diagram of a kitchen appliance with numbered parts and directional arrows indicating assembly steps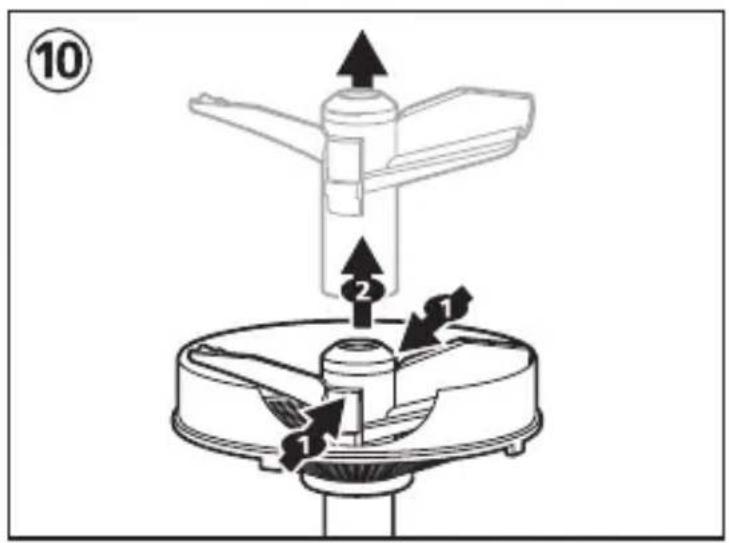
text_image
10 ⑩ ② ① ①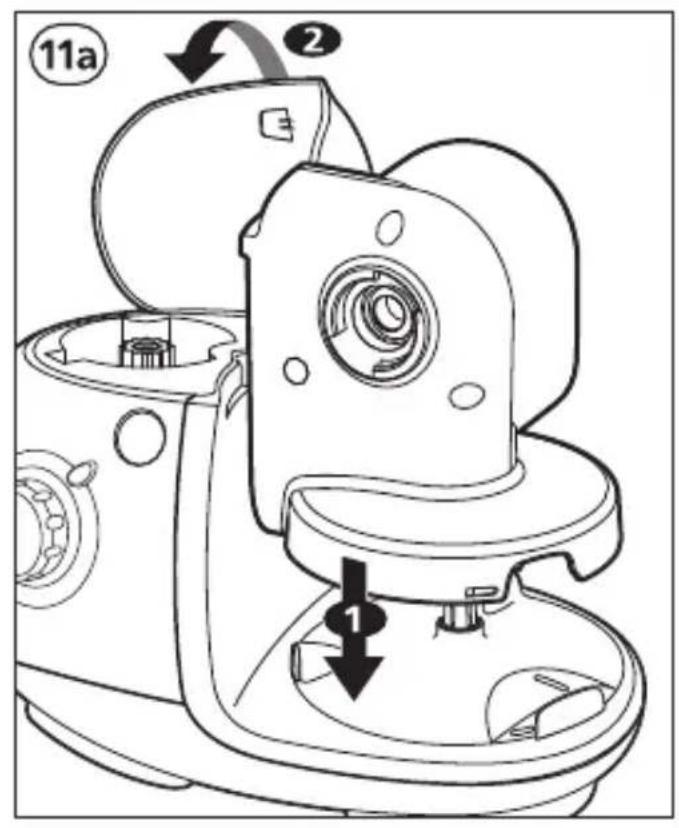
text_image
11a 2 1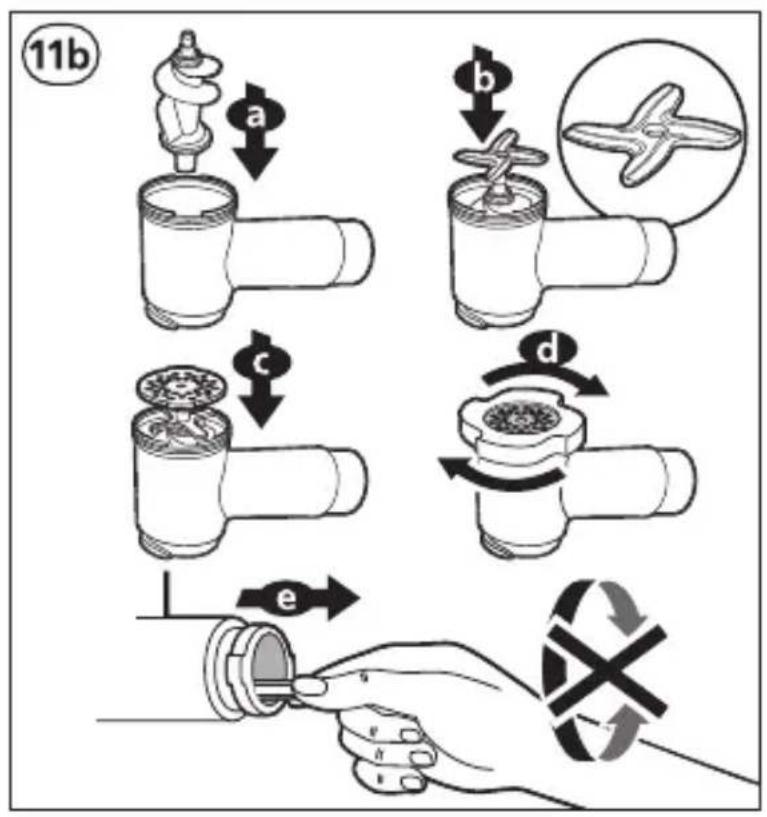
text_image
11b a b c d e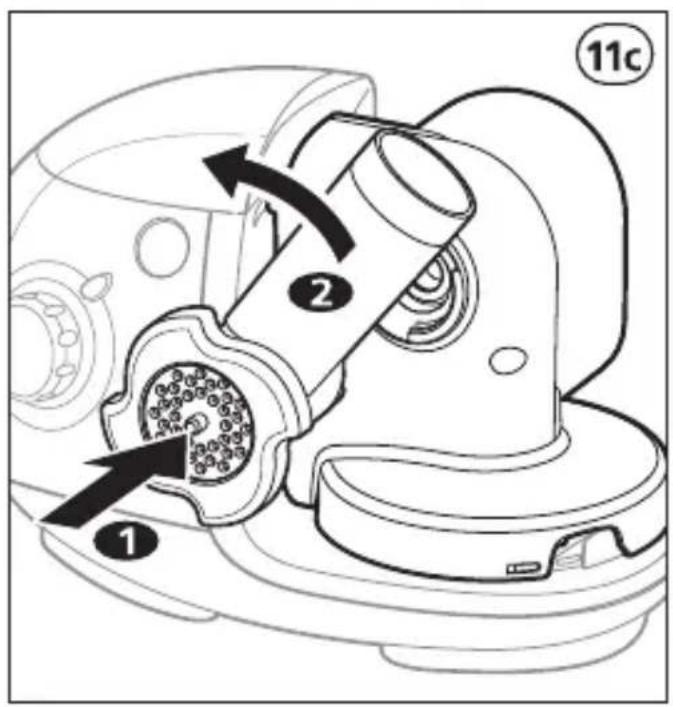
text_image
11c 2 1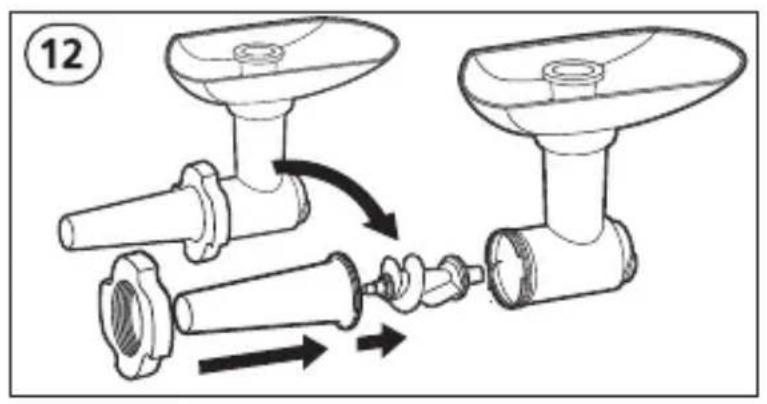
text_image
12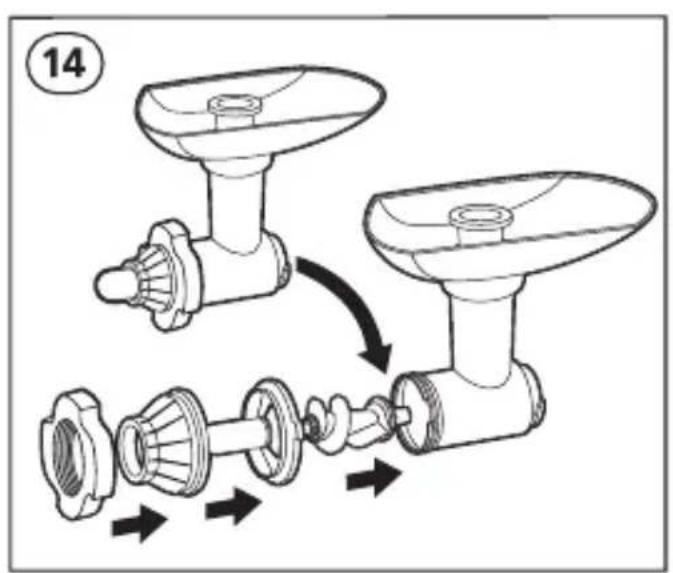
text_image
14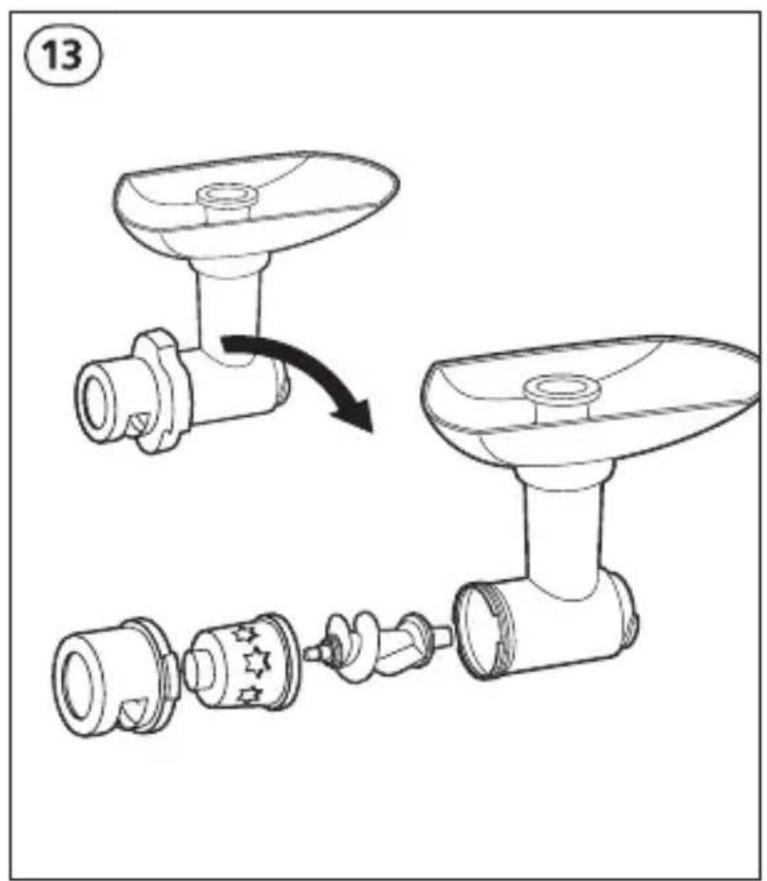
text_image
13Abricots secs : 140 g / 10s.
Thank you for choosing a product from the MOULINEX range, exclusively designed for the preparation of foodstuffs.
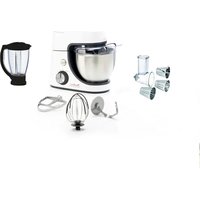
DESCRIPTION
A Motor unit
a1 upper drive cover
a2 upper drive
a3 lower drive
a4 release button of the cover (a1) and unclipping of the accessory on the upper drive
a5 electronic speed variator from 1 to 5 (depending on model)
a6 knob for Operation/Stop and Pulse (intermittent operation)
a7 1-2 and Pulse speed selector
Accessories depending on model:
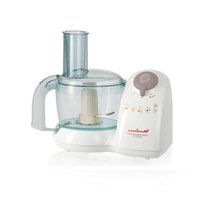
b. Bowl assembly
b1. pusher-measure
b2. lid with standard feed tube
b3. bowl (see figure1)
b3-1. drive rod
b3-2. rubber seal
b3-3. nut
b4. removable handle
b4-1. knob for unclipping the handle
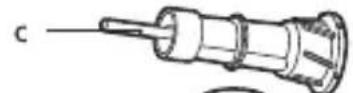
c. Spindle
d. Vegetable cutter
d1. discs
A/D : fine slicing / grating
C/H : thick slicing / grating
E : chip cutter
G : parmesan grater
B/G : parmesan scraper / shaver
d2. small food pusher
d3. large food pusher
d4. lid with large feed tube
d5. disc support
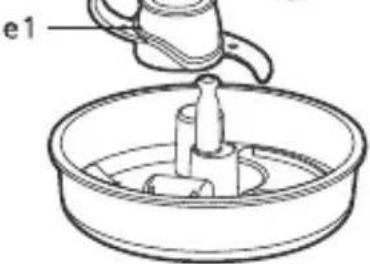
e. Cutters
e1. metal blade
e2. plastic kneader
e1. metal blade e2. plastic kneader
f. Whisk
f1. drive housing
f2. whisk
f1. drive housing f2. whisk
g. Emulsifying disc
h. Citrus press
h1. cone
h2. filter basket
h3. drive rod
i. Mini-chopper
i1. lid
i2. bowl
j. Grinder
j1. lid
j2. bowl
k. blender with or without tap
k1. measuring cap
k2. lid
k3. jug
k4. removable handle
k4-1. knob for unclipping the handle
k5. seal pour tap
k6. tap
k7. stopper
l. "Maxipress"
l1. rotor blade
l2-1. disc for purée
l2-2. disc for coulis
m. Centrifugal juice extractor with pouring spout or filter basket
m1. food pusher
m2. lid
m3. rotary filter
m4. pulp collector
m5. pouring spout
m6. locking lever
m7. food pusher
m8. Lid
m9. filter crown
m10. filter basket
n. Geared reducer for mincer head
o. Mincer head
-
Body
o2. Removable tray
o3. Screw -
4 blade cutter
- Discs
05-1. Small hole disc: fine mincing
05-2. Large hole disc: coarse mincing
-
Nut
-
Food pusher
p. Sausage nozzle
q. Cake nozzle
The accessories supplied with the model you have purchased are shown on the label on the top of the packaging.

CAUTION: the safety precautions are part of the appliance.
Read them carefully before using your new appliance for the first time. Keep them in a place where you can find and refer to them later on.
FIRST USE
- Before using for the first time, wash all of the parts in hot soapy water. Rinse and dry.
- Place the motor unit on a flat, clean dry surface.
- Plug in your appliance.
Starting your appliance
Electronic model:
- Pulse (intermittent operation): turn the knob (a6) to the "Pulse" position
By pressing successively for better control of some preparations. - Continuous operation: turn the knob (a6) to the "1" position.
- Stop: turn the knob (a6) to the "0" position.
- Speed variator (a5): select the speed indicated or vary it during the preparation.
Two-Speed Model:
- Pulse (intermittent operation): turn the knob (a7) to the "Pulse" position by pressing successively for better control of some preparations.
-
Continuous operation: turn the knob (a7) to the "1" or "2" position depending on the preparation.
-
Stop: turn the knob (a7) to the "0" position.
- Using the upper drive (a2): check that no accessories are attached to the lower drive.
THE FUNCTIONS OF YOUR FOOD PROCESSOR
1 ASSEMBLING THE REMOVABLE PARTS
- Fitting / removing the bowl (b3)
The bowl is used with the following accessories (depending on model):
- Cutters (e), vegetable cutters (d), whisk (f), emulsifier (g), citrus press (h), centrifugal juice extractor with filter basket (m10) "Maxipress" (l).
- If it is not already fitted, fit the seal (b3-2) onto the bottom of the bowl. The lip of the seal must be facing upwards.
- Fit the drive rod (b3-1) onto the seal (b3-2).
- Lock the assembly with the nut (b3-3) until it locks.
- Dismantle the assembly and clean it after each use.
- Fitting / removing the handles (b4) of the bowl and (k4) the blender.
- For easier cleaning and storage, the handle of the bowl (b4) and the blender (k4) can be removed.
- To fit the handle, position it opposite the clips of the bowl.
- Slide the handle upwards until it clicks into place.
- To remove the handle, press the release knob (b4-1) or (k4-1) and slide it downwards. (Note: the lid of the blender must be removed to allow the handle (k4) to be taken off.
The handle (b4) must be fitted to the bowl so that the upper drive cover (a1) may be locked.
2 MIXING / BLENDING / MINCING / KNEADING
ACCESSORIES USED (depending on model)
- Bowl assembly (b), spindle (c), and cutters (e):
• metal blade (e1) for blending and chopping. - plastic kneader (e2) for kneading or mixing.
FITTING THE ACCESSORIES
Press the release button (a4) to open the upper drive (a1) cover.
- Place the bowl (b3) on the lower drive (a3).
- Place the spindle (c) on the bowl drive (b3-1).
- Slide the metal blade (e1) or the plastic kneader (e2) onto the spindle (c), to the bottom of the bowl.
- Place the ingredients in the bowl.
- Fit the lid (b2) or (d4) onto the bowl.
- Close the upper drive cover (a1).
You should hear it "click" shut.
To release the cutters (e) from the spindle (c):
- Place the assembly on a stable surface.
- Turn the spindle (c) in a clockwise direction while holding the cutter (e) at the top.
Recommended speeds
| Function | Electronic Model | Two-Speed Model |
| Mixing 3-4-5 | 1-2 | |
| Chopping 5-Pulse 2-Pulse | ||
| Kneading 5 2 | ||
| Blending 5 2 | ||
Tips
Blending
- You can blend up to 1 litre of stew, soup, or purée in 20 s.
Chopping
- In 15 to 30 s, you can chop up to 600 g of foodstuffs:
- hard foodstuffs: cheese, dry fruits, certain vegetables (carrots, celery...).
- tender foodstuffs: certain vegetables (onions, spinach...).
- raw or cooked meats (bones and nerves removed and cut into cubes).
- raw or cooked fish...
Kneading / mixing
- With the kneading function, stop the appliance as soon as you see the ball of pastry form.
You can:
- knead up to 1.2 kg of heavy dough (rich shortcrust, shortcrust, bread dough) in approximately 60 sec.
- mix up to 1 litre of pancake or waffle batter, etc. in 1 to 1 min.
- mix 1.5 kg of light mixture (biscuits, cakes) in 1 to 3 min.
3 GRATING / SLICING
ACCESSORIES USED
- Bowl assembly (b), spindle (c) and vegetable cutter (d).
FITTING THE ACCESSORIES
Press the release button (a4)
To open the upper drive cover (a1).
- Place the bowl (b3) onto the lower drive (a3).
With the discs (d1):
3a Model with lid with standard feed tube (b2) and food pusher (b1):
- Place the spindle (c) in the central hole of the disc (d1). You have to turn clockwise to lock in place.
- Place the assembly onto the bowl drive (b3-1).
- Fit the cover (b2) on the bowl.
- Close the upper drive cover (a1).
You should hear it click shut. - Insert the foodstuffs into the tube and guide them with the food pusher (b1).
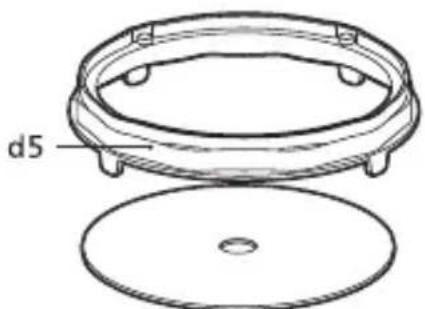
3b Model with lid with large feed tube (d4) and the (d2) and (d3) food pushers:
Place the disc support (d5) inside of the bowl.
- Place the spindle (c) in the central hole of the disc (d1). You have to turn it clockwise to lock the spindle in place.
- Place the assembly onto the bowl drive (b3-1), this assembly should rest on the disc support (d5)
- Fit the lid (d4) on the bowl.
- Close the upper drive cover (a1).
You should hear it click shut.
- Insert the foodstuffs into the tube and guide them with the food pushers (d2) or (d3).
- To guide small vegetables (carrots, courgettes...), place the large food pusher (d3) inside the feed tube and push the vegetables down with the small food pusher (d2).
Recommended speeds
| Function | Electronic Model | Two-Speed Model |
| Grating 3-4-5 | 1-2 | |
| Slicing 2 1 |
Tips
You can prepare with the discs (depending on model):
- thick slices (H) / thin slices (D): potatoes, onions, cucumbers, beetroot, apples, carrots, cabbage...
- thick grating (C) / thin grating (A): celeriac, potatoes, carrots, cheese...
- chip cutter (E): potato, chips
- parmesan grater (G): potatoes; parmesan ...
• shavings (B): carrots; courgettes, parmesan ...
4 BEATING / WHISKING / EMULSIFYING
ACCESSORIES USED (depending on model)
- Bowl assembly (b) and whisk (f)
or - Bowl assembly (b), emulsifier (g) and spindle (c).
FITTING THE ACCESSORIES
Press the release button (a4) to open the upper drive cover (a1).
- Place the bowl (b3) onto the lower drive (a3).
4a With the whisk (f):
- Place it onto the bowl drive (b3-1).
4b With the emulsifier(g):
- Place the spindle (c) onto the bowl drive (b3-1).
- Slide the emulsifier onto the spindle.
Then:
- Place the ingredients into the bowl.
- Fit the lid (b2) or (d4) on the bowl.
- Close the upper drive cover (a1).
You should hear it click shut.
Recommended speeds
| Function | Electronic Model | Two-Speed Model |
| Beating / Whisking / Emulsifying | 1 to 5 1-2 |
Tips
- Do not use these accessories to knead heavy dough or to mix sponges.
You can prepare: mayonnaise, aioli, sauces, whisked egg whites (1 to 6), whipped cream, Chantilly cream (up to 0.5 litre).
5 SQUEEZING FRUIT JUICES (depending on model)
ACCESSORIES USED
- bowl (b3) and citrus press (h).
FITTING THE ACCESSORIES
Press the release button (a4) to open the upper drive cover (a1).
- Place the bowl onto the lower drive (a3).
- Place the drive rod (h3) of the citrus press onto the bowl drive.
- Place the filter basket (h2) on the bowl.
- Place the cone (h1) in the hole of the filter basket.
- Close the upper drive cover (a1).
You should hear it click shut
Recommended speeds
| Function | Electronic Model | Two-Speed Model |
| Squeezing 1 1 |
Tips
- Place half a citrus fruit on the cone (h1). You can make up to 1 litre of juice without emptying the bowl.
SMOOTHIES / BLENDING / FINE BLENDING
ACCESSORY USED
- blender (k).
FITTING THE ACCESSORY
Press the release button (a4) to open the upper drive cover (a1).
6a Direct Service Model with tap:
6a1 Cleaning the tap (k6)
To make the tap (k6) easier to clean, it can be dismantled into two parts:
Press "push", and release the cover (fig. 6a-1). Clean the tap (k6) under running water. Fit the cover by pressing the middle of it, then clip on the metal pin underneath the hooks (fig. 6a-1).
6a2 Fitting the tap (k6) onto the blender (k3)
Push the seal (k5) as far as possible onto the neck of the jug, then lock the assembled tap (k6 with a quarter turn).
Tips: this blender, fitted with its tap, allows you to pour your preparation, directly into glasses (cocktails), onto plates or into bowls (soups) or into the pan (pancakes). Speed 1 helps you to serve thick preparations (milkshakes or smoothies). Stop the appliance as soon as it has finished.
Clean the assembled tap each time after each use.
If you do not need the tap, you can replace it with the stopper (k7) (see fig 6a-1), equipped with the seal (k5).
6b For the two models:
- Place the ingredients in the blender (k3), then lock the lid (k2) onto the jug.
- Place the blender assembly (k) onto the upper drive (a2).
You should hear a click.
Recommended speeds
| Function | Electronic Model | Two-Speed Model |
| Smoothing / mixing / blending | 1 to 5 - Pulse 1 to 2 - Pulse | |
Tips
You can add ingredients via the hole of the cap (k1) during the preparation.
Always use your blender (k) with its cover (k2) fitted.
- Do not fill the blender with a boiling liquid.
- Do not use the blender with dry foodstuffs (walnuts, almonds, peanuts...).
You can:
- prepare up to 1.5 litres of finely blended stews or soups, creams, purées, milk-shakes, cocktails.
- blend any liquid preparations (pancakes, doughnuts, clafoutis).
- crush ice at max. speed
To remove the blender, hold it by the handle and press the release button (a4).
7 CENTRIFUGING FRUITS and VEGETABLES (depending on model)
ACCESSORIES USED
Centrifugal juice extractor with pouring spout (m) or Bowl (b3) and centrifugal juice extractor with filter basket (m).
7a FITTING THE ACCESSORIES
Direct Service Model with pouring spout (m5)
Press the release button (a4) to open the upper drive cover (a1).
Place the filter (m3) in the centre of the pulp collector (m4), turn and lock the lid (m2) onto the pulp collector (m4). Hold the locking lever (m6) in the closed padlock position 📄 then fit the assembly, onto the upper drive (a2). You should hear a click. Slide the pouring spout (m5) onto the pulp collector (m4).
Tips
- Insert the foodstuffs into the tube and press them down slowly using the food pusher (m1). - Chop the fruits into pieces and place a large glass underneath the spout (m5). Do not process more than 0.5 kg of fruits (apples, carrots, grapes) 5 times consecutively, without allowing your appliance to cool down completely.
- Grapes, quinces or redcurrants: to obtain better results, clean the filter after every 300g of ingredients.
- Important: When the pulp collector is full, stop the appliance, and empty the collector.
- Wait until the rotary filter has completely stopped before removing the assembly. To remove the centrifugal juice extractor (m5), press the release button (a4), and lift off the assembly.
The locking lever (m6) returns automatically to the open padlock position ⚫.
7b Model with the filter basket (m10)
Press the release button (a4) to open the upper drive cover (a1).
- Place the bowl (b3) onto the lower drive (a3). Assemble the filter basket (m10) with its filter crown (m9): lower it into the filter basket to clip it onto the assembly. - Lower the filter basket assembly (m9+m10) onto the bowl drive (b3-1) - Fit the lid (m8) onto the bowl. - Close the upper drive cover (a1).
You should hear a click.
- Insert the foodstuffs into the tube and slowly press down using the food pusher (m7). - Empty the waste regularly from the filter - basket. - Do not use more than 250 g of ingredients (apples, carrots, grapes) for each operation.
| Function | Electronic Model | Two-Speed Model |
| Centrifuging 5 2 |
Tips
- Peel fruits with thick skins; remove stones and the core of pineapples.
- It is not possible to extract the juice from certain fruits and vegetables: bananas, avocado pears, blackberries, etc...
- You can prepare juices with different fruits and vegetables without having to clean the centrifugal juice extractor every time, the flavours will not be mixed.
- Drink the juices immediately after preparation or add lemon juice to prevent them from browning for a few hours.
8 FINELY CHOPPING SMALL QUANTITIES (depending on model)
ACCESSORY USED
- Mini-chopper (i) or Grinder (j).
FITTING THE ACCESSORY
Press the release button (a4) to open the upper drive cover (a1).
Place the ingredients inside the bowl (i2 or j2), then lock the lid (i1 or j1) onto the bowl.
- Place the accessory on the upper drive (a2) (you should hear a click).
If the lid is missing or incorrectly fitted, the food processor will not operate.
Recommended speeds
| Function | Electronic Model | Two-Speed Model |
| Fine chopping | 5 - Pulse 2 - Pulse | |
Tips
With the mini-chopper you can:
- Chop in a few seconds: cloves of garlic, fresh herbs, parsley, nuts, bread, crackers for breadcrumbs, ham, ...
• Prepare purées for baby.
Maximum quantity of nuts (walnuts, almonds, ...): 80 g.
This mini-chopper is not designed for hard foodstuffs such as tea, coffee.
With the grinder you can:
- Grind in a few seconds: coriander, pepper, Cayenne peppers, dried apricots,...
• Maximum quantity/time
dried apricots: 140 g / 10s.
dried figs: 90g / 8s
To remove the accessory, press the release button (a4).
9 PUREEING/ PRESSING / MASHING (depending on model)
ACCESSORIES USED
- Bowl assembly (b), spindle (c), et "Maxipress" (l)
FITTING THE ACCESSORY
Press the release button (a4) to open the upper drive cover (a1).
- Place the bowl (b3) onto the lower drive (a3).
- Place the spindle (c) on the bowl drive (b3-1).
- Slide the desired disc (l2) onto the spindle (c) whilst turning it slightly so that the slots under the disc come to a stop against the inside ribs of the bowl.
- Place the rotor (l1) in the central hole of the disc (l2) and push it in until it clicks into place.
- Fit the lid (b2) or (d4) onto the bowl.
- Close the upper drive cover (a1).
You should hear a click.
Recommended speeds
| Function | Electronic Model |
| Pureeing / Pressing / Mashing | 1 |
Tips
You can prepare with the disc:
- Large holes (l2-1): purées (up to 1 kg of cooked fruits or vegetables): potatoes, carrots, cauliflowers.
- Small holes (l2-2): coulis or compotes with cored fruits (up to 500 g): tomatoes, grapes, strawberries, raspberries, redcurrants, apricots, peaches.
Remark : If the rotor comes unclipped from the disc, check that you have fitted the correct disc for the type of preparation and that your food is fully thawed or fully cooked.
10 CLEANING AND REMOVING THE "MAXIPRESS"
- Remove the disc / rotor assembly from the spindle (c).
- Press the clips on either side of the rotor to free the disc.
11 MINCING HEAD (depending on model)
ACCESSORIES USED
- Geared reducer assembly (n) and mincer head (o).
BEFORE FIRST USE
- Wash the mincer head in hot soapy water and dry it carefully immediately.
USE
11a Fitting the geared reducer onto the food processor.
- Press the release button (a4) to open the upper drive cover (a1).
- Place the geared reducer onto the lower drive (a3):
- Close the upper drive cover (a1).
11b Assembling the mincer head:
- Hold the body (o1) by the tube with the largest opening at the top. Next insert the screw (o3) (longest pin first) into the body (o1).
- Fit the cutter (04) onto the short pin with the cutting edges towards the outside.
- Place the selected disc (05-1 or 05-2) on the cutter (04) by aligning the hooks with the slots.
- Tighten the nut (o6) completely onto the body (o1) in a clockwise direction, without jamming it.
- Check the assembly. The pin must not have any play or be able to spin.
If this is not the case, repeat the above operations.
11c Fitting the mincer head onto the appliance.
- Opposite the geared reducer (food processor motor unit unplugged), place the mincer head (o) with the tube angled towards the right. Insert the mincer head completely into the geared reducer (n).
- Bring the tube back to the vertical position until it is locked in place. The mincer head (o) will automatically lock onto the geared reducer (n), as soon as it is operated.
- Insert the removable tray (o2) onto the tube.
- Plug in the appliance.
USE
- Prepare the entire quantity of foodstuffs to be minced. Remove the bones, nerves and cartilages.
- Cut the meat into pieces (approximately 2 x 2 cm) and place them on the tray (02).
- Place a bowl underneath the mincer head.
Recommended speeds
| Function | Electronic Model | Two-Speed Model |
| Mincing 5 2 |
Tips
- Insert the meat into the tube piece by piece using the food pusher (07).
- Do not push with your fingers or any other utensil.
- Do not use your appliance for more than 15 minutes when you are mincing meat.
- Check that the meat is fully thawed.
Tip : at the end of the operation, you can process a few small pieces of bread to clear out all of the mince.
Cleaning the mincer head
- Before any cleaning operation, unplug your appliance.
- Release the mincer head by tilting it to the right to remove it from the geared reducer unit.
- To remove the mincer head, remove the tray (02) from the tube, and unscrew the nut (06), remove the disc (05), the cutter (04) and the screw (03).
- Handle all sharp parts with care.
- Wash all parts in hot soapy water, Rinse them and dry them carefully.
- The disc (05) and the cutter (04) must remain oiled. Coat them with oil.
- Do not allow water to enter the geared reduced. Simply wipe it using a soft cloth.
- Do not place the mincer head (o) in the dishwasher, which is to say the body (o1), the screw (o3), the cutter (o4), the discs (o5) and the nut (o6).
12 SAUSAGE FUNNEL (depending on model)
This accessory, which fits onto the metal mincer head allows you to make any kinds of sausages.
ACCESSORIES USED
- Sausage funnel (p), geared reducer assembly (n) and mincer head (o).
ASSEMBLY
- Fit the screws (o3) to the body (o1) of the mincer head metal.
- Place the funnel (p) then the nut (o6) and tighten fully.
- Place the assembled head onto the geared reducer (n).
Remark: this accessory is used without a disc or cutter.
USE
This accessory is to be used once the meat has been minced and you have seasoned the mince to your taste.
- After leaving the sausage skin to soak in warm water so that it becomes elastic again, slide it onto the funnel (p) and leave approximately 5 cm overhang.
- Fill the tube with mince (o1), start and press with the food pusher so as to push the mince to the end of the funnel.
- Stop the appliance.
- Make a knot 5 cm from the end of the sausage skin. Slide it onto the sausage funnel and push he knot onto the end of the funnel to avoid trapping air in the skin.
- Start the operation again and continue to supply the mince. The skin fills up.
- When all of the mince has been used, stop the appliance, and remove the remaining skin from the funnel and make a knot.
Tips
To avoid the skin being too tight, do not make sausages that are too big.
- It is easier when working with someone else: one supplies the mince and the other holds the skin while it fills up.
- Make the sausages as long as you want by pinching and turning the skin at the desired lengths.
The speeds used are those of paragraph 11.
13 BISCUIT NOZZLE (depending on model)
This accessory which fits onto the metal mincer head allows you to make small biscuits.
ACCESSORIES USED
- Biscuit nozzle (q), geared reducer assembly (n) and mincer head (o)
ASSEMBLY
- Fit the screws (o3) to the body (o1) of the metal mincer head.
- Place the mould (q2) in the support (q1).
- Align the two support hooks (q1) with the two slots on the mincer head (o1).
- Tighten fully, without locking it, the nut (06) onto the body (01).
- Place this head assembly onto the geared reducer (n).
Remark: this accessory is used without a disc or a cutter.
USE
- Prepare the biscuit dough (you will obtain better results with a soft dough).
- Choose the pattern by aligning the arrow with the chosen shape.
- Process until you have obtained the quantity of biscuits desired.
Tips
The speeds used are those of paragraph 11.
14 KEBBE ACCESSORY (depending on model)
ACCESSORIES USED
- Kebbe accessory (r), geared reducer assembly (n) and mincer head (o).
ASSEMBLY
- Fit the screws (o3) to the body (o1) of the metal mincer head.
- Place the nozzle (r2) on the head aligning the two hooks with the two slots on the mincer head.
- Place the ring (r1) on the nozzle (r2) then the nut (o6) and tighten fully.
- Place this head assembly onto the geared reducer (n).
Remark: this accessory is used without a disc or a cutter.
Tips
The speeds used are those of paragraph 11.
CLEANING
- Unplug the appliance.
- To make cleaning easier, rinse the accessories quickly after use.
- Wash and dry the accessories, they are all dishwasher proof except for:
• the whisk drive body (f1)
- the pulp collector of the centrifugal juice extractor (m4).
• the mincer head assembly (o).
For specific cleaning instructions for the mincer head, refer to paragraph 11c.
- Pour hot water and a few drops of washing up liquid into the blender (k). Close the lid. Pulse a few times using the pulse button. Unplug the appliance. Rinse the bowl under running water and leave to dry.
- The bowl (b3) has a seal (b3-2). To clean it, you can put it in the dishwasher or wash it in hot water.
To fit the seal back onto the bowl, check that the lip of the seal is always facing upwards.
- To make cleaning and storage easier, the handle of the bowl (b4) and that of the blender (k4) can be removed (they are dishwasher proof).
- In the event of your accessories being stained by foodstuffs (carrots, oranges...), wipe them with a cloth dipped in cooking oil, then clean as usual.
- Do not place the motor unit (a), the whisk drive body (f1), or the geared reducer (n) in water or under running water. Wipe them with a damp sponge.
- The blades of the accessories are very sharp. Handle them with care.
STORAGE
Your Odacio food processor is equipped depending on the model:
- With a storage unit (t), which is housed inside the bowl assembly (b).
You can store the vegetable cutter discs (d1), the disc support (d5), the metal cutter (e1), the plastic kneader (e2) and the spindle (c) in it.
- a cord storage recess inside the motor unit: Store and adjust the length of the power cord to suit your requirements by pushing or pulling the cord.
IF YOUR APPLIANCE WILL NOT OPERATE, WHAT SHOULD YOU DO?
Check :
- it is plugged in correctly
- that the accessories are correctly positioned on the motor unit.
- that the covers are correctly fitted.
- when the bowl assembly (b) or the mincer geared reducer (n) are used, that the upper drive cover (a1) is correctly closed.
Your appliance will still not operate?
Contact an approved Moulinex service centre (see list in the "Moulinex Service" manual).
ACCESSORIES
You can personalise your appliance and obtain from your usual dealer or an approved MOULINEX service centre the following accessories:
Moulinex approved accessory Service centre
Stainless steel chip cutter disc (disc E)
Stainless steel grater disc (disc G)
Stainless steel parmesan shaving / scraping disc (disc B/G)
Stainless steel thick slicing / grating disc (disc C/H)
Stainless steel thin slicing / grating disc (disc A/D)
Mini-chopper
Grinder
Blender
Blender with tap
Transparent bowl assembly
Metal blade
Plastic kneader
Whisk
Emulsifier
Citrus press
Maxipress (only for electronic
version)
Centrifugal juice extractor with
pouring spout
Centrifugal juice extractor with filter basket
Spatula
Mincer assembly
- Geared reducer
- Cutter
• Discs
- Sausage funnel
- Biscuit nozzle
- Kebbé accessory