
TL 32 eM - Scissors Wolf Garten - Free user manual and instructions
Find the device manual for free TL 32 eM Wolf Garten in PDF.
| Product type | Electric pruner (head) |
| Brand | Wolf Garten |
| Model | TL 32 eM |
| Max. cutting diameter | 32 mm (soft wood) |
| Adjustable cutting angle | Up to 225° continuously |
| Power supply | Integrated lithium-ion battery (via control handle, not included) |
| Nominal voltage | 18 V |
| Weight (head only) | 0.7 kg (approx.) |
| Length (head only) | 30 cm (approx.) |
| Width (head only) | 15 cm (approx.) |
| Blade material | Steel |
| Cutting type | Guillotine (scissors) |
| Lock-on switch | Yes |
| Overload protection | Yes (automatic shutdown) |
| Maintenance | Cleaning after use, regular oiling of the blade |
| Sharpening | By specialized workshop |
| Repairability | Original spare parts available |
| Warranty | 2 years (according to general conditions) |
| Use | Home users, garden |
| Recommended storage temperature | 0 to 23 °C |
Frequently Asked Questions - TL 32 eM Wolf Garten
User questions about TL 32 eM Wolf Garten
0 question about this device. Answer the ones you know or ask your own.
Ask a new question about this device
Download the instructions for your Scissors in PDF format for free! Find your manual TL 32 eM - Wolf Garten and take your electronic device back in hand. On this page are published all the documents necessary for the use of your device. TL 32 eM by Wolf Garten.
USER MANUAL TL 32 eM Wolf Garten
natural_image
Illustration of a long-handled metal tool with handle and spout, shown in grayscale (no text or symbols)
Baumschere
Pruning shears
Sécateur
TL 32 eM
text_image
A ① A ③ θ ② max. 225°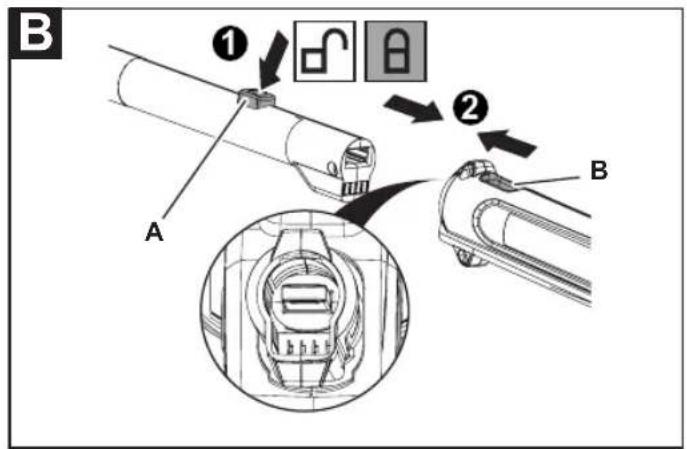
text_image
B ① A ② B
text_image
C A ① ② B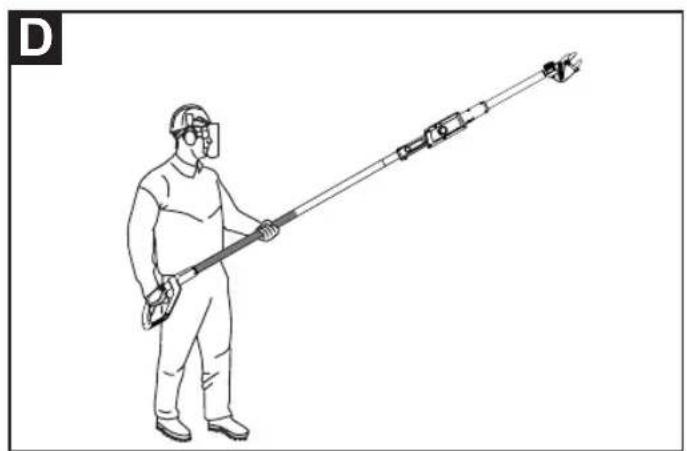
natural_image
Line drawing of a person in protective gear holding a long pole with mechanical components (no text or symbols)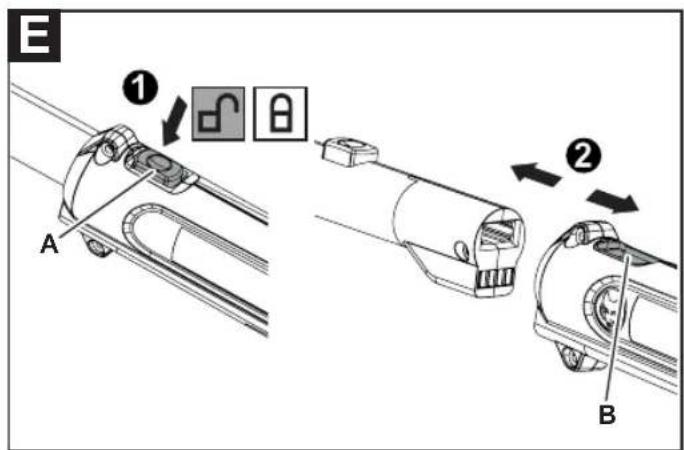
text_image
E ① A ② B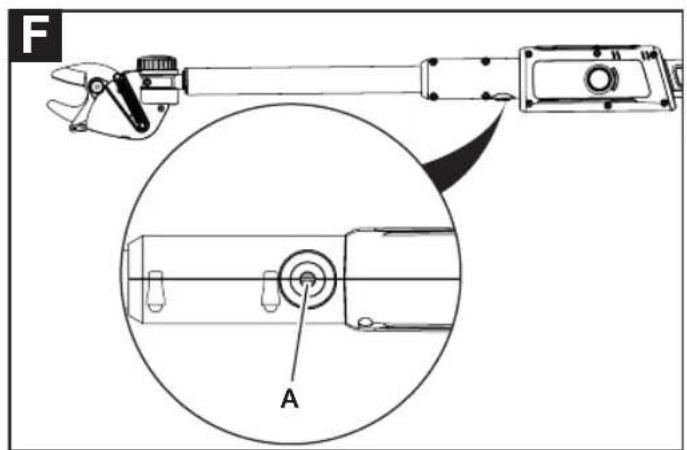
text_image
F A
text_image
G MTD Products AG Industriestraße 23 D-66129 Saarbrücken 72XXXXXXXX650 XXXXXXXXXXXX 11 10 9 Telescopic Shear 18V --- XX kg 4 5 6 7 8 LWA XXX dB
H
text_image
1 2 3 4 5 6 7
DE Deutsch 8
(Original operating instructions)
FR Français 28
Meaning of the symbols....18
For your safety....19
Safety information....20
Intended use....23
Identification plate....23
Operating controls 23
Start-up....23
Operation....23
Servicing....25
Transport and storage 26
Troubleshooting....27
Warranty 27
CE Declaration of Conformity 27
Environmentally-friendly disposal 27
Meaning of the symbols

WARNING!
Read the instruction manual in order to reduce the risk of injury!

Wear head protection!

Wear safety goggles and ear defenders!

Keep your hands away from the cutting tool!
text_image
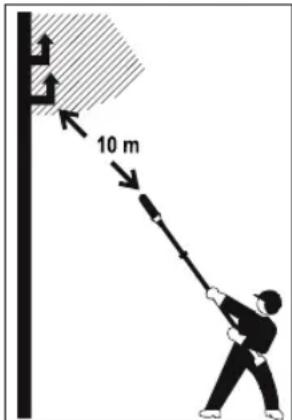
10 mWarning! The tool is not protected against electric shocks if it comes into contact with live cables!
Maintain a safety distance of 10 m from live cables and or objects that are in contact with them.

Note
Observe the symbols and their meaning in the operating manual for the operating arm.
For your safety

Before using your device for the first time, read this instruction manual carefully and observe the instructions.
Keep this instruction manual for later use or subsequent owners.
WARNING!
Read all safety information, instructions, illustrations and technical data provided with this power tool. Failure to comply with the following instructions could lead to electric shock, fire and/or severe injury.
Keep all information on safety precautions and instructions for future use.
→ The term "power tool" used in the safety instructions refers to mains-powered electrical tools (with a mains cable) and power pack-powered electrical tools (without a mains cable).
→ Before using for the first time, you must read the safety information!
Failure to observe the instruction manual and the safety instructions can result in damage to the device and danger for the operator and other persons.
→ All persons involved with the initial set-up, operation and servicing of the device, must have appropriate qualifications.
The making of unauthorised changes or conversions is not permitted
Do not make any changes to the device or convert it to make other machinery. Such changes can result in personal injury and incorrect operation.
→ Repairs to the device must only be performed by trained persons who have been instructed to do so. When doing so always use original spare parts. This ensures that the safety of the device is maintained.
Information symbols in this manual
The signs and symbols in this manual should help you to use the manual and device quickly and safely.

Note
Information to ensure the most effective and practical use of the device.
→ Action step
Requires you to perform an action.
√ Action result
This is the result of a sequence of action steps.
[1]Item number
Item numbers are indicated in the text by square brackets [].
A ustration label
Illustrations are numbered with letters and identified in the text.
① Step number
The defined sequence of action steps is numbered and identified in the text.
Danger levels of warning information
The following danger levels are used in this instruction manual to indicate potentially dangerous situations:

DANGER!

A dangerous situation is highly likely and, if the measures are not followed, will result in severe injury and even death.

WARNING!

A dangerous situation may occur and, if the measures are not followed, will result in severe injury and even death.

CAUTION!

A dangerous situation may occur and, if the measures are not followed, will result in slight or minor injuries.
Attention!
A possibly harmful situation may occur which if not avoided will result in property damage.
Safety information content

DANGER!

Type and source of the danger!
Consequences of non-observation
➢ Measure for preventing the danger
Safety information
Workplace safety
a) Keep your work area clean and well lit. Messy and poorly lit work areas can lead to accidents.
b) Do not use the power tool in an explosive environment, where there are inflammable liquids, gases or dusts. Electrical power tools may create sparks, which could ignite the dust or vapours.
c) Keep children and other persons away from the power tool during use. You can lose control of the device when distracted.
Electrical safety
a) Keep power tools away from rain and water. The ingress of water into a power tool increases the risk of an electric shock.
Personal safety
a) Pay attention, be aware of what you are doing and go about your work with the electric power tool prudently. Do not use any power tools if you are tired or under the influence of drugs, alcohol or medication. One moment of inattentiveness when using the power tool may lead to serious injury.
b) Wear personal protective equipment and always wear protective goggles. The wearing of personal protective equipment such as safety gloves, safety goggles, non-slip safety shoes, protective helmet or ear protection to match the type and use of the power tool, reduces the risk of injury.
c) Prevent unintentional start-up. Ensure that the power tool is switched off before connecting it to the power supply and/or the power pack, picking it up or carrying it. If you hold your finger to the switch when carrying the power tool or connect the device to the power supply when it is switched on, this can lead to accidents.
d) Remove any adjustment tools or spanners before switching the power tool on. A tool or spanner located in a turning device component may lead to injuries.
e) Adopt a normal posture. Ensure you are standing securely and that you maintain your balance at all times. This will ensure that you can maintain better control of the power tool if unexpected situations occur.
f) Wear suitable clothing. Do not wear any loose clothing or jewellery. Keep hair, clothing and gloves away from moving parts. Loose hair, clothing, jewellery or long hair may get caught be moving parts.
g) Do not lull yourself into a false sense of security and do not defy the safety rules for power tools, even if you are familiar with the power tool after a lot of use. Careless handling can lead to serious injuries in a split second.
Use and handling of the power tool
a) Do not overload the device. Use the electric power tool designed for your work. Your work is performed better and safer with the appropriate power tool in the specified power range.
b) Do not use a power tool with a defective switch. An electric power tool which can no longer be switched on or off is dangerous and must be repaired.
c) Pull the plug out of the socket and/or remove a detachable power pack before configuring any device settings, changing accessory parts or putting the device away. This precautionary measure prevents the unintended start of the power tool.
d) Keep unused power tools out of the reach of children. Do not let any individuals use the power tool who are unfamiliar with it or who have not read these instructions. Electric power tools are dangerous when used by inexperienced persons.
e) Treat power tools with care. Check that moving parts work seamlessly and do not jam; whether parts are so damaged that the function of the power tool is impaired. Have damaged parts repaired prior to using the device. Many accidents originate from poorly maintained electric power tools.
f) Keep cutting tools (blade) sharp and clean. Cutting tools with sharp cutting edges which are treated with care become stuck less frequently and are easier to run.
g) Use power tools, accessories, insertion tools, etc. in accordance with these instructions. Take the work conditions and the activity to be performed into consideration. The use of electric power tools for applications other than those intended may lead to hazardous situations.
h) Keep the handles and gripping surfaces dry, clean and free of oil and grease. Slippery handles and handle surfaces do not allow for safe operation or control of the power tool in unforeseeable situations.
Use and handling of the cordless tool
a) Only charge the power packs using chargers that are recommended by the manufacturer.
There is a risk of fire if a charger that is suitable for a specific type of power pack is used with other power packs.
b) Only use the power packs intended for this purpose in power tools. Use of other power packs can result in injuries and fires.
c) Keep the unused power pack away from paper clips, coins, keys, nails, screws or other small metal objects that could cause short circuiting of the contacts. A short-circuit between the power pack contacts could result in burns or a fire.
Safety information
d) Liquid may leak from the power pack if it is used incorrectly. Avoid contact with this liquid. If accidental contact occurs, rinse off with water. If the liquid comes into contact with the eyes, also seek medical assistance. Leaking battery fluid may lead to skin irritation and burns.
e) Do not use a damaged or modified power pack. Damaged or modified power packs can behave unpredictably and lead to fire, explosion or a risk of injury.
f) Do not expose a power pack to fire or to excessively high temperatures. Fire or temperatures above 130 °C may cause an explosion.
g) Follow all instructions on charging and never charge the power pack or the cordless tool beyond the temperature range specified in this instruction manual. Incorrect charging or charging outside the permitted temperature range can destroy the power pack and increase the risk of fire.
Service
a) All repairs to the power tool must be carried out by qualified specialist technicians and with original spare parts only. This ensures that the safety of the power tool is maintained.
b) Never service damaged power packs. Power pack servicing should only ever be performed by the manufacturer or authorised customer service points.
Residual risks when using the device
Even when the power tool is used properly, there will always be certain residual risks which cannot be excluded.
It is therefore mandatory always to use this device with the additional personal protective equipment, as illustrated and described in this operating manual, and to follow the safety instructions.
Safety information for pruning shears
Keep all body parts away from the cutting tool. Do not attempt to remove cut twigs or foliage or hold material to be cut when the pruning shears are running. Only rectify jammed pruning shears when the device is switched off. One moment of inattentiveness when using the device can result in serious injuries.
During transport or storage of the pruning shears, always pay attention to the sharp blade of the cutting device. Careful handling of the tool reduces the risk of injury from the pruning shears.
Only hold the power tool by the insulated handles, because the cutting tool can come into contact with hidden power cables.
Contact of the cutting tool with a live cable may conduct voltage to metallic tool components resulting in an electric shock.
➢ Check the tool for damage before every use or after a shock or impact. The tool must be repaired by a specialist workshop before it is placed in service again.
Protection of yourself and others
Do not operate the device if there are people (especially children) or animals in immediate proximity. Ensure children do not play with the tool.
➢ Stop using the device if persons (especially children) or animals are nearby.
This device must not be used by children or persons with reduced physical, sensory or mental capabilities or with inadequate experience and knowledge. Likewise persons must be familiar with this instruction manual before using the device. The minimum age for using the device may be specified by local or national legislation.
Only switch the device on if your feet and hands are at a safe distance from the cutting element.
➢ Always disconnect the device from the power supply if you are leaving it unattended or removing a blockage.
Always wear slip-resistant shoes and long trousers as well as other appropriate personal protective equipment (safety glasses, ear defenders, safety gloves, head protection, etc.) when working with or on the pruning shears. Wearing personal protective equipment reduces the risk of injuries.
Do not wear loose clothing, etc., which could be caught by the cutting tool.
Only remove jammed grass cuttings with the device switched off and the operating arm, in which the permanently installed power pack is located, is removed.
Before use
Before use, make sure you are familiar with the tool, its functions and controls.
➢ Never use a device with damaged or missing guards or covers. They must be repaired or replaced by a qualified expert or workshop.
Safety information
Before making adjustments to the device or After use
cleaning it, switch the device off and remove the power pack or remove the operating arm, in which the permanently installed battery is located.
➢ Ensure that the tool is fully assembled according to the instructions.
Read and observe the operating manual of the charger and operating arm in which the power pack is permanently installed.
During use
➢ Never leave the tool unattended during breaks and store it in a secure location.
➢ Be aware of hidden objects when working.
Always hold the tool firmly with both hands.
Also when working maintain a safe distance relative to the cutting tool.
If you have long hair, wear a hairnet.
Take extra care if you are walking backwards. Risk of tripping!
Switch the device off when carrying the device to or from separate working positions.
➢ Never bypass or tamper with safety devices installed on the device (e.g. by taping the switch to the handle).
Always be aware of your environment and possible hazards which you may not be able to hear because of the noise of the device.
No other persons or animals may remain within a circumference of 15 metres around the cutting area because they may be injured by ejected objects.
Do not work in poor lighting or weather conditions.
➢ Only use the tool for the work for which it is intended.
➢ Ensure that you can stand safely and securely in every work position.
Do not use ladders, as these can result in loss of balance or loss of control of the tool.
Do not stretch the arms too far forwards.
Never work while stood on or in trees.
Do not cut any wooden parts that are under strain.
➢ Never work alone. Ensure that you within earshot or sight of, or have some other form of connection with another person, who is able to provide first aid in an emergency.
If you are setting the tool down, always ensure that the motor is turned off.
➢ Never use the tool in a wet or moist environment.
Switch the device off, remove the operating arm from the device and check the device for damage. Attention, danger! Cutting tool still running!
If you need to clean or service the device, switch it off and remove the operating arm. Attention, danger! Cutting tool still running!
➢ Always wait until the cutting tool comes to a standstill and do not touch any moving dangerous parts without first removing the operating arm from the device.
Do not clean the device with water.
Store the device in a secure location.
Store the device out of reach of children.
➢ Let the device cool down before putting it away and/or storing it.
General safety information
➢ Spare parts must meet the requirements of the manufacturer. Therefore, use only original spare parts or those spare parts authorised by the manufacturer. During replacement, always observe the supplied fitting instructions and always remove the operating arm from the device prior to use.
➢ Repairs must only be performed by a qualified technician or service centre. Specialist workshop addresses can be found on our website.
This pruning shears are intended for the care of trees and shrubs in private households. The device must not be used for purposes other than those intended because of the risk of bodily injury to the user or other persons.
Only use the power packs intended for this purpose in power tools. Use of other power packs can result in injuries and fires.
➢ Regularly check all screw or bolt joints to ensure they have not come loose.
➢ Ensure maintenance work is always performed to schedule. This ensures that the safety of the power tool is maintained.
Switch the device off and wait until the cutting tool comes to a standstill before removing the operating arm.
➢ Replace all worn or damaged information signs on the device.
Intended use
This tool is intended solely
- to be pruning shears for pruning or cutting back branches on high trees or shrubs with a maximum branch thickness of 32 mm. In the case of hard wood, the maximum diameter is accordingly less.
- for use in accordance with the descriptions and safety instructions given in this operating manual.
The pruning shears are not designed for commercial use and may only be used in home gardens and allotments.
Any other use is classed as an unintended use. The user is liable for any damages arising from unintended use.
Identification plate
Position
The identification plate is located on the housing of the device.

Note
The label has the status of a certificate. It must never be altered or obliterated.
Structure G
1 Manufacturer
2 Device group
3 Model name
4 Rated voltage, current type
5 Weight
6 Disposal note
7 Year of manufacture
8 Guaranteed sound level
9 CE label
10 Model number
11 Serial number
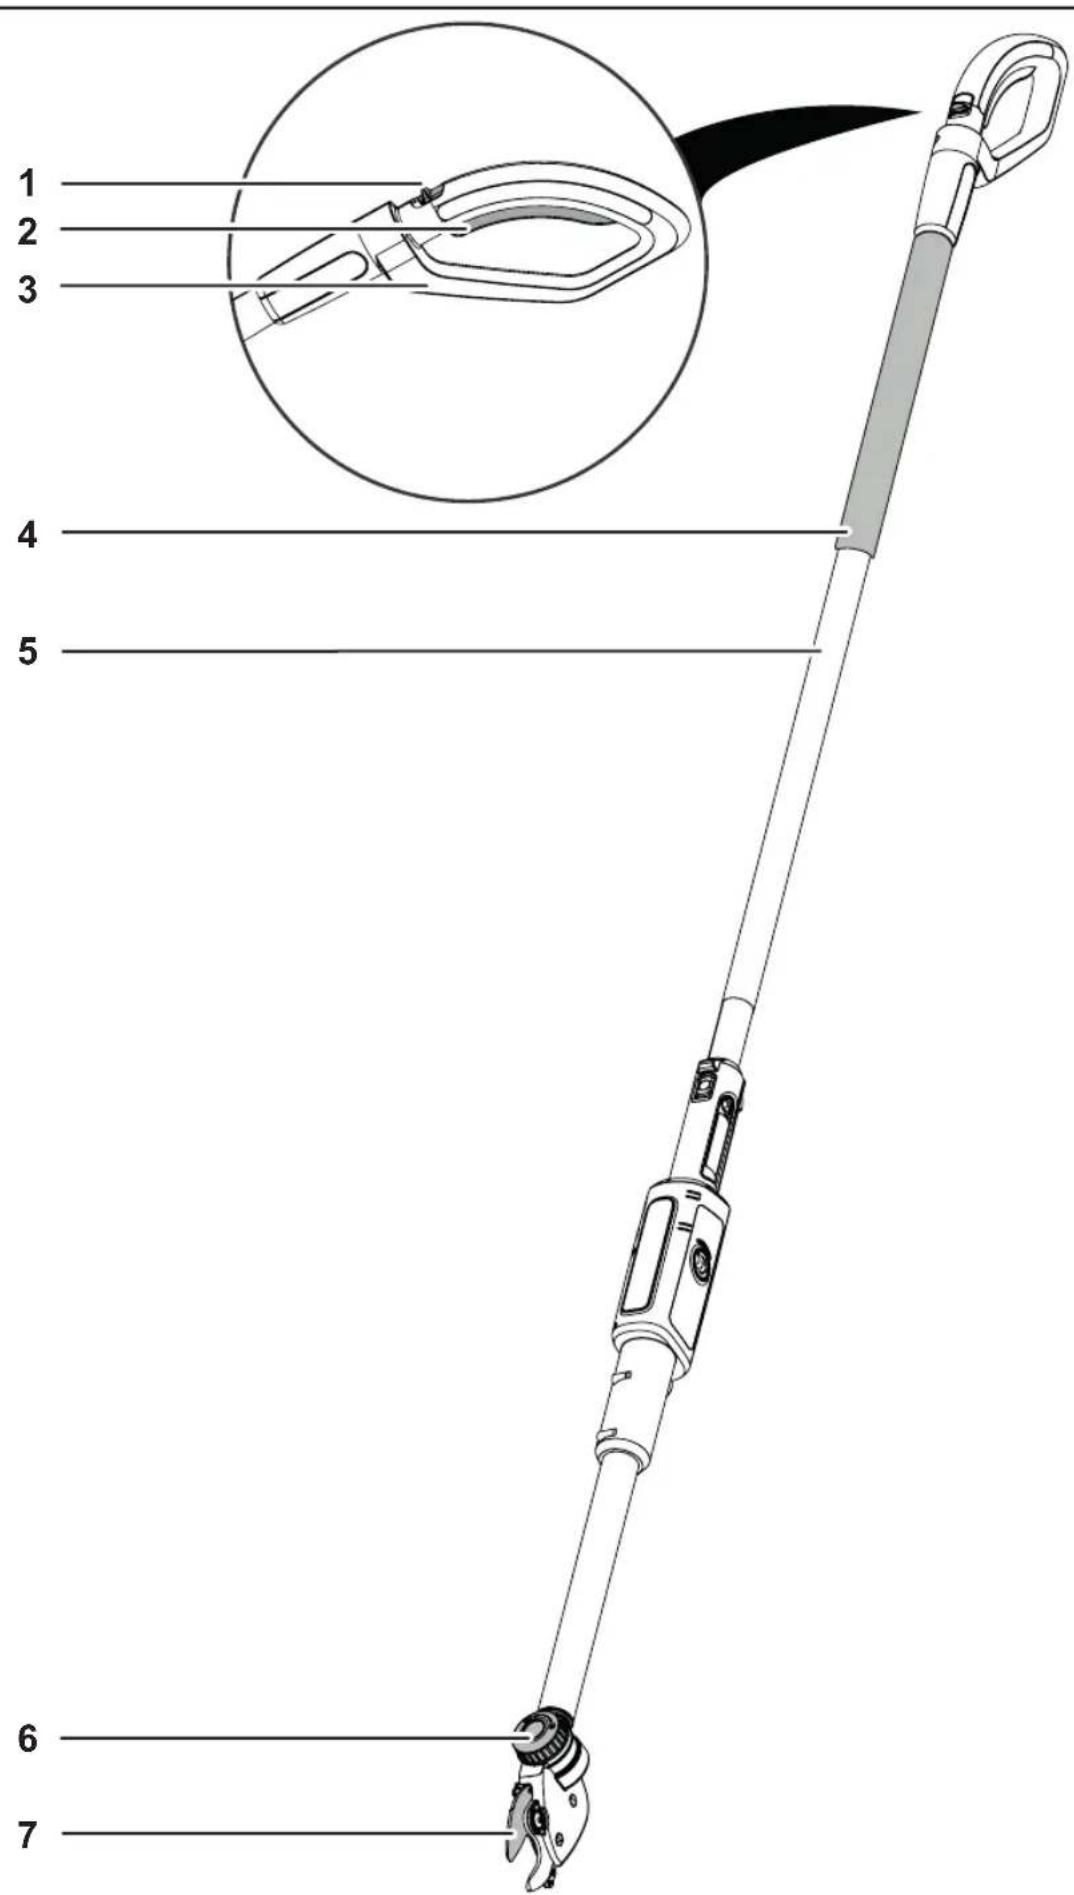
Operating controls
Operating elements H
1 Lock-on switch
2 On/off switch on handle
3 Handle
4 Holding area for the hand / fastening area for the optional middle handle
5 Operating arm * (with permanently installed power pack)
6 Fastening wheel for adjusting the working angle
7 Cutting blade/cutting tool
*Necessary operating element (not supplied)
Start-up
Supplementary documentation

Make sure the supplied instruction manuals of the charger and operating arm are available. Please read and understand them before using the device.
Power pack charging

WARNING!

Only charge the power pack using the charger approved by the manufacturer. The designations of the approved chargers are listed in the enclosed CE Declaration of Conformity.
Attention!
The power pack is supplied partially charged. Before using the device for the first time, fully charge the power pack to ensure effective performance.

CAUTION!

The power pack is permanently installed in the operating arm.
→ Power pack charging must be carried out according to the instructions in the supplementary documentation.
Operation
Operating times
Please observe the times stipulated in local byelaws. Check with your local authorities to determine if there are any operating time limitations.
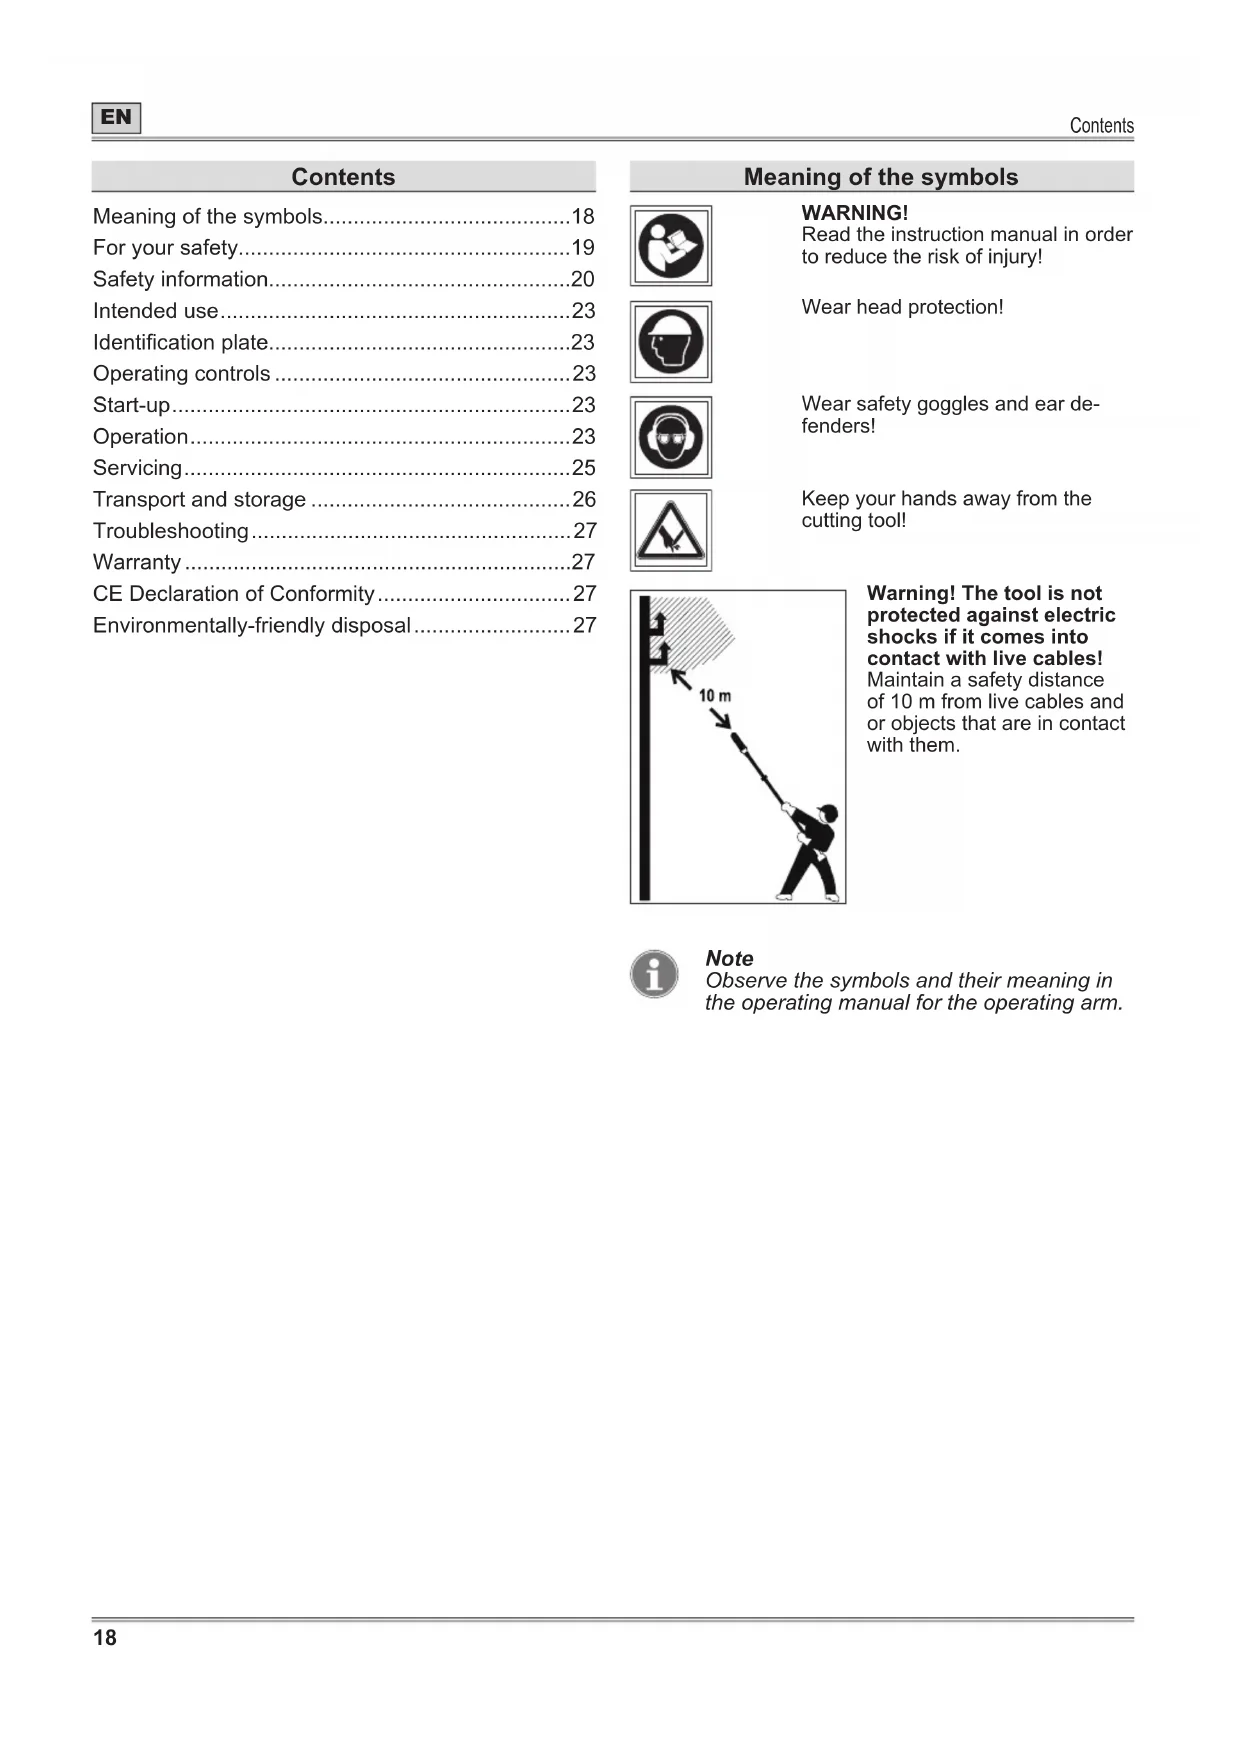
Adjusting the working angle A

WARNING!

Risk of injuries due to the cutting tool.
Only adjust the device with the motor switched off and the cutting tool at a standstill.
Before any work on the device, first remove the operating arm with the permanently installed power pack.
The device has an infinitely adjustable working angle with a radius of max. 225^ (depending on the model and design). This allows you to easily reach problematic and difficult-to-access positions.
→ Loosen the fastening wheel [A] in a counter-clockwise direction ①.
→ Set the working angle
→ Firmly tighten the fastening wheel again by hand ③.
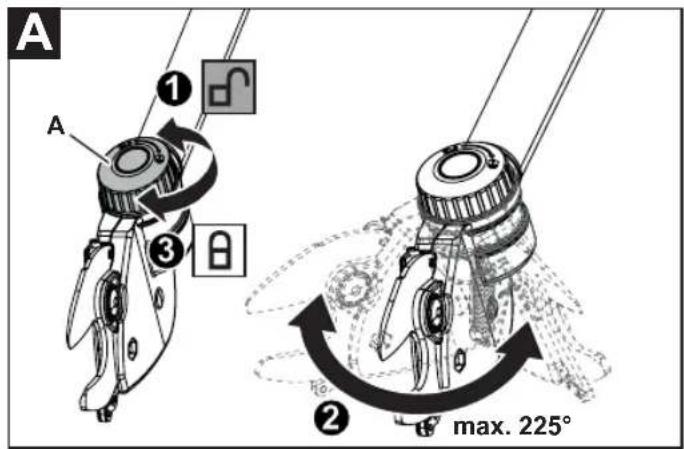
Connecting the pruning shears to the operating arm B
→Press the locking button [A] on the operating arm and insert the operating arm into the receptacle on the pruning shears until the locking button engages in the receptacle [B] ①②.
Attention!
➢ Ensure the button is correctly engaged.

Note
A middle handle is available as an optional accessory for the operating arm. You can find more information and assembly instructions in the operating manual for the operating arm.
Switching the device on C

WARNING!

Risk of injuries or material damage
➢ Always hold on to the device with both hands during operation. One hand holds the handle, the other hand holds the operating arm in the encased area or the optionally available middle handle.
Always ensure you are standing safely.

Note
The device has a special safety switch for switching on/off upon first use or after removing and re-attaching the operating arm.
The removal and re-attachment of the operating arm is the same as switching the device upon first use.
Switching on for first use or after disconnecting and re-attaching the operating arm
→Press the lock-on switch [A] on the handle and keep it pressed ①.
→ Slowly press the on/off switch [B] on the handle twice ②.
√ Upon slowly pressing the on/off switch a second time, the cutting process begins and the cutting device closes and opens for the cutting process in a single work step.
→ Release the lock-on switch.
Switching on after first use has already taken place
→ Press the lock-on switch [A] on the handle ①.
→ Simultaneously press the on/off switch [B] on the handle ②.
→ Release the lock-on switch.
√ The device is in operation and the cutting device closes and opens for the cutting process in a single work step.

Note
-If you release the on/off switch during the cutting process, the cutting device opens automatically without the cutting process ending.
-For the sake of safety, the complete switch-on procedure must always be repeated each time a cutting process is newly started.
Switching the device off C
→ Release the on/off switch on the handle.
√ The cutting blade moves into the open initial position and the device is switched on.

Note
The cutting tool briefly continues to run after releasing the on/off switch.

Note
The lock-on switch automatically returns to its initial position when you release the on/off switch.
Working with the pruning shears

WARNING!

Risk of injuries or material damage
➢ Hold the pruning shears in the working position as shown in figure D.
➢ Ensure you are standing securely, especially when working above head height.
➢ Hold the pruning shears away from the body.
➢ Hold the tool firmly in both hands. One hand holds the handle, the other hand holds the operating arm in the encased area or the optionally available middle handle.
➢ Never stand directly under the branch being cut.
➢ Never stand on a ladder or an unstable platform.
➢ Never work in dangerous positions in which you could be hit by falling branches or by branches bouncing back up from the ground.

CAUTION!

Do not cut any branches that are under strain.
Attention!
Do not cut any branches that are more than 32 mm in diameter and do not cut extremely hard wood. This can result in damage to the cutting blade or the device.
Working technique
Branch cut

Note
Prune the branch from the trunk by starting lower down and then working upwards.
→ Do not cut any branches with a diameter greater than 32 mm.
→ Do not carry out any lateral movements when cutting using the pruning shears.

Note
-When cutting branches, please observe the maximum 32mm-diameter cutting capacity. In the case of hard wood, the maximum cutting capacity is accordingly less.
—In the case of branches that are too hard or too thick, the device interrupts the cutting process automatically and the cutting device moves back into the initial position. This mechanism protects the device against damage and overload.
-Only pivot the pruning shears upwardly out of the cut if they get stuck in a branch.
-Do not try to remove stuck pruning shears with lateral movements on the branch since this can result in damage to the device.
Cutting tips
- Please remember the breeding season of birds!
- Please observe the regional/national regulations for cutting back trees and shrubs.
- Remove all branches to be removed at once.
- Cut large and long branches from the tree piece by piece.
- Thin treetops by cutting out tree shoots that intersect and are growing inwards.
- In the case of thick and hard branches, use a branch saw.
- Ensure that the cutting tool is not dull, worn or worn out.
- For cutting, an ideal branch cutting angle is approx. 45^ .
Removing the operating arm with permanently installed power pack E
→ Switch the device off
→ Press the locking button [A] on the operating arm ①.
→ Pull the operating arm right out of the locator of the pruning shears unit [B] ②.
Servicing

WARNING!

Risk of injuries or material damage.
Only clean or service the device if the motor is stationary and also the cutting tool.
Before any work on the device, first remove the operating arm with the permanently installed power pack.
Do not clean the device with water.
➢ Repair and service work as well as the replacement of safety elements must be performed by a qualified expert or workshop.
- Wear safety gloves before any work on the cutting device of the pruning shears.
→ Arrange for the cutting device (cutting blade) of the cutting shears to be checked, sharpened or replaced regularly by a specialist workshop.
→ Once yearly, arrange for the tool to be inspected and serviced by a service centre.
Cleaning
→ Switch the device off and wait until the cutting tool comes to a standstill before removing the operating arm.
→ After each use, clean the tool with a dry cloth or, in the event of heavy soiling, with a brush, paying particular attention to the ventilation slots.
→ Carefully clean the cutting device (cutting blade) after each use.
→ After use, oil the cutting device (cutting blade) with conditioning oil to ensure a long service life.
Where possible, use an environmentally friendly lubricant.
Sharpening and replacing the cutting blade
→ Before every use, check the cutting device for wear and damage.
→ Only have worn or damaged parts on the cutting device replaced by a specialist workshop.
→ Only have dull cutting blades sharpened by a specialist workshop.
Adjusting the end stop of the cutting blade F
The end-stop of the cutting blade can be adjusted on pruning shears so that the cutting device closes properly, thereby ensuring the best possible cut. The adjustment should be check by a specialist workshop once a year.
If the cutting device no longer fully closes, the end-stop can be adjusted using the adjustment screw [A].
Only have this adjustment carried out by a specialist workshop in order to avoid damage to the pruning shears.
Transport and storage

WARNING!

Risk of injuries due to the cutting tool.
Before transport or storage, switch off the device and wait until the cutting tool comes to a standstill.
Remove the operating arm before transporting or storing the device.
Transport
→ Secure the device sufficiently to prevent its unintentional slipping if you are transporting it on or in a vehicle.
Storage
→ Perform cleaning and servicing work before storage.
→ Store the tool in a dry location out of the reach of children.
→ Store the operating arm and pruning shears separately.
→ Store the operating arm in a cool and dry location. Recommended storage temperature approx. 0 - 23°C
→ Keep the device and especially its plastic components away from brake fluids, petrol, mineral oil containing products, penetrating oils etc. They contain chemical substances that can damage, attack or destroy the plastic components of the device.
→ Fertilizers and other garden chemicals contain substances that may have a highly corrosive effect on the metal parts of the tool. Therefore do not store your tool near to these substances.
Troubleshooting

WARNING!

Risk of injuries or material damage
In case of doubt always consult a specialist workshop.
Before any inspection or any work on the device, switch off the motor and remove the operating arm.
| Problem Possible cause Remedy | ||
| The device switches off. | The power pack is too hot. Allow the power pack to cool. | |
| The power pack is discharged. Charge the power pack. | ||
| The temperature of the device (electronics) is too high. | Allow the device to cool. | |
| Overcurrent release | If this occurs again take your device to a specialist workshop. | |
| The device will not switch on. | The power pack is discharged. Charge the power pack. | |
| Overcurrent release | If this occurs again take your device to a specialist workshop. | |
| Power pack temperature too high or too low. | Allow the power pack to cool down or heat up. | |
| The power pack is defective. Visit a service centre. | ||
| Inadequate cut | Blade is blunt Visit a service centre. | |
| Blade worn Visit a service centre. | ||
Warranty
The warranty conditions of our local company or importer apply in all countries. Under the terms of the warranty we will repair faults on your device free of charge, insofar as material or manufacturing defects are the cause. To make a claim under warranty please contact your seller or your nearest branch.
CE Declaration of Conformity

Further details about the device are contained on the separately enclosed CE Declaration of Conformity, which forms part of this instruction manual.
Environmentally-friendly disposal
Power tools, accessories and packaging must be disposed of via an environmentally compatible recycling chain.

Power packs/batteries:
Do not dispose of power packs in domestic waste, by burning or throwing into water. Power packs must be collected, recycled or disposed of in an environmentally friendly manner.
Power tools (without power packs/batteries):
Do not throw your old power tool away with the domestic waste. Take it to a disposal facility.
Table des matières
Signification des symboles ....28