YOOCare A014422 - Baby monitors BABYMOOV - Free user manual and instructions
Find the device manual for free YOOCare A014422 BABYMOOV in PDF.
| Product type | Digital video baby monitor |
| Brand | Babymoov |
| Model | YOOCare A014422 |
| Technology | Fully digital FHSS, interference-free |
| Outdoor range | 300 meters |
| Receiver screen | 2.4 inch color |
| Transmitter power supply | 3 AAA alkaline batteries or 5 V USB power adapter (included) |
| Receiver power supply | Built-in 1,200 mAh rechargeable lithium battery or 5 V USB power adapter (included) |
| Night vision | Automatic, infrared LED, black and white image |
| Walkie-talkie function | Yes, dedicated button on the receiver |
| VOX mode | Automatic screen activation via sound detection |
| Temperature indicator | Display on screen (in °C or °F) |
| Visual sound indicator | Light bars on the receiver |
| Digital zoom | x1 and x2 |
| Image rotation | Normal and 180° |
| Remote settings | Night light, microphone sensitivity, transmitter speaker volume |
| Built-in night light | Yes, adjustable (on, off, VOX mode) |
| Out-of-range alarm | Visual and audible |
| Included accessories | 2 x 5 V power adapters, installed battery, user manual |
| Maintenance | Clean with a soft, dry cloth. Do not use abrasive products. |
| Safety | Not to be used as a medical device. Adult supervision required. Observe battery polarity. |
| Warranty | Lifetime warranty* subject to registration within 2 months of purchase |
Frequently Asked Questions - YOOCare A014422 BABYMOOV
User questions about YOOCare A014422 BABYMOOV
0 question about this device. Answer the ones you know or ask your own.
Ask a new question about this device
Download the instructions for your Baby monitors in PDF format for free! Find your manual YOOCare A014422 - BABYMOOV and take your electronic device back in hand. On this page are published all the documents necessary for the use of your device. YOOCare A014422 by BABYMOOV.
USER MANUAL YOOCare A014422 BABYMOOV
natural_image
Line drawings of two different types of mobile phone devices, one with a circular lens and the other with a square button (no text or symbols)YOO Care
Réf.: A014422
Notice d'utilisation • Instructions for use • Benutzungsanleitung • Gebruikshandleiding Instrucciones de uso • Istruzioni per l'uso • Instruções de uso • Návod k použití Használati utasítások • Instructiuni de utilizare • Instrukcje użycia • Brugsanvisning
Émetteur - Transmitter - Sender - Zender Transmisor - Emissor - Emettitore - Vysílač Adóegység - Unitate emițator - Nadajnik - Sender
Récepteur - Receiver - Empfänger - Ontvanger Receptor - Receptor - Ricevitore - Přijímač Vevőegység - Unitate receptor - Odbiornik - Modtager
natural_image
Line drawing of a mechanical device with a cylindrical component and base mount (no text or symbols)a

natural_image
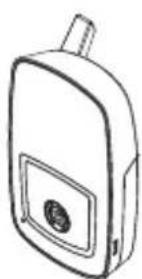
Line drawing of a mobile phone with a circular button and antenna (no text or symbols)b

C
text_image
MAIN MENU DISPLAY LANGUAGE MATCHING BABY SETTINGtext_image
MAIN MENU DISPLAY LANGUAGE MATCHING BABY SETTINGAFFICHAGE MENU
text_image
No signal or Out of RangeThank you for choosing our Baby monitor Visio Care. We recommend you read these instructions carefully in order to use your Baby monitor to best advantage and ensure it continues to operate as long as possible. If you should find a fault, however, or if you have any problem, please contact our company.
IMPORTANT – READ THESE INSTRUCTIONS PRIOR TO USE AND KEEP THEM FOR ALL FUTURE REFERENCE.
FUNCTIONS
• Totally digital FHSS technology with no interference.
• 300m range in an open area.
- Remote camera monitoring to watch baby while he sleeps.
- Screen automatically turns on when baby's voice is detected.
• 2.4» colour screen for improved visibility.
- Walkie-talkie function
• Automatic nightlight for improved visibility in the dark.
- Remote control of microphone sensitivity, nightlight and speaker volume on the transmitter.
- On-screen menu to adjust image brilliance and zoom.
- Visual sound level indicator.
- On-screen temperature indicator for baby's bedroom.
- Automatic alert when the video and audio are out of range.
- Battery level indicator.
- Receiver equipped with rechargeable Lithium battery.
AVERTISSEMENTS
- The Baby monitor Visio Care should not be seen as a medical device. In addition to using Baby monitor Visio Care, it is strongly recommended that an adult checks on your baby directly, on a regular basis. Premature babies or children considered to be at risk should be monitored by your pediatrician or a health professional.
- Never go away from your baby outside the house, even a short moment.
- Non-rechargeable batteries are not to be recharged.
- Rechargeable batteries are to be removed from the device before being charged.
- Different types of batteries: new and used batteries, or rechargeable and not rechargeable batteries, are not to be mixed.
- Rechargeable batteries are only to be charged under
adult supervision.
- Batteries are to be inserted with the correct polarity (+/-).
- Exhausted batteries are to be removed from the device.
- The supply terminals are not to be short-circuited.
- Always use the supplied battery for the receiver: if the battery is damaged it must be replaced by the manufacturer, the after-sales service or people with similar qualifications, in order to avoid any risk.
- For best performance of your babyphone, and to reduce any interference, we recommend you do not plug any other electrical appliance into the same socket as your babyphone. (Do not use multiple socket outlets).
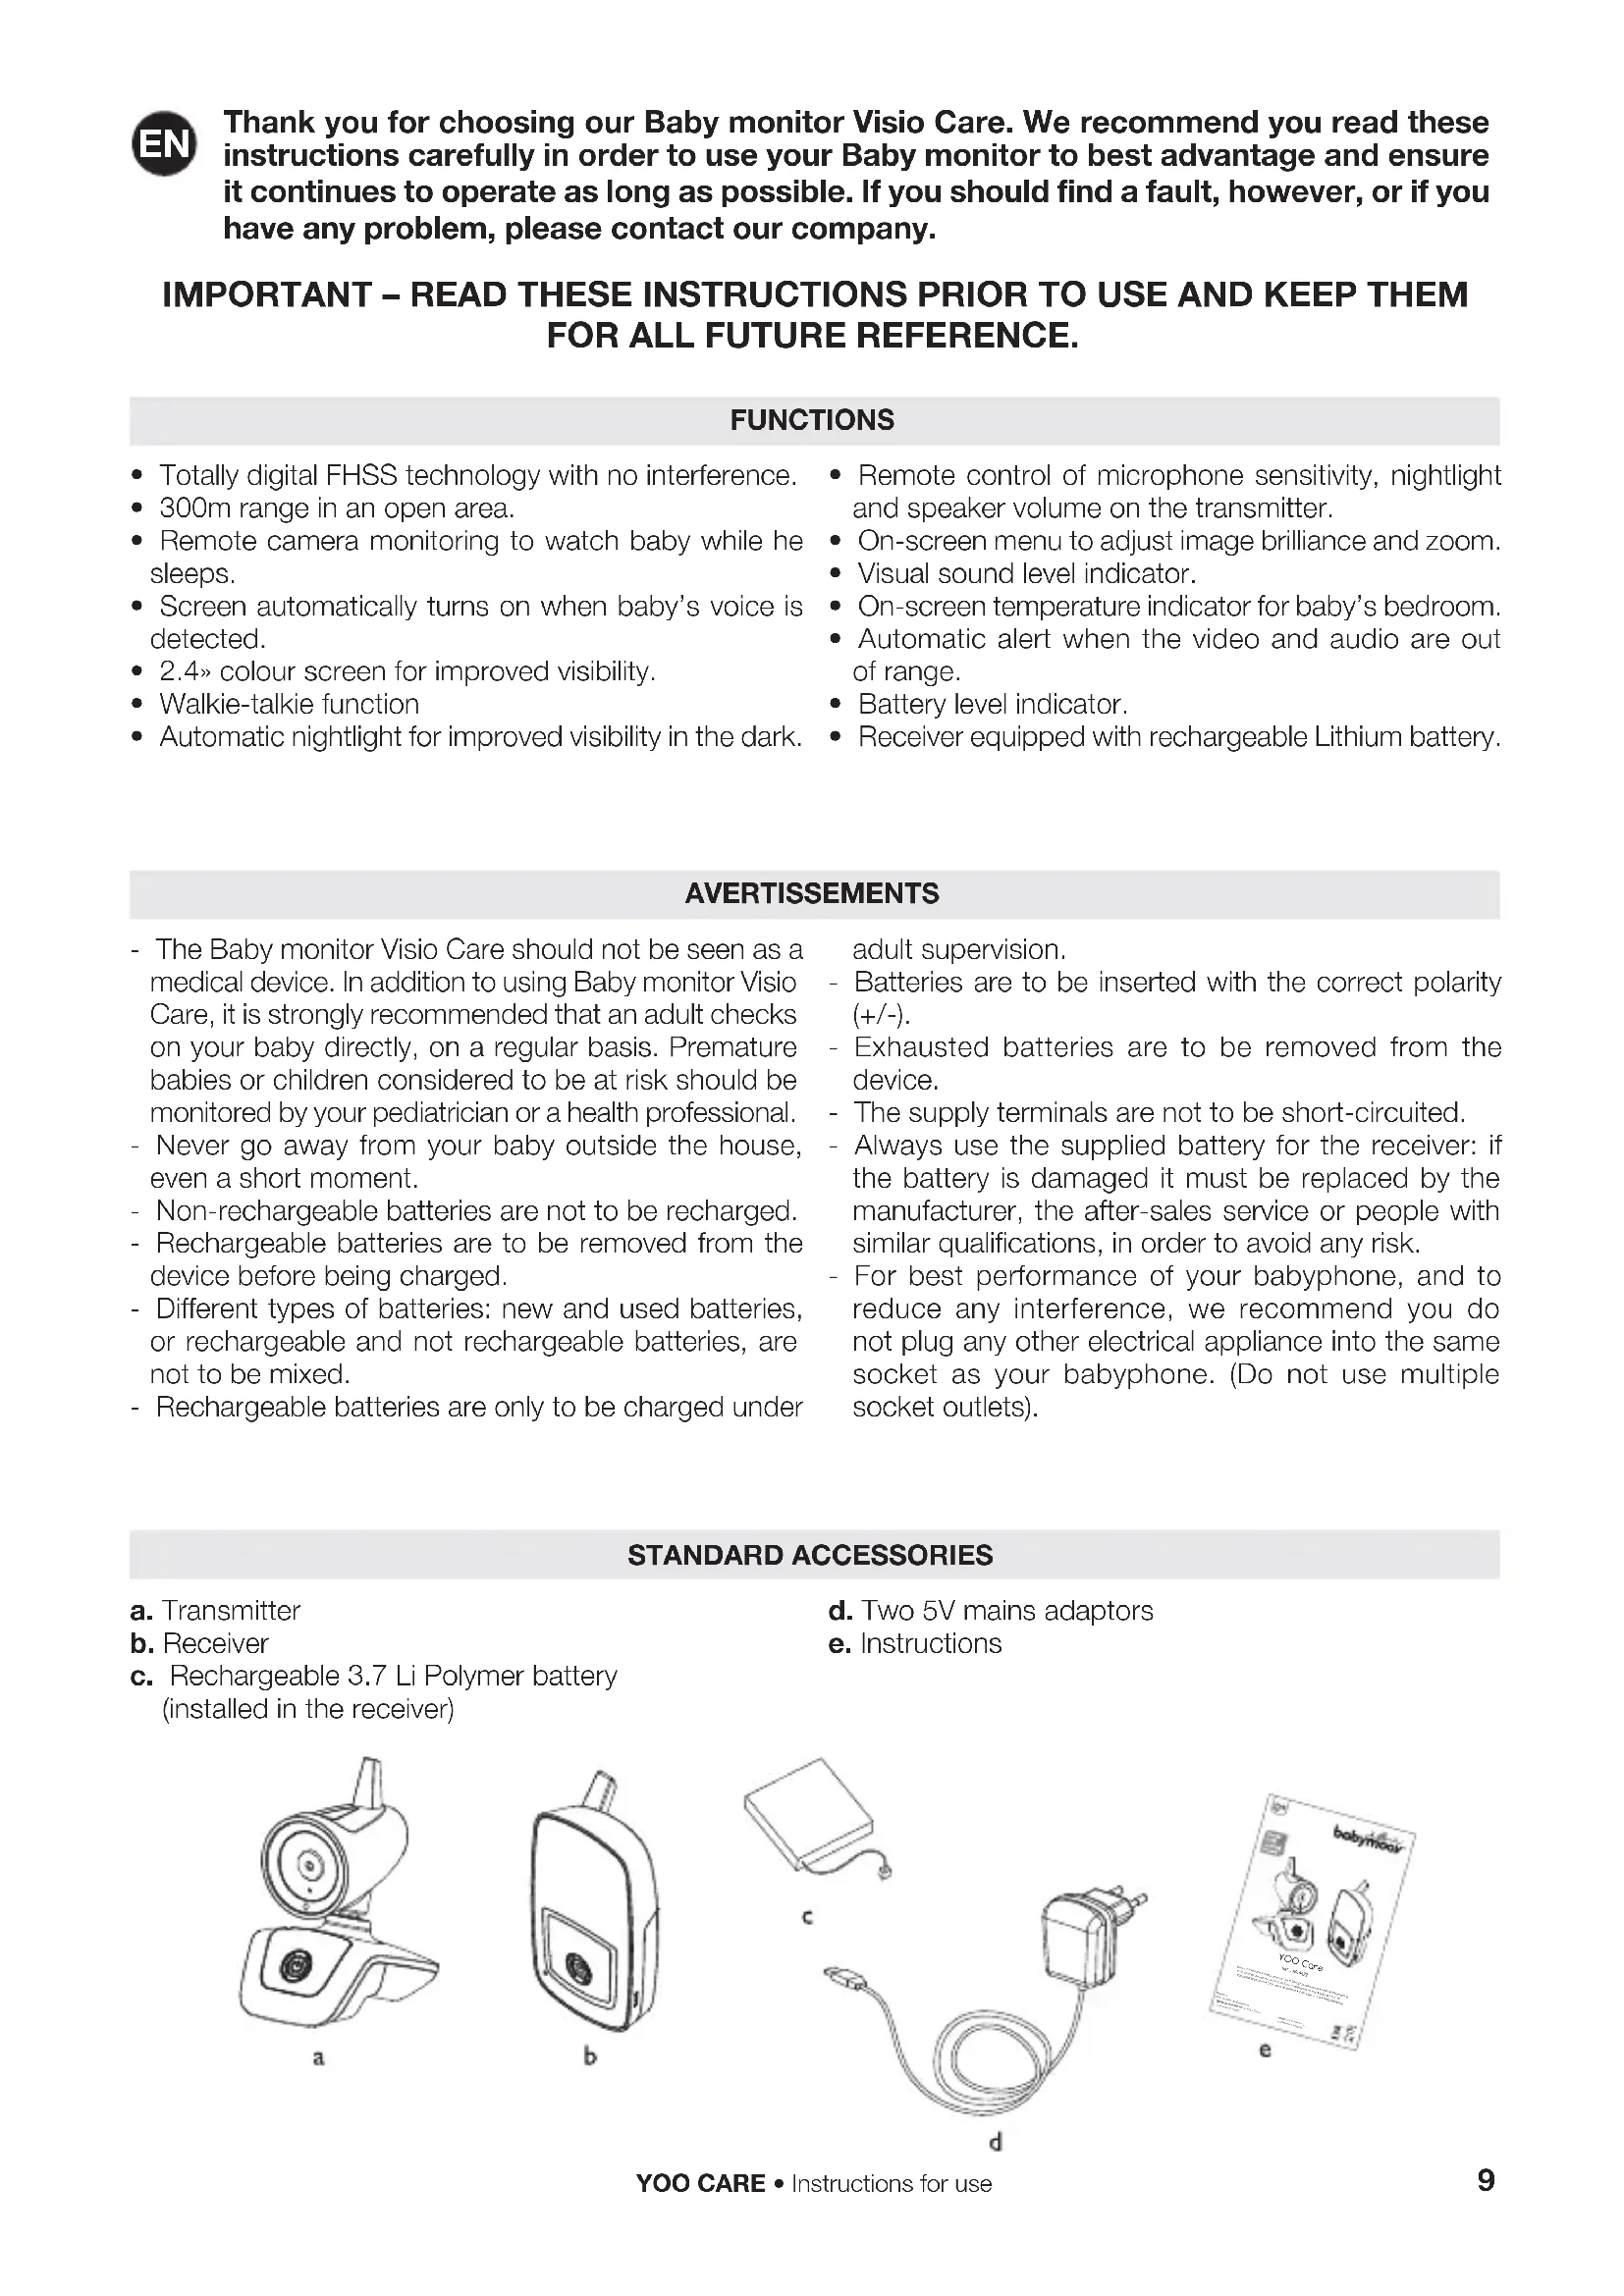
STANDARD ACCESSORIES
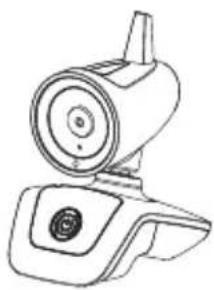
a. Transmitter
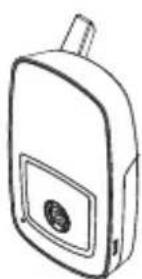
b. Receiver
c. Rechargeable 3.7 Li Polymer battery (installed in the receiver)
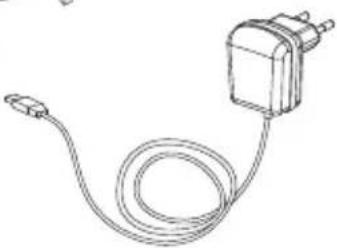
d. Two 5V mains adaptors
e. Instructions
natural_image
Line drawing of a mechanical device with a cylindrical component and base mount (no text or symbols)a
natural_image
Line drawing of a mobile phone with a circular button and antenna (no text or symbols)b

C

natural_image
Line drawing of a cable with a rectangular component attached (no text or symbols)d

text_image
babymloair KOT Care ee
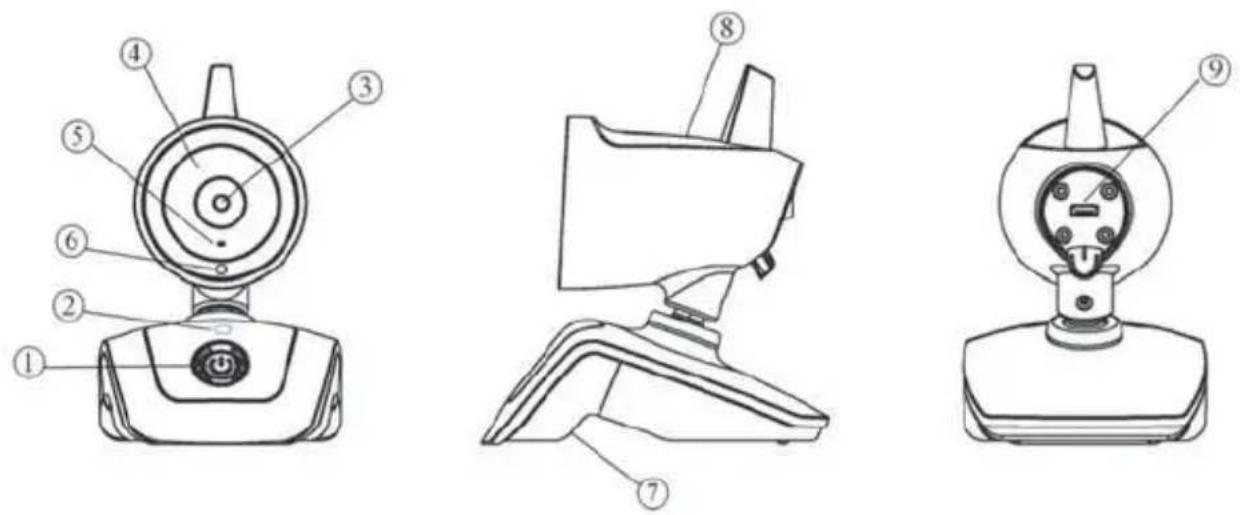
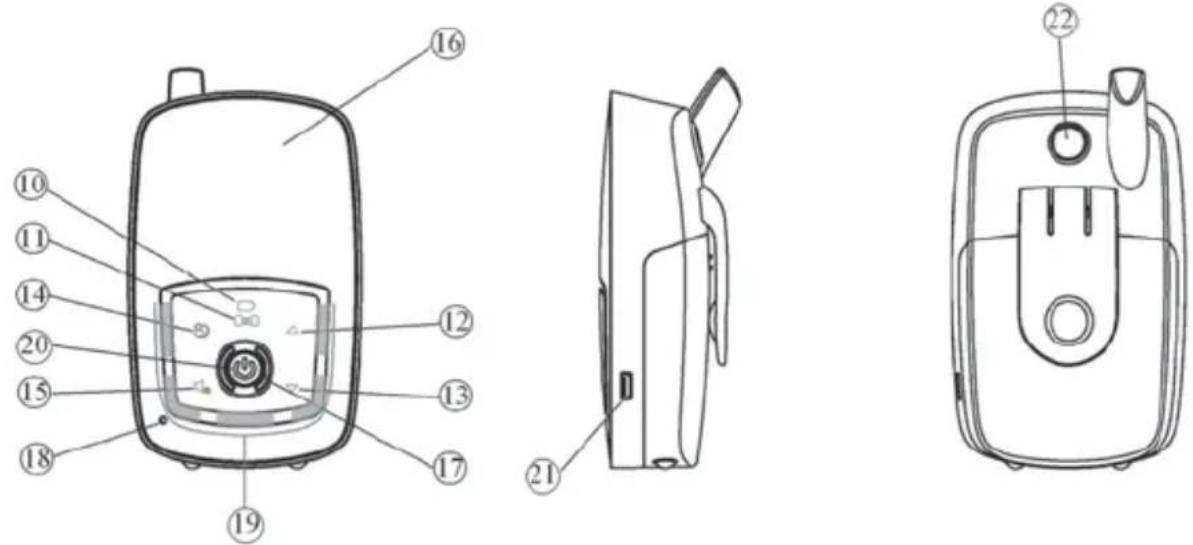
COMMANDS
- On/Off button
- Operation/low battery icon
- Camera shutter
- Infra-red LED for nightlight
- Microphone
- Light sensor
- Speaker
- Nightlight
- USB port
- Operation/low battery icon
-
Connection icon
-
Up key
- Down key
- Menu key
- Mute key for speaker
- Digital screen
- Speaker
- Microphone
- Visual alarm
- On/Off button
- USB port
- Walkie-talkie button
POWER
A/ TRANSMITTER
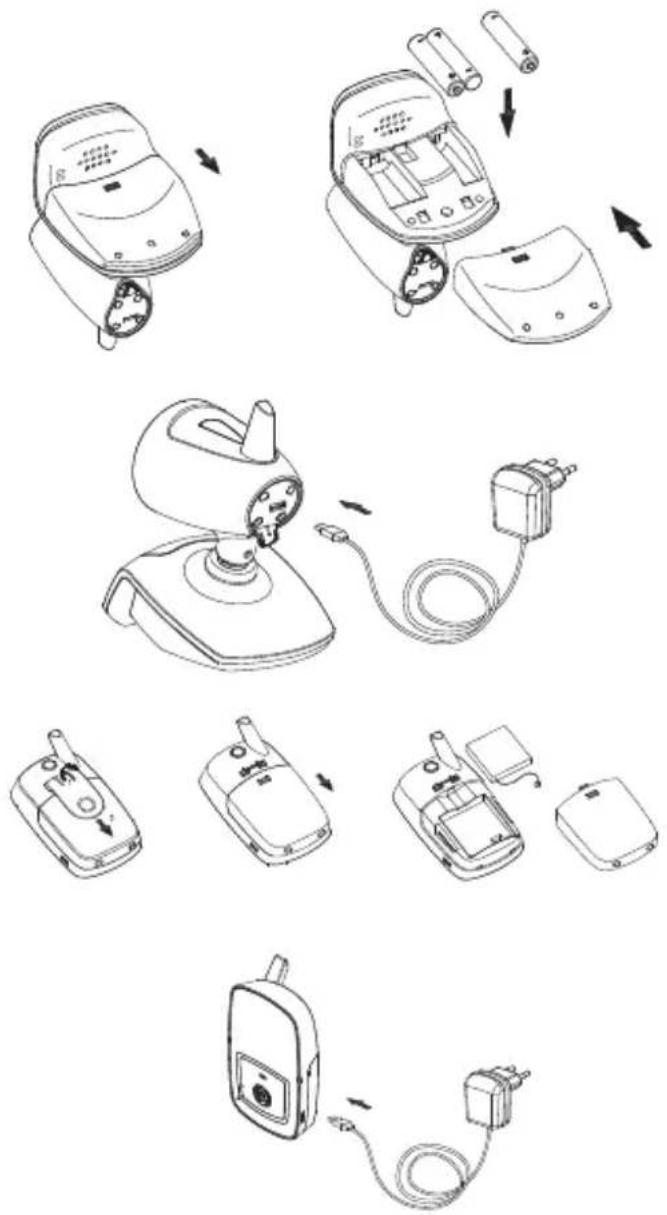
1. Battery operation
Press the cover and slide as shown. Insert three AAA (UM-4) alkaline batteries in the compartment. Ensure you respect the polarity. Replace the cover.
N.B.: For best operation, do not mix used and new or alkaline and rechargeable batteries.
2. Mains operation
The transmitter can be used with mains power using the 5V mains adaptor provided.
Connect the adaptor's outlet jack to the USB port (9) on the transmitter, ensuring it is correctly oriented. The battery will be shut off when the outlet jack is inserted in the USB port (9).
B/ RECEIVER
1. Operation with rechargeable battery
The rechargeable polymer I200mAh Li battery is already installed in the receiver. To change it, remove the belt clip and slide off the battery cover. Disconnect the battery connector.
2. Operation with mains adaptor
The receiver can run on mains power using the 5V mains adaptor provided. Connect the adaptor's outlet jack to the USB port (21) on the receiver. With the battery installed and the receiver turned on, the Operation/low battery icon (10) will switch from green to red, showing that the battery is being charged.
Once the battery is charged, the Operation/low battery icon (10) switches back to green. If the receiver is not turned on after the 5V mains adaptor is connected to the USB port (21), the Operation/low battery icon (10) will remain red during charging. The battery is not damaged if you disconnect the mains adaptor or leave it plugged in. If you leave it plugged in, the battery's power will not be used, and the device will run on mains power.
the Li battery for at least five hours using the mains adaptor provided.
WARNING: TO PREVENT AN EXPLOSION, ENSURE THAT THE BATTERY INSERTED IN THE RECEIVER IS RECHARGEABLE BEFORE CONNECTING THE MAINS ADAPTOR TO THE USB PORT.
N.B.: Before using the receiver for the first time, charge
CONNECTING THE TRANSMITTER TO THE RECEIVER
In this step, you connect the receiver to the transmitter to allow them to communicate without other devices (including Babyphones of the same model) interfering with you or receiving your signal.
The transmitter and receiver are already paired using a code pre-set at the factory. However, you should reset the connection if the event of interference:
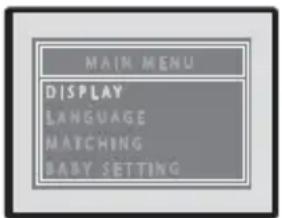
- Press the receiver's On/Off button (20) for two seconds to turn it on. While the menu icon (14) is lit (if it does not turn on, press on the On/Off button (20) briefly), touch the menu to display the main menu on the screen (16). Press the Up/Down keys (12), (13) to select the «matching» function, hold down the On/Off button (20) to confirm.
text_image
MAIN MENU DISPLAY LANGUAGE MATCHING BABY SETTING- The screen (16) will display the «Unit select» menu:

text_image
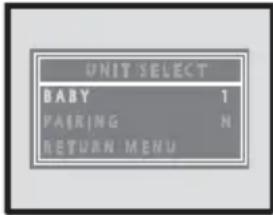
UNIT SELECT BABY 1 PAIRING N RETURN MENU-
Press the Up/Down keys (12) (13) to select «Baby», then hold down the On/Off button (20) to confirm. Press the Up/Down keys (12) (13) to choose a number for your transmitter, then hold down the On/Off button (20) to confirm.
-
Press the Up/Down keys (12) (13) to select «Connect», then hold down the On/Off button (20) to confirm. The connection icon (11) will flash rapidly for 15 seconds.
-
Press the On/Off button (1) on the transmitter until the Operation/Low battery icon (2) begins flashing green. Release the On/Off button.
-
If connection has worked properly, the screen (16) will display the image filmed by the camera (3) and the letter next to «Connection» in the menu will switch from N to Y. The green light on the connection icon (11) and the operation/low battery icon (2) remains on.
N.B.: You must perform step 5 while the connection icon (11) is flashing quickly for the connection to be made.
-
The device is ready to use.
-
If connection fails (the image on the screen (16) doesn't move and doesn't follow the image filmed by the camera (3), repeat steps 1 to 5.
-
To disconnect a transmitter, follow steps 1 and 2 above. At step 3, select the number of the transmitter to be disconnected and continue to step 4. Do not perform step 5, wait for the green light on the connection icon (11) to stop flashing. Hold down the On/Off button (20) to turn off the receiver. The selected transmitter is disconnected.
OPERATION
- Place the transmitter about 1 metre from baby's bed, pointing the camera (3) and the microphone (5) towards baby.
- Turn on the transmitter by holding down the On/Off button (1) for 2 seconds until the operation/low battery icon (2) turns green. Release the On/Off button (1). If the batteries are low, the icon (2) will turn red. Change the batteries or used the 5V mains adaptor provided.
- Now, turn on the receiver by holding down the On/Off button (20) for 2 seconds until the operation/low battery icon (10) turns green. If the icon starts flashing, the battery is low and needs to be recharged using the 5V mains adaptor.
- The image filmed by the camera (3) should appear on the screen (16), while the audio captured by the microphone (5) should be audible on the speaker
(17). If the screen displays the message «No signal or out of range», the devices have not been connected properly (see the CONNECTION section).
Adjust the speaker (17) volume for comfortable listening using the Up/Down keys (12) (13). Volume bars will appear on the screen.
If you don't want to hear, press «Mute» on the speaker (15). The speaker will be muted and the «mute» icon will appear on the screen (16). To turn on the sound again, press on the icon (15) again. The volume will be restored to its initial level.
N.B.: The keys will work only when the icons (▲▼ & ▶) are displayed. To activate them, hold down the On/Off button (20). To avoid mistakes, the icons will disappear after 8 seconds if no key is used.
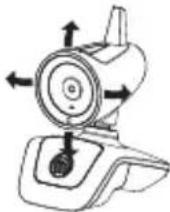
- The transmitter's camera can be tilted and panned to optimise visibility of your baby.
-
The microphone's sensitivity, speaker volume and nightlight on the transmitter can be set remotely from the receiver menu (see step 8 above).
-
The transmitter has an automatic «nightlight» function. When the light sensor detects a decrease in the light level in baby's room, it automatically triggers the infra-red LEDs (4) to provide light. The camera (3) records the infra-red images of baby and transmits them to the receiver, which displays them on the screen (16) in black and white.
-
Hold down the On/Off button (20) to display the icon keys (▲▼ & ▶). Touch the menu icon (14) to display the main menu. Press the Up/Down keys (12) (13) to select the language, display, matching and baby setting, then hold down the On/Off button (20) to confirm.
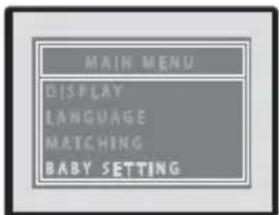
text_image
MAIN MENU DISPLAY LANGUAGE MATCHING BABY SETTINGMENU DISPLAY
Press the Up/Down keys (12) (13) to select brightness, zoom, temperature or rotation, then hold down the On/Off button (20) to confirm.

text_image
DISPLAY MENU BRIGHTNESS 3 ZOOM IN X1 FLIP C' TEMPERATURE C RETURN MENUBrightness
Press the Up/Down keys (12) (13) to select one of five brightness settings, then hold down the On/Off button (20) to confirm. Note that each transmitter's brightness will have to be set separately.
Zoom
Press the Up/Down keys (12) (13) to select x1 or x2, then hold down the On/Off button (20) to confirm.
Rotation
Press the Up/Down keys (12) (13) to select the normal or 180° inverted image, then hold down the On/Off button (20) to confirm.
Temperature
Press the Up/Down keys (12) (13) to select Celsius or Fahrenheit, then hold down the On/Off button (20) to confirm.
LANGUES
Press the Up/Down keys (12) (13) to select French, English or Spanish, then hold down the On/Off button (20) to confirm.

text_image
LANGUAGE ENGLISH FRÉNCIS SPANISHBABY
This menu lets you set the nightlight, microphone sensitivity and speaker volume on the transmitter remotely.
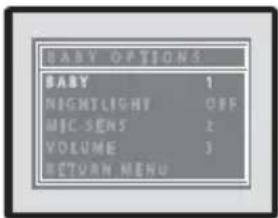
text_image
BABY OPTIONS BABY 1 NIGHTLIGHT OFF MIC SENS 2 VOLUME 3 RETURN MENUPress the Up/Down keys (12) (13) to select the transmitter to be configured, then hold down the On/Off button (20) to confirm.
Nightlight
Press the Up/Down keys (12) (13) to select «Nightlight», then hold down the On/Off button (20) to confirm. Press the Up/Down keys (12) (13) again to select ON, OFF, or VOX, then hold down the On/Off button (20) to confirm.
ON = The nightlight is always on.
OFF = The nightlight is always off.
VOX = The nightlight is voice activated (it turns on when noise is detected, and turns off when there is no noise).
Microphone sensitivity
Press the Up/Down keys (12) (13) to select «Mic Sens», then hold down the On/Off button (20) to confirm. Press the Up/Down keys (12) (13) to select one of four levels - 1, 2, 3 or No Vox, then hold down the On/Off button (20) to confirm.
Level 1 is the lowest microphone sensitivity level and 3 is the highest. Levels 1, 2 and 3 are voice activated. If you choose No Vox, the transmitter will transmit continuously (even if no noise is detected).
Speaker volume
Press the Up/Down keys (12) (13) to select «Volume», then hold down the On/Off button (20) to confirm. Press the Up/Down keys (12) (13) to select one of five levels (1 is the lowest, and 5 is the highest), then hold down the On/Off button (20) to confirm. At every step, you can press the menu icon (14) to exit the menu.
-
As soon as the receiver receives a signal, the visual alarm indicator (19) is activated. The louder your baby's voice, the brighter the alarm. This function is useful for parents who prefer to keep the speaker volume low for a quiet room, while still monitoring their baby.
-
Four icons appear along the top of the screen:
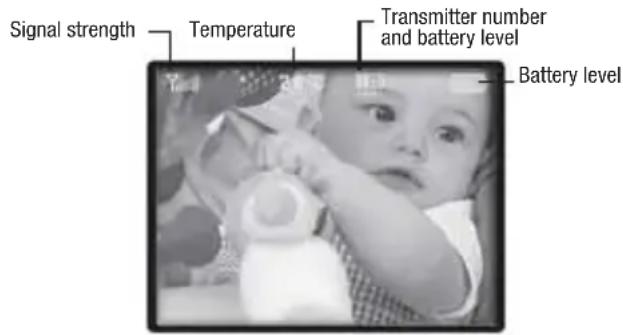
text_image
Signal strength Temperature Transmitter number and battery level Battery levelIn the range, when the signal strength shows 6 bars, the image on the screen (16) will be sharp and in colour. However, as the distance between the transmitter and the receiver increases, the signal strength will weaken and the image will become blurrier. At a certain distance, the image will become fixed, and a «No signal or out of range» message will be displayed on the screen (16). This message will be displayed at regular intervals on the screen (16). At the same time, the visual alarm indicator (19) and the connection icon (11) will flash and an audible alarm will sound. To shut off the audible alarm, hold down the On/Off button (20). The message on the screen (16), the visual alarm indicator (19) and the connection icon (11) will continue flashing until the correct distance is reached.

text_image
No signal or Out of RangeWhen the receiver returns within range, the audible alarm shuts off and the visual alarm indicator (19) stops flashing. If a signal is received, the connection icon (11) will remain green.
The temperature icon indicates the current temperature in baby's room.
The battery icon indicates the receiver's battery level. The bars disappear as the battery runs down until no bars are displayed. The icon then turns from green to flashing red and an audible alarm sounds to warn you that you need to change the battery.
While charging, the battery icon appears full (even if the battery isn't yet fully charged) but the operation/
low battery icon (10) remains red until the battery is fully charged (when it turns green).
-
When the microphone sensitivity is set to 1, 2 or 3, the screen (16) operates in voice-activated mode (VOX). When a signal is received, the screen (16) automatically turns on and the connection icon (11) lights up. When baby no longer makes noise, the screen (16) and the connection icon (11) shut off after 5 seconds. This extends battery life.
-
To see baby on the screen while he sleeps (when not making any noise), hold down the On/Off button (20) at any time to activate the transmitter. The screen (16) displays the image for about 30 seconds, then turns off to save battery life.
N.B.: when the screen (16) is in VOX mode, nothing happens when you hold down the On/Off button (20).
- You can talk to your baby at any time, using the «walkie-talkie» function:
a. Hold down the walkie-talkie button (22).
b. Speak towards the microphone (18).
c. You will hear your voice on the speaker (7).
d. To adjust speaker volume, use the «Baby» menu.
e. To listen to baby, release the walkie-talkie button (22).
- A beep will sound each time you press an icon key. To eliminate the beep, hold down the down icon (13) for 2 seconds until you hear a beep. Whenever you turn on or off the receiver, the beep will return.
TROUBLESHOOTING
| Problem Possible causes Solutions | ||
| No audio or video signal is transmitted | ·Microphone sensitivity is too low·The battery is run down or the mains adaptor is not correctly connected to the transmitter | ·Increase microphone sensitivity using the Baby menu·Replace the battery or check connections |
| Continuous transmission | ·Microphone sensitivity is too high·Microphone sensitivity is set to No Vox | ·Decrease microphone sensitivity using the Baby menu·Adjust microphone sensitivity in Vox mode (voice activated) |
| Out of range alarm sounds constantly | ·Transmitter battery is run down·The transmitter and receiver are out of range·Connection has been lost or is incorrect | ·Change the batteries or use the mains adaptor·Move the receiver closer to the transmitter·Reconnect |
| The image on the screen is still or blurred or in black and white | ·Range limits have been reached·Insufficient light in baby's room, the transmitter is operating in nightlight mode using the infra-red LEDs as light source·Interference from other devices is preventing the transmitter from operating correctly | ·Move the receiver closer to the transmitter·Increase lighting in baby's bedroom·Restart the transmitter |
| Battery constantly low | ·Battery is run down·Rechargeable battery is damaged | ·Recharge the battery or use the mains adaptor·Change the batteries or used the mains adaptor (transmitter).·Replace the rechargeable battery |
| The receiver's speaker makes no noise | ·The speaker is in «mute» mode | ·Press the icon (15) to cancel «mute» function |
| Static and interference | ·The transmitter is located near other electric devices | ·Move the electric devices away, or move the transmitter away from the source of interference, or change channel |
| Insufficient range | ·Wall between the transmitter and receiver is too thick·Transmitter battery is run down | ·Move the transmitter and receiver·Change the battery or use the mains adaptor |
natural_image
Line drawing of a mechanical device resembling a remote control or camera (no text or symbols)a

natural_image
Line drawing of a mobile phone with a circular button and antenna (no text or symbols)b

C

natural_image
Line drawing of a cable with a rectangular component attached (no text or symbols)d

text_image
babymloar YOO Care Mio 100% ee
BEDIENELEMENTE
text_image
MAIN MENU DISPLAY LANGUAGE MATCHING BABY SETTINGtext_image
MAIN MENU DISPLAY LANGUAGE MATCHING BABY SETTINGMENÜ MONITOR
text_image
No signal or Out of Rangenatural_image
Line drawing of a mechanical device with a cylindrical component and base mount (no text or symbols)a

natural_image
Line drawing of a mobile phone with a circular button on the front panel (no text or symbols)b
natural_image
Line drawing of a cable with a small terminal connector (no text or symbols)d

text_image
babymooar KOT Care and the other ee
BEDIENING
text_image
MAIN MENU DISPLAY LANGUAGE MATCHING BABY SETTINGtext_image
MAIN MENU DISPLAY LANGUAGE MATCHING BABY SETTINGMENU WEERGAVE
text_image
No signal or Out of Rangenatural_image
Line drawing of a mechanical device with a cylindrical component and base mount (no text or symbols)a

natural_image
Line drawing of a mobile phone with a circular button and antenna (no text or symbols)b
natural_image
Line drawing of a cable with a rectangular component attached (no text or symbols)d
text_image
babymooar KOT Care and the other ee
MANDOS
flowchart
graph TD
    A["Motor with battery"] --> B["Load battery"]
    B --> C["Plug plug"]
    C --> D["Electric motor with cable"]
    D --> E["Load plug"]
    E --> F["Electric motor with plug"]
    F --> G["Load plug"]
    G --> H["Electric motor with plug"]
    H --> I["Load plug"]
text_image
MAIN MENU DISPLAY LANGUAGE MATCHING BABY SETTINGtext_image
MAIN MENU DISPLAY LANGUAGE MATCHING BABY SETTINGVISUALIZACIÓN MENÚ
text_image
No signal or Out of Rangenatural_image
Line drawing of a mechanical device with a cylindrical component and base mount (no text or symbols)a

natural_image
Line drawing of a mobile phone with a circular button and antenna (no text or symbols)b
natural_image
Line drawing of a cable with a rectangular component attached (no text or symbols)d

text_image
babymooar KOT Care and the other ee
COMANDI
text_image
MAIN MENU DISPLAY LANGUAGE MATCHING BABY SETTINGtext_image
MAIN MENU DISPLAY LANGUAGE MATCHING BABY SETTINGVISUALIZZAZIONE MENU
text_image
No signal or Out of Rangenatural_image
Line drawing of a mechanical device with a cylindrical component and base mount (no text or symbols)a

natural_image
Line drawing of a mobile phone with a circular button and antenna (no text or symbols)b
natural_image
Line drawing of a cable with a rectangular component attached (no text or symbols)d

text_image
babymooair KOT Care BUT DOCKSe
COMANDOS
text_image
MAIN MENU DISPLAY LANGUAGE MATCHING BABY SETTINGtext_image
MAIN MENU DISPLAY LANGUAGE MATCHING BABY SETTINGEXIBIÇÃO MENU
text_image
No signal or Out of Rangenatural_image
Line drawing of a mechanical device with a cylindrical component and base mount (no text or symbols)a

natural_image
Line drawing of a mobile phone with a circular button and antenna (no text or symbols)b

C

natural_image
Line drawing of a cable with a rectangular component attached (no text or symbols)d

text_image
babymooair KOT Care BUT DOGe
OVLÁDÁNÍ PŘÍSTROJE
flowchart
graph TD
    A["Motor with battery"] --> B["Load battery"]
    B --> C["Plug plug"]
    C --> D["Electric motor with cable"]
    D --> E["Load plug"]
    E --> F["Electric motor with plug"]
    F --> G["Load plug with plug"]
    G --> H["Electric motor with plug"]
    H --> I["Load plug with plug"]
text_image
MAIN MENU DISPLAY LANGUAGE MATCHING BABY SETTING- Obrazovka (16) zobrazí menu « Volba prístroje » :

text_image
UNIT SELECT BABY 1 PAIRING N RETURN MENUtext_image
MAIN MENU DISPLAY LANGUAGE MATCHING BABY SETTINGZOBRAZENÍ MENU
text_image
No signal or Out of Rangenatural_image
Line drawing of a mechanical device with a cylindrical component and base mount (no text or symbols)a

natural_image
Line drawing of a mobile phone with a circular button and antenna (no text or symbols)b

C

natural_image
Line drawing of a cable with a rectangular component attached (no text or symbols)d
text_image
babymooar KOT Care BMOO ee
PARANCSOK
flowchart
graph TD
    A["Motor with battery"] --> B["Load battery"]
    B --> C["Plug plug"]
    C --> D["Electric motor with cable"]
    D --> E["Electric motor with plug"]
    E --> F["Electric motor with plug plug"]
    F --> G["Electric motor with plug plug plug"]
    G --> H["Electric motor with plug plug plug plug"]
    H --> I["Electric motor with plug plug plug plug plug"]
text_image
MAIN MENU DISPLAY LANGUAGE MATCHING BABY SETTINGtext_image
MAIN MENU DISPLAY LANGUAGE MATCHING BABY SETTINGA MENÜ MEGJELENÍTÉSE
text_image
No signal or Out of Rangenatural_image
Line drawing of a mechanical device with a cylindrical component and base mount (no text or symbols)a
natural_image
Line drawing of a mobile phone with a circular button and antenna (no text or symbols)b

C
d. 2 adaptori la priza de curent 5V
e. Mod de folosire

text_image
babymooair KOO Care BUTTERO ee
COMENZI
text_image
MAIN MENU DISPLAY LANGUAGE MATCHING BABY SETTING- Ecranul (16) va afisa meniul « Selectionati aparatul »:
text_image
UNIT SELECT BABY 1 PAIRING N RETURN MENUtext_image
MAIN MENU DISPLAY LANGUAGE MATCHING BABY SETTINGAFISAREA MENIULUI
text_image
No signal or Out of Rangenatural_image
Line drawing of a mechanical device with a cylindrical component and base mount (no text or symbols)a

natural_image
Line drawing of a mobile phone with a circular button and antenna (no text or symbols)b

C

natural_image
Line drawing of a cable with a rectangular component attached (no text or symbols)d

text_image
babymoair KOT Caree
STEROWANIE
text_image
MAIN MENU DISPLAY LANGUAGE MATCHING BABY SETTINGtext_image
MAIN MENU DISPLAY LANGUAGE MATCHING BABY SETTINGWYŚWIETLANIE MENU
text_image
No signal or Out of Rangenatural_image
Line drawing of a mechanical device with a cylindrical component and base mount (no text or symbols)a

natural_image
Line drawing of a mobile phone with a circular button and antenna (no text or symbols)b

C
natural_image
Line drawing of a cable with a rectangular component attached (no text or symbols)d

text_image
babymooar KOT Care and the other ee
BETJENING/KONTROL
flowchart
graph TD
    A["Motor with battery"] --> B["Load battery"]
    B --> C["Plug plug"]
    C --> D["Electric motor with cable"]
    D --> E["Load plug"]
    E --> F["Electric motor with plug"]
    F --> G["Load plug"]
    G --> H["Electric motor with plug"]
    H --> I["Load plug"]
text_image
MAIN MENU DISPLAY LANGUAGE MATCHING BABY SETTINGtext_image
MAIN MENU DISPLAY LANGUAGE MATCHING BABY SETTINGMENU DISPLAY
text_image
No signal or Out of RangeDÉCLARATION DE CONFORMITÉ
EU DECLARATION OF CONFORMITY
This declaration is issued under the sole responsibility of the manufacturer.
Babymoov
Declare that the following product:
Model: YOO Care
Référence : A014422
Model: MT53404TR
Is in conformity with the relevant Union harmonisation legislations :
- Directive 2014/30/UE: Electromagnetic compatibility;
- Directive 2014/35/UE: Low Voltage;
- Directive 2014/53/UE: Radio equipment;
and with the relevant harmonised standards used:
EMC: EN 301 489-1 : V2.1.1 (2017)
Signed for and on behalf of:
Name: M. Laurent Windenberger
Function: Marketing Director
Signature:

text_image
Buip.Date:
Place:

text_image
Garantie À VIE* LIFETIME Warranty*

www.service-babymoov.com


* Lifetime warranty. Warranty subject to terms and conditions. List of countries involved, activation timescales and information available online at the following address: www.service-babymoov.com