ED7005 - Deep fryer EDEN - Free user manual and instructions
Find the device manual for free ED7005 EDEN in PDF.
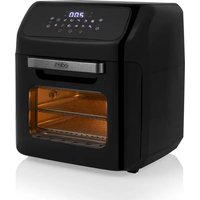
| Product Type | Hot Air Fryer (Aerofryer) |
| Brand | Eden |
| Model | ED7005 |
| Power Supply | 230 V ~ 50/60 Hz |
| Power | 1600 W |
| Tank Capacity | 5 L |
| Temperature Range | 80 °C to 200 °C |
| Timer | 1 to 60 minutes |
| Delay Timer | Up to 12 hours |
| Number of Programs | 8 automatic programs |
| Programs | Preheat, Fries, Meat, Chicken Drumsticks, Seafood, Roast Beef, Fish, Cake |
| Display | Digital touch screen |
| Coating Material | Non-stick coating |
| Removable grill | Yes, included |
| Removable basket | Yes, with handle |
| Safety | Auto shut-off, cool surface, thermal protection, insulated handle |
| Maintenance and cleaning | Manual cleaning with hot water and non-abrasive sponge. Do not immerse or put in dishwasher. |
| Weight | Approximately 4.5 kg |
| Dimensions (L × W × H) | 30 × 28 × 32 cm |
| Color | Black |
| Use | Household use only |
| Spare parts and repairability | Available at www.edenappliances.com |
| Warranty | 2 years (according to applicable legislation) |
Frequently Asked Questions - ED7005 EDEN
User questions about ED7005 EDEN
0 question about this device. Answer the ones you know or ask your own.
Ask a new question about this device
Download the instructions for your Deep fryer in PDF format for free! Find your manual ED7005 - EDEN and take your electronic device back in hand. On this page are published all the documents necessary for the use of your device. ED7005 by EDEN.
USER MANUAL ED7005 EDEN
EN | Instruction manual
natural_image
Line drawing of an air fryer with control panel and side arm (no text or symbols)ED-7005
PRINCESS
PARTS DESCRIPTION / ONDERDELENBESCHRIJVING / DESCRIPTION DES PIÈCES / TEILEBESCHREIBUNG / DESCRIPCIÓN DE LAS PIEZAS / DESCRIÇÃO DOS COMPONENTES / DESCRIZIONE DELLE PARTI / BESKRIVNING AV DELAR / OPIS CZĘŚCI / POPIS SOUČASTÍ / POPIS SÚČASTÍ
text_image
1 2 3 4 5 6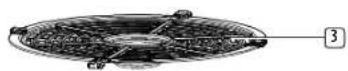
SAFETY
- By ignoring the safety instructions the manufacturer cannot be held responsible for the damage.
- If the supply cord is damaged, it must be replaced by the manufacturer, its service agent or similarly qualified persons in order to avoid a hazard.
- Never move the appliance by pulling the cord and make sure the cord cannot become entangled.
- The appliance must be placed on a stable, level surface.
- This appliance is only to be used for household purposes and only for the purpose it is made for. In worst case the food can catch fire. (i.e. do not use more than one tea spoon of oil, no meat that will release to much grease or water intended for boiling foods.
- This appliance shall not be used by children aged less than 8 years. This appliance can be used by children aged from 8 years and above and persons with reduced physical, sensory or mental capabilities or lack of experience and knowledge if they have been given supervision or instruction concerning
use of the appliance in a safe way and understand the hazards involved. Children shall not play with the appliance. Keep the appliance and its cord out of reach of children aged less than 8 years. Cleaning and user maintenance shall not be made by children unless older than 8 and supervised.
- To protect yourself against an electric shock, do not immerse the cord, plug or appliance in the water or any other liquid.
- The appliance is to be connected to a socket-outlet having an earthed contact (for class I appliances).
- WARNING: If the surface is cracked, switch off the appliance to avoid the possibility of an electric shock.
- Keep the appliance and its cord out of reach of children less than 8 years.
- The temperature of accessible surfaces may be high when the appliance is operating.
- The appliance is not intended to be operated by means of an external timer or a separate remote-control system.
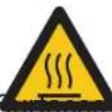
• Surfaces indicated with this logo are liable to get hot during use.
- In order to prevent disruptions of the airflow do not put anything on top of the appliance and make sure there is always 10 centimeter of free space around the appliance.
• After the baking process the appliance needs to cooldown, this cooling process will activate automatically when the timer is done. Avoid to unplug the appliance from the net socket before the cooling process is finished because the remaining hot air can damage the appliance.
• This appliance is intended to be used in household and similar applications such as:
- Staff kitchen areas in shops, offices and other working environments.
- By clients in hotels, motels and other residential type environments.
• Bed and breakfast type environments.
• Farm houses.
SAVE THESE INSTRUCTIONS
HOUSEHOLD USE ONLY

The universal recycling symbol, logo, or icon is an internationally recognized symbol used to designate recyclable materials. The recycling symbol is in the public domain and is not a trademark.

This product complies with conformity requirements of the applicable European regulations or directives.

The Green Dot is the registered trademark of Der Grüne Punkt – Duales System Deutschland GmbH and is protected as a trademark worldwide. The logo may only be used by customers of DSD GmbH holding a valid trademark usage contract or by engaged waste management companies within the Federal Republic of Germany. This also applies to reproduction of the logo by third parties in a dictionary, an encyclopaedia or an electronic database containing a reference manual.
Waste electrical products should not be disposed of with household waste. Please recycle where facilities exist. Check with your local Authority or local store for recycling advice.

This symbol is used for marking materials intended to come into contact with food in the European Union as defined in regulation (EC) No 1935/2004.

The product and packaging materials are recyclable, subject to extended manufacturer responsibility. Dispose it separately, following the illustrated packaging symbols, for better waste treatment. The Triman logo is valid in France only.
Cleaning and maintenance
- Before cleaning, unplug the appliance and wait for the appliance to cool down.
- Never immerse the device in water or any other liquid. The device is not dishwasher proof.
- Clean the pan and aeroplate (removable grid) with hot water, some washing-up liquid and a non-abrasive sponge. The pan and aeroplate (removable grid) are not dishwasher-proof.
- If dirt is stuck to the aeroplate (removable grid) or the bottom of the pan, fill the pan with hot water with some washing-up liquid.
Put the aeroplate (removable grid) in the pan and let the pan and the grid soak for about 10 minutes.
- Clean the appliance with a damp cloth. Never use harsh and abrasive cleaners, scouring pad or steel wool, which damages the appliance.
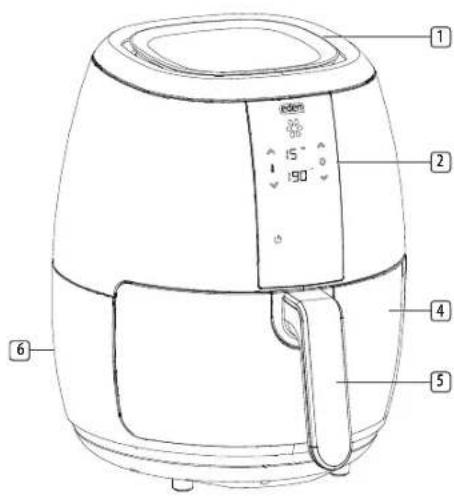
PARTS DESCRIPTION
- Air inlet
- Display
- Removable grid (do not use without this grid)
- Pan
- Handle
- Air outlet openings
BEFORE THE FIRST USE
- Remove all packaging material.
- Remove any stickers or labels from the appliance.
- Thoroughly clean the parts with hot water, some washing-up liquid and a non-abrasive sponge.
- Wipe the inside and outside of the appliance with a moist cloth.
- Place the appliance on a stable, horizontal and level surface, do not place the appliance on non-heat-resistant surfaces.

Instruction manual
- When the device is turned on for the first time, a slight odour will occur. This is normal, ensure adequate ventilation. This fragrance is only temporary and will disappear soon.
- Place the removable grid in the pan properly. NOTE: do not use the appliance without this grid.
- This is an air fryer that works on hot air. Do not fill the pan with oil or frying fat.
- In order to prevent disruptions of the airflow do not put anything on top of the appliance and make sure there is always 10 centimeter of free space around the appliance.
ICON FUNCTIONS AND USE
| POWER ON/OFF | START/STOP MODE TIMER | ||
 |  |  |  |
- Press the ON/OFF icon to turn the appliance on or off or to cancel a setting.
- Press the START/STOP icon to start or pause a program. To stop, press the it again. The appliance will shut off after 20 seconds.
- Press the MODE icon to select between programmed mode. There are 8 frying programs modes included: [PEREHEAT] [FRIES] [MEAT] [CHICKEN DRUM STICKS] [SHELLFISH], [ROASTBEEF] [FISH] and [BAKE]. Press the MODE icon followed by the desired frying program then press START.
Using the Aero fryer
- Put the mains plug in an earthed wall socket.
- Carefully pull the pan out of the Aero fryer.
- Put the ingredients in the pan, make sure the removable grid is placed in the pan before you put in the ingredients.
- Slide the pan back into the Aero fryer.
- Do not touch the pan during and sometime after use, as it gets very hot. Only hold the pan by the handle.
- Press the POWER button to turn on the appliance then choose between using manual input or a programmed setting.
Manual settings for time and temperature
Time 1-60 minutes
- The time can be adjusted with the timer control icons. Press time UP or time DOWN icons to increase or decrease the frying time by one minute. Press and hold one of the icons to adjust the time faster. You can set the timer between 1 and 60 minutes. When using the timer pressing the time UP or DOWN icons will increase or decrease the time by 30 minutes.
Temperature 80°C - 200°C
- The temperature can be adjusted with the temperature control icons Press temperature UP or DOWN icon to increase or decrease the temperature by 5 degrees. Press and hold one of the buttons to adjust the temperature faster. You can set the temperature between 80 and 200 degrees.
- When the desired time and temperature are set, press the START icon to start frying.
| Min-max amount (g) | Time (min) | Temperature (°C) | Shake | Extra information | |
| Fries 300-900 | 10-18 | 200 shake | |||
| Homemade fries | 300-800 | 16-20 200 | shake add 1/2 a | tablespoon of oil | |
| Frozen fish fingers | 100-400 | 6-10 200 | Use oven | ready | |
| Drumsticks | 100-500 | 18-22 180 | |||
| Hamburger | 100-500 | 13-15 180 | |||
| Spring rolls | 100-400 | 8-10 200 | shake Use oven | ready | |
| Cake 300 | 20-25 160 | Use baking | tin | ||
| Quiche 300 | 20-25 160 | Use baking | tin | ||
| Muffins 300 | 15-18 200 | Use baking | tin |
Programmed modes

Instruction manual
| # Symbol Program Temperature | (°C) | Time (min) | ||
| 1 Preheat 190 | 3 | |||
| 2 Aero fryer fries |  | |||
| 3 Meat 180 10 |  | |||
| 4 Chicken 200 | 2 | |||
| 5 Shellfish/ |  | Crustaceans | 180 12 | |
6 Roast beef 180 22 | |||
7 Fish 180 15 | |||
8 Bake 170 16 |
- Press the MODE icon. The first program and the start icon will flash repeatedly.
- Keep pressing the MODE icon until the desired program flashes.
- Press the START icon to start the operation. The Aero fryer will start the corresponding program.
- To cancel any program press the POWER button once. After this you can select another function. It is also possible to adjust the chosen program by changing the time and temperature.
- When you pull out the pan during the frying process, the device will shut off automatically within 5 seconds. When you reinsert the device, the program will resume.
-
Excess oil from the ingredients is collected on the bottom of the pan.
-
Some ingredients require shaking halfway through the preparation time. To shake the ingredients, pull the pan out of the appliance by the handle and shake it. Then slide the pan back into the Aero fryer.
- When you hear the timer beep, the set preparation time has elapsed. The device will shut off after 20 seconds. Pull the pan out of the appliance and place it on a heat resistant surface.
- Check if the ingredients are ready. If the ingredients are not ready yet, simply slide the pan back into the appliance and set the timer to a few extra minutes.
Using the timer
- Select the desired program or manually input the desired settings.
- The time and temperature of that program will be displayed.
- To set the starting time for the chosen program press the TIMER icon on the bottom row of the display.
- A small timer icon will appear near the time indication display. The timer, time, time up, and time down indicators will flash 3 times.
- Use the Time UP or DOWN icons to set the timing. The timer can be set to start the program within 30 minutes to 12 hours.
- Pressing the time UP or DOWN icons while in the TIMER mode, the time will increase or decrease the time by 30 minutes.
- Press START. The timer icon will flash and the countdown to start will be displayed.
-
The program will begin when the countdown is finished.
-
During the countdown you can revert to working mode by pressing START. The display will show the programmed settings. Press the TIMER icon again to revert to the set timer.
Tips
- Shaking smaller ingredients halfway during the preparation time optimizes the end result and can help prevent unevenly fried ingredients.
- Add some oil to fresh potatoes for a crispy result. Fry your ingredients in the air fryer within a few minutes after you've added the oil.
- Do not prepare extremely greasy ingredients such as sausages in the air fryer.
- Place a baking tin in the pan if you want to bake a cake or quiche or if you want to fry fragile ingredients or filled ingredients.
- You can also use the aero fryer to reheat ingredients. To reheat ingredients, set the temperature to 150^ for up to 10 minutes.
ENVIRONMENT

This appliance should not be put into the domestic garbage at the end of its durability, but must be offered at a central point for the recycling of electric and electronic domestic appliances. This symbol on the appliance, instruction manual and packaging puts your attention to this important issue. The materials used in this appliance can be recycled. By recycling of used domestic appliances you
PRINCESS
Instruction manual
contribute an important push to the protection of our environment. Ask your local authorities for information regarding the point of recollection.
Support
You can find all available information and spare parts at www.edenappliances.com!