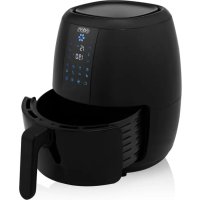
ED-7017 - Deep fryer EDEN - Free user manual and instructions
Find the device manual for free ED-7017 EDEN in PDF.


User questions about ED-7017 EDEN
0 question about this device. Answer the ones you know or ask your own.
Ask a new question about this device
Download the instructions for your Deep fryer in PDF format for free! Find your manual ED-7017 - EDEN and take your electronic device back in hand. On this page are published all the documents necessary for the use of your device. ED-7017 by EDEN.
USER MANUAL ED-7017 EDEN
EN | Instruction manual
natural_image
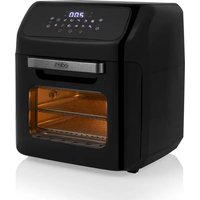
Black air fryer oven with digital display and oven, showing food inside (no visible text or symbols)ED-7017
PARTS DESCRIPTION / ONDERDELENBESCHRIJVING / DESCRIPTION DES PIÈCES / TEILEBESCHREIBUNG / DESCRIPCIÓN DE LAS PIEZAS / DESCRIÇÃO DOS COMPONENTES / DESCRIZIONE DELLE PARTI / BESKRIVNING AV DELAR / OPIS CZĘŚCI / POPIS SOUČASTÍ / POPIS SÚČASTÍ
text_image
200 ② ①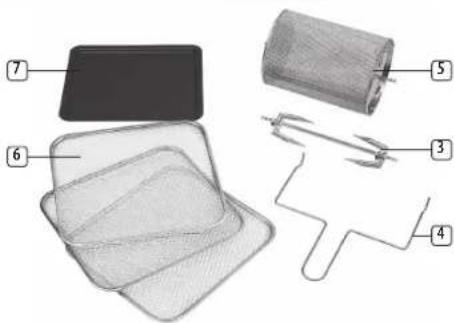
text_image
Labeled diagram of electronic components including a rectangular device, meshed circuit boards, and wire coils with numbered parts.SAFETY
- By ignoring the safety instructions the manufacturer cannot be held responsible for the damage.
- If the supply cord is damaged, it must be replaced by the manufacturer, its service agent or similarly qualified persons in order to avoid a hazard.
- Never move the appliance by pulling the cord and make sure the cord cannot become entangled.
- The appliance must be placed on a stable, level surface.
- This appliance is only to be used for household purposes and only for the purpose it is made for. In worst case the food can catch fire. (i.e. do not use more than one tea spoon of oil, no meat that will release to much grease or water intended for boiling foods.
- This appliance shall not be used by children aged less than 8 years. This appliance can be used by children aged from 8 years and above and persons with reduced physical, sensory or mental capabilities or lack of experience and knowledge if they have been given supervision or instruction concerning
use of the appliance in a safe way and understand the hazards involved. Children shall not play with the appliance. Keep the appliance and its cord out of reach of children aged less than 8 years. Cleaning and user maintenance shall not be made by children unless older than 8 and supervised.
- To protect yourself against an electric shock, do not immerse the cord, plug or appliance in the water or any other liquid.
- The appliance is to be connected to a socket-outlet having an earthed contact (for class I appliances).
- WARNING: If the surface is cracked, switch off the appliance to avoid the possibility of an electric shock.
- Keep the appliance and its cord out of reach of children less than 8 years.
- The temperature of accessible surfaces may be high when the appliance is operating.
- The appliance is not intended to be operated by means of an external timer or a separate remote-control system.
- Surface indicated with this logo are liable to get hot during use.
- In order to prevent disruptions of the airflow do not put anything on top of the appliance and make sure there is always 10 centimeter of free space around the appliance.
• After the baking process the appliance needs to cooldown, this cooling process will activate automatically when the timer is done. Avoid to unplug the appliance from the net socket before the cooling process is finished because the remaining hot air can damage the appliance.
• This appliance is intended to be used in household and similar applications such as: - Staff kitchen areas in shops, offices and other working environments.
- By clients in hotels, motels and other residential type environments.
• Bed and breakfast type environments.
• Farm houses. SAVE THESE INSTRUCTIONS HOUSEHOLD USE ONLY

The universal recycling symbol, logo, or icon is an internationally recognized symbol used to designate recyclable materials. The recycling symbol is in the public domain and is not a trademark.

This product complies with conformity requirements of the applicable European regulations or directives.

The Green Dot is the registered trademark of Der Grüne Punkt – Duales System Deutschland GmbH and is protected as a trademark worldwide. The logo may only be used by customers of DSD GmbH holding a valid trademark usage contract or by engaged waste management companies within the Federal Republic of Germany. This also applies to reproduction of the logo by third parties in a dictionary, an encyclopaedia or an electronic database containing a reference manual.
Waste electrical products should not be disposed of with household waste. Please recycle where facilities exist. Check with your local Authority or local store for recycling advice.

This symbol is used for marking materials intended to come into contact with food in the European Union as defined in regulation (EC) No 1935/2004.

The Eurasian Conformity mark (EAC) is a certification mark to indicate products that conform to all technical regulations of the Eurasian Customs Union.

The product and packaging materials are recyclable, subject to extended manufacturer responsibility. Dispose it separately, following the illustrated packaging symbols, for better waste treatment. The Triman logo is valid in France only.

Separate collection / Check your local municipal guidelines.
Cleaning and maintenance
- Before cleaning, unplug the appliance and wait for the appliance to cool down.
- Never immerse the device in water or any other liquid. The device is not dishwasher proof.
- Clean the appliance with a damp cloth. Never use harsh and abrasive cleaners, scouring pad or steel wool, which damages the appliance.
- Rinse all other used parts with dish soap and warm water or in the dishwasher. In the case of stubborn dirt, we recommend soaking the accessories in warm water and washing-up liquid beforehand.
- Allow all parts to dry completely or dry them with a towel.
PARTS DESCRIPTION
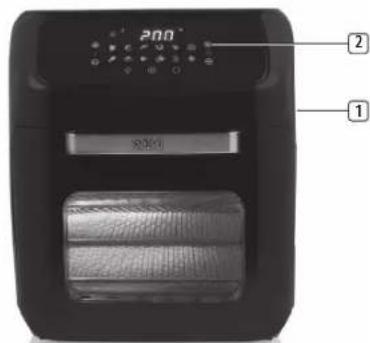
- Main unit
- Display
- Rotating spit fork with locking screw
- Rotisserie handle
- Rotating basket
- Baking rack (3 x)
- Fat collecting tray
BEFORE THE FIRST USE
- Remove all packaging material.
- Remove any stickers or labels from the appliance.
- Wipe the inside and outside of the appliance with a moist cloth.
- Place the appliance on a stable, horizontal and level surface, do not place the appliance on non-heat-resistant surfaces.
Instruction manual
Note: When the device is turned on for the first time, a slight odour will occur. This is normal, ensure adequate ventilation. This odour is only temporary and will disappear soon.
Fat collecting/baking tray
• Always place the fat collecting tray in the lower rails of the cooking space to collect dripping fat, food residues or crumbs. It can also be used as a baking tray by placing food on it, place the baking tray in the middle rails.
Rotating spit fork
- The spit fork shaft contains two notches. The notches mark the outermost positions of the locking screws. These must not be attached any further to enable correct operation.
- The rotating spit fork is suitable for grilling large pieces of meat, but do not place pieces of meat that are too large, the spit fork must still be able to rotate.
- Slide one of the rotating spit forks onto the shaft and lock it with the locking screw.
- Now slide the items you want to grill onto the shaft.
- Slide the other rotating spit fork onto the shaft and lock it with the locking screw.
- Plug the left end of the shaft as far as it will go into the round holder on the left-hand side of the cooking space.
- Insert the other end of the shaft into the support on the right-hand side of the cooking space.
- Check if it is placed correctly.
Removal tools
- Use the rotisserie handle to take out the rotating spit fork and the baking racks from the cooking space.
- Place the end of the rotisserie handle under the shaft.
- First lift up the right side of the shaft and move it forwards until the left end of the shaft is released from the holder.
- Lift the rotating spit fork gently out of the cooking space and put it on a heat-resistance surface.
- Use the removal handle to take out the rotating basket from the cooking space. First lift up the right side of the shaft and move it forwards until the left end of the shaft is released from the holder.
- Lift the rotating basket gently out of the cooking space and put it on a heat-resistance surface.
Rotating basket
- The rotating basket can be used to prepare chips or other potato products, pieces of vegetables, meat and frozen products like chicken nuggets or squid rings.
- Don't overfill the basket with ingredients, if it's to full, the food will not cook evenly.
- Close the basket and ensure that it is shut correctly so that it can't open during use.
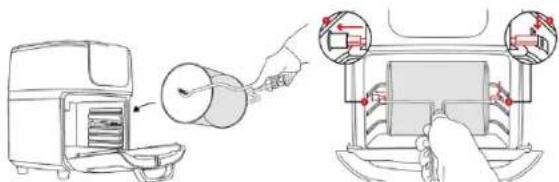
- First insert the left side with the L marking (image 2; number 1) of the rotating basket into the cooking space. To do this, plug the left end of the shaft as far as it will go into the round holder on the left side of the cooking space. Turn the basket until it is fixated into the axis and cannot move.
natural_image
Line drawing showing a toaster oven being processed with a tool, and a close-up of the device's interior (no text or symbols)- Then hang the right end of the shaft into the support on the right side of the cooking space. (image 2; number 2)
- Check if it is placed correctly.
- Always use the removal handle to remove the rotating basket from the cooking space (see removal tool chapter). The basket will be very hot.
Baking racks
- The baking racks are slid onto the rails in the cooking space.
• The heating element is located at the top of the cooking space. - The higher a rack is placed, the more intense the heat is from above.
- In the upper part, the food is cooked faster and crispy.
- The middle position can be selected to achieve uniform heating from all sides.
• The bottom rails are suitable for gentle cooking. - Use gloves to remove the baking racks.
USE
- Put the mains plug in an earthed wall socket.
-
Open the door.
-
If the fat collecting tray is not to be used as a baking tray, slide it into the lowest rails of the cooking space.
- Select a suitable accessory for the food to be prepared.
- Process the food and place it on or in the accessory and attach this accessory in the device.
- Close the door.
- Press the on/off switch. The display will become active.
- Set the temperature and cooking time manually or choose between one of the 10 programs.
Manual setting:
- Touch the up or down symbol at the temperature setting to set the desired temperature (lowest 80^ , highest 200^ ).
- Touch the up and down symbol at the time setting to set the desired time(1 minute to 90 minutes).
- Note: To preheat the device touch the preheat symbol. (default is set on 80^ and 5 minutes)
Program setting:
- Activate the desired program by touching the program symbol, it's activated when the symbol starts flashing. The appliance will start automatically.
- The flame indicator will start flashing and the °C and remaining time will be shown on display.
• See for pre-setting information the table below:
| Program | Icon | Default temperature/time | Quantity | Extra information |
Instruction manual
| Aerofryer fries | [ZX14] | 200°C/15 minutes | 500g When using the rotating frying basket, suitable up to 500g fries. When using the 3 grill racks, suitable up to 750g. (Shake every 5 minutes). Baking times may vary based on amount of fries, type of fries, temperature and brand. | |
| Homemade fries | Proposed time 120°C/10 min 200°C /20 min | 500g/ 750g | Add 1/2 a tablespoon of oil. 120°C When using the rotating frying basket, suitable up to 500g fries. 200°C When using the 3 grill racks, suitable up to 750g. (Shake every 5 minutes) | |
| Roast 175°C/15 min 200g | ||||
| Bake 160°C/10 min 1 pcs | ||||
| Pizza 180°C/15 min 1 pcs | ||||
| Heating up | [6HT3] | Proposed time 115°C/12 min | 1 pcs | |
| Shellfish/Crustace ans | [1VCSA][7306] | 160°C/12 min 250g | ||
| Fish 165°C | [OK3C]min | 200g | ||
| Chicken 18 | [K28G]/40 min | 600g | ||
| Rotisserie | [SS2D]C/30 min | 500g/ | 30min | |
| Dehydrating | [1084] | 30°C/2H 250g |
- The cooking time depends on the thickness of the food. Times can also vary due to the quantity and consistency of the food. The time settings are only guidelines and can be adapted to your taste. Double the time for tough meat. Extend the time by at least 20% for deep-frozen food or choose the defrost option first, touch the defrost symbol to start. (default 200^ , 20 minutes)
- Make sure that meat and poultry are thoroughly cooked before serving.
- To change the temperature or cooking time of a selected program, touch the temperature and time setting buttons, the same as for manual setting and set a new value.
-
A flashing flames indicator light indicates that the device is operating. If operation is interrupted, the flames indicator stays on and "OFF" is shown on display.
-
If the rotating basket or rotating spit are used, touch the rotating button to start the rotating function. Touching the button again will stop the rotating function.
- Switch on the light pushing the light button to check the condition of the food during use or open the door, the light will switch on and the operation is interrupted automatically. Operation is resumed once the door is closed again
- After the cooking time has elapsed, the device switches off automatically and it will give a beep sound. If the device must be stopped prematurely, press the on / off switch.
- Open the door and take the cooked items out of the device. Always use oven gloves and use the removal handle/tool to take out the accessories.
• After use, remove the mains plug from the wall socket. - Allow the used accessories and device to cool down and then clean them.
ENVIRONMENT

This appliance should not be put into the domestic garbage at the end of its durability, but must be offered at a central point for the recycling of electric and electronic domestic appliances. This symbol on the appliance, instruction manual and packaging puts your attention to this important issue. The materials used in this appliance can be recycled. By recycling of used domestic appliances you contribute an important push to the protection of our environment. Ask your local authorities for information regarding the point of recollection.
Support
You can find all available information and spare parts at www.edenappliances.com!
VEILIGHEID
natural_image
Illustration showing a hand pouring liquid into a microwave oven and a close-up of the lid with red arrows indicating motion (no text or symbols)natural_image
Line drawing showing a toaster oven and its interior with hand gestures (no text or symbols)natural_image
Illustration showing a hand pouring liquid into a microwave oven and a close-up of the lid with red arrows indicating motion (no text or symbols)• Die Backroste werden in die entsprechenden Schienen im Garraum geschoben.
- The heating element is located at the top of the cooking space.
- The higher a rack is placed, the more intense the heat is from above.
- In the upper part, the food is cooked faster and crispy.
- The middle position can be selected to achieve uniform heating from all sides.