E6018 - Weather Station Emos - Free user manual and instructions
Find the device manual for free E6018 Emos in PDF.
User questions about E6018 Emos
0 question about this device. Answer the ones you know or ask your own.
Ask a new question about this device
Download the instructions for your Weather Station in PDF format for free! Find your manual E6018 - Emos and take your electronic device back in hand. On this page are published all the documents necessary for the use of your device. E6018 by Emos.
USER MANUAL E6018 Emos
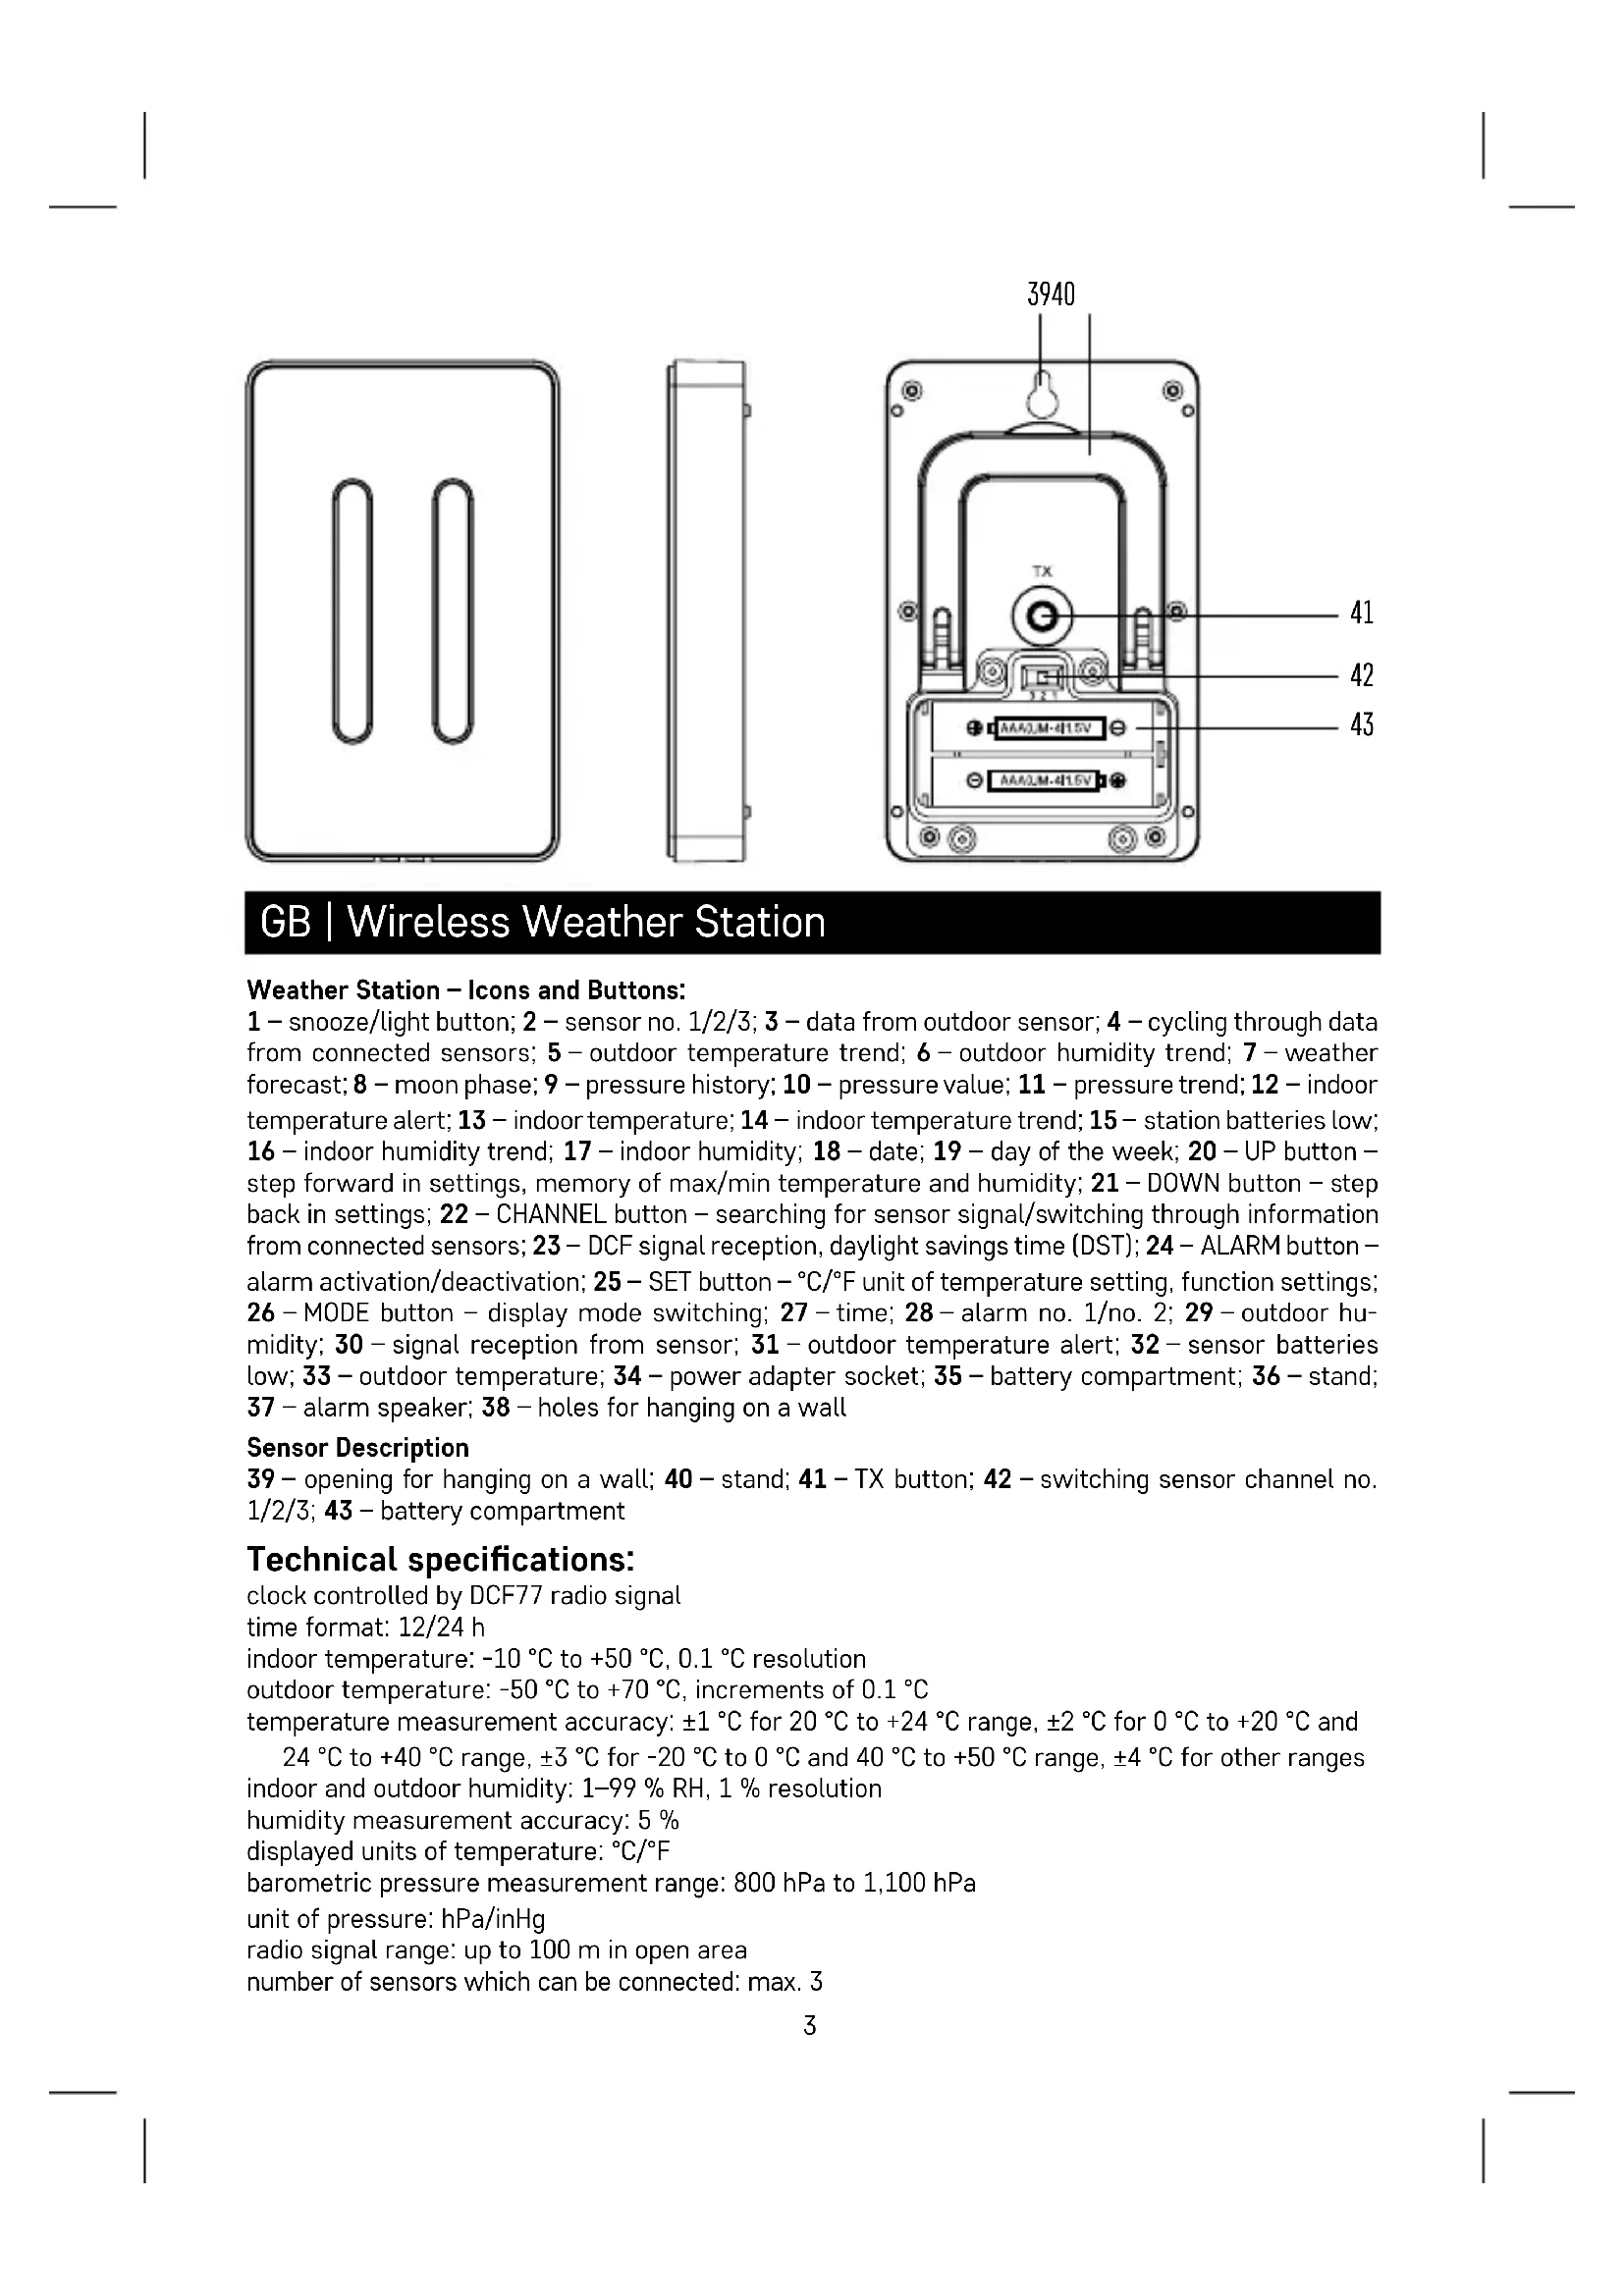
GB | Wireless Weather Station
Weather Station – Icons and Buttons:
1 – snooze/light button; 2 – sensor no. 1/2/3; 3 – data from outdoor sensor; 4 – cycling through data from connected sensors; 5 – outdoor temperature trend; 6 – outdoor humidity trend; 7 – weather forecast; 8 – moon phase; 9 – pressure history; 10 – pressure value; 11 – pressure trend; 12 – indoor temperature alert; 13 – indoor temperature; 14 – indoor temperature trend; 15 – station batteries low; 16 – indoor humidity trend; 17 – indoor humidity; 18 – date; 19 – day of the week; 20 – UP button – step forward in settings, memory of max/min temperature and humidity; 21 – DOWN button – step back in settings; 22 – CHANNEL button – searching for sensor signal/switching through information from connected sensors; 23 – DCF signal reception, daylight savings time (DST); 24 – ALARM button – alarm activation/deactivation; 25 – SET button – °C/°F unit of temperature setting, function settings; 26 – MODE button – display mode switching; 27 – time; 28 – alarm no. 1/no. 2; 29 – outdoor humidity; 30 – signal reception from sensor; 31 – outdoor temperature alert; 32 – sensor batteries low; 33 – outdoor temperature; 34 – power adapter socket; 35 – battery compartment; 36 – stand; 37 – alarm speaker; 38 – holes for hanging on a wall
Sensor Description
39 – opening for hanging on a wall; 40 – stand; 41 – TX button; 42 – switching sensor channel no. 1/2/3; 43 – battery compartment
Technical specifications:
clock controlled by DCF77 radio signal
time format: 12/24 h
indoor temperature: -10 °C to +50 °C, 0.1 °C resolution
outdoor temperature: -50 °C to +70 °C, increments of 0.1 °C
temperature measurement accuracy: ±1 °C for 20 °C to +24 °C range, ±2 °C for 0 °C to +20 °C and
24 °C to +40 °C range, ±3 °C for -20 °C to 0 °C and 40 °C to +50 °C range, ±4 °C for other ranges indoor and outdoor humidity: 1–99 % RH, 1 % resolution
humidity measurement accuracy: 5 %
displayed units of temperature: °C/°F
barometric pressure measurement range: 800 hPa to 1,100 hPa
unit of pressure: hPa/inHg
radio signal range: up to 100 m in open area
number of sensors which can be connected: max. 3
wireless sensor: transmission frequency 433 MHz, 10 mW e.r.p. max.
station power supply: 3× 1.5 V AAA batteries (not included)
adapter AC 230 V/DC 5 V, 300 mA (included)
sensor power supply: 2× 1.5 V AAA (not included)
station dimensions and weight: 17 × 192 × 127 mm, 364 g
sensor dimensions and weight: 15 × 62 × 100 mm, 54 g
Getting Started
-
Connect the adapter to the station, then insert batteries first into the weather station (3× 1.5 V AAA), then into the wireless sensor (2× 1.5 V AAA). The battery compartment of the sensor is protected by screws; use a suitable screwdriver.
-
When inserting the batteries make sure the polarity is correct to avoid damaging the weather station or sensor. Only use alkaline batteries of the same type; do not use rechargeable batteries.
-
Place the two units next to each other. The weather station will automatically detect the sensor signal within 3 minutes. If signal from the sensor is not detected, long-press the button on the weather station to repeat the search.
-
We recommend placing the sensor on the north side of the house. The range of the sensor may decrease substantially in areas with large number of obstacles.
-
The sensor is resistant to dripping water; however, it should not be exposed to sustained rain.
-
Do not place the sensor onto metal objects as this will reduce its transmission range.
-
If the low battery icon is displayed, replace batteries in the sensor or weather station.
Switching Channel and Connecting Additional Sensors
-
Choose the desired channel 1, 2, or 3 for the sensor by repeatedly pressing the button. Then, long-press the button; the icon will start flashing.
-
Unscrew the cover from the battery compartment on the rear of the sensor and set the sensor switch to the desired sensor channel number (1, 2, 3), then insert batteries (2× 1.5 V AAA). Data from the sensor will be loaded within 3 minutes.
-
If sensor signal is not found, remove the batteries and proceed again in accordance with steps 1 and 2 or press the TX button.
Displaying Data from Multiple Sensors, Automatic Cycling through Values from Connected Sensors
Press the button repeatedly to display data from all connected sensors on the weather station, one by one.
You can also activate cycling through data from all connected sensors:
1. turning on cycling
Repeatedly press the Ⓞ button until the display shows the 📊 icon.
Data from all 3 sensors will be shown automatically and repeatedly one after another.
2. turning off cycling
Repeatedly press the Ⓞ button until the 📊 icon disappears.
Radio Controlled Clock (DCF77)
The wireless sensor will automatically start searching for DCF77 (hereinafter referred to as DCF) signal for 5 minutes after pairing with the weather station; the Timpn is flashing. (The DCF sensor is located in the sensor).
Signal detected – the icon stops flashing and displays the current time with the DCF icon. Signal not detected – DCF icon will not be displayed. DCF signal will be synchronised daily between 2:00 and 3:00 am.
Note: If the weather station detects DCF signal but the current time on the display is incorrect (e.g. shifted ±1 hour), you must always set the correct time zone for the country where you are using the station, see Manual Settings.
In standard conditions (at safe distance from sources of interference, such as TV sets or computer monitors), the reception of time signal takes several minutes. If the weather station does not detect the signal, follow these steps:
- Move the weather station to another location and try to detect DCF signal again.
- Check the distance of the clock from the sources of interference (computer monitors or television sets). It should be at least 1.5 to 2 m during the reception of signal.
- When receiving DCF signal, do not place the weather station near metal doors, window frames and other metal structures or objects (washing machines, dryers, refrigerators, etc.).
- In reinforced concrete structures (cellars, high-rise buildings, etc.), DCF signal reception is weaker, depending on the conditions. In extreme cases, place the weather station close to a window toward the transmitter.
Reception of the DCF 77 radio signal is affected by the following factors:
- thick walls and insulation, basements and cellars,
- inadequate local geographical conditions (these are difficult to assess in advance),
- atmospheric disturbances, thunderstorms, electrical appliances with no interference elimination, television sets and computers, located near the DCF receiver.
Manual Settings
All changes in values are made using buttons ▼ and . ▲
After setting the desired value and not pressing any other buttons, the set values will automatically save and the display will switch to the main screen.
Setting Time, Date and Time Zone
-
Short-press the button
-
Press the ⏻ button for 3 seconds and use the ▼ and ▲ buttons to set the following values: time zone, calendar language (ENG, GER, FRE, ITA, DUT, SPA, DAN), year, date format, month, day, 12/24 h time format, hour, minute, second.
-
Confirm the set value by pressing the button; holding the arrow keys speeds up settings.
Alarm Settings
2 alarms can be set on the weather station.
-
Short-press the 📄 button twice
-
Press the button for 3 seconds and use the arrows to set the alarm hour and minute.
-
Confirm the set value by pressing ⚙: holding the arrow keys speeds up settings.
Alarm Activation/Deactivation/Snooze
Repeatedly pressing the button activates alarm 1 (AL1); alarm 2 (AL2); or both alarms at the same time (AL1, AL2); or deactivates the alarms.
You can postpone (snooze) the alarm by 5 minutes by pressing the 📄-zz button. After pressing, the AL1 🔊 AL2 🔊 Z ^Z icons will start flashing.
Turn off the alarm by pressing Ⓜ. After pressing, the icons will stop flashing and only AL1 ⚙ AL2 ⚙ will remain on the screen. The alarm will activate again the next day.
Setting Altitude and Atmospheric Pressure
The station shows atmospheric pressure in hPa or inHg and keeps a history of pressure readings for the last 12 hours.
To achieve more accurate calculation of pressure values, it is advised to manually set the altitude for the place where the weather station is being used.
-
Short-press the button three times
-
Press the ⏻ button for 3 seconds and use the arrows to set altitude between -90 m to +1,990 m (10 m increments).
-
Pressing the Ⓞ button switches between M/hpa and Ft/inHg units.
-
Short-press the ⏻ button to quit settings.
Setting Temperature Limits for Maximum and Minimum Temperature
Temperature limits can be set independently for up to 3 outdoor temperature sensors.
When minimum or maximum temperature limit is activated, the (min) or (max) icon will appear on the screen and disappear after deactivation.
Temperature limit ranges
| Outdoor Indoor | ||
| Minimum -50 °C to +10 °C 0 °C–23 °C | ||
| Maximum 28 °C to +70 °C 26 °C–50 °C | ||
| Resolution 0.5 °C 0.5 °C | ||
While on the main screen, repeatedly press the button to switch to sensor 1, 2 or 3 and proceed for each sensor as follows.
- Short-press the 📄 button four times.
- Press the button for 3 seconds and set the minimum outdoor temperature.
- Short-press the ⏻ button and activate (ON)/deactivate (OFF) the outdoor minimum temperature alert.
- Short-press the button and set the minimum outdoor temperature.
- Short-press the ⏻ button and activate (ON)/deactivate (OFF) the outdoor maximum temperature alert.
- Short-press the button and set the minimum indoor temperature.
- Short-press the ⏻ button and activate (ON)/deactivate (OFF) the indoor minimum temperature alert.
-
Short-press the button and set the minimum indoor temperature.
-
Short-press the ⏻ button and activate (ON)/deactivate (OFF) the indoor maximum temperature alert. When the set temperature limit is exceeded, an audio alarm will sound for 1 minute and the value will begin flashing.
Pressing any button on the screen cancels the alert sound, but the symbol of an active alert will continue flashing. Once temperature drops below the set limit, the symbol on the screen will stop flashing.
Temperature, Humidity and Pressure Trends
 |  |  |
| falling constant rising | ||
Moon phases
| 1234 | 5678 |
1 – New moon; 2 – Waxing crescent; 3 – First quarter; 4 – Waxing gibbous; 5 – Full moon; 6 – Waning gibbous; 7 – Last quarter; 8 – Waning crescent
Note: In the period between 18:00 and 06:00, the moon icon will be surrounded by stars.
Displaying Maximum and Minimum Readings of Temperature and Humidity
Press the button repeatedly to gradually display the maximum and minimum temperature and humidity values measured.
The memory of measured values is automatically erased every day at 00:00.
Or long-press the 🔒 button to erase the memory automatically.
Station Display Backlight
When powered via adapter:
Permanent backlighting is set automatically.
Repeatedly pressing the SNOOZE/LIGHT button will allow you to set 4 different levels of permanent backlighting (off, maximum, medium, low).
When powered only by 3× 1.5 V AAA batteries:
Display backlighting is off. Pressing the SNOOZE/LIGHT button will turn the display backlight on for 5 seconds, then it turns off again. When the station is only powered by batteries, permanent backlighting of the display cannot be activated!
Note: The inserted batteries serve as backup for the measured/set data.
If batteries are not inserted and you unplug the adapter, all data will be erased.
Weather Forecast
The station forecasts weather on the basis of changes in atmospheric pressure for the next 12–24 hours for an area within the range of 15–20 km.
The accuracy of weather forecast is 70–75 %. The forecast icon is displayed in field no. 7.
As the weather forecast may not always be 100 % accurate, neither the manufacturer nor the seller can be held responsible for any loss caused by an incorrect forecast.
After first setting or after resetting the weather station, a learning mode will be activated, indicated by LEARNING... appearing on the screen.
The station will evaluate measured data and continuously increase the accuracy of forecast. This mode continues for 14 days, then the LEARNING... icon automatically disappears.
Weather Forecast Icons:
 |
1 – Sunny; 2 – Cloudy; 3 – Overcast; 4 – Raining/snowing; 5 – Heavy rain/heavy snow
Upkeep and Maintenance
- Read the manual carefully before using this product.
- Do not expose the product to direct sunlight, extreme cold and moisture, and sudden changes in temperature as these may compromise detection accuracy.
- Do not place the product in locations prone to vibration and shocks; these may cause damage.
- Do not expose the product to excessive pressure, impacts, dust, high temperatures or humidity – these may cause malfunction, shorter battery life, damage to batteries and deformation of plastic parts.
- Do not expose the product to rain or moisture, it is not designed for outdoor use.
- Do not place any open flame sources on the product, e.g. a lit candle, etc.
- Do not place the product in places with inadequate air flow.
- Do not tamper with the internal electric circuits of the product. Doing so might damage it and automatically void the warranty.
- The product should only be repaired by a qualified professional.
- To clean the product, use a slightly moistened soft cloth. Do not use solvents or cleaning agents; they could scratch the plastic parts and cause corrosion of the electric circuits.
- Do not immerse the product in water or other liquids.
- The product must not be exposed to dripping or splashing water.
- In the event of damage or defect on the product, do not perform any repairs by yourself.
• Have it repaired in the shop where you bought it.
- Place the product out of reach of children; it is not a toy.
- Remove flat batteries; they could leak and damage the product.
- Use only new batteries of the recommended type and make sure polarity is correct when replacing them.
- Do not throw batteries into a fire and do not disassemble or short-circuit them.
- This device is not intended for use by persons (including children) whose physical, sensory or mental disability or lack of experience and expertise prevents them from safely using the device, unless they are supervised or instructed in the use of the device by a person responsible for their safety. Children should be supervised to ensure they do not play with the device.
After use, the device and batteries become hazardous waste – do not throw them into unsorted municipal waste, but return them to a collection point – e.g. the shop where you purchased the product.

Do not dispose with domestic waste. Use special collection points for sorted waste. Contact local authorities for information about collection points. If the electronic devices would be disposed in landfill, dangerous substances may reach groundwater and subsequently food where it could affect human health.
Hereby, EMOS spol. s r. o. declares that the radio equipment type E6018 is in compliance with Directive 2014/53/EU. The full text of the EU declaration of conformity is available at the following internet address: http://www.emos.eu/download
Alarm Activering / Deactivering / Snooze
 |  |  |
| Stijging Constant Daling | ||
Maanfasen
 |  |  |  |  |  |  |  |
| 1 2 3 4 | 5 6 7 8 |
1 – Nieuwe maan; 2 – Wassende maan; 3 – Eerste kwartier; 4 – Wassende maan; 5 – Volle maan; 6 – Afnemende maan; 7 – Laatste kwartier; 8 – Krimpende maan