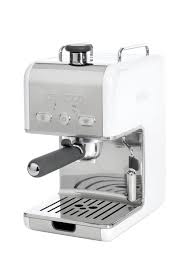
ES020 KMIX BLANC - Food Processor KENWOOD - Free user manual and instructions
Find the device manual for free ES020 KMIX BLANC KENWOOD in PDF.


| Product type | Espresso machine |
| Brand | Kenwood |
| Model | ES020 KMIX WHITE |
| Power supply | 220-240 V |
| Water tank capacity | 1 liter |
| Compatible coffee types | Ground coffee and ESE pods |
| Steam function | Yes, for frothing milk |
| Included filters | Small filter (1 cup) and large filter (2 cups) |
| Included accessories | Filter holder, measuring spoon, steam nozzle |
| Drip tray with float | Yes |
| Cup rest grid | Yes |
| Removable tank | Yes |
| Rotating steam nozzle | Yes |
| Preheating required | Yes |
| Recommended descaling | Every 200 cups |
| Cleaning | Hand washable parts, do not put in dishwasher |
| Housing material | Plastic |
| Safety | Do not immerse, do not use without water, keep out of reach of children |
| Usage | Household use only |
| Product type | Kitchen appliance (espresso machine) |
Frequently Asked Questions - ES020 KMIX BLANC KENWOOD
User questions about ES020 KMIX BLANC KENWOOD
0 question about this device. Answer the ones you know or ask your own.
Ask a new question about this device
Download the instructions for your Food Processor in PDF format for free! Find your manual ES020 KMIX BLANC - KENWOOD and take your electronic device back in hand. On this page are published all the documents necessary for the use of your device. ES020 KMIX BLANC by KENWOOD.
USER MANUAL ES020 KMIX BLANC KENWOOD
before using for the first time
1 Read these instructions carefully and retain for future reference.
2 Remove all packaging and any labels.
3 Wash the parts: see 'cleaning'
4 Flush the machine through with clean water: see 'before making coffee for the first time'.
safety
- Never remove the filter holder whilst coffee is brewing or steam is being produced - steam could shoot out and burn you.
-
Don't get burnt by:
-
hot parts, including the steam nozzle, filter holder and coffee outlet.
-
steam coming out of the steam nozzle or coffee from the coffee outlet.
-
Keep children away from the machine. And never let the cord hang down where a child could grab it.
- Never use a damaged machine. Get it checked or repaired: see 'service and customer care'.
- Never put the machine in water or let the cord or plug get wet - you could get an electric shock.
Unplug:
before filling with water
before cleaning
o after use.
- Never leave the machine on unattended.
- Don't let the cord touch hot parts.
- This appliance is not intended for use by persons (including children) with reduced physical, sensory or mental capabilities, or lack of experience and knowledge, unless they have been given supervision or instruction concerning use of the appliance by a person responsible for their safety.
- Children should be supervised to ensure that they do not play with the appliance.
- Only use the appliance for its intended domestic use. Kenwood will not accept any liability if the appliance is subject to improper use, or failure to comply with these instructions.
important
- Never use without water - the pump will burn out.
- Keep the machine above 0^ - otherwise any water in the machine will freeze and cause damage.
- Never use without the drip tray and cup stand.
before plugging in
- Make sure your electricity supply is the same as the one shown on the underside of your machine.
- This appliance conforms to EC directive 2004/108/EC on Electromagnetic Compatibility and EC regulation no. 1935/2004 of 27/10/2004 on materials intended for contact with food.
know your Kenwood espresso machine
① removable water tank
② lid
③ finger grip for steam nozzle
(4) steam tube
(5) steam nozzle
(6) coffee outlet
(7) variable steam knob
⑧ small filter for 1 cup dispensing or coffee pod
(9) tab
10 large filter for 2 cup dispensing only
(1) coffee button
12 coffee ready indicator light
(13) on/off button
(14) steam ready indicator light
⑤ steam button
16 drip tray
(7) float
(18) cup stand
19 measuring spoon/coffee tamper
20 filter holder
② filter emptying lever
② cup storage tray
before making coffee for the first time
1 Make sure the variable steam knob is closed by turning clockwise (don't overtighten).
2 Lift the lid, then lift out the tank and fill with cold water. Never fill above the "MAX" level marked. Alternatively lift the lid and fill the tank whilst in position.
- We recommend using filtered water as it produces better coffee and reduces limescale. Never use fizzy water or any other liquid.
3 Re fit the tank. Make sure that it is correctly located and apply light pressure if necessary to ensure the valve at the bottom of the tank connects with the bottom of the machine.
Important
Never operate the machine without water in the tank. Top up as soon as the level gets low.
4 Close the lid.
5 Hold the finger grip and swing out the steam nozzle and put a jug underneath.
6 Attach the filter holder to the machine by positioning it under the coffee outlet and turning to the right ①. Place a suitably sized container underneath.
7 Connect to the power supply then press the on/off button and it will glow orange. At the same time the green coffee ready indicator light will flash. Wait until the green light stops flashing.
8 Open the variable steam knob by turning anti-clockwise and press the coffee button and allow one cup of water to flow out of the steam nozzle. Close the variable steam knob and allow one cup of water to flow out of the coffee outlet into the container.
9 Press the coffee button to stop the flow, then press the on/off button to switch off the machine.
10 Repeat these steps if you haven't used the coffee maker for a few days.
preheating the coffee machine
To ensure your espresso coffee is dispensed at the right temperature it is necessary to pre-heat the coffee unit.
1 Check that the variable steam knob is firmly closed (turn clockwise) and that there is sufficient water to heat 1 or 2 cups as required.
2 Fit the desired filter into the filter holder (without coffee and making sure that the tab on the filter fits into the slot on the filter holder). Attach to the machine by positioning it under the coffee outlet and turning to the right ①. Ensure it is firmly located.
3 Position a cup under the filter holder. Using the same cup that the coffee will be served in will ensure it is preheated.
4 Press the on/off button and it will glow orange. At the same time the green coffee ready indicator light will flash. Wait until the green light stops flashing.
5 Press the coffee button and it will glow orange, and hot water will dispense into the cup. When the green coffee ready light starts flashing again, press the coffee button to stop the flow.
6 Remove the filter holder and proceed to make coffee using either ground coffee or coffee pods.
to make espresso using ground coffee
1 Pre heat the appliance as described on page 2.
2 Check that there is water in the tank.
3 Select the desired filter.
- Use the smaller filter for making one cup of coffee (or when using coffee pods) and the larger filter for 2 cups.
4 Add the coffee using the measuring spoon provided one level spoon per cup, level the surface then lightly press with the coffee tamper. Wipe off any coffee around the rim.
- When buying ground coffee make sure it is suitable for espresso machines.
- Never press the coffee too firmly as it will block the filter and the coffee will come out very slowly and the crema will be of a dark colour. However, if it is pressed too lightly, the coffee will come out too fast and the crema will be a light colour and the coffee will taste watery.
5 Fit the filter holder. Make sure that the tab on the filter fits into the slot on the filter holder.
6 Fit the filter holder into the coffee outlet. Turn it to the right to lock into position 1
- Put one or two cups underneath ②. If making one cup of coffee, centre your cup in the middle.
7 Press the on/off button and wait until the green coffee ready indicator light stops flashing, then press the coffee button.
8 When you've enough coffee – not too much otherwise it will be too weak, press the coffee button. If you're not making more coffee press the on/off button to switch off the machine. The chart below gives a guide on how long to operate the coffee button to produce drinks of different volumes.
| quantity | filter size | approximate time to dispense |
| 1 Espresso (40ml) | 1 cup | 12 sec |
| 2 x Espresso (40ml each) | 2 cup | 25 sec |
| 1 large coffee (125ml) | 1 cup | 32 sec |
| 2 large coffees (125ml each) | 2 cup | 65 sec |
9 Wait for 30 seconds then remove the filter holder by turning to the left.
- There may be water on the filter when you remove it: this is normal
10 To remove the used coffee from the filter holder, flip the lever on the handle so that the end locates over the filter ③. Hold the lever in position then tip the unit upside down and tap out the grounds ④.
Important
Never remove the filter holder while the coffee or steam function is selected - steam could shoot out and burn you.
to make coffee using filter pods
Important
If the filter for one cup is used after ground coffee has been used, it is necessary to clear any ground coffee from around the coffee outlet. This is necessary to avoid water leakages from the filter holder and to ensure optimum performance. Take care as the area may be hot.
1 Pre heat the machine as described on page 2, fitting the small filter in the filter holder.
2 After pre-heating remove the filter holder and place the coffee pod into the filter making sure the pod is facing the correct way 5.
3 Press the pod towards the lower part of the filter, making sure that the paper flaps adhere to the inner part of the filter.
4 The pod needs to be well centred and placed firmly in the filter.
5 Fit the filter holder into the coffee outlet and turn to the right until it locks into position 1.
6 Follow the points 'to make espresso'.
Note - use pods that conform to the ESE standard.
Always follow the instructions on the package of the pods for the correct positioning of the pods in the filter

to froth milk for cappuccino
Prepare the espresso as previously described
hint - to prepare more than one cappuccino, first make all the coffees then at the end prepare the frothed milk for all the cappuccinos.
1 Make sure there is water in the tank.
2 Ensure that the variable steam control is closed.
3 Press the on/off button and it will glow orange.
4 Press the steam button and the red steam indicator light will flash.
5 Wait until the red light glows continuously indicating that the unit has reached the correct temperature.
6 Part fill a jug with milk – the milk may increase up to three times in volume so select a suitably sized jug. As a guide use 40-60 ml milk per cappuccino.
Cold semi skimmed milk gives the best results.
7 Hold the jug in one hand and place the nozzle in the milk, ensure that the milk does not go above the join in the nozzle.
8 Open the variable steam knob by turning in an anti clockwise direction. The milk will begin to increase in volume and become frothy ⑥. Adjust the height of the jug ensuring that the tip of the nozzle remains below the surface of the milk. After 20-25 seconds the milk will be steamed and frothy.
9 Stop the steam by turning the variable steam knob in a clockwise direction.
- Never allow the milk to boil as this will spoil the flavour of the coffee.
10 Press the steam button.
11 Pour the frothed milk into the cups containing the espresso coffee. For coffee latte hold back the froth and just add the steamed milk.
Important - Never operate the steam nozzle for longer than 2 minutes at one time, and always clean the nozzle after use.
12 Press the on/off button to switch off.
to make espresso after frothing milk
Important
Never remove the filter holder from its housing immediately after using the steam suction.
If you're making espresso after frothing milk, you need to get rid of any over-hot water that could burn your coffee. Here's how:-
1 Switch off the steam button.
2 Ensure there is water in the tank and place a jug beneath the steam nozzle.
3 Open the variable steam knob by turning anti-clockwise and press the coffee button (water/steam will come out of the steam nozzle). Wait until the green light flashes then close the variable steam knob and switch off the coffee button
4 Wait for additional time until the green light glows continuously. When this happens the machine is ready to make coffee.
cleaning
steam nozzle
Prior to cleaning the steam nozzle allow some hot water to flow out of the nozzle to assist with the cleaning operation. This should be carried out immediately after having dispensed steam. Here's how:-
1 Ensure there is water in the tank and that there is a jug under the steam nozzle.
2 Switch off the steam button.
3 Open the steam knob by turning in an anti-clockwise direction.
4 Press the coffee button and operate for approximately 10 seconds to allow hot water to pass through the nozzle.
5 Switch off the coffee button then close the variable steam knob by turning clockwise.
6 Press the on/off button to switch off the machine.
- Before further cleaning, unplug and let everything cool.
- Never immerse the appliance in water.
- Don't wash parts in the dishwasher.
steam nozzle
1 Unscrew the nozzle by turning clockwise, then wash thoroughly. Check that the 3 holes indicated are not blocked 13. If necessary unblock them with a pin.
2 Clean the steam tube. Make sure the end is not blocked.
3 Screw the nozzle back onto the delivery tube.
tank, lid, filter holder
- Wash, rinse and allow to dry.
filter (one and two cup version)
- Wash and dry after every use.
- After approximately every 100 uses dismantle and clean more thoroughly as described below.
- Remove the cap located on the underside of the filter by turning in the direction indicated 7. Remove the crema device by pushing up from the underside 8. Separate the components of the crema device by pulling the gasket to the side 9 and removing the plastic disc and metal filter 10. Rinse parts thoroughly.
Clean the metal filter in hot water using a brush ①. Make sure the holes in the metal filter are not blocked. If necessary clean with a pin ②. Dry the parts then reassemble, making sure the parts are correctly assembled.
cup stand, drip tray
- Empty the drip tray regularly. You'll know when it is full, the red float in the middle of the drip tray will rise and become visible in the hole on the cup stand.
1 Wash then dry.
coffee outlet
- After every use check that this area is clean and free from any coffee grounds. Wipe clean and if necessary carry out the following procedure to clean more thoroughly. Failure to keep this area clean will affect the quality of the coffee produced and may damage the unit.
1 Using a screwdriver 14, unscrew the screw that holds the coffee outlet in place (do not remove the inner cover).
2 Clean the area with a damp cloth.
3 Clean the removed outlet thoroughly in hot soapy water using a brush. Rinse thoroughly. Make sure the holes are not blocked, if necessary use a pin to clean.
4 Reverse the above procedure to re fit to the outlet. Failure to clean the coffee outlet and the filters as described invalidates the guarantee.
descaling
It is advisable to discale the coffee maker after 200 cups of coffee have been made.
1 We recommend purchasing a product specifically for descaling espresso coffee machines. Use the quantities recommended by the proprietary descaler but do not exceed the 1 litre tank capacity.
2 Make sure the filter holder is not attached and position a bowl under the coffee outlet and a jug under the steam nozzle.
3 Press the on/off button then press the coffee button and open the variable steam knob by turning anti-clockwise and allow 1 cup of water to flow out of the steam nozzle. Close the variable steam knob and allow 1 cup of water to flow out of the coffee outlet. Do not wait for the green light to stop flashing.
4 Switch off and unplug the coffee maker and leave the machine to stand for 15 minutes.
5 Repeat step 3 and allow all the descaler to flow out of the machine. Switch off.
6 Thoroughly rinse the tank and fill with fresh water.
7 Follow step 3 allowing the water to flush out of the hot water nozzle and also the coffee outlet. Repeat with a fresh tank of water. This will remove all traces of the descaler.
Repairs caused by malfunctioning due to a build up of limescale in the product are not covered by the guarantee if the descending process is not carried out regularly.
service and customer care
- If the cord is damaged it must, for safety reasons, be replaced by KENWOOD or an authorised KENWOOD repairer.
If you need help with: - using your appliance or
servicing or repairs Contact the shop where you bought your appliance. - Designed and engineered by Kenwood in the UK.
Made in China.
IMPORTANT INFORMATION FOR CORRECT DISPOSAL OF THE PRODUCT IN ACCORDANCE WITH EC DIRECTIVE 2002/96/EC.
At the end of its working life, the product must not be disposed of as urban waste. It must be taken to a special local authority differentiated waste collection centre or to a dealer providing this service.
Disposing of a household appliance separately avoids possible negative consequences for the environment and health deriving from inappropriate disposal and enables the constituent materials to be recovered to obtain significant savings in energy and resources. As a reminder of the need to dispose of household appliances separately, the product is marked with a crossed-out wheeled dustbin.
trouble shooting guide
| problem | possible cause | solution |
| Espresso coffee doesn't come out of the machine. | ·The coffee is damp and/or pressed too firmly into the filter. ·The holes in the filter holder spouts are blocked. ·The coffee outlet is blocked. ·The tank is incorrectly fitted and the valve at the bottom is not open. ·The holes in the reca device are blocked. | ·Check that you are using ground coffee suitable for espresso makers. Press the coffee more lightly in the filter and change the grind if necessary. ·Clean the holes in the spouts ·Clean as indicated in the cleaning section. ·Press the tank lightly so as to open the valve at the bottom ·Dismantle the crema device ⑧ and clean parts thoroughly. See Cleaning (filter) section. |
| Espresso coffee drips from the edges of the filter holder, instead of from the holes. | ·The filter holder is incorrectly attached to the machine. ·The gasket of the espresso boiler has lost its elasticity. ·The holes in the filter holder spouts are blocked. ·Too much coffee has been placed in the coffee filter. | ·Refit the filter holder, making sure it is located correctly and turn to the right. ·Get the gasket replaced. Refer to Service and Customer Care. ·Clean the holes in the spouts. ·Decrease the quantity of coffee. |
| The espresso coffee is cold | ·Pre heating the machine was not carried out. ·The green coffee ready indicator light was not glowing when the coffee button was pressed. | ·Follow instructions on pre heating the coffee machine. ·Wait until the green coffee indicator light stops flashing before pressing the coffee button. |
| The pump is too noisy. | ·The water tank is empty. ·The tank is incorrectly fitted and the valve in the bottom is not open. | ·Fill the tank with water. ·Press the tank lightly so as to open the valve at the bottom. |
| The coffee cream is light in colour and is dispensed too quickly. | ·The ground coffee has not been pressed enough. ·Insufficient ground coffee has been used. ·Too much coffee has been dispensed. ·The coffee used is unsuitable. | ·Press the coffee more firmly. ·Increase the quantity of coffee in the filter. ·Decrease the quantity of coffee dispensed into the cup(s). ·Change the type of coffee used. |
| The coffee cream is dark in colour and is dispensed too slowly. | ·The ground coffee has been pressed too firmly. ·The coffee outlet is blocked. ·Too much coffee has been used. ·The coffee is too finely ground. ·The coffee used is unsuitable. | ·Press the coffee less. ·Clean as indicated in the cleaning section. ·Decrease the quantity. ·Change the coffee and buy one suitable for espresso machines. ·Change the coffee and buy one suitable for espresso machines. |
| The coffee has an acidic taste. | ·The machine was not rinsed thoroughly after descaling. | ·Flush the machine with several changes of clean water and rinse all components, see cleaning. |
| The milk does not froth when making a cappuccino | ·The milk is not cold enough. ·The cappuccino maker is dirty. | ·Always use milk from the refrigerator. ·Try milk with a different fat content. ·Clean the steam delivery tube as well as the nozzle. See Cleaning. |
Nederlands
reservoir, deksel, filterhouser
- Wasser, spoelen en latent drogen
He cnHMaIte DepeKaTeIb 0nIbTaBo BVpeM npriroTOBneHn KOpe nnpa.MoKET npOn3oITN Bb6poc npa N nobNeY OXOrn.
- Co6nIouaIte OToPoxKHoCTb BO n36ExaHHe nIoUyEHHa OXkoRb:
O npn npNKoCHOBENH K TROPaM DeTaIaM, BKNIOyA conIIO nIyBbIyCk a npa, depkaTeJIb fNbTpA n BbIXOHOe OTBepCTne Iy KoPe.
O napOM, BbIXoJIaIM N3 cOpJa IINI rOpJeuB BoDoI, IbIOUeICr N3 BbIXoJHO OTBepCTnI dJI KOFe.
He pa3peaIte deTAM np6JIuXaTbC K BkIoueHHO KoFeBaPKe. He donyckaIte, YTO6bl 3JeKTPnueckn SHHyp CBnCaJ Bn3 TaM, rIe erO MOryt CXBaNTb DeTn.
He noIb3yIeTcB HeNCpabHbIM npi6opom. IpoBepbTe n OtpemOnTpuyTe ero: cm. paadJe 'PemOnT n o6cnyKbAHne'
- Bo nizbexkaHne nopaxeHnA 3JekTpnuCeKm TOKOM He onyckaTepnp6Op B BOy Hn DeOnyckaTe PnonaDaHnBnHa Uhyp nIu BNky.
- OTKJIUOaJTe npIbOp oT cETn:
Oперд Tem,Кak 3aJIINBaTb BODy
O nepeud nictkoJ
NOCNE INCNOJB3OBAHNA.
He octablan Te BkHoueHHb np6op 6e3 npncMToPa.
He donyckaTe KOthakTa ceTeBOrO shHpya C ropaMn NOBepxHOCTAMN.
- JIIOJAM (BKNIOUaA DeTei) c OPAHnueHHbIMn Φn3NueCKMn, CEHCOPbIMn IIN NCNXUeCKMn CNOOC6HOCTaMn, a TAKKe pIn HeOCTaTKe ONbTa n 3HaHn pa3peWaaETcN POJIb3OBAtBCa DaHbIM 6bITOBIM pIN6Opom TOJbKO NOI HabIIOHeHem IINIca, OTBeTCTBEHHoro 3a IN 6e3OnaHocTb, n Nocne INHCTpyKTaja nCnONb3OBAHmIO np6Opa.
- DeTN DoJNkhb6blb NIO pncmOTpOM n He IrgpaTc npnbopom.
- 3TOT 6bIbOBo 3nEeKTPoPnp6op pa3pe7aetcra nCnONb30BaT bTobko no erOp npMOMy Ha3NaHeHIO. Kompania Kenwood He HecET OTBcTBeHHocTN, ecn np6op nCnOJb3yETcRe He No Ha3NaHeHIO nII Ne He B COOTBeTCTBN C daHHo INCHtpKcnei.
BHMMAHM
- He BkIIOuAte np6op 6e3 BOdI. 3To MOKet npBecTu K nepeoropaHIO 3NeKTPOdBVraTeTn Hacoca.
XpaHnTe npi6ope npri Tempepatye BbIe 0^ B npOTNBOM cnyae BOaB KoΦeBaPke 3aMep3HeT, yTO npIBeTe K NpONMeK.
He BkIIOuAte KoΦeBapKy 6e3 ycTaHOBJIeHHOrO loTka dIy c6opa KaIeIb I noCTaBKn dIy yauEeK.
Ipeep BkJIIOUeHEm KOeBapKn
- Y6eDInTeScb, YTO napaMeTpbl 3JNeKTPnuecko Cetu CoBnaIaOT c daHHbIMN, yka3aHHbIMN B Ta6JIuKe Ha HnXHei NOBepxHocTm MaunHbI.
- Данhoe устюctво COOTBEcTByeТ Диpektube EC 2004/108/EC no 3JIeKTPomarHnTHoN coBmecTmOCTn, a TAKKe HOpMe EC 1935/2004 ot 27/10/2004 no MaTePnAnam,прднaЗнayeHHbIM дЯ КонтakTa c ПИцEBblmnpodyKTamn.
3HaKOMCTBO C KoΦeBapKo 3cnpecco Kenwood
① CbEMHbIK KOHTeHep DnIy BODbI
② KpbiluKa
③ pyuKa conJa dIy BbInycka npa
④ Tpy6kaДЯВынуcka napa
⑤ conIIO nIa IyBaIyNcKa npa
⑥ BbIXoNDHoe OTBepCTne IЯ KoΦe
⑦ perylnpemyam kpyrna pyka BbInycka npa
⑧ He6oBbOoiФnIbTpДЯпriroTOBJIeHnIaUkN KoPe IIn KcpeHoro nakTeNka
⑨ BbICTyn
10 6oIbwof pInbTp In npiroTOBHeHn He 6Oone 2aWek KoPe
11 KhoNkaKoPe
12 INHINKATop rotOBHOCTN KOFE
⑬ KHONka on/off (BKJIQUHTb/BbIKJIQUHTb)
14 INHdNkATOp rTOBHOCTn npa
15 KhoNka《nap》
16 JIOTOK dIa c6bopa kaneB
17 nonJaBOK
18 NOIcTaBka DnAaWeK
19 Мерная Ложka/темпер (Для уразмбовки Кофе)
② ČeρKaTeJIb ΦnJIbTpα
② pbUar onOpoxHHeHHaNbTpA
② NOCTaBkA DnY XpaHEnHaWeK
Pepd npBbIM npnroTOBJIeHneM KoPe
1 Y6eDntEcB TOM,чTo KpyrJla pyuKa BblNycka napa HaxoDnTcB noIooKeHIN «3aKpbITo», T.e. nobepHyTa Do ynpa nO yacOBn CTpeNke (He 3akpyuNbaiTe CnIIuKOM cnJIbHo).
2 CHIMITE KpbIUKy, 3aTeM DoCTaHbTe KOHTeHep N HaneIte B Hero XoJIOHyO BODy. He npeBbIaIte OTMeTky "MAX" (MaKcImaJIbHbI yPoBeHb). Bbl MOxTe TAKKe CHrTb KpbIUKy I HaJIITb BODy npraMo B yCTaHOBJIeHHbI Ha KOΦeBapKe KOHTeHep.
- PekomeHdyetcNcNoIb3ObaTbΦnIbTpObaHHyIO BDO, NocKoJIbky OHa yNyUHaeB KByC KoPe I ChnKaeT pCK o6pa3OBAHn HaKnII. He nCNoIb3yIte Ra3nPoBaHHyIO BDO IIN DpyrYIO XnDkoCTb.
3 YctaHOBtE KOHTeHep Ha MeCTO. Y6eDITcB B TOM, YTO KOHTeHep YCTaHOBHeN npAInbHo. Pocne 3TOrCnEgKa HAdABtE Ha Hero, YTO6bl Klaapan Ha Dne KOHTeHepa nonan B OTBepCTne Ha Kopnyce npi6opa. BHIMAHme
He BkIIOuaiTe KofoeBapKy 6e3 BObl. IOniBaIte BOy, KaK ToIbKO ee ypoBeHb PONH3NTcR.
4 3akpoTe Kpbilky.
5 YdepKINBA pyKy, BbIBePnHte cOnIO nJa BblNycka npa HapKy nNoCTaBBTe NO Hero YauKy/EmKOcTb.
6 YctahOBHTe depKatEnb fHnIbTpa Ha KoFeBapKy.ДЯ 3TORO nomeCTte ero NOB BixOHNbIM OTBepCTnEM DnI KOFe N nobepHIne BnpaBO ①.ПоdctabTe NOd HERO EMKOCTb/KOHTeHep COOTBeTCTByUcero pa3mepa.
7 IopKnIOHTe np6Op K cTeu, a 3aTeM haxMITE KHOKNy on/off (BkIIOHTb/BbIKIOHTb). 3aIropNTc oApHXeBbI INDnKATOp. B To Jce Bpem 6yET MIRATb 3eJIeHbI INDnKATOp rOToBHOCTN KoPe. IoDOxJnte, noka 3eJIeHbI INDnKATOp He nepeCTaHET MIRATb.
8 OtkpoIte KpyrIyIO pyKy BbIyNcKa npa, noBopauHBAe ee npOTIB yacBOB CTpeIKn, n HaxMnTe KhONky "KoFe". PIoOJdnte, nOKa Onda yawka BoDbI He BblBeTcra I3 cOnla dJa BbIyNcKa npa. 3aKpyTIne KpyrIyIO pyKy BbIyNcKa npa I NOOxDIne, pOKa Onda yawka BoDbI He BblBeTcRA BawKy/EMKOCTb I3 BbIXoHDoro OTBepTna IЯ KOFe.
9 Haxmnte KhoNky «KoFe», уTo6bI ocTaHOBuTb npOMbIKy, a 3aTeM hAxmnte KhoNky on/off (BkJIIOChuTb/BbIKHOChuTb), уTo6bI bBkJIIOChuTb np6Op.
10 Nobtopite BblseonncanHyu npoceDpy, ecn Ha npotjKeHn HeckoBknx Dnei Bbl He nolb3OBaIncb KoFeBaPkoI.
PpeBapnTeIbHbI HarpB KoΦeBapKn
He chinmaite depkaTeIb fInIbTa BO BVpe mpiroTOBnEnH KOpe nnpa. MoKet npOn3oITN Bb6poc npa NIOBNeB OXkOrn.
Kak npiroTOBNTb KoOe, nCnoJb3yra KoOeHbIe naKeTnKi
BHHMaHHe
Ecni nocne npriroTOBnEHN 3cnpceco n3 MONOTOro KoFe nCNOJb3yeTcAinlbTp Ha Ondhy uawky, Heo6xOIMo OuHCTnB BbIXOHOe OTBepCTne dIKNoKoFe ot OCTaTKOB CBapeHHORO MONOTOro KoFe. 3To Heo6xOIMo dIINpEDoTbpaueHn IpoTeKaHn BODby Upe3 DepeKaTeJIb FInlbTp a NobecneueHn ONtImaJIbHo pa60bI KoFeBapKn. Co6IIHOaIte MepbI ppeIOCTOPOXHOCTH, T.K. NOBepXHOCTb OTBepCTn CInbHO HarpeBaETcA.
1 Пюпьдente п徴ырпелов пооргев Кофеварки, кak 3TO yka3aHo Ha CTpaHnue 62. 3aTeM yctahOBIne B depxaTeIb ФильТра ФильТр He60JIbшOrO pa3mepa.
2Поссе OkOHuaHЯ npOceIpybI NOOrpeBa CHIMMITE deprKateIbФINlbTpA INnoJKeITe KoFeHbI nakTeNK HaΦnIbTp, yOcTOBepNBWHncb, YTO NaKeTIK HaxoDHTCBA nPabUNbHOM NOLOXeHIn 5.
3 Haadabnte Ha naketnK, nepemeeza ero K dHy fNtpa TaK, TTOb6ymaxkHbe KpbIbnKn naketnKa npnnnInn K BHyTpneHne cToPOHe nbltpa.
4 Panektnk dOJIKeH HaxoIITcA CTPORO NO CEHTpy N 3aФИKcIPOBaH B TAKOM NOIOXeHIN.
5 UctaHOBHTe DepKataTeIb CnIbTpHa Na BbIXoHoe OTBepCTne IJN KoPe I NOBEPHTe Bnpa DO ynpa, YTO6bl 3aΦNKcnpoBaTb B COOTBeTCTByIOUeM NONOJKeHN 1.
6 BbINOHNHTe NHyKtbl, yKa3aHHbIe B pa3dene «Kak npriroTOBnTb 3cnpecco». BHIMAHne! IcnoNb3yHte ToJbKO Te KoPeHbIe nakETNIK, KOtOpbIE COOTBETCTByIOT Tpe6oBaHnM CTAHapTa ESE.
- TTo6bI npaBnIbHO pa3MeCTnTb nakETnK BHyTpN pfNtpa, CTporo BblIOJIHnTE IHCTpyKuMn, yKa3aHHbIe Ha yPaKOBKe C nakETnKAMn.

Kak BCpeHntb MOLOKO dIy nprirotOBJeHnKaanyuHHo
ПригOTOBБтЕЗСпесCO,ВьИОЛнЯИНСТPyкДУуК3HьE ВБИЕ COBET-ecЛN BblXOTITe ПriNGOTOBNTb HeCKOЛьКоЧашЕ КANЧИно,T O ChaЧANA CBAPITe BCEЧашКофe,a 3aTeM yxe B3биBaIte NeHky,a He haO6obot.
1Поверьт,налNTаиВODaВКOTteHep.
2Пюоверьт,eнхоитсялкуглая рчka Дя Выпунская пара в поожени «3akpbITO».
3 Haxmnte KhoIky on/off (BkJIHOuHTb/BbIKJIOuHTb), 3aROpNTcra opaHexeBbIMHdNKaTOP.
4 Haxmnte KhoNky «nap». 3aropntc KpaChbI INDnKaTOp roTOBHOCTn npa nHauchET Mrratb.
5 Поюждente, пoka Красьи Инданкатор He nepectaHTMraTb. 3To O3Haayet, YTOdoCTINrHyTa Heo6xOДмЯ TempepaTypa.
6 HaJIeIte HEmHOrO MOJOKa B EMKoCTb/YaIaIy. Ipn BCeHnBaHnO obE MoJOKa YBeIINuBaeTc B TpN pa3a, IOnTOMy BblOpaIte EMKOCTb COOTBeTCTByIOUepa3Mepa. IcNoIb3yIte 40-60 mI MOJOKa Ha OdHy YaIaIKy KanyuHIO.
- PeKOMeHdyeTcA INCNoJIb3OBAtB XoIOnIOHe MOJIO KOHOHKeHHO JxuHPOCTN.
7 UdepKINBaEMKocTb/YaShky OndHou pyKO,OnyCTnTe CONIIO B MOJOKo TAK, YTO6bI yPOBeHb MONoka HAXOUNcH NHXe COeHNHTeBHO MyfTb ConJa
8 OtkpoIte KpyIyIyO pyKy dIЯ BbIyNcKa npa, nobepHyB ee npoTnB yacoboi cTepeIkn. Objem MoIoka hauHET yBeIINuBaTbcr I noRbntc rNeHa 6. PerynipuyTe nIOJoxHeNe EMKocT/NaUKn. HocIK cOnIIa DoJxKeH hAxOHTbcr HnXe yPobHЯ MoIoka.Yepe3 20-25 cekyHd nOBaTc rToiKa rNeHa mOLOKO 6yDet roTOBO.
9ПпекразиTeВынсп.apа,ЗakртувКрглую руку по чавоь стpenke.
He dobointe MONOKo Do KInneHn. 3To npBBeTe K yxUdSeHnO Bkyca KoFe.
10 HaxMMTe KhoNky «nap».
11 Pa3neIe B36bntoe MONOKC peHKO B yaUKN C KOpe.ДЯ prnroTOBHeHnKoPe IaTte CHNIMTE peHKY HaNJIeTe B YAuKY TOlbKO MONOK. BHMaHHe! He OTKpbIbAaTE cOnIO dIra BbInycka npa 6Olee, Yem Ha 2 MHyTbI (6ecnPepbIBHO) N BCERda TuaTeNbHO UcCTNTe cOnIO nocJe NCpONJb3OBAHn.
12 Haxmnte KhoNky on/off (BkIIOUHTb/BbIKIOUHTb), YTO6bl BbIKIOUHTb KoΦeBaPky.
Kak npurotoBtB Kofoe 3cnpecco nocJe BCnEHNBaHnM OJOKa
BHMAMHe
He n3BlekaTe depeKaTeIb pfIbIpa I3 Kopnyca cpa3y Je noCne IcNoJIb3OBAHnI yFHKUIN «nap».
Ecni nocne iNcIIOJIb3OBAHnI ΦyHKUIN «Iap» Bbl XOTITe npriTOBNTb YaIiKy KoΦe, To Heo6XoIMO CInTb OCTaBlyIOc BHyTpNI rOpAHyIO BDOy, YTO6bI He CKeueb KoΦe. IJIa 3tOrO:
1 BbIKJIIOHTe KHOKNy «nap».
2Поверьт,ecьлвКонтейнepeВODaиnoctabTe EMKocTb/YaWky noD conNoДЯВыИсkanapa.
3 OtkpoTe KpyrIyIO pyKy dIa BbInycka npa, nokpyTnB ee npoTnB yacOBoi cTpeKN, a 3aTeM haxmnte KhoNky «KoPe» (i3 cOnIIa 6yJeT BbIXOJIT nap i BbJIINBaTcBraOa). Iocne TOrO, kak nepeCTaHET MIRaTB 3eJeHbI INdIKaTOp, 3aKpyTnTe KpyrIyIO pyKy dIa BbInycka npa N BbIKJIOUHTe KHOkny «KoPe»
4IIOJXDNTEeHemHOrO-3eHbINHIMNkAtOpdoJIKeHrOpTeB HnpepbIBHO.KordaINHmKAtOp ropnt HnpepbIBHO,3TO O3Haayet,HTO KOeEBapka CHOBA rOTOBa KNCIOJIb3OBAHNIO.
甲CTKa
conllo nla Bblnyska npa
B cnyae HeBbIOpJIHeHnpeyIaRPhoI npOeIpybI ydaJIeHnHaKnPi, HenoIaIKN, Bbl3BaHHbIe 6pa3OBAHmEh NaKnPi, He 6byT ycTpAraTcno rapaHTn.
O6cnyxmbaHne n 3a60Ta o nokynteJX
- Пи поьржденишнувцеляхбezонасочионdoлженбытзамеоньпразставлеськимашиьспалларовань мacrетckоюpenohу arperatob KENWOOD.
EcnBam HuxHa NMOOuB: - NOIb3OBAHnnp6Opom nn
- Texo6cnykubAHIN nnn peMOHTe
- O6paTntecb B Maar3nH, B KOTOpOM Bbl npno6peJI npin6op.
CnpoeKtpoBaHO npa3pa60TaHO KOMnHaHnei Kenwood, CoeHNHeHoe KoponeBCTBO.
CdeJanaHO KnTae.
BAXHAR INHΦOPMAÇUÑI NO IPIPABUNbHOJ UTVNJN3AUÑI N3DEJIYOR COΓJIACHO DNIPEKTNB E C 2002/96/EC.
IIO nCTeueHn cpoKa cnJy6bI n3dJeIne HeJb3a Bb6paCbIbA Tb KaK 6bITOBbIe (rOPODcKne) OTXoDbI.
U3dJeIne cIeMyET nepeDaT B CnEuaJIbHbIK KOMMyHaJIbHbIK NpHKT
pa3dJIbHorO c6bopa OTxODob MeCTHOe UypeJXeHHe IIN B ppeIpnTne,
OKa3bIBaHOoee nOIObHbIe ycnyI. OTdJIbHaa YtINImaZIaN 6bITOBbIX pIn6bpOB
no3BOJRAET PpeOTBpaTb BO3MOXHbIE HerATNBHBe NocJIeCTBnI DnIA
OKpykaUoSeI cpeBIs n 3IDOpOBBy, KOToPbIMu YpeBaTa HeHaJIeXaIaJ
yTNIm3aIaI, INo3BOJRAET BOCCTaHOBHT MaTePnAIbl, BXOJaIe N Bo CoCTabe
n3dJIin, ObecneuHBa 3NaHTeJIbHyIO EKOHOmIO 3HepRn I necypcoB. B
KaueCTBe HAnOMHaHnI O Heo6XoDMOCtn OTdJIbHOY TynImaZIaN 6bITOBbIX
np6bpOB Ha n3dJeIne HaHeceH 3NaK B VnDE nepeyeKHyTORO MycOPHO 6aka
Ha KOncax.
boxie, kamaki, UTOOxyn pfIATPOU
Jr roTyBaTn ecnpeco 3 MeJeHoI KaBn
1ПidirpiiTe npnila,Iak ce3a3naueHoHa cTOpin76.
2IpekeohaiTeCyaemHctIOCTaTHKilbKiTbBOU.
3 O6epitb noTpi6Hn pfinTp.
BukopocToByTe HeBeIeKnI IbTp dI npiroTyBaHHa Ondiei fiiXaHKn KaBN (a6o JaIO Bn BnkOpocToByTe nakEtNK 3 KaBOH), i BeIeKnI IbTp -dIaDBOX fiiIXaHOK.
4ДоаиTe kaby 3a ДОПOMOROМIpquoi loxkn.Онha mIpca loxka Ha Ondhyaшky.Po3piBnIte NOBepxHIO,a NOTIM,BNKOPINCTOBYUOn TeMnep,IereHbKO npndaibTb.3HIMITb 3aIIuKm KABN 3 06iJa.
KyuynuHmMeIeHyKaBy,nepekoHaTeCya,IO BOHaPiXoDHTb DO KaBOBaPOK ecnpco.
He tram6yIte kaby duyke cnIbHO, aJeke ce moKe 3a6nOkByaTn fInbTp i kaba 6yDe BiXoJNTn dUyKe NOBInbHO, a NiHa MaTmE TeMHN KOnip. Ane RaKIO He dUyke CnIbHO yTrpAM6yBatn, kaba 6yDe BiXoJNTn dUyKe WbNkO i MaTmE BODaHy CTpyKtPy, a NiHa MaTmE CBITnI KOnip.
5 YctaHOIBiB TpIMaU pIbTpa. IpekoHaNTecra, 10 yCTyn Ha pIbTpicnIBnadae 3 OTbOpOM Ha TpIMaU pIbTpa.
6 YctahOBiTb TpIMaUphiIbTaHaBnIXiDnO TBip IJNAKABN.IIOBepHITb npabOpuy, 0o5 3aΦikCyBaTu Ha Micu 1.
- Поставе оndу abo DBi YAшки ②.Яku BO Bn roTyeTe OndHy YAшky, поста ву ceHTpi.
7 HaTnCHiB kHONkY on/off (yBIMKHyTN/BIMMKHyTN) Ta 3auekaite,doKn 3eelenh CBITIOB INIINKAtop roTOBHOCT KABN He npinnHITb MrrITn, a nicJzboHO HATNCiB KHONky «Kaba».
8 Konyu yauzijbdyocTaTHbo KaBn, aJe He 3a6arato, 6o iHaKwbe BOHa MaTIme BODany CTpykTypY, HATNCiTb KHONky «KaBa'. JaKUO BN He 3bnpacTeecra TOTyBaTn Ue KaBy, HATNCiTb KONky on/off (yBIMKHyTN/BMKNHyTN), Uo6b BmMKHyTN npJnaD. Y Ta6nci, kky HabeJeHO HnKCh, 3a3NaHeO Yac npiroTOyBaHHa KABn pi3Hnx 06'emib.
He 3himaiTe TpImauch pfIbtpa nIac npnroTybaHna KaBn YN BnPo6JIeHn nap, aJxK MoXJIbBn BnKd nap, kMy MoKc cnpuHHInOnIK.
PnirtoyTe ecnpco, k3a3NaeHOBu
napa - nla npriroTuBaHHaDox abo 6iNbhe fiiixKaanyuHo, cnouatky 3bapitb kaby, i notim Bxe roTyte niHy dna BCix fiiixKaanyuHo, a He Habnakn.
1 PepekoHaTeCra, yo y EmHOcti DoCTaTHK KJIbKICTb BODn.
2 IpekeonaiTeC, 0Kpyrpa pyka Bnnycky napn 3haxoDntbcs y noIoxeHHi «3aHHeHO».
3 Hatncitb KhoNky on/off (yBIMKHyTN/BUMKHyTN), BOHa cnaIaxHe nomapaHueBM.
4 Hatachitb kHONKy «napa». Cnajaxhe yepBoHIn iHdNkaTOp yTBOpEHn napi.
5 3auekaTe,doKu YepBOHn iHnKaTOp He npnnHITb MmTTiN,IO O3HaATMe,IO npnaIad HabpaB Heo6xIDHy Tempepatypy.
6 HanIte y KeINx/uaKu TPOxN MoIoka. PIIac oBpO6Kn O6'em MoIoka 3bIbIyUeTbcra BTPnHi, TOMy O6npaIte EMHicTb BiINObIDHoro p03mipy. 3rIdNo 3 iHcTpkyiEIO BVKOpncTObuYTe 40-60 Mm MoIoka Ha Ondy uAiky KanyuHIO.
- PeKOMeHdyeTbc BnKOpNCTOBvBaTu XoNoDHe MOnOKo 3HnKeHoJ JnKpHocTi.
7 Utpmuyu KeiNx Ondiepyko,OnycttB conNo Iy BxOdy napu y MOKO TAK,06bM MOnKO He nipHimanoC Bnue wBa Ha conNI.
8 Biékpié Te kpyrny pyky Bnyncky napi, noBepTaOnu nn npOTn rOHHNKOBoi cTprkN. Monoko noounHae 36ilbuyBaTncB o6'Emi Ta 3'raBnEbTcB niHa 6. PerynioTe noloxeHHa KeJnxy, aJxhe Hocnk conla nobHHe 3haxoHTncn HnKpePiBna MOnoka. 3a 20-25 cekHy yTBopntbcn iHa i monoko 6yde rotobO.
9 3ynnHtB yTbOpenHHn nap.ДЯцboro noBepHiTb kpyIy pyuKy dЯ Bnyncky nap 3a roDHHNKOBOIO CTPIIKOO.
He doBodt b MOKo DO KINiHnA dxKe noripuC mak KaBn.
10 HatnciB kHonkY «napa».
11 HaJIInTe cInHeMo MONO y finiXaHN 3 KaBOo ecnpeco. IIN npriroTyBaHHK KABn NaTte 3HIMiBt nHy Ta dOnaTe TlBKn 36NeTe napOIO MONO.K Ybaral He BiKpRbAte CoIIO dIy BUNyCKy napi 6IbW, HIX Ha DBI XBNHn (6e3nepePBHO). 3aBXJn UcTicTB coIIO nicJI BVKOpNCTAHN.
12 506n BvIMKHyTn npuaad, HataNCHiB KOnKy on/off (YbIMKHyTN/BvIMKHyTN).
( 1) ^2( 2) ^2
1
100-1500 1500000000000000000000000000000000000000
1,2,3,4 ≈ | z| 1 - z = 1 - z
110
15 157 157 157 157 157 157 157 157 157 157 157 157 157 157 157 157 157 157 157 157 157 157 157 157 157 15
- = ( x1,y1) , = ( x2,y2)
0 1
11! = 12 + 13 + ·s + 1n + 1
1 11111111111111111111
= 18.90 时 0 < t2 < 17.12 时 t2 < t_1
1 1
112 112 112 112
1.5 · = | | · | |
60 60
rnrnnn nnnn 1nnn nnnn nnnn nnnn nnnn nnnn nnnn nnnn nnnn nnnn nnnn nnnn nnnn nnnn nnnn nnnn nnnn nnnn nnnn nnnn nnnn nnnn nnnn nnnn nnnn nnnn nnnn nnnn nnnn nnnn nn
1
97 1111111111111111111
1K111111111111111111111111
- 25.2017年全国卷2, ( {19m} ) 二、三, ( {19} : {12} : {10} : {14} : {12} : {10} : {14} : {12} : {10} : {14} : {12} : {10} : {14} : {12} : {10} : {14} : {12} : {10} : {14} : {12} : {10} : {14} : {12} : {14} : {12} : {10} : {14} : {12} : {10} : {14} : {12} : {10} : {14} : {12} : {10} : {14} : {12} : {10} : {14} : {12} : {10} : {14} : {1
6.1.1.2.1.3.4.5.6.7.8.9.10.11.12.13.14.15.16.17.18.19.20.21.22.23.24.25.26.27.28.29.30.31.32.
| λ ∑i=1n ∑j=1n (Sj Sj∩Oj∩T) | λ ∑i=1n | 0.5 ∑i=1n |
| 1 ∑i=1n ∑j=1n (Oj∩T) | 1 ∑i=1n | 0.4 ∑i=1n |
| λ ∑i=1n (Sj∩Oj∩T) | λ ∑i=1n | 0.6 ∑i=1n |
| 1 ∑i=1n ∑j=1n (·3∩T) | 1 ∑i=1n | 0.4 ∑i=1n |
| 1 ∑i=1n | 1 ∑i=1n | 0.6 ∑i=1n |
100
111111111111111111111111111
V 15.46 = ( x1,y1) , = ( x2,y2)
四
1111 1
- | 2^n - 1| = | 2^n| - | 2^n - 1| = | 2^n| - | 2^n - 1| = | 2^n| - 2
( 1 + u) + ·s + ( 1 + z) + ( 1 + 1) > ( 1 + u) u + ·s + 8 1 + z + 1
1111111111111111111111111
10 : | 91 - 7| = | 91 + 7|
1 1
S_ AOB = 12 · OB · AB = 12 × 10 = 14
( 1,12,0) . ( 2,14,0) .
1111111111111111111111111111
153 2007 11971 mkiog? 10k0007 11971, mkiog
18 11 1015 2 1115 2 2 2 2 2 2 2 2 2 2 2 2 2 2 2 2 2 2 2 2 2 2 2 2 2 2 2 2 2 2 2 2 2 2 2 2 2 2 2 2
1^ 1^ 1^ 1^
15^ r1r2 = 2( 15^ r1r2)
18 × 15
1
15 × 25
- ( 5) ^2 11. ( 5) ^2 . 2^2 . 3^2 . 4^2 . 5^2 . 6^2 . 7^2 . 10 · 10 · 10 · 11 · 11 · 11 · 11 · 11 · 11 · 11 · 11 · 11 · 11 · 11 · 11 · 11 · 11 · 11 =
( 1,2) = ( ab + 4, - b + 8) 命为
= 12( + ) = 1m
Head Office Address:
Kenwood Limited, New Lane, Havant, Hampshire PO9 2NH, UK
www.kenwoodworld.com
Designed and engineered by Kenwood in the UK
Made in China