
SND 4600 A1 - Scanner SILVERCREST - Free user manual and instructions
Find the device manual for free SND 4600 A1 SILVERCREST in PDF.
| Product type | Scanner for negatives and slides |
| Brand | SilverCrest |
| Model | SND 4600 A1 |
| Dimensions (L x H x D) | approx. 9.4 x 16.9 x 10.4 cm |
| Weight (without accessories) | approx. 450 g |
| Power supply | 5 V DC, 500 mA via USB port (USB-C) |
| Interface | USB-C |
| Sensor | CMOS 8 megapixels |
| Resolution | Standard: 2300 dpi, Interpolated: 4600 dpi |
| Light source | Backlight with 3 white LEDs |
| Scanning method | Single pass |
| Output formats | JPG, TIFF |
| Compatible operating systems | Windows Vista/7/8/10/11, Mac OS 10.10-12 |
| Operating temperature | +5 to +40 °C |
| Allowable humidity | ≤ 75 % (without condensation) |
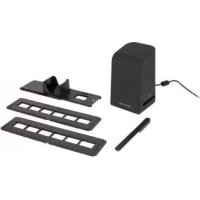
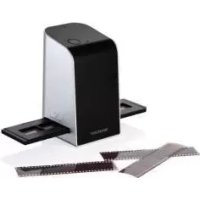
| Package contents | Scanner, 2 negative holders, slide carrier, cleaning brush, USB cable, software CD, instruction manual, quick start guide |
| Cleaning | Housing: damp cloth with mild dish soap; backlight: provided cleaning brush |
| Safety instructions | Do not expose to moisture, do not open, keep out of reach of children, use only original accessories |
| Warranty | 3 years |
| Intended use | Private use, scanning of negatives and slides |
| Spare parts | Available during the warranty period (contact customer service) |
Frequently Asked Questions - SND 4600 A1 SILVERCREST
User questions about SND 4600 A1 SILVERCREST
0 question about this device. Answer the ones you know or ask your own.
Ask a new question about this device
Download the instructions for your Scanner in PDF format for free! Find your manual SND 4600 A1 - SILVERCREST and take your electronic device back in hand. On this page are published all the documents necessary for the use of your device. SND 4600 A1 by SILVERCREST.
USER MANUAL SND 4600 A1 SILVERCREST
Operating instructions
FR BE
SCANNER POUR DIAPOSITIVES ET NÉGATIFS
Mode d'emploi
c1
SKENER DIAPOZITIVÜ A NEGATIVÜ
Návod k obsluze
SK
SKENER DIAPOZITÍVOV A NEGATÍVOV
Návod na obsluhu
DK
DIAS- OG NEGATIVSCANNER
GB/IE Operating instructions Page 1

Contents
Introduction....3
Information about these operating instructions .... 3
Notes on trademarks 3
Proper use 3
Warnings and symbols used 4
Safety information....5
Description of the appliance ....6
Initial operation....7
Check package contents 7
Connecting to a computer 8
Installing the software 8
Handling and use 10
Inserting negatives 10
Inserting slides 1 1
Digitizing negatives/slides 12
After use 17
Troubleshooting 18
Cleaning 19
Storage when not in use ....20
Disposal 20
Disposal of the device 20
Disposal of the packaging 21
Appendix 21
Technical data 21
Notes on the EU Declaration of Conformity ..... 2 2
Kompernass Handels GmbH warranty 22
Service 25
Importer 25
Introduction
Information about these operating instructions
Congratulations on the purchase of your new device.
You have selected a high-quality product. The operating instructions are part of this product. They contain important information about safety, use and disposal. Before using the product, please familiarise yourself with all operating and safety instructions. Use the product only as described and for the range of applications specified. Keep these operating instructions as a reference and store them near the product. Please pass on all documentation incl. these operating instructions to any future owner(s) if you sell this product or give it away.
Notes on trademarks
-USB® is a registered trademark of USB Implementers Forum, Inc.
—Microsoft ^® , Windows ^® , Windows Vista ^® , Windows 7 ^® ,
Windows 8 ^® , Windows 10 ^® and Windows 11 ^® are registered trademarks of the Microsoft Corporation in the United States of America and/or other countries.
—Mac OS® is a registered trademark of Apple Inc. in the USA and other countries.
— The SilverCrest trademark and the retail name are the property of their respective owner.
All other names and products may be trademarks or registered trademarks of their respective owner.
Proper use
This device is a consumer electronics device intended exclusively for the non-commercial scanning and digitizing of film negatives and slides. The device is not intended for any other purpose, nor for use beyond the scope described. No claims of any kind will be accepted for damage arising as a result of incorrect use. The risk is borne solely by the user.
Warnings and symbols used
The following warning notices are used in these operating instructions:

DANGER
A warning at this hazard level indicates a hazardous situation.
Failure to avoid this hazardous situation will result in serious injuries or death.
▶ Follow the instructions on this warning label to avoid the risk of death or serious injuries.

WARNING
A warning at this hazard level indicates a potentially hazardous situation.
Failure to avoid this hazardous situation could result in serious injuries or death.
▶ Follow the instructions on this warning label to avoid the risk of death or serious injuries.

CAUTION
A warning at this hazard level indicates a potentially hazardous situation.
Failure to avoid this hazardous situation could result in injuries.
▶ Follow the instructions on this warning label to prevent injuries.

ATTENTION
A warning at this hazard level indicates a risk of property damage.
Failure to avoid this situation could result in property damage.
▶ Follow the instructions in this warning notice to prevent property damage.
NOTE
▶ A note provides additional information which will assist you in using the device.
Safety information
- Check the device for visible external damage before use. Do not operate a device that has been damaged or dropped.
If the cables or connections are damaged, have them replaced by authorised specialists or Customer Service.
This device may be used by children aged 8 years and above and by persons with limited physical, sensory or mental capabilities, or lack of experience and knowledge, provided that they are under supervision or have been told how to use the device safely and are aware of the potential risks. Children must not play with the device. Cleaning and user maintenance tasks may not be carried out by children unless they are supervised.
■ All repairs must be carried out by authorised specialist companies or by the Customer Service department. Improper repairs can pose significant risks to the user. It will also invalidate any warranty claims.
■ Do not make any unauthorised modifications or alterations to the device.
■ Protect the device from penetration by moisture and liquids. Do not place any liquid-filled vessels (such as flower vases) next to the device.
- Keep the device away from naked flames, and do not place candles on or next to the device. This will help to prevent the spread of fires.
■ If you move the device quickly from a warm to a cold room or vice versa, allow the device 30 minutes to acclimatise.
■ DANGER! Do not allow children to play with the packaging material! Keep all packaging materials away from children. There is a risk of suffocation!
Description of the appliance
(For illustrations see fold-out pages)
1 PWR LED
② SCAN button
③ USB-C port
4 Slot for the negative holder or slide magazine
5 Negative holder
6 Slide magazine
⑦ Cleaning brush
8 USB cable (USB-A to USB-C)
Initial operation
Check package contents
(For illustrations see fold-out pages)
The product includes the following components:
- Scanner
- 1 x slide magazine
- 2 x holders for negatives
- Program CD
- Cleaning brush
- USB cable
- Operating instructions
- Quick Start Guide
◆ Unpack all parts of the device from the packaging and remove all packaging materials.
NOTE
▶ Check the package for completeness and signs of visible damage.
▶ If the delivery is incomplete or damage has occurred as a result of defective packaging or during transport, contact the service hotline (see section Service).
Connecting to a computer
NOTE
▶ Use only the original accessory parts recommended by the manufacturer for this appliance.
System requirements
Operating system: Windows Vista/7/8/10/11, Mac 10.10-12 Slot: USB connection (USB-A)
Connect the USB-C plug on the USB cable ^8 to the USB-C port ^3 on the scanner.
Connect the USB-A plug on the USB cable ^8 to a powered-on PC. The computer recognises the new hardware and starts installing the drivers automatically. This process can take a around a minute. The PWR LED 1 lights up as soon as the scanner is properly connected.
Installing the software

ATTENTION
▶ Important files may be changed or overwritten during the installation of the software! Before installing the installing the software, make a backup of your original files to ensure that you will be able to access them later if problems occur during installation.
Installation on Windows
NOTE
▶ If your computer does not have a CD drive, visit the following website to download the software: www.kompernass.com/365299_2204
NOTE
If the autostart function is deactivated and the installation does not start automatically, you can start the installation with a double-click on the "WinSetup.exe" file in the main directory of the CD.
◆ Insert the supplied program CD into your CD drive of your computer. The installation menu starts automatically.
Click on the "Installation" button to start the installation.
◆ Install the software as described in the on-screen instructions.
◆ After successful installation you can leave the menu by clicking on the "Exit" button.
Installation on Mac OS
NOTE
▶ If your Mac computer does not have a CD drive, visit the following website to download the software: www.kompernass.com/365299_2204
◆ Insert the supplied program CD into your CD drive of your Mac computer.
◆ Open the main directory of the program CD.
◆ Switch to the "Mac" directory.
◆ Start the installation by double-clicking on the "ImageScan.dmg" file.
◆ Install the software as described in the on-screen instructions.
Handling and use
Inserting negatives
◆ Unlock the catch on the front of the negative holder ⑤ and open the holder.
- Lay the negative in the negative holder ^5 the right way up. Ensure that holes of the negative strip are placed on the corresponding retaining tabs on the holder, so that the negative strip can not move.
◆ Close the negative holde⑤ so that the lid is firmly shut.
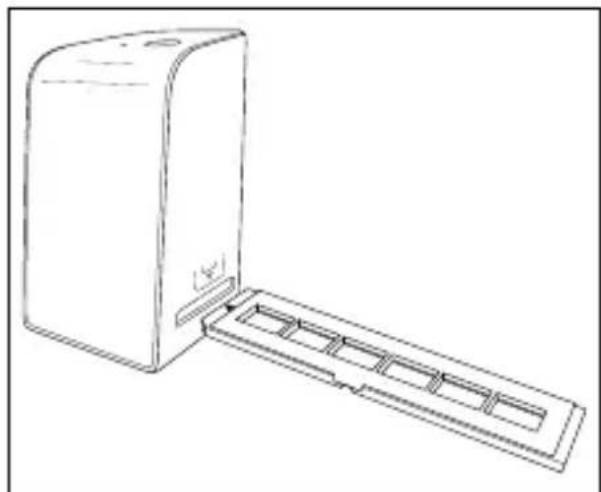
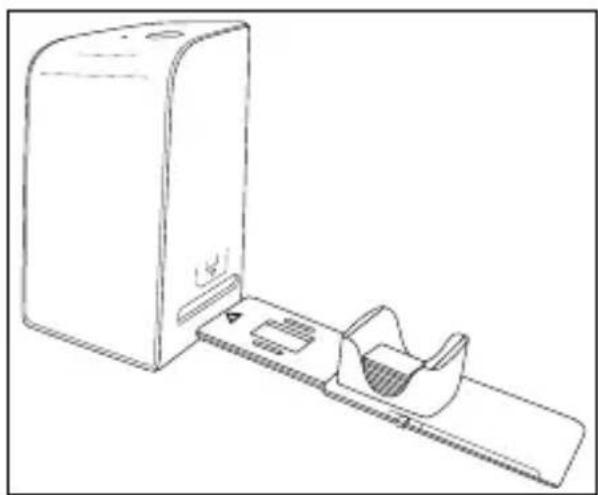
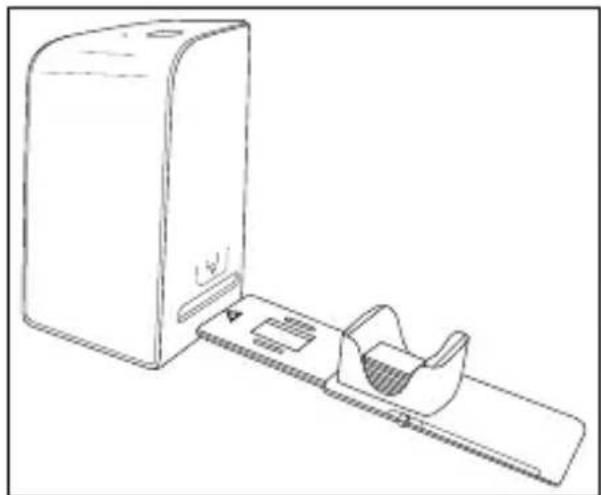
Now insert the negative holde⑤ with the triangle marking at the front and visible into the slot ④ on the right (see figure 1).
◆ Push the negative holder⑤ into the slot ④ until it audibly clicks into the first position. For additional negatives, push the negative holder ⑤ further in until it audibly clicks into the next position.
natural_image
Line drawing of a rectangular device with a side panel extending from its side (no text or symbols)Figure 1 Figure 2

natural_image
Line drawing of a device with a rectangular base and a curved handle, no text or symbols presentInserting slides
◆ Insert slides the right way round into the shaft provided on the slide magazine ⑥. Around 10–12 slides (depending on size) can be added to the magazine.
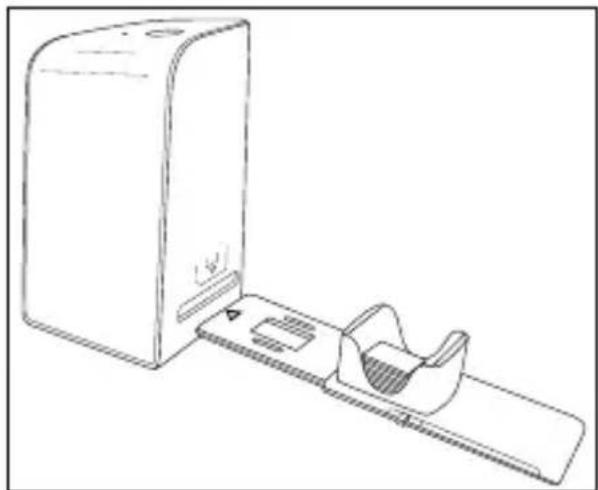
◆ Push the slide magazine⑥ into the slot ④ on the right with the viewing window at the front. Ensure that the triangle marking is at the front and visible (see figure 2).
Use the pusher on the side of the slide magazine ⑥ to push the slides in the shaft individually into the scanner.
To do this, first slide the pusher away from the scanner as far as the stop. Afterwards, move the pusher carefully towards the scanner.
NOTE
This pushes any slide that is in the scanner out of the device and a new slide is pushed into the viewing range of the scanner.
▶ Make sure that you push the new slide into the scanner slowly. If you push too quickly, the slide could slip past the viewing range of the scanner.
When you have finished scanning slides, remove the slide magazine ⑥ from the slot ④.
Remove the last slide from below from out of the slide magazine viewing window ⑥.
Digitizing negatives/slides
Windows software
- Start the "ImageScan" program by double-clicking on program icon on the desktop or select the corresponding entry from the start menu. The program opens directly in the main window.
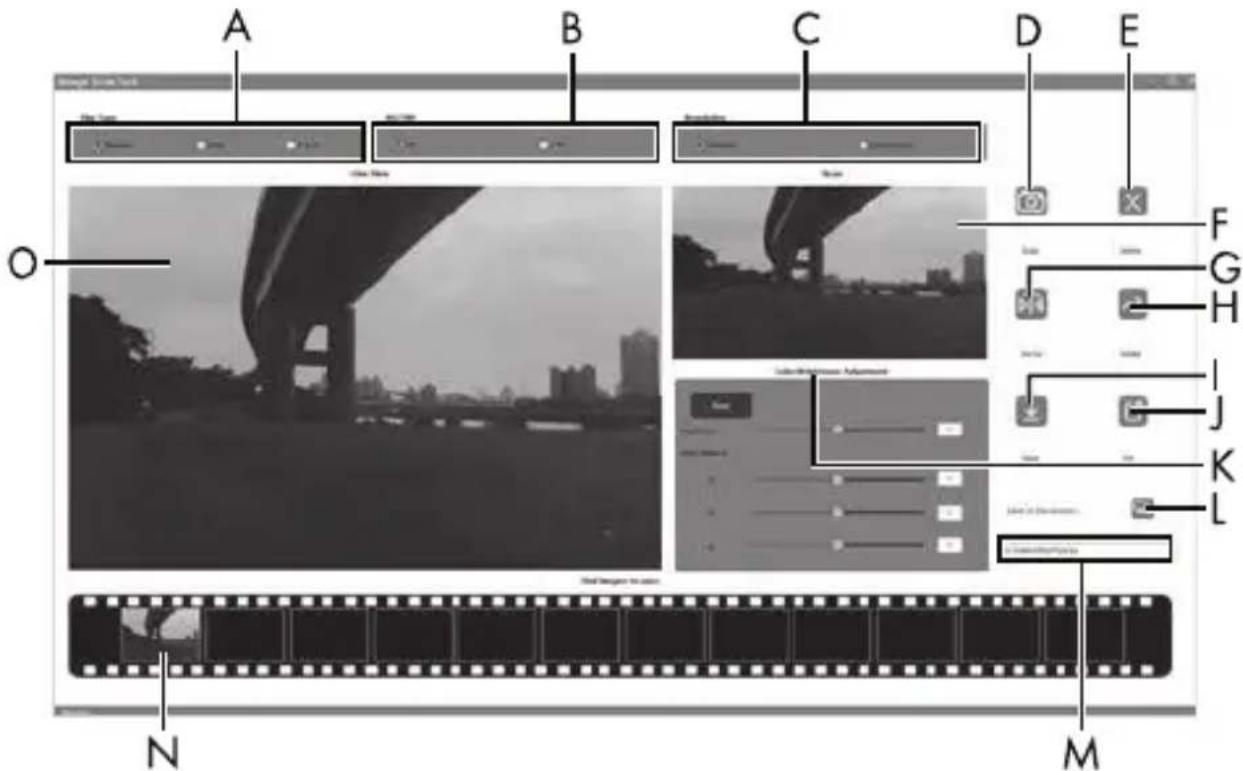
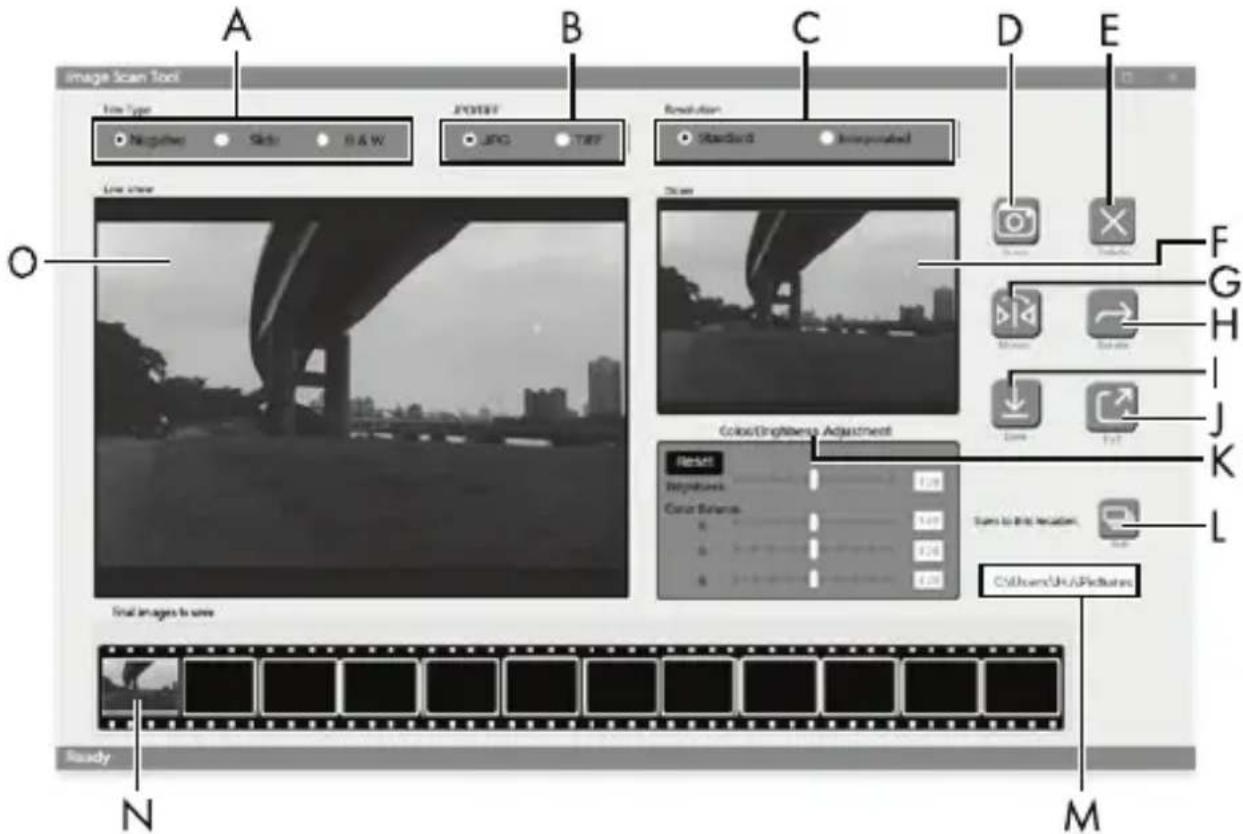
| A | Select the type here (negative, slide or colour/black & white) you want to use. |
| B | Select here the format (JPG or TIFF) you want to use for saving images. |
| C | Select the resolution here: Standard: 2300 dpi Interpolated: 4600 dpi |
| D | Click on this button or press the SCAN button 2 directly to scan an image. |
| E | Click this button to delete the currently selected image. |
| F | The currently selected image is shown here. |
| G | Click this button to flip the currently selected image. |
| H | Click this button to rotate the currently selected image clockwise. |
| I | Click this button to save the scanned images. If the path entered is invalid, a warning will appear. |
| J | Click this button to close the program. |
| K | Click this button to make colour or brightness settings before scanning the image. The adjustments will be shown in the live view. |
| L | Click this button to select a folder as a save location for the scanned images. |
| M | Here you will see the folder where the scanned images have been saved. |
| N | Here you can see scanned images which have not yet been saved. The currently selected image is shown with a green frame and displayed in the window (F). |
| O | Here you will see a live view of the inserted negative/slide. |
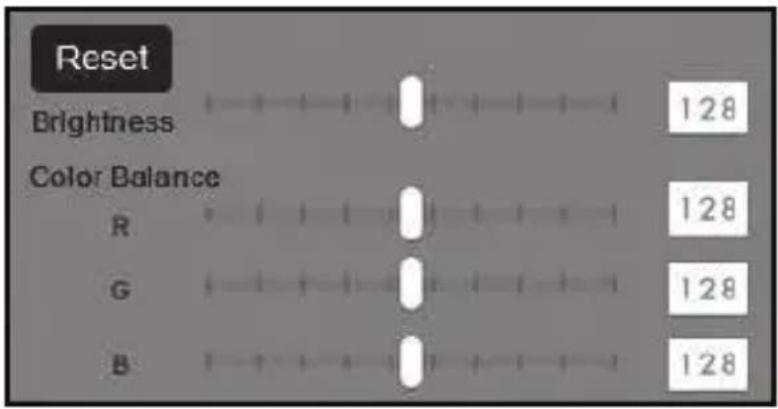
Colour and brightness settings
Adjust the colours and brightness as required by clicking on the "Color/Brightness Adjustment" button (K).
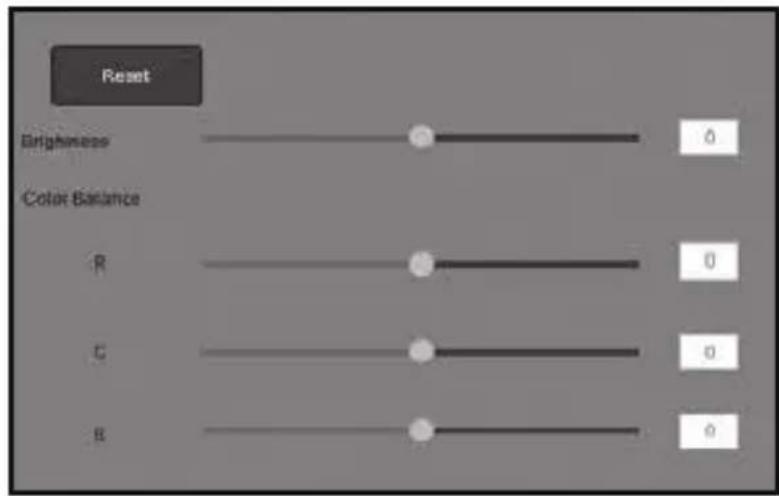
◆ Move the "Brightness" slider to set the brightness between -64 and 64.
◆ Move the three "Color Balance" sliders to set the RGB values between -6 and 6.
◆ To reset to the default values, click on the "Reset" button.
Mac software
- Start the program "ImageScan" by double-clicking the icon. The program opens directly in the main window.

| A | Select the type here (negative, slide or colour/black & white) you want to use. |
| B | Select here the format (JPG or TIFF) you want to use for saving images. |
| C | Select the resolution here:Standard: 2300 dpiInterpolated: 4600 dpi |
| D | Click on this button or press the SCAN button 2 directly to scan an image. |
| E | Click this button to delete the currently selected image. |
| F | The currently selected image is shown here. |
| G | Click this button to flip the currently selected image. |
| H | Click this button to rotate the currently selected image clockwise. |
| I | Click this button to save the scanned images. If the path entered is invalid, a warning will appear. |
| J | Click this button to close the program. |
| K | Click this button to make colour or brightness settings before scanning the image. The adjustments will be shown in the live view. |
| L | Click this button to select a folder as a save location for the scanned images. |
| M | Here you will see the folder where the scanned images have been saved. |
| N | Here you can see scanned images which have not yet been saved. The currently selected image is shown with a green frame and displayed in the window (F). |
| O | Here you will see a live view of the inserted negative/slide. |
Colour and brightness settings
Adjust the colours and brightness as required by clicking on the "Color/Brightness Adjustment" button (K).
◆ Move the "Brightness" slider to set the brightness between 0 and 255.
◆ Move the three "Color Balance" sliders to set the RGB values between 0 and 255.
◆ To reset to the default values, click on the "Reset" button.
After use
Remove the negative holder ⑤ by pushing it all the way through the device.
Remove the slide magazine 6 by pulling it back out of the slot 4 on the right.
◆ Remove the USB cable 8 from the USB port on your computer and the scanner.
Troubleshooting
The following table will help you to identify and rectify minor malfunctions:
| Fault Possible cause Remedy | ||
| PWR LED 1 does not light up. | The device is not correctly connected. | Connect the device. |
| Poor image quality. | Dust on the scanner's background lighting. | Clean the back-ground lighting (see section "Cleaning"). |
| Dust on the film/slide. | Clean the film/slide. | |
| The scanned images are blurred. | The lens of the scanner has fogged up due to temperature differences. | Wait until the device has ac-climatised to room temperature. |
| Scanner is not recognised by the computer after soft-ware installation. | The scanner is not connected to the USB port on the computer. | Connect the device to a USB port on your computer. |
| The USB port on the computer is defective. | Connect the device to a different USB port on your computer. | |
| The computer needs to be rebooted. | Restart your computer. | |
| The scanner cannot be operated via the software. | An anti-virus program is blocking the functionality of the scanner or the software. | Check the settings on your anti-virus program. |
NOTE
▶ If the above-mentioned solutions do not resolve the problem, please contact Customer Service (see section Service).
Cleaning

ATTENTION
▶ To avoid irreparable damage to the device, ensure that no moisture penetrates it during cleaning.
◆ Clean the housing only with a soft damp cloth and a mild detergent.
Clean the surfaces of the background lighting inside the device with the cleaning brush ⑦. To do this, push the cleaning brush with the cleaning surface facing downwards into the slot ④ on the right (see figure 3).
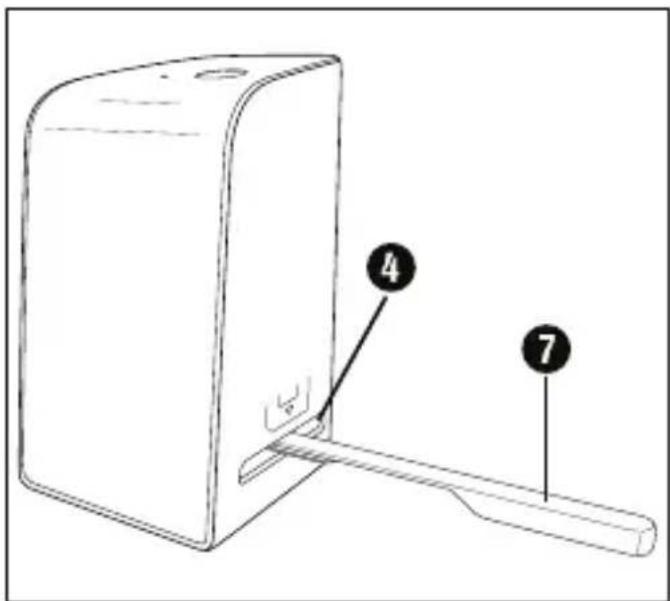
Figure 3
Storage when not in use
◆ Store the device in a dry and dust-free environment away from direct sunlight.
Disposal
Disposal of the device
natural_image
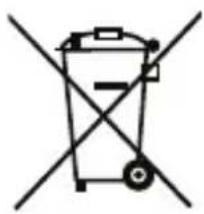
Symbol of a trash bin crossed with a diagonal line, representing no waste or discharge (no text or labels)The adjacent symbol of a crossed-out dustbin means that this appliance is subject to Directive 2012/19/EU. This directive states that this appliance may not be disposed of in the normal household waste at the end of its useful life, but must be taken to specially set-up collection locations, recycling depots or disposal companies.
This disposal is free of charge for the user. Protect the environment and dispose of this device properly.

Your local community or municipal authorities can provide information on how to dispose of the worn-out product.

The product and its packaging are recyclable. They are subject to an extended manufacturer responsibility and will be collected separately.
Disposal of the packaging
The packaging materials have been selected for their environmental friendliness and ease of disposal and are therefore recyclable.
Dispose of packaging materials that are no longer needed in accordance with applicable local regulations.
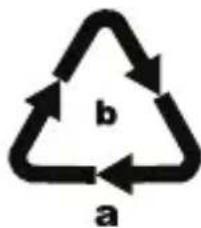
Dispose of the packaging in an environmentally friendly manner. Note the labelling on the packaging and separate the packaging material components for disposal if necessary. The packaging material is labelled with abbreviations (a) and numbers (b) with the following meanings: 1–7: Plastics, 20–22: Paper and cardboard, 80–98: Composites.
Appendix
Technical data
| Operating voltage/current | 5 V (direct current)/500 mA (via USB port) |
| Interface USB-C | |
| Operating temperature +5 to +40°C | |
| Humidity (no condensation) ≤ 75% | |
| Dimensions (W x H x D) | approx. 9.4 x 16.9 x 10.4 cm |
| Weight (without accessories) approx. 450 g | |
| Image sensor 8 megapixel CMOS sensor | |
| Focus range Fixed focus | |
| Brightness control Automatic | |
| Colour adjustment Automatic | |
| Resolution | Standard: 2300 dpiInterpolated: 4600 dpi |
| Scanning method Single pass | |
| Light source Backlight (3 white LEDs) | |
| System requirements | Windows 11/10/8/7/VistaMac OS 10.10-12 |
NOTE
The type plate is located on the underside of the device.
Notes on the EU Declaration of Conformity
This device complies with the basic requirements and other relevant provisions of the directive 2014/30/EU and the directive 2011/65/EU.
The complete EU Declaration of Conformity is available from the importer.

This appliance has a 3-year warranty valid from the date of purchase. If this product has any faults, you, the buyer, have certain statutory rights. Your statutory rights are not restricted in any way by the warranty described below.
Warranty conditions
The warranty period starts on the date of purchase. Please keep your receipt in a safe place. This will be required as proof of purchase.
If any material or manufacturing fault occurs within three years of the date of purchase of the product, we will either repair or replace the product for you or refund the purchase price (at our discretion). This warranty service requires that you present the defective appliance and the proof of purchase (receipt) within the three-year warranty
period, along with a brief written description of the fault and of when it occurred.
If the defect is covered by the warranty, your product will either be repaired or replaced by us. The repair or replacement of a product does not signify the beginning of a new warranty period.
Warranty period and statutory claims for defects
The warranty period is not prolonged by repairs effected under the warranty. This also applies to replaced and repaired components. Any damage and defects present at the time of purchase must be reported immediately after unpacking. Repairs carried out after expiry of the warranty period shall be subject to a fee.
Scope of the warranty
This appliance has been manufactured in accordance with strict quality guidelines and inspected meticulously prior to delivery.
The warranty covers material faults or production faults. The warranty does not extend to product parts subject to normal wear and tear or to fragile parts which could be considered as consumable parts such as switches, batteries or parts made of glass.
The warranty does not apply if the product has been damaged, improperly used or improperly maintained. The directions in the operating instructions for the product regarding proper use of the product are to be strictly followed. Uses and actions that are discouraged in the operating instructions or which are warned against must be avoided.
This product is intended solely for private use and not for commercial purposes. The warranty shall be deemed void in cases of misuse or improper handling, use of force and modifications / repairs which have not been carried out by one of our authorised Service centres.
Warranty claim procedure
To ensure quick processing of your case, please observe the following instructions:
■ Please have the till receipt and the item number (IAN) 365299_2204 available as proof of purchase.
■ You will find the item number on the type plate on the product, an engraving on the product, on the front page of the operating instructions (below left) or on the sticker on the rear or bottom of the product.
If functional or other defects occur, please contact the service department listed either by telephone or by e-mail.
■ You can return a defective product to us free of charge to the service address that will be provided to you. Ensure that you enclose the proof of purchase (till receipt) and information about what the defect is and when it occurred.

You can download these instructions along with many other manuals, product videos and installation software at www.lidl-service.com.
This QR code will take you directly to the Lidl service page (www.lidl-service.com) where you can open your operating instructions by entering the item number (IAN) 365299_2204.
Service
Service Great Britain
Tel.: 0800 404 7657
E-Mail: kompernass@lidl.co.uk

Servicelreland
Tel.: 1800 101010
E-Mail: kompernass@lidl.ie
IAN 365299_2204
Importer
Please note that the following address is not the service address. Please use the service address provided in the operating instructions.
KOMPERNASS HANDELS GMBH
BURGSTRASSE 21
44867 BOCHUM
GERMANY
www.kompernass.com
Inhaltsverzeichnis
Einführung 29
natural_image
Line drawing of a rectangular device with a side panel extending from its side (no text or symbols)natural_image
Line drawing of a medical device with a rectangular box and a curved connector (no text or symbols)Dias einlegen
Abbildung 3
natural_image
Simple line drawing of a trash bin with two crossed lines indicating no waste or discharge (no text or symbols)KOMPERNASS HANDELS GMBH
BURGSTRASSE 21
44867 BOCHUM
DEUTSCHLAND
www.kompernass.com
Table des matières
Introduction 55
natural_image
Line drawing of a device with a rectangular tray and a rectangular base (no text or symbols)Figure 1 Figure 2

natural_image
Line drawing of a medical device with a box and catheter (no text or symbols)Figure 3
natural_image
Simple line drawing of a trash bin with two crossed lines indicating no waste or prohibition (no text or symbols)KOMPERNASS HANDELS GMBH
BURGSTRASSE 21
44867 BOCHUM
ALLEMAGNE
www.kompernass.com
Inhoud
Inleiding 85
natural_image
Line drawing of a rectangular device with a side panel extending from its side (no text or symbols)natural_image
Line drawing of a medical device with a rectangular chamber and a side-mounted device (no text or symbols)Dia's plaatsen
Afbeelding 3
KOMPERNASS HANDELS GMBH
BURGSTRASSE 21
44867 BOCHUM
DUITSLAND
www.kompernass.com
Obsah
Úvod....111
natural_image
Line drawing of a device with a rectangular panel extending from its side (no text or symbols)Obrázek 1

natural_image
Line drawing of a medical device with a box and tray, no text or symbols presentObrázek 2
Vložení diapozitivů
Obrázek 3
natural_image
Symbol of a trash bin crossed out by two crossed lines (no text or labels)natural_image
Two simple line icons: a box with open lid and a trash bin with circular arrow (no text or symbols)KOMPERNASS HANDELS GMBH
BURGSTRASSE 21
44867 BOCHUM
NĚMECKO
www.kompernass.com
Spis treści
W step 135
natural_image
Line drawing of a rectangular device with a side panel extending from its side (no text or symbols)
natural_image
Line drawing of a medical device with a box and catheter (no text or symbols)Rysunek 1 Rysunek 2
Wkładanie slajdów
Rysunek 3
natural_image
Simple line drawing of a trash bin with no text or symbolsKOMPERNASS HANDELS GMBH
BURGSTRASSE 21
44867 BOCHUM
NIEMCY
www.kompernass.com
Obsah
Úvod....161
natural_image
Line drawing of a computer monitor with an open access slot (no text or symbols)Obrázok 1 Obrázok 2

natural_image
Line drawing of a medical scanner device with a base and internal component (no text or symbols)Obrázok 3
natural_image
Simple line drawing of a trash bin with crossed lines indicating no waste or restriction (no text or symbols)KOMPERNASS HANDELS GMBH
BURGSTRASSE 21
44867 BOCHUM
NEMECKO
www.kompernass.com
Índice
Introducción....187
natural_image
Line drawing of a computer monitor with an open access slot (no text or symbols)Figura 1 Figura 2
natural_image
Line drawing of a medical device with a box and a cup, no text or symbols presentFigura 3
natural_image
Simple line drawing of a trash bin with crossed lines indicating no waste or restriction (no text or symbols)KOMPERNASS HANDELS GMBH
BURGSTRASSE 21
44867 BOCHUM
ALEMANIA
www.kompernass.com
Indholdsfortegnelse
Introduktion 213
Installation of software 218
Installation of software

OBS
natural_image
Line drawing of a device with a rectangular tray and a rectangular base (no text or symbols)
natural_image
Line drawing of a medical scanner device with a box and scanner (no text or symbols)Figur 1 Figur 2
Indsætning af dias
Figur 3
natural_image
Simple line drawing of a trash bin with crossed lines indicating no waste or discharge (no text or symbols)KOMPERNASS HANDELS GMBH
BURGSTRASSE 21
44867 BOCHUM
TYSKLAND
www.kompernass.com
Indice
Introduzione 237
natural_image
Line drawing of a rectangular device with a side panel extending from its side (no text or symbols)Figura 1 Figura 2
natural_image
Line drawing of a medical device with a rectangular box and a curved mechanical component attached to a plate (no text or symbols)Figura 3
natural_image
Symbol of a trash bin crossed with a diagonal line, representing waste sorting or disposal (no text or labels)KOMPERNASS HANDELS GMBH
BURGSTRASSE 21
44867 BOCHUM
GERMANIA
www.kompernass.com
Tartalomjegyzék
Bevezető 263
natural_image
Line drawing of a computer monitor with an open access slot (no text or symbols)
natural_image
Line drawing of a medical device with a clamped component and a rectangular base (no text or symbols)- ábra 2. ábra
Diák behelyezése
- ábra
natural_image
Simple line drawing of a trash bin with crossed lines indicating no waste or restriction (no text or symbols)KOMPERNASS HANDELS GMBH
BURGSTRASSE 21
44867 BOCHUM
NÉMETORSZÁG
www.kompernass.com
Kazalo
Uvod....289
Informacije o teh navodilih za uporabo 289
Opombe k blagovnim znamkam 289
Predvidena uporaba 289
Varnostna opozorila in simboli v teh navodilih . . . . . . . . . . . . . 2 9 0
Varnostna navodila 291
Upravljalni elementi 292
Opis naprave 293
natural_image
Line drawing of a device with a rectangular panel extending from its side (no text or symbols)
natural_image
Line drawing of a medical device with a rectangular box and a curved mechanical component attached to a plate (no text or symbols)Slika 1 Slika 2
Vstavljanje diapozitivov
Diapozitiv pravilno obrnite in ga vstavite v za to namenjeno režo zalogovnika za diapozitive 6. V zalogovnik za diapozitive lahko vstavite pribl. 10–12 diapozitivov (odvisno od velikosti).
Zalogovnik za diapozitive 6 vstavite z okencem naprej v desni nastavek 4. Pri tem pazite, da je trikotna oznaka spredaj in vidna (glejte sliko 2).
| A | Tukaj izberite vrsto posnetka (negativ, diapozitiv ali črno-beli), ki ga želite uporabiti. |
| B | Tukaj izberite obliko zapisa datoteke (JPG ali TIFF), s katero želite shraniti slike. |
| C | Tukaj izberite ločljivost:Standardna: 2300 dpiInterpolirana: 4600 dpi |
| D | Kliknite ta gumb ali neposredno pritisnite tipko SCAN 2za optično branje slike. |
| E | Kliknite ta gumb, da izbrišete trenutno označeno sliko. |
| F | Tukaj se prikaže trenutno izbrana slika. |
| G | Kliknite ta gumb, da trenutno označeno sliko prezrcalite. |
| H | Kliknite ta gumb, da trenutno označeno sliko zavrtite v desno. |
| I | Kliknite ta gumb, da shranite posnete slike. Če vnesete neveljavno pot za shranjevanje, se prikaže opozorilo. |
| J | Kliknite ta gumb, da končate program. |
| K | Kliknite ta gumb, da pred optičnim branjem slike spremenite nastavitve barve ali svetlosti. Spremembe se prikažejo na prikazu v živo. |
| L | Kliknite ta gumb, da izberete mapo za shranjevanje optično prebranih slik. |
| M | Tukaj se prikaže mapa, kjer lahko shranite optično prebrane slike. |
| N | Tukaj se prikažejo slike, ki so bile že optično prebrane, vendar doslej še ne shranjene. Trenutno označena slika se prikaže z zelenim okvirjem v oknu (F). |
| O | Tukaj se prikaže vstavljeni negativ/diapozitiv v živo. |
| A | Tukaj izberite vrsto posnetka (negativ, diapozitiv ali črno-beli), ki ga želite uporabiti. |
| B | Tukaj izberite obliko zapisa datoteke (JPG ali TIFF), s katero želite shraniti slike. |
| C | Tukaj izberite ločljivost:Standardna: 2300 dpiInterpolirana: 4600 dpi |
| D | Kliknite ta gumb ali neposredno pritisnite tipko SCAN 2 za optično branje slike. |
| E | Kliknite ta gumb, da izbrišete trenutno označeno sliko. |
| F | Tukaj se prikaže trenutno izbrana slika. |
| G | Kliknite ta gumb, da trenutno označeno sliko prezrcalite. |
| H | Kliknite ta gumb, da trenutno označeno sliko zavrtite v desno. |
| I | Kliknite ta gumb, da shranite posnete slike. Če vnesete ne-veljavno pot za shranjevanje, se prikaže opozorilo. |
| J | Kliknite ta gumb, da končate program. |
| K | Kliknite ta gumb, da pred optičnim branjem slike spremenite nastavitve barve ali svetlosti. Spremembe se prikažejo na prikazu v živo. |
| L | Kliknite ta gumb, da izberete mapo za shranjevanje optično prebranih slik. |
| M | Tukaj se prikaže mapa, kjer lahko shranite optično prebrane slike. |
| N | Tukaj se prikažejo slike, ki so bile že optično prebrane, vendar doslej še ne shranjene. Trenutno označena slika se prikaže z zelenim okvirjem v oknu (F). |
| O | Tukaj se prikaže vstavljeni negativ/diapozitiv v živo. |
Slika 3
natural_image
Symbol of a trash bin crossed with a diagonal line, representing no waste or discharge (no text or labels)KOMPERNASS HANDELS GMBH
BURGSTRASSE 21
44867 BOCHUM
NEMČIJA
www.kompernass.com
Pooblaščeni serviser

ServisSlovenija
Tel.: 080 080 917
E-Mail: kompernass@lidl.si
IAN 365299_2204
Garancijski list
natural_image
Line drawing of a rectangular device with a side panel extending from its side (no text or symbols)
natural_image
Line drawing of a desktop computer with a monitor and keyboard (no text or symbols)Slika 1 Slika 2
Umetanje
Stavite dijapozitiv s ispravne strane u za to predviđen utor u spremniku dijapozitiva 6. U spremnik za dijapozitive može se staviti približno 10-12 dijapozitiva (ovisno o veličini).
◆ Umetnite spremnik za dijapozitive ^6 s prozorčićem prema naprijed u desni utor ^4 . Pazite da je oznaka trokuta okrenuta prema naprijed i vidljiva (vidi sliku 2).
Klizač s bočne strane spremnika dijapozitiva ⑥ gura pojedinačne dijapozitive u skener.
◆ U tu svrhu najprije klizač gurnite do kraja od skenera. Nakon toga klizač ponovno pažljivo pomaknite u smjeru skenera.
NAPOMENA
| A | Ovdje odaberite vrstu (negativ, dijapozitiv ili crno-bijelo) koju želite koristiti. |
| B | Odaberite format datoteke (JPG ili TIFF) u kojem želite spremiti slike. |
| C | Odaberite razlučivost:Standardno: 2300 dpiInterpolirano: 4600 dpi |
| D | Kliknite ovaj gumb ili izravno pritisnite gumb SCAN 2 za skeniranje slike. |
| E | Kliknite ovaj gumb za brisanje trenutno odabrane slike. |
| F Ovdje se prikazuje trenutno odabrana slika. |
| G Kliknite ovaj gumb za zrcaljenje trenutno odabrane slike. |
| H Kliknite ovaj gumb za rotiranje trenutno odabrane slike u smjeru kazaljke na satu. |
| I Kliknite ovaj gumb za spremanje skeniranih slika. U slučaju nevažeće mape za pohranu pojavljuje se poruka upozorenja. |
| J Kliknite ovaj gumb za izlaz iz programa. |
| K Kliknite ovaj gumb za postavljanje boje ili svjetline prije skeniranja slike. Postavke se prikazuju u prikazu uživo. |
| L Kliknite ovaj gumb za odabir mape za spremanje skeniranih slika. |
| M Ovdje se prikazuje mapa u koju se pohranjuju skenirane slike. |
| N Ovdje se prikazuju slike koje su već skenirane i još nisu spremljene. Trenutno odabrana slika je uokvirena zeleno i prikazana u prozoru (F). |
| O Ovdje se prikazuje prikaz u živo umetnutog negativa/dija-pozitiva. |
♦ Pomaknite klizač „Svjetlina“ za podešavanje svjetline između -64 i 64.
♦ Pomaknite tri klizača „Balans boja“ za postavljanje RGB vrijednosti između -6 i 6.
Da biste vratili zadane vrijednosti, kliknite gumb „Reset“.
Mac softver
♦ Pokrenite program „ImageScan“ dvostrukim klikom na ikonu programa. Program se otvara izravno u glavnom prozoru.
| A Ovdje odaberite vrstu (negativ, dijapozitiv ili crno-bijelo) koju želite koristiti. |
| B Odaberite format datoteke (JPG ili TIFF) u kojem želite spremiti slike. |
| C Odaberite razlučivost:Standardno: 2300 dpiInterpolirano: 4600 dpi |
| D Kliknite ovaj gumb ili izravno pritisnite gumb SCAN 2 za skeniranje slike. |
| E Kliknite ovaj gumb za brisanje trenutno odabrane slike. |
| F Ovdje se prikazuje trenutno odabrana slika. |
| G | Kliknite ovaj gumb za zrcaljenje trenutno odabrane slike. |
| H | Kliknite ovaj gumb za rotiranje trenutno odabrane slike u smjeru kazaljke na satu. |
| I | Kliknite ovaj gumb za spremanje skeniranih slika. U slučaju nevažeće mape za pohranu pojavljuje se poruka upozorenja. |
| J | Kliknite ovaj gumb za izlaz iz programa. |
| K | Kliknite ovaj gumb za postavljanje boje ili svjetline prije skeniranja slike. Postavke se prikazuju u prikazu uživo. |
| L | Kliknite ovaj gumb za odabir mape za spremanje skeniranih slika. |
| M | Ovdje se prikazuje mapa u koju se pohranjuju skenirane slike. |
| N | Ovdje se prikazuju slike koje su već skenirane i još nisu spremljene. Trenutno odabrana slika je uokvirena zeleno i prikazana u prozoru (F). |
| O | Ovdje se prikazuje prikaz u živo umetnutog negativa/dija-pozitiva. |
Slika 3
natural_image
Symbol of a trash bin crossed with a diagonal line, representing no waste or discharge (no text or labels)Ovaj simbol prekrižene kante za otpad na kotačićima ukazuje na to da ovaj uređaj podliježe direktivi 2012/19/EU. Tom se direktivom zabranjuje bacati uređaj na kraju njegova roka uporabe u obično kućno smeće. Uređaj se mora predati na mjestu za sakupljanje posebnog otpada ili predati poduzeću za zbrinjavanje posebnog otpada.
KOMPERNASS HANDELS GMBH
BURGSTRASSE 21
44867 BOCHUM
NJEMAČKA
www.kompernass.com
Cuprins
Introducere 339
Conector: Conexiune USB (USB-A)
natural_image
Line drawing of a rectangular device with a side panel extending from its side (no text or symbols)Figura 1 Figura 2

natural_image
Line drawing of a medical device with a box and catheter (no text or symbols)Introducerea diapozitivelor
Figura 3
natural_image
Simple line drawing of a trash bin with crossed lines indicating no waste or restriction (no text or symbols)KOMPERNASS HANDELS GMBH
BURGSTRASSE 21
44867 BOCHUM
GERMANIA
www.kompernass.com
Съдържание
Въведение....365
natural_image
Line drawing of a rectangular device with a side panel extending from its side (no text or symbols)Фигура 1 Фигура 2
natural_image
Line drawing of a medical device with a box and catheter (no text or symbols)Фигура 3
natural_image
Simple line drawing of a trash bin with two crossed lines indicating no waste or restriction (no text or symbols)natural_image
Line drawing of a rectangular device with a side panel extending from its side (no text or symbols)Εικόνα 1 Εικόνα 2

natural_image
Line drawing of a medical device with a rectangular base and a curved internal component (no text or symbols)Τοποθέτηση σλάιντς
Eikóva 3
natural_image
Simple line drawing of a trash bin with two crossed lines indicating no waste or restriction (no text or symbols)KOMPERNASS HANDELS GMBH
BURGSTRASSE 21
44867 BOCHUM
ΓΕΡΜΑΝΙΑ
www.kompernass.com


KOMPERNASS HANDELS GMBH
BURGSTRASSE 21
44867 BOCHUM
GERMANY
www.kompernass.com
Last Information Update · Stand der Informationen · Version des informations · Stand van de informatie
Stav informací · Stan informacji · Stav informácií · Estado de las informaciones

- SCANNER POUR DIAPOSITIVES ET NÉGATIFS
- SKENER DIAPOZITIVÜ A NEGATIVÜ
- SKENER DIAPOZITÍVOV A NEGATÍVOV
- DIAS- OG NEGATIVSCANNER
- Contents
- Introduction....3
- Safety information....5
- Description of the appliance ....6
- Initial operation....7
- Handling and use 10
- Troubleshooting 18
- Cleaning 19
- Storage when not in use ....20
- Disposal 20
- Appendix 21
- Introduction
- Information about these operating instructions
- Notes on trademarks
- Proper use
- Warnings and symbols used
- DANGER
- A warning at this hazard level indicates a hazardous situation.
- WARNING
- A warning at this hazard level indicates a potentially hazardous situation.
- CAUTION
- ATTENTION
- A warning at this hazard level indicates a risk of property damage.
- NOTE
- Safety information
- Description of the appliance
- Initial operation
- Check package contents
- (For illustrations see fold-out pages)
- Connecting to a computer
- System requirements
- Installing the software
- Installation on Windows
- Installation on Mac OS
- Handling and use
- Inserting negatives
- Inserting slides
- Digitizing negatives/slides
- Windows software
- Colour and brightness settings
- Mac software
- After use
- Troubleshooting
- Cleaning
- Storage when not in use
- Disposal
- Disposal of the device
- This disposal is free of charge for the user. Protect the environment and dispose of this device properly.
- Disposal of the packaging
- Appendix
- Notes on the EU Declaration of Conformity
- Warranty conditions
- Warranty period and statutory claims for defects
- Scope of the warranty
- Warranty claim procedure
- Service
- Service Great Britain
- Servicelreland
- Importer
- Inhaltsverzeichnis
- Einführung 29
- Dias einlegen
- Table des matières
- Introduction 55
- Inhoud
- Inleiding 85
- Dia's plaatsen
- Obsah
- Úvod....111
- Vložení diapozitivů
- Spis treści
- W step 135
- Wkładanie slajdów
- Úvod....161
- Índice
- Introducción....187
- Indholdsfortegnelse
- Introduktion 213
- Installation of software
- OBS
- Indsætning af dias
- Indice
- Introduzione 237
- Tartalomjegyzék
- Bevezető 263
- Diák behelyezése
- Kazalo
- Uvod....289
- Varnostna navodila 291
- Upravljalni elementi 292
- Opis naprave 293
- Vstavljanje diapozitivov
- Pooblaščeni serviser
- Garancijski list
- Umetanje
- NAPOMENA
- Mac softver
- Cuprins
- Introducere 339
- Introducerea diapozitivelor
- Съдържание
- Въведение....365
- Τοποθέτηση σλάιντς
- KOMPERNASS HANDELS GMBH
Brand : SILVERCREST
Model : SND 4600 A1
Category : Scanner