SND 3600 A2 - To scan SILVERCREST - Free user manual and instructions
Find the device manual for free SND 3600 A2 SILVERCREST in PDF.
User questions about SND 3600 A2 SILVERCREST
0 question about this device. Answer the ones you know or ask your own.
Ask a new question about this device
Download the instructions for your To scan in PDF format for free! Find your manual SND 3600 A2 - SILVERCREST and take your electronic device back in hand. On this page are published all the documents necessary for the use of your device. SND 3600 A2 by SILVERCREST.
USER MANUAL SND 3600 A2 SILVERCREST
Operating instructions
IAN 73761
FR
Before reading, unfold both pages containing illustrations and familiarise yourself with all functions of the device.
Installation et raccordement
Information for these
operating instructions . 54
Copyright 54
Limited liability 54
Warnings 55
Proper use 55
Safety. 56
Basic Safety Instructions. 56
Setting up and
connecting .58
Safety instructions. 58
Package contents and
transport inspection 58
Disposal of the packaging 59
Requirements for the set-up
location 59
Connecting to a computer 60
Operating
components...66
Handling and
operation.66
Insert the negative strip. 66
Inserting slides 66
Starting the ArcSoft Media
Impression 2 programme 68
ArcSoft MedialImpression 2
programme. 68
Scanning with the
ArcSoft MedialImpression 2
programme 69
After Use 72
Cleaning 73
Safety instructions. 73
Cleaning. 73
Troubleshooting . .74
Safety instructions. 74
Malfunction causes and
remedies. 74
Storage/Disposal . .75
Storage. 75
Disposal of the device . . . 75
Appendix. .76
Technical data 76
Note regarding the
conformity declaration ..77
Warranty 77
Service 78
Importer 78
Introduction
Information for these operating instructions
Congratulations on the purchase of your new appliance.
You have clearly decided in favor of a quality product.
These operating instructions are a component of the Slide & Negative Scanner SND 3600 A2 (henceforth designated as the device) and supplies you with important information for intended use, safety and connection as well as operation of the device. The operating instructions must be constantly kept available close to the device. They are to be read and used by anyone assigned to the operation and repairing of the device. Keep these operating instructions and hand them over with the device to any future owners.
Copyright
This documentation is copyright protected.
Any copying and/or printing, including partial copying/printing, as well as reproductions of the diagrams, even in an altered state is only allowed with written permission from the manufacturer.
Limited liability
All technical information, data and information for connection and operation, contained in these operating instructions correspond to the latest at the time of printing and, to the best of our knowledge, take into account our previous experience and know-how.
No claims can be derived from the details, illustrations and descriptions in these instructions.
The manufacturer assumes no responsibility for damage caused by failure to observe the instructions, improper use, inappropriate repairs, making unauthorized changes or for using unapproved replacement parts.
Warnings
In the current operation instructions the following warnings are used:

WARNING
A warning of this danger level signifies a possible dangerous situation.
If the dangerous situation is not avoided it can lead to injuries.
The directives in this warning are there to avoid personal injuries.
IMPORTANT
A warning of this danger level signifies possible property damage.
If the situation is not avoided it can lead to property damage.
The directives in this warning are there to avoid property damage.
NOTICE
A notice signifies additional information that assists in the handling of the device.
Proper use
This device is intended exclusively for the non-commercial use of scanning and digitizing film negatives and slides.
This device is not intended for any other use or for uses beyond those mentioned.

WARNING
Danger from unintended use!
Danger can come from the device if used for unintended purposes and/or other types of use.
Use the device exclusively for intended purposes.
Observe the procedures described in these operating instructions.
Claims of any kind for damage resulting from unintended use will not be excepted.
The operator alone bears liability.
Safety
In this chapter you receive important safety information regarding handling of the device.
This device complies with the statutory safety regulations. Improper use can lead to personal injury and property damage.
Basic Safety Instructions
For safe handling of the device observe the following safety information:
Before use check the device for visible external damage. Do not put into operation a device that is damaged or has been dropped.
Damaged cables or connections should be replaced by authorized qualified persons or by the customer service department.
This appliance is not intended for use by individuals (including children) with restricted physical, physiological or intellectual abilities or deficiencies in experience and/or knowledge unless they are supervised by a person responsible for their safety or receive from this person instruction in how the appliance is to be used.
Children should be supervised to ensure that they do not play with the appliance.
Repairs should only be carried out by authorized specialist companies or by the customer service department. Incorrect repairs can result in significant dangers for the user. In addition warranty claims become void.
A repair to the device during the warranty period may only be carried out by a customer service department authorized by the manufacturer otherwise no additional warranty claims can be considered for subsequent damages.
Defective components may only be replaced with original replacement parts. Only by using original replacement parts can you guarantee that the safety requirements are complied with.
- Do not carry out any unauthorised reconstructions or alterations to the device.
- Protect the device from moisture and liquid penetration. Do not place any liquid-filled vessels (such as flower vases) next to the appliance.
Do not operate the device in the vicinity of open flames.
GB
Setting up and connecting
Safety instructions

WARNING
Personal injury and property damage can occur during initial operation of the device!
Observe the following safety information to avoid danger:
- Packaging material should not be used as a play thing. There is a risk of suffocation!
Package contents and transport inspection
The device is delivered with the following components as standard:
- Scanner
1 x Slide magazine - 2 × Negative holder
Programme CD - Cleaning brush
- Operating instructions
NOTICE
Check the contents to make sure everything is there and for visible damage.
If the contents are not complete or are damaged due to defective packaging or through transportation contact the service hotline (see the section "Service").
Disposal of the packaging
The packaging protects the device from transport damage. The packaging materials are selected from the point of view of their environmental friendliness and disposal technology and are therefore recyclable.

The recirculation of packaging into the material circuit saves on raw material and reduces generated waste. Dispose of packaging material that is no longer needed according to the regionally established regulations.
NOTICE
If possible preserve the device's original packaging during the warranty period so that in the case of a warranty claim you can package the device properly for return.
Requirements for the set-up location
For safe and faultless operation of the device the set-up location must fulfill the following provisions:
The device must be placed on a firm, flat and level surface.
- Do not place the device in a hot, wet or very damp environment or in the vicinity of flammable materials.
Place the device so that it is not subjected to direct sunlight.
Connecting to a computer
System prerequisites
You will need a computer with a vacant USB port and with the operating system Windows XP, Windows Vista or Windows 7 from the Microsoft corporation.
Installation of the ArcSoft Medialmpression 2 programme
NOTICE
In these operating instructions only the programme sections are described that you will need for scanning your slides and/or film negatives. You can find further information in the programme's on-line help.
The illustrations and descriptions refer to the operating system Microsoft® Windows® 7. The illustration depictions can differ, depending on the display settings, with other operating systems.
Insert the supplied programme CD into your computer's CD drive. The window "Automatic playback" will be displayed.

Click on the button "run autorun.exe". The installation begins and the start window is displayed.
NOTICE
If you have switched off the autopost function and the installation process does not begin automatically you can start the installation process by double clicking on the file "autorun.exe" in the CD's main directory.

Click on the button "Arcsoft Software" to install the "ArcSoft MedialImpression 2" programme. The installation wizard will be configured.

GB
The start window of the installation wizard will be displayed.

Click on the button "Continue >".
The window "License agreement" will be displayed.

Click on the button "Yes".
The window for the selection of the installation directory will be displayed.

Select the desired installation directory and click on the button "Continue >".
The window for the selection of the programme folders (Entry in the Windows start menu) will be displayed.

Select the desired programme folder and click on the button "Continue >".
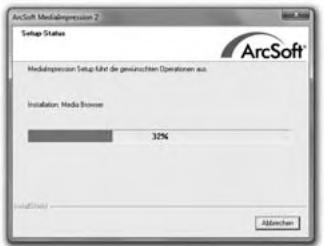
The programme will be installed and the installation progress will be displayed.
The window "Associated file formats" will be displayed.
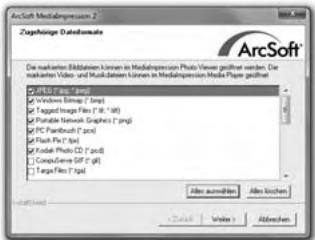
Select the file format that is to be associated with the programme and click on the button "Continue >".
The display will show that the installation has been completed.
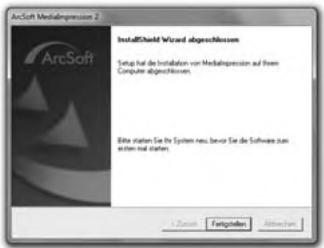
Click on the button "Finish".
The start window will be displayed again.

Click on the button "Exit Installation" to exit the installation programme.
Connection
Connect the USB cable 4 to a USB port on your computer. The computer recognizes the new hardware and starts the automatic driver installation.
GB
Operating components
1 LED PWR
2 SCAN button
3 Insert slot for the negative or slide magazine
4 USB connection cable
5 Film holder
6 Slide magazine
7 Cleaning brush
Handling and operation
In this chapter you receive important information for the handling and operation of the device.
Insert the negative strip
Release the fastener on the front of the film holder 5 and open the holder.
Insert the film strip, correctly orientated, into the holder.
Close the holder making sure that the cover locks into place.
Inserting slides
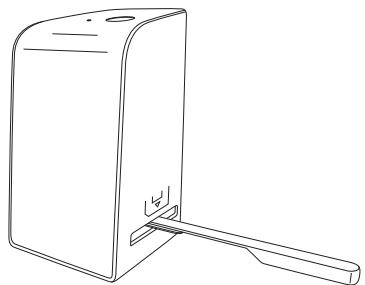
Place the slides, with the sides the right way round, into the intended slot of the slide magazine 6.
First guide the slide magazine 6, with the viewing window leading, into the insert slot 3.
By means of the slider, located laterally on the slide magazine 6, the slides contained in the slots are pushed individually into the scanner.
For this, first slide the slider away from the scanner to the dead stop. Then carefully move the slider back towards the scanner.
NOTICE
A slide located in the scanner is thereby removed from the appliance and a new slide is pushed into the visual range of the scanner.
- Be sure to insert a new slide into the scanner slowly. If this happens too quickly, then the slide could glide outside the visual range of the scanner. In this case, you will need to raise the appliance slightly to the side, so that the slide can glide back to an optimal position.
When you have decided to finish scanning the slides, remove the slide magazine 6 from the insert slot 3. Remove the last slide from the bottom of the viewing window of the slide magazine 6.
Starting the ArcSoft MedialImpression 2 programme
Start the ArcSoft MedialImpression 2 programme by double clicking on the programme icon on the desktop or select the corresponding input from the start menu.
ArcSoft Medialmpression 2 programme
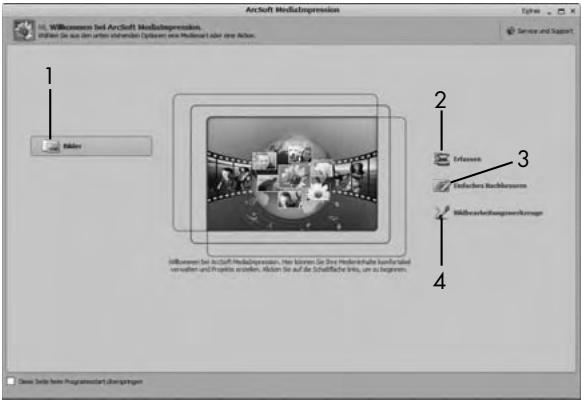
There are four options available:
- Image: Open an available image on the computer or memory medium.
- Capture: For the scanning of new images
- Simple reproduction: Fast image editing
- Image editing tools: Detailed image editing
NOTICE
In these operating instructions only the programme sections are described that you will need for scanning your slides and/or film negatives. You can find further information in the programme's online help.
Scanning with the ArcSoft MedialImpression 2 programme
Connect the device. The LED PWR ① lights up.
Start the ArcSoft MedialImpression 2 programme.
Click on the button "Capture".
When the programme is first started after the installation a calibration and data collection process takes place. Make sure that no slide or negative holders are inserted into the device.
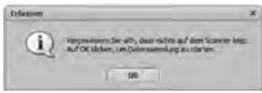
In the displayed information window click on the button "OK" to start calibration and data collection. The first calibration and data collection process can take several minutes.
The calibration progress will be displayed.

After completion of the calibration the programme window will be displayed.
The window "Capture from scanner" will be displayed.
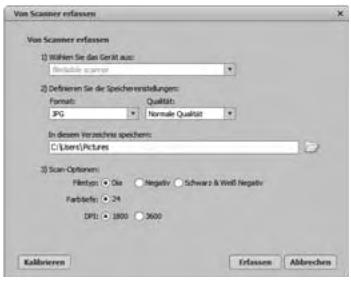
Carry out the necessary settings:
File format, quality (only with JPG files), memory location, film type, colour depth, scan resolution
NOTICE
The colour depth is defined as 24 Bit. A scan with 1800 DPI has a resolution of 2520 × 1680 Pixel and a scan with 3600 DPI has a resolution of 5040 × 3360 Pixel.
Click on the button "Capture".
The "Capture" window is displayed.
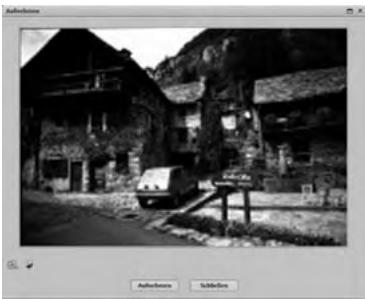
Slide the holder with the negatives and/or slides to be scanned into the slot 3 on the device until it locks into place.
The scan motif will be displayed in the preview field.
NOTICE
A holder that has been inserted into the device cannot be pulled out again, it has to be pushed completely through the device.
Adjust the holder, if required, until the scan motif is displayed optimally in the preview window.
If necessary, you can set the electrical balance (Balance), the exposure (Exposure), the brightness (Brightness), the contrast (Contrast) and the saturation (Saturation) by pressing on the button "Adjust".
A settings window will be opened.
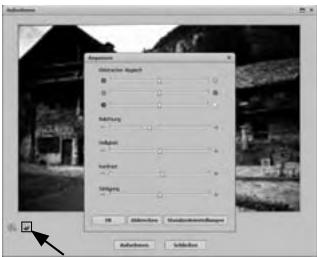
Click on to increase the corresponding value and on to decrease the corresponding value.
Use the slide controller to adjust the electrical balance (Colour balance).
Example: If the image has a too high proportion of blue, this can be reduced by increasing the yellow component.
Click on the "OK" button to accept the setting and return to the "Capture" window.
Press the SCAN 2 button on the device or click on the "Capture" button. The image will be scanned and be displayed in the scan field.
Repeat this procedure to scan additional images.
After Use
Remove the film holder 5 by pushing it completely through the appliance.
Remove the slide magazine 6 by pulling it back out of the insert slot 3.
Remove the USB cable 4 from the USB port of your computer.
Cleaning
Safety instructions
IMPORTANT
Possible damage to the device
Penetrating moisture can lead to damaging of the device.
Make sure when you are cleaning the device that no moisture gets inside in order to avoid irreparable damage to it.
Cleaning
Clean the housing exclusively with a soft damp cloth and a mild dishwashing liquid.
Clean the surface of the scanner lens inside of the device with a cleaning brush ⑦. For this, push the cleaning brush with the cleaning surface facing downwards only into the right slot ③.
Troubleshooting
In this chapter you will receive important information for malfunction localization and remedies. Observe the instructions in order to avoid danger and damage.
Safety instructions
WARNING
Observe the following safety information to avoid danger and property damage:
Repairs to electronic devices may only be carried out by specialists who have been trained by the manufacturer. Considerable danger to the consumer and damage to the device can occur as a result of incorrect repairs.
Malfunction causes and remedies
The following table will help with localizing and remedying minor malfunctions:
| Malfunction | Possible cause | Solution |
| LED PWR ① does not light up | The device is not connected correctly. | Connect the device. |
| Poor image quality | Dust on the scanner lens. | Clean the scanner lens. |
| Dust on the film and/or the slide | Clean the film and/or the slide. |
NOTICE
If you cannot solve the problem with the aforementioned methods please contact customer service.
Storage/Disposal
Storage
Store the device in a dry environment.
Disposal of the device


Do not dispose of the device in your normal domestic waste. This product is subject to the European directive 2002/96/EC-WEEE (Waste Electrical and Electronic Equipment).
Dispose of the device through an approved disposal centre or at your community waste facility. Observe the currently applicable regulations. In case of doubt, please contact your waste disposal centre.
GB
Appendix
Technical data
| Interface | USB 2.0 | |
| Operating temperature | +5 - +40 | °C |
| Humidity (no condensation) | 5 - 90 | % |
| Measurements (W x H x D) | 9.6 x 16.9 x 10.5 | cm |
| Weight (without accessories) | approx. 540 | g |
| Image sensor | 1/2.5" CMOS-Sensor (5 038 848 Pixel) | |
| Lens | F=6.0, 4 Glass components, half field angle 15° | |
| Image repeat rate | 2 | fps |
| Focusing range | Fixed focus | |
| Brightness control | automatic | |
| Colour adjustment | automatic | |
| Resolution (interpolated) | 3600 | dpi |
| Data converting | 10 bit per colour channel | |
| Scan method | Single pass | |
| Light source | Backlighting (3 white LEDs) | |
Note regarding the conformity declaration
This device complies regarding conformity with the basic requirements and other relevant provisions of the directive for electromagnetic compatibility 2004/108/EC.
The complete original declaration of conformity can be obtained from the importer.
CE
GB
Warranty
You receive a 3-year warranty for this device as of the purchase date. This device has been manufactured with care and meticulously examined before delivery.
Please retain your receipt as proof of purchase. In the case of a warranty claim, please get in touch, by telephone, with our service department. Only in this way can a post-free despatch for your goods be assured.
NOTICE
The warranty is valid only for material or manufacturing defects and not for transportation damage, wear and tear or for damages to breakable parts such as switches or power packs.
This product is for private use only and is not intended for commercial applications. In the event of misuse and improper handling, use of force and interference not carried out by our authorized service branch, the warranty will become void.
Your statutory rights are not restricted in any way by this warranty. The guarantee period will not be extended by the warranty. This also applies to replacement and repaired parts.
Damages and defects possibly present at time of purchase must be reported immediately after unpacking or at the latest two days after the purchase date. After expiration of the guarantee period incidental repairs are liable to costs.
Service

Service Great Britain
Tel.: 0871 5000 720 (£ 0.10/Min.)
E-Mail: kompernass@lidl.co.uk
IAN73761
Importer
KOMPERNASS GMBH
BURGSTRASSE 21
44867 BOCHUM, GERMANY
www.kompernass.com
KOMPERNASS GMBH
Burgstraße 21
D-44867 Bochum
www.kompernass.com