
ICM 220 A1 - Ice maker SILVERCREST - Free user manual and instructions
Find the device manual for free ICM 220 A1 SILVERCREST in PDF.
| Product type | Ice cube maker |
| Brand | SilverCrest |
| Model | ICM 220 A1 |
| Daily ice production | approx. 20 kg / 24 h |
| Water tank capacity | approx. 2.5 L |
| Ice cube size | Small and large (selectable) |
| Power supply | 220–240 V~, 50 Hz |
| Power consumption | 220 W |
| Rated current | 1.8 A |
| Refrigerant | R600a (isobutane) – 30 g |
| Climate class | SN/N |
| Dimensions (W × D × H) | approx. 30 × 25 × 35 cm (estimate) |
| Weight | approx. 7 kg (estimate) |
| Self-cleaning function | Yes |
| Automatic shut-off | When the tank is empty or the basket is full |
| Recommended ambient temperature | +10 to +25 °C |
| Recommended water temperature | +8 to +25 °C |
| Water type | Drinking water only |
| Water tank cleaning | Every 10 hours of use |
| Materials | Plastic, stainless steel (estimated) |
| Package contents | Ice cube maker, ice scoop, instruction manual |
| Warranty | 3 years |
| Customer service France | 0800 904 879 |
Frequently Asked Questions - ICM 220 A1 SILVERCREST
User questions about ICM 220 A1 SILVERCREST
0 question about this device. Answer the ones you know or ask your own.
Ask a new question about this device
Download the instructions for your Ice maker in PDF format for free! Find your manual ICM 220 A1 - SILVERCREST and take your electronic device back in hand. On this page are published all the documents necessary for the use of your device. ICM 220 A1 by SILVERCREST.
USER MANUAL ICM 220 A1 SILVERCREST
Operation and safety notes
FR BE
FABRIQUEÀGLACONS
Warnings and symbols used
Introduction
Intended use. 19
Scope of delivery. 19
Description of parts. 19
Technical data 19
Safety instructions. Page 20
Before first use. 23
Operation. 23
Filling the water tank. 23
Making ice cubes. 23
Refilling the water tank. 24
Self-cleaning function. 24
Draining water from the water reservoir.. 24
Troubleshooting 25
Cleaning and care 26
Storage 26
Transportation 26
Disposal. 27
Warranty 28
Warranty claim procedure.. 28
Service 28
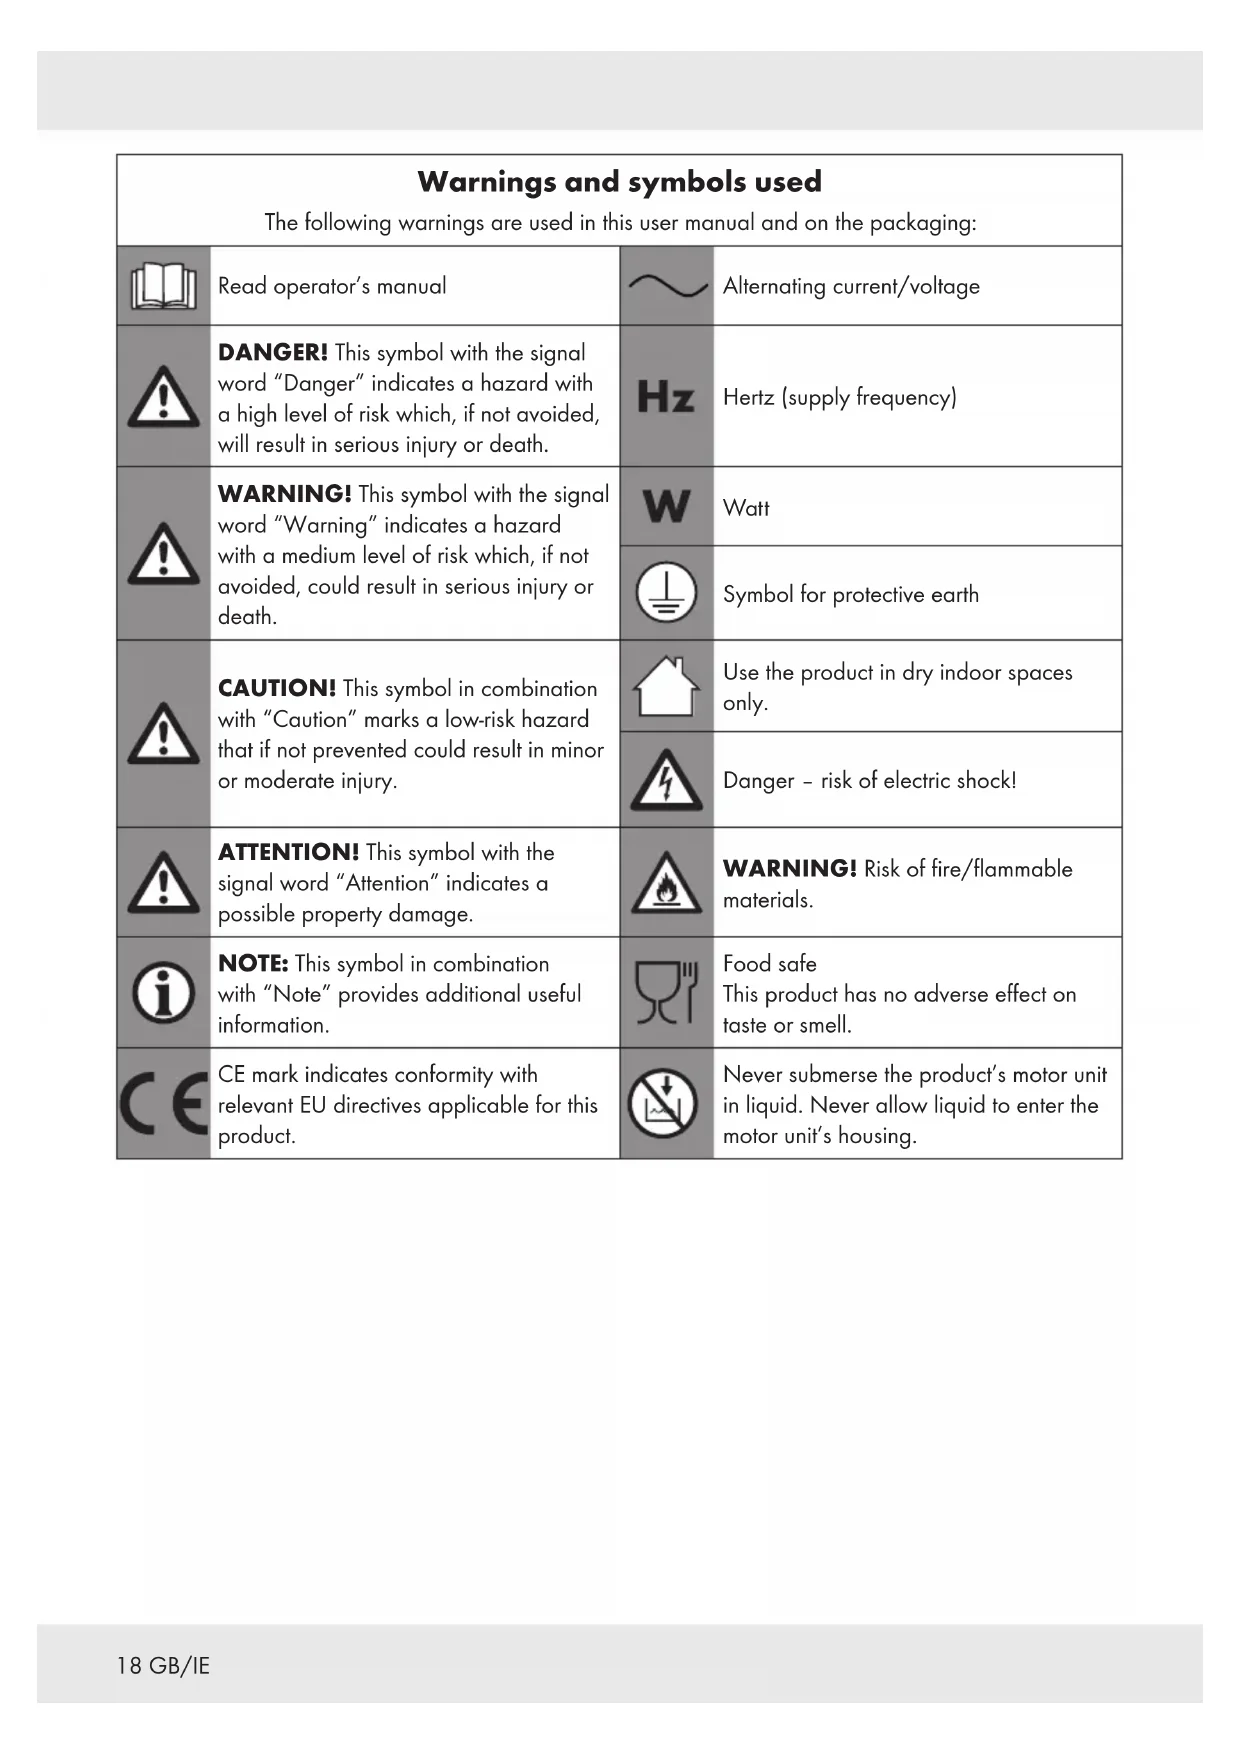
| Warnings and symbols used The following warnings are used in this user manual and on the packaging: | |||
| Read operator's manual | ~ | Alternating current/voltage | |
| DANGER! This symbol with the signal word "Danger" indicates a hazard with a high level of risk which, if not avoided, will result in serious injury or death. | Hz | Hertz (supply frequency) | |
| WARNING! This symbol with the signal word "Warning" indicates a hazard with a medium level of risk which, if not avoided, could result in serious injury or death. | W | Watt | |
| Symbol for protective earth | |||
| CAUTION! This symbol in combination with "Caution" marks a low-risk hazard that if not prevented could result in minor or moderate injury. | Use the product in dry indoor spaces only. | ||
| Danger - risk of electric shock! | |||
| ATTENTION! This symbol with the signal word "Attention" indicates a possible property damage. | WARNING! Risk of fire/flammable materials. | ||
| NOTE: This symbol in combination with "Note" provides additional useful information. | Food safe This product has no adverse effect on taste or smell. | ||
| CE | CE mark indicates conformity with relevant EU directives applicable for this product. | Never submerse the product's motor unit in liquid. Never allow liquid to enter the motor unit's housing. | |
ICE MAKER
Introduction
We congratulate you on the purchase of your new product. You have chosen a high quality product. The instructions for use are part of the product. They contain important information concerning safety, use and disposal. Before using the product, please familiarise yourself with all of the safety information and instructions for use. Only use the product as described and for the specified applications. If you pass the product on to anyone else, please ensure that you also pass on all the documentation with it.
Intended use
This product can be used for making small or large ice cubes from drinking water.
The product is only intended for private household use, not for commercial purposes.
The manufacturer accepts no liability for damages caused by improper use.
Scope of delivery
After unpacking the product, make sure that the product is in orderly condition. Remove all packaging materials before use.
1x Ice maker
1x Ice scoop
1x Instruction manual
Description of parts
Before reading, unfold the page containing the illustrations and familiarise yourself with all the functions of the product.
1 (cleaning button)
2 (ice cube size selection button)
3 (start/stop button)
4Display with (ice bar)
5Water tank cover
6Water tank
7Power cord with power plug
8Drain cap
9icebasket
10Water reservoir
11 Spray pipe
12 Ice scoop
Technical data
Input voltage: 220-240 V , 50Hz
Power consumption: 220 W, 1.8 A
Daily ice output: approx. 20kg / 24h
Water tank 6 volume: approx. 2.5 L
Dimensions (W× D× H) .. 35.7× 28.9× 35.2cm
Refrigerant: R600a
Weight of refrigerant: approx. 30g
Climate class: SN/N

Safety instructions
BEFORE USING THE PRODUCT,
PLEASE FAMILIARISE
YOURSELF WITH ALL OF
THE SAFETY INFORMATION
AND INSTRUCTIONS FOR
USE! WHEN PASSING THIS
PRODUCT ON TO OTHERS,
PLEASE ALSO INCLUDE ALL THE
DOCUMENTS!
In the case of damage resulting from non-compliance with these operating instructions the warranty claim becomes invalid! No liability is accepted for consequential damage! In the case of material damage or personal injury caused by incorrect handling or non-compliance with the safety instructions, no liability is accepted!

WARNING! RISK OF LOSS OF LIFE OR ACCIDENT TO INFANTS AND CHILDREN!
Never leave children unsupervised with the packaging material. The packaging material represents a danger of suffocation.
Children frequently underestimate the dangers. Always keep children away from the packaging material.
This product can be used by children aged from 8 years and above and persons with reduced physical, sensory or mental capabilities, or lack of experience and knowledge if they have been given supervision or instruction concerning use of the product in a safe way and understand the hazards involved.
Children shall not play with the product.
- Cleaning and user maintenance must not be performed by children without supervision.
WARNING! When positioning the product, ensure the supply cord is not trapped or damaged.
WARNING! Do not locate multiple portable socket-outlets or portable power supplies at the rear of the product.
WARNING! Fill with potable water only.
WARNING! Keep ventilation openings, in the product enclosure or in the built-in structure, clear of obstruction.
WARNING! Do not use mechanical devices or other means to accelerate the defrosting process, other than those recommended by the manufacturer.
WARNING! Do not use electrical appliances inside the food storage compartments of the product, unless they are of the type recommended by the manufacturer.
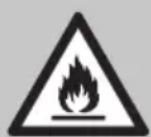
WARNING! Risk of fire/flammable materials!
This product contains a small amount of isobutane as a refrigerant (R600a). Isobutane is a natural and environmentally sound gas that is flammable. In the event of a leak, pull out the power plug, avoid any open flames or sources of ignition, ventilate the room where the product is located and contact the customer service.
This product contains an insulating foam made of Cyclopentane. This foam is flammable.
- Keep ventilation openings in the product enclosure. The product requires a free space of approx. 15cm on all sides.
If the supply cord is damaged, it must be replaced by the manufacturer, its service agent or similarly qualified persons in order to avoid a hazard.
This product is intended to be used in household and similar applications such as:
- staff kitchen areas in shops, offices and other working environments.
-farmhouses and by clients in hotels, motels and other residential type environments
-bed and breakfast type environments.
-catering and similar non-retail applications.
Do not place the product on or near a hot gas or electric burner, in a heated oven or near any other heat sources.
- Do not use the product with an external timer or a separate remote control system.
Never insert any objects into the housing.
To protect against risk of electric shock, do not pour water on power cord, power plug and ventilation, immerse the product in water or any other liquid.
ATTENTION! Risk of product damage! Do
switch on the start/stop button frequently (ensure 5 minute interval at least).
WARNING! Do not store explosive substances such as aerosol cans with a flammable propellant in this product.
The surface temperature of the ventilation and surrounding area can be very high when working.
Ice cubes have sharp edges as they melt. Do not to put ice in your mouth to prevent mouth injury.
Before first use
Remove the packing materials.
Check that all parts are included (Fig. A, B).
Clean the product and its accessories (see "Cleaning and care").
Place the product on an easily accessible, level, dry and sufficiently stable work surface. Reserve approx. 15cm space on the top, sides and back to ensure proper ventilation.
Wait for 2 hours before you use the product after transportation.
- Keep the water tank cover 5 open for at least 2 hours before you use the product.
Push the drain cap 8 into the drain opening.
Operation
Filling the water tank
① NOTES:
The drain cap 8 has to be pushed into the drain opening (Fig. D, 2) before filling the water tank 6 with water.
Do not exceed the MAX water level mark (Fig. C).
Do not fill the water tank 6 with hot water.
Open the water tank cover 5.
Remove the water tank 6
Fill the water tank 6 with fresh water. Do not exceed the MAX water level mark (Fig. C).
Put the water tank 6 back into the product.
Close the water tank cover 5.
Making ice cubes
① NOTES:
The ice cubes made in the first 3 cycles may be small and irregular in size.
The ice cubes may appear cloudy due to the fast rate of freezing, but the quality or taste of the ice is not affected.
At an ambient temperature of +25^, the ice cube making process takes as follows:
Cycle Ice cube size Processing time
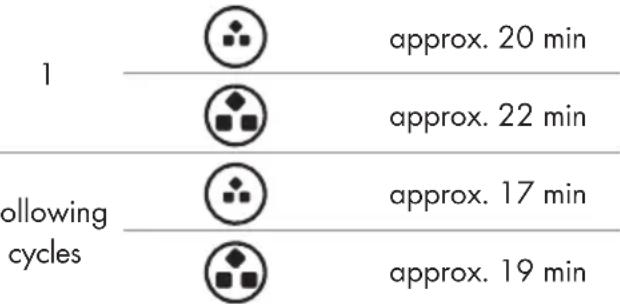
Do not use the product without the ice basket in place.
Change the water in the water tank 6 every 10 hours to ensure the ice is clean.
- Remove ice cubes after every 2 to 3 cycles. Otherwise the ice cubes start melting. The ice basket 9 is not refrigerated.
① NOTES:
The ambient temperature should be between +10 to +25^ .
The water temperature should be between +8 to +25^ .
- Connect the power plug 7 to a power outlet. The display 4 lights up. The product emits a signal sound. The product is in standby mode.
Select the ice cube size: By default the large ice cube size is set. 3 is shown on the display 4. Press 2 to select the small ice cube size. 5 is shown on the display 4.
Press 3 to start making ice cubes. The product emits a signal sound. 4 is flashing. The product starts.
The ice cubes are formed and dropped into the ice basket 9.
Press 3 to stop making ice cubes. The product emits a signal sound. 4 stops flashing. The product stops.
Pull out the ice basket 9. Remove the desired amount of ice cubes from the ice basket 9 using the ice scoop 12.
Put the ice basket 9 back into the product.
Press 3 to start making ice cubes. The product emits a signal sound. The product starts.
Press 3 to stop making ice cubes, once you are finished. The product emits a signal sound. 4 stops flashing. The product stops.
① NOTE: Remove all ice cubes from the product before you remove the power plug from the power outlet.
Remove the power plug 7 from the power outlet.
① NOTES:
If is shown on the display 4, the ice basket 9 is full. The product stops operating.
Remove the ice from the ice basket 9.
The cycle should resume automatically. If this is not the case, press 3 to continue making ice cubes.
Refilling the water tank
NOTE: If 4 is shown on the display, the water level is too low. The product stops operating.
Add fresh water to the water tank (see "Filling the water tank").
Press 3 2x to continue making ice cubes.
Self-cleaning function
NOTES:
If there is a power failure due to disconnecting the power cord or switching off the product, the formed ice may remain on the ice grid.
Use the self-cleaning function to remove the ice.
In standby mode, press 1 to start the self-cleaning process.
Wait for approx. 5 minutes until the self-cleaning process is completed.
Press 3 to start making ice cubes. The product emits a signal sound. The product starts.
Draining water from the water reservoir
NOTE: Drain the water from the water reservoir [10] latest after 10 hours. Otherwise germs can form inside the product.
Place a container underneath the drain opening. The container has to be large enough to hold the expected amount of water.
Pull out the drain cap 8 of the drain opening (Fig. D, 1).
The water from the water reservoir 10 is drained into the container.
Use a dry clean cloth to wipe off the water reservoir [10]. Let the water reservoir dry completely.
Push the drain cap 8 firmly back into the drain opening (Fig. D, 2).
Troubleshooting
Problem Cause Solution
| The product shows no function. | The power plug 7 is not connected to a suitable power outlet. | Connect the power plug 7 to a suitable power outlet. |
| 4 is shown on the display 4. The product stops operating. | The water level is too low for making ice cubes. | Refill the water tank 6. Press 3 to continue making ice cubes. |
| 4 is shown on the display 4. The product stops operating. | The ice basket 9 is full. | Remove the ice from the ice basket 9. The cycle should resume automatically. If this is not the case, press 3 to continue making ice cubes. |
| The ice cubes stick together. | The water temperature in the water tank 6 is too low. | Drain the water from the water tank 6. Refill the water tank 6 with water at a temperature between +8 to +25 °C. |
| The ice making cycle is normal but no ice is formed. | The ambient temperature or water temperature is too high. | The ambient temperature should be between +10 to +25 °C. The water temperature should be between +8 to +25 °C. |
| The refrigerant leaks or the spray pipe 11 is blocked. The compressor or the fan motor are damaged. | Clean the spray pipe 11 (see "Cleaning and care"). Contact the customer service for assistance. | |
| The ice cubes made are too small. | The wrong ice cube size was chosen. | Press 2 to change the ice cube size. The ambient temperature should be between +10 to +25 °C. The water temperature should be between +8 to +25 °C. |
Cleaning and care
WARNING! Risk of electric shock!
Before cleaning or maintaining the product: Disconnect the power plug 7 from the power outlet.
WARNING! Risk of electric shock!
Do not immerse the product in water or other liquids. Never hold the product under running water.
① NOTES:
Do not use any abrasive, aggressive cleaners to clean the product.
Do not use boiling water to clean the product.
Let the product rest until it reaches the ambient temperature.
Use the self-cleaning function to clean the inside of the product (see "Self-cleaning function").
Remove and empty the water tank 6 and the ice basket 9.
Clean the water tank 6, the ice basket 9 and the ice scoop 12 with warm water and a mild cleaning detergent. Rinse with clear water.
Drain the water from the water reservoir [10] (see "Draining water from the water reservoir").
Clean the water reservoir with a slightly damp cloth. Use a dry clean cloth to wipe off the water reservoir.
Clean the product enclosure with a slightly damp cloth. If necessary, use cleaning detergent.
If the spray pipe 11 hole is blocked:
-
Remove the spray pipe [1] from the product (Fig. E, 1).
Clean the spray pipe 11 with warm water and a mild cleaning detergent. Rinse with clear water. -
Place the spray pipe [11] in the original position inside the product (Fig. E, 2).
Use a dry cloth to wipe off all parts of the product.
After cleaning: Allow all parts to dry completely.
Storage
-
Allow the product to dry completely before storing it.
Store the product in a dry and clean place. -
Close the water tank cover 5 when storing the product. Otherwise dust can collect in the product and contaminate the next ice cubes.
Transportation
- Do not tilt the product at an 45^ angle or turn it upside down during transportation. This may damage the compressor and seal system.
Rest the product at least 2 hours after transportation.

Disposal
The packaging is made entirely of recyclable materials, which you may dispose of at local recycling facilities.

Observe the marking of the packaging materials for waste separation, which are marked with abbreviations (a) and numbers (b) with following meaning: 1-7: plastics / 20-22: paper and fibreboard / 80-98: composite materials.

The product and packaging materials are recyclable, dispose of it separately for better waste treatment.
The Triman logo is valid in France only.

Contact your local refuse disposal authority for more details of how to dispose of your worn-out product.

To help protect the environment, please dispose of the product properly when it has reached the end of its useful life and not in the household waste. Information on collection points and their opening hours can be obtained from your local authority.
The refrigerant (R600a) used in this product must be disposed of with the appropriate care. You can obtain further information from your local disposal company or the city or local authority.
This product contains an insulating foam made of Cyclopentane. This foam is flammable. At the end of the product's life, the product must be disposed of in a suitable place. If in doubt, contact your waste disposal centre.
Warranty
The product has been manufactured to strict quality guidelines and meticulously examined before delivery. In the event of product defects you have legal rights against the retailer of this product. Your legal rights are not limited in any way by our warranty detailed below.
The warranty for this product is 3 years from the date of purchase. The warranty period begins on the date of purchase. Please keep the original sales receipt in a safe location. This document is required as your proof of purchase.
Should this product show any fault in materials or manufacture within 3 years from the date of purchase, we will repair or replace it - at our choice - free of charge to you. This warranty becomes void if the product has been damaged, or used or maintained improperly.
The warranty applies to defects in material or manufacture. This warranty does not cover product parts subject to normal wear, thus possibly considered consumables (e.g. batteries) or for damage to fragile parts, e.g. switches, rechargeable batteries or glass parts.
Warranty claim procedure
To ensure quick processing of your case, please observe the following instructions:
Please have the till receipt and the item number (IAN 400463_2107) available as proof of purchase.
You will find the item number on the rating plate, an engraving, on the front page of the instructions for use (bottom left), or as a sticker on the rear or bottom of the product.
If functional or other defects occur, please contact the service department listed either by telephone or by e-mail.
You can return a defective product to us free of charge to the service address that will be provided to you. Ensure that you enclose the proof of purchase (till receipt) and information about what the defect is and when it occurred.
Service
GB Service Great Britain
Tel.:08000569216
E-Mail: owim@lidl.co.uk
IE Service Ireland
Tel.:1800200736
E-Mail:owim@lidl.ie

Pooblasceni serviser:
OWIM GmbH & Co. KG
Stiftsbergstraße 1
74167 Neckarsulm
NEMCIJA
Servisna telefonska stevilk: 080082034