
Shire PRF0119823A - Range hood ELICA - Free user manual and instructions
Find the device manual for free Shire PRF0119823A ELICA in PDF.
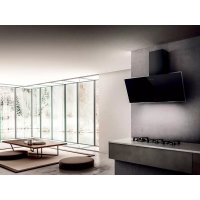


| Product type | Range hood |
| Brand | Elica |
| Model | Shire PRF0119823A |
| Usage | External evacuation or internal recirculation (with charcoal filter) |
| Control types | Touch (5 keys) or mechanical (buttons or knob) depending on version |
| Number of speeds | 3 speeds + intensive function (5 minutes) |
| Lighting | LED or halogen (depending on version) |
| Grease filter | Metal, dishwasher safe or hand washable |
| Charcoal filter | Active, replacement recommended every 4 months |
| Filter saturation alarm | Yes (for grease and charcoal filters, depending on version) |
| Programmed shutdown | Yes, 3 minutes |
| Minimum safety distance | 55 cm (electric cooking) / 70 cm (gas or mixed cooking) |
| Evacuation diameter | To be adapted according to connection flange (not supplied) |
| Max number of burners | 6 |
| Safety | Electrical disconnection before maintenance; use by children ≥8 years with supervision |
| Cleaning | Damp cloth and neutral detergent; do not use alcohol or abrasives |
| Repairability | Replacement of lamps possible (LED or G4 halogen) |
| Compliance | WEEE Directive 2012/19/EU, EN/IEC 60335, 61591, etc. |
Frequently Asked Questions - Shire PRF0119823A ELICA
User questions about Shire PRF0119823A ELICA
0 question about this device. Answer the ones you know or ask your own.
Ask a new question about this device
Download the instructions for your Range hood in PDF format for free! Find your manual Shire PRF0119823A - ELICA and take your electronic device back in hand. On this page are published all the documents necessary for the use of your device. Shire PRF0119823A by ELICA.
USER MANUAL Shire PRF0119823A ELICA
EN Instruction on mounting and use
EN - Instruction on mounting and use
Closely follow the instructions set out in this manual. All responsibility, for any eventual inconveniences, damages or fires caused by not complying with the instructions in this manual, is declined. This appliance is intended to be used in household and similar applications such as: - staff kitchen areas in shops, offices and other working environments; - farm houses; - by clients in hotels, motels and other residential type environments; - bed and breakfast type environments.
The hood can look different to that illustrated in the drawings in this booklet. The instructions for use, maintenance and installation, however, remain the same.
! It is important to conserve this booklet for consultation at any moment. In the case of sale, cession or move, make sure it is together with the product. ! Read the instructions carefully: there is important information about installation, use and safety. ! Do not carry out electrical or mechanical variations on the product or on the discharge conduits. ! Before proceeding with the installation of the appliance verify that there are no damaged all components. Otherwise contact your dealer and do not proceed with the installation.
Note: the elements marked with the symbol (*) are optional accessories supplied only with some models or elements to purchase, not supplied.

Caution
Before any cleaning or maintenance operation, disconnect hood from the mains by removing the plug or disconnecting the mains electrical supply.
Always wear work gloves for all installation and maintenance operations.
This appliance can be used by children aged from 8 years and above and persons with reduced physical, sensory or mental capabilities or lack of experience and knowledge if they have been given supervision or instruction concerning use of the appliance in a safe way and understand the hazards involved.
Children shall not be allowed to tamper with the controls or play with the appliance.
Cleaning and user maintenance shall not
be made by children without supervision.
The premises where the appliance is installed must be sufficiently ventilated, when the kitchen hood is used together with other gas combustion devices or other fuels.
The hood must be regularly cleaned on both the inside and outside (AT LEAST ONCE A MONTH).
This must be completed in accordance with the maintenance instructions provided. Failure to follow the instructions provided regarding the cleaning of the hood and filters will lead to the risk of fires.
Do not flambé under the range hood.
The use of exposed flames is detrimental to the filters and may cause a fire risk, and must therefore be avoided in all circumstances.
Any frying must be done with care in order to make sure that the oil does not overheat and ignite.
CAUTION: Accessible parts of the hood may become hot when used with cooking appliances.
For lamp replacement use only lamp type indicated in the Maintenance/Replacing lamps section of this manual.
WARNING! Do not connect the appliance to the mains until the installation is fully complete.
With regards to the technical and safety measures to be adopted for fume discharging it is important to closely follow the regulations provided by the local authorities.
The air must not be discharged into a flue that is used for exhausting fumes from appliance burning gas or other fuels.
Do not use or leave the hood without the lamp correctly mounted due to the possible risk of electric shocks.
Never use the hood without effectively mounted grids.
The hood must NEVER be used as a support surface unless specifically indicated.
Use only the fixing screws supplied with the product for installation or, if not supplied, purchase the correct screws type.
Use the correct length for the screws which are identified in the Installation Guide.
In case of doubt, consult an authorised service assistance centre or similar qualified person.
WARNING! Failure to install the screws or fixing device in accordance with these instructions may result in electrical hazards.
Do not use with a programmer, timer, separate remote control system or any other device that switches on automatically.
This appliance is marked according to the European directive 2012/19/EC on Waste Electrical and Electronic Equipment (WEEE). By ensuring this product is disposed of correctly, you will help prevent potential negative consequences for the environment and human health, which could otherwise be caused by inappropriate waste handling of this product.
The symbol on the product, or on the documents accompanying the product, indicates that this appliance may not be treated as household waste. Instead it should be taken to the appropriate collection point for the recycling of electrical and electronic equipment. Disposal must be carried out in accordance with local environmental regulations for waste disposal.
For further detailed information regarding the process, collection and recycling of this product, please contact the appropriate department of your local authorities or the local department for household waste or the shop where you purchased this product.
Appliance designed, tested and manufactured according to:
- Safety: EN/IEC 60335-1; EN/IEC 60335-2-31, EN/IEC 62233.
- Performance: EN/IEC 61591; ISO 5167-1; ISO 5167-3; ISO 5168; EN/IEC 60704-1; EN/IEC 60704-2-13; EN/IEC 60704-3; ISO 3741; EN 50564; IEC 62301.
- EMC: EN 55014-1; CISPR 14-1; EN 55014-2; CISPR 14-2; EN/IEC 61000-3-2; EN/IEC 61000-3-3. Suggestions for a correct use in order to reduce the environmental impact: Switch ON the hood at minimum speed when you start cooking and kept it running for few minutes after cooking is finished. Increase the speed only in case of large amount of smoke and vapour and use boost speed(s) only in extreme situations. Replace the charcoal filter(s) when necessary to maintain a good odour reduction efficiency. Clean the grease filter(s) when necessary to maintain a good grease filter efficiency. Use the maximum diameter of the ducting system indicated in this manual to optimize efficiency and minimize noise.
Use
The hood is designed to be used either for exhausting or filter version.

Ducting version
In this case the fumes are conveyed outside of the building by means of a special pipe connected with the connection ring located on top of the hood.
Attention! The exhausting pipe is not supplied and must be purchased apart.
Diameter of the exhausting pipe must be equal to that of the connection ring.
Attention! If the hood is supplied with active charcoal filter,
then it must be removed.
Connect the hood and discharge holes on the walls with a diameter equivalent to the air outlet (connection flange).
Using the tubes and discharge holes on walls with smaller dimensions will cause a diminution of the suction performance and a drastic increase in noise.
Any responsibility in the matter is therefore declined.
! Use a duct of the minimum indispensable length. ! Use a duct with as few elbows as possible (maximum elbow angle: 90°). ! Avoid drastic changes in the duct cross-section.

Filter version
The aspirated air will be degreased and deodorised before being fed back into the room.
In order to use the hood in this version, you have to install a system of additional filtering based on activated charcoal.
Installation
Fig. 3
The minimum distance between the supporting surface for the cooking equipment on the hob and the lowest part of the range hood must be not less than 55 cm from electric cookers and 70 cm from gas or mixed cookers.
If the instructions for installation for the gas hob specify a greater distance, this must be adhered to.
As described in the installation drawings perform 6 holes (8 mm diameter, 40 mm deep), in the positions shown in the drilling template, to fix the hood support bracket and the exhaust flue. After installation, check that the hood and exhaust flue are perfectly aligned.
The range hood is intended to be installed over a hob having 6 heating elements.

Electrical connection
The mains power supply must correspond to the rating indicated on the plate situated inside the hood. If provided with a plug, connect the hood to a socket in compliance with current regulations and positioned in an accessible area after installation. If it is not fitted with a plug (direct mains connection) or if the plug is not located in an accessible area after installation, apply a double pole switch in accordance with standards which assures the complete disconnection of the mains under conditions relating to over-current category III, in accordance with installation instructions.
Warning! Before re-connecting the hood circuit to the mains supply and checking the efficient function, always check that the mains cable is correctly assembled.
Warning! If the supply cord is damaged, it must be replaced by the manufacturer, its service agent or similarly qualified persons in order to avoid hazard.
Mounting
Before beginning installation:
- Check that the product purchased is of a suitable size for the chosen installation area.
- Remove the charcoal (*) filter/s if supplied (see also relative paragraph). This/these is/are to be mounted only if you want to use the hood in the filtering version.
- Check (for transport reasons) that there is no other supplied material inside the hood (e.g. packets with screws (), guarantees (), etc.), eventually removing them and keeping them.
Expansion wall plugs are provided to secure the hood to most types of walls/ceilings. However, a qualified technician must verify suitability of the materials in accordance with the type of wall/ceiling. The wall/ceiling must be strong enough to take the weight of the hood. Do not tile, grout or silicone this appliance to the wall. Surface mounting only.
Operation
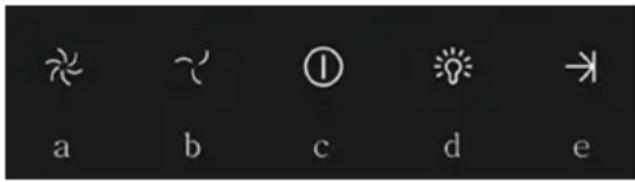
Model with 5-key keyboard
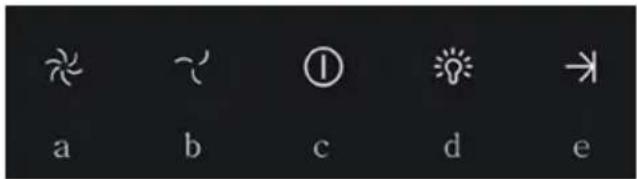
To select the functions of the hood, simply touch the commands:
a. Button to increase suction speed (power):
Suction speed (power) 1
Suction speed (power) 2
Suction speed (power) 3
Note: suction speed (power) 3 is timed; after approximately 5 minutes, the hood returns to suction speed (power) 2.
b. Button to decrease suction speed (power). c. Button ON/OFF hood. d. Button ON/OFF lighting. e. Button ON/OFF programmed switching off: it programs switching off of the active suction speed (power) after approximately 3 minutes.
Models with mechanical control panel
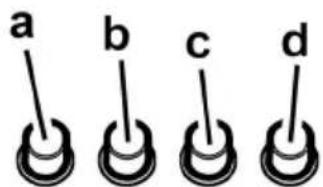
a. ON/OFF light switch. b. Speed 1/OFF switch. c. 2-speed selection. d. 3-speed selection.
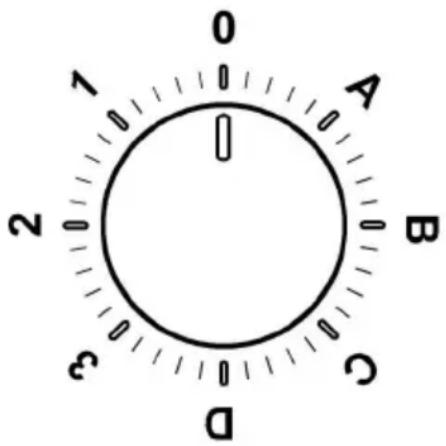
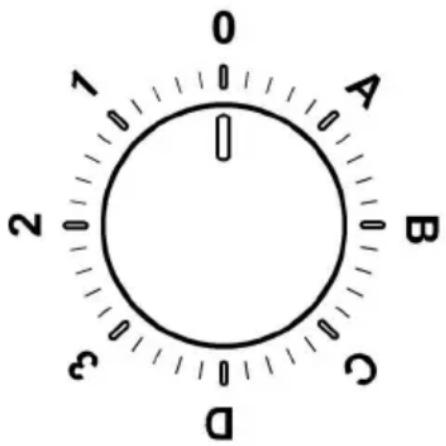
Models with knob
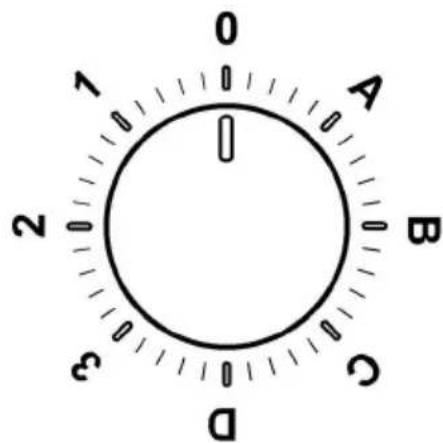
| 0 | OFF |
| 1 | Speed 1 Light OFF |
| 2 | Speed 1 Light OFF |
| 3 | Speed 1 Light OFF |
| A | Light ON |
| B | Speed 1 Light ON |
| C | Speed 1 Light ON |
| D | Speed 1 Light ON |
Control panel with 6 buttons
To select the functions of the hood, just touch the commands.

Light key ON/OFF

Intensive speed selection key (suction power) - duration 5 minutes: the hood sets this power and at the end of the 5 minutes returns to the previous setting.

High-speed selection key (suction power).

Medium-speed selection key (suction power) - when flashing, it indicates the need to wash or replace the carbon filter. This signal is normally deactivated. To activate the alarm, disable the electronic by pressing the 0 button for 3 seconds.
Next, simultaneously press buttons 1 and 2 for 3 seconds; at first, only button 1 will flash, then both buttons 1 and 2 will flash to indicate activation. Repeat the procedure to deactivate the alarm; at first buttons 1 and 2 will flash and subsequently only button 1 to indicate deactivation.

Low-speed selection key (suction power) - when flashing, it indicates the need to wash the fats filter.

Motor key OFF (stand by) - excludes the electronics - reset wash/replace filters signals. MOTOR OFF
Press briefly to switch the motor off.
RESET FILTERS SIGNALS
In functioning mode, after carrying out filter maintenance, press the key until hearing the sound signal. The flashing LED 1 (grease filter) or 2 (carbon filter) stops flashing.
EXCLUDING THE ELECTRONICS
Press the key for 3 seconds. The hood command electronics will be excluded.
This function can be useful during the product cleaning operations.
Just repeat the operation to reinsert the electronics.
If the hood fails to operate correctly, briefly disconnect it from the mains power supply for almost 5 sec. by pulling out the plug. Then plug it in again and try once more before contacting the Technical Assistance Service.
Maintenance
Cleaning
Clean using ONLY the cloth dampened with neutral liquid detergent. DO NOT CLEAN WITH TOOLS OR
INSTRUMENTS. Do not use abrasive products. DO NOT USE ALCOHOL!
Grease filter
Fig. 11
Traps cooking grease particles.
The grease filter must be cleaned once a month using non-aggressive detergents, either by hand or in the dishwasher, which must be set to a low temperature and a short cycle. When washed in a dishwasher, the grease filter may discolor slightly, but this does not affect its filtering capacity.
To remove the grease filter, pull the spring release handle.
Charcoal filter (filter version only)
Fig. 12
It absorbs unpleasant odors caused by cooking.
The saturation of the charcoal filter occurs after more or less prolonged use, depending on the type of cooking and the regularity of cleaning of the grease filter.
In any case it is necessary to replace the cartridge at least every four months.
The charcoal filter may NOT be washed or regenerated.
Circular carbon filter
Apply one on each side as cover to both the shield grids of the motor impeller, then turn clockwise.
For the disassembly, turn counter-clockwise.
Replacing lamps
Fig. 10
Disconnect the appliance from the electricity.
Warning! Prior to touching the light bulbs ensure they are cooled down.
Replace the old light bulb with the one of the same type as specified in the feature label or near the light lamp on the hood.
- Using a flat head screwdriver or equivalent tool, carefully pry loose the light cover.
- Replace the damaged LED or halogen lamp, with one having the same characteristics, as specified in the label features or near the lamp:
LED lamp: For replacement, contact the technical service.
Halogen lamp: 12V - 20W max - G4 (take care not to touch them with your hands)
- Reinstall the light cover. (it will snap shut).
If the lights do not work, make sure that the lamps are fitted properly into their housings before you call for technical assistance.
MOTOR OFF button
Models with mechanical push-button panel
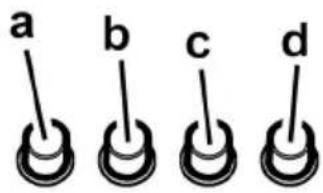
a. Light switch ON/OFF. b. Light switch OFF/speed 1 c. Speed selection 2 d. Speed selection 3
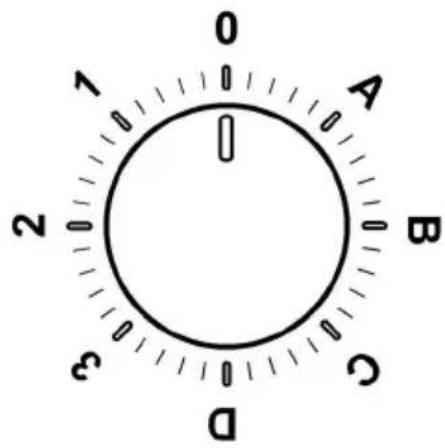
Models with knob
Control panel with 6 buttons
The device may be used by children aged 8 years and above.
This appliance can be used by children aged from 8 years and above and persons with reduced physical, sensory or mental capabilities or lack of experience and knowledge if they have been given supervision or instruction concerning use of the appliance in a safe way and understand the hazards involved.
Do not allow children to play with the device.
Cleaning and user maintenance shall not be made by children without supervision.
The appliance must be placed with sufficient ventilation when the aspirator is used simultaneously with gas or other fuel burning devices.
The aspirator must be cleaned frequently both inside and outside (at least once a month).
Follow the instructions for maintenance in the manual for maintenance!
Failure to follow the instructions for cleaning the aspirator and for replacing and cleaning the filters may lead to risk of fire.
It is strictly forbidden to use the appliance without the aspirator.
Using an open flame is harmful to the filters and may cause fire, therefore it must be avoided at all costs.
Frying food must be done under supervision, as overheated oil may catch fire.
WARNING: When the appliance is in operation, accessible parts may become hot.
To replace the lamps, use only those specified in the section "Replacement/Removal of lamps" as specified in this instruction manual.
Warning! Do not connect the device to the mains until the installation is completely finished.
Due to technical dimensions and safety measures that you must take for the exhaust of the fumes, we recommend that you strictly follow the rules set out in the regulations of the competent local authorities.
The appliance must not be connected to the flue used for exhausting fumes from gas or other fuel-burning appliances.
Do not use or leave the appliance without properly installed lamps due to the risk of electric shock.
Never use the appliance without a properly installed filter grille!
The appliance must never be used as a support surface unless this is specifically indicated.
When installing, use only the fixing screws supplied with the device or, if provided, purchase suitable screws. Use screws of the correct length, as indicated in the installation instructions. If in doubt, contact an authorized service center or qualified personnel.
WARNING! Failure to install the screws or the fixing device in accordance with these instructions may result in electrical hazards.
This product is subject to the provisions of the following directive:
- European Directive 2012/19/EC
- Waste Electrical and Electronic Equipment (WEEE).
Make sure that this product has been properly disposed of in accordance with the regulations for the protection of the environment and your health.

The symbol on the product or on its packaging indicates that this product must not be treated as household waste. Instead, it must be handed over to an appropriate collection point for the recycling of electrical and electronic equipment. By ensuring this product is disposed of correctly, you will help prevent potential negative consequences for the environment and human health, which could otherwise be caused by inappropriate waste handling. For more detailed information about recycling of this product, please contact your local city office, your household waste disposal service, or the shop where you purchased the product.
The appliance has been designed, tested, and manufactured in accordance with: - Safety: EN/IEC 60335-1; EN/IEC 60335-2-31, EN/IEC 62233. - Performance: EN/IEC 61591; ISO 5167-1; ISO 5167-3; ISO 5168; EN/IEC 60704-1; EN/IEC 60704-2-13; EN/IEC 60704-3; ISO 3741; EN 50564; IEC 62301. - EMC - Electromagnetic Compatibility: EN 55014-1; CISPR 14-1; EN 55014-2; CISPR 14-2; EN/IEC 61000-3-2; EN/IEC 61000-3-3. Recommendations for correct use to minimize impact on the environment: Turn on (ON) the aspir
ator at minimum speed when you start cooking and leave it running for a few minutes after cooking is finished. Increase the speed only in case of large amounts of smoke and steam, and use the boost speed only in extreme situations. Replace the grease filter/charcoal filter when necessary to maintain good filtration efficiency. Clean the grease filter/charcoal filter when necessary to maintain good filtration efficiency. Use the maximum diameter of the exhaust duct system, as indicated in your installation manual, to optimize efficiency and minimize noise.
The vacuum cleaner is intended for dry vacuuming and for filtering the exhaust air, simultaneously with the filter.

Vacuuming
The exhaust air hose is connected to the exhaust air connection.
The diameter of the exhaust air hose must correspond to the diameter of the exhaust air connection.
Attention! The exhaust air hose is not included in the accessories and must be purchased separately.
If the vacuum cleaner is equipped with a filter bag, the bag must be removed.
Connect the vacuum cleaner to the exhaust air hose and open the vent. The diameter of the hose must correspond to the diameter of the exhaust air connection.
Connecting to an exhaust air hose with a smaller diameter reduces the suction capacity and significantly increases the noise during operation.
In these cases, the manufacturer accepts no responsibility.
Use a hose of the required length. Use a hose with as few bends as possible (with a maximum bend of 90 degrees; do not sharply bend the hose!).

Filtering
The suction air is drawn in and filtered before it is returned to the room. To use the vacuum cleaner in this mode, you must install an additional filter system at the base of the filter with an active bag.
Mounting
Fig. 3
The distance between the surface on which the burners are placed and the lowest part of the cooker hood must be no less than 55 cm in the case of electric cookers, or no less than 70 cm in the case of gas or combined cookers.
If the instructions of the gas cooker manufacturer specify a greater distance, this must be respected.
Drill the holes in the wall, as indicated on the templates, (8 mm in diameter and 40 mm deep), while keeping to the markings on the template, in order to fix the hood and the support bracket for the chimney. After fixing, make sure that the hood and the chimney are perfectly aligned with each other.
The device is intended for installation above a gas cooker with a maximum output.

Electrical connection
The connection to the mains must correspond to the connection indicated on the rating plate of the hood, located on its inner side. If the hood is fitted with a plug, connect the hood to a socket that complies with the applicable standards, in an easily accessible place after installation. If it is not fitted with a plug (direct connection to the mains), or if the plug is not in an easily accessible place after installation, use a double-pole switch that complies with the standards, so that the mains can be completely disconnected under overvoltage category III, in accordance with the installation rules.
Warning! Before connecting the hood to the mains and checking that it works properly, check that the cable is installed correctly.
Warning! Replacement of the power cable must be carried out by an authorized technical service, to avoid any risk.
INSTALLATION
Before proceeding with the installation:
Make sure that the product you have purchased is of appropriate dimensions for the chosen installation location. Remove the filters/grilles with active carbon (if your model is equipped with them). To do this, follow the operations in the relevant paragraph. Install the filters/grilles again if you intend to use the hood in the recirculation version. Make sure that during transport no foreign objects, such as rags, lights, cardboard, etc., have entered the inside of the hood; if you find any, remove them and keep them.
For all this, we recommend that you consult a qualified technician to ensure that the supplied accessories are suitable for your needs. The wall, accordingly
the ceiling, must be sufficiently stable to withstand the load.
Method of use
Modulating impulse with button
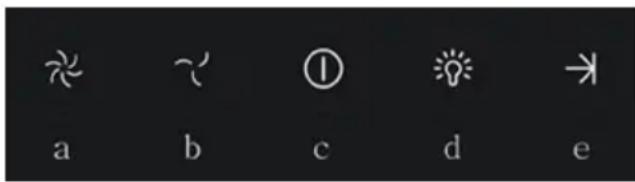
To set the device and get it ready for operation, follow the commands:
a. Button for increasing the speed (power) of suction:
1 - speed (power) of suction, 2 - speed (power) of suction, 3 - speed (power) of suction
Note: The 3rd speed (power) of suction is with a preset time interval and after approximately 5 minutes the aspirator automatically switches to the 2nd speed (power) of suction.
b. Button for decreasing the speed (power) of suction. c. ON/OFF button for the aspirator. d. ON/OFF button for the lighting. e. ON/OFF button for the programmed shutdown: used for programming the shutdown of the speed (power) of suction; it is activated after approximately 3 minutes.
Control buttons
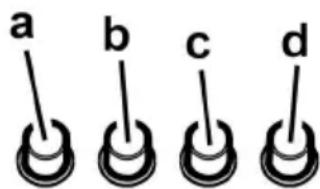
a. Press the lighting ON/OFF. b. Press OFF/speed 1. c. Select speed 2. d. Select speed 3.
Cover open
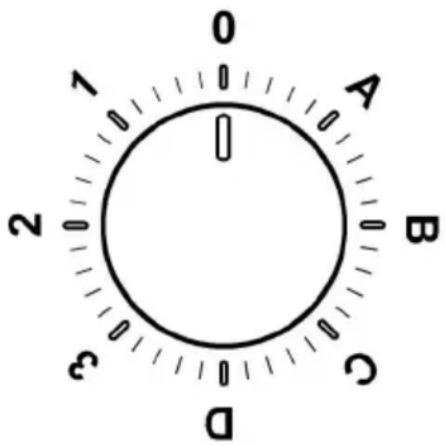
| 0 | OFF |
| 1 | 1-ва скорост Освetedlenке OFF |
| 2 | 2-раз скорost Освetedlenке OFF |
| 3 | 3-ва скорost Освetedlenке OFF |
| A | Освetedlenке ON |
| B | 1-ва скорost Освetedlenке ON |
| C | 2-раз скорost Освetedlenке ON |
| D | 3-ва скорost Освetedlenке ON |
Control panel with buttons
To select the desired operating mode, it is sufficient to press the corresponding button.

ON/OFF button for the lighting

Button for selecting the operating mode (gentle suction - intensive) - timer - 5 minutes: the aspirator operates at this power and after the 5th minute it switches to the previous power.

Button for selecting the operating mode (gentle suction - high)

Button for selecting the medium speed (power of suction) - when moving
Indicates that the filter with active carbon needs to be replaced or cleaned. By principle, this signal is inactive. To activate it, turn off the electronics by pressing the button and holding it for 3 seconds.
Press and hold buttons 1 and 2 simultaneously for 3 seconds. First, button 1 will light up, and then buttons 1 and 2 will light up simultaneously, which means the function is activated. To deactivate the signaling, repeat the operation. First, buttons 1 and 2 will light up, and then only button 1, which means the function is deactivated.

Button for selecting the operating mode (vacuum cleaner - floor). When it lights up, it means that it is necessary to clean the filter for fine dust.

OFF MOTORE button (stand by) - disconnects the electronics control of the signaling for filter cleaning / replacement.
OFF MOTORE
Press lightly to turn off the motor.
CONTROL OF THE SIGNALING FOR FILTERS
When the vacuum cleaner is turned on and after you have performed filter maintenance, press the button and hold it until you hear a sound signal. The indicator light 1 (for the fine dust filter) or 2 (for the filter with activated carbon) stops flashing.
DISCONNECTION OF THE ELECTRONICS
Press and hold the pressed button for 3 seconds. In this way, the command electronics of the vacuum cleaner are disconnected.
This function may be useful when storing the device.
To activate the electronics again, you must repeat the operation.
If you notice irregularities during the working cycle, disconnect the cable from the socket, wait at least 5 seconds and reconnect it. If this does not solve the problem, we advise you to contact the appropriate warranty service.
Maintenance
Cleaning
For cleaning, use ONLY a cloth dampened with neutral detergent. DO NOT use tools or devices for cleaning!
Before handling, keep the abrasive parts. DO NOT USE!
Filter housing
Fig. 11
Remove the housing of the filter part, removed during maintenance.
Clean the filter element with neutral detergent. It is not recommended to wash it in a dishwasher or at high temperature for a short washing cycle.
If it is not possible to clean the filter in a dishwasher, it can be rinsed, but this in no way affects the filter's performance.
To remove the filter, press the latch with the spring mechanism.
Activated carbon filter (optional for filtration version)
Fig. 12
Remove the carbon filter, which is removed during maintenance.
The activated carbon filter should be replaced approximately every period of use depending on the type of maintenance. Therefore, clean the filter as often as possible.
In any case, it is necessary to replace the activated carbon filter every four months or when the indicator for saturation and cleaning shows that it is necessary.
Do not use it again.
Activated carbon filter cover
Place one filter from each cartridge, so that the two front grids of the motor's flat coil are covered, then close the cover in the direction of the hour hand.
Turn the knob in the direction opposite to the clockwise arrow.
Replacing the lamp
Fig.10
Remove the plug from the mains.
Attention! Before you take the lamp, check that it is cold.
Replace the damaged lamp with a new one of the same type, as indicated on the label with the characteristics near the lamp on the hood.
- With the help of a small screwdriver or similar tool, remove the cover of the halogen lamp. 2. Replace the damaged lamp with a new halogen lamp with the same characteristics as those indicated on the label or near the lamp.
Halogen lamp: For assistance, contact the service center for technical maintenance.
Halogen lamp: 12V - 20W max - G4 (be careful not to touch it directly with your fingers).
- Close the cover (it clicks when closed).
If the lamp does not light, check that it is installed correctly before contacting a specialist.
Use the correct length for the screws which are identified in the Installation Guide.
Attention! Do not connect the appliance to the electrical supply until the installation is completely finished.
Regarding technical and safety measures in the application of steam release, strictly follow what is provided by the standards of local competent authorities.
The extracted air must not be discharged into a pipe used for exhaust fumes from appliances that operate on gas or other fuels.
Never use the hood without correctly installed filters, risk of electric shock.
Never use the hood without the correctly installed grille!
The hood must never be used as a support surface, unless specified.
Use only the screws supplied with the product for installation, if not supplied, purchase screws of the correct type. Use the correct screw length as indicated in the installation manual. In case of doubt, consult the authorized service center for the hood with qualified personnel.
WARNING! Failure to install the screws or fixing device in accordance with these instructions may result in electrical hazards.
This product is marked in accordance with European Directive 2012/19/EC on the disposal of electrical and electronic equipment (WEEE).
By ensuring proper disposal of this product, you will help prevent potential negative consequences for the environment and human health.
The symbol on the product or its documentation indicates that this product must not be treated as household waste. Instead, it should be handed over to the appropriate collection point for the recycling of electrical and electronic equipment.
Disposal must be carried out in accordance with local regulations for waste disposal.
For more detailed information on the treatment, recovery, and recycling of this product, please contact your local city office, your household waste disposal service, or the shop where you purchased the product.
The device has been designed, tested, and manufactured in accordance with:
- Safety: EN/IEC 60335-1; EN/IEC 60335-2-31, EN/IEC 62233.
- Performance characteristics: EN/IEC 61591; ISO 5167-1; ISO 5167-3; ISO 5168; EN/IEC 60704-1; EN/IEC 60704-2-13; EN/IEC 60704-3; ISO 3741; EN 50564; IEC 62301. EMC: EN55014-1; CISPR 14-1; EN55014-2; CISPR 14-2; EN/IEC61000-3-2; EN/IEC61000-3-3. Recommendations for correct use and to reduce environmental impact: Turn on the hood at minimum speed when you start cooking and leave it running for a few minutes after finishing. Increase speed only in case of large amounts of smoke or steam, and use boost speeds only in extreme situations. Replace the charcoal filter(s) when necessary to maintain good efficiency in odor reduction. Clean the grease filter(s) when necessary to maintain good
efficiency of the grease filter. Use the maximum ducting system diameter specified in this manual to optimize efficiency and minimize noise levels.
Use
The hood has been designed to operate in recirculation mode or extraction mode.

Extraction mode
In this mode, the air is discharged outside through an exhaust pipe connected to the collar. The diameter of the exhaust pipe must match the diameter of the collar.
Warning! The exhaust pipe is not included and must be purchased separately.
The hood is supplied with a charcoal filter; make sure to connect the hood to the exhaust pipe with a diameter corresponding to the outlet opening (connecting flange).
Installing pipes with a smaller diameter will reduce suction power and sharply increase noise levels.
The manufacturer declines all responsibility for the above.
Use a pipe of the minimum required length. Use a pipe with the fewest bends (maximum bend angle: 90°). Avoid sharp changes in the pipe direction.

Recirculation mode
A charcoal filter must be used, available from your distributor. The extracted air is filtered and purified before being returned to the room through the top grille.
Installation
Fig. 3
The distance between the lower edge of the hood and the hob surface must be at least 55 cm for electric hobs, and at least 70 cm for gas or combination hobs.
If the installation instructions for the gas hob specify a greater distance, take that into account.
As shown in the installation diagrams, drill 6 holes (8 mm diameter, 40 mm deep) in the position indicated on the drilling template, then fix the hood to the wall using the mounting brackets. Check in the installation manual that the hood is level and properly aligned.
Before installation, make sure that the appliance is not connected to the power supply and that there are no more than 6 heating elements.

Electrical connection
The voltage must correspond to the voltage indicated on the technical data plate, which is located inside the appliance. If the plug is suitable, connect the appliance to a suitable socket. It must comply with current regulations and be located in an accessible place. It can be plugged in after installation. If the plug is not suitable (direct connection to the mains), and the socket is not located in an accessible place, even after installation, use an omnipolar switch with a contact opening of at least 3 mm, in accordance with installation instructions.
Warning! Before connecting the appliance to the power supply, check that it is functioning correctly and make sure that the power cable is properly installed.
Warning! To avoid any risk, the operation of replacing the power cable must be carried out by qualified personnel from the technical service.
Installation
Before installation:
Check that the dimensions of the purchased appliance are suitable for the chosen installation location. Remove the charcoal filter(s), if present (see also the relevant section). The filters are installed only if you intend to use the appliance in recirculation mode. Check that no objects have been left inside the appliance during transport (e.g., bags with screws, warranty documents, etc.), and if any, remove and keep them.
The appliance is equipped with fixing brackets for installation on most walls/ceilings. However, it is necessary to contact a qualified technician to ensure that the materials are suitable for this type of wall/ceiling. The wall/ceiling must have sufficient strength to support the weight of the appliance.
Operation
Model with control panel with 5 buttons

To select the functions of the hood, simply touch the buttons lightly:
a. Button to increase speed (power) of suction: speed (power) of suction 1, speed (power) of suction 2, speed (power) of suction 3. Note: speed (power) of suction 3 is temporary, preferably after 5 minutes, after which the hood returns to speed (power) of suction 2. b. Button to decrease speed (power) of suction. c. Button to turn the lights on/off. d. Button to turn the lights on/off. e. Button to turn the programmed shutdown on/off:
The programmed shutdown is active approximately 3 minutes after the suction speed (power) is activated.
Model with mechanical control
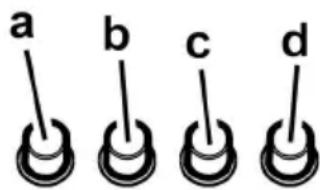
a. Light ON/OFF switch. b. OFF/speed 1 switch. c. Speed 2 selector. d. Speed 3 selector.
Control panel
| 0 | OFF |
| 1 | Сkopocт b 1 СBet OFF |
| 2 | Сkopocт b 2 СBet OFF |
| 3 | Сkopocт b 3 СBet OFF |
| A | СBet ON |
| B | Сkopocт b 1 СBet ON |
| C | Сkopocт b 2 СBet ON |
| D | Сkopocт b 3 СBet ON |
Control panel with 6 buttons
To select a function, briefly press the command buttons.

Light ON/OFF button

Intensity/speed (suction power) selector button - duration 5 minutes: the extractor sets this power and after 5 minutes returns to the previous setting.

High speed (suction power) selector button

Medium speed (suction power) selector button - when flashing, indicates the need to clean or replace the charcoal filter. This signal
is normally disabled; to activate the signal, it is necessary to disconnect the electricity. To do this, press button 0 and hold it pressed for 3 seconds.
Then simultaneously press buttons 1 and 2 for 3 seconds; first button 1 will start pulsing, then both buttons 1 and 2 will start pulsing, indicating that activation is complete. Repeat this operation to deactivate the signal; first buttons 1 and 2 will start pulsing, then button 1 will start pulsing, indicating the deactivation of the signal.

Low speed (suction power) selector button - when flashing, indicates the need to clean the grease filter.

Motor OFF button (stand by) - disconnection of electronics - reset of filter signal/cleaning/replacement of filters. MOTOR OFF
Briefly press the button to switch off the motor.
FILTER SIGNAL RESET
With the extractor on, after the technical maintenance of the filters has been carried out, press the button and hold it pressed until an acoustic signal sounds. The flashing light 1 (metal filter) or 2 (charcoal filter) will stop flashing.
NCKIIOUeyHNE 3JIeKTPoHnKi
DepkaTb HakaTo3 3 ckyHdbi KHOkny 6ydet NCKIOUeHa 3JeKTPoHnKa ynpaBHeHn BbITX-KN.
DaHHa yHKnma MoKet 6bITb Ione3HO B BpEm OuNCTKN N3dJIIn.
YTO6bI CHOBA BKNHOHTb 3JeKTPoHnky,IOCTaTOUHO NOBTOPIb ONEpaUNHO.
B cnyae BO3MOxHBix aHOMaHn pa6oTbI, nepeTeM KaK o6paNTbcB U cHTp TEXHnueckO NOMOu NTKJIIOHTb OT 3JIeKTPoNTaHm MNHMym Ha 5 cek. np6op, n3BJIeKa BUNKy I NOTOM BHOBb NOcOeHNHTb ee. B cNYae, eCn aHOMaHn He NCHe3AET, o6paNTbcB U cHTp TEXHnueckO NOMOuN.
yxo
OuInCTka
ДячNTКИСПОЛБ3уITE TOЛБКОспuaJIbHyTOТРЯКY, CMOчЕнHyО HeITpaJIbHbIM KINKIM MOJOUIM cpeICTBOM. HE NCПОЛБ3yITE HNKAKNE INHCTPUMEHTbl IДЯ OЧNTK. He npIMeHЯITE cpeICTBa, coDEpXaUne abpa3INBhble MaTePnaJIb. HE NPIMEHЯITE CnIPT!
ΦnIbTpbl 3aDepeKKn Knpa
Pnc.11
YdepKnBaet qactuIbI Jnpa, nCxOJaIne OTnnTbl.
Фильтслдуетчнгь exжемяно HearpeccnBbIMMOUIMN cpeiCTBaMn, BpyHyu NIN B NOcydOMoeHOMMaUNHe Pn H3KoI TempepaType n 3KOHOMuHOM LKJIeMbITb.
PnMbIbE B NocydomoeyHOMaunHe MoXeT IMeT MeCTO HeKOTOpoe oBeecuBcYBaHne FnIbTp a3aepxKn Knpa, Ho erO FnIbTpuyoUa XapaKTepNCtNka ocTaETcA abCoHOTHO HEn3MeHHo.
Дя сгтma Фиьтpa 3адрхкн кира NotHnTe K ce6e noDpykHeHHyO pyKу OTuENHeNHaФиьтpa.
YroIbHbI ΦnIbTp (TOnbKO B pexIme peunpkyJauu)
Fig. 12
Coal filter replacement
Coal saturation occurs gradually over a period of 6 months or more of operation, depending on the frequency of cleaning of the flame arrestor grids. In any case, replace the cartridges at least every 4 months.
The coal filter cannot be regenerated.
Round coal filter
Cover both sides to protect the motor rotor fan grilles, then rotate the filter counterclockwise.
Rotate counterclockwise.
Lamp replacement
Fig. 10
Disconnect the device from the power supply.
Warning! Before touching the lamps, make sure they have cooled down.
Replace the damaged lamp with a new one of the same type as indicated on the label, or next to the lamp on the extractor.
- Using a flathead screwdriver or similar tool, carefully remove the protective element.
- Replace the damaged lamp with a halogen lamp or LED lamp with the same characteristics as specified on the label or in the lamp specifications.
LED lamp: For replacement, contact technical service.
Lamp type: 12V - 20W max - G4 (do not touch with bare hands).
- Close the plafond (fasten with latch).
If the lighting system does not work, check the correct installation of the lamps in the sockets before contacting the technical support center.
Carefully follow the instructions given in this manual. The manufacturer disclaims all liability for damage, injuries, or fire that may occur as a result of using the device contrary to the instructions provided in this manual. The product is designed for use with gas and steam, which are formed during cooking and are intended solely for domestic use.
The kitchen hood may have differences that are determined by the hood model shown in the manual, but in any case, the instructions for installation, technical maintenance, and operation remain the same.
IMPORTANT: Keep these instructions so that you can refer to them in case of sale, transfer to a new owner, or to ensure that the instructions are with the product. IMPORTANT: Read the instructions carefully: they contain important information about installation, use, and safety. It is forbidden to perform electrical work in humid environments or in wet conditions. Before starting installation, check that all components are free of defects and are not damaged. In case of damage, contact the point of sale and stop installation.
Note: Parts marked with an asterisk (*) are supplied only on special order for certain models, or in case of need to purchase parts that were not supplied.
They must be controlled and must not be played with by children.
Operations for cleaning and maintenance must not be performed by children without supervision.
The appliance must have sufficient ventilation to be used simultaneously with other appliances that operate on gas or other fuels.
The hood must be cleaned both internally and externally (at least once a month), following the instructions in the maintenance manual.
Failure to follow the cleaning and filter replacement norms increases the risk of fire.
It is strictly forbidden to cook on an open flame under the hood.
Using an open flame damages the filters and may cause fire, so it must be avoided in any case.
Regularly perform maintenance to avoid the risk of fire.
WARNING: Do not touch the surface while the appliance is in operation.
To replace the lamp, use only the lamps specified in the maintenance/replacement section of this manual.
WARNING! Do not connect the appliance to the electrical grid until the installation is completely finished.
Regarding technical and safety measures for use, refer to the standards in force in the countries of destination, which must be strictly observed by the competent local authorities.
The appliance must not be used to exhaust fumes from appliances burning gas or other fuels.
Do not use or protect the hood without correctly installed lamps, risk of electric shock.
Never use the hood without the correctly installed grille!
The hood must never be used on a surface unless it is visible.
Use the screws provided for fixing or with the product for installation, which are not included in the kit, purchase the screws correctly. Use the correct screw length as indicated in the installation manual. In case of doubt, consult an authorized service center or qualified personnel.
WARNING! Installing incorrect screws or devices for fixing may result in electrical hazards.
This product is marked according to the European Directive 2012/19/EC on waste electrical and electronic equipment (WEEE). By ensuring the correct disposal of this product, you will help prevent potential negative consequences for the environment and human health, which could otherwise be caused by inappropriate waste handling.

The symbol on the product or on its accompanying documents indicates that this product shall not be treated as household waste. It shall be handed over to the applicable collection point for the recycling of electrical and electronic equipment. Disposal must be carried out in accordance with local environmental regulations for waste disposal. For more detailed information about treatment, recovery and recycling of this product, please contact your local city office, your household waste disposal service or the shop where you purchased the product.
The appliance has been designed, tested and manufactured in accordance with: - Safety: EN/IEC 60335-1; EN/IEC 60335-2-31, EN/IEC 62233. - Performance: EN/IEC 61591; ISO 5167-1; ISO 5167-3; ISO 5168; EN/IEC 60704-1; EN/IEC 60704-2-13; EN/IEC 60704-3; ISO 3741; EN 50564; IEC 62301. EMC: EN 55014-1; CISPR 14-1; EN 55014-2; CISPR 14-2; EN/IEC 61000-3-2; EN/IEC 61000-3-3. Advice for correct use to reduce environmental impact:
The hood is designed for minimal draft before cooking and protects it during operation for several days after cooking. Increase the draft only in case of a large amount of smoke and steam, and use the hood only in extreme cases. To maintain high efficiency of odor removal, if necessary, perform the replacement of the charcoal filter(s). To maintain high efficiency of the filters, if necessary, perform the cleaning of the filter(s). Use the maximum diameter of the air duct system, as indicated in the instructions, to optimize efficiency and minimize noise.
Use
The hood is designed for recirculation mode, with the air outlet closed or in the filter mode with air recirculation.

Exhaust mode
The exhaust pipes are led out through the exhaust pipe attached to the flange connection.
The diameter of the exhaust pipe must match the diameter of the connection ring.
Attention! The exhaust pipe is not supplied and therefore must be purchased separately.
If the hood has charcoal filters, they must be removed.
Connect the hood to the existing exhaust pipe and exhaust outlet with the same outlet diameter of the air (connection flange).
Using existing exhaust pipes and outlets with a smaller diameter will lead to a change in operating efficiency and a significant increase in noise level.
Therefore, we disclaim any responsibility for the above. Use only short exhaust ducts.
Use the exhaust duct with the minimum number of bends (maximum bend angle: 90°) to avoid sharp changes in the cross-section of the exhaust duct.

Recirculation mode
Pull the air out of the room and then return it to the room. To use the hood in this mode, it is necessary to install a preliminary filter system with charcoal.
Installation
Man. 3
The distance from the lower edge of the hood to the cooking surface must be at least 55 cm for electric hobs, and 70 cm for gas and combination hobs.
It is necessary to take into account the distance specified in the installation instructions for the gas hob.
As shown in the drawings for installation, drill 8 holes (8 mm diameter, 40 mm deep) in place of the indicated drilling on the template, to secure the hood and the flue. Check that the hood and flue are correctly aligned.
The hood is designed for installation above the hob, at a distance not exceeding 6 heating elements.

Electrical connection
The voltage in the electrical network must correspond to the characteristics indicated on the label located inside the hood. If the hood is supplied with a plug for the electrical connection, then connecting the hood to the socket, which corresponds to the existing standards, must be accessible after installation. If the plug is not supplied (without plug for electrical connection), or the socket is not accessible after installation, then install a suitable omnipolar switch, which ensures complete disconnection from the network under overvoltage category III, in full compliance with installation rules.
Warning! Before connecting the hood to the electrical network again, check the correct operation, and make sure that the network cable is correctly installed.
Warning! Replacement of the electric cable must be carried out by authorized technical service personnel.
Installation
Before starting installation:
- Check that the dimensions of the product you have purchased fit the chosen location for its installation. Remove the grease filter(s) if present (see also the relevant section). Reinstall the filter(s) if you intend to use the hood in recirculation mode. Check that the inside of the hood is not obstructed by items placed there during transport (e.g., packaging with screws, warranty documents, etc.), if any, remove them and keep them.
The hood package includes screws for fixing, designed for most types of walls/ceilings. However, it is necessary to consult a qualified technician to verify the suitability of the materials depending on the type of wall or ceiling. The wall/ceiling must be sufficiently sturdy to support the weight of the hood.
Operation
Model with 5-button panel
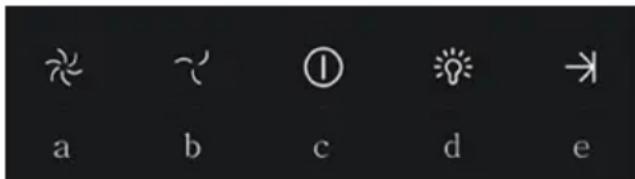
Press the buttons in the following order to reset the device:
a. Button for increasing the suction power: Suction power 1, Suction power 2, Suction power 3. Note: Suction power 3 is temporary; after 5 minutes, it will automatically return to suction power 2. b. Button for changing the suction power. c. On/Off button. d. Light on/off button. e. Button for enabling/disabling the programmed shutdown.
Cleaning the filters
On the removed filter, after maintenance, press the button and hold it until you hear a sound signal. The filter will stop being clogged.
Turning on the electronics
Press the button for 3 seconds; the electronics of the lid will turn on.
This operation can be useful during a test run.
To turn off the electronics, press again.
In case of any malfunction, first contact the service center and disconnect from the power supply, remove the plug, and then turn it on again. If the malfunction persists, contact the service center.
Cleaning
Cleaning
Use only a special cloth moistened with a neutral cleaning agent. Do not use aggressive agents or tools for cleaning!
Do not use cleaning agents or abrasive materials. Do not use alcohol!
Filter for dust
Fig. 11
3atpmye xnpoBi cnoJyehn, 0o BnHkaotb niq yac npiroTyBaHHi.
IobHHe uNCTnTcB OIN Ha MicaIb He CInbHOIOUHMM MIOUHMN 3acO6aMn, BpyHy a6o B NocydommHm MaunHi np Hn3bKi Tempepatypi i 3 KOpOTKm UKNOM.
Pn MNTI B NocydommHm MaunH MeTaneBn PInbTp 3aTpMkn Knpy MoKe BtpaTn T KoIp, ane Ioro XapakTepcntKn 3 pItbTpYBaHH JODHM YHOM He 3MiHrTbcra.
Дя 3Япглгу 3aTpIMKn Jnpy notarHITb Ha cebe npyknHny pykky BiDuenneHry φiIbtpy.
ByrilbHn n pIbTp (tiIbKn B peXmPipeu npKyauii)
Man. 12
B6npac HnpeMHI 3anax KyxHi.
Ipebeipka ByrilbHoro fInbtpy Ha HacnueHH npoBOnTbcn icnla bIIbM MeHJ DOBroro nepiody BnKOpNCtAHnB 3aJIeXHOCTi BiD TUNy KxHi i peryIpaHcOti ONUCTKn fInbtpy XnpiB. Y6yb-IAKOMY BnAaKy Heo6XiHo 3aMIHTn NaTPOH MaKcNMyM KOxHi YoTnpu Micci.
HE niDnrae MmTTH qn noHOBneHHIO.
Kpyrnn ByrinbHn pInbTp
PnKnaCTn fIbTpno 06uDbI CTOpOHn DnI NOKpTTa3axnCHnx pniitok potopa DnBryHa, nicIyOro NOBepHytnfIbTp 3a rOHHNKOBIO CTpiIKoO.
Iπa 3HaTTa - NoBepHytn pInbTp npOt rOuHHNKOBoCTpIKn.
3aMiHa JAmn
MaJ.10
BiknouHT npuiaD bi eKeKtpomepekei.
Warning! Before replacing the lamp, it is necessary to disconnect the power supply.
Replace the lamp with a new one of the same type as indicated on the label, or with a lamp of the same type.
- Remove the protective element using a screwdriver or similar tool.
- Replace the lamp with a new one of the same type or with the same characteristics as indicated on the label or near the lamp:
LED lamp: For replacement, contact the technical service.
Lamp type: 12V - 20W max - G4 (do not touch with fingers).
- Close the cover (fasten with the latch).
If the system does not work correctly, check the correct installation of the lamp in the socket before contacting the technical support center.
The safety instructions in this manual must be followed carefully to prevent fire, electric shock, or injury. Keep the manual for future reference.
The figures shown in the manual may differ slightly from the actual product. The manufacturer reserves the right to make changes without prior notice.
! Read the safety instructions carefully before using the device. Failure to follow them may result in fire, electric shock, or injury. ! Do not use the device if it is damaged: it may cause fire, electric shock, or injury. ! Do not attempt to repair the device yourself; contact qualified service personnel. ! If the power cord is damaged, it must be replaced by the manufacturer, its service agent, or similarly qualified persons to avoid a hazard.
Note: "(*)" indicates that the accessory is optional and may be sold separately, or it may not be included; in that case, it needs to be purchased separately.
Safety instructions
To reduce the risk of fire, electric shock, or injury, always unplug the appliance from the electrical outlet before cleaning or performing maintenance.
When performing maintenance or repair, always use the appropriate tools.
This device may be used by children aged 8 and above, and by persons with reduced physical, sensory or mental capabilities, or lack of experience and knowledge, if they have been given supervision or instruction concerning use of the appliance in a safe way and understand the hazards involved.
Children shall not play with the appliance. Cleaning and user maintenance shall not be made by children without supervision.
Do not replace the control elements or operate the device with a timer or remote control.
Cleaning and user maintenance shall not be performed by children without supervision.
If the supply cord is damaged, it must be replaced by the manufacturer, its service agent or similarly qualified persons in order to avoid a hazard.
The appliance must be cleaned both inside and outside (at least once a month) as described in the instructions provided for cleaning and maintenance.
Cleaning should be carried out according to the standard cleaning and disinfection instructions.
It is possible to hold the device in the installation position. Do not place any objects on the appliance during operation.
For safe operation, it is possible to use the device with a timer or remote control, but it is necessary to give a warning about this.
To prevent the appliance from tipping over or falling, it must be secured properly.
CAUTION: The accessible parts of the appliance may become hot during use.
They may cause burns if touched.
For repair, only use the spare parts specified in the "Technical Service/Repair" section of this manual.
WARNING! Do not connect the device to the electrical network without proper installation.
Keep in mind the technical and safety requirements for the device, and follow the safety regulations established by the relevant authorities.
If the hood is used in conjunction with non-electric appliances (e.g., gas appliances), the negative pressure in the room must not exceed 4 Pa (0.4 mbar) to prevent flue gases from being drawn back into the room. This must be ensured during operation of the hood.
Do not use the hood without the filters in place.
Before connecting the hood to the mains, ensure that the voltage and frequency match the rating plate.
For the correct operation, the filters must be cleaned or replaced regularly. If not, the filters may become clogged.
The filters must be cleaned or replaced according to the instructions in the manual.
If the hood is not working properly, contact the service center or the dealer where you purchased the hood.
WARNING! The hood must be installed in accordance with the instructions. Incorrect installation may cause electric shock.
Electrical and electronic appliances must be disposed of separately from household waste, in accordance with the European Directive 2012/19/EC (WEEE).
Do not dispose of the hood with household waste. Contact the local waste disposal authority or the dealer for information on proper disposal.
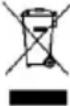
The appliance must be disposed of at an authorized collection point for electrical and electronic equipment. Do not dispose of it with household waste.
Dispose of the appliance in accordance with local regulations for waste electrical and electronic equipment.
The appliance must be disposed of separately from household waste. Contact the local waste disposal authority or the dealer for information on proper disposal.
The hood is designed for use in households and similar applications.
- Safety: EN/IEC 60335-1; EN/IEC 60335-2-31, EN/IEC 62233.
- Performance: EN/IEC 61591; ISO 5167-1; ISO 5167-3; ISO 5168; EN/IEC 60704-1; EN/IEC 60704-2-13; EN/IEC 60704-3; ISO 3741; EN 50564; IEC 62301. EMC: EN 55014-1; CISPR 14-1; EN 55014-2; CISPR 14-2; EN/IEC 61000-3-2; EN/IEC 61000-3-3.
Kopwaan opTara ocepiaaayuuih npbic naaanahy TpaJIb HycKaynap:
3ipnyi6actaHaKaKaNaKbIeH a3 KbldAmDbIKneH KObl3XHe 3ipney aKaTaHaHaH KeIH bpa3 MNHyT BoH JyMbIC iTeTiH3. KbldAmbIKta TEK TyTHHH XHe 6ydbH yKeH MeuWepi XaRaBnHa apTbIPbHb3 XHe KYeHTy XblDAMDbIFbH(KTabbH) TEK WeKTi XaFdaNapDa naDanaHbH3. XaKcbI XaFbIMCb3 NiCTi a3aHTy TImdiinirCaTay yuH kaxet 6oFaHda Kemip cyricih(lepH) aybCTbIPbHb3. XaKcbMaCyrici TImdiinirCaTay yuH kaxet 6oFaHda Ma cyricih(nepH) aybCTbIPbHb3. TImdiNtOHTaNaHdbpy XHe WybIb 6apbHwa a3aHTy yuH oCbI HycKayNbTKa KepcTeINrE hTk3y KyueciHi eH YKeH DnaMeTpIn NaDanaHbH3.
PaindanaHy
Copfbb cblpka aya 6ypfblb6ap tapTy kendetkiw petiHde, Hemece iuKiaaHaNy cy3riwi peTINe naDanaHyra apHaIFaH.

TyTih wbiFapy Ky6bipbHbH HycKacbl
By cbiptka 6ipiktipywi fnaheueke kocbinafah copfbliu K6bip apkblbl wflapbnada.
Copfbi Ky6bipdbi DnAmetpi 6ipiktipuyi caKHaHbIH DnAmetpime HteDec 6ony Kepek.
Ha3ap aydpbIbH3! CopfbIi Ky6bIpbl copfbIi XnHaKTamacbIme HxetKl3inMei, Ohbl 6eneK caTbIn any Kepek.
CopfbIbTbI Ka6bipraIabI copfbI Kw6bIpnapbI MeH aya IbI- fapatbIH TecikTepei, coI dnaMetpderi TecikTepe KocbiHb3 (6ipiktpuyi pfanae).
Ka6bipraarbl copbIw Kx6bIpnapbl MeH KEmdey DnaMeTpdi eri TecikTI naIaIaNHy, copy KyatbIH HauapnAtbIn, rypinDeyH KyweTei.
! KaKeTTi MUNHImaIbI y3bIHbIKTaFbI TYtIKTI KOJaHaBbIH-b13. ! BapbHua ken ninimi 6ap tyikti kondaHbIHb3 (ninimHi, MakcMaIdbI 6ypbUb: 90° TytikinKeJdeHeKmAcbHdaTy6ereNl e3repctep 60ndbipMaHbI3.

Cy3ri Hyckacbl
On yin6ip kemip cyrici kaxet, OHbl eDetteri catyubnapan anyra 6oana.
Cy3ri WbIrapbnraH aayhbl XorapFbI WbIFbc TOpbl apKbInb6eMere KaTata Xibepy anDbda OHb MaM MeN iCtepeH Ta3apTaBbl.
KoHdbipy
The cover of the switchboard must be installed with a gap of 55 cm for electric stoves, and 70 cm for gas stoves, but not less than that.
If the gas stove is installed with a gap greater than required, check it. To protect the switchboard and the socket, install a hole (diameter 8 mm, depth 40 mm) at the installation site as shown in the figure. After installation, the switchboard and socket should be easily accessible.
The grounding element is installed on the upper part.

Electrical connections
When performing installation work, follow the technical requirements indicated on the plate. If the grounding is not connected, it is necessary to install it and then check the resistance, which should be no more than 0.1 Ohm. If the grounding is connected (to the water pipe), or if the resistance is not more than 0.1 Ohm after installation, then the installation is correct. If not, consult a specialist for further diagnostics.
WARNING! When connecting the electric cable of the stove, do not touch the cable during installation.
WARNING! The power supply must be disconnected before any work on the electrical connections.
Installation
Before starting installation:
- Check the voltage in the network (if it is single-phase) (see the plate). If the voltage does not match, it must be adjusted. Remove all packaging, cardboard, etc. from the stove. Check all accessories (installed for transportation) and remove them. Keep them in a safe place.
Connect the stove to the power supply using the appropriate plug and socket (with fuses) from the kit. First, check the materials
for the correct connection of the plug and socket. The plug and socket must be suitable for the stove's power.
Grounding
The stove has a 5-pin plug
The copy is made automatically, and for example, in Turkish.
a. Copy mode (Copy) button sequence:
1st copy mode (Copy) 2nd copy mode (Copy) 3rd copy mode (Copy)
Example: Press the 3rd copy mode (Copy) button, then after 5 minutes, the 2nd copy mode (Copy) will be activated.
b. Copy mode (Copy) start sequence. c. Copy/Print sequence. d. Print/Print sequence. e. For this, the print sequence is as follows:
After 3 minutes, the selected copy mode (Copy) will be automatically activated.
Mechanical control panel buttons
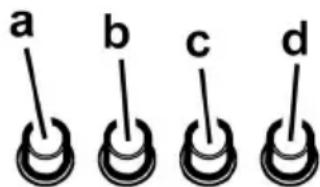
a. Power on/off switch b. 1st copy/print button c. 2nd copy/print button d. 3rd copy/print button.
Buttons with sequence
Power ON/OFF (ON/OFF) button

The 1st copy button (copy mode) - after 5 minutes of inactivity, it will automatically switch to the copy mode.

The 2nd copy button (copy mode)

The 3rd copy button (copy mode) - when pressed, it will indicate the need for maintenance or repair. This signal is not active.
Signal activation button
Press and hold for 3 seconds to activate the electronics. Then, within 3 seconds, press button 1 or 2 once, and only one button will be active. Then, press button 1 or 2 twice, and both buttons will be active. This indicates activation. To deactivate the signal, repeat the operation, but press button 1 or 2 once, and only one button will be active. Then, press button 1 or 2 twice, and both buttons will be active. This indicates deactivation.

The long press button (copy mode) - indicates the need to press the button to copy the text of the messages.

The OFF button (cut mode) - to stop electronic counting - to stop the analysis of the word counting.
PRESS THE OFF BUTTON
Press the short button to turn off the device.
STOP THE ANALYSIS OF THE WORD COUNTING
If the old copy is in the text, then to provide technical service to the words, it is necessary to press the button until a fast signal appears. Press the long button 1 (for words) or 2 (for letters) to stop the counting.
ELECTRONIC COUNTING
Press the button for a second, then the electronic counting of the word will start.
This function may be available at any time.
To make a new copy, it is necessary to press the operation button.
In case of a malfunction, before starting the counting service, it is necessary to disconnect the electric power, wait at least 5 seconds, then turn it on again, and then press the operation button. If the malfunction persists, then it is necessary to start the counting service.
Technical service
Cleaning
For cleaning, use only a soft cloth dampened with water. Do not use any cleaning agents! Do not use abrasive materials!
Word counter
11-cypet
Ac daBbHdyaDaBbMn 6eWekTePi yctan KaIaNbl.
ΦιNbTpdi aai caBbH arpeccnBTi eMeC JyfbIu 3aTTapMeH, KOJImeH Hemece bIDbcJxJyfbIu MaunHa, TEmeH TemnepaTypa, yHemDi Ta3anay Tepti6Hne Kyy KepeK.
blbckyfbMaunHadaXybJfAH MaYcTaTbIH qnIbTp Tycci3deHyi MymkiH, 6ipak OdaH OHbH cy3riu Kacneti Mynde e3repicci3 Kanadbl.
MaCy3ricn anbIn Tacay yuH cepinnenI 6ocaty TytKacbln TapTbHb1
Kemip cy3riw (tek cy3riw-copfbiw TypiHde) 12-cypert
Ac nicipreh ke3de xapaMcbI3 niCTi yctan KaIaDbI.
Kemipni fnhbtpdi KaHbIybi y3ak naDanaHy Mep3imH KblcKa Hemece y3ak etyHe baNaHbICTbI 60ana, on ac YnDiHTpyi MeH MaDbI YCTaIbIH FnbTpdi YCTaHbINFaH Mep3iMNIIK Ta3aIayMeH aDbIH ana aHbIKTaJaB. KaHaJ XaFdaN 6oIca Da, KaptpnXkDi Kem dereHde 4 aJa bip pet aybICTbIpblb13.
KemipJIi fIJIbTpdi Jyyra 60nMaIdbI JxHe de pereHeuRa JkapaMcbI3.
Dehrelek Kemip cyrici
Ko3faJtkbIbTHn KanakTb DeHreJIerHH TopaIbHa 6ipeyIH opHaTbIbI3, CenTin OnapDbI caF TINIMEN 6paHbI3.
Any yuin oJapdbi cafat tinihe kepi 6ypaHb3.
Wamaybictbipy
10 cypet
AcnanTbI 3JneKtp KnyecineH eUpiHiz
If the ceiling lamp is not connected to the housing, connect the old lamp to the new lamp before installation.
- Remove the protective film or any packaging from the panel.
- If the lamp is connected to a switch or dimmer, connect the hot wire from the lamp to the corresponding hot wire from the switch or dimmer.
Lamp's hot wire: For safety, contact a qualified technician.
Halogen lamp: 12V-20W max. G4 (Do not exceed the specified wattage).
- Attach the panel to the ceiling using the mounting bracket.
If you encounter any issues, contact a qualified technician for assistance.
-12V 20W max G4
i
a bia 1i iio ai a a b b jaoi
1
i 1
Jgssll Jaa
jgaaa
11
a
y
1 1 1 1 1 1 1 1 1 1 1 1 1 1 1
.0j 1
aai j 1
aai jll a jll g bll 1
aiaia aaii 100
aill jll llgill b 8 Jaai i, jai ai
Waste EC/96/2002
Electrical and Electronic Equipment (WEEE)
Therefore, a1 = 2, and a_{n+1} = a_n / (1 - 2/a_n).
i
jglly
i 1
J 1
e i
ba12
i
1
.
- EN - INSTRUCTION ON MOUNTING AND USE
- CAUTION
- USE
- DUCTING VERSION
- FILTER VERSION
- INSTALLATION
- FIG
- ELECTRICAL CONNECTION
- MOUNTING
- BEFORE BEGINNING INSTALLATION
- OPERATION
- MODEL WITH 5-KEY KEYBOARD
- MODELS WITH MECHANICAL CONTROL PANEL
- MODELS WITH KNOB
- CONTROL PANEL WITH 6 BUTTONS
- LIGHT KEY ON/OFF
- RESET FILTERS SIGNALS
- EXCLUDING THE ELECTRONICS
- MAINTENANCE
- CLEANING
- GREASE FILTER
- CHARCOAL FILTER (FILTER VERSION ONLY)
- CIRCULAR CARBON FILTER
- REPLACING LAMPS
- MODELS WITH MECHANICAL PUSH-BUTTON PANEL
- VACUUMING
- FILTERING
- BEFORE PROCEEDING WITH THE INSTALLATION
- METHOD OF USE
- CONTROL BUTTONS
- COVER OPEN
- CONTROL PANEL WITH BUTTONS
- ON/OFF BUTTON FOR THE LIGHTING
- OFF MOTORE
- CONTROL OF THE SIGNALING FOR FILTERS
- DISCONNECTION OF THE ELECTRONICS
- FILTER HOUSING
- ACTIVATED CARBON FILTER (OPTIONAL FOR FILTRATION VERSION)
- ACTIVATED CARBON FILTER COVER
- REPLACING THE LAMP
- EXTRACTION MODE
- RECIRCULATION MODE
- BEFORE INSTALLATION
- MODEL WITH CONTROL PANEL WITH 5 BUTTONS
- MODEL WITH MECHANICAL CONTROL
- CONTROL PANEL
- LIGHT ON/OFF BUTTON
- FILTER SIGNAL RESET
- NCKIIOUEYHNE 3JIEKTPOHNKI
- YXO
- OUINCTKA
- ΦNIBTPBL 3ADEPEKKN KNPA
- YROIBHBI ΦNIBTP (TONBKO B PEXIME PEUNPKYJAUU)
- LAMP REPLACEMENT
- EXHAUST MODE
- MAN
- BEFORE STARTING INSTALLATION
- CLEANING THE FILTERS
- TURNING ON THE ELECTRONICS
- FILTER FOR DUST
- BYRILBHN N PIBTP (TIIBKN B PEXMPIPEU NPKYAUII)
- KPYRNN BYRINBHN PINBTP
- AMIHA JAMN
- SAFETY INSTRUCTIONS
- PAINDANAHY
- TYTIH WBIFAPY KY6BIPBHBH HYCKACBL
- CY3RI HYCKACBL
- KOHDBIPY
- ELECTRICAL CONNECTIONS
- GROUNDING
- THE STOVE HAS A 5-PIN PLUG
- MECHANICAL CONTROL PANEL BUTTONS
- BUTTONS WITH SEQUENCE
- POWER ON/OFF (ON/OFF) BUTTON
- THE 2ND COPY BUTTON (COPY MODE)
- PRESS THE OFF BUTTON
- STOP THE ANALYSIS OF THE WORD COUNTING
- ELECTRONIC COUNTING
- TECHNICAL SERVICE
- WORD COUNTER
- CYPET
- KEMIP CY3RIW (TEK CY3RIW-COPFBIW TYPIHDE) 12-CYPERT
- DEHRELEK KEMIP CYRICI
- WAMAYBICTBIPY
Brand : ELICA
Model : Shire PRF0119823A
Category : Range hood