
ELITE 14 PRF0098879B - Range hood ELICA - Free user manual and instructions
Find the device manual for free ELITE 14 PRF0098879B ELICA in PDF.
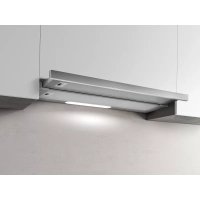



| Product type | Kitchen hood |
| Brand | Elica |
| Model | ELITE 14 PRF0098879B |
| Power supply | 220-240 V ~ 50 Hz |
| Lighting power | 3 W (socket E14) |
| Number of speeds | 3 |
| Grease filter type | Metallic, dishwasher safe or hand washable |
| Activated carbon filter | Optional (recirculation version), replace every 4 months |
| Minimum safety distance (electric cooking) | 50 cm |
| Minimum safety distance (gas cooking) | 65 cm |
| Available configurations | Extracting (external evacuation) or recirculating (recycling) |
| Grease filter maintenance | Monthly cleaning recommended |
| Bulb replacement | Disconnect the appliance, let it cool, replace with 3W E14 bulb |
| Installation type | Built into a cabinet or on a support |
| Materials | Stainless steel (typical) |
| Protection class | Class I (grounded) |
Frequently Asked Questions - ELITE 14 PRF0098879B ELICA
User questions about ELITE 14 PRF0098879B ELICA
0 question about this device. Answer the ones you know or ask your own.
Ask a new question about this device
Download the instructions for your Range hood in PDF format for free! Find your manual ELITE 14 PRF0098879B - ELICA and take your electronic device back in hand. On this page are published all the documents necessary for the use of your device. ELITE 14 PRF0098879B by ELICA.
USER MANUAL ELITE 14 PRF0098879B ELICA
EN Instruction on mounting and use
EN - Instruction on mounting and use
Closely follow the instructions set out in this manual. All responsibility, for any eventual inconveniences, damages or fires caused by not complying with the instructions in this manual, is declined. This appliance is intended to be used in household and similar application such as: - staff kitchen areas in shop, offices and other working environments; - farm houses; - by clients in hotels, motels and other residential type environments; - bed and breakfast type environments.
- It is important to conserve this booklet for consultation at any moment. In the case of sale, cession or move, make sure it is together with the product.
- Read the instructions carefully: there is important information about installation, use and safety.
- Do not carry out electrical or mechanical variations on the product or on the discharge conduits.
- Before proceeding with the installation of the appliance verify that there are no damaged all components. Otherwise contact your dealer and do not proceed with the installation.
Note: The parts marked with the symbol "(*)" are optional accessories supplied only with some models or otherwise not supplied, but available for purchase.

Caution
- Before any cleaning or maintenance operation, disconnect hood from the mains by removing the plug or disconnecting the mains electrical supply.
- Always wear work gloves for all installation and maintenance operations.
- This appliance can be used by children aged from 8 years and above and persons with reduced physical, sensory or mental capabilities or lack of experience and knowledge if they have been given supervision or instruction concerning use of the appliance in a safe way and understand the hazards involved.
- Children shall not be allowed to tamper with the controls or play with the appliance.
- Cleaning and user maintenance shall not be made by children without supervision.
- The premises where the appliance is installed must be sufficiently ventilated, when the kitchen hood is used together with other gas combustion devices or other fuels.
- The hood must be regularly cleaned on both the inside and outside (AT LEAST ONCE A MONTH).
- This must be completed in accordance with the maintenance instructions provided. Failure to follow the instructions provided regarding the cleaning of the hood and filters will lead to the risk of fires.
- Do not flambe under the range hood.
- For lamp replacement use only lamp type indicated in the Maintenance/Replacing lamps section of this manual.
The use of exposed flames is detrimental to the filters and may cause a fire risk, and must therefore be avoided in all circumstances.
Any frying must be done with care in order to make sure that the oil does not overheat and ignite.
CAUTION: Accessible parts of the hood may become hot when used with cooking appliances.
- Do not connect the appliance to the mains until the installation is fully complete.
- With regards to the technical and safety measures to be adopted for fume discharging it is important to closely follow the regulations provided by the local authorities.
- The air must not be discharged into a flue that is used for exhausting fumes from appliance burning gas or other fuels.
- Do not use or leave the hood without the lamp correctly mounted due to the possible risk of electric shocks.
- Never use the hood without effectively mounted grids.
- The hood must NEVER be used as a support surface unless specifically indicated.
- Use only the fixing screws supplied with the product for installation or, if not supplied, purchase the correct screws type.
- Use the correct length for the screws which are identified in the Installation Guide.
- In case of doubt, consult an authorized service assistance center or similar qualified person.
WARNING!
- Failure to install the screws or fixing device in accordance with these instructions may result in electrical hazards.
- Do not use with a programmer, timer, separate remote control system or any other device that switches on automatically.
- This appliance is marked according to the European directive 2012/19/EC on Waste Electrical and Electronic Equipment (WEEE).
- By ensuring this product is disposed of correctly, you will help prevent potential negative consequences for the environment and human health, which could otherwise be caused by inappropriate waste handling of this product.
- The symbol on the product, or on the documents accompanying the product, indicates that this appliance may not be treated as household waste. Instead it should be taken to the appropriate collection point for the recycling of electrical and electronic equipment. Disposal must be carried out in accordance with local environmental regulations for waste disposal.
- For further detailed information regarding the process, collection and recycling of this product, please contact the appropriate department of your local authorities or the local department for household waste or the shop where you purchased this product.
Appliance designed, tested and manufactured according to:
- Safety: EN/IEC 60335-1; EN/IEC 60335-2-31, EN/IEC 62233.
- Performance: EN/IEC 61591; ISO 5167-1; ISO 5167-3; ISO 5168; EN/IEC 60704-1; EN/IEC 60704-2-13; EN/IEC 60704-3; ISO 3741; EN 50564; IEC 62301.
- EMC: EN 55014-1; CISPR 14-1; EN 55014-2; CISPR 14-2; EN/IEC 61000-3-2; EN/IEC 61000-3-3. Suggestions for a correct use in order to reduce the environmental impact: Switch ON the hood at minimum speed when you start cooking and keep it running for a few minutes after cooking is finished. Increase the speed only in case of large amount of smoke and vapor and use boost speed(s) only in extreme situations. Replace the charcoal filter(s) when necessary to maintain a good odor reduction efficiency. Clean the grease filter(s) when necessary to maintain a good grease filter efficiency. Use the maximum diameter of the ducting system indicated in this manual to optimize efficiency and minimize noise.
Use
The hood is designed to be used either for exhausting or filter version.

Extraction version
In this case the fumes are conveyed outside of the building by means of a special pipe connected with the connection ring located on top of the hood.
A
CAUTION!
The exhausting pipe is not supplied and must be purchased apart.
Diameter of the exhausting pipe must be equal to that of the connection ring.
A
CAUTION!
If the hood is supplied with active charcoal filter, then it must be removed.
Connect the hood and discharge holes on the walls with a diameter equivalent to the air outlet (connection flange).
Use a duct of the minimum indispensable length.
Use a duct with as few elbows as possible (maximum elbow angle: 90°).
Avoid drastic changes in the duct cross-section.
Attention! If the hood is supplied with carbon filter, then it must be removed.

Filtration version
The aspirated air will be degreased and deodorised before being fed back into the room.
In order to use the hood in this version, you have to install a system of additional filtering based on activated charcoal.
Attention! If the hood is not supplied with carbon filter, then it must be ordered and mounted.
Installation
The minimum distance between the supporting surface for the cooking equipment on the hob and the lowest part of the range hood must be not less than 50 cm from electric cookers and 65 cm from gas or mixed cookers.
If the instructions for installation for the gas hob specify a greater distance, this must be adhered to.
Electrical connection
The mains power supply must correspond to the rating indicated on the plate situated inside the hood. If provided with a plug connect the hood to a socket in compliance with current regulations and positioned in an accessible area, after installation. If it not fitted with a plug (direct mains connection) or if the plug is not located in an accessible area, after installation, apply a double pole switch in accordance with standards which assures the complete disconnection of the mains under conditions relating to over-current category III, in accordance with installation instructions.
WARNING!
Before re-connecting the hood circuit to the mains supply and checking the efficient function, always check that the mains cable is correctly assembled.
The hood is provided with a special power cable; if the cable is damaged, request a new one from Technical Service.
Mounting
Before beginning installation:
- Check that the product purchased is of a suitable size for the chosen installation area.
- Remove the charcoal (*) filter/s if supplied (see also relative paragraph). This/these is/are to be mounted only if you want to use the hood in the filtering version.
- Check (for transport reasons) that there is no other supplied material inside the hood (e.g. packets with screws ( ), guarantees ( ), etc.), eventually removing them and keeping them.
This hood is designed for fitting in a cabinet or on some other support.
Operation
The hood is fitted with a control panel with aspiration speed selection control and a light switch to control cooking area lights.
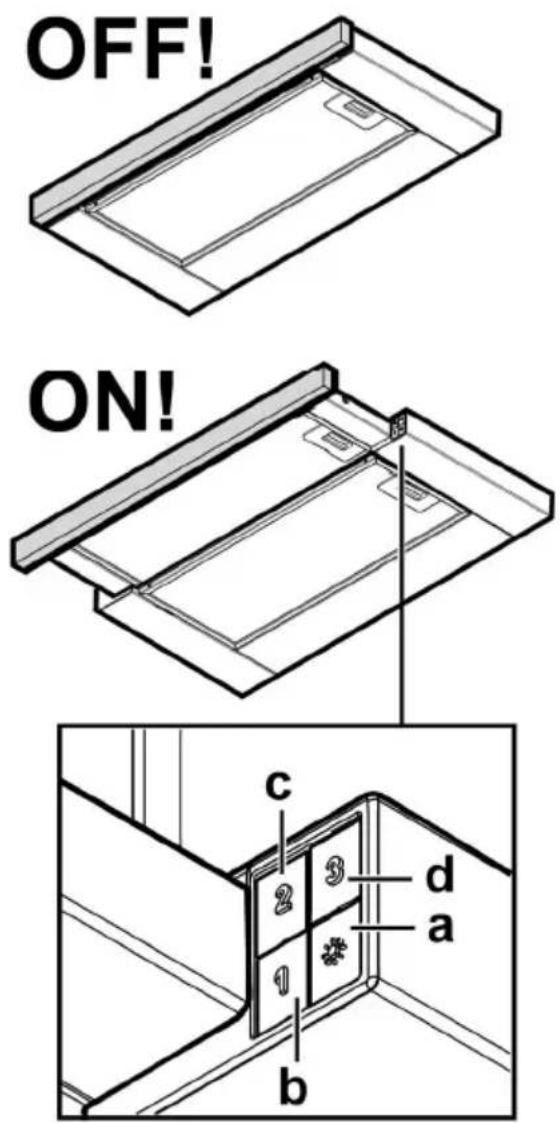
a. ON/OFF light switch b. Speed 1/OFF switch c. 2-speed selection d. 3-speed selection
Maintenance
Cleaning
Clean using ONLY the cloth dampened with neutral liquid detergent. DO NOT CLEAN WITH TOOLS OR INSTRUMENTS. Do not use abrasive products. DO NOT USE ALCOHOL!
Grease filter
Fig. 10-21
Traps cooking grease particles.
The grease filter must be cleaned once a month using non-aggressive detergents, either by hand or in the dishwasher, which must be set to a low temperature and a short cycle. When washed in a dishwasher, the grease filter may discolor slightly, but this does not affect its filtering capacity.
To remove the grease filter, pull the spring release handle.
Charcoal filter (filter version only)
Fig. 20
It absorbs unpleasant odors caused by cooking.
The saturation of the charcoal filter occurs after more or less prolonged use, depending on the type of cooking and the regularity of cleaning of the grease filter.
In any case it is necessary to replace the cartridge at least every four months.
The charcoal filter may NOT be washed or regenerated.
Remove the grease filters.
Apply one charcoal filter on each side and hook it onto the hood. Refit the grease filter.
Replacing lamps
Disconnect the appliance from the electricity.
Warning! Prior to touching the light bulbs, ensure they are cooled down.
Extract the drawer completely.
Remove the suction grill to access the lamp area.
Remove the damaged light and replace it with a new one (see the table below):
| Lamp | Power (W) | Socket | |
| 3 | E14 | ||
| Voltage (V) | Dimension (mm) | ||
| 230 | 55 (Light Center Length) | ||
| ILCOS D Code (according IEC 61231) | |||
| DRGSB/C/UB-3/27/1B-230-E14-55 | |||
Put the grill back.
If the lights do not work, make sure that the lamps are fitted properly into their housings before you call for technical assistance.
Extract the drawer completely.
Remove the suction grill to access the lamp area.
Byalte nvy oxapa anoppoqnonc yia va eioeAtheta otov xwp oTou Biokovtai oAaTec.
Application of the corresponding measurement of the table (definition of the table of contents):
Parts of the device, separated during transportation.
The appliance is designed for household use. It should be used only for the intended purpose and at the specified temperature and washing cycle.
If the filter for the household appliance is clogged, it is possible to clean it, but this does not affect its filtering capacity.
To remove the filter for the household appliance, press the button with the spring mechanism.
Active carbon filter (only for filtering version)
Fig. 20
The appliance is designed for household use only.
The filter is active inside and becomes clogged approximately after the first use, depending on the type of food and how often you use the filter.
In any case, it is necessary to replace the active filter at least every three months or when the saturation indicator shows that it is necessary.
Do not reuse it.
Remove the filter for cleaning.
Insert one filter on each side of the aspirator and lock it.
Mount the filter for cleaning again.
Replacing the light bulb
Disconnect the device from the power supply.
Warning! Before taking the light bulb in hand, make sure it has cooled down.
Remove the frame from the lamp.
To access the bulb, remove the suction grille.
Remove the damaged bulb and replace it with a new one (consult the table below):
| Лампа | Мошноct (W) | Контукт | |
| 3 | E14 | ||
| Напlexени (V) | Разmersр (mm) | ||
| 230 | 55 (Дължина на Чeнтыр на Светлина) | ||
| Код ILCOS D (B сьответостбVE c IEC 61231) | |||
| DRGSB/C/UB-3/27/1B-230-E14-55 | |||
Mount the grille again.
If the bulbs do not light, check that they are installed correctly, or contact a specialist.
RO - Installation and use instructions
Extractor hood.
Do not connect the appliance to the electrical power supply until the installation is completely finished.
As regards technical and safety measures for the discharge of vapors, strictly comply with the provisions of local competent authorities. - The aspirated air must not be discharged into a flue used for exhaust fumes from appliances burning gas or other fuels. - Do not use or leave the extractor without correctly installed lamps, with the risk of electric shock. - Never use the extractor without the correctly installed grille! - The extractor must never be used as a support surface, unless specified on the plate. - Use only screws for fixing supplied with the product for installation or, if not supplied, check that the screws are of the correct type. - Use the correct screw length specified in the installation manual.
In case of doubt, consult an authorized service center for maintenance or qualified personnel.
WARNING!
- Failure to install the screws or fixing device in accordance with these instructions may result in electrical hazards. Do not use the device with a programmer, timer, separate remote control or any other device that switches on automatically.
This product is marked in accordance with European Directive 2012/19/EC on the disposal of electrical and electronic equipment (WEEE).
By ensuring the correct disposal of this product, you will help prevent potential negative consequences for the environment and human health.

The symbol on the product or on its accompanying documents indicates that this product must not be treated as household waste. Instead, it should be handed over to the appropriate collection point for the recycling of electrical and electronic equipment.
Disposal must be carried out in accordance with local waste disposal regulations.
For more detailed information on the treatment, recovery and recycling of this product,
please contact your local city office, your household waste disposal service or the shop where you purchased the product.
The device has been designed, tested and manufactured in accordance with:
- Safety: EN/IEC 60335-1; EN/IEC 60335-2-31, EN/IEC 62233.
- Key characteristics: EN/IEC 61591; ISO 5167-1; ISO 5167-3; ISO 5168; EN/IEC 60704-1; EN/IEC 60704-2-13; EN/IEC 60704-3; ISO 3741; EN 50564; IEC 62301.
- EMC: EN 55014-1; CISPR 14-1; EN 55014-2; CISPR 14-2; EN/IEC 61000-3-2; EN/IEC 61000-3-3. To reduce the impact on the environment, turn on the extractor hood at minimum speed when you start cooking and leave it running for a few minutes after you finish cooking. Increase the speed only in case of large amounts of smoke and steam, and use higher speeds only in extreme situations. Replace the charcoal filters when necessary to maintain good odor removal efficiency. Clean the grease filters when necessary to maintain good grease filter efficiency. Use the maximum diameter of the duct system specified in this manual to optimize efficiency and minimize noise levels.
Use
The hood is designed to operate in air extraction mode or air recirculation mode.

Using the air extraction mode
In this mode, vapors are discharged outside through the duct pipe connected to the connecting ring.
WARNING!
The exhaust pipe is not included and must be purchased separately.
The diameter of the exhaust pipe must match the diameter of the connecting ring.
WARNING!
If the hood is equipped with a charcoal filter, make sure it is removed.
Connect the hood to the exhaust pipe with a diameter corresponding to the air outlet opening (connecting flange).
Use a pipe with the minimum necessary length. Use a pipe with the fewest bends (maximum bend angle: 90°).
Avoid sharp changes in the pipe cross-section.
WARNING! If the hood is equipped with a charcoal filter, remove it.

Switching to recirculation mode
air
must use a charcoal filter, which is available from your distributor. The extracted air is purified and deodorized before it is returned to the room through the top grille.
Attention! If the hood is not equipped with a charcoal filter, install one before use.
Installation
The distance between the lower edge of the hood and the hob surface must be at least 50 cm for electric hobs, and at least 65 cm for gas or combination hobs.
If the installation instructions for the gas hob specify a greater distance, follow that.

Electrical connection
The voltage must correspond to the voltage indicated on the technical data plate located inside the appliance. If the hood is fitted with a plug, connect the plug to a suitable socket. It must comply with current regulations and be placed in an accessible location. The socket can be switched on after installation. If the hood is not fitted with a plug (direct connection to the mains), or if the socket is not in an accessible location after installation, use a suitable two-pole switch that ensures complete disconnection from the mains in case of overvoltage category 3, in accordance with installation instructions.

Attention!
Before connecting the electrical system of the hood to the power supply and checking its proper functioning, make sure that the power cable is correctly installed.
The hood has a special power cable; in case of damage, it must be ordered from the technical service department.
Installation
Before starting installation:
Check that the dimensions of the hood you purchased are suitable for the chosen installation location.
- Filters for the hood, see the table of contents (corresponding section). Filters are installed only if you want to use the hood in recirculation mode.
Check that no objects remain inside the hood that were placed there during its
transport (for example, bags with screws, warranty sheets, etc.). If any are present, remove them and keep them.
This hood must be secured to a wall or another object that supports it.
Operation
The hood is equipped with a control panel for adjusting the speed of the exhaust fan and turning on the work surface lighting.
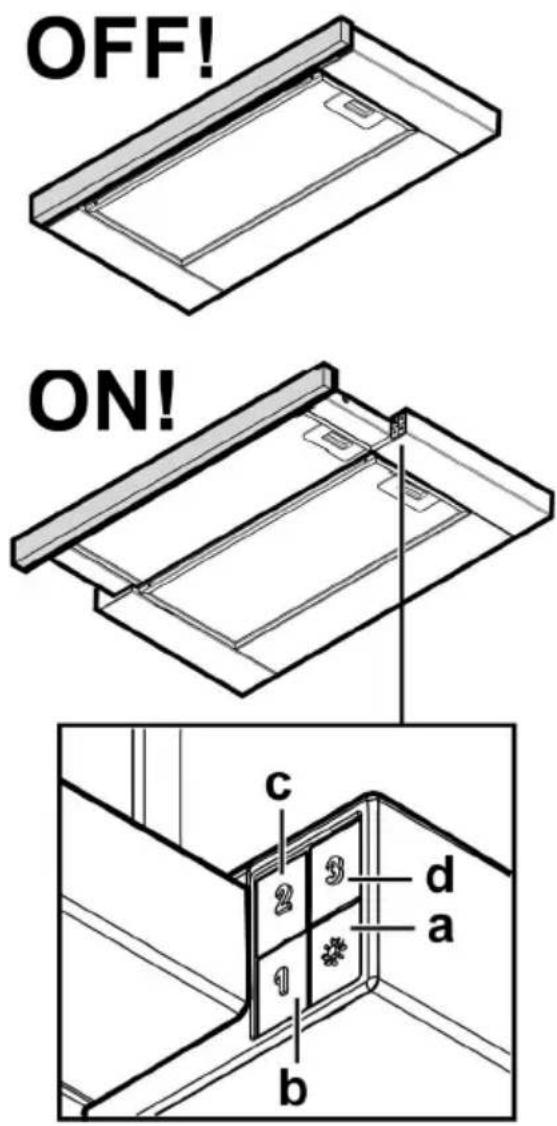
a. Light switch ON/OFF. b. Switch OFF/SPEED 1 c. Speed selector 2 d. Speed selector 3
Maintenance
Cleaning
For cleaning, use only a special cloth moistened with a neutral liquid detergent. Do not use any tools for cleaning. Do not use products containing abrasive materials. DO NOT USE ALCOHOL!
Grease filters
Fig. 10-21
Retains grease particles coming from the hob.
The filter should be cleaned monthly with non-abrasive detergents, by hand or in the dishwasher at low temperature and with a short cycle.
Washing in the dishwasher may cause some discoloration of the grease filter, but its filtering characteristics remain absolutely unchanged.
Use the hood to pull out the lamp.
Remove the pulled-out grille to gain access to the backlight lamps.
Unscrew the damaged lamp and replace it with a new one (see the table below).
| Лампа | Мошность (Bт) | Цокль | |
| 3 | E14 | ||
| Наряжени (B) | Размер (MM) | ||
| 230 | 55 (ВыICOTa СВЕТОВОТо цHTра) | ||
| КоД ILCOS D (no систeme IEC 61231) | |||
| DRGSB/C/UB-3/27/1B-230-E14-55 | |||
Reinstall the new filters for the pulled-out grille.
If the lighting system does not work, check the correct installation of the lamps in the sockets before contacting technical support.
Carefully follow the instructions given in this manual. The manufacturer is not responsible for damage or injury that may occur due to improper use of the device, not following the instructions given in this manual. The product is designed for household use only, as stated in the instructions and intended for home use.
It is important to keep these instructions so that you can refer to them at any time. In case of sale, before handing over the device, make sure that the instructions are included with the product. - Read the instructions carefully: they contain important information about installation, use, and safety. It is forbidden to use electrical or mechanical modifications in the ventilation ducts. - Before starting the installation, check that all components are free of defects and not damaged. Otherwise, contact the place of purchase and stop the installation.
Note: Parts marked with the symbol (*) are additional accessories and are supplied with some models, or are parts that are not included in the kit and need to be purchased separately.

Safety warnings
Before starting any cleaning or maintenance operation, disconnect the hood from the electrical supply by unplugging it from the socket or switching off the main switch.
-For installation and maintenance operations, use work gloves. -The hood can be used by children aged 8 and above and by persons with reduced physical, sensory or mental capabilities, or lack of experience and knowledge, if they are supervised or have been instructed on the safe use of the hood and understand the hazards involved.
with the dangers.
-Children must be supervised and must not play with the appliance. Cleaning and maintenance must not be performed by children without supervision. -The hood must have sufficient ventilation when used simultaneously with other appliances that operate on gas or other fuels. The hood must be cleaned frequently both inside and outside (at least once a month), following the instructions in the maintenance manual. Failure to follow the cleaning and filter replacement instructions increases the risk of fire. Strictly forbidden to cook with an open flame under the hood. -For replacing the lighting lamps, use only the lamps specified in the maintenance/replacement section of the manual.
Using an open flame under the hood can damage the filters and may cause a fire, so it is necessary to avoid it in any case.
Installation must be carried out by qualified personnel to prevent the risk of fire from spilled oil.
WARNING: The accessible surfaces of the device may become hot during operation.
Do not connect the device to the electrical supply until the installation is fully completed.
- This applies to technical and safety measures when using the device. Strictly follow the standards of local competent authorities.
- Check that the exhaust pipe is not blocked before using the device. Do not use or store the device without properly installed lamps, as there is a risk of electric shock. Never use the device without a properly installed grille! The device must never be used on a surface that is not indicated. Use the screws for fixing the set with the product of the installation, which is included in the set. Add screws of the correct type. Use the correct length of screws as indicated in the installation instructions.
- In case of doubt, consult an authorized center or qualified personnel.
WARNING!
Improper installation of the fixing screws and devices for fixing the appliance may lead to risks of electric shock. Do not use with a programmer, timer, separate remote control, or any other device that switches on automatically.
This product has been marked in accordance with the European Directive 2012/19/EC on waste electrical and electronic equipment (WEEE). By ensuring the correct disposal of this product, you will help prevent potential negative consequences for the environment and human health, which could otherwise be caused by inappropriate waste handling.

The symbol on the product or on its accompanying documents indicates that this product must not be treated as household waste. It must be handed over to the appropriate collection point for the recycling of electrical and electronic equipment. The disposal must be carried out in accordance with local regulations for waste disposal. For more detailed information about the treatment, recovery, and recycling of this product, please contact your local city office, your household waste disposal service, or the shop where you purchased the product.
The device has been designed, tested, and manufactured in accordance with:
- Safety: EN/IEC 60335-1; EN/IEC 60335-2-31, EN/IEC 62233.
- Standards: EN/IEC 61591; ISO 5167-1; ISO 5167-3; ISO 5168; EN/IEC 60704-1; EN/IEC 60704-2-13; EN/IEC 60704-3; ISO 3741; EN 50564; IEC 62301. EMC: EN55014-1; CISPR 14-1; EN55014-2; CISPR 14-2; EN/IEC61000-3-2; EN/IEC61000-3-3. For proper operation, it is recommended to: Plug in the hood and set the minimum speed before cooking, and leave it running for a few minutes after cooking. Increase the speed only in case of large amounts of fumes and use the boost speed in extreme cases. To maintain high efficiency of odor extraction, if necessary, replace the charcoal filter(s). To maintain high efficiency of the grease filter, if necessary, clean the grease filter(s). Use the maximum diameter of the air exhaust system, as indicated in the instructions, for optimal efficiency and minimal noise.
Use
The hood is designed for operation in recirculation mode, with the outlet connected to the top or in filtration mode with recirculation.

Exhaust version
The fumes are discharged outside through an exhaust pipe connected to the flange.
WARNING!
The exhaust pipe is not supplied and must be purchased separately.
The diameter of the exhaust pipe must match the diameter of the connection ring.
WARNING!
If the hood is equipped with charcoal filters, they must be removed.
Attach the hood to the exhaust pipe and the exhaust outlet with the same inlet diameter (connection flange).
Use the shortest possible exhaust duct. Use an exhaust duct with the fewest number of bends (maximum bend angle: 90°). Avoid sudden changes in cross-section of the duct.
Warning! If the hood is equipped with a charcoal filter, it must be removed.

Filtration version
Remove the hood from the electrical outlet and then put it back in place. To use the hood in this mode, it is necessary
Install the filter system with activated carbon.
Warning! If the socket is not equipped with a carbon filter, install it before first use.
Installation
The distance from the bottom of the hood to the gas hob must be at least 50 cm, and for electric hobs, 65 cm, for gas and combined hobs.
It is necessary to take into account the distances specified in the instructions for installing the gas hob.

Electrical connection
The voltage in the electrical network must correspond to the characteristics indicated on the label located inside the hood. If the electrical connection plug is included in the kit, then it must be connected to a socket that matches the existing standard and is accessible, which can be done after installation. If the plug is not included in the kit (without electrical connection plug), or the socket is not accessible, then after installation, a certified two-pole switch must be installed to ensure complete disconnection from the network in case of overvoltage category III, in full compliance with installation rules.

WARNING!
Before reconnecting the plug to the electrical network, check the correctness of the connection, to ensure that the network is installed correctly.
The outer cover has a special conductive wire; in case of wire damage, contact the technical service.
Installation
Before installation:
- Check that the dimensions of the purchased product fit the chosen installation location. The filter(s) may be present (see also the relevant section). The filter(s) will be reinstalled if you want to use the hood in recirculation mode. Check that the inside of the hood is not blocked by objects placed there during transportation (e.g., packages with magazines, warranty cards, etc.), if any, remove them and keep them.
This hood must be installed in the existing element or another support system.
Operation
Check the liquid level control command and the light control for the working surface illumination.
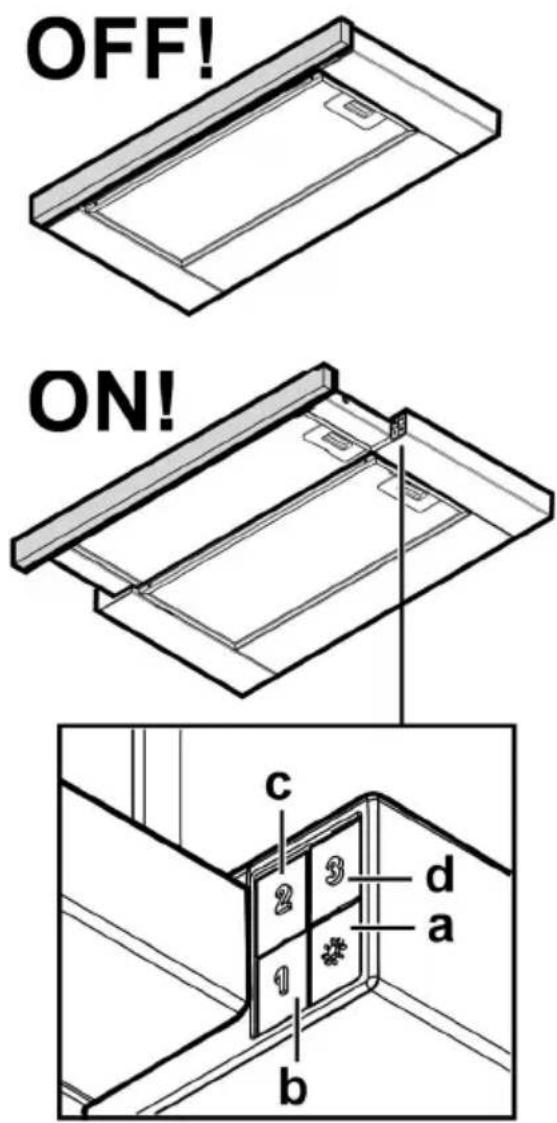
a. Turn the light ON/OFF. b. Turn OFF / hold for 1 second. c. Liquid level switch 2. d. Liquid level switch 3.
Dorna
Cleaning
Only use a special cloth moistened with a neutral cleaning agent. Do not use abrasive agents or tools for cleaning!
Do not use agents that contain abrasive materials. Do not use alcohol!
Grease filter
Fig. 10-21
Grease filters catch grease that forms during cooking.
Clean the filters regularly with mild cleaning agents, by hand or in the dishwasher at low temperature and with a short cycle.
When washing in the dishwasher, the metal grease filter may lose its color, but its filtering characteristics will not change if washed properly.
Gorky and Tatar.
I am a big fan of the team, but the task is too difficult for the team.
Close the lid of the device, press the button (see the sequence):
| Шam | Куат (Вт) | Ушык | |
| 3 | E14 | ||
| Керney (В) | Өлшем (МM) | ||
| 230 | 35x102 (шам opТасын и Чьдыfbl) | ||
| ILCOS D КODEB (IEC 61231 стадартына сай) | |||
| DRGSB/C/UB-3/27/1B-230-E14-55 | |||
Press the button.
Kemecki Kapbik icTeMeReH KaFdaJaTaTexHnKaJbIK Kbl3MeT KepceTy OptaIbIFbIH XOJIbIKNaCTaH 6ypbIH, WamDapDbIH Dypbc OPHaTbIfAHbIH Tekcepin KeipH3.
PnpdpjyBajte cctp0rO ynataCTBaTdaeHb BO Oboj npnpaHnK. Hne od6nBaMe 6nIOKaKbA ODROBOPHOCT 3a 6nIOK AOB npo5nem, WTeTa nnNoxap npeu3BnKaH Ha anapaTOT KAKO pe3yJITat Ha HeCneJeHe Ha yNaTCTBaTA BKnyehn BO OBOJ npnpaHnK. AcnPapotOp e HameHET NCKnyuHbO 3a DomauHa yNotpe6a.
Baxho e da ro 3aCyBaTe Oba yNaTCTBO 3a da 6n MoKeIe Da ro KOHCyTTnpate Bo 6nIO kOJ MOMENT. Bo cnyaj Ha npoJaX6a, pacxOyBaHe nHn Ha npemecTyBaHe, Heka octahe 3aEDHO co npOn3BODoT. - IpoHTajTe HBNMaTeJIHO yIaTCTBaTa: OBJe mAbaxHn INHΦOpMauIN 3a INHCTaJIIPAbETo, 3a yNtpe6ataN 3a 6e36eHocTa. He BpweTe eJEnKtpuHn mIIM MExaHnUKN 3MeHN Ha npOn3BOoT nNn Ha N3dyBHHTe KaHaJI. - Прд да почheTe co MOHTIPAhe Ha anapaTOT npOBepeTe dHa He ce OwTeTeHn KOMnoHEHTnte. Bo cnpOTINBHO, obpaTeTe ce kaj BaIWIOT nCTpN6yTeP n He npoDoJXyBaJIte Co MOHTIPAheTO.
3a6eneka:doataoHTe 03aueHn CO CmboJOT (*) Ce akyntaTbBeH doaTeH npBop KOn CE Bknyehn cAmo BO HeKoNkMoJeN, a aKO He CE Bknyehn BO MoJeNt Tpe6a da ce Haabat.
Baxhncobetn
- Празд 6илokakBa onepaunja 3a чисье плн оджуbahe, Иckлучete ro acnnapatopot od eilektpnHaTa Мржа со вадеье на CTpyjHnot рпИКлучнК плс co nCKluyBaHe Ha DOMaшнOT Мржен пркнHyBaч. 3a cnte onepaun 3a MOHTaxa n OdpjyBaHe da ce KopncTat pa60THn paKaBn.
- Oboj anapat moke da ce kopnctn od cTpaHa Ha Deca 8 roDHH na Harope nIuCa co HamaJIeHN QH3NcK, CEH3OPHn IIN MeHTaJIHn CNOco6HOCTn, INn aKO HeMaat NCKyCTBO INn 3HaEHe, DOKOJIky Ce NOd HAd3Op INn IMaAT DoBneHO IHCTpyKznn 3a yNoTppe6a Ha anapatot Ha 6e3BeDen HauHH n pa3bnpaaT ONaCHOCTnte NOBp3aHn CO Hero. Tpe6a da ce BnMaBa decaTa da He cn nIgpaat co anapatot.
- YnCTeHbETo n OdpKxUBaHbETo He Tpe6a Da ro npaBat Deca 6e3 HaI3Op.
- Посторида мopa набende доволноюветера KORA Кчнсnot acnnpatopce коритул заедно co anapatn koncoropybaat rac плдругл ropива.
- Acnnapotop Mopa peoBHO da ce chnti KaO OJ BHaTpeHocTa Taka N od HAnBopeHocTa (HAJMAIKY EDHAI MECEUHO), Bo cekoj cnuyaj noTppeHo e Da ce NoCTanyBa BO cornaCHOCT CO yNaTCTBaTa 3a OndKyBaHe. Ako He ce cIeDat yNaTCTBaTa BO OndHoc Ha YnCTeHbETo Ha acnnpaTopoT n 3ameHa T YnCTeHbETo Ha qnIITpTe Ke DOBeDe Do pN3NK OD NOxapn.
- Ctrporo ce 3a6paHyBa qIam6npaHbe Ha xpaHaTa POnd camNt acnnpaTop. 3a 3aMeHa Ha cnjaJIuCaTa KOpNCTeTecAMO OJ TINOT Ha cnjaJIuCa HABeDeH BO DeIOT OdpKyBaHe/3aMeHa Ha cnjaJIuCaTa BO OBOj npnpauHnK.
YnoTpe6bata Ha OTBOpEN PIIaMeHn e 3a 0nIPTpTe N MoKe Da npEiN3BnKa pN3NK OJ NOXap N IopaN Toa Mopa Da Ce N36eRHyBa BO CNTe OKOJIHOCTN.
Check the motor regularly to ensure it is properly directed so that the oil does not overheat and catch fire.
WARNING: When the appliance is in operation, the accessible parts of the hood may become hot.
Do not connect the appliance to the electrical power supply until the installation is completely finished.
Complete.
- When disposing of the appliance, it is important to follow the technical and safety regulations for scrapping. It is essential to carefully follow the rules set by the local authorities.
- The exhaust air must not be discharged into an active flue used for fumes from appliances burning gas or other fuels. Do not use or leave the hood without properly installed filters, as there is a risk of electric shock.
- Never use the hood without the correctly installed filter grid!
- The hood must never be used as a support surface unless explicitly stated. Use only the screws provided for mounting, and if not provided, purchase the correct type of screws.
- Use the correct length for the screws as indicated in the installation instructions. In case of doubt, consult the authorized technical service or a person with appropriate qualifications.
WARNING!
- Failure to install the screws or fixing devices in accordance with these instructions may result in electrical hazards. Do not use with a programmer, timer, separate remote control, or any other device that activates automatically.
This appliance is marked according to the European Directive 2012/19/EC on Waste Electrical and Electronic Equipment (WEEE). By properly disposing of this product, you help prevent potential negative consequences for the environment and human health, which could otherwise be caused by inappropriate waste handling of this product.

The symbol on the product or its packaging indicates that this product cannot be treated as household waste. Instead, it should be handed over to the appropriate collection point for the recycling of electrical and electronic equipment. Disposal must be carried out in accordance with local environmental regulations for waste disposal. For more detailed information about treatment, recovery, and recycling of this product, please contact your local authorities, your household waste disposal service, or the shop where you purchased the product.
The appliance is designed, tested, and manufactured according to: - Safety: EN/IEC 60335-1; EN/IEC 60335-2-31, EN/IEC 62233.
- Performance: EN/IEC 61591; ISO 5167-1; ISO 5167-3; ISO 5168; EN/IEC 60704-1; EN/IEC 60704-2-13; EN/IEC 60704-3; ISO 3741; EN 50564; IEC 62301. EMC: EN 55014-1; CISPR 14-1; EN 55014-2; CISPR 14-2; EN/IEC 61000-3-2; EN/IEC 61000-3-3.
Improper use can affect the environment.
Turn on the aspirator at minimum speed at the end of cooking and leave it running for a few more minutes after cooking is finished. Increase the speed in case of a large amount of fumes and use the boost speed in rare situations. Replace the grease filter (-PITE) when necessary to maintain the efficiency of the appliance. Clean the grease filter (-PITE) when necessary to maintain its efficiency. Use the maximum diameter of the exhaust system shown in this manual to optimize efficiency and reduce noise.
Use
The aspirator can be used in extraction mode with external exhaust or in filter mode with recirculation of air.

Extraction mode with
external exhaust
The air is expelled outside through an exhaust pipe connected to the upper connection.
WARNING!
The exhaust pipe is not supplied and must be purchased. The diameter of the exhaust pipe must be equal to the diameter of the connection ring.
WARNING!
If the aspirator is equipped with an active carbon filter, it must be removed.
Connect the aspirator to the exhaust pipes and to the exhaust outlet with a diameter equal to the air outlet (see figure).
! Use of pipes with the minimum required length. ! Use of pipes with as few bends as possible (maximum angle of curvature: 90°). Avoid sharp changes in the cross-section of the pipe.
Attention! If the aspirator is equipped with an active carbon filter, it must be removed.

Filter version
The air outlet must be free of obstacles and must not be blocked, so that the air can flow back into the room. For using the extractor hood in this variant, it is necessary to install an additional system for
filtering based on activated carbon filters.
Warning! If the extractor hood is not equipped with a charcoal filter, the filter must be ordered and installed before use.
Installation
The minimum distance between the hob and the extractor hood for cooking appliances must not be less than 50 cm for electric cooking appliances and 65 cm for gas or combined cooking appliances. If the installation instructions for the gas hob specify a greater distance, this must be respected.

Electrical connection
The main power supply must correspond to the specifications shown on the rating plate inside the extractor hood. If the extractor hood is equipped with a plug, connect it to a socket in accordance with the electrical regulations, positioned in an accessible place after installation. If it is not equipped with a plug (direct connection to the electrical supply) or if the plug is not in an accessible place after installation, use a bipolar switch in accordance with the standards that ensure complete disconnection from the electrical supply under conditions of overvoltage category III, in accordance with the installation instructions.

Adjustment!
Before (re)connecting the extractor hood to the electrical supply and checking its functionality, always check that the power cable is correctly installed.
The extractor hood is supplied with a power cable; in case of cable damage, contact the technical service.
Operation
Before starting the installation:
Check that the purchased product has the appropriate dimensions for the installation space. The outlet/charcoal filter/activated carbon filter, if provided (see relevant paragraph), should be installed only if you intend to use the extractor hood in the filtering variant. Check that inside the extractor hood (e.g., during transport) there is no packaging material (e.g., screws, washers, etc.), and if there is, remove and discard it.
This type of extractor hood must be installed inside a cabinet or another type of kitchen unit.
Functioning
The device is supplied with a control panel with a speed regulator for the fan and a regulator for the lighting under the hood.
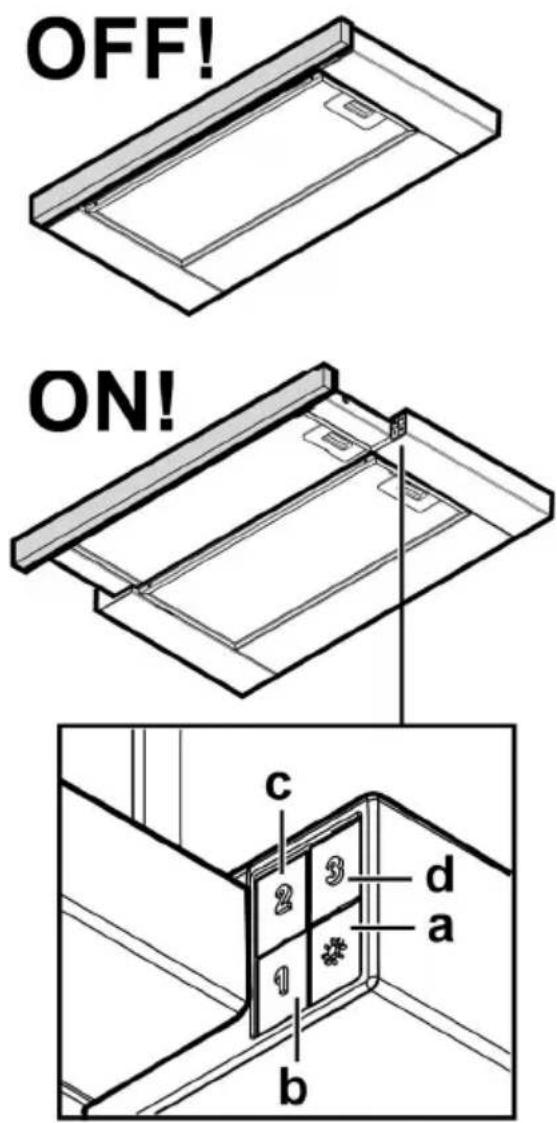
a. Switch for turning on/off the light. b. Switch for turning off/speed 1 c. Speed 2 d. Speed 3
Maintenance
Cleaning
For cleaning, use exclusively a cloth dampened with neutral detergent. Do not clean with abrasive or other instruments.
Do not use products containing abrasives. DO NOT USE ALCOHOL!
Grease filter
Fig. 10-21
For collecting grease particles from cooking.
The metal grease filter should be cleaned monthly with neutral detergent, either in a dishwasher at low temperatures and in a short cycle.
When washed in a dishwasher, the metal grease filter may lose its shiny appearance, but its filtering characteristics are not affected.
To remove the grease filter, pull it towards you to release it.
Filter with activated charcoal (only for versions with filters)
Fig. 20
For collecting unpleasant odors from cooking.
The filter must be installed on the intake pipe according to the manufacturer's instructions, and its use depends on the type of fuel and the operating conditions of the engine. In any case, it is necessary to replace the filter at least every 4 months.
It cannot be cleaned or reused.
Remove the fuel filter.
Place a container under the filter on the side and catch the fuel with a rag.
Reinstall the fuel filter.
Replacing the spark plugs
Turn off the device and let it cool down.
Warning! Before you start, check that the device is unplugged.
Remove the spark plug cap.
Remove the air filter cover for access to the spark plug.
Remove the old spark plug and replace it with a new one (according to the specification table).
| Ламба | Мок (W) | Штек- КOHТАКТ | |
| 3 | E14 | ||
| Наон (V) | Димензий (mm) | ||
| 230 | 55 (Дожина на Чентрална对接а Светлина) | ||
| КоД ILCOS D (ВО согласност co IEC 61231) | |||
| DRGSB/C/UB-3/27/1B-230-E14-55 | |||
Reinstall the air filter cover.
If the lighting does not work, contact a technical support specialist, check that the bulbs are properly installed.

- Since the area of triangle AOB equals the area of triangle COD equals the area of triangle BOC,
Waste Electrical and Electronic Equipment (WEEE)

001
ailll lallllllllll 1
jill li: aiiaial,
aaii i 1
y j 1000
.5j
killl lss s j gill 100000000000000000000000000000
ailll lllllllll
Jcklly 1s k j y gll aal l s uu n blaa
1
a lae e jao g aas baaal
al al
aiae aie 1
15 15
glll aalll lglblc 1y jn nn nnnn nn nnnn
a 1
a 1
ailll Jao Jao pbl all jai aall
a 1
y j 15
a 1
paai pi jlll llaa aaljgl aalal
gall lac jayll s y, axl bai lae 1
jiall pliuiuui jaiia g
joo kailll aaii jaiy
e 1
a 1
aaiy
Cilgaio:gi:Gaiyaiiaiuiyaiyaiii
aokulljol1golil 100 jill llae Jda
y
Jbllg 1
iagw wuxu Lxu ySioJus jI 1
J 1
aueae aee eae ee eae eae eae eae eae eae
Ciaia jie jie 气 ^ ( 气 ) ^ jaojai gill ciisall:
1000 2000
1
A
i 1
y
J 1
J 1
Jjll
e 1
- EN - INSTRUCTION ON MOUNTING AND USE
- CAUTION
- WARNING
- USE
- EXTRACTION VERSION
- A
- FILTRATION VERSION
- INSTALLATION
- ELECTRICAL CONNECTION
- MOUNTING
- BEFORE BEGINNING INSTALLATION
- OPERATION
- MAINTENANCE
- CLEANING
- GREASE FILTER
- CHARCOAL FILTER (FILTER VERSION ONLY)
- REPLACING LAMPS
- ACTIVE CARBON FILTER (ONLY FOR FILTERING VERSION)
- FIG
- REPLACING THE LIGHT BULB
- RO - INSTALLATION AND USE INSTRUCTIONS
- EXTRACTOR HOOD
- USING THE AIR EXTRACTION MODE
- SWITCHING TO RECIRCULATION MODE
- AIR
- ATTENTION
- BEFORE STARTING INSTALLATION
- GREASE FILTERS
- SAFETY WARNINGS
- EXHAUST VERSION
- BEFORE INSTALLATION
- DORNA
- BAXHNCOBETN
- COMPLETE
- EXTERNAL EXHAUST
- FILTER VERSION
- ADJUSTMENT
- BEFORE STARTING THE INSTALLATION
- FUNCTIONING
- FILTER WITH ACTIVATED CHARCOAL (ONLY FOR VERSIONS WITH FILTERS)
- REPLACING THE SPARK PLUGS
Brand : ELICA
Model : ELITE 14 PRF0098879B
Category : Range hood