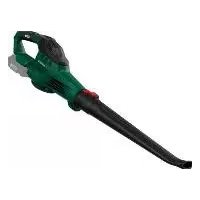
PPTLBA 40Li A1 - Leaf blower PARKSIDE - Free user manual and instructions
Find the device manual for free PPTLBA 40Li A1 PARKSIDE in PDF.

| Product type | Cordless turbine leaf blower |
| Brand | Parkside |
| Model | PPTLBA 40Li A1 |
| Power supply | 2 Parkside X 20 V TEAM batteries (40 V DC total) |
| Max nominal power | 1000 W |
| Nominal speed | 9000 – 23000 min⁻¹ |
| Max air speed | 250 km/h |
| Weight (without battery) | 2.78 kg |
| Protection type | IPX0 |
| Sound pressure level (L_pA) | 74.1 dB(A), K=3 dB |
| Guaranteed sound power level | 96 dB(A) |
| Vibrations (a_b) | ≤2.5 m/s², K=1.5 m/s² |
| Main functions | Variable blowing, Turbo mode (15 s), round and flat nozzle, shoulder strap |
| Package contents | Blower, 2-part blower tube, flat nozzle, shoulder strap, manual |
| Maintenance and cleaning | Clean ventilation slots with a damp cloth; do not use solvents or immerse in water |
| Safety instructions | Wear PPE (goggles, helmet, gloves, shoes); keep a distance of 5 m; remove battery before maintenance |
| Spare parts available | Blower tube (ref. 911 10000), shoulder strap (ref. 91110002), Smart PAPS 204 A1 battery (ref. 80001154) |
| Repairability | Repairs by authorized service center; parts available during warranty period |
| Warranty | 5 years (France/Belgium) from date of purchase |
| General information | Device compatible with Parkside X 20 V TEAM range; do not use indoors; store dry and dust-free |
Frequently Asked Questions - PPTLBA 40Li A1 PARKSIDE
User questions about PPTLBA 40Li A1 PARKSIDE
0 question about this device. Answer the ones you know or ask your own.
Ask a new question about this device
Download the instructions for your Leaf blower in PDF format for free! Find your manual PPTLBA 40Li A1 - PARKSIDE and take your electronic device back in hand. On this page are published all the documents necessary for the use of your device. PPTLBA 40Li A1 by PARKSIDE.
USER MANUAL PPTLBA 40Li A1 PARKSIDE
Cordless Turbine Leaf Blower 40V
Translation of the original instructions
NL BE
Accu-turbinebladblazer 40 V
Before reading, unfold the page containing the illustrations and familiarise yourself with all functions of the device.
FR BE
GB / MT Translation of the original instructions Page
General description. 23
Scope of delivery - Parts list. 23
Function description. 23
Overview 23
Technical data. 23
Charging time 24
Safety instructions. 25
Symbols and icons 25
General notes on safety 26
Residual risk 30
Initial start-up 31
Charging the battery 31
Remove/insert battery 31
Fitting/removing blower pipe and flat nozzle 31
Putting on the carrying strap 32
Operation 32
Switching on and off 32
Turbo mode 33
Checking the charge status of the battery. 33
Working with the leaf blower 33
Cleaning and maintenance.....34
Cleaning. 34
General maintenance 34
Storage 34
Disposal and protection of the environment 34
Spare parts/Accessories. 35
Trouble shooting 36
Guarantee 37
Repair Service. 38
Service-Center 38
Importer 38
Translation of the original EC declaration of conformity. 217
Exploded Drawing 229
Introduction
Congratulations on the purchase of your new device. With it, you have chosen a high quality product.
During production, this equipment has been checked for quality and subjected to a final inspection. The functionality of your equipment is therefore guaranteed.
The operating instructions constitute part of this product. They contain
important information on safety, use and disposal. Before using the product, familiarise yourself with all of the operating and safety instructions. Use the product only as described and for the applications specified. Keep this manual safely and in the event that the product is passed on, hand over all documents to the third party.
Intended use
The cordless leaf blower is only suitable for gathering dry leaves.
This equipment is not suitable for commercial use. Commercial use will invalidate the guarantee. Any other use that is not specifically approved in these Instructions can result in damage to the blower and give rise to serious danger for the user.
The equipment is designed for use by adults. Adolescents over the age of 16 may use the device only under supervision. The use of the device in the rain or in a humid environment is forbidden.
The user or operator is responsible for accidents causing injury to other people or damage to property.
The manufacturer cannot be held liable for damage when the blower is not used in conformity with its intended purpose or due to incorrect operation.
The device is part of the Parkside X 20 V TEAM series and can be operated using X 20 V TEAM series batteries. The batteries may only be charged using chargers from the Parkside X 20 V TEAM series.
General description
The illustrations for operating the device can be found on the fold-out page.
Scope of delivery - Parts list
Unpack the device and check for completeness. Dispose of the packaging material properly.
- Turbine cordless leaf blower
Blower pipe (two-part) -
Flat nozzle
-
Carrying strap
- Instructions for use

Battery and charger are not included.
Function description
The cordless leaf blower has a fan.
Foliage can quickly be gathered or blown out of hard to reach areas with the cordless leaf blower.
Refer to the following descriptions for a functional description of the controls.

Overview
1 Handle
2 Battery
3 Motor housing
4 Blower pipe
5 Guide rail
6 Attachment
7 Lock
8 Charge level indicator
9 Volume control
10 TURBO button
11 On/Off switch
12 Flat nozzle
13 Carrying strap
14 Push-fit lock
15 Charger

16 Button
17 Fixing lug

18 Holder
Technical data
Cordless Turbine
Leaf Blower ....... PPTLBA 40-Li A1
Motor voltage U 40 V (DC) (2x 20 V)
Current strength 1. 16 A I_2 . 25 A Rated power.. max. 1000 W Rated speed n ..9000 - 23000 min Air speed max. 250 km/h Protection type IPXO Weight (without battery) .2.78 kg Sound pressure level (L_pA) .74.1 dB(A), K_pA = 3 dB Sound power level (L_WA) guaranteed .96 dB(A) measured .94.47 dB; K = 2 dB Vibration (a_h) .. ≤ 2.5m / s^2;K = 1.5m / s
Noise and vibration values have been determined according to the standards and regulations mentioned in the declaration of conformity.
The stated vibration emission value was measured in accordance with a standard testing procedure and may be used to compare one power tool to another. The stated vibration emission value may also be used for a preliminary exposure assessment.

Warning: The vibration emission value may differ during actual use of the power tool from the stated value depending on the manner in which the power tool is used.
Try to keep the exposure to vibra-
tions as low as possible. Examples of measures to reduce vibration exposure are the wearing of gloves when using the tool and limiting the working hours. For this purpose all parts of the operating cycle have to be considered (for example, times when the electric tool is switched off and times when it is switched on but running without any load).
Charging time
The device is part of the Parkside X 20 V TEAM series and can be operated with batteries of the Parkside X 20 V TEAM series.
Batteries of the Parkside X 20 V TEAM series may only be charged using chargers of the Parkside X 20 V TEAM series.
We recommend that you operate this appliance with the following batteries only: PAP 20 A1, PAP 20 A2, PAP 20 A3, PAP 20 B1, PAP 20 B3, Smart PAPS 204 A1. We recommend charging these batteries with the following chargers: PLG 20 A1, PLG 20 A2, PLG 20 A3, PLG 20 A4, PLG 20 C1, PLG 20 C3, PDSLG 20 A1, Smart PLGS 2012 A1.
An up-to-date list of battery compatibility can be found at: www.lidl.de/akku
| Charging time (min) | PAP 20 A1 PAP 20 B1 | PAP 20 A2 | PAP 20 A3 PAP 20 B3 | Smart PAPS 204 A1 | Smart PAPS 208 A1 |
| PLG 20 A1 PLG 20 A4 PLG 20 C1 | 60 90 1 | 20 120 210 | |||
| PLG 20 A2 45 60 | 80 80 | 165 | |||
| PLG 20 A3 PLG 20 C3 | 35 45 60 | 50 | 120 | ||
| PDSLG 20 A1 | 35 45 60 | 50 | 120 | ||
| Smart PLGS 2012 A1 | 35 40 40 | 40 | 50 |
Safety instructions
This section describes the basic safety rules when working with the device.
Symbols and icons
Symbols on the appliance:

Warning!

Read the manual.

Danger due to materials blown out of machine!

Remove persons in the vicinity from the danger area.

Rotating turbine wheel p away from hands!

Remove the battery before maintenance work.

Wear eye protection.

Wear ear protection.

Wear breathing protection.

Wear anti-slip safety shoes.
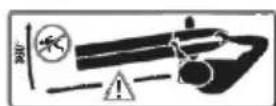
Keep a safety distance of at least 5 m from bystanders.

Do not leave the device in wet conditions. Do not work in the rain

Do not wear long hair uncovered. Use a hair net.

Battery charge level indicator

Guaranteed sound power level
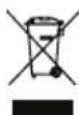
Electrical appliances must not be disposed of with the domestic waste.

The device is part of the Parkside X 20 V TEAM series.
Symbols used in the instructions

Hazard symbol with information on prevention of personal injury and property damage

Hazard symbol with information on the prevention of personal injury caused by electric shock

Precaution symbol with information on prevention of harm / damage

Notice symbol with information on how to handle the device properly
General notes on safety
IMPORTANT READ THROUGH CAREFULLY BEFORE USE KEEP IN YOUR FILES
Read the instructions carefully.

Caution! When using power tools, observe the following basic safety measures for the prevention of electric shocks and the risk of injury and fire:
Instruction:

Familiarise yourself with all the unit's parts and correct operation of the unit before you start working with it. Make sure that you can immediately switch off the unit in an emergency. Improper use of the unit may lead to serious injury.
Children, individuals with limited physical, sensory or mental capabilities, as well as those who have insufficient experience or knowledge or are not familiar with the instructions must never be permitted to use the device. Local regulations may specify an age restriction for the user..
Children must be supervised to ensure that they do not play with the device. Cleaning and maintenance must not be carried out by children.
The machine must not be used at altitudes over 2000m
- Read the instructions carefully. Familiarise yourself with the
controls and how to use the machine correctly.
- Never let children or persons who are not familiar with these instructions use the machine. Local regulations may restrict the age of the operator.
- Never operate the machine if there are people, particularly children or animals, nearby.
Preparation:
-
The personal protective equipment protects your own health and the health of others and ensures the smooth operation of the device:
-
Wear suitable work clothing, such as sturdy shoes with non-slip soles, long, robust trousers, gloves, safety goggles and ear protection. Wear these at all times while operating the machine. Never use the device barefooted or wearing open sandals. Wear respiratory protection to protect against dust.
-
Do not wear loose hanging clothing or jewellery that could be sucked into the air intake. Wear protective headwear to contain long hair. Keep long hair away from the suction apertures.
-
Pay attention to people, especially children, pets, open windows, etc. The blown material can be thrown in their direction. Stop working if they are in close proximity. Keep a safety distance of 5m around you.
- Be familiar with your surroundings and pay attention to poten
tial dangers that may be overlooked when working.
-
Carefully inspect the surface to be cleaned and remove all wires, stones, cans and other foreign bodies.
-
Use a rake or broom to remove foreign bodies before beginning the blowing process.
-
Use both parts of the blowpipe so that the airflow can work close to the ground.
-
In very dry conditions, lightly moisten the surface or use a sprayer to reduce the build-up of dust.
-
Do not work with a damaged or incomplete device or one which has been converted without the permission of the manufacturer. Before use, check the safety status of the device, in particular the switch.
-
Only use the device when fully assembled.
-
Never operate the device with defective protection equipment or faulty protection covers or without any protection equipment.
-
Please be aware that the operator or user is responsible for accidents or injuries to other people or their property.
-
Avoid wearing loose clothing, clothing with hanging laces or ties.
-
Operate the machine in a recommended position and only when standing on a solid, flat surface.
-
Do not operate the machine on a paved surface or a gravel surface where the ejected material
could cause injury.
Always perform a visual inspection prior to use to make sure that the fastening equipment is secured, the housing is undamaged and the protective equipment and shields are present. Replace worn or damaged components in sets to ensure balance. Replace damaged or illegible markings.
-
Ensure that the in-feed is empty prior to starting the machine.
-
Keep your face and body away from the in-feed aperture.
-
Do not allow hands or other body parts or clothing to enter the in-feed or discharge chute, or to be in the vicinity of moving parts.
-
Do not stand within the ejection zone while operating the machine.
Take extreme care when feeding material into the machine to ensure no metallic objects, stones, bottles, canisters or other foreign objects are taken in.
- If the cutting mechanism comes into contact with a foreign object or the machine starts to emit unusual noises or vibrate, immediately turn off the power source and wait for the machine to come to a standstill. Remove the battery and perform the following steps before restarting and operating the machine:
Investigate for damage;
-
Replace or repair damaged parts;
-
Check for loose parts and tighten as necessary.
GB MT
- Do not allow processed material to accumulate in the ejection zone since this can prevent proper ejection and cause the material to be brought back into the machine via the in-feed aperture.
- Avoid an abnormal work posture. Always maintain your balance to ensure secure footing on slopes. Walk, do not run.
Operation:
- Do not switch on the device if it is held upside down or is not in operating position.
Avoid starting the device unintentionally. Make sure that the device is switched off before you pick it up or carry it.
Having your finger on the switch of the device while carrying it can cause accidents.
- Never point the device at others, and in particular, do not point the air jet at the eyes and ears during operation.
Always ensure secure positioning, particularly on slopes, when working. Always hold the device tightly with both hands and only work with a correctly adjusted carrying strap. -
Do not stretch too far and do not lose your balance.
If you are tired or lacking in concentration or have consumed alcohol or tablets, do not work with the device. Always have a break on time. Work using common sense. Move slowly, do not run. -
Prolonged use of the device can lead to blood circulation disorders in the hands caused by vibration. You can however extend your machine use time by wearing appropriate gloves or by taking regular breaks.
- Avoid operating the machine in poor weather conditions, especially when there is a lightning hazard. Only work in daylight or where there is good artificial illumination.
-
Stop the machine and remove the batteries from the device. Ensure that all moving parts are at a full standstill:
-
when you are not using the device or when you are transporting or leaving it unattended;
- before removing any obstruction or blocked channels,
- before checking, cleaning or carrying out other work on the machine.
-
after contact with foreign bodies or if abnormal vibration occurs.
-
Keep the power source free of refuse or other accumulated material to prevent it from becoming damaged and avoid a potential fire.
- Do not tilt the machine while the power source is running.
- Do not use the device in a closed or poorly ventilated area.
- Do not use the device near flammable liquids or gases. There is a risk of fire or explosion if this advice is not heeded.
In the case of an accident or malfunction during operation,
the device must be switched off immediately and the batteries removed. Read the "Troubleshooting" section to correct any malfunctions or contact our Service Centre.
-
Walk at a steady pace, do not run.
-
Ensure you are standing securely and do not lose your balance. Avoid an abnormal work posture.
-
When material is being taken in by the machine, never stand on a higher level than the base of the machine.
-
If the machine becomes clogged, turn off the power source and disconnect the machine from the mains supply or remove the batteries before freeing any refuse.
-
Never operate the machine with defective protective equipment or shields, or without safety equipment.
-
Do not transport the machine while the power source is running.
-
Ensure that you do not touch any of the dangerous moving parts before you have unplugged the machine from the mains supply or removed the batteries from the machine, and that the dangerous moving parts have come to a complete standstill.
In the case of an accident or malfunction during operation, the device must be switched off immediately. Injuries must be properly treated or medical assistance sought. Read the "Troubleshooting" section to
correct any malfunctions or contact our Service Centre.
Maintenance and storage:
-
Regularly check the functionality and integrity of the device to avoid danger to the operator.
-
Replace worn or damaged parts in the interests of safety. Only use original replacement parts and accessories.
-
Do not try to repair the device yourself, unless you have professional training. All work not mentioned in these instructions may only be performed by authorised service representatives commissioned by us.
-
Store the device in a dry place and out of reach of children.
-
Treat your device with care. Clean the ventilation slits regularly and follow the maintenance instructions.
-
Keep all inlets for the cooling air free of debris.
-
Do not use the device if the switch cannot be turned on and off. Damaged switches must be replaced at a customer service workshop. Do not overload your device. Only work within the power range indicated. Do not use low-performance machines for heavy work. Do not use the device for purposes for which it is not intended.
-
If you stop the machine for maintenance, inspection, storage or to change accessories, switch off the power source, disconnect the machine from the mains supply or remove the batteries,
GB MT
and ensure that all moving parts have come to a standstill. Allow the machine to cool down before inspection, changing settings etc. Maintain the machine with care and keep it clean.
Always allow the machine to cool down before storage.
- Never try to circumvent the locking function of the protective equipment.
Additional safety instructions:
- Do not use any accessories that are not recommended by PARKSIDE. This can result in electric shock or fire.
! Observe the safety information and notes on charging and proper use as shown in the instruction manual for your battery and charger from the Parkside X 20 V Team series. A detailed description of the charging process and further information can be found in the separate operating instructions.
Recommendation:
- Avoid operating the machine in poor weather conditions, especially when there is a lightning hazard.
- Do not recharge non-rechargeable batteries.
-
Rechargeable batteries have to be removed from the device before they are charged.
-
Do not use different battery types or new and used batteries together.
- Insert the batteries with the correct polarity.
- Remove dead batteries from the device and dispose of them safely.
If the device is stored for a longer period of time without being used, the batteries should be removed.
RESIDUAL RISK
Even if properly operating and handling this electric tool, some residual risks will remain. Due to its construction and build, this electric tool may present the following hazards:
a) Ear damage if working without ear protection.
b) Damage to your health caused by swinging your hands and arms when operating the appliance for longer periods of time or if the unit is not held or maintained properly.
c) Lung damage, if suitable respiratory protection is not worn.
d) Eye injuries if no suitable eye protection is worn.
Warning! During operation, this electric tool generates an electromagnetic field which, under certain circumstances, may impair the functionality of active or passive medical implants. In order to reduce the danger of serious or fatal injuries, users who wear medical implants must consult their doctor and the manufacturer
of the implant before operating the machine.
Initial start-up
Before operating the device, you must insert both rechargeable batteries. Mount both pipes.

Caution! Risk of injury!
During assembly or disassembly of the pipes (blower pipe, attachment, flat nozzle), the device must be turned off and all moving parts must have come to a standstill. Remove the batteries before carrying out any work!
Charging the battery

Make sure that the recommended ambient temperature is observed during charging. You will find this in the instruction manual for your Parkside X 20 V Team series batteries and chargers.

If warm, allow the battery to cool before charging.

Do not expose the battery to direct sunlight for long periods and do not place it on a radiator (max. 50^ ).
- Remove the rechargeable batteries (2) from the device, if necessary.
- Slide the rechargeable batteries (2) onto the charger (15) up to the stop.
- Plug the charger (15) into a socket.
-
Once charging is complete, disconnect the charger (15) from the mains supply.
-
Remove the battery (2) from the charger (15).
Remove/insert battery
- To remove the battery (2) from the device, press the release button on the battery (2) and pull the battery out.
- To insert the battery (2), push the battery (2) along the guide rail into the device. You will hear it click into place.

Only insert the battery once the battery-operated tool is fully ready for use.

Fitting/removing blower pipe and flat nozzle

Never use the leaf blower without the attachment. There is a risk of personal injury!

Pay attention to the correct assembly of the blower pipe (4), otherwise the leaf blower will not start.
Fitting the blower pipe
- Place the blower pipe (4) on the motor housing (3). The lock (7) clicks into place.
Fitting the attachment
- Slide the attachment (6) onto the blower pipe (4).
The button (16) on the blower pipe (4) must slide into the guide rail (5) on the attachment (6).
There are 3 possible settings for the attachment (6).

The device can be set to your individual working height via these
3 settings. You should always work
with the blower pipe as close to the ground as possible.
Fitting the flat nozzle (optional)
- Slide the flat nozzle (12) onto the blower pipe (4).
The button (16) on the blower pipe (4) must slide into the guide rail (5) on the flat nozzle (12).
There are 3 possible settings for the flat nozzle (12).
The device can be set to your individual working height via these
3 settings. You should always work with the blower pipe as close to the ground as possible.
Removing the blower pipe
- Press the lock (7) and remove the blower pipe (4) and the attachment (6).
Removing the attachment
- Remove the attachment (6) from the blower pipe (4) by sliding it out of the guide rail (5).
Removing the flat nozzle (optional)
- Remove the flat nozzle (12) from the blower pipe (4) by sliding it out of the guide rail (5).
B Putting on the carrying strap
! Never wear the carrying strap diagonally across your shoulders and chest: only wear it on one shoulder to ensure you can detach the device quickly from your body in the event of danger.
Pulling the push-fit lock (14) releases the device quickly from the carrying strap. To open the push-fit lock, press the two clamps together.
- Place the carrying strap (A 13) on one shoulder.
- Adjust the strap length so that the snap hook is approximately 10 cm below your hip.
- Attach the snap hook on the carrying strap (A 13) at the fixing lug (17) to hook in the strap. This is located on the top of the device.
Operation
Caution! Risk of injury! Always wear appropriate protective equipment and work gloves while working with the device. Prior to each use, ensure that the device is working correctly. Ensure that the device has been mounted properly.
Stop using the device if the On/Off button is damaged.
Personal protective equipment and a fully functional device reduce the risk of injuries and accidents.
After the device has been switched off, the turbine wheel continues moving for some time. Injury hazard caused by rotating tool!
i Observe noise protection rules and other local regulations.
A Switching on and off
The leaf blower may only be used with two batteries of the Parkside X 20 V Team series.
Before switching the device on, make sure that it is not touching any objects. Ensure secure positioning.
- Press and hold the on/off switch (11) to start the device.
- In order to regulate the blowing power, press the volume control (9).

The 4 LEDs below the charge level indicator (8) on the control panel indicate the level of the blowing power.
- To switch off, briefly press the on/off switch (11).
Turbo mode
- Press and hold the TURBO button (10) to turn the blowing power to turbo power for a maximum of 15 seconds. Turbo mode stops automatically after 15 seconds but can be started back up by pressing the TURBO button (10) again.
- Release the TURBO button to exit turbo mode.
Checking the charge status of the battery
The charge level indicator (8) shows the state of charge of the battery (2) as long as the device is turned on via the On/off switch (11) on the control panel.
The charge level of the battery is indicated by illumination of the corresponding LED lights.
3 LEDs illuminated (red, orange and green): Battery charged
2 LEDs illuminated (red and orange): Battery partially charged
1 LED illuminated (red): Battery needs to be charged
Working with the leaf blower
The leaf blower may only be used for the following purposes:
- As a blower to pile up dry leaf material or to blow material out of places that are hard to access (e.g. under cars).
During work, ensure that the device is not struck against hard objects, which can cause damage.
Blowing operating mode:
- You get optimal results when you use the blower with a separation distance to the ground of 5 - 10cm .
- Begin work with the highest blowing power, in order to rapidly pile up the leaves lying around. Select a lower blowing power to compact the previously piled up leaves.
Before blowing, loosen leaves adhering to the ground with a broom or rake.
The guide rollers at the end of the tube make it easier to work on flat surfaces. - Hold the device by the handle (1) when working.
- B Working with the blower pipe and attachment/flat nozzle: With the blower pipe and attachment, you can collect leaves over a wider area. The flat nozzle functions as a turbo nozzle, which can be used to reach the highest air speed.
Cleaning and maintenance

Warning! Risk of injury by dangerous moving parts!

Switch off the device and remove the battery from the device before working with or transporting it.
Turn off the appliance and, before doing any servicing and remove the mains plug

Do not use any cleaning agents or solvents. Chemical substances may attack the plastic parts of the device.
The following cleaning and servicing should be done regularly. This will ensure a long and reliable service life.
Cleaning

Do not spray the appliance with water and do not immerse it in water. Electric shock hazard!
- Keep clean the ventilation slots, motor housing and handles of the appliance. Use a damp cloth or a brush.
Do not use cleaning agents or solvents. You may otherwise irreparably damage the appliance.
General maintenance
- Prior to every use, check the appliance for obvious defects such as loose, worn or damaged parts.
Storage
- For storage, you can remove the blower pipe (4), attachment (6)/at nozzle (12) from the motor housing (3) (see corresponding installation instructions in the "Start-up" section).
- At the bottom of the device, you will end a holder (18) that you can use to hang the device on the wall using a screw/nail (Ø 7-10 mm) (Fig. 1).
- Store the device in a dry place well out of reach of children.
Disposal and protection of the environment
Remove the battery from the device and recycle the device, battery, accessories and packaging in an environmentally-friendly manner.
Machines do not belong with domestic waste.
The batteries must be removed from the device before disposal. Do not throw batteries into domestic waste, re (risk of explosion) or water. Damaged batteries can harm the environment and your health if poisonous fumes or liquids escape.
Directive 2012/19/EU on waste electrical and electronic equipment: Used electrical devices must be collected separately for disposal and recycled in an environmentally sound manner.
Depending on the implementation in national law, you may have the following options:
- Return to a shop: Food retailers with a total sales area of at least 800 square
metres that offer electric and electronic devices multiple times a year or permanently and distribute them on the market are obligated to take back old electric and electronic devices at no charge. When handing a new electric or electronic device to an end user, they have to take back an old device of the same kind from the end user that essentially fulfils the same functions as the new device at the site of handover or in the immediate vicinity at no charge as well as take back up to three old devices per device type with external dimensions no larger than 25 centimetres in the retail shop or the immediate vicinity at no charge without the purchase of an electric or electronic device at the request of the end customer.
- Hand over to an official collection point:
Take the device to a recycling plant. The plastic and metal parts used on your device can be properly sorted according to materials and grades and efficiently recycled. Please contact our service centre for more information.
- Return to the manufacturer/distributor:
We will dispose of any defective devices that you send to us free of charge. Please contact our service centre for more information.
This does not affect accessories enclosed with the old devices or tools without any electrical components.
Dispose of the batteries according to local standards. Defective or used batteries must be recycled in accordance with Directive 2006/66/EC. Hand in the batteries at a used battery collection point where they are recycled in an environmentally friendly manner. For more information, please
contact your local waste management provider or our service centre.
Dispose of batteries in a discharged state. We recommend covering the contacts with an adhesive strip to protect against short circuits. Do not open the battery.
- Feed leaves to composting and do not throw them into the refuse bin.
A Spare parts/ Accessories
Spare parts and accessories can be obtained at www.grizzlytools.shop
If you have issues ordering, please use the contact form.
If you have any other questions, contact the "Service-Center" (see page 38).
4+6+12 Blower pipe
Incl. attachment
and flat nozzle.....911 10000
13 Carrying strap 91110002
Battery
Smart PAPS 204 A1 80001154
PAP 20 B3, 4.0 Ah 80001157

Trouble shooting
| Problem Possible cause Corrective action | ||
| Device does not start | Battery discharged (2) | Charge the battery(see "Charging the battery") |
| Battery (2) not inserted | Insert the battery (see "Inserting/ removing the battery") | |
| On/off switch (11)/control panel is broken | Repair by Service Centre | |
| Defective motor | ||
| Blower pipe (4) not properly attached | See the section on "Initial use" | |
| Device works with interruptions | Internal loose contact | Repair by Customer Care |
| On/off switch (11)/control panel is broken | ||
| Weak or no blowing power | Low battery power | Charge battery (2)(see "Charging the battery") |
Guarantee
Dear customer, this device comes with a 5-year warranty from the date of purchase. In case of defects, you have statutory rights against the seller of the product. These statutory rights are not restricted by our guarantee presented below.
Terms of Guarantee
The term of the guarantee begins on the date of purchase. Please retain the original receipt. This document is required as proof of purchase.
If a material or manufacturing defect occurs within five years from the date of purchasing this device, the device by will repaired or replaced free by us - according to our choice. This warranty service requires you to present the defective device and proof of purchase (sales receipt) within five years and describe briefly in writing the nature of the defect and when it occurred.
If the defect is covered by our guarantee, you will receive either the repaired product or a new product. No new guarantee period begins on repair or replacement of the product.
Guarantee Period and Statutory Claims for Defects
The guarantee period is not extended by the guarantee service. This also applies for replaced or repaired parts. Any damages and defects already present at the time of purchase must be reported immediately after unpacking. Repairs arising after expiry of the guarantee period are chargeable.
Guarantee Cover
The equipment has been carefully produced in accordance with strict quality guidelines and conscientiously checked prior to delivery.
The guarantee applies for all material and manufacturing defects. This guarantee does not extend to cover product parts that are subject to normal wear and may therefore be considered as wearing parts (e.g. Pipes) or to cover damage to breakable parts (e.g. switches).
This guarantee shall be invalid if the product has been damaged, used incorrectly or not maintained. Precise adherence to all of the instructions specified in the operating manual is required for proper use of the product. Intended uses and actions against which the operating manual advises or warns must be categorically avoided.
The product is designed only for private and not commercial use. The guarantee will be invalidated in case of misuse or improper handling, use of force, or interventions not undertaken by our authorised service branch.
Processing in Case of Guarantee
To ensure quick handling of you issue, please follow the following directions:
-
Please have the receipt and identification number (IAN 404419_2110) ready as proof of purchase for all enquiries.
-
Please find the item number on the rating plate.
-
Should functional errors or other defects occur, please initially contact the service department specified below by telephone or by e-mail. You will then receive further information on the processing of your complaint.
-
After consultation with our customer service, a product recorded as defective can be sent postage paid to the service address communicated to you, with the proof of purchase (receipt) and specification of what constitutes the defect and when it occurred. In order
to avoid acceptance problems and additional costs, please be sure to use only the address communicated to you. Ensure that the consignment is not sent carriage forward or by bulky goods, express or other special freight. Please send the equipment inc. all accessories supplied at the time of purchase and ensure adequate, safe transport packaging.
Repair Service
For a charge, repairs not covered by the guarantee can be carried out by our service branch, which will be happy to issue a cost estimate for you.
We can handle only equipment that has been sent with adequate packaging and postage.
Attention: Please send your equipment to our service branch in clean condition and with an indication of the defect.
Equipment sent carriage forward or by bulky goods, express or other special freight will not be accepted.
We will dispose of your defective devices free of charge when you send them to us.
Service-Center
GB Service Great Britain Tel.: 0800 404 7657
E-Mail: grizzly@lidl.co.uk
IAN 404419 2110
MT Service Malta Tel. 80062230
E-Mail: grizzly@lidl.com.mt
IAN 404419 2110
Importer
Please note that the following address is not a service address. Please initially contact the service centre specified above.
Garantie - France. 55
PAP 20 B3, 4,0 Ah 80001157

Dépannage
PAP 20 B3, 4,0 Ah 80001157
Akumulator Smart PAPS 204 A1 .80001154 PAP 20 B3,4,0 Ah .80001157
Akumulator Smart PAPS 204 A1 .80001154 PAP 20 B3,4,0 Ah .80001157

Hledani chyb
PAP 20 B3, 4,0 Ah 80001157

Zistovanie zavad
PAP 20 B3, 4,0 Ah 80001157
Batteria Smart PAPS 204 A1 .80001154 PAP 20 B3,4,0 Ah .80001157

Ricerca di guasti
PAP 20 B3, 4,0 Ah 80001157

Hibakeresés
PAP 20 B3, 4,0 Ah 80001157
Pooblasceni serviser:
Tel.: 080080917
E-Mail: grizzly@lidl.si
(Birotehnika, Hodošček Renata s.p., Lendavska ULICA 23, 9000 Murska Sobota)
Garancijski list
| Translation of the original EC declaration of conformity | |
| We hereby confirm that the Cordless Turbine Leaf Blower 40V model PPTLBA 40-Li A1 serial number 000001 - 030230 conforms with the following applicable relevant version of the EU guidelines: | |
| 2006/42/EC • 2014/30/EU • 2000/14/EC & 2005/88/EC 2011/65/EU* & (EU)2015/863 | |
| In order to guarantee consistency, the following harmonised standards as well as national standards and stipulations have been applied: | |
| EN 60335-1:2012/A15:2021 • EN 50636-2-100:2014 • EN 62233:2008 EN 55014-1:2017/A11:2020 • EN 55014-2:2015 EN IEC 55014-1:2021 • EN IEC 55014-2:2021 EN ISO 12100:2010 • EN IEC 63000:2018 | |
| We confirm the following in accordance with the 2000/14/EC emissions guideline: Sound power level: guaranteed: 96 dB(A) measured: 94.47 dB(A) Compliance evaluation process carried out in accordance with Appendix V / 2000/14/EC Registered Office: NB 0123, TÜV Süd, Ridlerstraße 65, 80339 München, Germany | |
| This declaration of conformity is issued under the sole responsibility of the manufacturer: | |
| CE Grizzly Tools GmbH & Co. KG Stockstädter Straße 20 D-63762 Großbostheim Germany 25.05.2022 | Christian Frank Documentation Representative |
- The object of the declaration described above satisfies the provisions of Directive 2011/65/EU of the European Parliament and the Council of 8 June 2011 on limiting the use of certain harmful substances in electrical and electronic appliances.