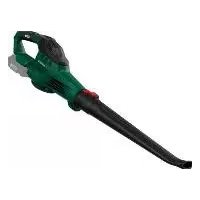
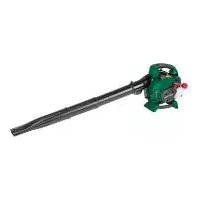
PBLG 52 A1 - Leaf blower PARKSIDE - Free user manual and instructions
Find the device manual for free PBLG 52 A1 PARKSIDE in PDF.

| Product type | Thermal leaf blower |
| Brand | Parkside |
| Model | PBLG 52 A1 |
| Engine | 2-stroke, 52 cm³ |
| Engine power (ISO 8893) | 1,6 kW |
| Rated power | 1,45 kW |
| Rated speed | 7500 min⁻¹ |
| Idle speed | 3000 min⁻¹ |
| Air flow speed (flat nozzle) | 290 km/h |
| Air flow rate (flat nozzle) | 750 m³/h |
| Fuel tank capacity | 1,3 L |
| Fuel mixture | Unleaded petrol (min. SP95) / 2-stroke oil (JASO FD/ISO-LEGD), ratio 40:1 |
| Spark plug | L7RTC, electrode gap 0,6 mm |
| Sound pressure level (LpA) | 97,1 dB(A) (K=3 dB) |
| Guaranteed sound power level (LWA) | 111 dB(A) |
| Vibrations (Aw, eq) | 4,016 m/s² (K=1,5 m/s²) |
| Required protective equipment | Hearing protection, safety glasses, gloves |
| Safety distance | 15 m from people and animals |
| Weight (approx.) | 8 kg |
| Warranty | 3 years (private use) |
| Intended use | Blow leaves, grass, vegetation on lawns, paths, asphalt roads |
| Delivery contents | Engine unit with strap, direction tube, 2 nozzles (round and flat), 2 extensions, elbow hose, flexible hose, clamps, mixing can, tool, instruction manual |
| Regular maintenance | Air filter cleaning, spark plug check, screw and nut check |
Frequently Asked Questions - PBLG 52 A1 PARKSIDE
User questions about PBLG 52 A1 PARKSIDE
0 question about this device. Answer the ones you know or ask your own.
Ask a new question about this device
Download the instructions for your Leaf blower in PDF format for free! Find your manual PBLG 52 A1 - PARKSIDE and take your electronic device back in hand. On this page are published all the documents necessary for the use of your device. PBLG 52 A1 by PARKSIDE.
USER MANUAL PBLG 52 A1 PARKSIDE
Translation of the original instructions Read carefully before using the machine and keep it safe for later use!
NL BE
BENZINE-BLADBLAZER
Before reading, unfold the page containing the illustrations and familiarise yourself with all functions of the device.
FR BE
GB/IE Translation of the original instructions Page 13
KOMPERNASS HANDELS GMBH
BURGSTRASSE 21
44867 BOCHUM
DEUTSCHLAND
www.kompernass.com
Entsorgung

Package contents. 14
Technical specifications. 15
General safety instructions. 16
Personal protective equipment (PPE) 16
Storage and transportation 16
Environmental safety 16
Adding fuel 17
General working procedures. 17
Basic safety instructions 17
Before use 17
Vibrations 18
Before use 18
Setting up the appliance (see fig. A). 18
Mixing fuel 18
Adding fuel 18
Adjusting the carrying strap 19
Use 19
Starting when the engine is cold 19
Starting when the engine is hot 20
Parking throttle/throttle lever lock 20
Turning the engine off 20
Basic working techniques 20
Cleaning and maintenance 21
Cleaning the engine unit 21
Cleaning the air filter. 21
Maintaining the spark plug 21
Maintaining the carburettor settings 21
Maintenance intervals. 21
Ordering replacement parts. 22
Storage and transportation 22
Troubleshooting. 22
Original declaration of conformity 24
PETROL LEAF BLOWER PBLG 52 A1
Introduction
Congratulations on the purchase of your new appliance. You have chosen a high-quality product. The operating instructions are a part of this product. They contain important information about safety, usage and disposal.
Before using the product, please familiarise yourself with all operating and safety instructions. Use the product only as described and for the range of applications specified. Please also pass these operating instructions on to any future owner.
Intended use
This appliance is only suitable for blowing leaves, grass and the like off lawns, pavements and tarmac roads. The appliance must not be used for other purposes.
Do not make any modifications to the appliance. This can compromise the safety.
The user, not the manufacturer, is liable for any resulting damage or injuries of any kind. Please note that this appliance is not designed for commercial use.
We accept no warranty liability if the appliance is used in commercial, manual trade or industrial operations or equivalent activities.
National regulations may restrict the use of the appliance!
WARNING!
This appliance is not suitable for use by children.
WARNING!
- Long-term exposure to noise can lead to permanent hearing damage. Always wear approved hearing protection (ear muffs).
WARNING!
Under no circumstances may the original construction of the appliance be changed without the manufacturer's approval. Always use original accessories. Unauthorized modifications and/or unauthorized accessories can cause serious or even fatal injuries to the user or others.
WARNING!
An improperly or carelessly used appliance can become dangerous and lead to serious or even life-threatening injuries. It is very important that you read and understand the contents of these operating instructions.
Features
1 Frame
16 Carrying handle
2 Carrying strap
3 Curved pipe
Hose clip
Flexible pipe (D)
Hose clip
Control pipe (C)
Operating lever
Throttle
Throttle lock
10 On/Off switch
1 Pipe extension (B)
Pipe extension (B)
12 End pipe, round (A1)
16 Attachment hole (for the carrying strap)
Spark plug connector
15 Choke
16 Pull start
Fuel tank cap
13 Fuel tank
19 Locking screw (for the air filter cover)
Air filter cover
Fuel pump (primer)
2x fastening screws (for the operating lever)
2x locking nuts (for the operating lever)
End pipe, flat (A2)
Mixing tank
Spark plug wrench/flat-head screwdriver
Package contents
1 engine unit with carrying strap
1 Headtube (C)
2 end pipes, flat, round (A1/A2)
2 pipe extensions (B)
1 curved pipe
1 flexible pipe (D)
2 hose clips
1 mixing tank
2 fastening screws
2 locking nuts
1 tool
1 set of operating instructions
Technical specifications
Engine
Displacement 52 cm
Max. motor output as per ISO 8893 1.6 kW
Nominal power 1.45kW
Nominal speed 7500 rpm
Idle speed 3000 rpm
Spark plug L7RTC
Airflow velocity 290km / h (with flat nozzle)
Volumetric flow 750 m 3 / hr (with flat nozzle)
Volumes
Fuel tank approx. 1300 cm
Noise and vibration data
Information on the sound power level emitted by the machine, determined according to the European Directives 2000/14/EC and 2005/88/EC.
Noise measurement value determined in accordance with EN 15503:2009 + A2:2015.
The A-rated noise level is typically as follows:
| Sound pressure level LpA in dB (A) | 97.1 dB K = 3 dB |
| Sound power level LWA, in dB (A) | Measured: 109.1 dB Guaranteed: 111 dB K = 2 dB |
| Vibration value Ahv, eq in m/s2ISO 22867 | 4.016 m/s2K = 1.5 m/s2 |

Wear ear muffs to prevent hearing damage!
NOTE
The vibration level specified in these instructions has been measured in accordance with the standardised measuring procedure specified in EN 15503 and can be used to make equipment comparisons. The specified vibration emission value can also be used to make an initial exposure estimate.
WARNING!
The vibration level varies in accordance with use and may be higher than the value specified in these instructions in some cases. There is a risk of underestimation of the vibration load if the appliance is used regularly in this manner. To estimate the vibration load during a specific working period accurately, periods during which the appliance is switched off (or running, but not being used) must also be taken into account. This can significantly reduce the vibration load over the total working period.
WARNING!
- You can reduce the vibration risk, for example, the risk of Raynaud's phenomenon (circulatory problems), by taking regular breaks during which you rub your hands together.
The following symbols are used in these original operating instructions/on the appliance
| Read these operating instructions thoroughly before using the tool for the first time, and retain them for future reference. | |
| Warning! Read the operating instructions before use! | |
| WARNING! Special safety precautions are required when working with the appliance. Read and observe all warnings. | |
| Wear ear muffs. | |
| Wear safety goggles. | |
| Wear protective gloves. | |
| Pull the pull start with the choke in this position. When you pull out the choke, the air flap closes. When you push in the choke, the air flap opens. | |
| Press the fuel pump (primer) 6x | |
| 40:1 | Fuel tank; mixing ratio: 40 parts petrol to 1 part oil |
| Petrol: ROZ 95/ROZ 98 | |
| 2-stroke motor oil: ISO-LEGD/JASO FD | |
| Open flames and smoking in the vicinity of the appliance are strictly prohibited! | |
| Guaranteed sound power level of the appliance | |
| The operator of the leaf blower must ensure that people and animals keep a distance of at least 15 m. If several operators are working in close proximity to each other, the safety distance must be at least 15 m. | |
| Caution! Poisonous CO vapours (carbon monoxide vapours)! Do not use the appliance in closed rooms! | |
| WARNING! Hair can be sucked into the appliance! | |
| Caution - petrol is highly flammable! Explosion hazard! Do not spill any fuel! | |
| Turn the appliance off and remove the spark plug connector before performing any maintenance work! | |
| Attention! Risk of suffocation! | |
| Attention, hot parts. Maintain a safe distance! | |
| Watch out for flung away parts! Keep others away! Maintain a safe distance! | |
| Do not fill up on E10! | |
| Pour the gasoline mixture in here! |

General safety instructions
IMPORTANT! READ CAREFULLY BEFORE USE AND STORE SAFELY FOR LATER USE.
WARNING!
- Stay alert, watch what you are doing and use common sense when operating the appliance. Do not use the appliance while you are ill, tired or under the influence of drugs, alcohol or medication.
A moment of inattention while operating the appliance may result in serious personal injury.
Avoid improper use. Use the appliance only as described in the section "Intended use".
Before using the appliance for the first time, read the operating instructions and pay close attention to the safety instructions.
The warning and safety signs on the appliance provide important information for safe operation.
In addition to the notices in these operating instructions, all general safety and accident prevention legislation must also be complied with.
Keep plastic wrapping away from children. There is a risk of suffocation!
Insufficiently informed operators can be a danger to other people and themselves due to improper use. The operator is responsible for third parties.
■ Be very careful when handling the appliance. Use common sense when working and play close attention to what you are doing.
Perform an overall check before using the appliance.
Never use the appliance when you are tired, have drunk alcohol or taken medication, as this may impair vision, judgement or bodily control. - Do not work for longer than 10 minutes in one session. We recommend taking a break of 10-20 minutes between working sessions to avoid vibration damage and/or hearing damage.
Wear personal protective equipment.
Lend the appliance only to users who have experience with the appliance. Hand over the operating instructions at the same time. - When not in use, the appliance must be secured to ensure that it is not a risk to anyone else.
Secure against unauthorised access.
- Keep all parts of the body away from hot surfaces.
There is a risk of burns.
WARNING! There is a risk of injury from rotating parts.
WARNING! Never permit children to use the appliance.
The operator of the leaf blower must ensure that people and animals keep a distance of at least 15m . If several operators are working in close proximity to each other, the safety distance must be at least 15m
The user of the appliance is responsible for all accidents and risks that cause injury or damage to other people's property.
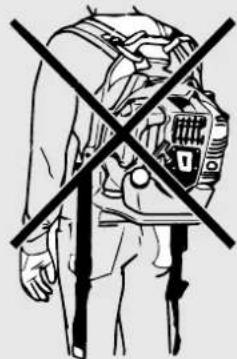
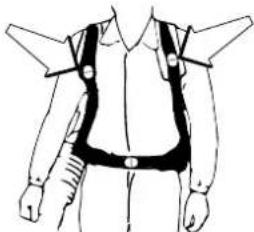
In an emergency, release yourself from the appliance by opening the hip and chest straps and letting the appliance fall backwards.
The appliance's electrical ignition system generates a small electromagnetic field. If you have a heart pacemaker or similar implants, consult a doctor about the possible health risks before using the appliance.
- Never touch the spark plug or ignition cable while the engine is running. There is a risk of electric shock.
Note that improper maintenance, the use of non-approved spare parts, or the removal or modification of the safety equipment can lead to damage to the appliance and severe injuries to the operator. - Contact your local authorities to ensure that you are complying with the applicable regulations.
Personal protective equipment (PPE)
DANGER!
Wear personal protective equipment (PPE)!

Wear ear muffs.

Wear safety goggles.

Wear protective gloves.
To prevent eye injuries, always use a face shield or safety goggles while working with the appliance.
Always wear ear muffs.
The noise produced by the appliance can damage your hearing.
Wear robust protective gloves made of a durable material, e.g. leather.
Storage and transportation
Switch off the appliance before transporting it anywhere, even short distances.
During transport (also in vehicles), secure the appliance against tipping over to prevent fuel loss, damage or injuries.
Hold the hot exhaust silencer away from your body. There is a risk of burns!
Clean and maintain the appliance before storage.
Store the appliance in a secure and dry location. Secure it against unauthorised access.
Environmental safety
National and/or local regulations may restrict the use of noise-generating, motor-driven appliances during certain times. Ask at your local authority.
- Do not operate the appliance in confined spaces or other poorly ventilated areas. Risk of suffocation from poisonous exhaust fumes/lubricating oil vapours.
■ Work only in daylight.
Do not work early in the morning or late in the evening if this could disturb others.
Do not work in inopportune weather conditions, such as rain or wind. This will lead to an increased risk of accidents.
Do not work near open windows, etc.
■ Keep your work area clean and tidy. Before starting work, loosen foreign bodies with a rake and broom.
In dusty environments, we recommend wearing a dust mask and/or slightly dampening the environment.
Always use a blower nozzle attachment so that the air stream can work close to the ground.
- Keep children, other people and animals at a distance before and during the work.
Distractions can cause you to lose control.
Before starting work, ensure that no people, animals or valuable property are inside the danger zone.
If you are working in a combustible environment, such as dry grass etc., have a fire extinguisher on hand.
There is a risk of fire!
Adding fuel
Petrol is highly flammable. When filling the tank, keep at a distance from open flames and do not smoke. There is a risk of fire!
Make sure that you do not spill any petrol. Do not allow petrol to get into the soil. Lay down suitable tarpaulins or similar.
Fill up the tank only in well-ventilated areas. Petrol vapours are highly inflammable and can explode.
- Switch off the engine before refuelling and allow the appliance to cool down. If you spill any petrol, clean the affected area immediately. Do not allow petrol to come into contact with your clothing. If this happens, get changed immediately.
Avoid skin or eye contact with petrol or lubricants (oil).
Do not inhale any petrol/lubricating oil vapours.
Check for leaks. If petrol leaks out, do not start the engine. There is a risk of burns.
■ Be careful when removing the petrol cap so that any pressure can escape slowly and no petrol sprays out.
General working procedures
NOTE
-
Be considerate of the people around you:
Avoid using the appliance at inappropriate times, such as late evening or early morning. Reduce the noise level by limiting the number of appliances used simultaneously. Read and follow the simple advice below to minimise disruption to your surroundings. -
Use the appliance only during normal working hours to avoid unnecessary noise nuisance. Avoid working in the early morning or late evening.
Avoid gunning the engine during operation. Using less fuel not only makes less noise, it also kicks up less dust. In addition, you also have better control over the material you are blowing together or away.
■ Remove any debris stuck to the ground with the help of a rake or stiff broom.
- Keep the blower opening as close as possible to the floor. Use the entire length of the blower pipe to keep the air jet close to the ground.
Leave your work area clean and tidy. Make sure that you have not blown rubbish onto other people's property.
WARNING!
Pay attention to your surroundings. If anyone approaches your working area, reduce the throttle to a minimum until the person is again at a sufficient distance.
Always direct the air jet away from people, animals, playgrounds, open windows, cars, etc.
Basic safety instructions
No unauthorised persons or animals may be present in a work area of 15m
■ Allow the engine to cool down before topping up the fuel.
- Keep all parts of your body away from hot surfaces.
If the appliance catches fire or there is any other emergency that requires you to detach from the appliance, open the straps and let it fall backwards.
Due to the strong air flow, foreign objects can be blown away at such a speed that they can bounce back and cause serious eye injuries.
Never direct the air steam toward people or animals.
Always switch off the engine before installing or removing accessories or the like.
Avoid using the appliance in bad weather, such as thick fog, heavy rain or wind, very cold, etc. Working in bad weather is very tiring and can cause dangerous conditions, e.g. a risk of slipping.
- Reduce the blowing time by slightly moistening dusty areas or by using spray devices.
Make sure that you can walk and stand safely. Watch out for possible obstacles (roots, stones, branches, holes, ditches, etc.) if you suddenly change your location. Be especially careful when working on sloping ground.
Never set down the appliance unattended with the engine running.
The engine exhaust gases contain carbon monoxide, which can cause carbon monoxide poisoning. Never start or run the appliance indoors or in other places with poor air circulation.
The leaf blower may not be used on ladders, scaffolding or in a raised position (e.g. on roofs). This work can lead to serious injuries.
■ ATTENTION! Never use the appliance in areas where it is not possible to call for help in the event of an accident.
Before use
WARNING!
Always carry out checks before use and with the engine switched off.
- Check that the appliance is in good working order before every use and if it has fallen.
- Check whether moving parts work properly. Many accidents are caused by poorly maintained tools.
Have any damage repaired by qualified specialists.
- Use the appliance and accessories only as described in these instructions, taking into account the working conditions and the work to be performed.
Using power tools for purposes different from those intended could result in a hazardous situation.
Check the throttle 9 and the throttle lock 9 for freedom of movement. The throttle 9 must spring back to its starting position.
Check whether there is enough fuel in the fuel tank 18.
Check whether the handles are clean, dry and free of oil and dirt.
Never carry out the work alone. In case of emergency, someone should be close by.
Switch the appliance off immediately if you notice any changes in the way it behaves.
Vibrations
WARNING!
- You can reduce the vibration risk, for example, the risk of Raynaud's phenomenon (circulatory problems), by taking regular breaks during which you rub your hands together.
Always wear protective gloves and ensure your hands are warm.
Take regular work breaks.
Before use
Setting up the appliance (see fig. A)
Take the two hose clips ① + ⑥ and slide them over the ends of the flexible pipe
Push the larger end of the flexible pipe ⑤ onto the curved pipe ③ and tighten the hose clip ④ using the flat-head screwdriver ②.
Slide the control pipe 1 into the flexible pipe section 5 and tighten the hose clip 6 using the flat-head screwdriver 20.
First loosen the fixing screws 2 on the operating lever 8.
Slide the operating lever ⑧ onto the guide of the head pipe ⑦.
Attach the operating lever 8 using the supplied fastening screws 22 and locking nuts 23.
Push the pipe extension 1 onto the control pipe 7. To fix the pipe extension 1 in place, turn it clockwise (see fig. A) and secure it by tightening the inserted screw.
If an extension is required, push the second pipe extension 1b onto the previously mounted pipe extension 1.
To fix the pipe extension place, turn it clockwise (see fig. A) and secure it by tightening the inserted screw.
Push the desired end pipe (round) 12 or end pipe (flat) 23 onto the pipe extension 1 or 15 and fix it in place by turning it clockwise (see Fig. A) and secure it by tightening the inserted screw.
NOTE
Higher air velocity = flat tailpipe 23
Normal air velocity = circular tailpipe 12
Disassembly is carried out in the reverse order.
Mixing fuel
The engine must be operated with a mixture of petrol and motor oil.
WARNING!
Avoid direct skin contact with fuel and do not inhale fuel vapours.
Always use a mixture of unleaded petrol (at least RON 95) and special 2-stroke engine oil (JASO FD/ISO-LEGD). Mix up the fuel mix according to the fuel mix table.
Pour the correct amount of petrol and 2-stroke oil into the openings provided in the enclosed mixing container (see "Fuel mix table").
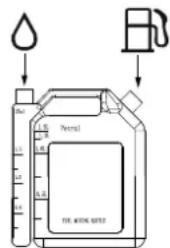
Tilt the mixing container 25 to the side so that the filled oil can flow into the chamber with the petrol.
Then give the mixing tank a good shake.
Fuel mix table
Mixing process: 40 parts petrol to 1 part oil
| Petrol | 2-stroke oil |
| 0.5 litres 12.5 ml |
Adding fuel
WARNING!
- Fill the fuel tank only when the engine is switched off and cooled down. There is a risk of fire!
Always clean the area around the fuel tank cap before filling to prevent dirt getting into the fuel tank Use a dry, lint-free cloth to do this.
Place the appliance on a suitable, level surface so that the fuel tank cap is facing upwards.
Turn the fuel tank cap ① anticlockwise and remove it. The fuel tank cap ⑦ is connected to the fuel tank with an anti-loss device and cannot fall down.
Fill the fuel tank 10 with the fuel mix. Do not spill any fuel while filling the fuel tank 10 and do not fill it to overflowing.
Wipe up any spilled fuel immediately.
Turn the fuel tank cap 17 clockwise to close it.
Adjusting the carrying strap
WARNING!
The carrying strap 2 should always be worn during work. Otherwise, the appliance cannot be controlled safely and may cause injury to the user or others.
Make sure that you have secured and correctly adjusted the carrying strap.
If the carrying strap is open, there is a risk that it can get caught or sucked into the blower of the machine.
Proper adjustment of the carrying strap 2 and appliance will make working much easier. Adjust the carrying strap 2 to the optimum working position.
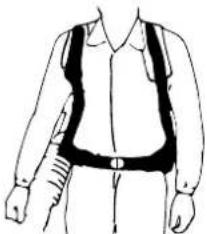
Position the hip strap at hip level, not too far down the stomach. Tighten the hip strap so you can feel the weight of the appliance resting on your hips.
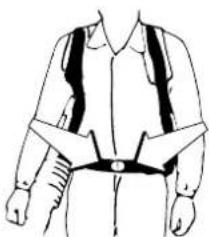
Tighten the two shoulder straps and adjust them until you achieve the best working position.
Use
CAUTION
Please comply with the statutory provisions in the relevant noise protection regulations.
Before starting the appliance, always check that:
The fuel system is not leaking.
All screw connections are firmly seated.
Starting when the engine is cold
ATTENTION!
Never allow the pull start to whip back. This could cause damage.
Set the On/Off switch to "I".
Press the throttle ⑨ halfway down and then push down the throttle lock ⑩.
Now release the throttle 9 and the throttle lock 95. The throttle 9 is now locked.
Pull the choke 15 out.
Press the fuel pump (primer) 6x.
Press the appliance against the floor with your left hand on the frame 1 (ATTENTION! Do not use your foot!). With your right hand on the pull start 16, pull it slowly until you feel resistance.
ATTENTION!
Always pull the pull start 16 straight out. Hold the handle of the pull start 16 firmly when the pull start 16 retracts. Do not allow the pull start 16 to whip back.
Now pull the pull start 6 quickly so that the engine starts. If the engine does not start, repeat the process.
When the engine starts, press down the throttle. The choke will be reset.
If the engine does not start after several attempts, read the "Troubleshooting" section.
NOTE
At high outdoor temperatures it is possible that even a cold engine has to be started without using the choke 15!
Starting when the engine is hot
(The appliance has been turned off for less than 15-20 minutes)
Set the On/Off switch 10 to "I".
The choke 15 does not need to be pulled out to start a warm motor.
Press the appliance against the floor with your left hand on the frame 1 (ATTENTION! Do not use your foot!). With your right hand on the pull start 16, pull it slowly until you feel resistance.
ATTENTION!
Always pull the pull start 16 straight out. Hold the handle of the pull start 16 firmly when the pull start 16 retracts. Do not allow the pull start 16 to whip back.
Now pull quickly on the pull start 10. The appliance should start after 1-2 pulls. If the appliance has still not started after 6 pulls, repeat the process as described in "Starting when the engine is cold".
Parking throttle/throttle lever lock
Press the throttle 9 halfway down and then push down the throttle lock 93.
Now release the throttle 9 and the throttle lock 95. The throttle 9 is now locked.
NOTE
When the throttle lever lock 9 is actuated, the unit does not run in full throttle position!
Turning the engine off
Emergency stop sequence
If the appliance needs to be stopped immediately, turn the On/off switch 10 to "0".
Normal sequence
Release the throttle 9. The engine idles. Then move the On/Off switch 10 to "O".
Basic working techniques
Make sure that you are familiar with the appliance before starting work.
WARNING!
WARNING! Risk of flying objects. Always wear goggles. Flying stones, debris, etc. could hit your eyes and cause serious injury or blindness. Maintain a safe distance. Children, animals, spectators and helpers should remain outside a safety zone of 15m . Switch off the appliance immediately if anyone approaches.
Do not use the appliance if the exhaust opening on the engine cover is obstructed by a wall and/or other objects. Otherwise, the appliance could be damaged. Ensure that a distance of at least 50~cm to other objects is always maintained during operation.
The leaf blower is portable and is carried during operation on the shoulders by means of a belt. It is controlled with the right hand using the handle on the pipe.
The speed of the air jet is controlled with the throttle. Adjust the speed to the respective application.
Make sure that the air inlet is not blocked, for example, by leaves or dirt. A blocked air inlet reduces the blowing power and increases the working temperature of the engine, which can lead to engine failure. If necessary, switch off the engine and remove any foreign bodies.
Pay attention to the wind direction. It is easier to work with the wind (at your back).
The leaf blower should not be used to move large piles of leaves, as this is very time-consuming and causes unnecessary noise.
Assume a safe working position with a firm stand.
After finishing work, the machine must be stored upright.
Cleaning and maintenance
RISK OF INJURY!
Always switch off the appliance before cleaning and then disconnect the spark plug connector 14.
NOTE
Clean the appliance thoroughly after every use.
- Carry out the cleaning and maintenance work only as described in these instructions. Any more extensive work has to be carried out by specialist personnel.
- Maintenance work must be carried out regularly (see section "Maintenanceintervals").
Cleaning the engine unit
RISK OF INJURY!
RISK OF BURNS! Do not touch the hot exhaust silencer, cylinder or cooling fins.
- Keep the air vents and the engine housing as free of dust and dirt as possible. Blow it out with low-pressure compressed air.
Clean the appliance regularly with a damp cloth and a mild detergent. Make sure that no water can penetrate into the interior of the appliance.
Cleaning the air filter
Contaminated air filters reduce the engine output due to low air supply to the carburettor.
Regular inspection is essential. The air filter must be inspected regularly and cleaned if necessary.
The air filter must be checked more frequently if the air is dusty.
Undo the locking screw for the air filter cover by turning it in an anticlockwise direction.
Remove the air filter cover 20.
Remove the air filter.
Clean the air filter by tapping or blowing it out (with compressed air).
Assembly is carried out in the reverse order.
ATTENTION!
Never clean the air filter with petrol or flammable solvents.
Maintaining the spark plug
Pull off the spark plug connector 10.
Remove the spark plug using the enclosed spark plug wrench 26.
Assembly is carried out in the reverse order.
Electrode gap = 0.6mm (distance between the electrodes between which the ignition spark is generated). Check the spark plug for contamination after the first 10 hours of operation and clean it with a copper wire brush if required.
Afterwards, service the spark plug after every 50 hours of operation.
Maintaining the carburettor settings
NOTE
- Have the carburettor adjustment (e.g. adjusting the idling speed) carried out by qualified specialists only to prevent engine damage.
Maintenance intervals
The information given here is based on normal operating conditions. In the event of more difficult conditions, such as strong dust generation and longer daily working hours, the given intervals are to be reduced correspondingly.
| MAINTENANCE | before starting work | weekly | monthly |
| Cleaning the outside of the appliance. x | |||
| Check whether the throttle is working properly. | x | ||
| Check the whether the stop switch is working. x | |||
| Clean the air filter. Replace if necessary. x | |||
| Tighten the screws and nuts. x | |||
| Ensure that no fuel is leaking from the engine, tank or fuel lines. | x | ||
| Make sure that the sides of the air intake grille are not blocked. | x | ||
| Check the starting mechanism and its start cable. | x | ||
| Clean the outer surfaces of the spark plug. Remove the spark plug and check the electrode gap. Set the gap to 0.6-0.7 mm or replace the spark plug. | x | ||
| Clean the outside of the carburettor and the area around it. | x | ||
| Check all cables and connections. x | |||
| Replace the spark plug. x |
Ordering replacement parts
Ordering replacement parts
The following information should be provided when ordering replacement parts:
Type of appliance: Petrol leaf blower
■ Item number of the appliance IAN 341672
Appliance ID number PBLG 52 A1
GENERAL INFORMATION
Replacement parts not listed (such as switches, air filters) can be ordered via our service hotline.
Current prices and information are available at www.kompernass.com
Storage and transportation
Always clean and maintain the appliance before storage, see section "Cleaning and maintenance".
Switch off the appliance before transporting it anywhere, even short distances. During transport (also in vehicles), secure the appliance against tipping over to prevent fuel loss, damage or injuries.
Hold the hot exhaust silencer away from your body. There is a risk of burns!
Store the appliance in a secure, dry, frost-free and well-ventilated location that is protected from the effects of weather. Outside storage is not recommended. Secure it against unauthorised access.
Empty the oil and fuel tanks using a suction pump.
WARNING!
Do not drain the fuel in enclosed rooms, in the vicinity of fire or while smoking. Gas vapours can cause explosions or fire.
Start the engine and leave it running until the remaining petrol has been used up.
Troubleshooting
| Problem Possible cause | Troubleshooting | |
| The engine will not start | Incorrect start-up process | Follow the instructions regarding starting |
| The engine starts but does not run at full power | Contaminated air filter | Clean air filter |
| The engine does not run smoothly | Incorrect spark plug gap | Clean the spark plug and adjust the spark plug gap or replace the spark plug |
| Soot deposits or wetness on the spark plug | Incorrect carburettor adjustment | Clean spark plug or replace it with a new spark plug |
This appliance has a 3-year warranty valid from the date of purchase. If this product has any faults, you, the buyer, have certain statutory rights. Your statutory rights are not restricted in any way by the warranty described below.
Warranty conditions
The warranty period starts on the date of purchase. Please keep your receipt in a safe place. This will be required as proof of purchase.
If any material or manufacturing fault occurs within three years of the date of purchase of the product, we will either repair or replace the product for you or refund the purchase price (at our discretion). This warranty service requires that you present the defective appliance and the proof of purchase (receipt) within the three-year warranty period, along with a brief written description of the fault and of when it occurred.
If the defect is covered by the warranty, your product will either be repaired or replaced by us. The repair or replacement of a product does not signify the beginning of a new warranty period.
Warranty period and statutory claims for defects
The warranty period is not prolonged by repairs effected under the warranty. This also applies to replaced and repaired components. Any damage and defects present at the time of purchase must be reported immediately after unpacking. Repairs carried out after expiry of the warranty period shall be subject to a fee.
Scope of the warranty
This appliance has been manufactured in accordance with strict quality guidelines and inspected meticulously prior to delivery.
The warranty covers material faults or production faults. The warranty does not extend to product parts subject to normal wear and tear or to fragile parts which could be considered as consumable parts such as switches or parts made of glass.
The warranty does not apply if the product has been damaged, improperly used or improperly maintained. The directions in the operating instructions for the product regarding proper use of the product are to be strictly followed. Uses and actions that are discouraged in the operating instructions or which are warned against must be avoided.
This product is intended solely for private use and not for commercial purposes. The warranty shall be deemed void in cases of misuse or improper handling, use of force and modifications / repairs which have not been carried out by one of our authorised Service centres.
The warranty period does not apply to
Normal reduction of the battery capacity over time
Commercial use of the product
Damage to or alteration of the product by the customer
Non-compliance with safety and maintenance instructions, operating errors
Damage caused by natural hazards
Warranty claim procedure
To ensure quick processing of your case, please observe the following instructions:
Please have the till receipt and the item number (e.g. IAN 12345) available as proof of purchase.
- You will find the item number on the type plate on the product, an engraving on the product, on the front page of the operating instructions (below left) or on the sticker on the rear or bottom of the product.
If functional or other defects occur, please contact the service department listed either by telephone or by e-mail.
You can return a defective product to us free of charge to the service address that will be provided to you. Ensure that you enclose the proof of purchase (till receipt) and information about what the defect is and when it occurred.

You can download these instructions along with many other manuals, product videos and installation software at www.lidl-service.com.
This QR code will take you directly to the Lidl service page (www.lidl-service.com) where you can open your operating instructions by entering the item number (IAN) 123456.
Service
GB Service Great Britain
Tel.: 0800 404 7657
E-Mail: kompernass@lidl.co.uk
IE Service Ireland
Tel.: 1890930034
(0,08 EUR/Min., (peak))
{0,06 EUR/Min., {off peak})
E-Mail: kompernass@lidl.ie
IAN341672_1910
Importer
Please note that the following address is not the service address. Please use the service address provided in the operating instructions.
KOMPERNASS HANDELS GMBH
BURGSTRASSE 21
44867 BOCHUM
GERMANY
www.kompernass.com
Disposal

The packaging is made from environmentally friendly material and can be disposed of at your local recycling plant. The appliance and its accessories are made from various materials, such as metal and plastic.
Your local community or municipal authorities can provide information on how to dispose of the worn-out appliance.
Environmental protection
Carefully empty the petrol and oil tank and dispose of your appliance at a recycling plant. The plastic and metal parts used can be separated and recycled.
- Dispose of waste oil and petrol at a waste collection centre and do not dump these into the sewerage or drainage system.
Dispose of contaminated maintenance material and consumables at a collection point provided for this purpose.

Dispose of the packaging in an environmentally friendly manner. Note the labelling on the packaging and separate the packaging material components for disposal if necessary. The packaging material is labelled with abbreviations (a) and
numbers (b) with the following meanings: 1-7: plastics, 20-22: paper and cardboard, 80-98: composites.

Your local community or municipal authorities can provide information on how to dispose of the worn-out product.

The product is recyclable, subject to extended producer responsibility and is collected separately.
Original declaration of conformity
We, KOMPERNASS HANDELS GMBH, document officer: Mr. Semi Uguzlu, BURGSTR. 21, 44867 BOCHUM, GERMANY, hereby declare that this appliance complies with the following standards, normative documents and EC directives:
Machinery Directive
(2006/42/EC)
EMC (Electromagnetic Compatibility)
2014/30/EU
Outdoor Directive
(2005/88/EC)
(2000/14/EC)
Notified body: No. 0123
TUV SUD Industrie Service GmbH, Westendstraße 199, 80686 Munich, Germany. Evaluation procedure for conformity as per appendix VI.
Sound power level LWA
Measured 109.1 dB (A)
Guaranteed 111 dB (A)
Directive on exhaust gas emissions
(2016/628/EU changed to 2017/656/EU)
RoHS Directive
(2011/65/EU)*
- The manufacturer bears the full responsibility for compliance with this conformity declaration. The object of the declaration described above complies with the requirements of the Directive 2011/65/EU of the European Parliament and Council of 8 June 2011 on the limitations of use of certain dangerous substances in electrical and electronic appliances.
Related harmonised standards
EN 15503:2009+A2:2015
EN ISO 12100:2010
EN ISO 14982:2009
EN 50581:2012
Type/appliance designation: Petrol leaf blower PBLG 52 A1
Year of manufacture: 04-2020
Serial number: IAN 341672_1910
Bochum, 08/04/2020

CE
Semi Uguzlu
- Quality Manager
We reserve the right to make technical changes in the context of further product development.
Table des matieres
Introduction 26
Chere cliente, cher client,
Chere cliente, cher client,
KOMPERNASS HANDELS GMBH
BURGSTRASSE 21
44867 BOCHUM
ALLEMAGNE
www.kompernass.com
Recyclage

Directive relative aux machines
(2006/42/CE)
- Responsible qualite -
KOMPERNASS HANDELS GMBH
BURGSTRASSE 21
44867 BOCHUM
DUITSLAND
www.kompermass.com
BENZYNOWA DMUCHAWA DO LIScI PBLG 52 A1
Wstep
Noš okulary ochrone.

Nosrekawice ochonne.
KOMPERNASS HANDELS GMBH
BURGSTRASSE 21
44867 BOCHUM
NIEMCY
www.kompernass.com
Utylizacja

KOMPERNASS HANDELS GMBH
BURGSTRASSE 21
44867 BOCHUM
NEMECKO
www.kompernass.com
Likvidace

Obal se sklady z ekologickych materiul, ktere lze zlikvidovat v komunlhich sbernych recyklacnich dvorech. Pistroj a jeho prisluensstvi se skladaji z ruznych materiul jak napr. kovu a plastu.
KOMPERNASS HANDELS GMBH
BURGSTRASSE 21
44867 BOCHUM
NEMECKO
www.kompernass.com
Originalne vyhlasenie o zhode
My, spolocnost KOMPERNASS HANDELS GMBH, osoba zodpovedna za dokumentaciu: pán Semi Uguzlu, BURGSTR. 21, 44867 BOCHUM, DEUTSCHLAND/NEMECKO vyhlasujeme,Že tento pristroj je v sūlade s nasledujúcimi normami, normativnymi dokumentmi a smernicami ES:
Smernica o strojovych zariadeniach
(2006/42/EC)
Elektr magneticka kompatibilita
2014/30/EU
Vonkajśia politika
(2005/88/EC)
(2000/14/EC)
Uvedené miesto: C. 0123
TÜV SÜD Industrie Service GmbH, Westendstraße 199, 80686 Mnichov, Nemecko, Postupy hodnotenia zhody poda Prilohy VI.
KOMPERNASS HANDELS GMBH
BURGSTRASSE 21
44867 BOCHUM
GERMANY
www.kompernass.com