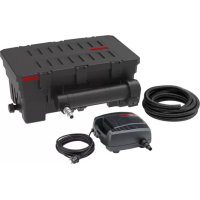
Classic 150 - Water filter EHEIM - Free user manual and instructions
Find the device manual for free Classic 150 EHEIM in PDF.

User questions about Classic 150 EHEIM
0 question about this device. Answer the ones you know or ask your own.
Ask a new question about this device
Download the instructions for your Water filter in PDF format for free! Find your manual Classic 150 - EHEIM and take your electronic device back in hand. On this page are published all the documents necessary for the use of your device. Classic 150 by EHEIM.
USER MANUAL Classic 150 EHEIM
natural_image
Line drawing of a cylindrical industrial device with a handle and control panel (no text or symbols)150
(Typ 2211)


flowchart
graph TD
    A["Component 1: Board with screws"] --> B["Component 2: Ring with plastic"]
    B --> C["Component 3: Cover in a circular base"]
    C --> D["Component 4: Rear assembly"]
    D --> E["Final Packaging with EHEIM device"]
natural_image
Diagram illustrating a mechanical process with a container, stack of coins, and a water pump (no text or symbols)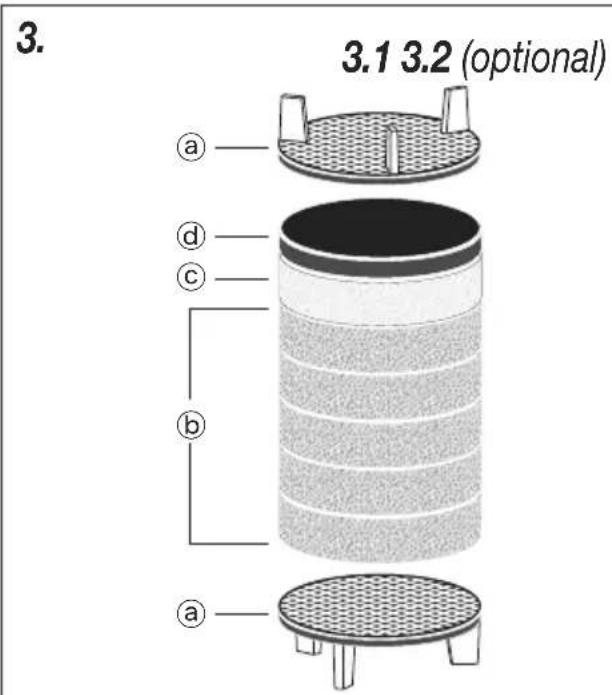
natural_image
Line drawing of a portable device with scroll wheel and control buttons, showing rotational arrows (no text or symbols)
IMPORTANT SAFETY INSTRUCTIONS
WARNING! RISK OF ELECTRIC SHOCK! This pump has not been investigated for use in swimmung pools areas! DO NOT RUN DRY!
WARNING – To guard against injury, basic safety precautions should be observed, including the following.
a) READ AND FOLLOW ALL SAFETY INSTRUCTIONS.
b) DANGER – To avoid possible electric shock, special care should be taken since water is employed in the use of aquarium equipment. For each of the following situations, do not attempt repairs by yourself; return the appliance to an authorized service facility for service or discard the appliance.
1) If the appliance falls into the water, DON'T reach for it! First unplug it and then retrieve it. If electrical components of the appliance get wet, unplug the appliance immediately.
2) If the appliance shows any sign of abnormal water leakage, immediately unplug it from the power source.
3) Carefully examine the appliance after installation. It should not be plugged in if there is water on parts not intended to be wet.
4) Do not operate any appliance if it has a damaged cord or plug, or if it is malfunctioning or has been dropped or damaged in any manner.
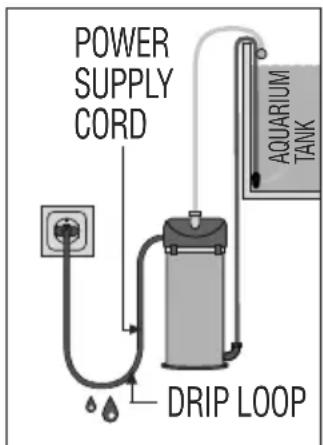
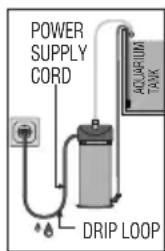
5) To avoid the possibility of the appliance plug or receptacle getting wet, position aquarium stand and tank to one side of a wall-mounted receptacle to prevent water from dripping onto the receptacle or plug.
A "drip loop", shown in the figure, should be arranged by the user for each cord connecting an aquarium appliance to a receptacle. The "drip loop" is that part of the cord below the level of the receptacle, or the connector if an extension cord is used, to prevent water traveling along the cord and coming in contact with the receptacle.
If the plug or socket does get wet, DON'T unplug the cord. Disconnect the fuse or circuit breaker that supplies power to the appliance. Then unplug and examine for presence of water in the receptacle.
c) Close supervision is necessary when any appliance is used by or near children.
d) To avoid injury, do not contact moving parts or hot parts such as heaters, reflectors, lamp bulbs, and the like.
e) Always unplug an appliance from an outlet when not in use, before putting on or taking off parts, and before cleaning. Never yank cord to pull plug from outlet. Grasp the plug and pull to disconnect.
f) Do not use an appliance for other than intended use. The use of attachments not recommended or sold by the appliance manufacturer may cause an unsafe condition.
g) Do not install or store the appliance where it will be exposed to the weather or to temperatures below freezing.
h) Make sure an appliance mounted on a tank is securely installed before operating it.
i) Read and observe all the important notices on the appliance.
j) If an extension cord is necessary, a cord with a proper rating should be used. A cord rated for less amperes or watts than the appliance rating may overheat. Care should be taken to arrange the cord so that it will not be tripped over or pulled.
1) "SAVE THESE INSTRUCTIONS".
Translation of the original operating manual Aquarium exterior filters classic 150 (Type 2211)
1. General user instructions

Information on using the operating manual
Before using the appliance for the first time, the operating manual must be read fully and understood. Consider the operating manual as part of the product and keep in a safe and accessible location. Enclose this operating manual if passing the appliance on to a third party.
Symbol explanation
The following symbols are used on the appliance:

The appliance must only be used indoors, and exclusively for aquariums.

The appliance is of protection class II.
IP X4
The symbol advises that the device is protected against splashed water.

The appliance is certified according to the relevant national regulations and directives, and conforms to EU standards.
The following symbols and signal words are used in this operating manual:

DANGER!
The symbol indicates imminent danger from electric shock that can result in death or serious injury.

DANGER!
The symbol indicates imminent danger that can result in death or serious injury.

WARNING!
The symbol indicates imminent danger that can result in moderate to minor injury or a health risk.

CAUTION!
The symbol indicates the danger of material damage.

Note with useful information and tips.
Typographical conventions:
☒A Reference to a figure; in this case, reference to figure A.

You are prompted for an action.
2. Application
The appliance and all parts included in the scope of delivery are intended for private use and must only be used:
- For the cleaning of aquarium water in fresh and salt water aquariums.
- indoors
• in compliance with the technical data.
The following limitations apply to the appliance:
-
do not use for commercial or industrial purposes.
• the water temperature may not exceed 35^ C. -
Corrosive, highly flammable, aggressive or explosive substances, foodstuffs and drinking water must not be conveyed.
- never operate without a water flow.
3. Safety instructions
Risks for persons and property can arise from this appliance if the appliance is improperly used or not used as intended or if the safety instructions are not heeded.
For your safety

- Do not let the appliance packaging and small parts get into the hands of children or people who are unaware of how to handle them, as hazards can arise (danger of suffocation!). Keep away from animals.
- Only for EU countries:
This appliance can be used by children from the age of 3 and by persons with reduced physical, sensory or mental capabilities or lack of experience and/or knowledge if they are supervised and have been instructed in the safe use of the appliance and have understood the resulting dangers. Children must not play with the appliance. Cleaning and user maintenance must not be carried out by children unless they are supervised. - This equipment is not intended for use by persons (including children) with limited physical, sensory or mental abilities or for persons with no experience or knowledge unless they are supervised by a person respond for safety or unless they have received from such a person instructions on how to use the equipment. Children should be supervised to ensure that they do not play with the equipment.
- Before use, carry out a visual inspection to ensure that the appliance, especially the mains cable and plug, are undamaged.
- Do not use the device if it does not function properly or if it is damaged.
- Never use the appliance with a damaged mains cable or power supply unit.
- The power cable of this device can not be replaced. When the line is damaged, the device must no longer be used.
• Repairs must only be carried out by an EHEIM service centre. - Do not carry the appliance by the mains cable, and to disconnect from the mains, always pull on the plug and not on the cable or appliance.
- Protect the mains cable against heat, oil and sharp edges.
- Only carry out the work described in these instructions.
- Never make technical modifications to the appliance.
- Only use original spare parts and accessories for the appliance.
- The device should be protected by means of a residual current protective device with a maximum rated residual current of 30 mA. Ask your electrician.
- If they are not being used, always disconnect all devices in the aquarium from the power supply before you install/remove any parts and before all cleaning and maintenance work.
- Protect the mains socket and mains plug against moisture. It is recommended to form a drip loop with the mains cable to prevent any water running along the cable to the mains socket.
- The electrical data of the power supply must match the data of the power mains. This data is found on the type plate of power supply, the packaging and in these instructions.


4. Delivery scope and component overview (see I)
① Pump head ② Filter canister ③ pressure side hose connection ④ suction side hose connection ⑤ lattice screen ⑥ intake pipe ⑦ suction basket ⑧ suction cups with clips ⑨ outlet elbow ⑩ outlet pipe ⑪ base.
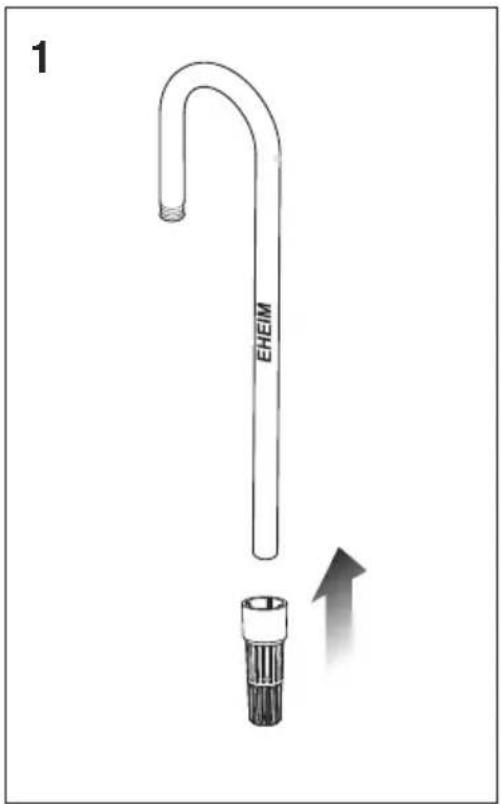
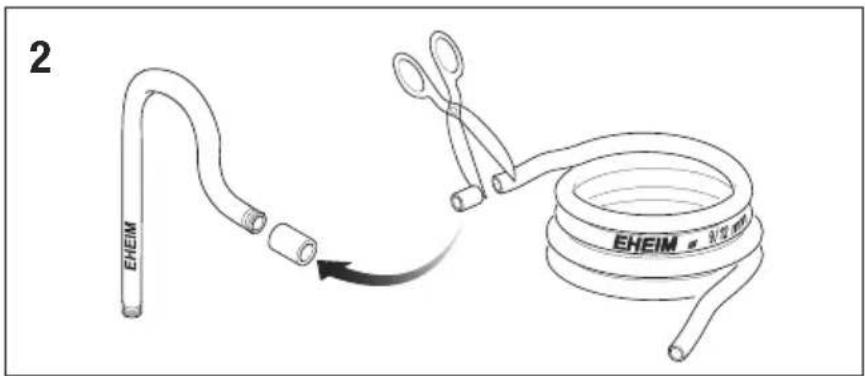
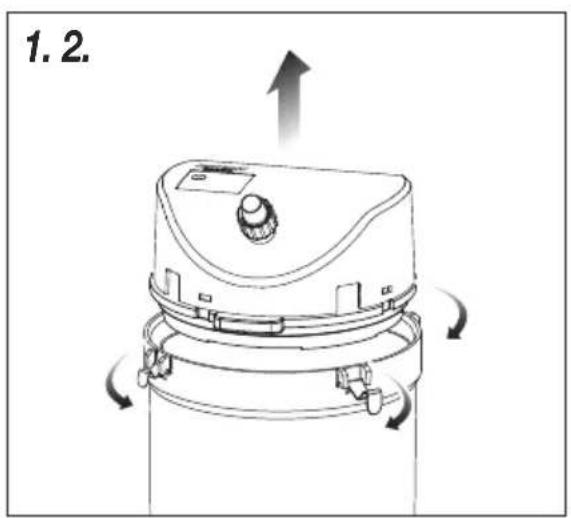
5. Preparation (See II and III)
1 Check that all parts are present.

II. 1. Connect the suction basket to the intake pipe.
- Cut a piece of hose (min. 1.5 cm) from the enclosed hose ∅ 9/12 mm and use it to connect the outlet elbow to the outlet pipe.
- Close the end of the outlet pipe with the plug.
- Connect the clamp and the suction cup and clip them (2x each) onto the intake and outlet pipes.

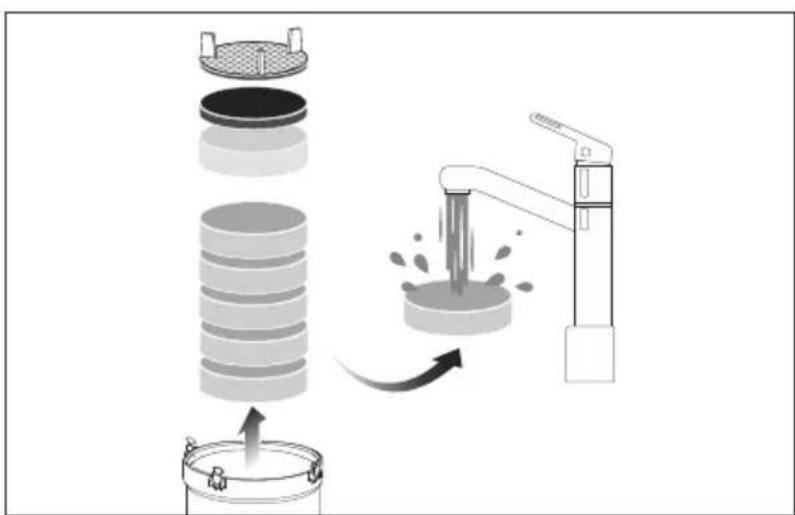
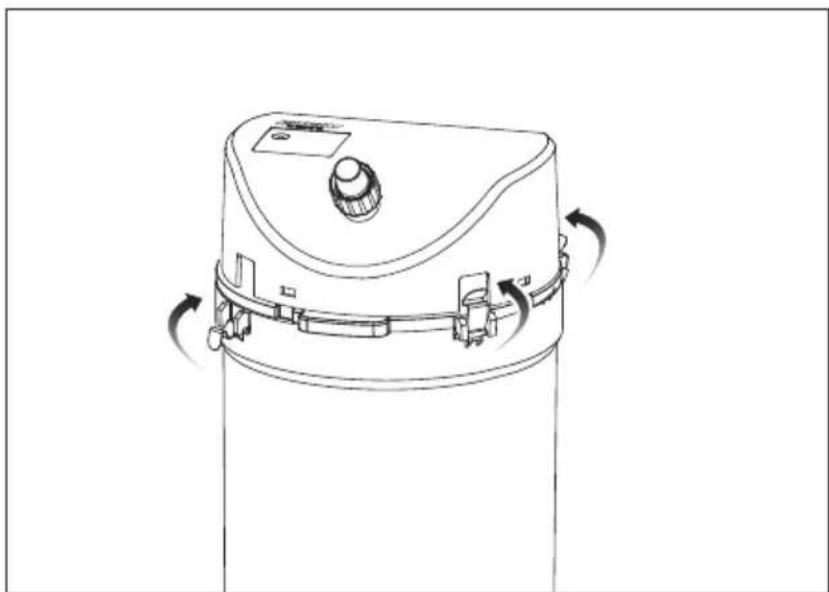
III. 1. Open all 3 spring clips and remove the pump head from the filter canister.
- Remove all filter mats and loose filter material (not supplied) and gently rinse under running water.
- Place the lattice screen and filter media back into the filter canister as shown in Figure 3.1: a lattice screen, b 5 filter mats blue, c Filter fleece white, d Carbon fleece black, a lattice screen as the top layer.
The carbon fleece is used to adsorb possible dissolved pollutants in the water when setting up a new aquarium. aquarium. After a running-in period of approx. 2 - 4 weeks, carbon fleece should be removed.
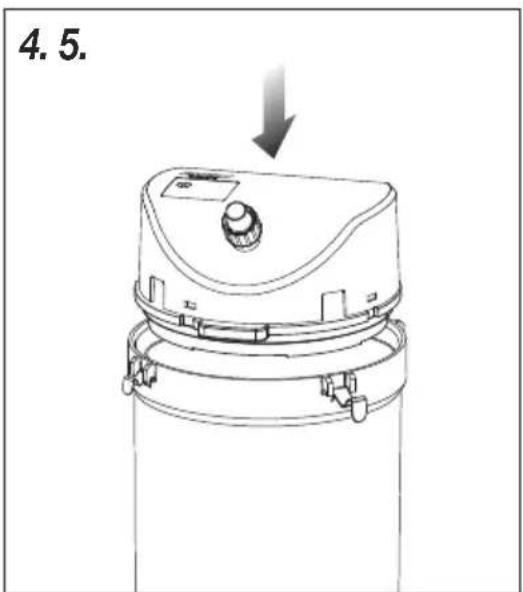
- Put the pump head back on the filter canister.

Make sure that the sealing ring is correctly positioned in its guide and is not damaged or dirty.
- Lock all 3 spring clips.
6. Installation

A Place the filter under the aquarium - at least the pump head must be at least 10 cm below the aquarium water level.

- When choosing a location for the unit, pay attention to the installation height. In order to achieve optimum functional reliability, there must be a maximum of 180 cm between the water surface and the bottom of the filter.
• Always operate the filter in an upright position.

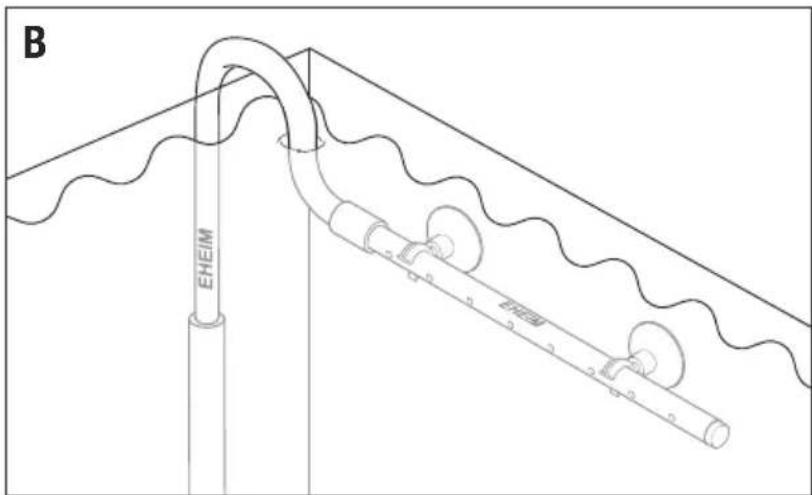
B Mount the outlet pipe by pressing it firmly against a side window.

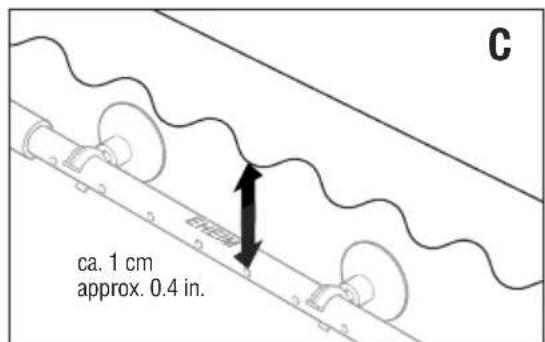
C Place the outlet pipe so that it is approx. 1 cm below the water surface and the pipe are aligned parallel to the surface.

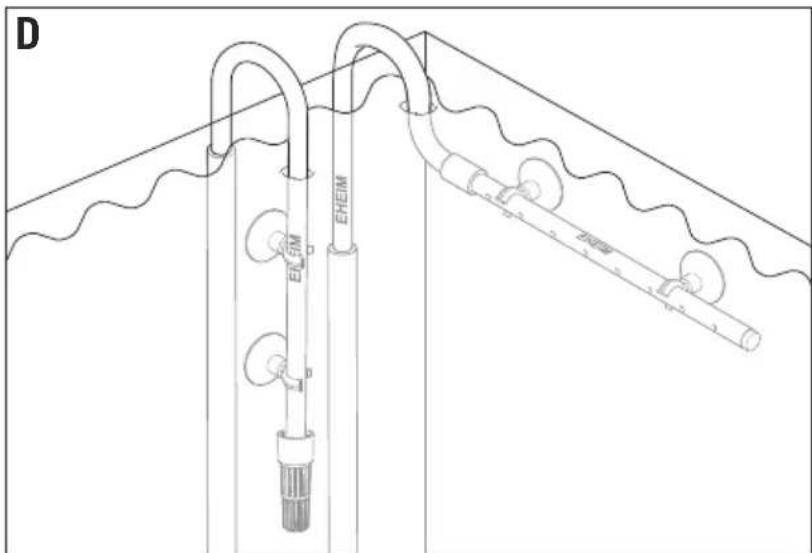
D Fix the intake pipe in the rear corner of the same side window with the suction cups.

E 1. Cut the hoses according to the distance between the filter and the aquarium. Connect the suction side on the filter canister to the intake pipe and the pressure side on the pump head to the outlet pipe.
2. Secure all hose connections with the union nuts.

Keep hose lengths as short as possible to prevent loops and kinks and minimise flow resistance.
7. Start up

-
Disconnect the connection between the outlet elbow and the outlet pipe on the pressure side.
-
Suction at the end of the outlet elbow until the filter system automatically fills with water.
- Once the water circuit has been established, reconnect the outlet elbow to the outlet pipe.
- Insert the power cable into the mains socket.
8. Cleaning
- Unplug the mains plug from the socket.
- Open all 3 spring clips and remove the pump head from the filter canister.

- Remove all filter mats and rinse them gently under running water.
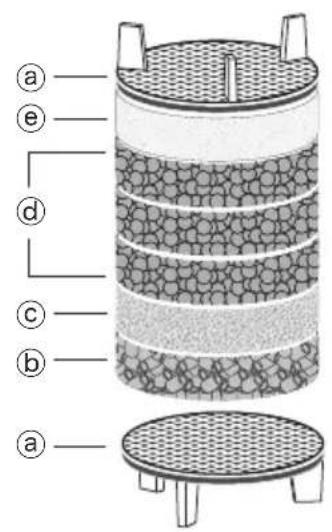
- Put the filter media back into the filter canister as shown in figures 3.1 or 3.2.
- Put the pump head back on the filter canister.
Make sure that the sealing ring is correctly positioned in its guide and is not damaged or dirty.
- Close all 3 spring clips.
- Restore the water circuit. When the filter system is completely filled with water, put the appliance into operation by plugging in the mains plug.
9. Maintenance

- Pull out the mains plug and remove the pump head as described in chapter 9. cleaning point 1 - 4.
- Open the locking part and remove the pump cover.
- Carefully remove the pump wheel from the pump chamber.
- Use a small screwdriver to carefully lever the blade out of the cooling channel.
- Clean all parts under running water with a brush.

Caution Risk of breakage: The axle of the pump wheel is made of ceramic.
- It is best to clean the pump chamber with the 4009560 cleaning brush.
- Assemble all pump parts in reverse order.
10. Decommissioning and disposal
Storage

- Uninstall the device from the aquarium.
- Clean the appliance.
- Store the appliance in a frost-proof place.
Disposal
When disposing of the appliance, heed the respective statutory regulations. Information on the disposal of electrical and electronic appliances in the European Union: Within the European Union, disposal of electrically operated appliances is governed by national regulations that are based on the EU Directive 2012/19/EU on waste electrical and electronic equipment (WEEE). The appliance may no longer be disposed of with the municipal or household waste. The appliance will be accepted free of charge at municipal collection points or recycling centres. The product packaging is made up of recyclable materials. Dispose of them in an environmentally responsible manner and take them for recycling.
12. Technical data
See page 103
Élimination/destruction
Reproduction or copying – even parts thereof – only with the express permission of the producer.