G24PS20 - Saw GREENWORKS - Free user manual and instructions
Find the device manual for free G24PS20 GREENWORKS in PDF.

User questions about G24PS20 GREENWORKS
0 question about this device. Answer the ones you know or ask your own.
Ask a new question about this device
Download the instructions for your Saw in PDF format for free! Find your manual G24PS20 - GREENWORKS and take your electronic device back in hand. On this page are published all the documents necessary for the use of your device. G24PS20 by GREENWORKS.
USER MANUAL G24PS20 GREENWORKS
.senneirea sengied ecneserp
Deficence auditive.
Your Greenworkstools cordless pole pruner has been designed for pruning trees. This tool is intended for consumer use only.
Your Greenworkstools charger has been designed for charging Greenworkstools batteries of the type supplied with this tool.
Safety instructions
General power tool safety warnings

Warning! Read all safety warnings and all instructions. Failure to follow all instructions may result in electric shock, fire and/or serious injury.
Save all warnings and instructions for future reference.
The term "power tool" in all of the warnings listed below refers to your mains operated (corded) power tool or battery operated (cordless) power tool.
- Work area safety
a. Keep work area clean and well lit. Cluttered and dark areas invite accidents.
b. Do not operate power tools in explosive atmospheres, such as in the presence of flammable liquids, gases or dust. Power tools create sparks which may ignite the dust or fumes.
c. Keep children and bystanders away while operating a power tool. Distractions can cause you to lose control.
- Electrical safety
a. Power tool plugs must match the outlet. Never modify the plug in any way. Do not use any adapter plugs with earthed (grounded) power tools. Unmodified plugs and matching outlets will reduce risk of electric shock.
b. Avoid body contact with earthed or grounded surfaces such as pipes, radiators, ranges and refrigerators. There is an increased risk of electric shock if your body is earthed or grounded.
c. Do not expose power tools to rain or wet conditions. Water entering a power tool will increase the risk of electric shock.
d. Do not abuse the cord. Never use the cord for carrying, pulling or unplugging the power tool. Keep cord away from heat, oil, sharp edges or moving parts. Damaged or entangled cords increase the risk of electric shock.
e. When operating a power tool outdoors, use an extension cord suitable for outdoor use. Use of a cord suitable for outdoor use reduces the risk of electric shock.
- Personal safety
a. Stay alert, watch what you are doing and use common sense when operating a power tool. Do not use a power tool while you are tired or under the influence of drugs, alcohol or medication. A moment of inattention while operating power tools may result in serious personal injury.
b. Use personal protective equipment. Always wear eye protection. Protective equipment such as dust mask, non-skid safety shoes, hard hat, or hearing protection used for appropriate conditions will reduce personal injuries.
c. Avoid accidental starting. Ensure the switch is in the off-position before connecting to power source and/or battery pack, picking up or carrying the tool. Carrying power tools with your finger on the switch or energising power tools that have the switch on invites accidents.
d. Remove any adjusting key or wrench before turning the power tool on. A wrench or a key left attached to a rotating part of the power tool may result in personal injury.
e. Do not overreach. Keep proper footing and balance at all times. This enables better control of the power tool in unexpected situations.
f. Dress properly. Do not wear loose clothing or jewellery. Keep your hair, clothing and gloves away from moving parts. Loose clothes, jewellery or long hair can be caught in moving parts.
g. If devices are provided for the connection of dust extraction and collection facilities, ensure these are connected and properly used. Use of dust collection can reduce dust-related hazards.
- Power tool use and care
a. Do not force the power tool. Use the correct power tool for your application. The correct power tool will do the job better and safer at the rate for which it was designed.
b. Do not use the power tool if the switch does not turn it on and off. Any power tool that cannot be controlled with the switch is dangerous and must be repaired.
c. Disconnect the plug from the power source and/or the battery pack from the power tool before making any adjustments, changing accessories, or storing power tools. Such preventive safety measures reduce the risk of starting the power tool accidentally.
d. Store idle power tools out of the reach of children and do not allow persons unfamiliar with the power tool or these instructions to operate the power tool. Power tools are dangerous in the hands of untrained users.
e. Maintain power tools. Check for misalignment or binding of moving parts, breakage of parts and any other condition that may affect the power tools operation. If damaged, have the power tool repaired before use. Many accidents are caused by poorly maintained power tools.
f. Keep cutting tools sharp and clean. Properly maintained cutting tools with sharp cutting edges are less likely to bind and are easier to control.
g. Use the power tool, accessories and tool bits etc. In accordance with these instructions, taking into account the working conditions and the work to be performed. Use of the power tool for operations different from those intended could result in a hazardous situation.
- Battery tool use and care
a. Recharge only with the charger specified by the manufacturer. A charger that is suitable for one type of battery pack may create a risk of fire when used with another battery pack.
b. Use power tools only with specifically designated battery packs. Use of any other battery packs may create a risk of injury and fire.
c. When battery pack is not in use, keep it away from other metal objects, like paper clips, coins, keys, nails, screws, or other small metal objects, that can make a connection from one terminal to another. Shorting the battery terminals together may cause burns or a fire.
d. Under abusive conditions, liquid may be ejected from the battery; avoid contact. If contact accidentally occurs, flush with water. If liquid contacts eyes, additionally seek medical help. Liquid ejected from the battery may cause irritation or burns.
- Service
a. Have your power tool serviced by a qualified repair person using only identical replacement parts. This will make sure that the safety of the power tool is maintained.
Additional power tool safety warnings

Warning! Additional safety instructions for pole pruners
The intended use is described in this instruction manual. Do not use the tool for purposes not intended; for example do not use the tool to fell trees. The use of any accessory or attachment or performance of any operation with this tool other than those recommended in this instruction manual may present a risk of personal injury.
Hold power tool by insulated gripping surfaces when performing an operation where the cutting tool may contact hidden wiring or its own cord. Contact with a "live" wire will also make exposed metal parts of the power tool "live" and give the operator an electric shock.
Wear close fitting and protective clothing including a safety helmet with visor/goggles, ear protectors, non-skid safety footwear, protective bib trousers and strong leather gloves.
Always position yourself out of the path of falling branches.
- The safe distance between a branch to be felled and bystanders, buildings and other objects is at least 2 1/2 times the length of the branch. Any bystander, building or object within this distance is at risk from being struck by the falling branch.
Pre-plan a safe exit from falling trees or branches. Ensure the exit route is clear of obstacles that would prevent or hinder movement. Remember wet grass and freshly cut bark is slippery.
Ensure someone is nearby (but at a safe distance) in case of an accident.
Do not use the tool while standing in a tree, on a ladder or on any other unstable surface.
Keep proper footing and balance at all times.
Hold the tool firmly with both hands when the motor is running.
Do not let the moving chain contact any object at the tip of the guide bar.
Start cutting only with the chain moving at full speed.
Do not attempt to enter a previous cut. Always make a fresh cut.
Watch for shifting branches or other forces that could close a cut and pinch or fall into the chain.
- Do not attempt to cut a branch when the diameter of the branch exceeds the cutting length of the tool.
Always remove the battery from the tool and place the chain cover over the chain when storing or transporting the tool.
Keep the saw chain sharp and properly tensioned. Check the tension at regular intervals.
Switch the tool off, allow the chain to stop and remove the battery from the tool before carrying out any adjustment, servicing or maintenance.
Only use genuine replacement parts and accessories.
Carry the pole pruner by the handle with the cutter blade stopped. When transporting or storing the pole pruner always fit the cutting device cover and dismantle it into its component parts. Proper handling of the pole pruner will reduce possible personal injury and injury to others.
Safety of others
This appliance is not intended for use by persons (including children) with reduced physical, sensory or mental capabilities, or lack of experience and knowledge, unless they have been given supervision or instruction concerning the use of the appliance by a person responsible for the their safety.
Children should be supervised to ensure that they do not play with the appliance.
Vibration
The declared vibration emission values stated in the technical data and the declaration of conformity have been measured in accordance with a standard test method provided by EN 60745 and may be used for comparing one tool with another. The declared vibration emission value may also be used in a preliminary assessment of exposure.
Warning! The vibration emission value during actual use of the power tool can differ from the declared value depending on the ways in which the tool is used. The vibration level may increase above the level stated.
When assessing vibration exposure to determine safety measures required by 2002/44/EC to protect persons regularly using power tools in employment, an estimation of vibration exposure should consider, the actual conditions of use and the way the tool is used, including taking account of all parts of the operating cycle such as the times when the tool is switched off and when it is running idle in addition to the trigger time.
Pruning
Before attempting to prune a tree, ensure there are not bylaws or regulations that would prohibit or control the felling of the tree.
Be aware of the direction a branch may fall. Consider all conditions that may affect the direction of fall, including:
- the length and weight of the branch to be cut
- the intended direction of fall
- any unusual heavy limb structure or decay
- the presence of surrounding trees and obstacles,
- including overhead lines
- the intertwinent with other branches
- the speed and direction of the wind.
Consider access to the tree limb.
Tree branches are liable to swing towards the tree trunk. In addition to the user, any bystander, building or object below the branch is at risk of being struck by the branch.
Warning symbols
The following warning symbols are shown on the tool:

Warning! To reduce the risk of injury, the user must read the instruction manual.

Do not expose the tool to rain or high humidity.

Always wear the gloves when use the chain saw.
Beware of falling objects. Keep bystanders away.
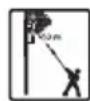
Electrocution hazard. Keep at least 10m away from overhead lines.

Always wear head and eye protection.

Wear non-slip safety footwear.

Always wear the glasses when use the chain saw.

Always wear the ear protector when use the chain saw.

Direction of rotation of the chain.

Warning! Do not touch chain at the chip ejection point.
Residual risks
Additional residual risks may arise when using the tool which may not be included in the enclosed safety warnings. These risks can arise from misuse, prolonged use etc.
Even with the application of the relevant safety regulations and the implementation of safety devices, certain residual risks cannot be avoided. These include:
Injuries caused by touching any rotating/moving parts.
Injuries caused when changing any parts, blades or accessories.
Injuries caused by prolonged use of a tool. When using any tool for prolonged periods make sure you take regular breaks.
Impairment of hearing.
Health hazards caused by breathing dust developed when using your tool (example:- working with wood, especially oak, beech and MDF).
Additional safety instructions for batteries and chargers
Batteries
Never attempt to open for any reason.
Do not expose the battery to water.
Do not expose the battery to heat.
Do not store in locations where the temperature may exceed 40^
Charge only at ambient temperatures between 10^ and 40^ .
Charge only using the charger provided with the appliance/tool. Using the wrong charger could result in an electric shock or overheating of the battery.
When disposing of batteries, follow the instructions given in the section "Protecting the environment".
Do not damage/deform the battery pack either by puncture or impact, as this may create a risk of injury and fire.
Do not charge damaged batteries.
Under extreme conditions, battery leakage may occur. When you notice liquid on the batteries, carefully wipe the liquid off using a cloth. Avoid skin contact.
In case of skin or eye contact, follow the instructions below.
Warning! The battery fluid may cause personal injury or damage to property. In case of skin contact, immediately rinse with water. If redness, pain or irritation occurs seek medical attention. In case of eye contact, rinse immediately with clean water and seek medical attention.
Chargers
Your charger has been designed for a specific voltage. Always check that the mains voltage corresponds to the voltage on the rating plate.
Warning! Never attempt to replace the charger unit with a regular mains plug.
Use your Greenworkstools charger only to charge the battery in the appliance/tool with which it was supplied. Other batteries could burst, causing personal injury and damage.
Never attempt to charge non-rechargeable batteries.
If the supply cord is damaged, it must be replaced by the manufacturer or an authorised Greenworks tools Service Centre in order to avoid a hazard.
Do not expose the charger to water.
Do not open the charger.
Do not probe the charger.
The charger must be placed in a well ventilated area when charging.
Symbols on the charger
The following symbols are found on your charger:

Your charger is double insulated; therefore no earth wire is required. Always check that the mains voltage corresponds to the voltage on the rating plate. Never attempt to replace the charger unit with a regular mains plug.
If the cord is damaged, it must be replaced by the slootskrowneer
Service Centre in order to avoid a hazard.

The charger is intended for indoor use only.

Read the instruction manual before use.
Features
- On/off switch
- Lock-off button
- Main handle
- Saw head
- Sprocket cover
- Guide bar
- Chain
- Chain sheath
- Extension tube
- Battery
- Oil tank
Fig. A
- Charger
Assembly
Warning! Before assembly, remove the battery from the tool.
Fitting and removing the battery (fig. B)
To fit the battery (11), line it up with the receptacle on the tool. Slide the battery into the receptacle and push until the battery snaps into place.
To remove the battery, push the release button (13) while at the same time pulling the battery out of the receptacle.
Warning! To prevent accidental operation, ensure that the battery is removed and that the chain sheath is in placed on the saw chain before performing the following operations. Failure to do this could result in serious personal injury.
Fitting the saw head (fig. C)
The saw head can be fitted directly to the handle in order to achieve standard reach.
ENGLISH
(Original instructions)
Align the groove on the outside of the coupling end of the handle (3) with the tongue on the inside of the coupling end of the saw head (4). Push the saw head (4) onto the handle (3).
Slide the collar (14) upwards and rotate it counter-clockwise until it is fully tightened.
Warning! Periodically check the connections to ensure that they are tightened securely.
Extending the saw head (fig. D)
The maximum reach can be achieved by fitting the extension tube (9) between the saw head (4) and the handle (3).
Align the groove on the outside of the coupling end of the handle (3) with the tongue on the inside of the coupling end of the extension tube (9).
Push the extension tube (9) onto the handle (3).
Slide the collar (15) upwards and rotate it counter-clockwise until it is fully tightened.
Align the groove on the outside of the coupling end of the extension tube (9) with the tongue on the inside of the coupling end of the saw head (4).
Push the saw head (4) onto the extension tube (9).
Slide the collar (14) upwards and rotate it counter-clockwise until it is fully tightened.
Warning! Periodically check the connections to ensure that they are tightened securely.
Removing the saw head (fig. C & D)
If the extension tube ( 9 ) is fitted, the saw head must be removed first.
To remove the saw head (4), rest the handle (3) on the ground, loosen the collar (14) and take off the saw head.
Use
Warning! Let the tool work at its own pace. Do not overload.
Charging the battery (fig. A)
The battery needs to be charged before first use and whenever it fails to produce sufficient power on jobs that were easily done before.
The battery may become warm while charging; this is normal and does not indicate a problem.
Warning! Do not charge the battery at ambient temperatures below 10^ or above 40^ . Recommended charging temperature: approximately. 24^ .
Note: The charger will not charge a battery if the cell temperature is below approximately 10^ or above 40^ .
The battery should be left in the charger and the charger will begin to charge automatically when the cell temperature warms up or cools down.
To charge the battery (10), remove it from the tool and insert it into the charger (12). The battery will only fit into the charger in one way. Do not force. Be sure that the battery is fully seated in the charger.
Plug in the charger and switch on at the mains.
The charging indicator (24) will iulluminate
The charge is complete when the charging indicator (24) lights green continuously. The charger and the battery can be left connected indefinitely with the LED illuminated. The LED will change to red state as the charger occasionally tops off the battery charge. The charging indicator (24) will be lit as long as the battery is connected to the plugged-in charger.
Charge discharged batteries within 1 week. Battery life will be greatly diminished if stored in a discharged state
Leaving the battery in the charger
The charger and battery pack can be left connected indefinitely with the LED lit. The charger will keep the battery pack fresh and fully charged.
Charger diagnostics
If the charger detects a weak or damaged battery, the charging indicator (24) will flash red at a fast rate. Proceed as follows:
Re-insert the battery (10).
If the charging indicator continues flashing red at a fast rate, use a different battery to determine if the charging process works properly.
- If the replaced battery charges correctly, the original battery is defective and should be returned to a service centre for recycling.
If the new battery gives the same indication as the original battery, take the charger to be tested at an authorised service centre.
Note: It may take as long as 60 minutes to determine that the battery is defective.
Switching on and off (fig. E)
For your safety, this tool is equipped with a double switching system. This system prevents starting the tool inadvertently.
Switching on
Push the lock-off button (2) backward using your thumb and at the same time squeeze the on/off switch (1).
Release the lock-off button (2).
Switching off
Release the on/off switch (1).
Warning! Never attempt to lock a switch in the on position.
Pruning (fig. F)
Make sure the tool is running at full speed before making a cut.
Hold the tool firmly in place to avoid possible bouncing or sideways movement of the tool.
Guide the tool through the branch using light pressure. When cutting heavy branches, where a partial cut may splinter and damage the tree, proceed as follows:
- Make the first cut 15cm from the tree trunk on the underside of the limb. Use the top of the guide bar (6) to make this cut.
down from the top.
Cleaning, maintenance and storage
Your Greenworkstools corded/cordless appliance/tool has been designed to operate over a long period of time with a minimum of maintenance.
Continuous satisfactory operation depends upon proper tool care and regular cleaning.
Warning! Before performing any maintenance on corded/ cordless power tools:
Switch off and unplug the appliance/tool
Or switch off and remove the battery from the appliance/ tool if the appliance/tool has a separate battery pack
Or run the battery down completely if it is integral and then switch off
Unplug the charger before cleaning it. Your charger does not require any maintenance apart from regular cleaning.
Regularly clean the ventilation slots in you appliance/tool/ charger using a soft brush or dry cloth.
Regularly clean the motor housing using a damp cloth. Do not use any abrasive or solvent-based cleaner.
Regularly open the chuck and tap it to remove any dust from the interior (when fitted).
After use and before storage
Regularly clean the ventilation slots with a clean, dry paint brush.
To clean the tool, use only mild soap and a damp cloth. Never let any liquid get inside the tool and never immerse any part of the tool into liquid.
Remove debris using a hard brush.
Lubricate the chain with oil.
Installing and removing the saw chain (fig. G & H)
Warning! Always wear protective gloves when installing or removing the saw chain. The saw chain is sharp and can cut you when it is not running.
Place the tool on a firm and stable surface.
Loosen the screws (16).
Remove the screws.
Remove the sprocket cover (5).
Turn the screw (18) counterclockwise to allow the guide bar (6) to recede and to reduce the tension on the saw chain (7).
Remove the old saw chain from the sprocket (19) and the guide bar (6).
Place the new saw chain in the groove of the guide bar and around the sprocket. Make sure that the teeth are facing the correct direction by matching the arrow on the saw chain with the arrow on the housing.
Make sure that the slot (20) in the guide bar is over the bottom of the pin. The pin is located over the adjustment pin (23).
Re-fit the sprocket cover (5) and the screws (16).
Tighten the screws (16).
Adjust the chain tension as described below.
Checking and adjusting the chain tension (fig. G)
- Check the saw chain tension. The tension is correct when the saw chain (7) snaps back after being pulled away 3mm from the saw chain bar with light force from the middle finger and thumb. There should be no 'sag' between the guide bar (6) and the saw chain (7) on the underside.
To adjust the tension:
Loosen the screws (16).
Turn the screw (18) clockwise.
Warning! Do not over-tension the chain as this will lead to excessive wear and will reduce the life of the bar and chain.
Once the chain tension is correct, tighten the screws (16).
Warning! When the saw chain is new, check the tension frequently during the first two hours of use as a new saw chain stretches slightly.
Oiling the chain
The saw chain must be oiled before each use and after cleaning using only the correct grade of oil (cat. no. A6027).
Oil the whole saw chain (7) evenly.
Storage
When the tool will not be used for several months, ideally leave the battery connected to the charger.
Otherwise proceed as follows:
Fully charge the battery.
Remove the battery from the tool.
Store the tool and battery in a secure and dry location.
ENGLISH
(Original instructions)
The storage temperature must always remain in the range of +10^ to +40^ . Place the battery on a level surface.
Before using the tool after prolonged storage, fully charge the battery again.
Protecting the environment

Separate collection. This product must not be disposed of with normal household waste.
Should you find one day that your Greenworkstools product needs replacement, or if it is of no further use to you, do not dispose of it with household waste. Make this product available for separate collection.

Separate collection of used products and packaging allows materials to be recycled and used again. Re-use of recycled materials helps prevent environmental pollution and reduces the demand for raw materials.
Technical data
| 20127 | |
| Input voltage Vdc 24 | |
| No-load chain speed m/s 6.67 | |
| Max cutting length cm 20 | |
| Weight kg 3.2 | |
| Chain Oil tank capacity ml 50 | |
| Battery | 29697/29707 |
| Voltage Vdc 24 | |
| Capacity | Wh 44 / 88 |
| Type Li-Ion | |
| Charger 29687/29437 | |
| Input voltage Vac 100-240V | |
| Output voltage Vdc 24 | |
| Output current mA 2200 |
Level of sound pressure according to EN ISO 11680-1:
Sound pressure (LpA) 100.6 dB(A), uncertainty (K) 3 dB(A)
Level of sound power according to EN ISO 3744:
Sound power (LWA) 104 dB(A), uncertainty (K) 3 dB(A)
Vibration total values (triax vector sum) according to EN 60745: Cutting freshly felled softwood (a_h,w) = < 2.5m / s^2 Uncertainty (K) 1.5m / s^2
Batteries

At the end of their useful life, discard batteries with due care for our environment:
Do not short-circuit the battery terminals.
Do not dispose of the battery(s) in a fire as this may result in a risk of personal injury or an explosion.
Run the battery down completely, then remove it from the tool.
Batteries are recyclable. Place the battery(s) in a suitable packaging to ensure that the terminals cannot be short-circuited. Take them to any authorised repair agent or a local recycling station.
English(original instructions)
TROUBLESHOOTING
| PROBLEM | POSSIBLE CAUSE | REMEDY |
| Bar and chain running hot and smoking. | Check chain tension for overtightened condition Bar lube reservoir empty. | Tension chain. Refer to Chain Tension earlier in this manual. Check bar lube reservoir. |
| Motor runs, but chain is not rotating. | Chain tension too tight. Check guide bar and chain assembly. Check guide bar and chain for damage. | Retention chain. Refer to Chain Tension earlier in this manual. Refer to Replacing the Bar and Chain earlier in this manual. Inspect guide bar and chain |

DISPOSAL
Power tools and accessories contain large amount of valuable resources and plastics that can be recycled. Waste electrical products should not be disposed of together with household waste. Please recycle where facilities exist. Check with your local authority or retailer for recycling advice.
Guarantee
Greenworkstools is confident of the quality of its products and offers an outstanding guarantee. This guarantee statement is in addition to and in no way prejudices your statutory rights. The guarantee is valid within the territories of the Member States of the European Union and the European Free Trade Area.
If a Greenworkstools product becomes defective due to faulty materials, workmanship or lack of conformity, within 24 months from the date of purchase, Greenworkstools guarantees to replace defective parts, repair products subjected to fair wear and tear or replace such products to make sure of the minimum inconvenience to the customer unless:
The product has been used for trade, professional or hire purposes.
The product has been subjected to misuse or neglect.
The product has sustained damage through foreign objects, substances or accidents.
Repairs have been attempted by persons other than authorised repair agents or Greenworkstools service staff.
To claim on the guarantee, you will need to submit proof of purchase to the seller or an authorised repair agent. You can check the location of your nearest authorised repair agent by contacting your local Greenworks office at the address indicated in this manual. Alternatively, a list of authorised Greenworkstools repair agents and full details of our after-sales service and contacts are available on the Internet at:
www.greenworkstools.com.
Please visit our website www.greenworkstools.com to register your new Greenworkstools product and to be kept up to date on new products and special offers. Further information on the Greenworkstools brand and our range of products is available at www.greenworkstools.com.
Dra at skruvarna (18) nar kadjan ar ratt spand.
Greenworks tools servicecenter, for at undgå fare.
1. 6E30NACHOCTb HA PABOYEM MECTE
a.Heo6xOIMO NOePbBaTb Ha pa6oyem MeCTe 1NCTOTy HxopoOee OcBeueHne. BecnpaOK NIN TEMHbIe MecTa BeDyT K HeCuaCTbIM CnyaM.
b.3anpeaaetc3kcnnyatnpoBaTb3neKtponHCTpyMeHTbBO B3pbIBOONACHbIX aTMocΦepax, TAKX, B KOTopblx npcyTCTBYOT TOPOHye XKnKoCTn, Ra3bl Nn Nblb.3NeKTPoHNCTpyMeHTbl ReHePpYIO T NCKpbI, KOtOpbl E MOrTyBOCNJaMeHHTb Nblb Nll Nbl BIdJeRMeBle Ra3bl.
c.He donyckatb npncytcbn H noctoponHHN LNC BO Bpempaobtbc 3neKtponHCTpymehTOM. Bbl mokeTe OTBNEbCn IOTepaTb ynpabNeHne.
3. JIYHAR 6E3ONACHOCTb
a.Heo6xOIMO coXpaHbT 6dHTeJIbHocTb, H6IIOdaTb 3a npOncXoJyMm N cNoNt3OBaTb 3dpAbbi CMBICn npn pa6ote c 3NeKtpoHHCTpymENTom. 3anpeaaetcN HCNOB3OBaTb 3NEKtpoHHCTpymENT, ecnn Bbl yctann HnHaxoNDteb NOd DeHcTBHeHapKOTKNOB, anKOrONn HnN nekapCTb. OcnabneHne BHMaHnBa Bpempa60TbC 3NEKTPoHHCTpymEHTAMMOkET npNBecTN K cepbe3HBIM TpaBMam.
b.Heo6xOAnMo HcNoIb30BaTb JnHoe 3aunTHoe o6OpdyoBaHne. Bcerda Hocntb cpeCTBa 3aunTbI rna3. 3aunTHoe O6OpdyoBaHne, Takoe KAK nbJIeBaJ MACKA, 6OTINHn Ha Heckonb3auei NODOWBE, 3auHTHa KACKa INN cpeCTBa 3auNTbI CnyxA CHN3r PNCK NOnyHeHn TPaBM, ecnn cnoNob3yIOrCA HADNeKaaUIM 6pa3OM.
c.PpeodTbpauHHe cnyaHoro 3anycka. Heo6xoHMo y6eHntbcra, YTO nepeKIOUaTeNB HaxoDNTcB NnoXKeHH BbIKL,do NOkJIIOUeHHNCTOUYHKA NHTAHn NNN AKKymyIaTOPHO 6atapEn, a TAKKe npn noDBeMe Nnn nepeHoKe HNCTpyMeHa. NepeHoc 3NEKTPoHnCTpyMeHTOB, KOrda NaNeu HaxoDITcH a NepeKIOUaTeNE, NNI NOaHa NtAHn Ha 3NEKTPoHnCTpyMeHTbI, nepeKIOUaTeNB KOToPbIX BKJIOUeH, pINBOIDNT K HeCHacTHbIM CNYaRM.
d.Heo6xOaHMo y6paTb np6Opbl perynnpOBKn nnraeHbI KIOU npExde, YEM BKIOuAtb 3NeKtpOHcTpymENT. faeyhbi KIOU nn np6op, OCTabunncr npKpeHHeHbIM K BpauaHouceJCACTN 3NeKtpOHcTpymEHTa, MoKeT npNBecTN K TpaBMam.
e.He cneNyET CnNkOM TnHyTbcn npn pa6ote. Heo6xOaHMo Bce BpemnoepKNaBt npaBnIbHyto CTouky 6baanC.3To oBeecneuBaet lyuwee ynpabNeHne 3NEKtpOHCTpyMeHOM B HnpeDbUeHHbIX CNTyaunx.
f.PaBnIbHO OeBaTecb. 3anpeaaetc Hocntb Cbo6oHyO oExdy nnn ykpaawenH.NcndyTe noo6pTaB BOncbl, y6paTb Oexdy n nepuATKn noadnbwe OT DBNkUxxCra cacte. Cbo6oHaA OExka, ykpaewHn nn DnHHbIe BOIOcbl MOrTy nonactb B dBNKUxuecaCTn.
g.EcIn yctpoiCTBa npedHa3HaeHbI dnn noKnIOeHn K yctpoiCTBAM ydaJIeHn I c6opa nbIIN, Heo6xOJIMo y6eINTbc, YTO yctpoiCTBa NOkNIOeHbI n npaBHnBHO nCNoJIb3yIOTc. NcNoIb3OBAHne yctpoiCTBa c6opa nbIIN yMeHbIIT BepoTHOCTb BO3HNKHOBEHn ONaCHOCTe, CBraHHbIX C nbJIbIO.
4.ИСПОЛБ3OBAHHE 3ЛЕКТPOHHTPYMEHTA I ERO OБСЛУЖИBAHNE
a.3anpeaaetcnaeperykaTb 3neKtpoHnCTpyMeHT.
NcnoB3yIte 3neKtpoHnCTpyMeHT no Ha3haueHHIO.
NcpabHBn 3neKtpoHnCTpyMeHT 6yET cnpabJIbTBcA C
pa60To n Lyuwe n 6e3onacHee npn CKopocTN, dnn KOTopoOH 6bl pa3pa60tah.
b.3anpeaaetcHcnoB3OBaTb 3neKtpOHCTpyMeHT, ecnn BblknoyateHb He pa6oTaET. IIOboI 3NEKTPOHCTpyMeHT, KOtOpBn HE MoXeT ynpabnTbcR
NOCpeiCTBOM BbIKHouaTeTn,-OnaceH nOJKeH 6bITb OTpeMOHTnpOBaH.
c.OTKnIOuHTb BnIKy 3NEKTPoHnCtpymeHaTo NTocTuHnKa nTahndo BBINOJIHeHn JIO6bIX peryInpOBok,3aMeHbI akceccyapob Hnn XpaHeHH 3NEKTPoHnCtpymeHTOB. TaKne npOoINaKTmueckne Mepbl 6eONaCHOCTn CHNkaIOT onaCHOCTb CnyaHnHO BKIOUeHH 3NEKTPoHnCtpymeHTOB.
d.XpaHnTb 3NeKtpOnHCTpyMeHTb B HeDocTyNHOM dIaTei MeCTe; 3anpeaaetcpa6oTaTB C 3NeKtpOnHCTpyMeHTom IIOJIM, He3HaKOMbIM C HHM INN C 3TNIM IHCTpyKUJMM K 3NeKtpOnHCTpyMeHTy. 3NeKtpOnHCTpyMeHTb ONaCHbI BYkax HeONbIHbIX NOIb3OBateiE.
e.Heo6xOIMO BbINOJHrB 06cIyKuBaHne
3JeKTPoHNCTpymeHTOB. IpOBePrtb paccorlacOBaHne
Hn 3AcTepeBaHne DbNcxUxxCraCTei, NOnOMky
Yacte Hn DpyRn CnTyauHH, KOToPbE MOrYT
OKa3aTb BnHHe Ha paOry 3JeKTPoHNCTpymeHTOB.
Ecnn 3JeKTPoHNCTpymeHT NobpeXDeH, erO Heo6xOIMO
OTpEmOHtPOBaTB do nCNoJIb3OBAHH. MHorne HeecactThbie
Cnyau npou30wnn n3-3a nIOxOro 06cIyKuBaHH
3JeKTPoHNCTpymeHTOB.
f.CoxpaHb3aToky uNcToTy peKyuNX HnCTpyMeHTOB.PexyUne nHCTpyMeHTbl,KOTOpbIe npabNilbHO o6cnyKbAInbc,y KOtOpbIX OCTpbIe peKyUne KpOMKn,pEke 3aXIMAIOTcN InerYe KOHTPOINPYIOTC.
g.Heo6xOIMO nCnOJb3OBaTb 3NeKTPoHnCTpyMeHT, akceccyapbl, BCTaBHbIe pe3cbl N.T.D. B COOTBeTCTBm C daHHbIMn HnCTpyKUmaN, yuHTbIBaY cNoBn N BblONlHReMyo paBoTy. IcNoJIb3ObaHne 3NeKTPoHnCTpyMeHTa Dn Opeaun, KOtOpbIe OTnHaOTcR OT npEJaHa3NaHeHOrO nCNOJb3OBaHn, MoXeT pInBeCTN K OnaCHO nCtyaun.
5. INONb3OBAHNE AKKUMYJTOPHOHOHCTPYMEHTA I ERO OBCNJXKBAHNE
a.Ipe3ap4ky Heo6xOIMO BbINOJHrTb TOnbKO C 3ap4nHbIM yCTpoiCTBOM, Yka3aHHbIM n3rTOBNTeIeM. 3ap4nHOe ycTPOiCTBO, KOtOpoe NOXoDIT dNra ODHoro Tnna akkMyIaTOPHoH bTaapeu, MoKet Co3daTb OnaCHOCTb NOXapa Ni HcNoJIb3OBAHN C dpyroakkMyIaTOPHO batapeeu.
b.Heo6xOIMO nCnONb3OBaTb 3NeKTPoHnCTpyMeHTbI TONbKO CO CNEuHaNbHO npEHa3HaYeHHbIMN aKKMyJrTOpHBIMn 6atapeMn. NcNoB3OBaHHe IIObix dpynx aKKMyJrTOpHbIX 6atapee MoKet Co3daTb ONaCHOCTb TpaBM nNoXapa.
c.Korda akKymyIaTOPHa 6aTape He HcNoB3yeTc, ee Heo6xoJHMo DePkaTb NodaJIbwe OT dpyrnx MeTaNnuecknx npEMeTOB, TAKNX KAK cKpenKN, MOHeTbI, KIOUCh, TB03Dn, WypynbI INN dpyrne He6Obnwne MeTaNnueckne npEMeTbI, KOtOpBe MoryT o6pa3OBaTB NOkKnOuHene ODHON KNeMMbl K dpyro. KopOTKoe 3aMbKaHne KOHTaKTOB aKKymyIaTopa MoKeT npINBecTN K OKOram INN NoXApy.
d.Pn HnpabNbHOM 6paueHH N3 AkkMyIaTopa MoXe TneYb KxNkoCTb; B 3Tom Cnyae Heo6xOIMo M36eraTb KOHTaT. Pn CnyauHOM KOHTaTe npomblb6onbHM KOnueCTBmblbHO Bobl. Ecn JxNkoCTb nona B rna3a, HeMeDneHNO 6pataNTbcra 3a MeDnIHcKo NMOUbIO. XNkoCTb, BbTEKaIOuaA n3 AKKyMnyaTopa, MoXe TblBaTb pa3dpaxHeue HnOxKoH.
6. OBCJNYKUBAHNE
a.ObnykBaIte CBOJ3NEKTPOHCTpyMeHT y KBaINΦNUPOBAHHOrO peMOHTHKa C NcNOb3OBaHHeM
TOnbKO NdeHTuHbIX 3aNaChbIX qAcTei. 3To rapaHTnpyET coXpaHeHne 6e3oNaCHOCTn 3NeKtpOHcHcTpymEHa.
IONHHTENbHIE INPEOCTEPEXEHNA KACAUINECPA60TbIC3NEKTPOHCHPTYMEHTOM
NPEIOCTEPEXEHNEI DononHnTeNbHbIe HnCTpyKuIN, Kacaoounec 6e3oNaChocT npn paOte c ycTPONCTBAMn o6pe3Kn cybeB.
IpeyncMOTpeHHoe nCnONb30BaHne OncaHO B Hactoae pykoBODCTBE NO 3KcnnyatauIN. 3anpeaaetcra NcNoB30BaTb INCHPTyMEHT DnA HenpeyncMOTpeHHbIX cenei; HAnpIMep, 3anpeaaetcra NcNoNb30BaTb INCHPTyMEHT DnA BANKn DEpeBBeB. IcNoNb30BaHne IIO6O raKceccyapa nnDOnONHInTeBHorO npCnOC6NeHnE INN BblNOJHeHne 3TNM INCHPTyEMTOIIO60I ONePAUKN, KOTOPAR OTNIuaeTcR OT peKOMEHDoBAAHOB IN DAHHO INHCTpyKUIN No 3KcnNyatauIN, CO3daET PNC NOJYHeHr TpaBMbl.
DepKaTb 3NeKtpOnHCTpyMeHT TOJbKO 3a H3OInpObaHHbIe, npedHa3NaueHHbIe dNRA 3TOR0 NOBepxHOCTN, NCKoJIbKy pExyUnn IHCTpyMeHT MOKeT KacaTbC8 CKpbITOn NPOBOdKN. KOHTKT C npOBoDAmN NO TOKOM MOKeT n epeDaBaTb HanpXeHHe Ha OTKpbTBe MeTaJInuYeCKne YactN 3NEKtpOnHCTpyMeHTa YTO MOKeT PnIBcT N YdApY OepaTopa 3NeKtpUeCKM TOKOM.
Hocnte npntaIeHHyIO 3auuTHyIO odexdy, BkIouyAR 3auuTHyIO KACKY C KO3bIPbKOM / OyKaMn, 3auuTHbIE HayuHNK, HeckoJIb3aUyIO 3auuTHyIO oByB, 3auuTHbI pa6Ouy KOMbHcE0H n IpOuybIe KoxaHbIe nepaTKn.
Heo6xOIMO BcERda HaxoNTbcBHe TpaekTopn naiaounx Betbe.
6e3oNaCHOpe paccToHHe MeKdy cpe3aEmoB BeTKoN NOCTOPOHMM, 3dAHnMn INpyHMn PpeDMTaM NOnXHO 6bIb KaK MHNmYMB 21/2 pa3a BoNbwe DnHbBe TBN. IIO6bIe NoCTOpOHHe, 3daHne INn PpeDMET B npeDeJAX 3TOrO paccToHnNoDBepraIOTc ONaCHOCTu Ydapa naiaoue BetKoN.
3apahee cnpaHpyte 6e3oNaChbI OTxOJ OT naAounx DepeBbeB nII BcTBeN. Y6eInTeCb, yTO MapuPyT OTxOJa CBO6OHeH OT npEnrTCTBn, KOtOpBie MOrY T NOMEwAtb DINXKeHIO IIN CdeNaTb erO HeBO3MOXhblm. POMHnte,
YTO MOKpa TpaBA N CBExeCpe3aHHa Kopa RaNraHOTcCKOJIb3KIMM.
Y6eHNTecb, YTO KTO-TO HAXOHTCn NO6n30CTn (HO HA 6e3oNaChOM paCCToHHN) Ha BCaKN CnyaH.
3anpeaaetcnoh3oBaTbCnHCTpyMeHTOM,CTOHa DepeBe Hn Ha neCTHnCe, N6o Ha nboDpyroNeHYCTOuHBONOBEPXHOCTN.
Heo6xOIMO Bcerda coxpaHrTb npaBnIbHyIO CTOnKy npabHOBeCne.
IpouHOn yIepKnBaIte HNCTpyMeHT 3a O6e pyKoTKn, KOrJa pa60taet MOTOp.
He no3BOJnIe DnBxUeC rENN KOHTaKTHIpOBAbC IIO6bIM npEMeTOM Ha KOHcKe HAnpabJIouoero NONoTHa.
HaHHaHTe NnNTb TOJbKO TOrda, KOrda cenb DnKcTcH a noHHOCKoPoCTn.
3anpeaaetc nItaTbC BCTabnIb NnIy B npediyuHnHn. Bcerda HauHaHe HOBn HaHnN.
CneDnte 3a CDbiraOuMnncBETBmN Nn DpymN CNAMN, KOTOpbIE MoryT 3akpbITb HaanJN N 3axKaTb cenb, Nn ydapNTb NO Hei.
RUSSIAN
Ydoctobepbtecb HnpanpabneHnn, no KOTOpOMy MoKet 3anpeaaotcnonbttkn nnnntb BetBn, kOrda dnaMeTp BETn npebblwaeT pexyuyo nnHy nHCTpyMeHTa.
Bcerda n3BnekaaTe akkymyIaTOp n3 nHCTpyMeHTa nHaedeBaIte KoxyX ceni Ha cenb npn XpaHeHHn nn TpaHCnOPTnpOBKe IHCTpyMeHTa.
Depxnte cenb nnbI ocTpo u npabnblHO HaTaryToI. PpOBepaTe HAnpXKeHHe CpeyraPbIMN INTEpbAImN
IbINHeHnIIOBperynpOBKn,yXoHaNlOBCnyKmbHnHHeo6xOUMOOTKNIOHTbNHCTpyMeHT,DaTbUeHNOCtAHOBNTbcnH3BnebAKkyMnyrTop.
NcnoB3OBAbT OINbKO NODINHHbIe 3aNaCHbIe Yactn Akceccyapbl.
IpeHocntb wTaHROBbIM cKaTOp 3a pyKoRTky C octahOBHeHHbIM pexyUIM NOnOTHom. Ipn TpaHCnOpTnPOBKe HIN XpAHEnHM WtAHTROBOrCeKaTopa Heo6xOdMBO BcERda yCTaHaBnBaTB KOKyX pexyUeTO YcTpoiCTBa n pa3bnpaTB NHCTpyMeHT Ha KOMNOHEThbl. IpaBnBHeO obpaueHne Co wTaHROBbIM cKaTOpOM yMeHbWNT BepoTHOCb NOnyuEHN TpABMbI u yMeHbWNT NOUYEHN TpaBMbl DpyuMM JInCaAMn.
BE30NACHOCTb DpynX Niu
-3TOT npn6op He npedha3HaueH IINcNoIb3OBAHHIiAAMN (BKIOUa DeTe) C ORpaHnueHHbIMn FIn3NueckHM,CEHCOPHBIM NINYMCTBEHHbIMn CNOC6HOCTMn, IN6o HE 05NaiaouMM 3HaHnMaN INbITOM, ECIN TOJbKO OHNHE HAXoYrTcN IOHAD3OpOM, INIe HNOyUuN INHCTpyKcN, KACAIOXxCRnCNOB3OBAHHI np6opa, OTIIua, OTBETCTBeHHOR 3a IN6 Be3OnaCHOCTb.
-TeHdoJXhI HaxoDHTbCnO npncMOTpOM, YTO6bl rapaHTnpOBaTb, yTO OHn He nRpaIOT C npnbOpOM.
BIBPAIIN
Yka3aHHbIe B TexHnuecknx DaHHbIX N DeKlnapauuN COOTBETCTBnA 3HaueHnBn6paunN 6blnn N3MepeHbl B COOTBETCTBnCO CTAHapTHbIM MToDOM TcTInpObaHn, npNBedeHHom B CTaNapTe EN 60745, nMoryT NCNoJIb3OBaTbCn DnC pabHeHn OOnHO INCHTpymEHTa C dpym. Yka3aHHoe 3HaueHne Bn6paunN TaKke MOxET NCNoJIb3OBaTbCn DnN PpeDbapNTelbHOIN OUeHKN BO3dEChTBnR.
PpeDocTepeXeH! 3HaueHne Bn6paun npn
fakTNueckOM nCNoB3OBAHHN 3NeKTPoHCTpyMeHTa MoKeT
OTNIuATbCR OT yKa3aHHORO 3HaueHnB 3aBNCMOCTN
OT cNOcoBbNCNoB3OBAHHN HcTpyMeHTa. YpOBHeB
Bn6paun MOKeT pBeBbIwA Tb yKa3aHHbYpOBHeB.
PnOueHKn BO3dEChTBn Bn6paunn DnI ONpeDeneHn
Mep 6e30NaChocTn, Heo6xOaIMbIX B COOTBcTCTBN
co DnpeKTHBO2 2002/44/EC dnn 3auNTbI Niu,
peyraRHO nOJIb3yOuXncx 3NEKTPOnHCTpyMeHTAMN B
npoeccHOHaJIbHOJ DeTeJIbHOCTn, OueHka BO3DeHCTBn
Bn6paunn DOJXHa yUHTbIbATb KaTNUeCKne ycNOBn
HCNoJIb3OBAHn HcNOcO hCNOJIb3OBAHn IHCTpyMeHTA, B
TOM YNCNE C yUeTOM BCex 3tanOB pa6oHeo cIKNa,
TAKNX KAK nepnoDbI OTKNIOUeHn IHCTpyMeHTa N nepNOdbI
pa60Tb I INCTpyMeHTa Ha XONOCOM XOdy, B DonONHeHne K
BpemeHN aKTIBaunn TpIRrepa.
06pe3ka cy4beB
PpeJde, HeM nbITaTcB o6pe3aTb cyHb Ha depeBe, Heo6xOAnMo y6eDnTbcB B OTCyTCTBn NOd3aKOHbIX AKTOB HIN HopM, KOtOpBle 3anpeuaN 6bl NIn KOHTpOJInpOBaN BBipy6ky DepeBbeB.
-
yOCTOBepbTecb B HApabNeHn, NO KOTOPMY MoKet
ynactb Betka. YyTeBce ycNoBn, KOtOpbIe Moryr Oka3aTb
BnnaHne Ha HApabNHe NadeHn, BKIOuHa:
dInHa n Bec cpe3aEmoB BetBn
npedymotpeHHoe HApabNHe NadeHn
IIO6a HeobbyHnA CtpyKTypa IIN rHNb B BetBX XpeBa
HaNNue OKpyKaIOUxN DepeBBeB IN ppenrTcBn, BKIOuHa
IIHNn 3NeKTPonepeDaun NpePENTeHne C dpyHMn
BetBmN CKOpocTb n HApabNHe NBeTa. -
Uyntte doctyn K Betke depeba. Betbn DepeBbeb MOrT cBnraTbCn No HapnbneHIO K CTBOy. Kpome TOrO, cyueCTByeT onaCHOcTb NOnyHTb ydAp BeTKo IIN NOIb3OBaTeJI, IIObOro NOCTOPOHHeRIO IInca, 3daHnI INI pEmTa nD Betko.
IPEIOCTEPERAIOUNE CMBOJIbI
Cnedyuounie CnMBoNbI yKa3aHbI Ha HnHCTpyMeHTe:

Ppeoctepexehne!T06bI cH3nltb pnc nonyen HnpouHTab npykoBcCTBO onepatopa.

3anpeaetcnoBeprtaBo3eHCTBnIOdojnn Bnarn.

Heo6xOIMO Hocntb nepaTkn npn nCnoJIb30BaHm cnHoi nnbl

OnacaiTebc nadaoux npedMeTOB. Depknte noCTOPOHHX Ha pacCTOAHN.

Onachocb npaxeHn 3neKtpueeckm TOkOM. DepeKncb Ha pacctoHH, KAK MHHMym, 10 M OT BOaDyUHbIX NHH 3neKtponepepa.

Heo6xOIMHOHCnTB3aunTHyIO KACKy n CpeCTBa 3aunTb rna3.

Heo6xOIMO Bcerda Hocntb Heckonb3aunTHy0 06yBb.

Bcerda Hocnte 3aunTHbIe OKn npn nCnoJb3OBAHnn cnHoi nnbl.

Bcerda Hocnte 3aunTHbIe HayuHnKn npn nCnoJb3oBaHHn cnHNO nnbl.

HanpaBHeHBeBaPaeHnIeenn

PpeocTepeXeHne! 3anpeaaetcKacatbcaeennBTOckn Bb6pocuaenbl.
OCTATOUHbIE PNCKN
MoryT Bo3HnKaTb DoonHnTeNbHbIe OcTaOuHbIe pNcKn npN nCOnb3OBAHn NHTCPyMeHTa, KOTOpBle He MOrYT 6bItb BKNoUeHb I OONcaHHbIe 3Decb npaBnJaTexHnKn 6e3oNaChOCTn. 3TN pNcKn MOrY TBo3HnKHyTb npN HEnpBaNJbHOM INnpoDJIKKTeNbHOM nCOnb3OBAHnn N3DeJInr N.T.D.
Hn npoJIKTeJbHom nCNoJIb3OBAHnn N3dJIyN T.D.
JaKe npn npimeHeHH COOTBeTCTByIOUxN npaBn TExHKn
6eONaCHOCTn IN CNOJIb3OBAHnn npedeoxpAHnTEJIbHbIX
ycTpOiCTB, HeJIb3r N36EkaTb HEKOTOpBX OCTaTOHbIX
pNCKOB.K HMM OTHOcRc:
TpaBMBi, Bbi3BaHHbIe npNKoCHOBHeHEm K Bpaaoumcmc/ DBNkUIMCMc Yactm.
TpaBMBi, CBraHHbIe C 3aMeHOJ qACTeN, peKyUx NJIe3Bn INI aKCeCCyApOB.
- TpaBmbl, Bb3BaHHHbe npOIOJXnTEJbHbIM nCNOJIb3OBaHHem HhCTpyMeHTa. PnHcNOJIb3OBaHHn IIO6Oro HhCTpyMeHTa
B TeueHHe DnnteHbHoro BpeMeHn y6eNTecb, YTO Bbl peryIraHPO deIaTe nepepbIbbl..
- YxuDWeHne cnyxa.
- OnachOCTnДЯЗdOpOBb, CB3aHHbIe C BdIbxAHNeM Пылп ри ИСнОЛБ3OBaHIM INHCTpyMeHTa (прИМЕ: - pa60Ta C DepeBOM, B OCO6eHHoCTn, C Dy6OM, ByKOM n DpeBeCHO- BOJOKHCTbIM NITAMN).
DOnONHHTeIbHbIe HNCTpyKUIN No 6e3OanCHOCTn DnAkkymyIaTOpHbIX 6aTapei N 3apRdHbIX yCTpoiCTB AKKMyIaTOpHbIX 6aTapei
- HnKOrda He nbItaTneCb OTKpbBaTb aKKyMyIaTOpHbIe 6aTapeN noJIO6bIM npeDnORm.
3anpeaetcnoBepraTbcaakymyIaTopHy6aTaepo BO3deCTBIOBObl. - 3anpeaetcnoBepraTbcaakkymyIaTopHyIO6atapeHO BO3dEChTBnIO TENla.
- 3anpeuaeTcXpaHbAkkMyJrTophie 6aTapeB MeCTax, rDe TemnepaTypa MoKeT npeBbIwab 40^
3apkaTe 6atapen TOnbko npn TemnepaTyokpykaoue cpebl MeKdy 10^ n 40^ - 3apjkaTe 6aTapeN TObko C NOMOcHIO 3apJdHoro yCTpoiCTBa, BXoJUeR O B KOMnJIeKT NOCTABKN npIbopa. IcnoJb3OBaHne HnpePabNJbHOrO 3apJdHoro yCTpoiCTBa MOKeT npIbEeTN K Uydp 3NeKTPueCKM TOKOM n neperpeBy aKKMyJITOPHO 6aTapeN.
- Pn yTINH3aunn akKymyIaTOpHbIX 6aTapeHne06xOIMo CNEIOBaTB INCHCTpyKUJNM, pNBEeHHbIM B pa3dene "3aunTa OKpyKaIOUe Cpebl".
3anpeaetcnoBpeKdaTb/deΦopMnpoBaTa kkymyIaTOpHy6baTapeIO npTeM npokaIbHaHna Iydpap, nockoIbKy 3TO MOKeT pNBeCTN K BO3HKnHOBeHNOAChOCTN NOlyeHn TpaMbbln NoxApy.
3anpeuaetc3apkaTb nobpeXdeHHbIe aKKMyrTopHbIe 6aTapeu.
B3KCTpeMaJIbHbIgYcNIOBnXMOKeTBO3HNKHyTByTeKa n36aTapei.EcNBI3aMeTnINJxNIOKocTbHa6BaTapex, OCTOPOXHO COTPte XNIOKOCbC NOMOuBTO KaHn. 136eraaTe KOtAKTa C Koxe.
Bcnyae KOHTaKTA C KOKeH INI rna3AMn Heo6xOIMOBbINOHNTH HIXKePnBEdeHHBe IHCTpykun.
IpeodocetepexeHn!KIOCTb n3 aKKyMylrTOpHO Batape moKET cTaB npuHHoT pAbMbI nIN NOBpeXdEHN mUyecTBA.Bcnyae KOHTaKTA C Koxei Heo6xOIMo HEmeJNeHHO npOMbITb 3TO MecTo BOdo. Ppi NOBHeHH NOKpaCHeHH, 60nn nnP a3DpaKeHHn HemeJNEHNO bpaNTecb K BPay. B cnyae KOHTaKTA C rna3amn Heo6xOJIMO HEmeJNeHHO npOMbITb IN YHCTO BDOOn n O6paNTbcra MeMNCHCKON NOMOsbio.
3apnHbIe yctpoNCTBa
3apndoe yctpoieCTBO 6bno pa3pa6oTaHO dno onpeedeHnHO HanpXeHHe. HeoXoHMo BCerda y6eHTbcra, YTO cTeBoe HAnpXeHHe COOTBcTcByET HanpXeHIO, yka3aHHOMy Ha nacnpTHo Ta5nUKe.
PpeoctepexeHHe! Hn npKaKnx 06ToTeNbCTBax He nbTaeTcB 3aMeHHTb 3apdHoe yCTpOcTBo CeTeBBIM wTekePOM.
- IcnoIb3yIte 3apIHoe yCTpoIcTBo Greenworks tools TOnIbKO dIa 3apIaIKN aKKMyIaTOpA npIbopa, B KOMnJIeKT NOCTaBKn KOTOPoO OHO BxOJNT. DpyrIe aKKMyIaTOpbl MOrYT B3OpBaTbC, YTO pINBeTe K TpaBMam N NOBPEXDeHNM.
- 3anpeuaOTcra nonbITkn nepe3apkatab OndHopa3OBble 6aTapeu.
- Ecnn HwHpy nHTaHn NOBpeKDeH, OH DonKeH 6bTb 3ameHeH hroTOBHTeH mN B aBTOpu3OBAHHOM
cepbnchom ceHTpe Greenworks tools, yTo6bI n36exaTb onaCHOCTN.
3anpeaetcnoBepraTb 3apnHoe yctpoCTBO BO3dEChTBNO B0bl.
- 3anpeaetc0TkpblBaTb3apdHoe yctpoCTBO.
- 3anpeaetcnoMeaaTb noCTOPOHnne npedMeTbIB 3apndoe yctpOCTBO.
3apnHoe yctpoCtBO BO BpeM 3apnDOnxHO HaxoNTbC B XopoIPOBETpNAeMOM NOMEueHm.
Cnmbonbl Ha 3apdHOM yCTpoCTBe
Ha 3apyHOM yCTPOICTBE HAXOJTCR CNEyUOJIne CMMBOLJIb:

3apdHoe yctpoCTBO IMeET DBOHyIO hOJIaIO, NOtOMy He Tpe6yeTc3a3eMnIoumnpoBOD. Heo6xOIMMO Bcerda y6eDntbCra, YTOceBoE HaprJKeHne COOTBeTCTByeT HAprrKeHIO Ha nacnopTHoT Ta5nUKe. 3anpeaIOTc IOnbITKn 3AmEHHTb 3apdHoe yCTPOICTBO CeTeBbIM WTEKepOM. Ecnn UHyp NITAHN IOBpExDeH, OH DOJXeH 6bITb 3aMeHeH N3ROBNTeIeM INB ABTOpN3OBaHHOM cepBnCHOM CEHTpe Greenworks tools, YTo6bl N36ExKaTb OnaCHOCTN.

3apnHoe yctpoNCTBO npedHa3NaHeHO TOnbKO dIyNCIOB3OBAHIN B NOMEeEHINX.
PpOHTaTe pyKOBOdCTBO nepe nCnOJIb3OBAHmE npI6opa.
XAPAKTEPNCIKN
- NepeeknoyateBkN./BbIKN
- KhoIka pa36JOKnPOBKn
- JnaBnay pyKoRTka
- TOnOBka nIbI
- Kpbuoka 3Be3dooukN
- HanpaBnIouaJyHnHa
- Lcnb
- Koxyux cenn
- Pa3DbNkHa WtHaHa
- AkymyTOpHa6Tape
- MacnHbI pe3epByap
Pnc.A
- 3apnHoe yctpoiCTBO
C60pk
PNEIOCTEPEXEHNEI PEPD C60PKOHNEOXOMN3BNEyAKKUMYJTOPNIPBOPA.
YCTAHOBKA IN 3BNEUHEHNE AKKUMYJTOPHO BATAPEN (PNC.B)
-Дя yctahOBKN aKKymyIaTopa (11) BBipOBHbT bero C nocaoCHbIM MecToH Ha HnCTpyMeHTe. BCTaBNTb aKKymyIaTOpHyIO batapeHO B nocaoQHoe MeTO n HaxmTaB Do Tex nop, noka aKKymyIaTOp He BCTaHET Ha MecTO.
-ДяИЗВЛЕЧЕНЯ AkKуМЛТОР"H6aTApEN HaKaTb KHOKNy BbICBO6OxJDeHnY (13),ODHOBpeMeHHO BbITrNBAI aKKuMЛТOP n3 NOcdoUHOro MeCTa.
Ppeoctepexene! nnpoDBpaueHn CnyaHOrO cpabaBHaHn Heo6xOdmo y6eDnTbC, YTO AKyMylTop n3BneH, nTO KOxy pxeyuero NOIOnHa yCTaHOBneH Ha MeTo Ha peXyUne NoIOnTHa, npExeYcEM BblONHrTa
RUSSIAN
CneDyIOUe ONEpaUN. HecO6IIOJeHHe 3TOro Tpe6OBaHN MoKeT PnIBeCTN K TjXeJIbIM TpaBMam.
YcTaHOBka n rONOBKn nnbl (pnc. C)
TOnOBKa Nnbl MoKet 6bItb yCTaHOBNeHa HenOCpeDCTBeHHo Ha pykoTky, TTo6bl NoJyHTb CTaHapTHbOXBat.
BbipOBHbTb na3 Ha HapyKHO CTOpOHe KOHcMa MyTbI pyKOaTKN (3) C a3bUcKOM Ha BHyTpEHHe CTOpOHe KOHcMa MyTbI rONOBKn Nnbl (4).HaBnHyTB rONOBKy nnlbl (4) HApyKOaTKY (3).
CdbHytb KObIoo (14) BBepx NOBopaunBaT bero npOTNB YacBOB CTpeKN Do Tex NOp, NOKa OHO He 6yJeT NOHOCTBIO 3aTAYTO.
IpeDocTepeXeHHe! Heo6xOdmo nepnoOnuYeckn npOBepaTb coeHNHeHry, YTo6bI rapaHTnpoBaTb nx npOHyIO 3aTAAKky.
BbDnKHeHne roJIOBKn nIbl (pnc.D)
Moxet 6bItb DOCTHHT MaKCMaJIbHbI OXBaT npu
yCTaHOBKe yDnHHTeJIbHOJ WTAHN (9) MeXdY rOIOBKOINIIbl (4) npyKoRTKOI (3).
- BbipOBHrTb Na3 Ha HapyXHoN CTopoHE KOHua MyΦTbI pyKoRTKn (3) C r3bYcOM Ha BHYTppeHHe N CTopoHE KOHua MyΦTbI yDnIHHTbHOu WTaHn (9).
HaBHyb yDnHHTenbHyu wTaHry (9) Ha pyKoRTy (3).
CdbHytb KObfo (15) BBepx NOBopaHbTaB erOpTnB YacBOB CTpeKN Do Tex nop, noka OHO He 6ydetNOJIHOCTbO 3aTAYTO. - BbipOBHrTaB Na3 Ha HapyxHOI CTopoHE KOHua MyΦTbI pyKoRTKn (3) C r3bIyKom HA BHYTpEHHe CTopoHE KOHua MyΦTbI rOJIOBKn NJIbI (4).
HaBnHyb ronOBky nIbI (4) Ha pyKoTky (3).
CdbHybKobio(14)BBepxNOBopaHbTa ernpOTNBacBOBcTpeKNdoTexnop,OKA OHO He 6ydetNOIHOCbIO 3aTAYTO.
Ipeoocepexene! Heo6xOIMO nepnoDnueckn npOBepaTb coeHNHeHna, yTo6bI rapaHTnpoBaTb nx npouHyIO 3aTAAky.
DemoHTax roJIOBkn nHbI (pnc.CnD)
Ecnn yctahOBnHeHa ydHnHtBnHa WtAHra (9), Heo6xoNMO ChaAna demOHtnpObaTb roNOBky nnnbl.
- YTO6bl DEMOHHTPOBAtb rONOBky Nnbl (4), OCTaBnTb pyKoRTy (3) Ha 3emJIe, ocJa6nTb KOJbUO (14) n CHrTb rONOBky Nnbl.
HcnoJb30BaHne
IpeoctepexeHne! DaTe HnCTpymEny pa6oTaB B co6CTBeHHOM Temne. 3anpeuaetc nperepykAtb HHCTpymEnT.
3apnka akkymyIaTOpHoi 6aTapei (pnc.A)
Heo6xOIMO 3apjKaTb akKymJrTOp nepei nepBbIM nCnoIb3OBaHHem, a TAOKe KaKdbI pa3, KOrDa OH He Bblpa6aTbIbaeT DOCTaTOUHO 3HepnN dJa pa60tBi, C KOtopoN OH NERKO cnpabJIraNc paHbWe.
AkkymyIaTOp MoKet HArpeBaTcB O BpEm 3apJKn;3To HOpMaJIbHO H e Yka3bIbaeT Ha KaKe-JIn6o np6JIembl.
IpeoctepexeHne! 3anpeaetc3apxkaTb
akmylTop npn TemnepaType OkpykaOuec cpebl
Hxke 10^ nnn CbbIwe 40^ .PekomeHyema
TemnepaTypa 3apdKn: npn6n3ntelHo 24^
PnmeaHne.3apdHoe yctpoCTBO He 6ydeT 3apKaTb aKkymyIaTOp,ecn TeMnepaTypa 3JeMeHTa Hxke np6nn3ntbHo 10^ nn Bbiue 40^
-
AkkymyjIop HxHIO OCTaBtB 3apJdHOM yCTpoiCTBe, n 3apJdHoe yCTpOiCTBO HAHT 3apJdKY aBTOMaTnueCKN, KOrJa TeMnepaTypa 3JeMeHTa YBeJIuHTCn INn yMeHbWNTcR.
-
UTO6bl 3apnntb akmyjIATOP (10), n3BneKeIte ero n3 HNCTpyMeHTa N BCTaBBTe B 3apJHOe yCTpoiCTBO (12). AkmyjIATOp BCTaJIaETcB 3apJHOe yCTPOICTBO TOnbKO B ODHOM HApabHeHH. 3anpeuaTcR npKNaIbIBaTb
ycnne.Y6eNTecb,TOAKKMYJATOPNONHOCTbO YcTaHOBNEH B3aprHOM yCtpoICTBE.
-ПоdkнчiteЗapянhoe yctpoiCTBO K cetN.
- 5ydt ropetb nHdkatop 3apk (24). 3apka 3akOHcHeHa, kOrda nHdkatop 3apk (24) 6ydET noCTOHHo ropetb 3eHbIM cBETOM. 3apdHoe yCtpoiCTBO H AKyMnTOp MOxHO OCTABITb NOKIOUcEHbIM Ha HeonpeJeHbI CPOK CROPaUM CBeTOIOOM. LBE T CBToNDoA N3MeHNTc HA KpachN (uTeT 3apk), ecn 3apdHoe yCtpoiCTBO cnUaHNO pEkpATnIO 3apkky AKKymnTOpa. INDKatop 3apk (24) 6ydET ropetb, nOKa aKKymnTOp NOkKnOChEKN BKNIOUeHHOMy 3apdHOMy yCtpoiCTBy.
3apjkaite pa3pjkxHbIe akymyIaTOpbl B npdeJax 1 HeJeIN. Cpok cnjX6bl akymyIaTOppa 6ydt 3HaHTeBHO MeHbWe, ecn OH xpaHITcB pa3pjkxHOM COCTOHN.
OctabunncraakkymyIaTOpB3apnHOMycTpoNCTBe
3apdHoe yctpoHCTBO n aKKymyTOpHAR 6aTapeMOrY T octabaTbCn NOKJIIOUeHHbIMN Ha HeOppeDeNEHbI CpOK C ropuIM CBeToNDoOM. 3apdHoe yctpoHCTBO 6yTe N oDepXkBaTB aKKymyTOpHy 6aTapeIO CBExeN n noJHOCTbO 3apxKeHHoN.
DnarHocTnKa 3apAHorO yCTpoNCTBa
Ecnn 3apraHoe yctpoCTBO 6hApuyKnIO cna6bI INn NOBpeKdHHbI AKkymJrTOp, INnIKAtOp 3apAkn (24) 6ydt 6bICTPO MIRATb KpachbIM UBeTOM. Heo6xOIMO BbINONHTcNeDyUOHe Oepaun:
- NOBTOPHO BCTABNTb aKKMyTnTOp (10).
- Ecni HnDnKaTOp 3apRKn npoOJkaet 6bICTpO Mrratb KpaChbIM CBeTOM, INcNoIb3yIte DpyrO aKKMyJlAToP, TTO6bl ONpeJeNTb, npaBnIbHO JIN npoxOJNT npoUeCC 3apRKn.
- Ecnn Cmehnbi aKKyMylTOp 3apXaETc npabNbHO, nCXoHbI aKKyMylTOp ABnETC HeNCnPabHbIM, I erO Heo6xOIMO BepHyTB B cepBnCHbI cHTp IJI nepepaBoTkn.
- Ecni HOBbI aKKMyJrTOp noka3bIbaeT takyIO je HnDnkauH, YTO INCXoNDbI aKKMyJrTOp, CneDyET OTBe3TN 3apJdHoe yCTpoiCTBO dJI TecTIPOBaHHN B ABTOP3OBaHHbI cepBnchbI ueHTp.
PnmueyaHHe: MoKet notpe6oBaTbCra Do 60 MmHyr, TTo6bl onpeDenHTb, YTO akymyIaTOp HeucnpaBeH.
BkHIOUeHHe n OTKJIIOUeHHe (pnc. E)
IbBaWei 6e3oNaCHOCTn 3OT HNCTpyMeHrOBpyOBOAH DBOHOH CNCTeMOI nepeKIOUeHn. 3Ta CNCTema npedOTBpaauaet CnyauHoe BKNIOUeHne NHCTpyMeHTa.
BkHoueHne
HaxkTb KONky pa36nokpOBKn (2)Ha 3aDHe CTopoHe 60JIbWM najIbCem N OJHOBpeMeHHO CdBHyTb nepeKIOUcATEb BKIOUcEHN/OTKIOUcEHN (1).
- Otnyctntb Khonky pa36JIOKnpOBkn (2).
OTKIOUeHne
OTnyctntb nepekHIOUaTeJIb BKNIOUeHn / OTKIOUeHn (1). PpeIOCTepeXeHne! HNKOrJa He nbITaTecb 3a6NOKpObaTb nepeKIOUaTeJIb B NOJIOKeHne BKNIOUeHn.
06pe3ka cyybeB
Heo6xOIMO y6eIHTbC, YTO INHCTpyMeH paboTaET Ha noJIHOI CKOPoCTn, npexKeYem HAuHaHTb Ope3ky.
-ПочноудерхиВаьнИСТсрмЕНHaМсeTe,ЧTOбыИЗБжАв Bo3MOxHbIXpbIBKOBIIIN6OKOBOrOcMeUeHnIHHCTPymeHTa.
- HanpaBnTb IHCTpyMeH nonepek BetKn, cnerKa HadaBnBa. Pnp Obe3Ke TOnCTbIX BetBei, rDe YactNHybI npOnJIM MoKET pacuENrB n NOBpeDITb DepeBO, Heo6xOIMO BInOJIHrTB CJeDyUOUIne onepaun:
- CdeNaTb nepBb npOnn B 15 cm OT cTbOJa DepeBa Ha HIXKHe CTOpOHe cyKa. IcNoJIb3OBaTb BepXHIOU qACTb
HanpaBraIooIero nonoTHa (6) nIy BbINOnHeHn 3TOrO nponna.
- PpOnnntb OndHy TpeTb DnAmetpa cyka. 3aTeM OTnnnntb Cbepxy.
OuNTka, TexHnueckoe 6cbnyKbAHne XpaHeHne
Baw npoBODH/6ecnpoBOHO np60p /nHCTpyMeHT OT kOMnAHn Greenworks tools 6bl pa3pa60tah dnyHKIOHOHPoBAHn B TeueHne DITeHbHO BPemHe C MHHMaJIbHbIM O6cnyKbAHmE.
HenpepbHbHag yDobNetBopntbHa pa6ota 3abncrt OT npabnIbHorO yXoDa 3a INCTpyMeHToM I erO peryIpaHOn OHCTKn.
Ppeoctepexene! Do BbINONHeHnIIO6OrO 06cnyKBAHn npOBdHor / 6ecnpOBdHor 3NEKTPOHCTDyMeHTA:
BbIKIOHHTb N o6eTOHTb npH6Op /nHCTpyMeH.
- INN OTKNIOHTb N3BNEeBu AKKMyJrTOp n3 np60pa / INCTpyMeHtA, ecnnp60p / INCTpyMeHrObOpydoBaH OTJeBHOn AKKMyJrTOpHO6Taapee.
- INN NOINHOCTbIO pa3pIaHT bAKyMnIaTOpHyIO 6aTaapeIO, ECNI OHA ABJIaETcRA BCTPOeHHOJ, a 3aTEM OTKIIHOTb.
- OToCoeHNHb 3apJdHoe yCTpoNCTBO OT cTe Npeed erO ouNCTKoJ. 3apJdHoe yCTpoNCTBO He Tpe6yeT HnKaKOro texHueckoro 06cnyKnBaHn, Kpome peYyIaPHOuN CTKn.
Perynpho Ounuaine BENTINHIOHHbIe 9eHn Ha npbiope / nHCTpyMeHTE / 3apAINOM yCTPOINCTBE C NOMOIO MrgKoi TETKNN CYXONTKAHN.
Perynpho Ounuau Te Kopnyc MoTopa c NMOoub BnaXho TkaHn. 3anpeuaetc nCNOJb3ObaTb abpa3NHBOE qHCTaUee CpeCTBO HNN MOUooe CpeCTBO Ha OCHOB pactBOPNTen. Perynpho OTKpbIbAte NaTPOH npeBopauBaIte erO, YTObbl ydaIITb nbIb n3 BHyTpEHHero npoctpaHCTBa (ecnn ycTaHOBneH).
Nocne nCnonb3ObaHnI nepeXpaHeHHem
Perynpo OuHauTe BeHTnnaOHbIe IeJIc NOMOsbIO CHTO CYXON KCTOQK.
-Дя OчNTKи ИСТPyMeHTA ИСОЛьЗУTe TOnБКо MЯrkOe MOUOuee CpeDCTBO N BnAnxHyTO TKAHb. He DonyckaIte, YTO6bl JxNkOCTb NOJANA BHYTpB INHCTPyMeHTA,И HN npN kAKNX OБТОгТeBCTBax He NOrpyKaIte IInObyU qAcTb INHCTPyMeHTA B XNkOCTb.
- YdaJIte MyCOP C nOMOu bIO JXeCTKoI UeTKn.
CmKbTe LcIb MaHHHbIM MacJOM.
YctahOBka N demoHTax cennnnbI (pnc.GnH)
PpeoctepexeHne! Bcerda HaeBaTe 3aunTHbIe nepuATKn npn yCTaHOBKe n demoHTaxe cenn nnbl. Lcnb nblOcTpaN mOKe Tnope3aTb Bac, kOrda OHa He pa60taet.
IOMeCTNb HnCTpyMeHT Ha npouHyIO yctOuHByIO NOBepxHOCTb.
- Ocna6ntb BnHTbl (16).
-13BJIeYb BnHTbl.
- CHaTb KpbIuKy 3BcE3dOuKn (5).
-Повернь вит (18) npOTnB YacBOB CTpeJIKN, YTO6bl HAnpabJHIOOe NOIOTHO (6) OTOBbHNyNacb, N YTO6bl yMeHbUnNOcB HATXKeHne cENn NINbI (7).
- Chrtb cTapyu ceNb nNbI co 3Be3doQKn (19) n HapablaiooJero nonoTHa (6).
- NomeCTnB HOByIO ueb nnbl B na3 HAnpaBIAIOUeI O NOOTHa BOKpy 3Be3DOuKn. Y6eNtbc, yTO 3y6bA HAnpaBNeHb B npabNlBHom HAnpaBNEHm, CONoCTaBnB CTpeJIky Ha CEIN nnbl Co CTePknO HA Kopnyce.
- Y6eDntbCra, YTO na3 (20) B HAnpabJnIOUeM NNoTHe HAXOINTcRAHd NO3NtOHpyUOUMN WTHΦTAMN (21),
IyTOOTBepCTne(22)noJna3OMHaxoNTcnoBepx peRyIpOBOUHOHTa(23).
- YCTAHOBHTb Ha MecTo KpbIiKy 3BcE3Oo4Kn (5) INBnHTbl (16).
-3aTarybBuHTbl(16). - OTPerynipoBaTb HataXeHne cenn, KaK 3TO ONuCaHO Hxke.
PpOBepKa n perynpoBka HATXeHnue (pnc.G)
- PpOBepntb HaTaeKHeue cenn nNbl. HATaKeHne RABnEeTc npabNlbHbIM, KOrda cenb nnbl (7) OTCKaKNBaET H3ad nocne toro, Ka OHa 6bIJa OTTHyTa Ha 3 MM OT nonoTHa cenn nNbl He6oNbUHM ycINmE CpeHero n BoIbWoro naIbceB. He doJXHO 6bITb npOBuCAHn Mekdy HanpaBnIOUmm NOOTHom (6) u cenbIO nnbl (7) Ha HxKHei CTopoHe.
Дя рунрови Натхеня:
- Ocna6ntb BnHTbl (16).
-NoBepHyTB BnHTbI (18) no yacoboi cTpeKe.
IpeoctepexeHne! 3anpeaetcna36b10ouHoe HataxekHeu cenn, nockolky 3to npueedK n36b10uyHomv n3Hocy n cokpatnt cpoK cnlyk6bl noLToHa n cenn.
- KAK TONbKO HArJKeHHe ZeHN CTAHET npaBnIbHbIM, 3aTAYb BnHTbl (16).
PpeoctepexeH! KOrdaueNBnblAraTcRHOBO, Heo6xOIMo YacTo npOBepaTb HATXKeHHB NepnoD nepBbIX DByx YacOB pa60Tb, NOCKoNbky HOBaueNBnbl cnerka pactraHbaetc.
Cma3ka cenn
Lcnb nJbI dOJIxHa CMa3bIbTaBcR nepeKKaJdbIM NcNoJb3OBaHHeM Nocne OuNCTKn; npn 3TOM Heo6XoHMo npImeHrTb TOnbKO npabNJbHbI COPT MaunHHoro Macna (Kat. No A6027).
- PaBHomepHo Cma3aTb BCIO ueiN nnbl (7).
XpaHHeHne
Korda HnHCTpyMeHT He hCNoIb3yETcB TeueHne HeckOJIbKINMecAUEB,nyUWe OCTaBtB aKKMyJrTOp NODKNoUeHHbIM K3apAnHOmy yCTpOJCTBy.
B npoTHBOM cnyae Heo6xOIMo BbINOHNHTb CJeDyUOuNE onepaun:
-ПолнocьюзардnteakkymnyTOp.
- N3BneKeTte akKymyIaTOp n3 nHcTpymeHTa.
XpaHHTe HHTpymeHT N aKKMyJrTOp B 6e3oNaCHOM CYXOM MCTe.
- TemnepaTpya xpaHeHHI DOJIXHa BcerHa OCTaBaTbC8B Dnana3OHe oT +10°C Do +40°C. NomeCTnte aKKyMylrTop Ha POBHyIO NOBepXHOCTb.
- IpeepncnojIb3OBAHnEM HNCTpyMeHTa nocJe dIINTEJIbHOxpaHeHnra Heo6XoIMo CHOBA noJHOCTBIO 3aprAnb aKkyMnyTOp.
RUSSIAN
3aunTa okpykaioe cpebl

Pa3denehBnC6op.3To n3deneHe doJHKHO yTINHPOBaTcR C 0bIHHbIMN 6bITOBbIMN OTXoAMn.EcnO ndaKdbBbl 6hopyKeTe, 4TO BAwe n3deneGreenworks tools Tpe6yeT 3aMeHbI,nnecn OHO 6oNbWe He MoKet 6bITb BAM None3Ho,He BbIbpaCbIbAteero Bmecte C 6bITOBbIMN OTXoAMn. OnpeDenite 3TO n3dene DnPa3deneBHorO c6opa.

Pa3dJIbHbI C6Op nCNoJIb3OBAHHbIX n3dJIIN yNAKOBKn NO3BOJnEepepa60Ky MaTePnaIOB INx NOBTOPHoe nCNOJIb3OBAHHe. NOBTOPHoe nCNoJIb3OBAHHe nepepa6oTaHHbIX MaTePnaIOB NO3BOJnEe npEDOTBpAaTb 3arpr3HeHne OkpykaIOU eepdbI yMeHbShaET Notpe6HOCTB CbIpbe.
AkkymyTOpbl

B KOHc cpoKa CnyK6bl yTNnN3npyTe aKKyMyrToPbI cdoJHKHO 3a60ToI 6OxyKaUoJe Cpde:
3anpeuaetcKopoTko 3aMbKaTb KneMMbl AKKMyJrToPA.
3anpeaaetc Cxiratb akmyyIaTOp(b), nockonby 3TO MOKET CO3daTb PNCK TpaBM WnB B3pbIbA.
NIOHOCbIOp pa3PraNTe aKKyMyrTOp, a 3aTeM n3BnEKeNTE erO n3 INCHCTpyMeHTA.
AkymyIaTOpbI npiroDhbI nB TOpuHoi nepepa60TK. NomeCTnTe akymyIaTOp(b) B noXoJMyO ynaKOBky, rapaHTnpYIOU OTCyTCTBne KopoTkoR O3MbIKAHNA. CdaIte Ix B IIO6oABTOBaHHb CEpBnCHbI cHTp IIN B MeCThblpyHKT nepepa60TK.
TexHnueckne daHHbIe
29697/29707
BbIaJIeHHeN I YCTPAHEHHe HENCnPABHOCTeI
All new Greenworks Tools machinery is supplied with a 2 year parts and labour warranty from original date of purchase. A 30 day warranty is available for machines used professionally as Greenworks Tools are designed primarily to be used by DIY consumers. This warranty is non-transferable.
LIMITATIONS
This warranty applies only to defective parts/components and does not cover repairs due to:
- Normal wear and tear.
- Routine tune up or adjustment
- Damage caused by improper handling/abuse/misuse or neglect.
- Overheating due to lack of maintenance
- Damage due to fittings/fasteners becoming loose/detached through lack of maintenance.
- Damage caused by cleaning with water.
- Machines serviced or repaired by non-authorised Greenworks Tools service centres.
- Machines incorrectly assembled or adjusted.
- Damage caused by improper use of the machine.
- Damage caused by improper winterisation (pressure washers)
-
Items considered as consumable parts are not normally covered by the warranty, including but not limited to:
-
Batteries
Electric cables - Blade and blade assemblies
- Belts
- Filters
-
Chucks and tool holders
-
Certain products may contain components such as engines, transmissions from an alternative manufacturer, these items will be subject to the appropriate manufacturer's warranty policy except where Greenworks Tools Europe GmbH agrees to underwrite any claims outside the said manufacturer's warranty period.
- Second hand goods are not covered under this warranty policy.
- The fitting of spares, replacements or extra components which are not supplied or approved by Greenworks Tools Europe GmbH.
Warranty
To claim a warranty on any product under this policy a proof of original purchase is required. Credit card statement do not qualify as sufficient proof of purchase. In the first instance of a warranty event occurring the consumer should return the product to the original place of purchase with their proof of purchase. The machine will be sent to our central service facility and an inspection made. If the machine be found to be at fault it will be repaired and sent back to the address of the consumer free of charge. Machines that retail for less than €100 euros including sales taxes will generally be replaced.
If the central service facility finds that machine is not found to be at fault then the consumer will be advised they will need to pay for the cost of the repair.
This warranty policy is subject to change from time to time to accommodate the needs of new products. A copy of the latest warranty policy will be available at www.greenworkstools.eu.
Greenworks Tools garanti for hobbymaskiner
GARANTIPERIOD
- UuurjUuuuue / uuuuuuuuuuuuuuuuuuuuuuuuuuuuuuuuuuuuuuuuuuuuuuuuuuuuuuuuuuuuuuuuuuuuuuuuuuuuuuuuuuuuuuuuuuuuuuuuuuuuuuuuuuuuuuuuuuuuuuuuuuuuuuuuuuuuuuuuuuuuuuuuuuuuuuuuuuuuuuuuuuuuuuuuuuuUU
6.1
- UU UU UUUUUUUUUUUUUUUUUUUUUUUUUUUUUUUUUUUUUUUUUUUUUUUUUUUUUUUUUUUUUUUUUUUUUUUUUUUUUUUUUUUUUUUUUUUUUUUUUUUUUUUUUUUUUUUUUUUUUUUUUUUUUUUUUUUUUUUUUUUUUUUUUUUUUUUUUUUUUUUUUUUUUUUUUuuuuuuuuuuuuuuuuuuuuuuuuuuuuuuuuuuuuuuuuuuuuuuuuuuuuuuuuuuuuuuuuuuuuuuuuuuuuuuuuuuuuuuuuuuuuuuuuuuuuuuuuuuuuuuuuuuuuuuuuuuuuuuuuuuuuuuuuuuuuuuuuuuuuuuuuuuuuuuuuuuuuuuuuuuuuuuuuuuuuuuuuuuuuuuuuuuuuuuuu uu
8.1JUH 1
9.1uUuUuUuUuuuUUuuuuuuuu
10:UuUuuuue uuuuuuuuuuuuuuuuuuuuuuuuuuuuuuuuuuuuuuuuuuuuuuuuuuuuuuuuuuuuuuuuuuuuuuuuuuuuuuuuuuuuuuuuuuuuuuuuuuuuuuuuuuuuuuuuuuuuuuuuuuuuuuuuuuuuuuuuuuuuuuuuuuuUU
- 1u, u, u, u, u, u, u, u, u, u, u, u, u, u, u, u, u, u, u, u, u, u, u, u, u, u, u, u, u, u, u, u, u, u, u, u, u, u, u, u, u, u, u, u, u, u, u, u, u, u, u,
| x - 2| = | x - 4| = 1
1
·
1
心
·
Uus uusuusususususususususususususususususususususususususususususususususususususususususususususususususususususususususususususususususus
10 100000000000000000000000000000000000000000
U 1
www.greenworkstools.eu.

EN EC DECLARATION OF CONFORMITY
Manufacturer: Changzhou Globe Co., Ltd.
Address: No. 65 Xinggang Rd., Zhonglou Zone, Changzhou, Jiangsu, China
Name and address of the person authorised to compile the technical file:
Name: Ted Qu Haichao (Quality Director)
Adress: Greenworks Tools Europe GmbH,
Wankelstrasse 40. 50996 Cologne Germany
Herewith we declare that the product
Category POLESAW
Model 20127
Serial Number See product rating label
Year of Construction . See product rating label
■ is in conformity with the relevant provisions of the Machinery Directive (2006/42/EC)
■ is in conformity with the provisions of the following other EC-Directives
EMC Directive (2014/30/EU),
Noise Emission Directive (2000/14/EC amended by 2005/88/EC)
And furthermore, we declare that
The following (parts/clauses of) European harmonised standards have been used EN 55014-1, EN 55014-2, EN 60745-1, EN ISO 11680-1, EN ISO 3744
Measured sound power level 100.6 dB(A)
Guaranteed sound power level 104 dB(A)
Conformity assessment method to Annex V / Directive 2000/14/EC
The EC type-examination certificate number: 13SHW0282-04 issued by
Place, date: Changzhou, 04/20/2016
Quality Director
Signature: Ted Qu Haichao
Ted qu
Adresse: No. 65 Xinggang Rd., Zhonglou Zone, Changzhou, Jiangsu, China
Indirizzo: No. 65 Xinggang Rd., Zhonglou Zone, Changzhou, Jiangsu, China
Adresse: No. 65 Xinggang Rd., Zhonglou Zone, Changzhou, Jiangsu, China
Endereço: No. 65 Xinggang Rd., Zhonglou Zone, Changzhou, Jiangsu, China
Local, data: Changzhou, 04/20/2016
Adres: No. 65 Xinggang Rd., Zhonglou Zone, Changzhou, Jiangsu, China
Ampes: No. 65 Xinggang Rd., Zhonglou Zone, Changzhou, Jiangsu, China
IIMy n aDpec Jnua, OTBETCTBENHO 3a NOJROTOBky TEXHnueckoJ DOKymeHTaun:
IIMy: Tei Ky XaHuao (DnpeKTop no KaueCTBy)
Ampec: Greenworks Tools Europe GmbH,
Wankelstrasse 40. 50996 Cologne Germany
HactoIIMMbI3aBnE,HTOdaHHbINpoDyKT
Kateropny 5HTAHROBAI NIIA
MoideJIb 20127
3aBODCKoHomep Cm.nacnOpTHyU Ta6nUky npOdyKta
Tod BbInycka Cm. nacnopTHyIO Ta6JIuKU npOdykTa
COOTBeTCTByeT BcEM BaXHeiM NpOJKeHnA M DnpeKtNBbl No MexaHnueckomy o6OpydoBaHnIO (2006/42/EC)
COOTBETCTByeT BcEM NOLOXeHnM CNeDyUoIx DnpeKtNB EC
Директua EMC (2014/30/EU),
Директуba пошуmy (2000/14/EC сизменим 2005/88/EC)
Kpome 3Toro, Mbl 3aBnem, yTO
6bIINNCIOB3OBAHbICNeDyUoIe Yactn IIN CTaTbN eBponecknx corlaocBaHHbIX cTaHapTOB
EN 55014-1, EN 55014-2, EN 60745-1, EN ISO 11680-1, EN ISO 3744
I3MepeHHbI yPOBeHb 3ByKOBoMooHocTn 100.6 dB(A)
TapaHTnpyeMbI yPoBeHb 3ByKOBoMooHocTn 104 dB(A)
MeToD oueHKn COOTBeTCTBnA yIOBnEeTBopReT PpIIOXeHnO V DInpeKTHBbI 2000/14/
EC.
N° cepTnΦnKaTa npOBepKn no cTaHdApTy EC: 13SHW0282-04 BbIaH
Osoite: No. 65 Xinggang Rd., Zhonglou Zone, Changzhou, Jiangsu, China
Adress: No. 65 Xinggang Rd., Zhonglou Zone, Changzhou, Jiangsu, China
Adress: Greenworks Tools Europe GmbH,
Wankelstrasse 40. 50996 Cologne Germany
Adresse: No. 65 Xinggang Rd., Zhonglou Zone, Changzhou, Jiangsu, China
Adresse: No. 65 Xinggang Rd., Zhonglou Zone, Changzhou, Jiangsu, China
Adres: No. 65 Xinggang Rd., Zhonglou Zone, Changzhou, Jiangsu, China
Adresa: No. 65 Xinggang Rd., Zhonglou Zone, Changzhou, Jiangsu, China
Adresa: No. 65 Xinggang Rd., Zhonglou Zone, Changzhou, Jiangsu, China
Naslov: No. 65 Xinggang Rd., Zhonglou Zone, Changzhou, Jiangsu, China
Ime in naslov osebe, ki je pooblascena za sestavljanje tehnicne dokumentacije:
Ime: Ted Qu Haichao (direktor kakovosti)
Naslov: Greenworks Tools Europe GmbH,
Wankelstrasse 40. 50996 Cologne Germany
Adresa: No. 65 Xinggang Rd., Zhonglou Zone, Changzhou, Jiangsu, China
Ime i prezime, i adresa osobe ovlaštene da sastavi tehničku datoteku:
Ime i prezime: Ted Qu Haichao (Direktor odjela za kvalitetu)
Adresa: Greenworks Tools Europe GmbH,
Wankelstrasse 40. 50996 Cologne Germany
Cim: No. 65 Xinggang Rd., Zhonglou Zone, Changzhou, Jiangsu, China
Adresa: No. 65 Xinggang Rd., Zhonglou Zone, Changzhou, Jiangsu, China
Ampes: No. 65 Xinggang Rd., Zhonglou Zone, Changzhou, Jiangsu, China
Ime n aadpec Ha JnueTo, ynbHHomOuSeHO da cbCTaBn TexHnueckn qaui:
Ime: Ted Qu Haichao (dipektop kacheTBO)
Ampec: Greenworks Tools Europe GmbH,
Wankelstrasse 40. 50996 Cologne Germany
C hactoJeTo deKnapnpame, ye npodykTbT
Kateropn TENECKONNUEHTPNOH
Moei 20127
CepneH Homep . BIXK eTNKeTa c HOMHaJIHnTe cToHOCn
ToiHa Ha npOn3BOIDCTBO .BxK etNKeTa c HOMHaJIHnTe cToHOCn
OTROBAPRA Ha CbOTBeTCTBaUHTe pa3nopeDn Ha NipeKTHBaTA OTHOCHO MaUNHNTe (2006/42/EC)
OTROBAPa pa3nope6nte Ha cneHnTe pyrN dIpeKtNBHa EO
2014/30/EU (Диuropeктува за EMC),
Директуba 3a Шу mobиTe emncn (2000/14/EC, n3meheHa ot 2005/88/EC)
OcBeH ToBa IekJapnpame,Ye
ca npinnojehn cneHnTe (uaCTn/Knay3n OT) eBponeiCKnTe xapMOHn3npaHn CTaHdapTu
EN 55014-1, EN 55014-2, EN 60745-1, EN ISO 11680-1, EN ISO 3744
I3mepeHnBOHa 100.6dB(A)
TapaHTnpaHO HnBO Ha shym 104 dB(A)
MeToHa OueHbAHe Ha CbOTBeTCTBnETo CbO6pa3Ho npInIOxKeHne V ot DnpeKtNa
2000/14/EC
Homep Ha ceptnoikat Ha ekcneptna Tn EC: 13SHW0282-04 n3daen ot
Ji: No. 65 Xinggang Rd., Zhonglou Zone, Changzhou, Jiangsu, China
U 1
Uu:Ggog()
J: Greenworks Tools Europe GmbH,
Wankelstrasse 40. 50996 Cologne Germany
1
J 20127
U
u 1
■ 1 (2006/42/EC)
EC-Directives
(2014/30/EU),
(2000/14/EC 2005/88/EC)
EJgEJgJgJgJgJgJgJgJgJgJgJgJgJgJgJgJgJgJgJgJgJgJgJgJgJgJgJgJgJgJgJgJgJgJgJgJgJgJgJgJgJgJgJg
1w(/)U
EN 55014-1, EN 55014-2, EN 60745-1, EN ISO 11680-1, EN ISO 3744
100.6 dB(A)
104 dB(A)
2000/14/EC
13SHW0282-04JJ
J: Changzhou, 04/20/2016
()
Ted qu
Uretici: Changzhou Globe Co., Ltd.
Adres: No. 65 Xinggang Rd., Zhonglou Zone, Changzhou, Jiangsu, China
Yer, tarih: Changzhou, 04/20/2016
Imza: Ted Qu Haichao
Kalite Muduru
Ted qu
: Changzhou Globe Co., Ltd.
No. 65 Xinggang Rd., Zhonglou Zone, Changzhou, Jiangsu, China
Adresas: No. 65 Xinggang Rd., Zhonglou Zone, Changzhou, Jiangsu, China
Adrese: No. 65 Xinggang Rd., Zhonglou Zone, Changzhou, Jiangsu, China
Personas, kas atbildigs par tehniska faila apkopošanu, vards un adrese:
Vards: Ted Qu Haichao (kvalitates direktors)
Adrese: Greenworks Tools Europe GmbH,
Wankelstrasse 40. 50996 Cologne Germany
Aadress: No. 65 Xinggang Rd., Zhonglou Zone, Changzhou, Jiangsu, China
Aadress: Greenworks Tools Europe GmbH,
Wankelstrasse 40. 50996 Cologne Germany
Kinnitame, et see toode
Nimetus AKUGA KETTSAAG
Madel 20127
Seerianumber vaadake toote tehasesilti