222645 - Slow cooker SousVideTools - Free user manual and instructions
Find the device manual for free 222645 SousVideTools in PDF.
| Product Type | Immersion Circulator Sous Vide |
| Brand | SousVideTools |
| Model | 222645 (iVide Thermal Circulator Home 2.0) |
| Power Supply | 220-240 V ~ 50 Hz |
| Nominal Power | 1200 W |
| Temperature Range | 5 °C to 90 °C |
| Protection Class | IPX7 (temporary immersion) |
| Connectivity | Wi-Fi IEEE 802.11 b/g/n, iVide app (iOS 9.3.5+, Android 4.3+) |
| Water Level | Between MIN and MAX marks on the housing |
| Circulation Capacity | Suitable for containers up to 20 L (estimated) |
| Display | Digital temperature and time display |
| Controls | Temp/Time buttons, Start/Stop, +/-, combined reset |
| Indicator Lights | Red (heating), Green (temperature reached and countdown) |
| Housing Material | Plastic and stainless steel (heating part) |
| Cable Length | Approximately 1 m (estimated) |
| Cleaning | Vinegar/water cycle (25% vinegar) at 80 °C for 3 hours every 20 uses |
| Weight | Approximately 2 kg (estimated) |
| Dimensions | Height ~40 cm, diameter ~10 cm (estimated) |
| Warranty | 1 year (functional defects) |
| Included Accessories | Mounting clamp, user manual |
Frequently Asked Questions - 222645 SousVideTools
User questions about 222645 SousVideTools
0 question about this device. Answer the ones you know or ask your own.
Ask a new question about this device
Download the instructions for your Slow cooker in PDF format for free! Find your manual 222645 - SousVideTools and take your electronic device back in hand. On this page are published all the documents necessary for the use of your device. 222645 by SousVideTools.
USER MANUAL 222645 SousVideTools
Special Safety Regulation 6
Ground Installation 6
Sous Vide Cooking
Product Function 7-8
Product Structure 8
The APP 9
Operation 10
Maintenance 11
Cleaning 12
Troubleshooting 12
Technical Specification 13
Warranty 13
CE Certificate 14
FR//NOTICE D'UTILISATION
Important 15
Specification technique 24
Garantie 24
Certificate CE 25
DE//BENUTZERHANDBUCH
Wichtig 26
Product Function 51-52
Produktstruktur 52
The APP 53
Operation 54
Vedligeholdelse 55
Rengoring 56
Fejlfinding 56
Teknisk specification 57
Garanti 57
CE-certifikat 58
ES//MANUALDELUSUARIO
Important 59
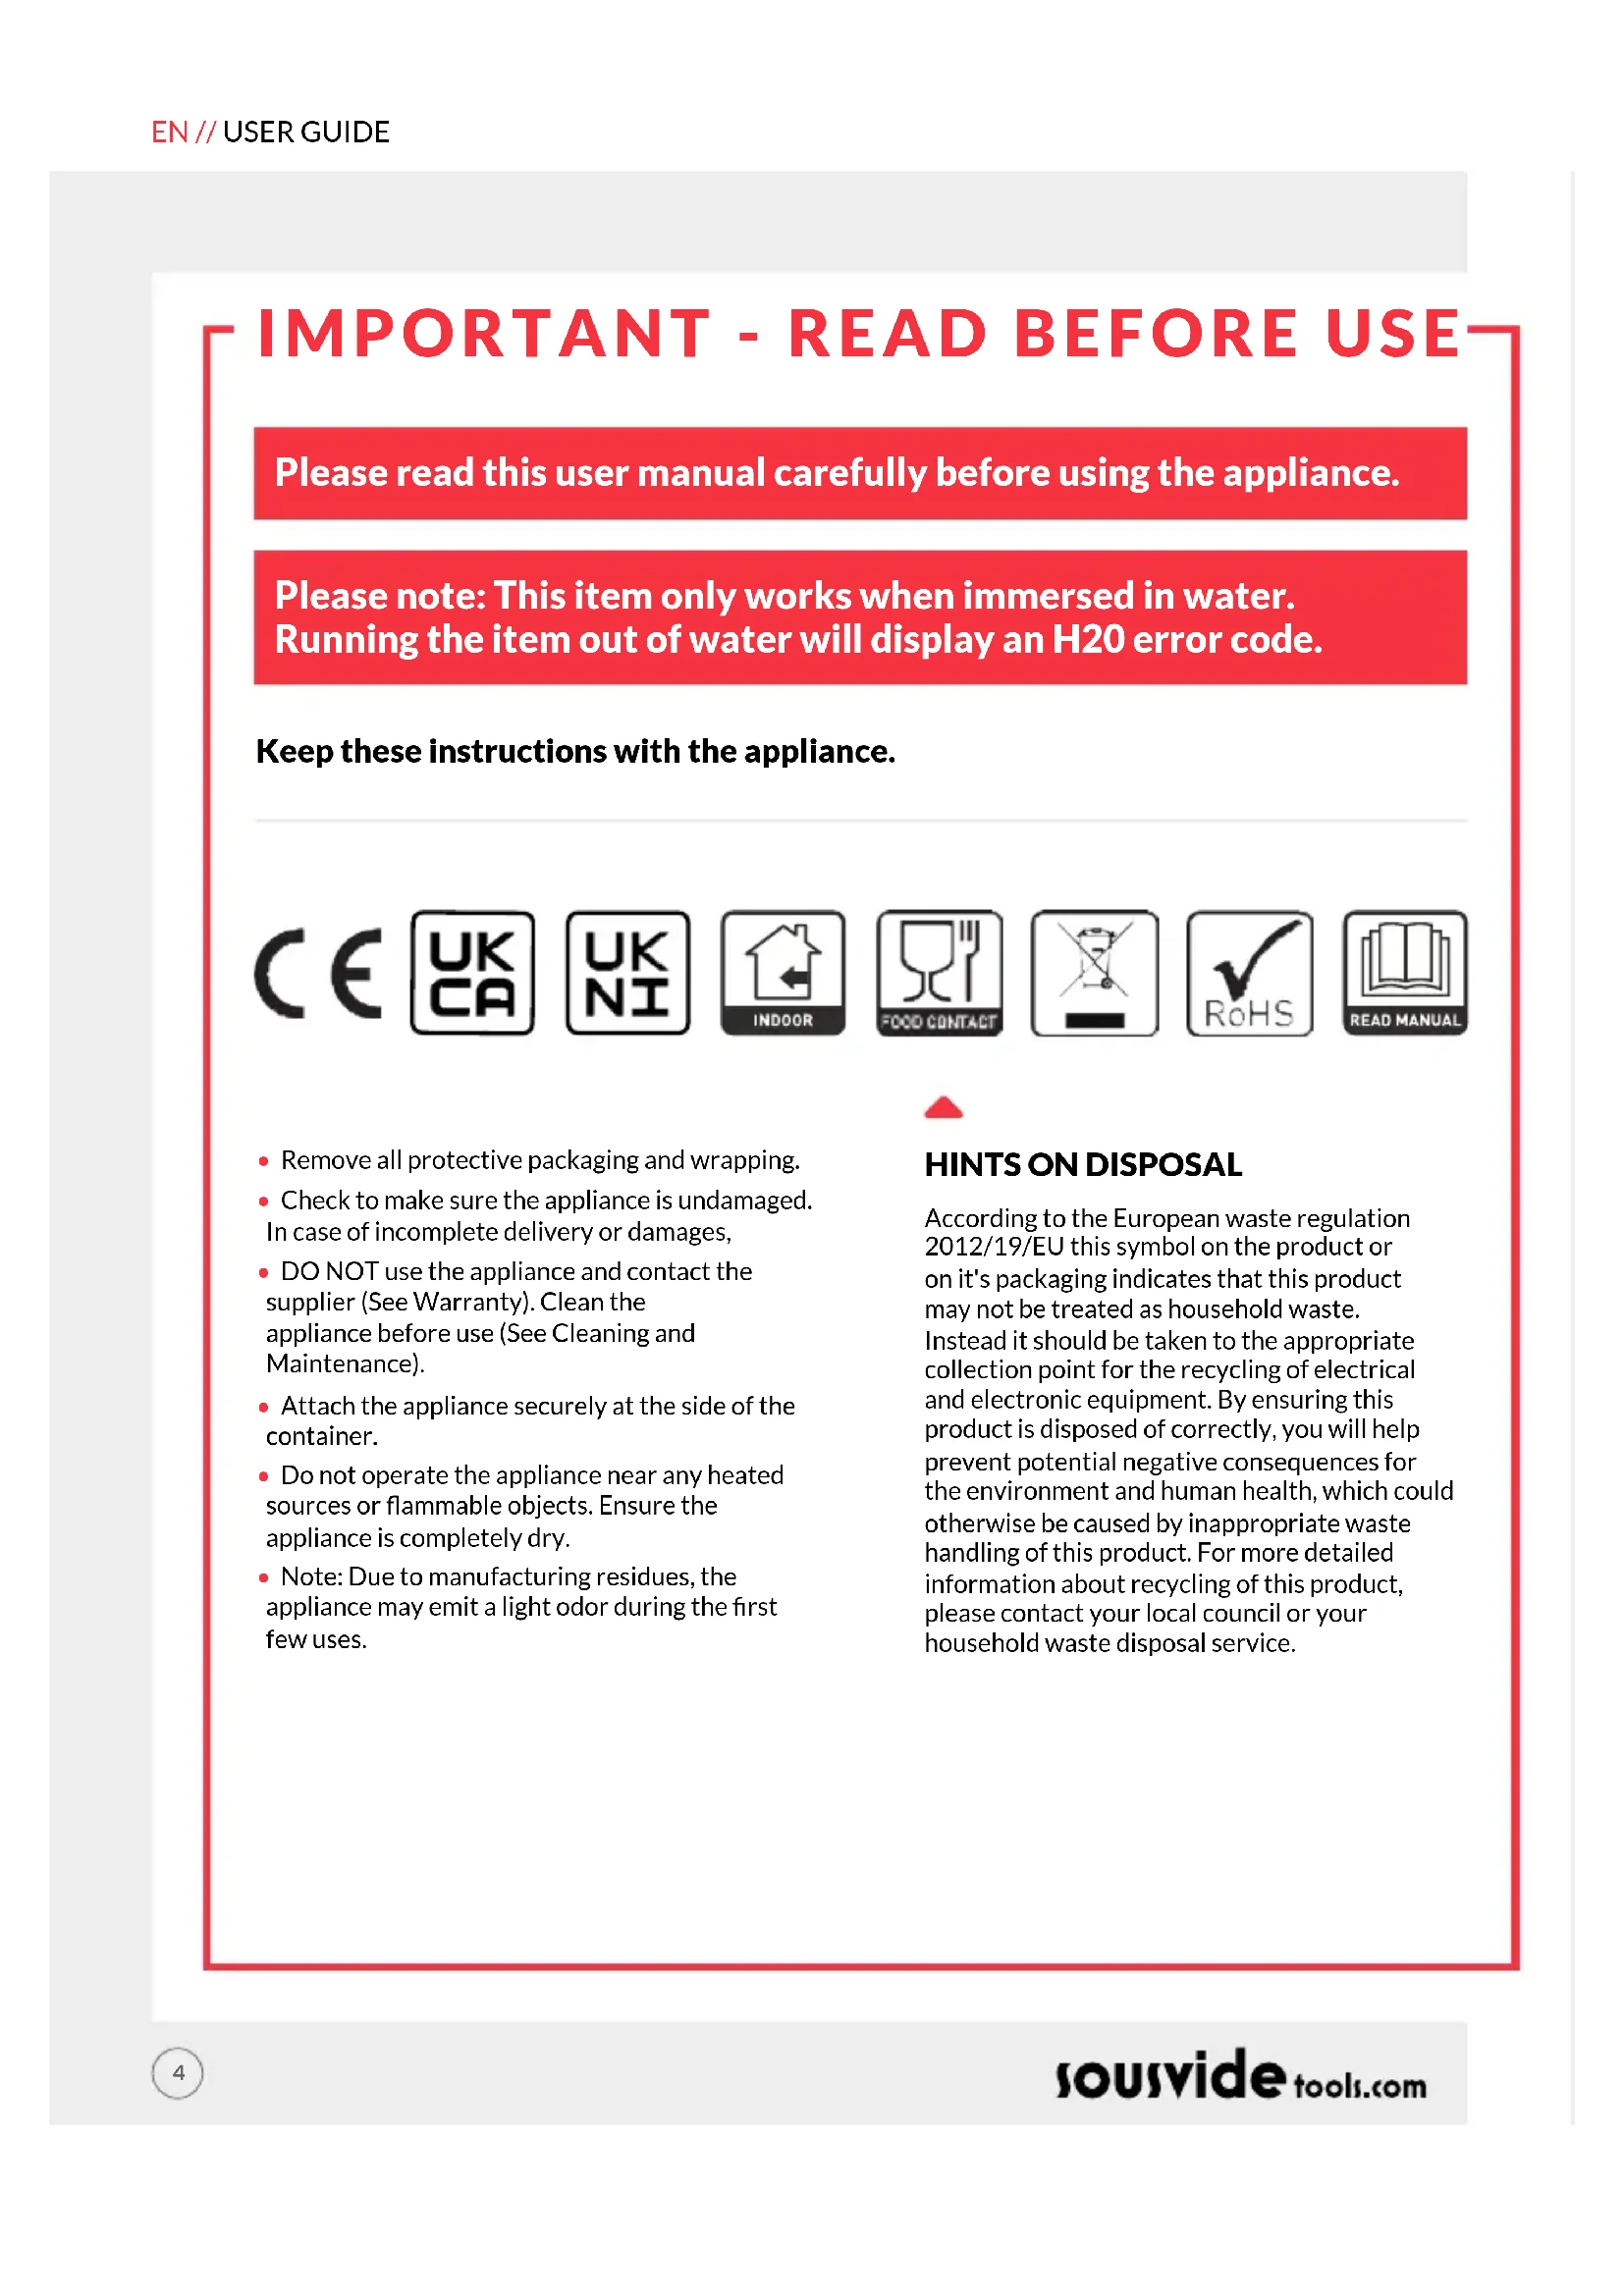
Please read this user manual carefully before using the appliance.
Please note: This item only works when immersed in water. Running the item out of water will display an H20 error code.
Keep these instructions with the appliance.


- Remove all protective packaging and wrapping.
- Check to make sure the appliance is undamaged. In case of incomplete delivery or damages,
DO NOT use the appliance and contact the supplier (See Warranty). Clean the appliance before use (See Cleaning and Maintenance). - Attach the appliance securely at the side of the container.
- Do not operate the appliance near any heated sources or flammable objects. Ensure the appliance is completely dry.
Note: Due to manufacturing residues, the appliance may emit a light odor during the first few uses.
HINTS ON DISPOSAL
According to the European waste regulation 2012/19/EU this symbol on the product or on it's packaging indicates that this product may not be treated as household waste. Instead it should be taken to the appropriate collection point for the recycling of electrical and electronic equipment. By ensuring this product is disposed of correctly, you will help prevent potential negative consequences for the environment and human health, which could otherwise be caused by inappropriate waste handling of this product. For more detailed information about recycling of this product, please contact your local council or your household waste disposal service.
SAFETY REGULATIONS
- The appliance must only be used for the purpose for which it was intended and designed. The manufacturer is not liable for any damage caused by incorrect operation and improper use.
- Keep the electrical plug away from water and any other liquids. Do not use until the appliance has been checked by a certified technician. Failure to follow these instructions could cause a risk to lives.
- Never attempt to open the casing of the appliance yourself.
- Do not insert any objects in the casing of the appliance.
- Do not touch the plug with wet or damp hands.
- Danger of electric shock! Do not attempt to repair the appliance yourself. In case of malfunctions, repairs are to be conducted by qualified personnel only.
- Never use a damaged appliance! Disconnect the appliance from the electrical outlet and contact the retailer if it is damaged.
- Regularly check the power plug and cord for any damage. If the power plug or power cord is damaged, it must be replaced by a service agent or similarly qualified persons in order to avoid danger or injury.
- Make sure the cord does not come in contact with sharp or hot objects and keep it away from open fire.
- To pull the plug out of the socket, always pull on the plug and not on the cord.
- Ensure that the cord (or extension cord) is positioned so that it will not cause a trip hazard.
We recommend you check the appliance regularly when in use. - Turn off the appliance before pulling the plug out of the socket.
- Never carry the appliance by the cord.
- Do not use any extra devices that are not supplied along with the appliance.
- Only connect the appliance to an electrical outlet with the voltage and frequency mentioned on the appliance label.
- Connect the power plug to an easily accessible electrical outlet so that in case of emergency the appliance can be unplugged immediately. To completely switch off the appliance pull the power plug out of the electrical outlet.
Always turn the appliance off before disconnecting the plug. - Never use accessories other than those recommended by the manufacturer. Failure to do so could pose a safety risk to the user and could damage the appliance. Only use original parts and accessories.
- This appliance is not intended for use by persons (including children) with reduced physical, sensory or mental capabilities, or lack of experience and knowledge.
- This appliance must not be used by children under any circumstances.
- Keep the appliance and its cord out of reach of children.
Always disconnect the appliance from the mains if it is left unattended or is not in use, and before assembly, disassembly or cleaning.
SPECIAL SAFETY REGULATIONS
- The appliance is intended only for cooking food packed in vacuum bags at the precisely controlled temperature in household use. Any other use may lead to damage of the appliance or personal injury.
- Do not use this appliance for cooking food products, heating substances which are flammable, dangerous or otherwise unsafe.
- Use the appliance only as described in this manual.
- Caution! Hot surface! The temperature of the surface is hot during use. Hold the handle or upper part of the appliance.
- Never use the appliance near explosive or flammable materials, credit cards, magnetic discs or radios.
- This appliance is not intended to be operated by means of an external timer or separate remote control system.
- Keep the appliance away from any heat sources and open flames.
- Do not use the appliance near explosive or flammable materials, credit cards, magnetic discs or radios.
- The appliance should be mounted vertically to the container.
- During use, put the food for heating inside the water container, make sure the water level should be controlled between the lowest water level "MIN" and the highest water level "MAX", to avoid damage to the appliance.
- Only water should be heated with this appliance. Other liquids could damage the appliance. Do not use the appliance without water inside.
- Never cover the appliance with foils, cloths, etc while using.
- Check the water temperature with the temperature display. Do not touch the water.
- Do not use hard utensils to hit the heating plate surface. Do not use water jet, flush directly with water or steam cleaner as the parts will get wet and electric shock might be resulted.
- Do not clean or store the appliance unless it is completely cooled down.
GROUNDING INSTALLATION
This appliance is classified as protection class I appliance and must be connected to a protective ground
Grounding reduces the risk of electric shock by providing an escape wire for the electric current. This appliance is equipped with a cord having a grounding wire with a grounding plug. The plug must be plugged into an outlet that is properly installed.
SOUS VIDE COOKING
"Sous Vide" is a precise cooking technique which cook food at lower temperature under longer period of time. The essence of food is retained and cook to perfection. Vegetables can retain its nutritional value as well.
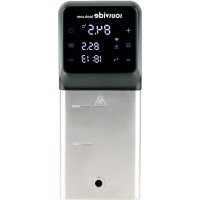
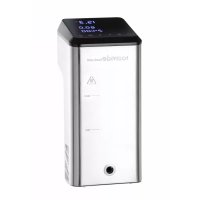
PRODUCT FUNCTION
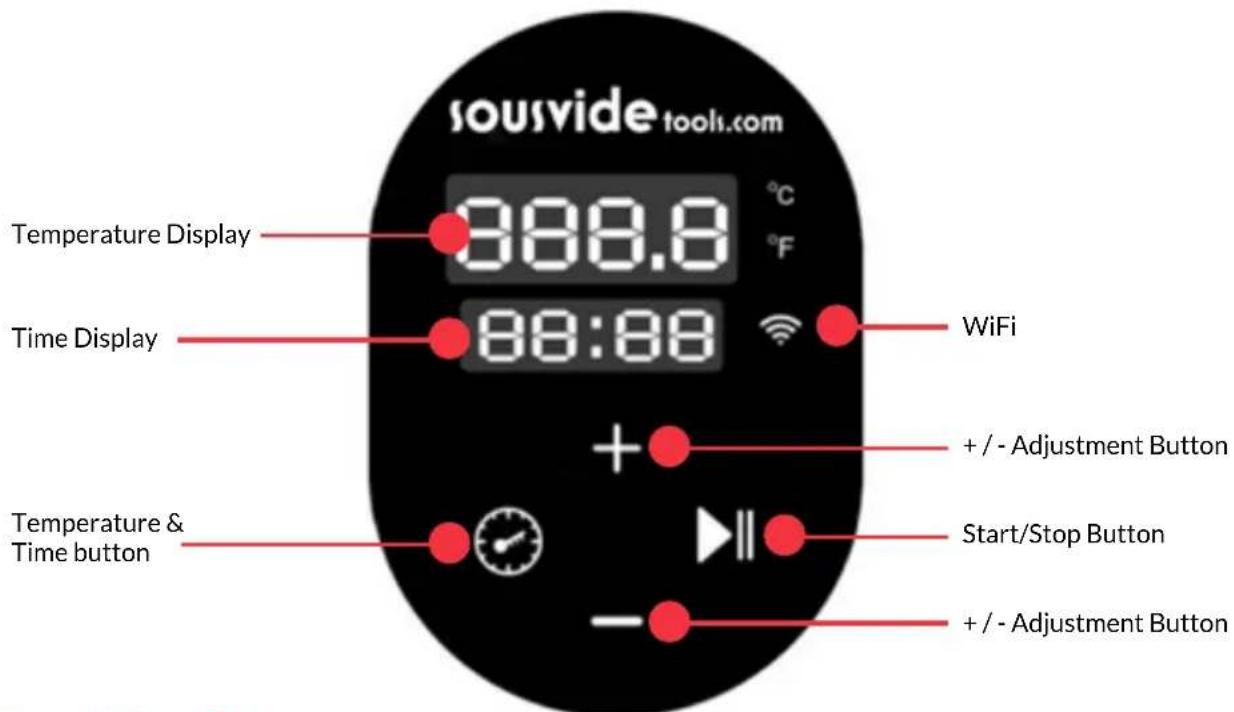
Temp/Time Button
Click the Temp/Time button to toggle the temperature or time setting. When the temperature display is flashing, set the desired target temperature with "+" and "-"; when the time display is flashing, the desired target time can be set with "+" and "-".
- After the light flashes 10 times, if there is no setting operation, the machine will exit the Temp/Time setting. If you need to reset it, click the temp/time button again to enter the setting state.
- In the working mode, press and hold the Temp/Time button, the digital tube displays the time and temperature that have been set.
Start/Stop Button
In standby mode, press the Start/Stop button to start the machine.
Pressing the Start/Stop button for a second time will start the time to count down.
Pressing the Start/Stop button for a third time will stop the machine and it will go back in to standby mode.
+/- Adjustment Button
Use the button to increase or decrease the temperature and time setting, after selecting the appropriate function.
Temperature Display
Displays real-time working temperature.
Time Display
In standby mode, the set target time is displayed. In working mode, the remaining working time is displayed.
**WIFI indicator is used when operating the distribution network with mobile phone. If no network and mobile phone operation is required, this indicator is not displayed.
Reset to Default
Under the ready working mode, press and hold the Start/Stop and + the Temperature Display will display the setting temperature 60^ . The Time Display will display the setting time 24:00. Release the Start/Stop and + buttons and the display will flash 10 times at the same time and exit the setting mode.
If you need to switch the Celsius and Fahrenheit, press + and - simultaneously to switch.
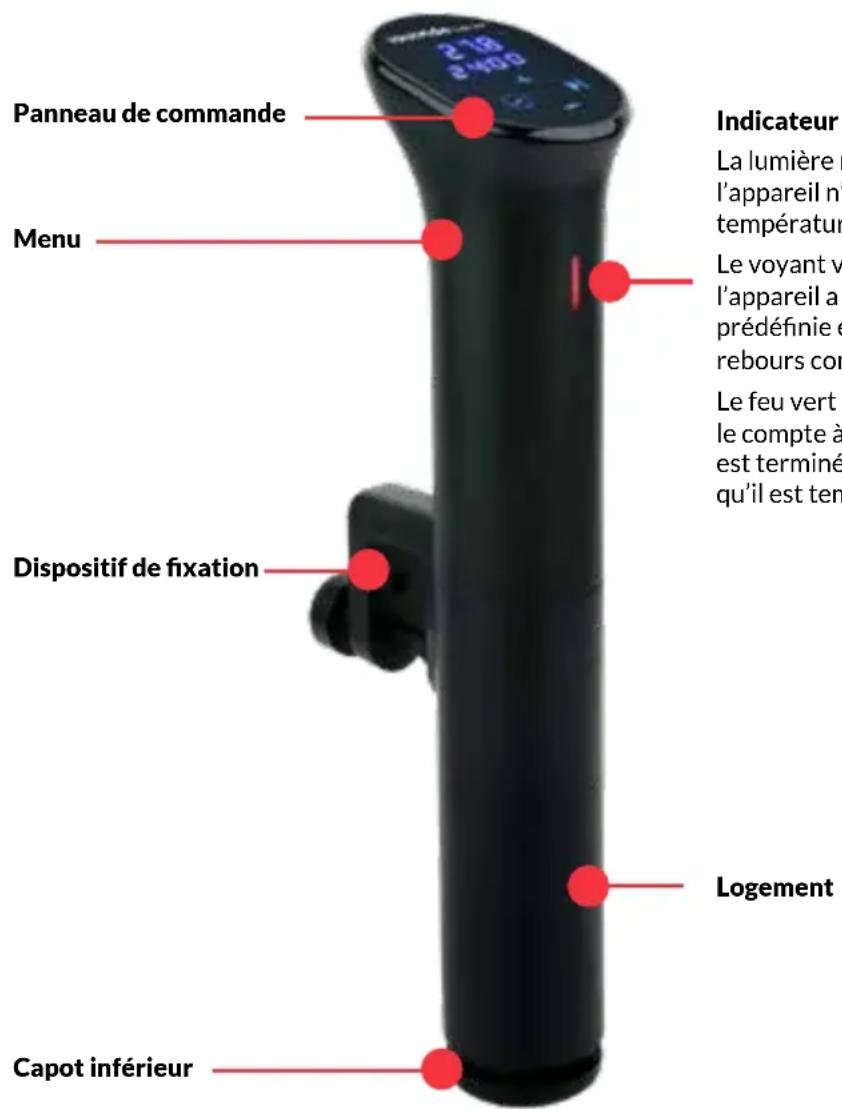
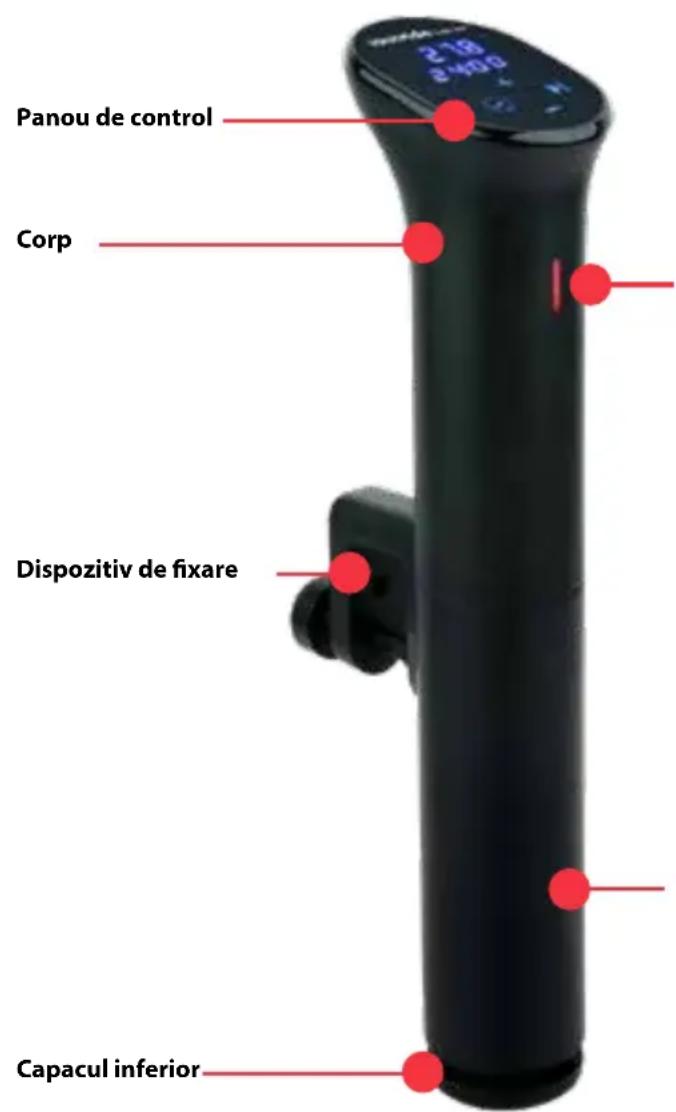
PRODUCT STRUCTURE
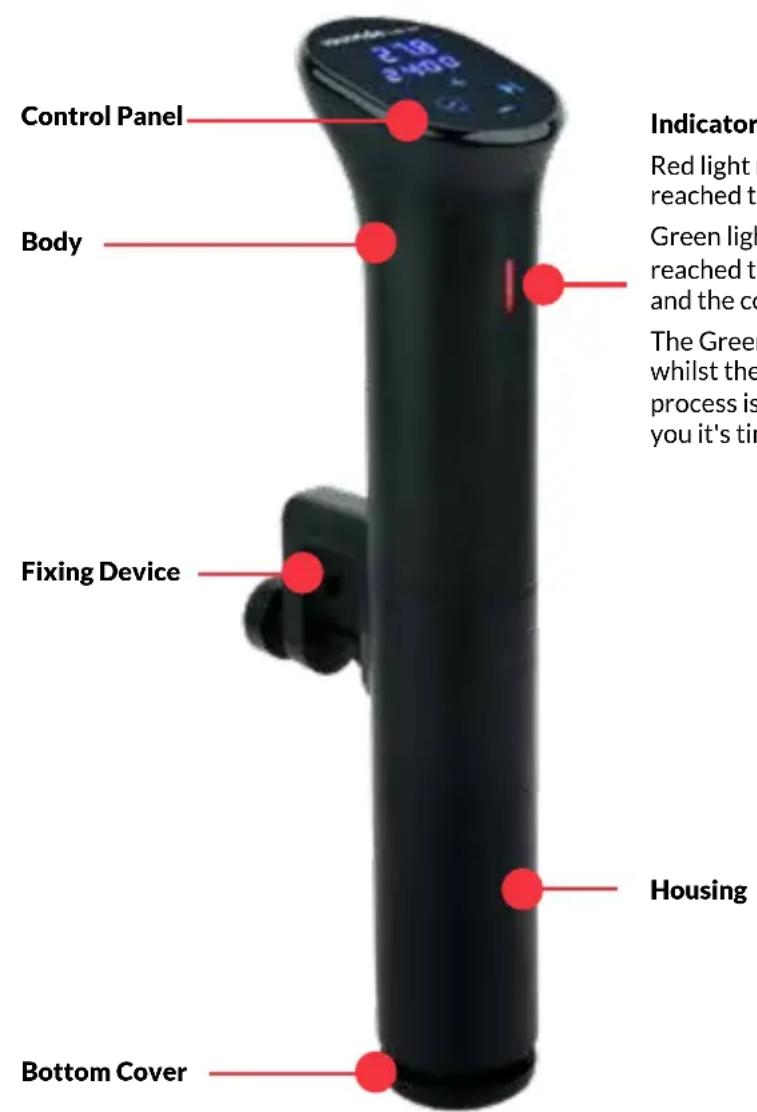
Indicator
Red light means the device has not reached the preset temperature
Green light means the device has reached the preset temperature and the countdown begins.
The Green light will remain on whilst the time countdowns, the process is complete or to remind you it's time to cook.
THE APP
Downloading The iVide APP
If the iVide APP has not yet been downloaded, it can be downloaded from the Apple Store (IOS) or Google Play (Android). It is compatible with IOS version 9.3.5 and later. It is compatible with Android version 4.3 and later. Note: Please check with your mobile phone or device's manufacturer if you have a question about downloading APP.
Six Steps To Configure The iVide APP
Installing the iVide APP is quick, in contrast to some other apps. The iVide APP allows instant use, providing the necessary information exactly when you need it. We have developed a completely new approach to this kind of applications because every moment in the kitchen should be unforgettable. The APP is compatible with the SousVideTools® iVide Thermal Circulator Home 2.0 with Wi-Fi. The App makes cooking with the iSousVideTools® iVide Thermal Circulator Home 2.0 incredibly easy. Simply select the food, adjust the settings, and press Start.
Six Easy Steps
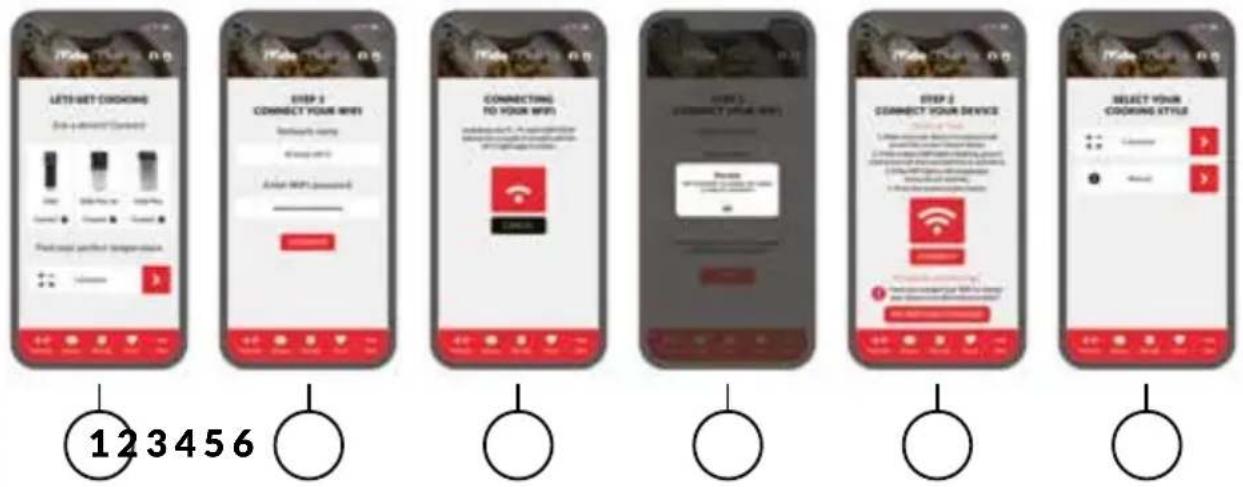
1 Select the appliance you want to use, and press "CONNECT".
2 The app will detect a connected Wi-Fi network. Enter the password and press 'Confirm'.
3 The application starts searching for the SousVideTools iVide Thermal Circulator Home 2.0. Hold down the Temp/Time and Start/Stop buttons for a couple of seconds until the Wi-Fi light begins to flash. Wait until the appliance finishes automatic configuration.
4 At the end, you will see a message confirming the appliance is ready to be connected.
5 Make sure the Wi-Fi light has stopped flashing and then press the 'Connect' button. If you need help, read the hints and tips on the display.
6 Congratulations! The SousVideTools iVide Thermal Circulator Home 2.0 has just been configured! Enjoy your cooking!
Possible Error: If the distribution network has timed out after 60 seconds and the network fails to be deployed, the WIFI indicator could be switched off.
WIFI indicator prompts: 1, no light, no connection to the network; 2, flash: distribution process; 3, slow flash: connect to the router, not connected to the M2M server. 4. Always on: Connect to the M2M server.
Note:The Apple and iPhone logos are trademarks of Apple Inc., registered in the USA and other countries. Apple Store is a service mark of Apple Inc. Android; Google Play and Google Play logo are trademarks of Google Inc.
OPERATION
- Place the SousVideTools® iVide Thermal Circulator Home 2.0 in a heat resistant container that is sufficiently deep to hold the device using the clamp.
- Fill the container with water level between the MIN and MAX markings on the heating element housing.
Note: Placing vacuum bag with food will increase the water level. Check the water level afterwards to ensure that it does not beyond MAX marking.
- Connect the power cable to the power supply. Press the Start/Stop button.
A: VIA THE CONTROL PANEL
- Use the Temp/Time button to select Temperature and then set the desired value with the + and - buttons.
- Use the Temp/Time button to select the required time, again using the + and - buttons.
- When you select the temperature and time of cooking, press the Start/Stop button to start the appliance. After reaching the required temperature, light will turn from red to green. Place the bag in water. CAUTION! The water will be hot.
- After reaching the set cooking time, remove the bag from the hot water using kitchen tongs. The machine will beep once the cooking has finished.
Note: If there is no operation, the machine will emit a continuous beep after 20 seconds, while the water temperature will remain at the preset temperature.
- Finish the cooking process by searing the meat in a pan to obtain the taste of fried meat and crunchy crust. Add a little butter and briefly sear the cooked meat on both sides.
- After the cooking process is finished, disconnect the device from the power supply and leave it to cool down before cleaning. To avoid any risk of burns, leave the water to cool before pouring it from the container.
B: BY USING THE IVIDE APP (REPLACES STEPS 1 & 2)
Connect the device (if this is the first time you perform this operation, please refer to the information above). Select the recipe or use the calculator and then follow the directions on the display. The application will automatically select the correct temperature and time of cooking. Select 'Start cooking'. The SousVideTools® iVide Thermal Circulator Home 2.0 will start heating water to the set temperature. For safety reasons do not place bags with food in water before reaching the set temperature.
COMPATIBILITY DISCLAIMER
Wireless performance is dependent on your device's Wi-Fi wireless technology, please refer to your device's manufacturer. SousVideTools.com will not be liable for any lost of data or leakage resulting from the use of these devices.
MAINTENANCE
MAINTENANCE
To avoid burning, please make sure the power is turned off on the machine and it has cool down to room temperature before cleaning.
1 Place the machine vertically after cleaning, do not place it horizontally or upside down.
2 During cleaning, do not damage the components inside the machine. Once the components are damaged, please ask specialist to check and repair. Do not attempt unauthorised repairs to avoid accidents.
3 Abandon old water after each use and fill with fresh water next time. If the water is reused many times, some mineral substance may subside or adhere to the surface of the components, thus influencing the machine performance.
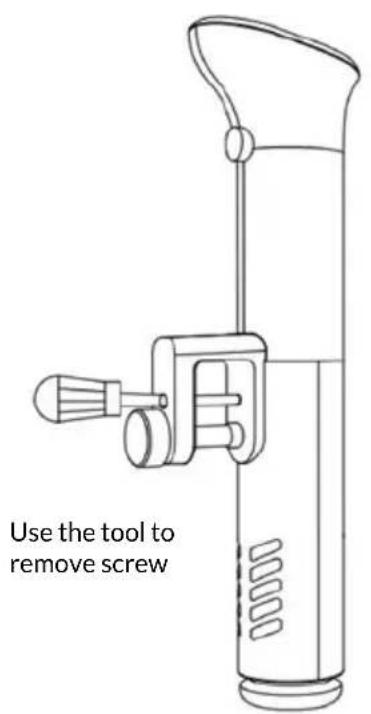
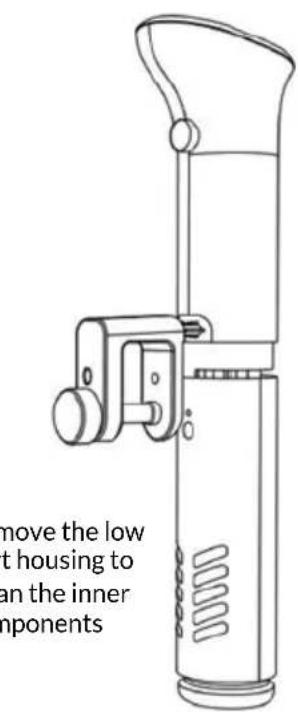
If you notice the discharge capacity reduce massively or the machine's components are covered in ash and dirt, please disassemble the low part of the machine's housing to clean the heat tube and probe.
HOW TO DISASSEMBLE QUICKLY
It is recommended to not put the hot machine in to cool water. The machine should be cooled down to room temperature and then put into cool water to use. Otherwise it will influence the machine function and lifetime. We also recommend to not put a cold machine in to hot water.
CLEANING
HOW TO CLEAN
PREPARATION:
Food grade vinegar (white vinegar, apple vinegar, etc.)
WHY NEED TO CLEAN:
Normally tap-water contains minerals which can cause limescale. When the water is heated to a certain temperature, the limescale will appear on the heater or surface of the machine, this could affect the performance of the machine. We suggest you clean the machine after every 20 uses or 200 hours.
HOW TO CLEAN:
1 Mix 75% water and 25% vinegar and pour it into a container until you reach the Max line of the machine.
2 Turn on the machine, set the working temperature to 80^ / 176^ and set the time 3 hours (03:00) then press the Start/Stop button. When the machine reaches the preset temperature press the Start/Stop button to start the timer.
3 When the timer indicates 00:00, stop the machine and turn off the power, unplug and let the machine cool.
4 Drain out the water from the container and use fresh water to clean the device.
TROUBLESHOOTING
If the appliance does not function properly, please check the below table for the solution. If you are still unable to solve the problem, please contact the supplier/service provider.
| Error Possible | Cause | Troubleshooting |
| H20 | The water level is lower than the lowest water level | Turn off the machine power, add the right amount of water to the container. |
| E02 | 1. The heating pipe isn't normal; 2. The internal wiring of the machine isn't normal; 3. The temperature sensor isn't normal | Need to ask a professional to repair |
TECHNICAL SPECIFICATION
Operating voltage & frequency: 220 - 240V~50Hz
Rated input power: 1200W
Waterproof protection class: IPX7
Temperature range: 5^ 90^
Network details: Compatible standards: IEEE 802.11 b/g/n Frequency band: 2,412MHz -2,484MHz Operating frequency/Max output power: 2,412MHz - 2,484MHz / < 20,0dB
WARRANTY
Any defect affecting the functionality of the appliance which becomes apparent within one year after purchase will be repaired by free repair or replacement provided the appliance has been used and maintained in accordance with the instructions and has not been abused or misused in anyway. Your statutory rights are not affected. If the appliance is claimed under warranty, state where and when it was purchased and include proof of purchase (e.g. receipt).
In line with our policy of continuous product development we reserve the right to change the product, packaging and documentation specifications without notice
DISCARDING & ENVIRONMENT
At the end of the life of the appliance, please dispose of the appliance according to the regulations and guidelines applicable at the time. Throw packing materials like plastic and boxes in the appropriate containers.
STATEMENT ON COMPLIANCE
The following information is only applicable to equipment sold in countries applying EU directives.
- This equipment is intended to be used with the iVide WIFI Cooker APP and is verified to comply with the essential requirements of the Directive 2014/53/EU.
- We hereby declare that this equipment (item no.: 224076) is in compliance with the essential requirements and other relevant provisions of Directive 2014/53/EU.
- The full text of the EU Declaration of conformity is available below and the following internet address: www.SousVideTools.com
CE CERTIFICATE
European Declaration of Conformity

Marking we
Gastronomy Plus Ltd t/a Sousvidetools.com
Central Barn
Claughton Business Park
Hornby Road
Claughton
Lancaster
United Kingdom
declare under our sole responsibility that the product
Article: Sous Vide Circulator
Trademark: sousvide tools.com
Model no.: SVT-01046 & SVT-01046EU
To which this declaration relates is in conformity with the following harmonized standards
EN 60950-1: 2006+A11(2009)+A1(2010)+A12
(2011)+A2(2013)
EN 62479: 2010
EN 55014-1:2006/A2:2011
EN 55014-2:2015
EN 61000-3-2:2014
EN 61000-3-3:2013
ETSI EN 301489-01 V2.l.1 (2017-02)
ETSI EN 301489-17 V3.l.1 (2017-02)
EN 300 328 V2.l.1: 2016-11
EN 60335-1:2012/All:2014
EN 60335-2-74:2003/A2:2009
EN 62233:2008
Following the provisions of
2014/53/EU (RED directive) 2014/30/EU (EMC directive) 2014/35/EU (LVD directive)
01.10.2020
Date / Place Name: Alex Shannon
Alex Shannon
Position: Managing Director
IMPORTANT - LIRE AVANT L'UTILISATION
STRUCTURE DU PRODUIT
Indicateur
Claughton Business Park
Hornby Road
Claughton
Lancaster
United Kingdom
A:ÜBER DAS BEDIENFELD
Claughton Business Park
Hornby Road
Claughton
Lancaster
United Kingdom
Claughton Business Park
Hornby Road
Claughton
Lancaster
United Kingdom
HVORFOR SKAL DEN RENGORES:
Claughton Business Park
Hornby Road
Claughton
Lancaster
United Kingdom
Claughton Business Park
Hornby Road
Claughton
Lancaster
United Kingdom
Claughton Business Park
Hornby Road
Claughton
Lancaster
United Kingdom
Claughton Business Park
Hornby Road
Claughton
Lancaster
United Kingdom
Claughton Business Park
Hornby Road
Claughton
Lancaster
United Kingdom
SOLUTIONANDO PROBLEMAS
Claughton Business Park
Hornby Road
Claughton
Lancaster
United Kingdom
declarar sob{nossa unica responsabilitad que o produits
Artigo: Sous Vide Circulador
Marca: sousvide tools.com
Modelo no.: SVT-01046 & SVT-01046EU
Data / Local Nome: Alex Shannon
Alex Shannon
Claughton Business Park
Hornby Road
Claughton
Lancaster
United Kingdom
Claughton Business Park
Hornby Road
Claughton
Lancaster
United Kingdom
8nawvei e bi nTc euvn oTo npoiov
Поiov: Kukloopopntic Sous Vide
STRUCTURA PRODUSULUI
Indicator
Lumina rosie inseamna ca dispositivul nu a atins temperatura prestabilita
Claughton Business Park
Hornby Road
Claughton
Lancaster
United Kingdom
Claughton Business Park
Hornby Road
Claughton
Lancaster
United Kingdom
POSEBNI PROPISIO SIGURNOSTI
- Urečaj je namijenjen samo za pećenje namirnica pakiranih u vakuumske vrecice pri precizno kontroliranoj temperaturi pri kućnoj uporabi. Svaka druga uporaba može dovesti do oštećinja uredaja ili obosne ozljede.
- Ne upotrebljavaje ovaj uredaj za peçenje prehrambenih proizvoda, kao ni za zagrijavanje tvari koje su zapaljive, opasne ili na drugi način nesigurne.
- Urejd upotrebljavaje samo kako je opisano u ovom prisučniku.
- Oprez! Vruca povrsina! Temperatura povrsine tijekom uporabe je vruca. Drzite ruicu ili gornji dio uredaja.
- Nikada nemojte upotrebljavati uredaj u blizini eksplozivnih ili zapaljivih materijala, kreditnih kartica, magnetskih diskova ili radija.
- Ovaj uredaj nije predviden za rad uz pomoc vanjskog tajmera ili odvojenog sustava daljinskog upravljanja.
- Urejad drzite dalje od izvora topline i otvorenog plamena.
- Urečaj ne upotreblavajte u blizini eksplozivnih ili zapaljivih materijala, kreditnih kartica, magnetskih diskova ili radija.
- Uredaj treba montirati okomito na sprenik.
- Prilikom uporabe stavite hranu za zagrijavanje u spremnik za vodu i uvjerite se da se mora regulirati razina vode izmedu najnije razine vode „MIN" i najviše razine vode „MAX", kako bi se izbjeglo oštećenje uredaja.
- U ovom uredaju samo se voda smije zagrijavati. Druge tekuciine mogu ošetiti uredaj. Uredaj ne upotrebljavaje bez vode u njemu.
- Nikada ne prekrivajte uredaj folijom, krpama itd. tijekom korišenja.
- Provjerite temperaturu vode pomoću prikaza temperature. Nemojte dirati vodu.
- Ne upotrebljavaje tvrdi pribor za postavljanje povrsine grijace ploce. Ne upotrebljavaje vodeni mlaz, ispirite izravno vodom ili sredstvom za cisicenje pare jer se dijelovi mogu smociti i besoin doci do strujnog udara.
- Nemojte Čistiti niti spremati uredaj osim ako je potpuno ohlaen.
UGRADNJA UZEMLJENJA
B:UPORABOM APLIKACije IVIDE (ZAMJENJUJE KORAKE 1 I 2)
Spojite uredj (ako je to prvi put da izvodite ovaj postupak, pogledajte gore navedene podatke). Odaberite recept ili upotrijebite kalkulator i zatim slijedite upute na zaclinu. Aplikacija ce automatski odabrati tocnu temperaturi vrijeme pecenja. Odaberite "Pokreni kuhanje". SousVideTools iVide Termalni cirkulator Poctak 2.0 zapocet ce zagrijavanje vode do postavljene temperature. Iz sigurnosnih razloga nemojte stavljati vrecice s hranom u vodu prise Negro sto dosegnete postavljenu temperaturu.
ODRICANJE OD ODGOVORNOSTI ZAKOMPATIBILNOST
Bezična izvedba ovis i Wl-Fl bezičnoj technologiji vaşeg uredaja, obratite se proizvodacu uredaja. SousVideTools. com nije odgovoran za bilokakav gubitak podataka ili curenja usljed uporabe ovih uredaja.
ODRŽAVANJE
ODRZAVANJE
Kako bist izbjugli opekotine, prije ciiscenja provjerite je li uredaj iskljucen i hladio se na sobnoj temperaturi.
Claughton Business Park
Hornby Road
Claughton
Lancaster
United Kingdom
izjavljujemo na vlastitu odgovornost da je proizvod
Claughton Business Park
Hornby Road
Claughton
Lancaster
United Kingdom
Central Barn, Claughton Business Park, Hornby Road, Claughton, Lancaster, LA2 9JX
08006785001
01524770060
enquiries@sousvidetools.com
www.sousvidetools.com
EU: c/o ProductIP BV Authorized Representative Dept. Galvanistraat 1, 6716 AE Ede, Netherlands