
Solo 6436 - Saw AL-KO - Free user manual and instructions
Find the device manual for free Solo 6436 AL-KO in PDF.



| Product type | Petrol chainsaw |
| Brand | AL-KO |
| Model | Solo 6436 |
| Guide bar length | 35 cm (cutting length 33 cm) |
| Weight (with bar and chain) | 5.38 kg |
| Engine type | 2-stroke engine, 35.2 cm³ |
| Maximum power | 1.45 kW (according to ISO 7293) |
| Fuel | Gasoline/oil mixture (50:1) |
| Fuel tank volume | 270 cm³ |
| Chain oil tank volume | 230 cm³ |
| Cutting chain | Oregon 91P053X, pitch 3/8", gauge 0.05" |
| Main functions | Felling, pruning, cutting wood |
| Safety devices | Chain brake, hand guard, safety lock button |
| Maintenance and cleaning | Clean air filter every 15h, sharpen chain regularly |
| Spare parts and repairability | Original AL-KO spare parts, repair by approved service center |
| General information | Manual available in multiple languages, weight with empty tanks |
Frequently Asked Questions - Solo 6436 AL-KO
User questions about Solo 6436 AL-KO
0 question about this device. Answer the ones you know or ask your own.
Ask a new question about this device
Download the instructions for your Saw in PDF format for free! Find your manual Solo 6436 - AL-KO and take your electronic device back in hand. On this page are published all the documents necessary for the use of your device. Solo 6436 by AL-KO.
USER MANUAL Solo 6436 AL-KO
natural_image
Technical line drawing of a chain drive assembly (no text or labels)






Inhaltsverzeichnis
Deutsch 8
English....34
Nederlands 59
Français....86
Español 113
Italiano 140
Slovenščina 166
Hrvatski....190
Polski 214
Česky 242
Slovenská 266
Magyarul....291
Dansk 317
Svensk....341
Norsk 365
Suomi 389
Lietuvių 414
Latviešu 439
Русский 464
Україна....493
Türkçe 521
© 2018
AL-KO KOBER GROUP Kötz, Germany
This documentation or excerpts therefrom may not be reproduced or disclosed to third parties without the express permission of the AL-KO KOBER GROUP.
01
natural_image
Illustration of hands using a knife to cut through a saw, with four cross marks above (no text or symbols)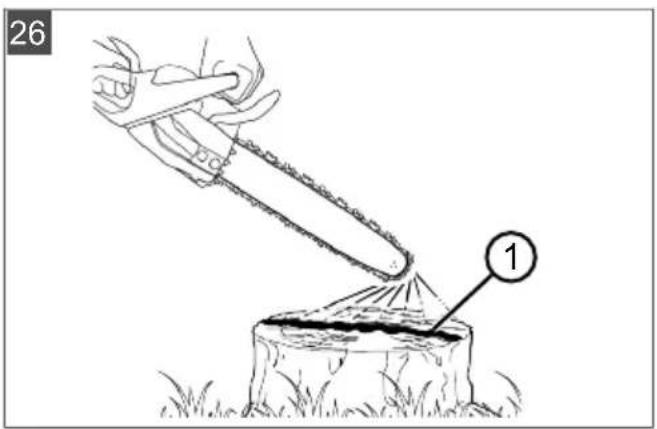
Nr. Bauteil
1 Führungsschiene
2 Sägekette
3 Benzin-Kettensäge
www.al-ko.com/service-contacts
15 GARANTIE
1 About these operating instructions ..... 35
1.1 Symbols on the title page.... 35
1.2 Legends and signal words ...... 35
2 Product description 35
2.1 Intended use 35
2.2 Possible foreseeable misuse .... 35
2.3 Residual risks.... 36
2.4 Safety and protective devices ...... 36
2.5 Symbols on the appliance 36
2.6 Scope of supply.... 37
2.7 Product overview (01) 37
3 Safety instructions 38
3.1 Safety instructions for chain saws..... 38
3.2 Causes and operator prevention of kickback 39
3.3 Safety information when working ..... 39
3.3.1 Operator 39
3.3.2 Operating times 40
3.3.3 Working with the chain saw ..... 40
3.3.4 Vibration load.... 40
3.3.5 Noise pollution 41
3.3.6 Handling of petrol and oil...... 41
3.3.7 Safety of persons, animals and property 41
4 Assembly 42
4.1 Assembly of the guide rail and the saw chain (02 to 06).... 42
5 Start-up 43
5.1 Fuel 43
5.1.1 Mixing fuel 43
5.2 Chain lubricant 43
5.3 Filling with service products (07)...... 44
5.4 Check the chain tension (06, 08) ..... 44
5.5 Checking the chain brake (09) 45
6 Operation 45
6.1 Switching the engine on and off ..... 45
6.1.1 Starting the engine (10, 11) ..... 45
6.1.2 Switching off the motor (12) ..... 46
6.2 At the end of a work session 46
6.3 Changing between normal/summer and winter operation (29).... 46
7 Working behaviour and working technique.... 47
7.1 Using the bumper spike (13) 47
7.2 Felling trees (14, 15)...... 48
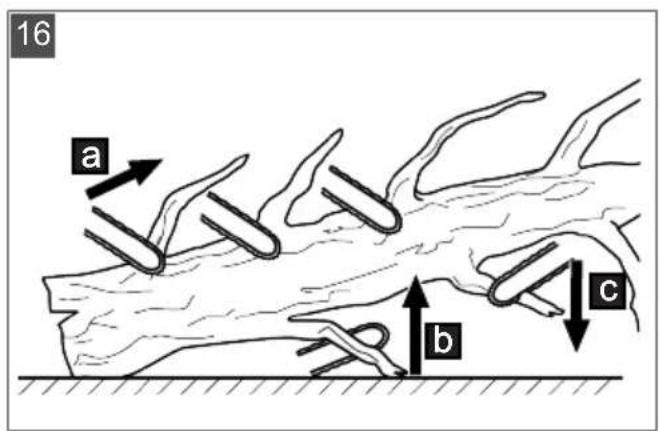
7.3 Delimbing (16) 49
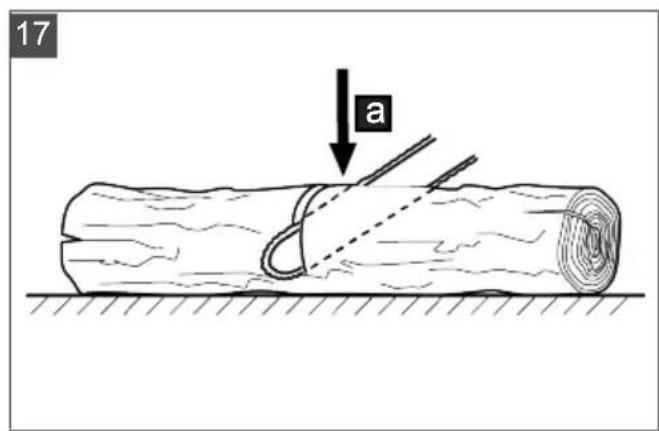
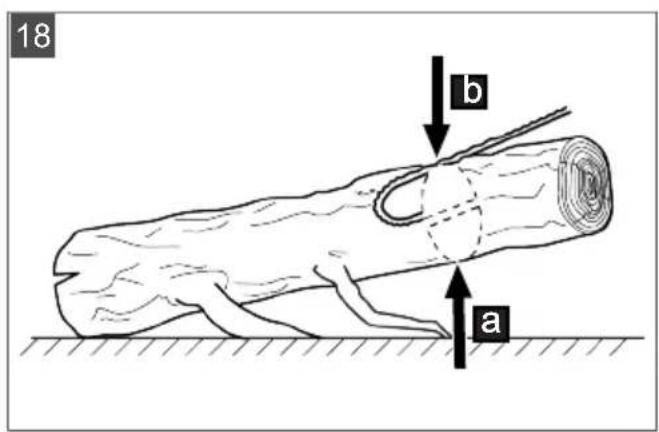
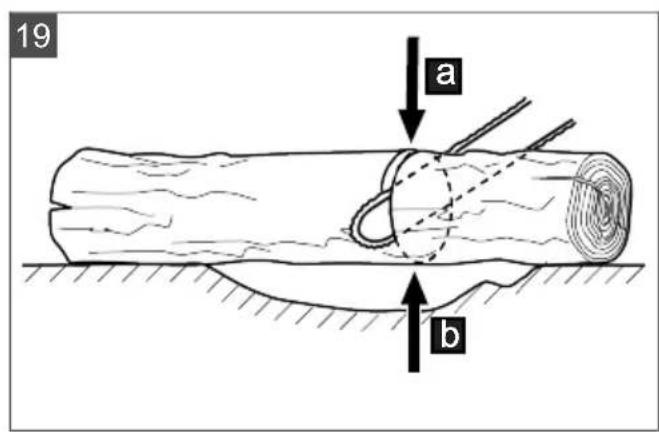
7.4 Cross-cutting (17, 18, 19) ...... 49
7.5 Cutting converted timber 49
8 Maintenance and care.... 49
8.1 Removing/remounting the air filter cover (20) 50
8.2 Cleaning the air filter (21) 50
8.3 Checking/replacing the spark plug (22, 23) 51
8.4 Guide rail (25, 27).... 51
8.5 Sharpening the saw chain (24)...... 51
8.6 Checking the chain lubrication (26) .... 52
8.7 Adjusting the chain lubrication (28) .... 52
8.8 Checking a standstill when the saw chain is running in idle 52
8.9 Setting the idling speed on the carburettor 52
8.10 Chain maintenance table.... 53
8.11 Maintenance schedule.... 53
9 Help in case of malfunction 55
10 Transport.... 56
11 Storage.... 56
12 Disposal.... 56
13 Technical data.... 56
14 After-Sales / Service.... 57
15 Guarantee 58
16 Translation of the original EU declaration of conformity.... 58
1 ABOUT THESE OPERATING INSTRUCTIONS
The German version is the original operating instructions. All additional language versions are translations of the original operating instructions.
■ Always safeguard these operating instructions so that they can be consulted if you need any information about the appliance.
■ Only pass on the appliance to other persons together with these operating instructions.
■ Comply with the safety and warning information in these operating instructions.
1.1 Symbols on the title page
Symbol Meaning

It is essential to read through these operating instructions carefully before start-up. This is essential for safe working and trouble-free handling.

Operating instructions

Never operate the petrol powered device in the vicinity of open flames or heat sources.
1.2 Legends and signal words

DANGER!
Denotes an imminently dangerous situation which will result in fatal or serious injury if not avoided.

WARNING!
Denotes a potentially dangerous situation which can result in fatal or serious injury if not avoided.

CAUTION!
Denotes a potentially dangerous situation which can result in minor or moderate injury if not avoided.
IMPORTANT!
Denotes a situation which can result in material damage if not avoided.

NOTE
Special instructions for ease of understanding and handling.
2 PRODUCT DESCRIPTION
These operating instructions describe a hand-operated chain saw that is powered by a petrol engine.
2.1 Intended use
The chain saw is exclusively designed for domestic gardening applications. In this application area the chain saw can be used for wood sawing work, e.g. for:
■ Sawing of tree trunks
■ Sawing of squared timbers
■ Sawing of branches, depending on the length of cut
The chain saw must only be used outdoors for working with wood. While in use, it is necessary to wear adequate personal protective equipment. Further applications, such as professional tree care within a tree, are expressly excluded. The operator is liable for any damage caused by improper operation. It is only permitted to use the saw chains and bar combinations stated in the operating instructions for this device. Any other application not in accordance with the designated use described here shall be regarded as misuse. The chain saw must not be used in the commercial sector.

CAUTION!
Danger of injury due to non-designated use!
If wood or other substances embedded with foreign bodies are sawn with the chain saw, injury can result.
■ Only use the chain saw for light wood sawing work.
■ Before sawing wood, check for foreign bodies, e.g. nails, screws, fittings.
2.2 Possible foreseeable misuse
- Do not saw off any branches that are directly or at an acute angle above the user or other persons.
Do not use old oil.
■ Do not use the tool in a potentially explosive atmosphere.
2.3 Residual risks
Even when using the device as intended, there is always a certain residual risk that cannot be excluded. The following hazards cannot be ruled out due to the nature and design of the device.
■ Contact with the exposed teeth of the chain (risk of cutting)
■ Access to the moving chain (risk of cutting)
■ Sudden and unexpected movement of the bar (risk of cutting)
■ Separation of parts of the chain (e.g. risk of cutting/injury)
■ Separation of parts of the wood being worked on
Inhalation of particles of the wood being worked on.
■ Emissions from the petrol engine.
■ Contact of the fuel (petrol/oil) with the skin.
- Impairment of hearing during work if ear defenders are not used.
2.4 Safety and protective devices

WARNING!
Danger of serious injury from manipulated safety and protective devices
As a result of manipulated safety and protective devices, serious injury can occur when working with the chain saw.
■ Never deactivate safety and protective devices.
■ Only work with the chain saw if all safety and protective devices function correctly.
Protective cover of the guide rail
Before transport, the protective cover must be pushed onto the guide rail and saw chain to prevent injuries to persons and damage to objects.
Chain brake
In case of kickback, the chain brake is triggered by the hand guard and immediately brings the running chain saw to a standstill.
Safety locking switch
The throttle lever can only be depressed once the safety locking switch has been pressed.
2.5 Symbols on the appliance
Symbol Meaning

Pay special attention when handling this product!

Danger of kickback!
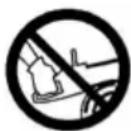
Do not operate the chain saw with one hand!

Wear a protective helmet, ear defenders and eye protection!

Wear protective gloves!

Wear sturdy shoes!

Read the operating instructions before starting operation.

Always operate the chain saw with both hands!

Tank for petrol/oil mixture

Primer

Sun: Normal/summer operation
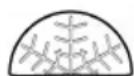
Snowflake: Winter operation
Symbols are stamped on the machine for safe operation and maintenance. It is important that you heed these notes.
Symbol Meaning
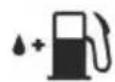



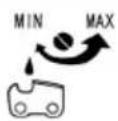




Connection for refilling the fuel mixture
Location: at the tank lid
Connection for refilling the chain oil
Location: at the oil tank cap
Press the engine switch; set the switch to the "O" position – the engine will be switched off immediately.
Location: On the left side of the rear handle
Operating the air flap button: If you pull out the button, the air flap closes; if the air flap closes, press in the button to open the air flap again.
Location: Air filter cover
Setting the oil pump: Using a screw-driver, turn the rod in the direction of the arrow until the MAX position is reached for a stronger flow of chain oil, or towards the MIN position for a reduced flow of chain oil.
Location: Bottom of the drive unit
The screw under the "H" mark is used to adjust the mixture at high speed.
Location: On the top left side of the rear handle
The screw under the "L" mark is used to adjust the mixture at low speed.
Location: On the top left side of the rear handle
The screw above the "T" mark serves to adjust the idle speed.
Location: On the top left side of the rear handle
Indicates the direction in which the chain brake is released (white arrow) or depressed (black arrow).
Location: Front side of the guide rail
Symbol Meaning

Indicates the direction in which the chain is mounted.
Location: Front side of the guide rail

Guaranteed sound level: 113 dB(A)
2.6 Scope of supply
After unpacking, check that all the parts have been delivered.
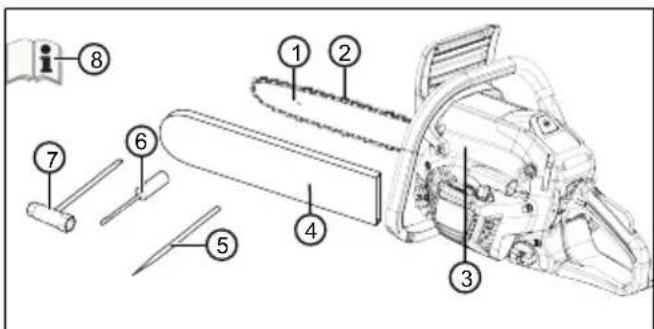
No. Component
| 1 Chain bar |
| 2 Saw chain |
| 3 Petrol chain saws |
| 4 Protective cover of the guide rail |
| 5 File |
| 6 Screwdriver |
| 7 Combination spanner |
| 8 Operating instructions |
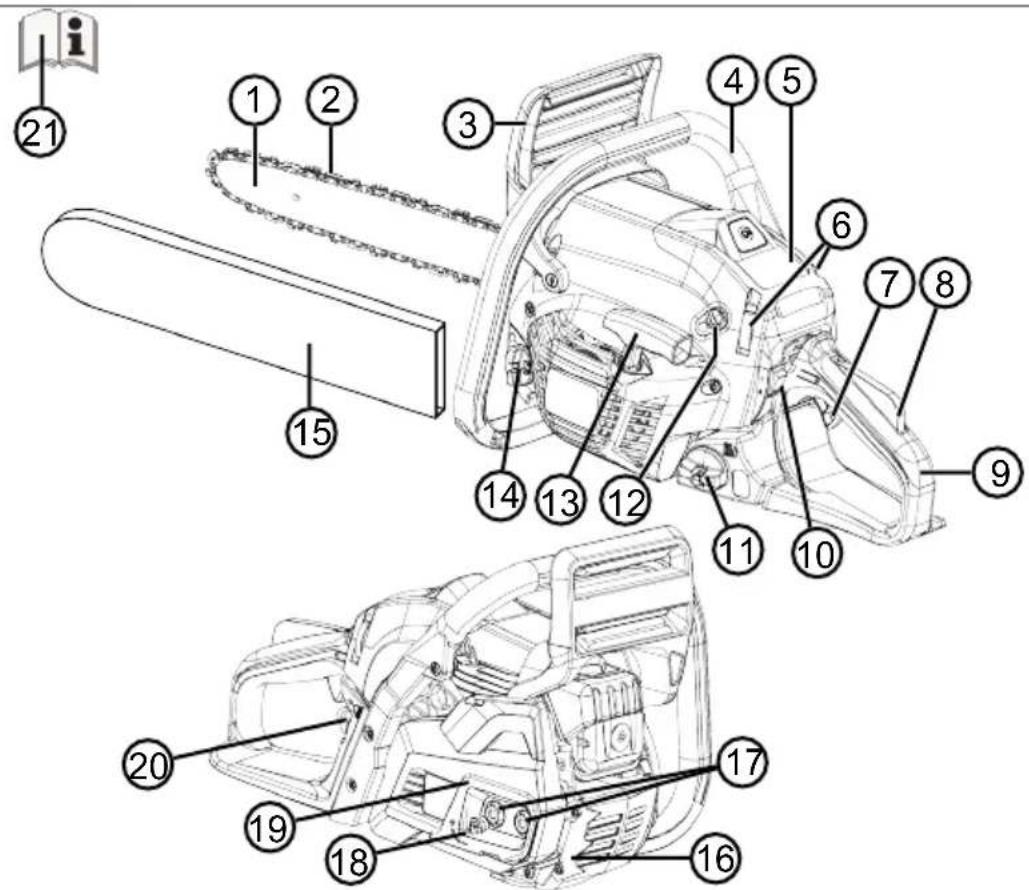
2.7 Product overview (01)
No. Component
| 1 Chain bar |
| 2 Saw chain |
| 3 Front hand guard |
| 4 Front handle |
| 5 Air filter cover |
| 6 Securing clips for |
| 7 Throttle lever |
| 8 Safety locking sw |
No. Component
| 9 Rear handle |
| 10 Rocker switch to turn off the engine, automatically resetting |
| 11 Fuel tank |
| 12 Choke knob (for cold start) |
| 13 Starter grip |
| 14 Oil tank |
| 15 Protective cover of the guide rail |
| 16 Tree grip |
| 17 Fastening nuts for guide rail |
| 18 Adjusting screw for chain tensioner |
| 19 Rail fastener |
| 20 Primer ball |
| 21 Operating instructions |
3 SAFETY INSTRUCTIONS
- Check the device daily for damage and to ensure that it is in a condition for safe operation before every use and after every fall or other incidents, such as external force due to impact or bumps.
- Check the tightness of the fuel system and the functionality of the safety devices. Do not continue using devices that are not safe for operation. In case of doubt, consult your dealer.
■ Wear ear defenders during work with the device, especially during a daily working period of more than 2.5 hours. The operation of the device causes intense noise that can cause hearing impairment in the user.
■ Wear gloves to cushion vibration and take regular breaks as a preventative measure against "white finger disease" (due to vibration-induced circulation problems in the hands). Using the device for a longer period of time may result in vibration-induced circulation problems in the hands. An exact period of use cannot be determined. This depends on a variety of factors. Observe your hands and fingers during constant use of the device. Consult a doctor if symptoms appear there, such as loss of feeling, pain, itching, impairment of physical strength or changes to the skin colour or the skin.
■ Never run the motor in closed rooms and switch it off if you feel nauseous, dizzy or weak when using this device. Immediately consult a doctor. The device generates toxic exhaust gases when the motor is running. These gases can be odourless and invisible.
■ Never operate the device in the vicinity of open flames or heat sources. Petrol and lubricating oil vapours are highly flammable.
■ Wear a dust mask if sawdust, mist or smoke are generated when working with the device. These can be dangerous to health.
3.1 Safety instructions for chain saws
- Keep all parts of your body away from the saw chain when the saw is running. Before starting the saw, make sure that nothing is touching the saw chain. When working with a chain saw, one moment of inattention can mean your clothing or parts of your body coming into contact with the saw chain.
■ Always hold the chain saw with your right hand on the rear grip and your left hand on the front grip. Holding the chain saw with your hands the other way around increases the risk of injury and is not allowed.
■ Wear protective goggles and ear defenders. Further protective equipment is recommended for the head, hands, legs and feet. Appropriate protective clothing reduces the risk of injury due to flying chips and inadvertent contact with the saw chain. - Do not work with the chain saw in a tree. Risk of injury when operating a chain saw in a tree.
■ Always make sure you are standing firmly and only use the chain saw if you are standing on firm, secure and level ground. Slippery ground or unstable standing surfaces such as on a ladder can lead to a loss of equilibrium or loss of control over the chain saw. -
When cutting a branch that is under tension, expect it to spring back. When the tension in the wood fibres is released, the branch under tension can hit the operator and/or cause a loss of control over the chain saw.
Take particular care when cutting under-growth and young trees. The thin material can get caught in the saw chain and hit you or cause you to lose your balance. -
Carry the chain saw at the front grip when it is switched off, and have the saw chain pointing away from your body. Always put on the protective cover when transporting or storing the chain saw. Careful handling of the chain saw reduces the probability of inadvertent contact with the running saw chain.
■ Follow the instructions for lubrication, chain tensioning and changing accessories. An incorrectly tensioned or lubricated chain can either tear or increase the risk of kickback. - Keep the grips dry, clean and free from oil and grease. Greasy, oily grips are slippery and result in loss of control.
Only saw wood. Do not use the chain saw for work for which it is not intended. Example: Do not use the chain saw for sawing plastic, masonry or construction materials that are not made of wood. Using the chain saw for non-designated work can lead to dangerous situations.
3.2 Causes and operator prevention of kickback
Kickback can occur if the tip of the chain bar touches an object or if the wood bends and traps the saw chain during cutting.
In many cases, contact with the tip of the bar can lead to an unexpected, rearward reaction causing the chain bar to be knocked upwards and towards the operator.
If the saw chain is trapped on the top edge of the chain bar, the bar can be forced violently back towards the operator.
Each of these reactions can result in you losing control of the saw, with the possibility of severe injury. Do not rely entirely on the safety devices installed on the chain saw. As user of a chain saw, you should take various measures to be able to work without accident and injury.
Kickback is the consequence of incorrect or faulty use of the tool. It can also be prevented by taking suitable precautions as described below:
- Hold the saw firmly with both hands, with your thumb and fingers around the grips of the chain saw. Hold your body and arms in a position that allows you to withstand the kickback forces. If suitable measures are taken, the operator will be able to control the kickback forces. Never release the chain saw.
- Avoid any abnormal posture, and do not saw anything above shoulder height. This will avoid inadvertent contact with the tip of the bar, and allow better control of the chain saw in unexpected situations.
■ Always use replacement bars and saw chains prescribed by the manufacturer. In-correct replacement bars and saw chains can lead to the chain breaking and/or to kickback.
■ Comply with the instructions of the manufacturer for sharpening and maintaining the saw chain. Depth limiters set too low increase the tendency to kickback.
3.3 Safety information when working
■ Heed the country-specific safety regulations, e.g. from the relevant trade associations, social security systems, authorities for industrial safety.
■ Only work in sufficient daylight or artificial lighting.
- Keep the working area free from objects (e.g. off-cuts) – danger of stumbling.
■ The user is responsible for accidents involving other people and their property.
3.3.1 Operator
■ Young people under 16 years of age and people who do not know the operating instructions are not allowed to use the tool.
If you are working with a chain saw for the first time: Have the salesperson or another expert explain the operation of the chain saw, or attend a course.
To operate the chain saw, you must be rest-ed and in good physical and mental health. If you must not exert yourself for health reasons, ask your doctor whether it is possible to work with a chain saw.
Take measures to protect yourself against vibration loads. The actual vibration values may differ from the values specified in the technical data, depending on what the tool is used for. In doing so, take account of the entire working process, i.e. also times during which the tool is operating without load, or is switched off. Suitable measures include regular maintenance and care of the tool and the tool attachments, keeping your hands warm, taking regular breaks and planning the working sequences effectively.
■ Determine the maximum handling period and set breaks in the work according to the vibration value.
3.3.2 Operating times
Heed the country-specific regulations for the operating times of chain saws. The operating times of chain saws can be limited by national and local regulations.
3.3.3 Working with the chain saw

WARNING!
Danger of serious injury.
If an incompletely mounted chain saw is used, serious injury can be caused.
■ Only use the chain saw when it has been fully mounted.
■ Before each use, perform a visual inspection in order to check that the chain saw is complete and does not contain damaged or worn components. Safety and protective devices must be intact.
■ Never work alone.
■ Always keep a first-aid kit to hand in case of accidents.
- Avoid touching metal objects in the ground or which are conductively connected to the ground.
■ The personal protective equipment comprises:
-
Protective helmet
■ Hearing protection (e.g. ear defenders, especially when working for than 2.5 hours a day)
■ Protective glasses or face visor incorporated in the protective helmet
■ Protective trousers with cut protection in-lay
Sturdy working gloves
Safety boots with high-grip soles, steel toe caps, and cut protection inlays -
Do not use the chain saw above shoulder height, since safe handling is no longer possible in this way.
■ When changing position, switch off the engine and put on the chain guard.
■ Switch off the petrol engine when not in use and put the chain guard in place.
■ Switch the chain saw off before putting it down.
- Do not use the chain saw for levering or moving wood.
■ Only specialist personnel are allowed to saw trunks that are thicker than the length of the chain bar.
■ Only start the cut once the saw chain is running, never switch on the chain saw already in the kerf.
■ Make sure that no saw chain oil gets onto the ground.
- Do not undertake sawing work in the rain, snow or stormy weather.
■ Never disable safety and protective devices.
3.3.4 Vibration load

WARNING!
Danger due to vibration
The actual magnitude of the vibration emissions during the use of the appliance may deviate from that stated by the manufacturer. Observe the following influencing factors before or during use:
Is the appliance being used as intended?
Is the material being cut or processed in the proper manner?
Is the appliance in a proper condition of use?
Is the cutting tool properly sharpened or is the correct cutting tool installed?
Are the handle grips and any optional vibration grips mounted, and are they firmly attached to the appliance?
■ Only operate the tool at the combustion engine speed required for the respective work. Avoid using the maximum speed in order to reduce noise and vibrations.
The noise and vibrations of the tool may increase due to improper use and maintenance. This leads to health damage. In this case, immediately switch off the tool and have it repaired by an authorised service workshop.
The degree of stress due to vibration depends on the work to be performed or on the use of the tool. Estimate the stress and plan appropriate work breaks. This considerably
reduces stress due to vibration over the entire working time.
- Extensive use of the tool exposes the operator to vibrations, which can lead to circulatory issues ("white fingers"). To avoid this risk, wear gloves and keep your hands warm. If any symptoms of "white fingers" occur, immediately consult a physician. These symptoms include: Numbness, loss of feeling, tingling, itching, pain, reduced muscular strength, changes in the colour or condition of the skin. Normally these conditions affect the fingers, hands or pulse. The risk increases at low temperatures (below approx 10°C).
Take long breaks during your working day so you can recover from the noise and the vibrations. Plan your work in such a way that the use of appliances that generate strong vibrations is spread over several days.
If you notice an unpleasant sensation or discolouration of the skin on your hands when using the tool, stop work immediately. Take sufficient work breaks. Without sufficient breaks, a hand/arm vibration syndrome can occur. - Minimise your risk of being exposed to vibrations. Maintain the tool according to the instructions in the operating instructions.
If the tool is used frequently, contact your dealer to purchase anti-vibration accessories (e.g. handles).
■ Define how the vibration load can be limited in a work plan.
3.3.5 Noise pollution
A certain level of noise exposure from this appliance is inevitable. Carry out noisy work at approved and specified time periods. Observe rest periods as necessary and restrict the duration of the work to a minimum. For your personal protection and protection of persons in the vicinity, appropriate hearing protection must be worn.
3.3.6 Handling of petrol and oil

DANGER! Risk of explosion and fire
An escaping petrol/air mixture can cause an explosive atmosphere. Deflagration, explosion and fire can lead to serious and even fatal injuries if fuel is not handled properly.
- Do not smoke when dealing with petrol.
■ Only handle petrol out of doors and never in enclosed spaces.
It is essential to heed the code of conduct stated below.
■ Only transport and store petrol and oil in containers approved for that purpose. Ensure that children have no access to stored petrol and oil.
In order to avoid ground contamination (environmental protection) when filling, ensure that no petrol or oil enters the soil. Use a funnel for filling.
■ Never fill the appliance in enclosed spaces. Petrol vapours may gather at ground level, and thereby result in a deflagration or even an explosion.
- Immediately wipe any spilled petrol off the appliance and the ground. Allow textiles used to wipe off petrol to dry in a well ventilated place before disposing of them. Otherwise, sudden self-ignition may occur.
If petrol has been spilled, petrol vapours occur. For this reason, do not start the appliance at the same location but at least 3 m away.
- Avoid skin contact with mineral oil products. Do not inhale petrol vapours. When filling, always wear protective gloves. Change and clean protective clothing regularly.
■ Ensure that your clothing does not come into contact with petrol. If petrol has got onto your clothing, change it immediately.
■ Never fill the appliance while the engine is running or hot.
3.3.7 Safety of persons, animals and property
■ Use the appliance only for the purposes for which it is intended. Any non-intended use can lead to injury and property damage.
■ Switch on the appliance only when there are no persons or animals in the working area.
- Maintain a safe distance to persons or animals, or switch off the appliance if persons or animals approach.
■ Never direct the exhaust gas jet of the engine towards persons and animals or towards inflammable products and objects. - Do not reach into the vacuum and vent grilles when the engine is running. Injuries can occur due to rotating appliance parts.
■ Always switch off the appliance when not in use, e.g. when changing the work area, during service and maintenance, and when filling with the petrol/oil mixture. - Immediately switch off the appliance if there is an accident in order to avoid further injuries and/or property damage.
■ Never operate the appliance with worn or defective parts. Worn or defective appliance parts can cause serious injuries. - Keep the appliance out of the reach of children.
4 ASSEMBLY

DANGER!
Danger of fatal injury and danger of extremely severe injury.
Danger of fatal injury and danger of extremely severe injury when the engine is switched on.
- Carry out all work with the engine switched off.
IMPORTANT!
Danger of damage to the appliance
Danger of damage to the appliance due to improper assembly.
■ Unpacking and assembly must be carried out on a firm and level surface.
There must be sufficient space for moving the machine and the packaging, and suitable tools must be available.
IMPORTANT!
Danger of environmental damage
Danger of environmental damage due to improper disposal.
The packaging must be disposed of according to local regulations.

CAUTION!
Risk of injury
Sharp-edged and moving appliance parts can lead to injury.
■ Always wear sturdy working gloves when assembling the bar and chain.
When installing the bar and chain, take the greatest of care so as not to impair the safety and efficiency of the machine; contact your dealer if you are in doubt.

NOTE
The machine is supplied with the bar and chain dismantled, and with the mixture and oil tanks empty.
Make sure that the chain brake is not activated before assembly. The chain brake is released when you pull the hand guard (01/3) in the direction of the handle (01/4).
4.1 Assembly of the guide rail and the saw chain (02 to 06)
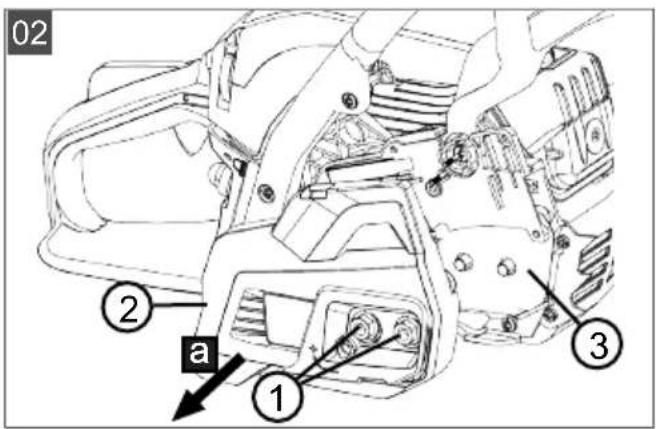
- Loosen and remove the two hex nuts (02/1) using the supplied combination wrench and remove (02/a) the sprocket guard (02/2).
- Remove the plastic spacer (02/3); this spacer is only used for transporting the packaged machine and is not required any longer.
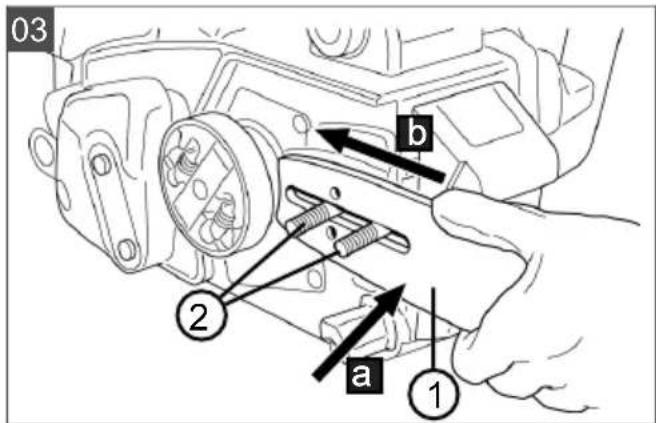
- Put (03/a) the groove of the guide rail (03/1) into the studs (03/2). Push the guide rail in the direction of the machine housing (03/b).
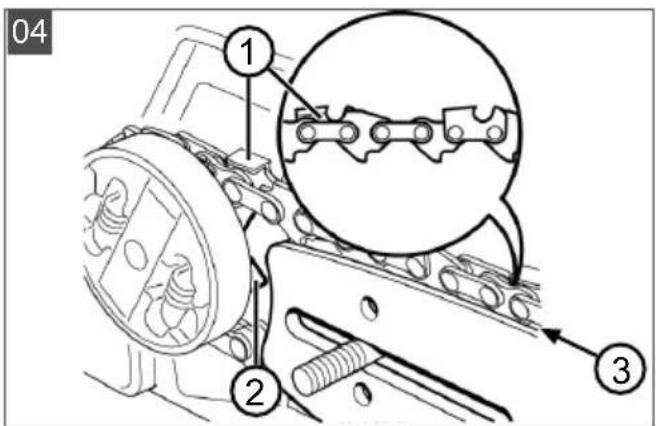
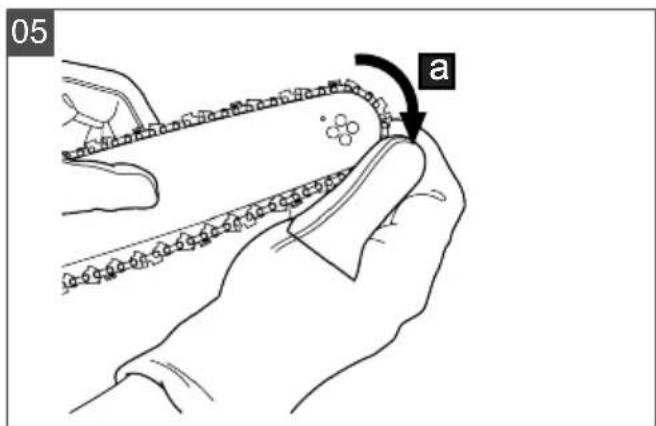
- Place the sawing chain (04/1) around the sprocket (04/2) and into the groove of the guide rail (04/3), while ensuring the correct running direction. Place the sawing chain over the reversing sprocket of the guide rail (05/a).
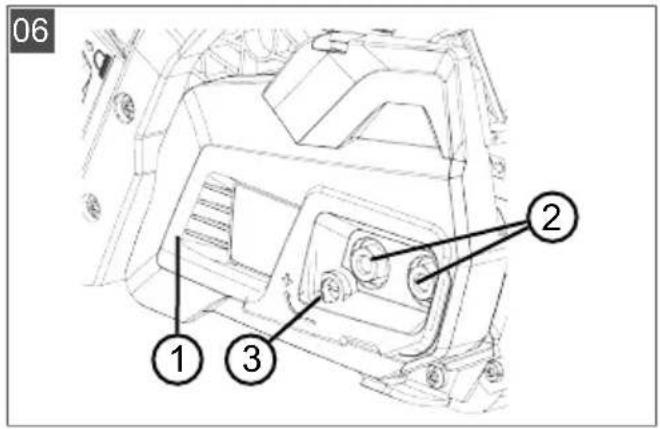
- Re-mount the sprocket guard (06/1), only slightly tighten the hexagon nuts (06/2).
- Push the guide rail away from the machine housing until the sawing chain is slightly taut.
- Only tighten the two hex nuts (06/2) to the extent that the sawing chain can be made even more taut.
- Turn the adjustment screw of the chain tensioner (06/3) until the sawing chain is correctly tensioned (see chapter 5.4 "Check the chain tension (06, 08)", page 44).
- Tighten the hexagonal nuts (06/2).
5 START-UP
5.1 Fuel
IMPORTANT!
Danger of damage to the appliance
Using petrol alone will damage the engine and invalidate the warranty.
■ Only use high-quality petrol and lubricating oil so as to ensure overall performance and the service life of the mechanical parts in the long term.

NOTE
Lead-free petrol tends to leave deposits in the tank if it is stored for more than 2 months. Always use fresh petrol!
This machine is equipped with a two-stroke engine that runs on a petrol/oil mixture.
Suitable oil
Use only high-quality synthetic two-stroke engine oils. Oils specially developed for such engines are available from your dealer, which can guarantee high performance.
Suitable petrol
Use only lead-free petrol with a minimum octane rating of 90 RON.
5.1.1 Mixing fuel

DANGER!
Risk of explosion and fire
Petrol and mixed fuel are highly inflammable!
■ Exclusively store fuel and mixed fuel in containers specially approved for fuels, and keep them in a safe place away from heat sources and naked flames.
■ Never leave the containers within reach of children.
- Do not smoke when mixing fuel, and attempt to avoid inhaling the petrol vapours.
IMPORTANT!
Danger of engine damage
Pure petrol will result in damage and complete failure of the engine. Guarantee claims against the manufacturer are excluded in this case.
■ Only operate the engine using the specified petrol/oil mixture ratio.

NOTE
The mixture is exposed to a continuous aging process. Do not prepare excessive amounts in order to avoid deposits forming.

NOTE
Regularly clean the petrol and mixture containers to remove any deposits.
An excessively lean mixture increases the risk of a premature piston seizure. The warranty shall be rendered void if the instructions on mixing the fuel, etc., in this manual are not followed.
In the table below you will find the correct mixing ratio, together with an example.
Mixing ratio Petrol Oil
| 50:1 and 1 part (50 Parts Fuel Oil) | 5 litres 100 ml |
- Pour about half of the specified quantity of fuel into an approved canister.
- Pour in the full volume of oil specified in the table.
- Add the rest of the petrol.
- Close the container and shake well.
5.2 Chain lubricant
IMPORTANT!
Danger of damage to the appliance
Due to the metallic abrasion it contains, the use of used oil for lubricating the chain would lead to premature wear of the guide rail and saw chain. Also, the warranty of the manufacturer will become void.
■ Never use used oil, only biologically degradable saw chain oil.
IMPORTANT!
Danger of environmental damage
The use of mineral oil for the chain lubrication leads to serious environmental damage.
■ Never use mineral oil, but only biologically degradable saw chain oil.
Do not use contaminated oil, since this can lead to blockage of the filter in the tank and irreparable damage to the oil pump.
Using high-quality oil is a decisive factor in achieving effective lubrication for the cutting elements; used or low-quality oil impairs lubrication and reduces the service life of the sawing chain and guide rail.
It is recommended that you fill the oil tank fully every time you refuel (by means of a funnel). The capacity of the oil tank is designed so that the fuel will run out before the oil does, thereby guaranteeing that the machine will not be operated without lubricant.
5.3 Filling with service products (07)

DANGER!
Risk of explosion and fire
An escaping petrol/air mixture can cause an explosive atmosphere. Deflagration, explosion and fire can lead to serious and even fatal injuries if fuel is not handled properly.
- Do not smoke when dealing with petrol.
■ Only handle petrol out of doors and never in enclosed spaces.
It is essential to heed the code of conduct stated below.
Filling with fuel
- Switch off the engine and pull the protective cover over the sawing chain.
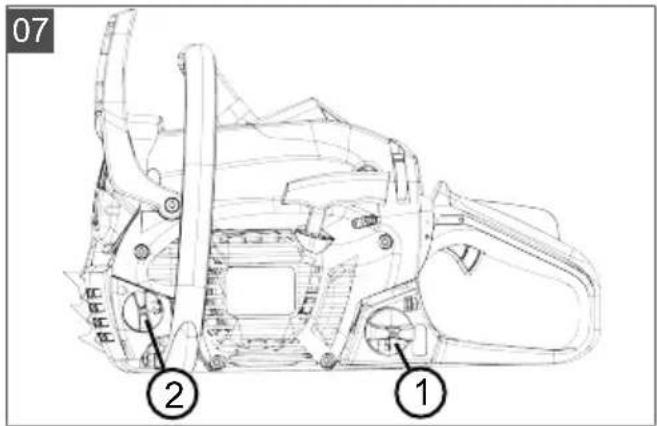
- Clean the tank cap (07/1) and the surrounding area so that no dirt will drop into the tank.
- Open the tank cap (07/1) carefully because pressure may have built up inside.
- Pour in the fuel using a funnel.
- Put the filler cap on the fuel tank and screw it on tightly.
-
Clean up any spilled fuel on the ground and the device.
-
Only start the device again after the fuel vapours have evaporated.
Filling saw chain oil
- Switch off the engine and pull the protective cover over the sawing chain.
- Clean the oil tank cap (07/2) and the surrounding area so that no dirt falls into the tank.
- Unscrew the oil tank cap (07/2).
- Fill the saw chain oil using a funnel.
- Put the oil tank cap back on the tank and screw it on tightly.
- Clean up any spilled saw chain oil on the ground and the device.
5.4 Check the chain tension (06, 08)

DANGER!
Danger of fatal injury and danger of extremely severe injury.
Danger of fatal injury and danger of extremely severe injury when the engine is switched on.
- Carry out all work with the engine switched off.
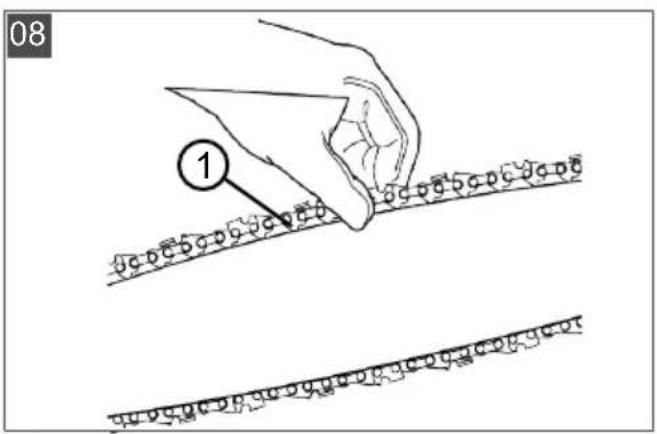
The tension is correct if the links do not come out of the guide (08/1) when you lift the chain in the middle of the guide rail, but the saw chain can still be turned.
Tightening the saw chain
-
Loosen the hexagonal nuts (06/2) of the sprocket guard (06/1) with the supplied combination wrench.
-
Turn the adjusting screw (06/3) of the chain tensioner until the saw chain is correctly tensioned.
-
Tighten the hexagonal nuts (06/2).
5.5 Checking the chain brake (09)

WARNING!
Danger of fatal injury and danger of extremely severe injury due to a defective chain brake
Extremely serious injury and even fatal injury of the operator can be caused if the chain brake does not function, e.g. due to kickback by the running saw chain.
- Check the chain brake each time before starting work.
Do not switch the chain saw on if the chain brake is defective. in this case, have the chain saw checked in a customer service workshop.
The unit is provided with a safety brake system (chain brake).
The chain brake was developed to immediately halt movement of the chain in case of kickback. The brake is normally actuated automatically through inertia.
This brake can also be actuated manually for control purposes.
- Start the engine and firmly hold the device grips with both hands.
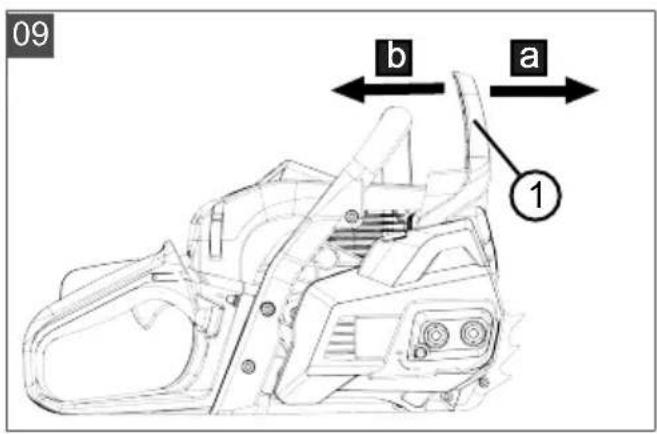
- Operate the safety locking switch (01/8) and throttle lever (01/7) to keep the chain moving, then press the hand guard (09/1) forward using the back of your left hand (09/a); the chain must stop immediately.
-
If the saw chain stops, immediately release the safety locking switch and then the throttle.
-
Switch off the engine.
-
Push the hand guard towards the rear to release the chain brake (09/b).
6 OPERATION
■ Comply with working time regulations in force in your country.
Grip the rear handle firmly with your right hand and the bow handle with your left hand, and hold them tightly.
- Do not release the handles as long as the motor is running.
■ Do not use the chain saw if you are:
Tired
Unwell
■ Under the influence of alcohol, medicines and drugs
6.1 Switching the engine on and off

WARNING!
Risk of explosion and fire
An escaping petrol/air mixture can cause an explosive atmosphere. Deflagation, explosion and fire can lead to serious and even fatal injuries if fuel is not handled properly.
Do not start the engine unless you are at least 3 metres away from the place where you filled the fuel.
6.1.1 Starting the engine (10, 11)

CAUTION!
Risk of injury from cable starter
Due to rapid retraction of the cable starter, the hand is pulled too quickly towards the engine. This can lead to bruises and sprains.
■ Never wind the cable starter around your hand.
IMPORTANT!
Danger of damage to the appliance
If the cable starter is pulled out too far, this can cause damage.
Do not to pull the cable out fully or cause it to rub against the edge of the cable guide opening; also, do not let go of the handle in such a way that the cable is retracted in an uncontrolled manner.
IMPORTANT!
Danger of damage to the appliance
If the engine is operated at high speed and the chain brake actuated, the clutch may overheat.
- Avoid letting the engine run at high speed with the chain brake actuated.
Cold start
A cold start means starting the engine after it has been switched off for at least 5 minutes or after re-filling with fuel.
- Place the device on a flat level surface, firmly grasp the front handle and press the device
onto the floor. If necessary, put the tip of your right foot on the rear handle.
- Press the hand guard forward to actuate the chain brake.
- Remove the protective cover of the saw chain.
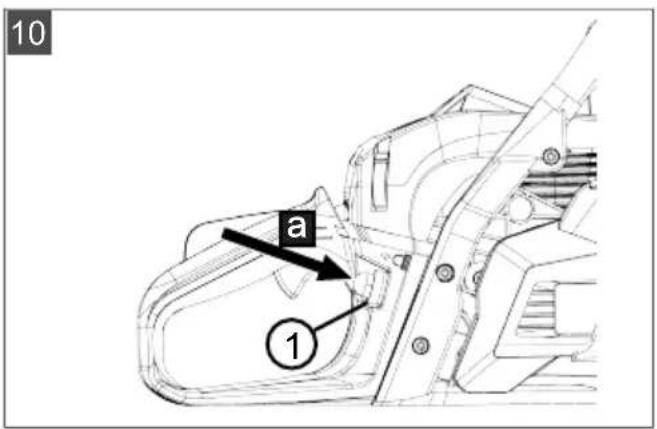
- Press the primer ball (10/1) 3-4 times (10/a).
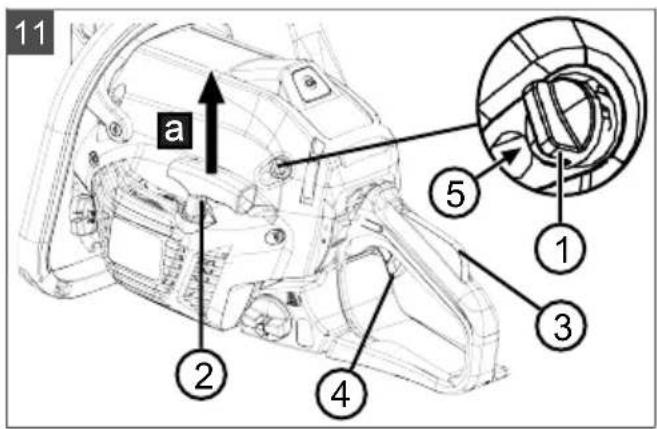
- Turn the rotary choke knob (11/1) clockwise to the end stop.
- Using your free hand, pull the starter grip (11/2) upwards (11/a) until resistance is felt.
- Do not release the starter grip; pull firmly several times until the engine starts for the first time. Turn the rotary choke knob (11/1) counterclockwise to the end stop.
- Pull the starter grip (11/2) firmly several times until the engine starts again.
- As soon as the engine is running, briefly press the safety locking switch (11/3) and throttle lever (11/4). Thus, the throttle valve of the carburettor is released from the locked position.
- Let the device run at idle for about one minute.
- To release the chain brake, pull back the hand guard.
Warm start
If the motor is only briefly shut down, the start procedure can be performed only by pressing the primer ball but not turning the choke knob.
6.1.2 Switching off the motor (12)
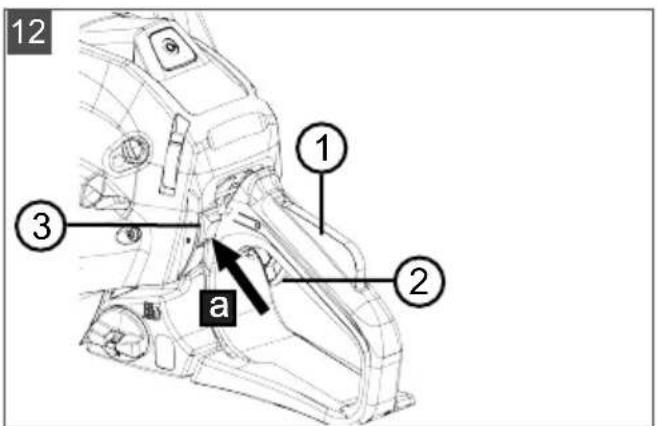
- Release the safety locking switch (12/1) and then the throttle lever (12/2).
- Allow the engine to run at idling speed for a few seconds.
- Press the rocker switch (12/3) into position "0" button (12/a).
6.2 At the end of a work session

WARNING!
Risk of injury by cutting
The sharp links of the saw chain can cause serious laceration injuries.
■ Switch off the motor.
■ Wear protective gloves.

WARNING!
Danger of fire
The heated machine can ignite waste cuttings (e.g. sawdust, remains of branches or leaves).
- Allow the engine to cool down before you place the machine in a room.
To reduce the risk of fire, the machine must be cleaned to remove saw chips, twigs, leaves or surplus grease. -
Containers with cutting residues must not be stored inside rooms.
-
Switch off the engine (see chapter 6.1.2 "Switching off the motor (12)", page 46).
- Allow the device to cool down.
- Remove all traces of saw chips or oil residues.
- If the saw chain is very dirty, remove the saw chain and leave it to soak for a few hours in a container of special cleaner. Then rinse it with clean water and spray with an appropriate anticorrosion product before mounting it on the device again.
- Pull the protective cover over the saw chain before cleaning up the device.
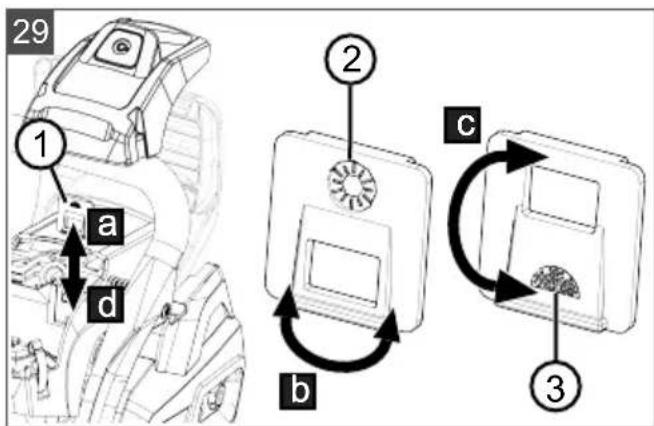
6.3 Changing between normal/summer and winter operation (29)
To prevent the carburettor from icing up at low ambient temperatures (less than 5\ ircC ), it is possible to heat the intake air by positioning the slider insert in winter operation. The slider insert can be accessed directly after removing the air filter cover, using a screwdriver.

IMPORTANT!
Danger of engine damage due to overheating!
If the chain saw is operated at more than 5irc C and the sliding insert is in the Winter position, this can cause it to overheat.
Before operating, check the ambient temperature and, if necessary, adjust the position of the sliding insert.
-
Remove the air filter cover (see chapter 8.1 "Removing/remounting the air filter cover (20)", page 50).
-
Pull the slider insert (29/1) out of the frame (29/a) by hand.
- Turn the slider insert horizontally (29/b):
■ Above 5 °C, i.e. normal/summer operation The sun icon (29/2) must be visible in normal/summer operation.
Below 5 °C, i.e. winter operation: The snowflake icon (29/3) must be visible in winter operation.
- Turn the slider insert vertically (29/c).
- Push the sliding insert into the frame (29/d).
- Mount the air filter cover (see chapter 8.1)
"Removing/remounting the air filter cover (20)", page 50).
7 WORKING BEHAVIOUR AND WORKING TECHNIQUE

DANGER!
Danger of fatal injury due to inadequate technical knowledge!
Inadequate technical knowledge can result in extremely serious up to fatal injury!
■ Only trained and experienced people are allowed to fell trees and lop branches.

DANGER!
Danger of fatal injury from uncontrollable movements of the machine
The moving saw chain develops enormous forces that could lead to the sudden uncontrollable swerving and throwing out of the chain saw.
■ Always hold the chain saw with both hands, the left hand on the front handle and the right hand on the rear handle. Regardless of whether you are left- or right-handed.

DANGER!
Danger of fatal injury due to kick-back!
The operator can be fatally injured by kickback of the appliance.
It is essential to comply with the measures in order to avoid any kick-back.

CAUTION!
Danger to health from inhaling hazardous substances!
The inhalation of lubricating oil steam, exhaust gases and sawdust can lead to health impairments.
■ Always use the prescribed personal protective equipment.

CAUTION!
There is a risk of injury when the chainsaw is blocked
If you try to pull out a cutting apparatus when the cutting apparatus – i.e. the saw chain and guide rail – is blocked while the engine is running, there is a risk of injury and risk of damaging the device.
■ Switch off the engine and pry open the cut (with a wedge, for example), or make a relief cut using a second chain saw or cutting apparatus. Remove the jammed cutting apparatus as soon as the cut opens up.
■ Follow the instructions and procedures stated in the following sections to avoid blocking or jamming of the chainsaw.

NOTE
Courses in the use of chain saws and techniques for felling trees are regularly held by various forestry organisations.
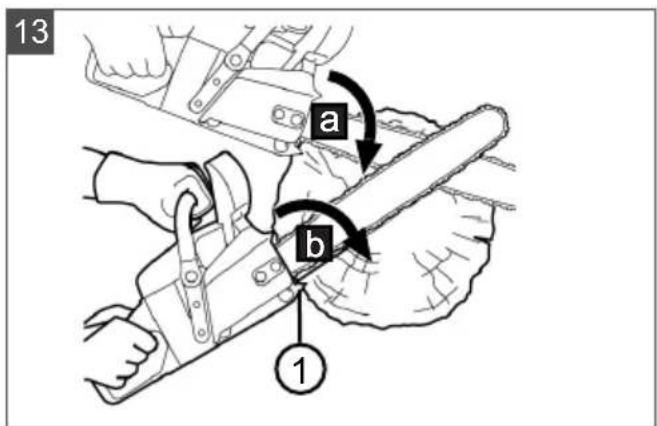
7.1 Using the bumper spike (13)
- Stick the bumper spike (13/1) into the trunk and make an arc motion with the chain saw (13/a) so that the chain saw cuts into the wood.
- Repeat this work step several times, moving the point of contact of the bumper spike (13/b).
7.2 Felling trees (14, 15)

DANGER!
Danger of fatal injury from a falling tree!
Having no escape route when felling a tree represents a danger of serious and even fatal injury!
- Do not start the felling work until you are sure there is an unobstructed escape route away from the tree to be felled.

DANGER!
Danger of fatal injury from an uncontrollably falling tree!
Uncontrolled falling trees can lead to extremely serious and even fatal injury!
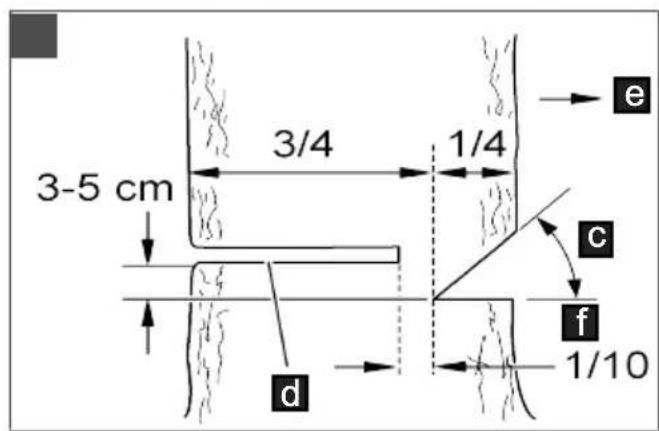
In order to guarantee controlled felling of a tree, leave a bridge between the undercut and the back cut. The length of this bridge should be approx. 1/10 of the trunk diameter.
- Do not carry out any felling work in windy conditions.

NOTE
Only use wedges made from wood, plastic or aluminium.
Take the following measures before starting felling work.
■ Make sure that no other people, animals or objects are in the danger area.
■ The safe distance from other workplaces or objects should be at least 212 tree lengths.
- Watch out for power lines and other people's property. If necessary, notify the power supply company or the property owner.
■ Judge the falling direction of the tree.
Factors influencing the falling direction of the tree:
Natural lean of the tree
Height of the tree
■ Branches growing on one side
Level ground or slope
■ Asymmetrical growth, wood damage
■ Wind direction and wind speed
Snow load
■ When working on a slope, always work uphill of the tree to be felled.
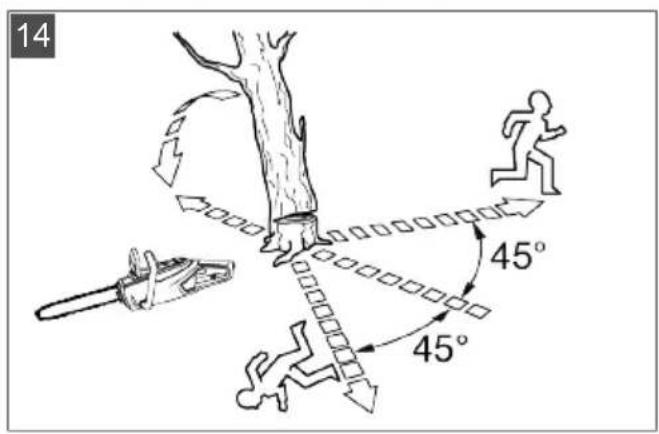
■ Establish your escape route in advance, and make sure that there are no obstacles in the way. The escape route should be at an angle of approx. 45irc diagonally behind the falling direction (14).
The trunk must be free from growth, branches and foreign bodies (e.g. dirt, stones, loose bark, nails, staples, wire, etc.).
Make an undercut a back cut in order to cut down a tree.
- During back cuts and cross-cuts, place the bumper spike firmly against the wood to be cut.
- Saw the first undercut (15/c) horizontally, then the second undercut at an angle of at least 45irc from above. This prevents the chain saw becoming trapped when you make the second undercut. The undercut must be as close as possible to the ground and in the required felling direction (15/E). The depth of the undercut should be about 1/4 of the diameter of the trunk.
-
Cut the back cut (15/d) exactly horizontally opposite to the undercut. The back cut must be made 3-5 cm above the horizontal undercut.
-
Saw in the back cut (15/c) sufficiently deep so that a bridge (15/f) of at least 1/10 the trunk diameter remains between the undercut (15/C) and the back cut (15/d). This bridge prevents the tree from twisting and falling in the wrong direction. The tree should start to fall when the back cut (15/d) approaches the bridge (15/f). If the tree falls whilst you are sawing:
-
Interrupt the back cut if the tree does fall in the wrong direction or leans back and traps the chain saw. To open the cut and fell the tree, drive in wedges in the direction of the required felling line.
-
Immediately pull the chain saw from the cut, switch it off and put it down.
■ Walk away in the direction of the escape route.
■ Watch out for falling branches and twigs. -
If the tree remains standing, drive wedges into the back cut in order to cause it to fall in a controlled way.
-
At the end of sawing work, immediately remove your ear defenders and listen out for signals or warning calls.
7.3 Delimbing (16)
Heed the following points during this work:
- Brace the chain saw against the tree trunk and sequentially cut off the freely accessible branches on the tree trunk, one after the other (16/a). When working on a slope, carry out preparatory work from below to above.
Leave larger, downward-pointing branches supporting the tree standing at first. - Cut off smaller branches with one cut.
Pay attention to branches under tension, and first saw through them a little from above, then from underneath upwards, in order to prevent the chain saw becoming trapped (16/b).
■ First saw free-hanging branches a little from below, then saw entirely through them from above downward (16/c).
■ Only experienced or trained people should make plunge cuts, longitudinal cuts and boring cuts.
7.4 Cross-cutting (17, 18, 19)
Heed the following points during this work:
■ When working on a slope, always stand uphill from the tree trunk, because it could roll away.
■ Guide the chain saw so that there is no part of your body in the extended sweep arc of the saw chain.
■ Positioning the chain on the trunk:
■ Position the bumper spike directly adjacent to the cut edge and allow the chain saw to pivot about this point.
The chain saw can slip sideways or jump easily when it is positioned. This depends on the wood and the condition of the saw chain. For this reason, always hold the chain saw firmly.
At the end of the cut, the chain saw swings due to its own weight because it is no longer supported in the cut. Counteract this in a controlled way and do not apply pressure so the saw chain does not touch the ground.
■ After finishing the cut, wait for the saw chain to come to a halt before you switch off the chain saw.
■ Always switch off the motor of the chain saw before you go to the next tree.
The entire length of the tree trunk is in contact with the ground:
■ Saw through the tree trunk from above, without cutting into the ground (17/a).
Tree trunk is lying raised at one end:
To prevent the chain saw becoming trapped and the wood splintering, first saw through 1/3 of the trunk diameter from below (18/a), then saw through the remainder from above, parallel to the cut made from below (18/b).
Tree trunk is lying raised at both ends:
To prevent the chain saw becoming trapped and the wood splintering, first saw through 1/3 of the trunk diameter from above (19/a), then saw through the remainder from below, parallel to the cut made from above (19/b).
7.5 Cutting converted timber
Heed the following points during this work:
■ Use a secure cutting surface (sawing trestle, wedges, beams).
■ Make sure you are standing securely and that your bodyweight is evenly distributed.
- Secure logs to prevent them twisting.
■ Only start the cut once the saw chain is running. Never switch on the chain saw already in the kerf.
- Do not secure the wood with your foot and do not get another person to hold it.
8 MAINTENANCE AND CARE

DANGER!
Risk of injury or death due to improper maintenance
Maintenance work carried out by unqualified persons and the use of non-approved spare parts can result in serious injuries and even death during operation of the appliance.
- Do not remove or deactivate any safety installations.
■ Use only approved OEM spare parts.
■ Ensure through regular and proper maintenance that the appliance is in a clean and functional condition at all times.

DANGER!
Danger of fatal injury and danger of extremely severe injury.
Danger of fatal injury and danger of extremely severe injury when the engine is switched on.
- Carry out all work with the engine switched off.

CAUTION!
Risk of injury
Sharp-edged and moving appliance parts can lead to injury.
■ Always wear protective gloves during maintenance, care and cleaning work.
■ Correct maintenance is essential to retain the original efficiency and working safety of the machine.
■ Make sure that all nuts and screws are firmly tightened so as to be certain that the machine is always operating under good conditions.
■ Never use the device with worn-out or damaged parts. The damaged parts must be renewed and are never allowed to be repaired.
Prior to the maintenance work:
■ Switch off the engine and let it cool down.
■ Remove the spark plug connector.
■ Wear protective gloves when working on the saw chain.
- Do not remove the chain guard unless you need to work on the guide rail or the chain itself.
■ Dispose of oils, petrol or other contaminating substances according to the regulations.
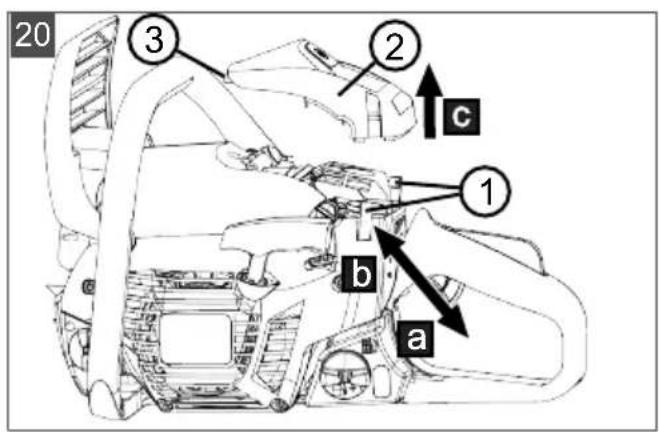
8.1 Removing/remounting the air filter cover (20)
Removing the air filter cover
- Insert a screwdriver between retaining clip (20/1) and air filter cover (20/2).
- Using the screwdriver, push the retaining clips away from the air filter cover (20/a).
- Pull off the air filter cover from the device (20/c).
Mounting the air filter cover
- Push the tab (20/3) of the air filter cover under the housing, then place the air filter cover on the device.
- Press the retaining clips (20/1) onto the air filter cover (20/b) until they snap into place.
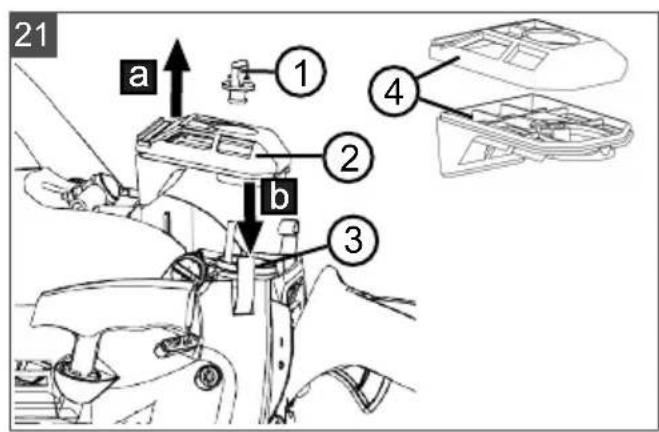
8.2 Cleaning the air filter (21)
IMPORTANT!
Hazard due to dirty, damaged or missing air filter
The device engine can suffer irreparable damage if the air filter is missing, dirty, or defective.
- Cleaning the air filter is a prerequisite for correct operation and a long service life of the device. To prevent damage to the engine, do not work without a filter or if the filter is damaged.
■ Cleaning should be carried out after every 15 hours of machine use.
■ Never wash the filter element; it must always be replaced it if it becomes too dirty or is damaged.
Removing the air filter
- Switch off the engine and let it cool down.
- Remove the air filter cover (see chapter 8.1 "Removing/remounting the air filter cover (20)", page 50).
- Loosen the wing nuts (21/1).
- Pull the air filter (21/2) up and away (21/a).
- Cover the intake opening (21/3) with a clean cloth. This prevents dirt particles from falling into the carburetor space.
- Separate both parts of the air filter (21/4).
Cleaning the air filter
- Clean the nylon filter with a brush or fine bristles; if necessary, blow off particles carefully from the inside to the outside with compressed air.
Mounting the air filter
- Put both parts of the air filter (21/4) back together.
- Place (21/b) the air filter (21/2) on the intake opening (21/3).
- Fasten the air filter tightly with the wing nuts (21/1).
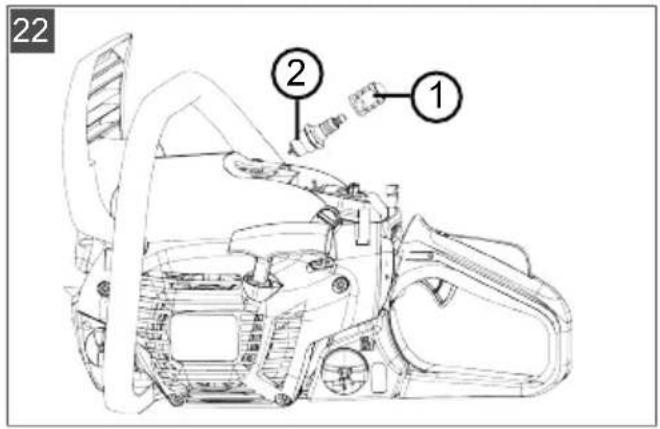
8.3 Checking/replacing the spark plug (22, 23)
In case of damage to the insulation, strong electrode erosion or heavily oil-contaminated electrodes, the spark plug must be replaced.
Preparation
- Switch off the engine and let it cool down.
-
Remove the air filter cover (see chapter 8.1 "Removing/remounting the air filter cover (20)", page 50).
-
Remove the spark plug connector (22/1).
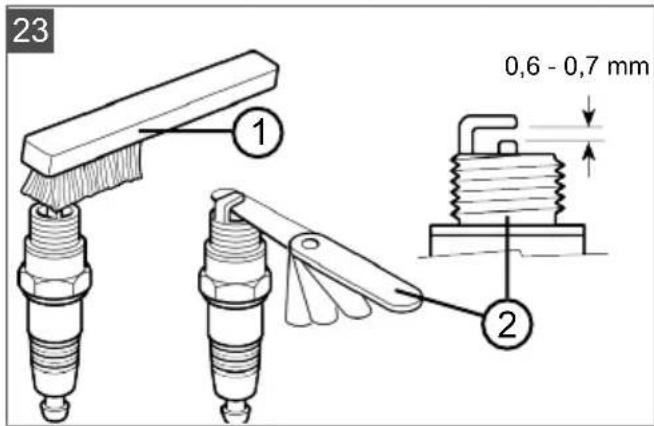
Check the electrode spacing (23)
-
Remove the spark plug (22/2) with the supplied combination wrench.
-
Clean the electrode with a brush (23/1).
-
Measure the distance (23/2). The gap dimension must be 0.6-0.7 mm.
Changing the spark plug
-
Remove the spark plug (22/2) with the supplied combination wrench.
-
Screw in the new spark plug until it stops.
-
Push the spark plug connector onto the spark plug.
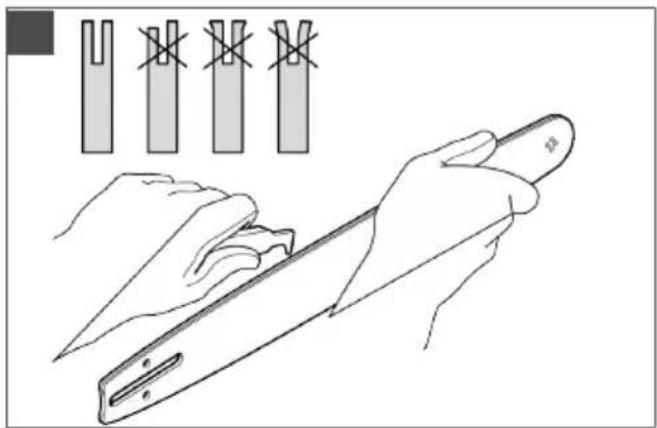
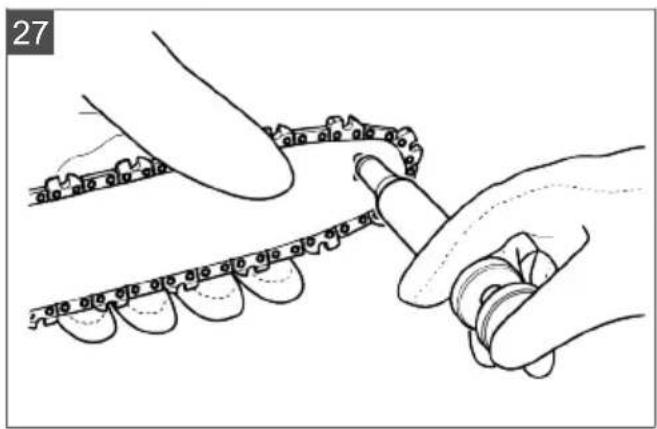
8.4 Guide rail (25, 27)
To prevent asymmetrical wear, the guide rail should be turned around regularly.
The following maintenance work must be carried out:
■ Grease the bearing of the reversing sprocket (27).
■ Clean (25) the groove of the guide rail with a scraper (not included in the scope of supply).
■ Clean the lubrication holes.
■ Use a flat file to remove burrs from the guide flanks and compensate for any deviations between the guides.
The guide rail must be replaced if:
The depth of the groove is less than the height of the pulling link (which is never allowed to touch the base of the groove);
The inner guide wall is worn to such an extent that the chain tilts to the side.
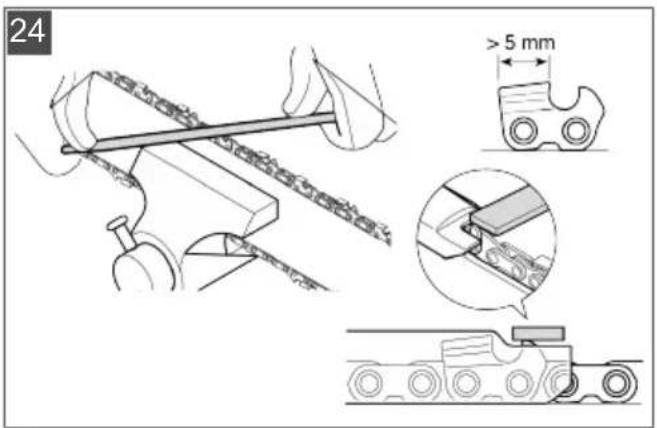
8.5 Sharpening the saw chain (24)

DANGER!
Danger of fatal injury due to kick-back!
Improperly sharpened saw chain increases the danger of kickback and thus the danger of fatal injury.
■ Sharpen the saw chain properly to reduce the risk of kickback.

NOTE
Inexperienced chain saw operators are recommended to have the saw chain sharpened by a specialist at the customer service.
The saw chain must always be well-sharpened for reasons of safety and efficiency.
Sharpening is required if:
■ The saw chips are like sawdust.
■ Greater force is necessary for cutting.
■ The cut is not straight.
■ Vibration increases.
■ Fuel consumption increases.
If you get trained customer service personnel to sharpen the chain for you, they will be able to do this with the appropriate tools for a minimum of material removal and even sharpening of all teeth.
You can sharpen the saw chain yourself using special round files whose diameters are adapted to the specific chain type (see chapter 8.10 "Chain maintenance table", page 53). A certain amount of skill and experience is necessary to avoid damage to the teeth.
To sharpen the saw chain:
-
Switch off the engine, release the chain brake, and clamp the guide rail firmly in a suitable vice with the saw chain mounted, while ensuring that the chain can move freely.
-
Tension the chain if it is slack.
-
Place the file in the corresponding guide and then guide the file through the opening of the tooth making sure that you keep an even angle according to the tooth profile.
-
Only perform a few strokes of the file and exclusively in the forwards direction, then repeat the working step on all teeth in the same orientation (right or left).
-
Reverse the position of the guide rail in the vice and repeat the working step on the remaining teeth.
- Check that the limit tooth does not project beyond the checking tool, and file off any projection using a flat file, then round down the profile.
- After sharpening, clean away all filings and dust, then lubricate the saw chain in an oil bath.
The chain must be renewed if:
■ The length of the teeth is less than 5 mm;
■ Where applicable: The mark on the teeth of the cutting elements is exceeded;
■ The play on the links at the chain rivets is excessive.
8.6 Checking the chain lubrication (26)
Never operate the device without sufficient chain lubrication. Otherwise you reduce the service life of the device. You should therefore check the amount of oil in the oil tank and the oil supply each time before starting work.
- Start the device.
- Hold the running chain saw about 15 cm above a tree stump or a suitable foundation.
A light oil film should form on the tree stump (26/1) if there is sufficient lubrication.
8.7 Adjusting the chain lubrication (28)

DANGER!
Danger of fatal injury and danger of extremely severe injury.
Danger of fatal injury and danger of extremely severe injury when the engine is switched on.
- Carry out all work with the engine switched off.
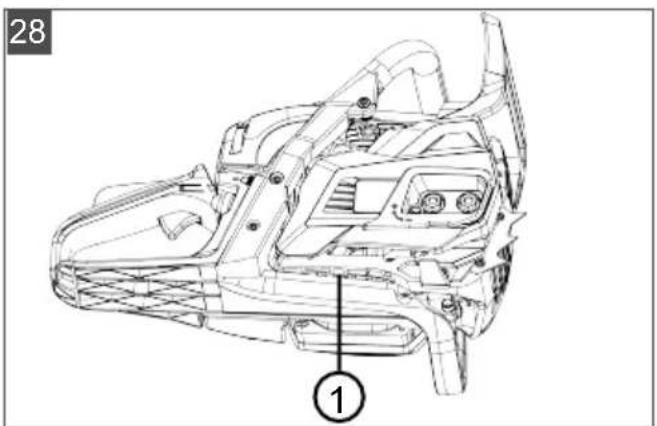
The oil supply rate can be adjusted with an adjusting screw. The adjusting screw is on the bottom of the device (28/1).
Use a small screwdriver to adjust the supply rate:
■ Turn it clockwise to decrease the supply rate
■ Turn it counterclockwise to increase the supply rate
When working, you should regularly check whether there is sufficient oil present in the oil tank.
8.8 Checking a standstill when the saw chain is running in idle

WARNING!
Danger from moving saw chain
A saw chain moving at idling speed can cause life-threatening injuries when working.
■ Never work with the chain saw when the saw chain is moving at idling speed.
Before every use, check that the saw chain is at a standstill if the engine is running at idling speed.
- Start the engine and let it run at idling speed.
- Check that the saw chain is stationary.
- If the saw chain is moving, the following errors could be present:
- Idle speed is too high (see chapter 8.9 "Setting the idling speed on the carburettor", page 52).
The coupling is defective, contaminated or incorrectly set. Contact an AL-KO service centre.
8.9 Setting the idling speed on the carburettor
The idling speed is specified in the technical data (see chapter 13 "Technical data", page 56). It is best adjusted with the aid of a speed counter.
If the idling speed is correctly set, the engine runs round at idling speed and the saw chain does not move. Depending on the operating location (mountain, lowland), the idling setting must be corrected using the "T" idling speed stop screw.

NOTE
The regulating screws "L", for idle fuel mixture, and "H", full load mixture, may only be adjusted by an AL-KO service station.
The saw chain moves without the throttle being applied:
The idling speed is too high.
- Turn the "T" idling stop screw (11/5) anti-clockwise a little until the saw chain no longer moves.
The engine continually dies if the throttle is not applied:
The idling speed is too low.
- Turn the "T" idling stop screw (11/5) clockwise a little until the engine runs smoothly. If the optimum carburettor setting cannot be adjusted by turning the "T" idling speed stop screw, have the carburettor optimally adjusted by an AL-KO service station.
8.10 Chain maintenance table

WARNING!
Danger of serious injury.
Use of an unapproved saw chain or guide rail on the chain saw can result in serious injuries.
■ Use only approved saw chains and guide rails.
The table shows the values for different chain types.
| Chain type File diameter Top plate angle | Down angle Head tilt angle (55°) | Depth gauge setting | ||
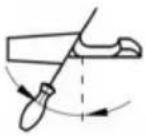 | 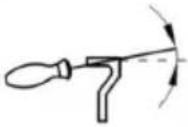 | 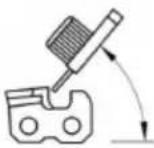 | ||
 | Rotational angle of the tool | Inclination angle of the tool | Side plate angle | |
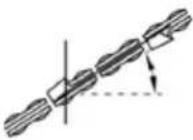 | 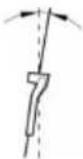 | 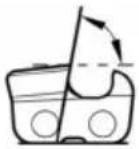 | ||
| 91P053X 5/32" | 30° 0° 80° 0.025" | |||
| 91P057X 5/32" | 30° 0° 80° 0.025" | |||
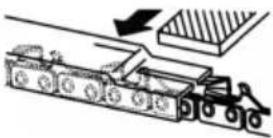 Depth gauge setting File Depth gauge setting File | 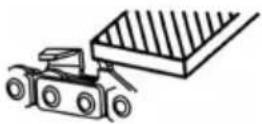 | |||
8.11 Maintenance schedule
The following jobs may be carried out by the user. All other work must only be carried out by a specialist service centre.
The following information relates to normal application conditions. Under special conditions such as working for a particularly long time, the specified maintenance intervals will have to be shortened accordingly.
Maintenance schedule
| One-time after 5 operating hours | Before starting work | Every week | Every 50 operating hours | Every 100 operating hours | As required | Before/after the season, annually | |
| Carburettor | |||||||
| Check idling speed X | |||||||
| Air filters | |||||||
| Clean X | |||||||
| Renew X | |||||||
| Spark plug | |||||||
| Check electrode gap, adjust if necessary | X | X | |||||
| Renew X X | |||||||
| Silencer | |||||||
| Visual inspection for condition | X | ||||||
| Fuel tank, oil tank | |||||||
| Clean X X | |||||||
| Chain brake | |||||||
| Functional check X | |||||||
| Clean, grease articulation points | X | X | |||||
| Chain lubrication | |||||||
| Check X X | |||||||
| Saw chain | |||||||
| Visual check for condition, check sharpness | X | ||||||
| Resharpen X X | |||||||
| Renew, if necessary renew the chain sprocket as well and grease the chain sprocket bearing | X | ||||||
| Chain bar | |||||||
| Visual inspection for condition | X | ||||||
| Turn over the guide rail X | |||||||
| Grease the reversing sprocket | X |
Maintenance schedule
| One-time after 5 operating hours | Before starting work | Every week | Every 50 operating hours | Every 100 operating hours | As required | Before/after the season, annually | |
| Clean the chain groove/oil hole | X | ||||||
| Clean the inside of the protective cover | X | ||||||
| All accessible screws(except set screws) | |||||||
| Retighten X X X | |||||||
| Complete machine | |||||||
| Visual inspection for condition | X | ||||||
| Clean (including air inlet, cylinder cooling vanes) | X X X |
9 HELP IN CASE OF MALFUNCTION

CAUTION!
Risk of injury
Sharp-edged and moving appliance parts can lead to injury.
■ Always wear protective gloves during maintenance, care and cleaning work.

NOTE
If you encounter any malfunctions that are not listed in this table or that you cannot rectify yourself, please contact our customer service.
| Malfunction Cause Remedy | ||
| The engine cannot be started or dies immediately. | Incorrect operation Start the engine as described in these operating instructions. | |
| Dirty spark plug or faulty electrode gap | Clean or replace the spark plug. | |
| Dirty air filter Clean or replace the air filter | ||
| The guide rail and saw chain become hot when running. Generation of smoke. | The saw chain is tensioned too tightly. | Reduce chain tension. |
| Oil tank is empty. Replenish the saw chain oil. | ||
| The oil entry hole and/or groove of the guide rail are dirty. | Clean the oil entry hole and groove of the guide rail. | |
| Engine running, but the saw chain does not move. | The saw chain is tensioned too tightly. | Reduce chain tension. |
| Device errors Contact an AL-KO service centre. | ||
| Only sawdust is thrown out, rather than wood chips. The chain saw has to be pushed through the wood. | The saw chain is blunt. Sharpen the saw chain or contact an AL-KO service centre. | |
| Device vibrates unusually. Device errors Contact an AL-KO service centre. | ||
10 TRANSPORT

WARNING!
Danger of fatal injury and danger of extremely severe injury.
During transport, a running saw chain can lead to extremely serious and even fatal injury.
■ Never carry and transport the chain saw with the saw chain running.
■ Before transporting, carry out the measures mentioned above.
Before transporting, carry out the following measures:
- Switch off the engine.
- Allow the device to cool down.
-
Remove all traces of saw chips or oil residues.
-
Pull the protective cover over the guide rail. Only carry the chain saw using the handle. When doing this, the guide rail points to the rear.
In vehicles: Secure the chain saw against tipping over, damage and leakage of service products.
11 STORAGE
Thoroughly clean the appliance after each use and – if present – attach all covers. Store the appliance in a dry, lockable place out of the reach of children.
Carry out the following jobs before intervals in work lasting for longer than 30 days:
- Completely drain the fuel and oil.
- Remove the saw chain and guide rail, clean it and spray it with rust-proofing oil.
- Thoroughly clean the device and store it in a dry place.
IMPORTANT!
Danger of damage to the appliance
Dried-on/sticky saw chain oil can lead to damage to oil-channelling components after lengthy storage.
■ Remove the saw chain oil from the appliance before an extended period of storage.
12 DISPOSAL

■ Before disposing of the device you must empty the fuel tank and the engine oil tank!
- Petrol and motor oil do not belong in household waste or the public sewer system, but should be collected and disposed of separately.
Packaging, equipment and accessories are made from recyclable materials, and must be disposed of accordingly.
13 TECHNICAL DATA
| Type 6436 6442 | ||
| Item no. 127429 127430 | ||
| Engine type 2-stroke 2-stroke | ||
| Engine displacement 35.2 cm3 41.9 cm3 | ||
| Maximum engine power in kW (according to ISO 7293) | 1.45 | 1.7 |
| Easy Start system | Yes / primer | Yes / primer |
| Idle speed | 3000 ± 400 min-1 | 3000 ± 400 min-1 |
| Maximum speed | 12000 min-1 | 12000 min-1 |
| Fuel Lead-free petrol | with at least 90 RON | Lead-free petrol with at least 90 RON |
| Mixing ratio 1:50 1:50 | ||
| Volume of fuel tank 270 cm | 3 | 270 cm3 |
| Oil tank volume 230 cm | 3 | 230 cm3 |
| Guide rail: | ||
| ■ Type Oregon | 140SDEA041 | Oregon 160SDEA041 |
| ■ Length/effective cutting length 35/33 cm 40/37 cm | ||
| Chain sprocket: | ||
| ■ Number of teeth 6z/6T 6z/6T | ||
| ■ Pitch 3/8" 3/8" | ||
| Saw chain: | ||
| ■ Type Oregon | 91P053X | Oregon 91P057X |
| ■ Pitch 9.525 mm (3/8") 9.525 mm (3/8") | ||
| ■ Driving link width | 1.27 mm (0,05") | 1.27 mm (0,05") |
| Maximum chain speed | ≤22.86 m/s | ≤22.86 m/s |
| Chain guard | Yes / automatic | Yes / automatic |
| Weight of the chain saw when the tanks are empty: | ||
| ■ Weight with guide rail and saw chain | 5.38 kg | 5.45 kg |
| ■ Weight without guide rail and saw chain | 4.75 kg | 4.75 kg |
| Sound pressure level LpA (as per DIN EN ISO 22868) | 101.1 dB(A) [K = 3.0 dB(A)] | 101.5 dB(A) [K = 3.0 dB(A)] |
| Sound power level LwA (as per DIN EN ISO 22868) | 109.9 dB(A) [K = 3.0 dB(A)] | 110.0 dB(A) [K = 3.0 dB(A)] |
| Equivalent total vibration value (as per DIN EN ISO 22867): | ||
| Front handle (K = 1.5 m/s2 ) | 6.57 m/s2 | 6.47 m/s2 |
| Rear handle (K = 1.5 m/s2 ) | 6.88 m/s2 | 6.96 m/s2 |
14 AFTER-SALES / SERVICE
In the event of questions of warranty, repair or spare parts, please contact your nearest AL-
KO Service Centre. These can be found on the Internet at:
www.al-ko.com/service-contacts
15 GUARANTEE
We will resolve any material or manufacturing faults on the appliance during the legal warranty period for claims relating to faults, in accordance with our choice either to repair or replace. The legal warranty period is determined by the legislation of the country in which the appliance was purchased.
Our warranty promise applies only if:
■ These operating instructions are heeded
■ The appliance is handled correctly
■ Original spare parts have been used
The warranty becomes void in the case of:
■ Unauthorised repair attempts
■ Unauthorised technical modifications
Non-intended use
The guarantee excludes:
■ Paint damage that can be attributed to normal wear and tear
■ Wear parts that are marked with a frame (x) on the spare parts card
■ Internal combustion engines (these are covered by the guarantee provisions of the corresponding engine manufacturers)
The guarantee period commences with purchase by the first end user. The date on the proof of purchase is decisive. In the event of a guarantee claim, please take this guarantee declaration and the original proof of purchase, and contact your dealer or the nearest authorised customer service centre. This statement does not affect the purchaser's statutory claims for defects against the vendor.
16 TRANSLATION OF THE ORIGINAL EU DECLARATION OF CONFORMITY
We hereby declare that this product in its marketed form conforms to the requirements of the harmonised EU Directives, EU safety standards and the product-specific standards.
| Product | Manufacturer | Duly authorised person for technical file |
| Chain saw | AL-KO Geräte GmbH | |
| Serial number | Ichenhauser Str. 14 | Andreas Hedrich |
| G4011022 | D-89359 Kötz | Ichenhauser Str. 14 |
| Germany | D-89359 Kötz | |
| Germany | ||
| Type | EU directives | Harmonised standards |
| 6436 | 2006/42/EC | DIN EN ISO 11681-1:2011 |
| 6442 | 2014/30/EU | DIN EN ISO 14982:2009 |
| 2000/14/EC | ||
| Sound power level | Conformity evaluation | |
| EN ISO 3744 | 2000/14/EC – Appendix V | |
| measured/guaranteed | ||
| 6436: 109.9 / 113 dB(A) | ||
| 6442: 110.0 / 113 dB(A) | ||
| Type examination as per | Notified body | Kötz, 11/01/2018 |
| 2006/42/EC Annex IX | Intertek Deutschland GmbH | |
| BM 18SHW0351-01 | Stangenstraße 1 | Wolfgang Hergeth |
| D-70771 Leinfelden-Echterdingen | ||
| Germany | Dr. Wolfgang Hergeth | |
| No. 0905 | Managing Director |
VERTALING VAN DE ORIGINELE GEBRUIKERSHANDLEIDING Inhoudsopgave
14 Klantenservice/service centre 84
15 Garantie....84
2 PRODUCTOMSCHRIJVING
Nr. Component
N° Pièce
1 Guide-chaîne
2 Chaîne coupante
www.al-ko.com/service-contacts
15 GARANTIE
Dr. Wolfgang Hergeth Managing Director
N.° Componente
www.al-ko.com/service-contacts
15 GARANTÍA
Dr. Wolfgang Hergeth Managing Director
TRADUZIONE DEL MANUALE PER L'USO ORIGINALE
Sommario
N. Componente
www.al-ko.com/service-contacts
15 GARANZIA
Št. Sestavni del
1 Meč
2 Veriga
3 Bencinska verižna žaga
14 SERVISNA SLUŽBA/SERVIS
www.al-ko.com/service-contacts
15 GARANCIJA
Br. Dio
| 1 Vodilica |
| 2 Lanac pile |
| 3 Benzinska lančana pila |
| 4 Zaštitni pokrov vodilice |
| 5 Turpije |
| 6 Odvijač |
| 7 Kombinirani ključ |
| 8 Upute za uporabu |
2.7 Pregled proizvoda (01)
| Br. Dio |
| 1 Vodilica |
| 2 Lanac pile |
| 3 Prednji štitnik za ruke |
| 4 Prednja poluga ručke |
| 5 Poklopac filtra za zrak |
| 6 Sigurnosne spojnice poklopca filtra zraka |
| 7 Poluga gasa |
| 8 Tipka za sigurnosnu blokadu |
| 9 Stražnja poluga ručke |
| 10 Pregibna tipka za isključivanje motora, samostalno se vraća |
Br. Dio
| 11 Spremnik goriva |
| 12 Okretni gumb prigušnice (za hladno pokretanje) |
| 13 Ručica aktivatora |
| 14 Spremnik ulja |
| 15 Zaštitni pokrov vodilice |
| 16 Granična kandža za drvo |
| 17 Pričvrsne matice za vodilicu |
| 18 Vijak za prilagođavanje zatezača lanca |
| 19 Pričvršćenje vodilice |
| 20 Kugla primera |
| 21 Upute za uporabu |
3 SIGURNOSNE NAPOMENE
www.al-ko.com/service-contacts
15 JAMSTVO
Možebitne greške u materijalu ili proizvodnji na uređaju uklonit ćemo tijekom zakonskoga roka zastare za jamstvo na nedostatke prema vlastitom izboru popravljanjem ili zamjenskom dostavom. Rok zastare određuje se prema pravu države u kojoj je uređaj kupljen.
| 2000/14/EZ – Prilog V |
Nadležna ustanova
Dr. Wolfgang Hergeth Managing Director
TŁUMACZENIE ORYGINALNEJ INSTRUKCJI OBSŁUGI
Spis treści
Nr elementu
Dr. Wolfgang Hergeth Managing Director
PŘEKLAD ORIGINÁLNÍHO NÁVODU K POUŽITÍ
Obsah
Č. Součást
www.al-ko.com/service-contacts
15 ZÁRUKA
Dr. Wolfgang Hergeth Managing Director
PREKLAD ORIGINÁLNEHO NÁVODU NA POUŽITIE
Obsah
1 O tomto návode na použitie.... 267
1.1 Symboly na titulnej strane 267
1.2 Vysvetlenie symbolov a signálne slová.. 267
2 Popis výrobku 267
2.1 Používanie v súlade s určením ..... 267
2.2 Možné predvídatel'né chybné použitie267
2.3 Zvyškové riziká.... 268
2.4 Bezpečnostné a ochranné zariadenia 268
2.5 Symboly na zariadenie.... 268
2.6 Rozsah dodávky.... 269
2.7 Prehl'ad výrobku (01)...... 269
www.al-ko.com/service-contacts
15 ZÁRUKA
Sz. Alkatrész
14 Kundeservice/service ....339
15 Garanti....340
www.al-ko.com/service-contacts
15 GARANTI
Dr. Wolfgang Hergeth
Managing Director
Dr. Wolfgang Hergeth
Managing Director
OVERSETTELSE AV DEN ORIGINALE BRUKSANVISNINGEN Innhold
14 Kundeservice/service 387
15 Garanti....387
7 ARBEIDSFREMTREDEN OG ARBEIDSTEKNIKK

FARE!
8 VEDLIKEHOLD OG PLEIE

FARE!
Livsfare pga. feil vedlikehold
www.al-ko.com/service-contacts
15 GARANTI
Dr. Wolfgang Hergeth Managing Director
KÄÄNNÖS ALKUPERÄISESTÄ KÄYTTÖOHJEESTA
Sisällysluettelo
Nro Osa
www.al-ko.com/service-contacts
15 TAKUU JA TUOTEVASTUU
www.al-ko.com/service-contacts
15 GARANTIE
Nr. Detaja
1 Vadsliede
2 Zāga kēde
BRĪDINĀJUMS! Smagu traumu risks.
www.al-ko.com/service-contacts
15 GARANTIE
www.al-ko.com/service-contacts
15 ГАРАНТИЯ
Dr. Wolfgang Hergeth Managing Director
www.al-ko.com/service-contacts
15 ГАРАНТИЯ
No. Yapı parçası
www.al-ko.com/service-contacts
15 GARANTI




- Inhaltsverzeichnis
- GARANTIE
- ABOUT THESE OPERATING INSTRUCTIONS
- Symbols on the title page
- Symbol Meaning
- Legends and signal words
- DANGER!
- WARNING!
- CAUTION!
- IMPORTANT!
- NOTE
- PRODUCT DESCRIPTION
- Intended use
- Possible foreseeable misuse
- Residual risks
- Safety and protective devices
- Danger of serious injury from manipulated safety and protective devices
- Protective cover of the guide rail
- Chain brake
- Safety locking switch
- Symbols on the appliance
- Scope of supply
- SAFETY INSTRUCTIONS
- Safety instructions for chain saws
- Causes and operator prevention of kickback
- Safety information when working
- Operator
- Operating times
- Working with the chain saw
- Danger of serious injury.
- Vibration load
- Danger due to vibration
- Noise pollution
- Handling of petrol and oil
- DANGER! Risk of explosion and fire
- Safety of persons, animals and property
- ASSEMBLY
- Assembly of the guide rail and the saw chain (02 to 06)
- START-UP
- Fuel
- Danger of damage to the appliance
- Suitable oil
- Suitable petrol
- Mixing fuel
- Risk of explosion and fire
- Danger of engine damage
- Chain lubricant
- Danger of environmental damage
- Filling with service products (07)
- Filling with fuel
- Filling saw chain oil
- Check the chain tension (06, 08)
- Danger of fatal injury and danger of extremely severe injury.
- Tightening the saw chain
- Checking the chain brake (09)
- OPERATION
- Switching the engine on and off
- Starting the engine (10, 11)
- Cold start
- Warm start
- Switching off the motor (12)
- At the end of a work session
- Risk of injury by cutting
- Danger of fire
- Changing between normal/summer and winter operation (29)
- Danger of engine damage due to overheating!
- WORKING BEHAVIOUR AND WORKING TECHNIQUE
- Using the bumper spike (13)
- Felling trees (14, 15)
- Danger of fatal injury from a falling tree!
- Danger of fatal injury from an uncontrollably falling tree!
- Delimbing (16)
- Cross-cutting (17, 18, 19)
- Cutting converted timber
- MAINTENANCE AND CARE
- Risk of injury or death due to improper maintenance
- Risk of injury
- Removing/remounting the air filter cover (20)
- Removing the air filter cover
- Mounting the air filter cover
- Cleaning the air filter (21)
- Hazard due to dirty, damaged or missing air filter
- Removing the air filter
- Cleaning the air filter
- Mounting the air filter
- Checking/replacing the spark plug (22, 23)
- Preparation
- Check the electrode spacing (23)
- Changing the spark plug
- Guide rail (25, 27)
- Sharpening the saw chain (24)
- Danger of fatal injury due to kick-back!
- Checking the chain lubrication (26)
- Adjusting the chain lubrication (28)
- Checking a standstill when the saw chain is running in idle
- Danger from moving saw chain
- Setting the idling speed on the carburettor
- The saw chain moves without the throttle being applied:
- The engine continually dies if the throttle is not applied:
- Chain maintenance table
- Maintenance schedule
- HELP IN CASE OF MALFUNCTION
- TRANSPORT
- STORAGE
- DISPOSAL
- TECHNICAL DATA
- AFTER-SALES / SERVICE
- GUARANTEE
- Our warranty promise applies only if:
- The warranty becomes void in the case of:
- The guarantee excludes:
- TRANSLATION OF THE ORIGINAL EU DECLARATION OF CONFORMITY
- VERTALING VAN DE ORIGINELE GEBRUIKERSHANDLEIDING Inhoudsopgave
- PRODUCTOMSCHRIJVING
- GARANTÍA
- TRADUZIONE DEL MANUALE PER L'USO ORIGINALE
- Sommario
- GARANZIA
- SERVISNA SLUŽBA/SERVIS
- GARANCIJA
- Pregled proizvoda (01)
- SIGURNOSNE NAPOMENE
- JAMSTVO
- TŁUMACZENIE ORYGINALNEJ INSTRUKCJI OBSŁUGI
- Spis treści
- PŘEKLAD ORIGINÁLNÍHO NÁVODU K POUŽITÍ
- Obsah
- ZÁRUKA
- PREKLAD ORIGINÁLNEHO NÁVODU NA POUŽITIE
- GARANTI
- OVERSETTELSE AV DEN ORIGINALE BRUKSANVISNINGEN Innhold
- ARBEIDSFREMTREDEN OG ARBEIDSTEKNIKK
- FARE!
- VEDLIKEHOLD OG PLEIE
- Livsfare pga. feil vedlikehold
- KÄÄNNÖS ALKUPERÄISESTÄ KÄYTTÖOHJEESTA
- Sisällysluettelo
- TAKUU JA TUOTEVASTUU
- BRĪDINĀJUMS! Smagu traumu risks.
- ГАРАНТИЯ
Brand : AL-KO
Model : Solo 6436
Category : Saw