USER MANUAL ABM P135 L Lescha
text_image
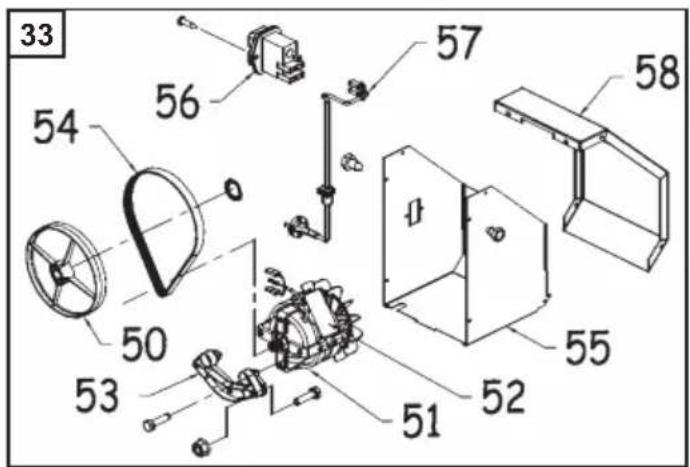
Technical diagram of a mechanical assembly with numbered components and labeled parts, including a fan, wheel, and housing.

text_image
33
54
56
57
58
50
53
51
52
55
| TECHNICAL DATA | ABM P 135L |
| Drum capacity | L | 130 |
| Maximum mixing capacity | L | 110 |
| Single phase motor 230V/50Hz Used power | W | 600 |
| Length | mm | 1220 |
| Width | mm | 700 |
| Height | mm | 1280 |
| Wheels | ø mm | 160 |
| Weight | kg | 48 |
text_image
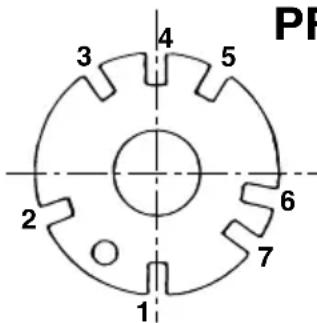
PF
1
2
3
4
5
6
7
PRODUCTION OF CONCRETES ANS MORTARS
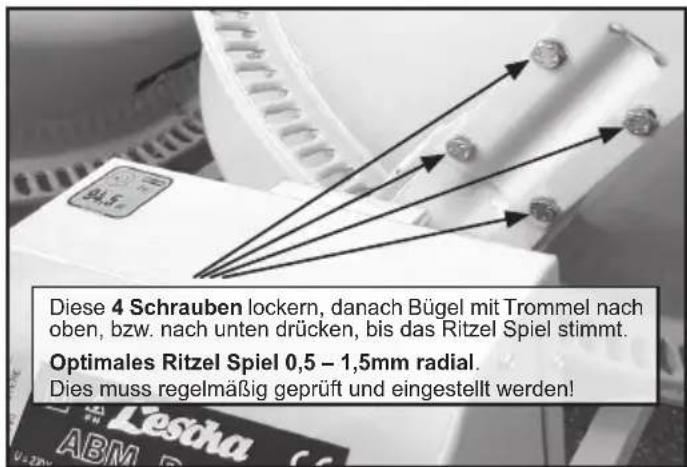
The tilting disk has 7 different notches
Position 1 Opening of the drum upward.
Position 2 Mixing on lefthand side.
Position 3 Emptying on lefthand side and storing.
Position 4 Opening of the drum downward.
Position 5 Emptying on righthand side and storing.
Position 6 et 7 Mixing on righthand side.
| Batch for usual concrete and mortar (with one 25 kg cementbag). |
 | Sand |  | Gravel |  |  Wat Wat |
| Concrete | 30 L | 60 L | around13 L |
| Mortar | 60 L | - | around13 L |
- Set the drum at the selected angle (on one side or the other). The angle the nearest to the horizontal will provide a better mixing of the aggregates, but will reduce the capacity.
- Put some water into the drum, spread the right quantity of cement over the aggregates (gravel or sand), and load the drum. Add some water while loading.
- The enclosed chart will guide you in the proportions of your works. The quantity of water is given as an indication only; it will depend on the degree of humidity of the aggregates. These proportions are given as information only, and
cannot engage the responsibility of the manufacturer.
- 1 shovel = 4 litres, 1 wheelbarrow = 60 litres.
- Let the drum turn during one minute or so, in order to obtain a good mix. Do not continue the mixing beyond two minutes otherwise you will centrifugate the materials.
The above sizes are for your information and cannot engage the responsibility of the manufacturer.
text_image
GB
8
29
25
10
7
1
1*
2
3
4
5
22
23
24
26
27

text_image
33
54
56
57
58
50
53
51
52
55
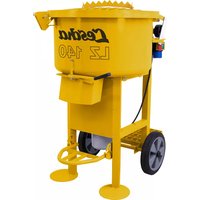
Install the mixer on a hard and horizontal soil in order to ensure a good stability to the machine.
Clear the surroundings of the machine from all thing likely to occasion a risk of accident or to impede the operator.
◆ Before starting your mixer make sure that : Electric driven mixer
- The tension of the network is 230 volts on two wires.
- Minimum capacity of the meter should be 5 Amps.
• The motor hood set benefits from double insulation class II protection grade IP 44.
- Foresee a two wires supply cable having a section of 2,5 mm2 for a maximum length of 50 m (equipment class II no need for a ground wire). If length is more than 50 m, foresee a cable with a bigger section.
SAFETY INSTRUCTIONS General
Before starting your mixer, check that :
- all protection devices are in position and good condition.
- Nobody is into contact or close to the mixer, and no tool is leaning against it.
- Never let a cable rolled on its support, this will cause impodant drops of tension and lead to overheating.
- The line must be fitted with fuses or circuit breaker to ensure the protection.
- Do not plug in and use the electric motor without making sure that the motor hood is closed.
MAINTENANCE
• After each use, clean the inside and the outside of your mixer. If you wash it with a high pressure cleaner, make sure that the water projections do not reach the motor.
- For a good and efficient leaning of the drum, use a shovel of gravels and water.
- Do not forget from time to time to grease the bearing of the bracket, a hole is foreseen for this.
- The bearings of the drum and of the driving axle are greased for life.
- The slew ring is made of synthetic material, high resistance, unalterable, maintenance and greasing free, which participates efficiently to the reduction of sound nuisances.
SAFETY INSTRUCTIONS
• The operator must wear appropriate shoes and working clothes.
- Do not put hands, head or any tool inside the drum while it is running.
- Never operate the mixer without its protections.
- Never open the hood of the electric motor while the latter is running.
- Stop and unplug your mixer before proceeding to any kind of interventions.
- Use your mixer only to mix materials for construction (any other mixing of chemical or food products is not recommended).
- Never replace a part by a non-genuine one.
Unplug the supply cable before every cover opening. The appliance must be used only when all protections are setting.
Be careful! Doubly insulated machine. During repairs, class II keeps preserved only when origin parts are used and insulation distances remain unchanged.
Maintenance
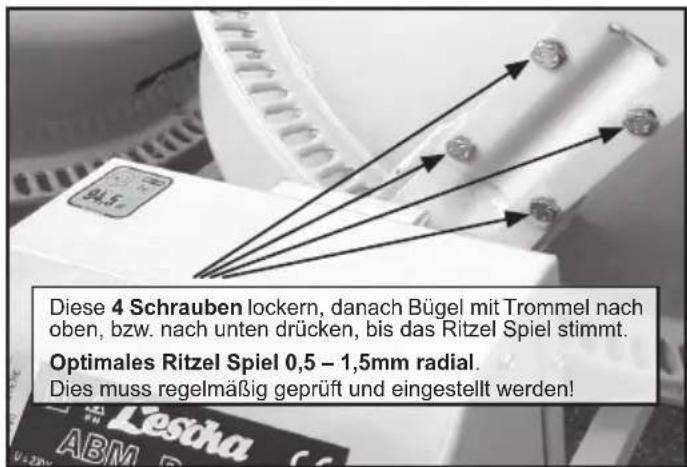
The pinion driving the drum is a wearing part of your mixer. In order to avoid any immobilization, it is recommended to foresee a replacement beforehand.
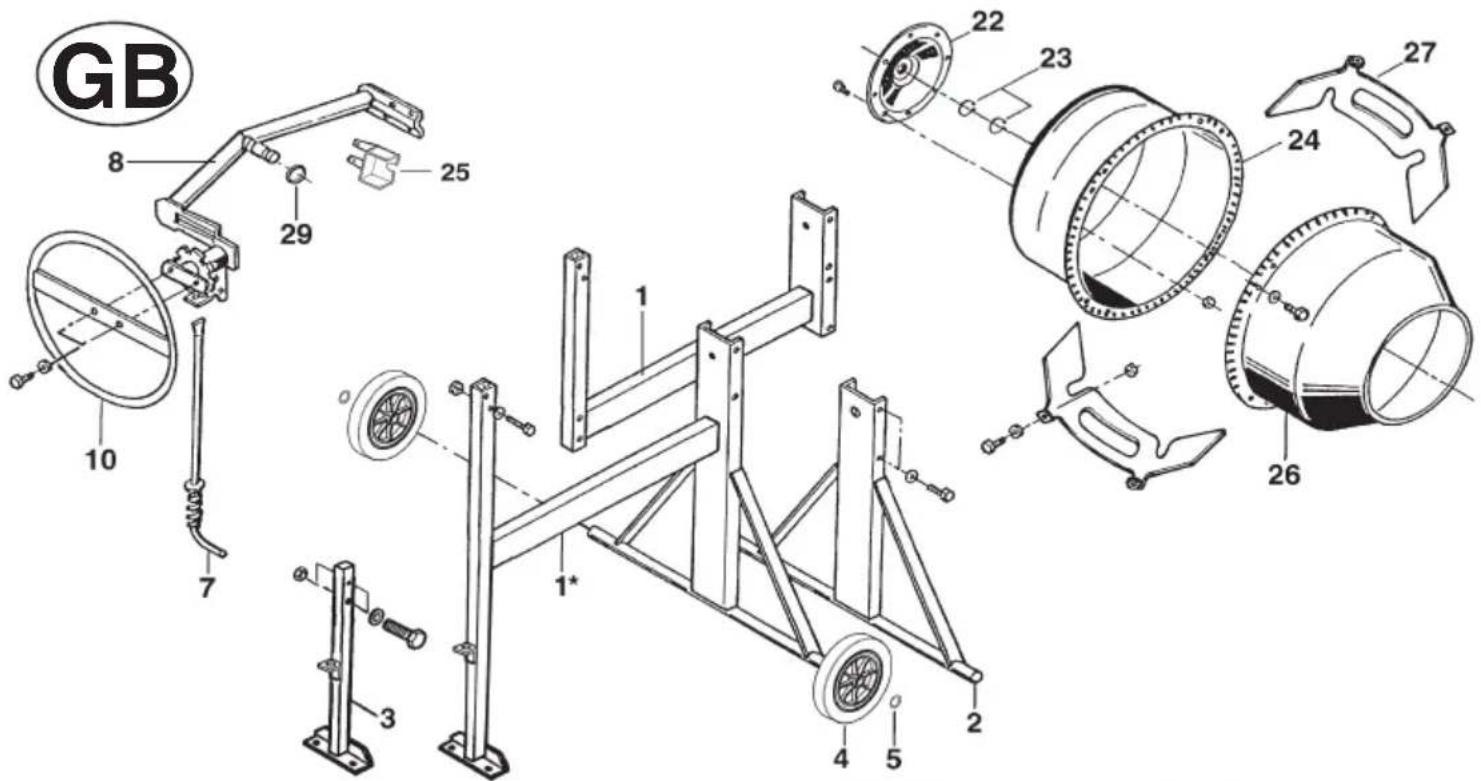
■ SPARE PARTS
For all orders, contact the nearest dealer, and specify the type and serial number of your mixer (plate on engine hood).
Indicate the quantity, the designation, and the number of the parts you need.
■ MODIFICATION OF THE PRODUCT
With the aim to constantly improve the quality and the efficiency of our products, we reserve the right to modify, at any moment and without prior notice, the product as described hereby.
WARRANTY
The manufacturer warranties your mixer for a period of 12 MONTHS as from the date of purchase. This warranty covers the free remplacement of the parts which will be acknowledged as defective, as the result of a default in the construction or a default in the material. The manufacturer reserves the right to make a valuation of the defective pieces. No warranty will apply to failures caused by : an improper handling or manoeuvring, a bad use, the use of non genuine spare parts, or a bad maintenance. The warranty of the engines is ensured by the manufacturer of those.
The manufacturer takes no responsibility in the event of failure to respect the safety instructions and utilization rules.
UTILIZZO - MANUTENZIONE - RICAMBI BETONIERE ABM P 135L

text_image
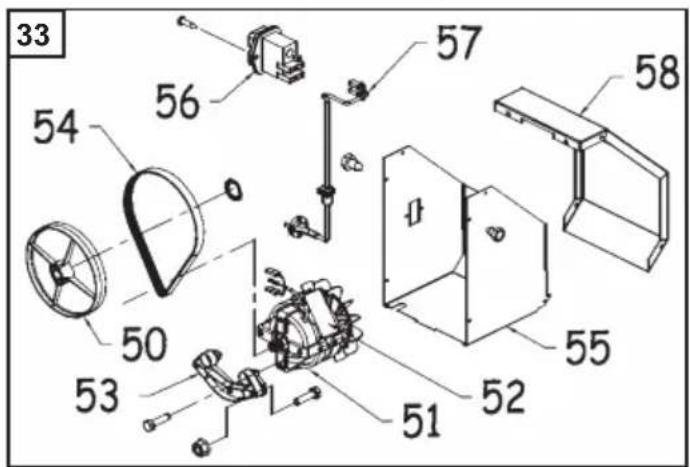
Technical diagram of a mechanical assembly with numbered components and exploded view, likely for assembly or maintenance purposes.
text_image
33
54
56
57
58
50
53
51
52
55

text_image
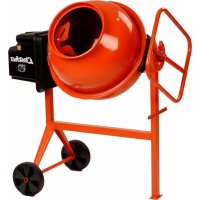
R1
C
R2
N L1
18
A
01
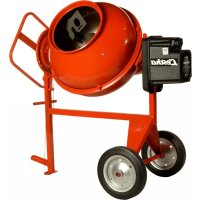
GEBRUIK - ONDERHOUD - ONDERDELEN BETONMOLEN ABM P 135L

| TECHNISCHEEIGENSCHAPPEN | ABM P 135L |
| Kapaciteit van den Kuip liter 130 Kapaciteit van den menging liter 110 | |
| Elektrisch motor 230V/50Hz | W 600 | |
| Lengte | mm | 1220 |
| Breedte | mm 700 | |
| Hoogte | mm | 1280 |
| Wielen | ø mm 160 | |
| Gewicht van de elektrisch motor | kg | 48 |

text_image
3
4
5
2
6
7
1
FABRIKATIE VAN BETONS EN MORTELS :
- 1 schop = 4 liter - 1 kruiwagen = 60 liter.
text_image
Technical diagram of a mechanical assembly with numbered components and labeled parts, including a magnified view of the component.

text_image
33
54
56
57
58
50
53
51
52
55

text_image
Technical diagram of a mechanical assembly with numbered parts and a compass, labeled with numbers 1 to 29.

text_image
33
54
56
57
58
50
53
51
52
55

text_image
Technical diagram of a mechanical assembly with numbered parts, likely an engine or motor assembly.
text_image
33
54
56
57
58
50
53
51
52
55

■MODYFIKACJE PRODUKTU
Wedeclareunderoursoleresponsibility, that this product is in accordance with the following directives: 2006/42/EG, 2006/95/EG and 2004/108/EG.