
MAFS 40 - Multitools METABO - Free user manual and instructions
Find the device manual for free MAFS 40 METABO in PDF.

| Product type | Accessory for multi-tool (brushcutter) |
| Brand | Metabo |
| Model | MAFS 40 |
| Power supply | CAS battery (Cordless Alliance System) - not included |
| Main functions | Lawn mowing, cleaning, removal of tough grass, scrub and thorn hedges (with undergrowth blade) |
| Cutting line diameter | 2 mm |
| Compatible use | Attachment to Metabo MA 36-18 LTX BL Q cordless multi-tool |
| Maintenance | Cleaning after each use; lubrication every 40 operating hours |
| Safety | Wear goggles, hearing protection, gloves, shoes, long trousers; maintain a safety distance of 15 meters |
| Spare parts | Original Metabo/CAS accessories: blades (ref. 628432000, 628433000), replacement lines (ref. 628430000, 628423000), complete cutting head (ref. 628429000) |
| Repairability | Repairs only by Metabo authorized electrician |
| Operating temperature | -20 °C to 50 °C |
| Storage temperature | 0 °C to 30 °C |
| General information | User manual provided; follow safety instructions and multi-tool guidelines |
Frequently Asked Questions - MAFS 40 METABO
User questions about MAFS 40 METABO
0 question about this device. Answer the ones you know or ask your own.
Ask a new question about this device
Download the instructions for your Multitools in PDF format for free! Find your manual MAFS 40 - METABO and take your electronic device back in hand. On this page are published all the documents necessary for the use of your device. MAFS 40 by METABO.
USER MANUAL MAFS 40 METABO
natural_image
Two metal tool holders with black bases and metallic blades, no visible text or symbols

 | MA 36-18 LTX BL Q & MA-FS 40*1) Serial Number 01725.. & 01728..MA-FS 40Serial Number 01728.. | ||
| B | c | m ( i n | |
| H | m | ( i n) | |
| H_X | mm (in) 2 (0.0625) | ||
| n_0 | /min (rpm) 6000 | ||
| m | kg (lbs) 1,6 (3.5) | ||
| a_h/K_h | m/s^2 | 3,5 / 1,5 | |
| L_pA/K_pA | dB(A) A: 81,7 / 3 B: 82,5 / 3 | ||
| L_WA/K_WA | dB(A) A: 94,57 / 1,03 B: 95,04 / 0,52 | ||
| L_WA(M)^*5 | dB(A) 95,6 | 95,6 | |
| L_WA(G)^*6 | dB(A) | 96 | |
A:
natural_image
Close-up of a mechanical tool with a black base and metallic handle (no visible text or symbols)B:
natural_image
Close-up of a mechanical component with a metallic tool inserted, no visible text or symbols
*2) 2006/42/EC, 2000/14/EC, 2014/30/EU, 2011/65/EU
*3) EN 62841-1:2015, EN ISO 11806-1:2011 (partly), EN ISO 11806-1:2022 (partly), EN 50636-2-91:2014, EN ISO 12100:2010, EN IEC 63000:2018
*4) Center for Testing and European Certification Ltd., Industrialna Str.2 post box 131, 6000 Stara Zagora, Bulgaria, Notified Body No. 1871
ppa. B.F.
2022-04-26, Bernd Fleischmann
Original instructions
1. Declaration of Conformity
We declare and accept sole responsibility for ensuring: these brush cutter and grass trimmer attachments identified by their type and serial number in connection with the cordless multifunction drive MA-36-18 LTX BL Q *1) conform to all relevant provisions of the directives *2) and standards *3). Technical documents at *7).
2000/14/EC: Conformity assessment procedures in accordance with Annex VI Stated body *4), measured sound power level *5), guaranteed sound power level *6), - see page 4.
For UK only:
UK We as manufacturer and authorized person to CA compile the technical file, see *7) on page 4, hereby declare under sole responsibility that these brush cutter and grass trimmer attachments, identified by type and serial number *1) on page 4, fulfill all relevant provisions of following UK Regulations S.I. 2016/1091, S.I. 2008/1597, S.I. 2001/1701, S.I: 2012/3032 and Designated Standards EN 62841-1:2015, EN ISO11806-1:2011 (partly), EN ISO 11806-1:2022 (partly), EN 50636-2-91:2014, EN ISO 12100:2010, EN IEC 63000:2018.
S.I. 2001/1701: Conformity assessment procedures in accordance with Schedule 9. Approved Body: AnP Certification Ltd, 2 Parkfield Street, Rusholme, Manchester, M14 4PN, UK, Body-No: 8500. Guaranteed sound power level LWA(G) *6) on page 4.
2. Specified Conditions of Use
The attachment MA-FS 40 in combination with the cordless multidrive MA 36-18 LTX BL Q when using the line head are intended for mowing and trimming applications and when using the thicket blade for mowing grass and thinning and removal of tough, matted grass, undergrowth and thorny hedges.
The brush cutter attachment must not be used for cutting and trimming of hedges, bushes and other vegetation, where the cutting level is not parallel to the surface of the underground.
Use only the recommended cutting heads and protective equipment! The use of other tools (e.g. multi-piece metal cutting tools with swivel chains and flail blades or circular saw blades) can cause serious injuries.
The brush cutter attachment may rest on the ground when working.
This brush cutter attachment is intended for attachment to an original Metabo cordless multifunction drive with the designation MA 36-18 LTX BL Q.
Use only with the cordless multifunction drive in place. The operating manual for the cordless multidrive must be observed.
The user bears sole responsibility for any damage caused by inappropriate use.
Generally accepted accident prevention regulations and the safety instructions must be observed.
3. General Safety Information

For your own protection and for the protection of your power tool, pay attention to all parts of the text that are marked with this symbol!

WARNING – Read the operating instructions to reduce the risk of injury.

WARNING – Read all safety warnings, instructions, illustrations and cifications provided with this power tool.
Failure to follow all instructions listed below may result in electric shock, fire and/or serious injury.
Save all warnings and instructions for future reference.
Always include these documents when passing on your power tool.
Residual risks: Even when the device is used as intended, there could be residual risks. Observe all safety warnings and instructions.
Possible hazards:
- Injuries and material damage caused by flying parts.
- Lung damage if no suitable dust mask is worn.
- Hearing damage if no suitable hearing protection is worn.
- Health detriment, due to vibration emissions, if the machine is used over a long period of time or if it not properly guided or maintained.
- Prolonged exposure to vibrations can cause injuries and neurovascular disorders (also called “Raynaud’s syndrome” or “white finger”), especially to people suffering from circulation disorders. The symptoms can regard the hands, wrists and fingers and are shown through loss of sensitivity, torpor, itching, pain and discolouring of or structural changes to the skin. These effects can be worsened by low ambient temperatures and/or by gripping the hand grips excessively tightly. If the symptoms occur, the length of time the machine is used must be reduced and a doctor consulted.
4. Special safety instructions
4.1 Safety instructions for brush cutters
a) Do not use the machine in bad weather conditions, especially when there is a risk of lightning. This decreases the risk of being struck by lightning.
b) Thoroughly inspect the area for wildlife where the machine is to be used. Wildlife may be injured by the machine during operation.
ENGLISHen
c) Thoroughly inspect the area where the machine is to be used and remove all stones, sticks, wires, bones, and other foreign objects. Thrown objects can cause personal injury.
d) Before using the machine, always visually inspect to see that the cutter or blade and the cutter or blade assembly are not damaged. Damaged parts increase the risk of injury.
e) Follow instructions for changing accessories. Improperly tightened blade securing nuts or bolts may either damage the blade or result in it becoming detached.
f) The rated rotational speed of the blade must be at least equal to the maximum rotational speed marked on the machine. Blades running faster than their rated rotational speed can break and fly apart.
g) Wear eye, ear, head and hand protection. Adequate protective equipment will reduce personal injury by flying debris or accidental contact with the cutting line or blade.
h) While operating the machine, always wear safety footwear. Do not operate the machine when barefoot or wearing open sandals. This reduces the chance of injury to the feet from contact with a moving cutter, line or blade.
i) While operating the machine, always wear long trousers. Exposed skin increases the likelihood of injury from thrown objects.
j) Keep bystanders away while operating the machine. Thrown debris can result in serious personal injury.
k) Always use two hands when operating the machine. Holding the machine with both hands will avoid loss of control.
I) Hold the machine by the insulated gripping surfaces only, because the cutting line or blade may contact hidden wiring. Cutting line or blades contacting a "live" wire may make exposed metal parts of the machine "live" and could give the operator an electric shock.
m) Always keep proper footing and operate the machine only when standing on the ground. Slippery or unstable surfaces may cause a loss of balance or control of the machine.
n) Do not operate the machine on excessively steep slopes. This reduces the risk of loss of control, slipping and falling which may result in personal injury.
o) When working on slopes, always be sure of your footing, always work across the face of slopes, never up or down and exercise extreme caution when changing direction. This reduces the risk of loss of control, slipping and falling which may result in personal injury.
p) Keep all parts of the body away from the cutter, line or blade when the machine is operating. Before you start the machine, make sure the cutter, line or blade is not contacting anything. A moment of inattention while operating the machine may result in injury to yourself or others.
q) Do not operate the machine above waist height. This helps prevent unintended cutter or blade contact and enables better control of the machine in unexpected situations.
r) When cutting brush or saplings that are under tension, be alert for spring back. When the tension in the wood fibres is released, the brush or sapling may strike the operator and/or throw the machine out of control.
s) Use extreme caution when cutting brush and saplings. The slender material may catch the blade and be whipped toward you or pull you off balance.
t) Maintain control of the machine and do not touch cutters, lines or blades and other hazardous moving parts while they are still in motion. This reduces the risk of injury from moving parts.
u) Carry the machine with the machine switched off and away from your body. Proper handling of the machine will reduce the likelihood of accidental contact with a moving cutter, line or blade.
v) When transporting or storing the machine, always fit the cover on metal blades. Proper handling of the machine will reduce the likelihood of accidental contact with the blade.
w) Only use replacement cutters, lines, cutting heads and blades specified by the manufacturer. Incorrect replacement parts may increase the risk of breakage and injury.
x) When clearing jammed material or servicing the machine, make sure the switch is off and the battery pack is removed. Unexpected starting of the machine while clearing jammed material or servicing may result in serious personal injury.
4.2 Blade thrust causes and related warnings
Blade thrust is a sudden sideways, forward or backward motion of the machine, which may occur when the blade jams or catches on an object such as a sapling or a tree stump. It can be violent enough to cause the machine and/or operator to be propelled in any direction, and possibly lose control of the machine.
Blade thrust and its related hazards can be avoided by taking proper precautions as given below.
a) Maintain a firm grip with both hands on the machine and position your arms to resist blade thrust. Position your body to the left side of the machine. Blade thrust can increase the risk of injury due to the machine moving unexpectedly. Blade thrust can be controlled by the operator if proper precautions are taken.
b) If the blade binds, or when interrupting a cut for any reason, switch the machine off and hold the machine motionless in the material until the blade comes to a complete stop. While the blade is binding, never attempt to remove the machine from the material or pull the machine backward while the blade is in motion, otherwise blade thrust may occur. Investigate
and take corrective actions to eliminate the cause of blade binding.
c) Do not use blunt or damaged blades. Blunt or damaged blades increase the risk of jamming or catching on an object, resulting in blade thrust.
d) Always maintain good visibility of the material being cut. Blade thrust is more likely to occur in areas where it is difficult to see the material being cut.
e) If you are approached by another person while operating the machine, switch the machine off. There is an increased risk of injury to other persons being struck by the moving blade in the event of blade thrust.
4.3 Introduction
- Carefully read the operating instructions. Familiarise yourself with the controls and the proper use of the machine.
- Do not allow children, persons with reduced physical, sensory or mental abilities or lack of experience and/or knowledge, or persons not familiar with these instructions to use this machine. Local regulations may limit the age of the operator.
- Children should be supervised to ensure that they do not play with the tool.
- The user is responsible for injuries or material damage to other persons or their property.
- Do not modify the device.
- National regulations may restrict the use of the machine.
- Additional safety instructions in the operating manual for the cordless multifunction drive must be observed.
4.4 Preparation
- Never replace the non-metalling cutting line with a metallic cutting line. Use only genuine accessories.
- Remove extension cables out of the range of action of the machine. Cutting accessory contacting a "live" wire may give the operator an electric shock.
- Practice all work techniques. Inexperienced persons are strongly advised to seek competent advise and guidance from an experienced person before operating this machine.
4.5 Operation
- Use the machine only in daylight or good artificial light.
- Avoid using the machine on wet grass.
- Keep the ventilation openings free from foreign bodies.
- Always use the supplied carry strap/shoulder strap.
- Avoid adverse body positions. Keep proper footing and balance at all times, especially when working on sloped ground.
-
Ensure stable footing. If you lose your balance, immediately let go of the switch.
-
Make sure you have the correct working position, take breaks and change working position.
- Guide the tool only at walking pace.
- Do not mow near steep slopes, ditches or embankments.
- Watch out for holes, furrows, rocks and other hidden objects that can cause you to fall. Remove all obstacles such as stones and branches
- Always keep the cutting tool close to the ground.
- Never operate the machine with damaged protective equipment or without protective equipment (e.g. step limiter, guard, handle).
- Carefully start up the motor according to the instructions and with your feet far away from the cutting insert.
- Danger from parts moving hazardously. Do not touch moving parts. Before any contact, all parts must have come to a complete standstill and the battery pack must have been removed.
- Do not put your hands or feet anywhere near or below rotating parts.
- Switch off the motor and remove battery pack(s). Ensure that all moving parts have come to a standstill:
- if you leave the machine unattended;
- before clearing any blockages;
- before checking or cleaning the machine or before carrying out any work on the machine;
- if a foreign object has been hit or if the machine has been dropped. Check the machine for damage and have repairs carried out before putting the machine back into operation.
- when the machine starts to vibrate excessively.
- If the machine starts to vibrate with unusual strength, an immediate check is required:
-check for damage;
- replace or repair damaged parts;
- ensure that all nuts, bolts and screws are tightened.
- In the event of an accident or malfunction, switch off the machine immediately and remove the battery pack.
4.6 Maintenance and storage
- Maintain power tools and accessories. Many accidents are caused by poorly maintained power tools.
- All nuts, bolts and screws must always be tightened to ensure that the machine is in safe operating condition.
- When adjusting the machine take care not to jam your fingers between moving blades and fixed parts of the machine.
- Remove battery packs from the machine. Wait until all moving parts have come to a standstill before making any adjustments, retrofitting, maintenance, cleaning or before storing the machine.
- When servicing the blades, please note that the blades can still move although the battery pack has been removed.
ENGLISHen
- Replace worn or damaged parts for safety reasons. Use only original spare parts and accessories.
- For storage and transport, always slide on the protective cover onto the blade.
4.7 Use and handling cordless tools
- Remove battery packs from the machine...
- ...before making any adjustments, changing tools, maintenance or cleaning.
- ...if the operator moves away from the tool.
- ...prior to the removal of blockages.
- ...after touching a foreign body in order to check the tool for damage.
- ...for immediate checking when the tool starts to vibrate excessively.
4.8 Icons

Wear safety goggles.
Wear ear protectors. High noise levels over a prolonged period of time may affect your
hearing.
Wear head protection if there is the risk of falling parts.

Wear gloves.

Wear non-slip foot protection.

Read the operating instructions.

Beware of parts being ejected.

WARNING – General hazards!

Keep other people away. Maintain a distance of at least 15 m (50 ft) from persons and objects.
WARNING! Unintentional start-up can cause serious injuries. Before cleaning or maintenance: Switch off the machine, remove the battery packs.

Ensure that nobody gets injured by catapulted foreign bodies. Keep other people away.

Keep persons nearby and pets at a safe distance to the device.

Do not use metal saw blades.

Protect the device from water and moisture. Do not expose to rain.
5. Overview
See pages 2 and 3.
2 Cutting head
3 Safety guard
4 Line cutter (WARNING! Danger of injury from the sharp edges of the blade)
5 Arrows show the direction of rotation of the cutting tools
6 Thread (cutting line)
7 Cap (of the line head)
8 Base body (of the line head)
9 Shackle (guard)
10 Screw (to fix the guard)
11 Allen key (to lock the drive shaft)
12 Drilled hole (to lock the drive shaft)
13 Drive shaft
14 Blades *
15 Disc
16 Clamping cap
17 Clamping nut
18 Combination wrench
19 Thread head
20 Step limiter (do not use as handle)
21 Shoulder strap
22 Carabiner hook
23 Suspension point
24 Handle
25 Handle
* depending on equipment/not included in scope of delivery
6. Initial Operation
WARNING! Switch off the machine and remove battery packs. Unintentional start-up can cause serious injuries. The machine must be stationary. WARNING! Danger of injury from sharp cutting edge on the line cutter (4) and blade (14). Wear protective gloves.
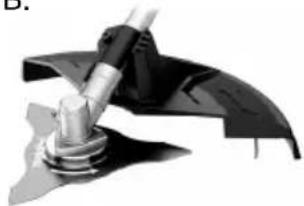
6.1 Attaching the guard (3) (fig. B)
WARNING! Danger of injury from sharp cutting edge on the line cutter (4). Wear protective gloves.
- Mount the shackle (9) to the rod (1).
- Hook the guard (3) into the shackle (9).
- Insert the screw (10) and firmly tighten it.
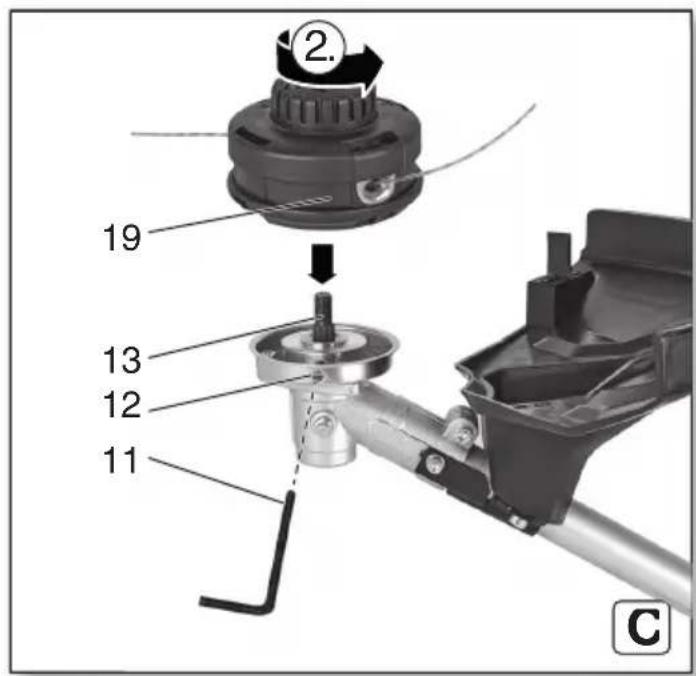
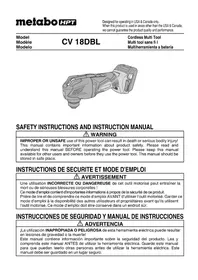
6.2 Attaching / removing the line head (19) (fig. C)
Fitting
- Locking the drive shaft (13):
- Insert the supplied Allen key (11) into the drilled hole (12).
-
Turn the drive shaft (13) by hand until the Allen key (11) engages and the drive shaft cannot be turned anymore.
-
As shown, screw on the line head (19) in anticlockwise direction and tighten by hand.
-
Release the drive shaft:
- Pull out the Allen key (11).
Removal
Proceed in the same way as for the attachment, however unscrew the line head in clockwise direction.
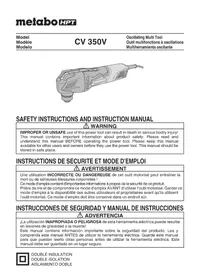
6.3 Insert cutting line (6) in line head (19) (fig. A)
- Hold tight the base body (8). Turn the cap (7) in clockwise direction until the triangular marks are opposite each other (and/or the continuous groove on the side of the print head is aligned with the triangle of the line head's cap).
- Bend the end of the line straight (so that it can be inserted more easily).
Push the line end (6) into the opening marked with an arrow and the words "LINE IN. NOTE: See fig. A: Push in exactly in the direction of the arrow (slightly slanted)!
Result: The line end emerges from the opposite opening. - Pull out the shorter line until both lines are of equal length.
- Hold tight the base body (8). Turn the cap (7) in clockwise direction: The line is wound up in the base body. Stop when 13 cm (5.1") of line still protrudes on both sides. (A line that is too long is automatically cut off by the line cutter (4)).
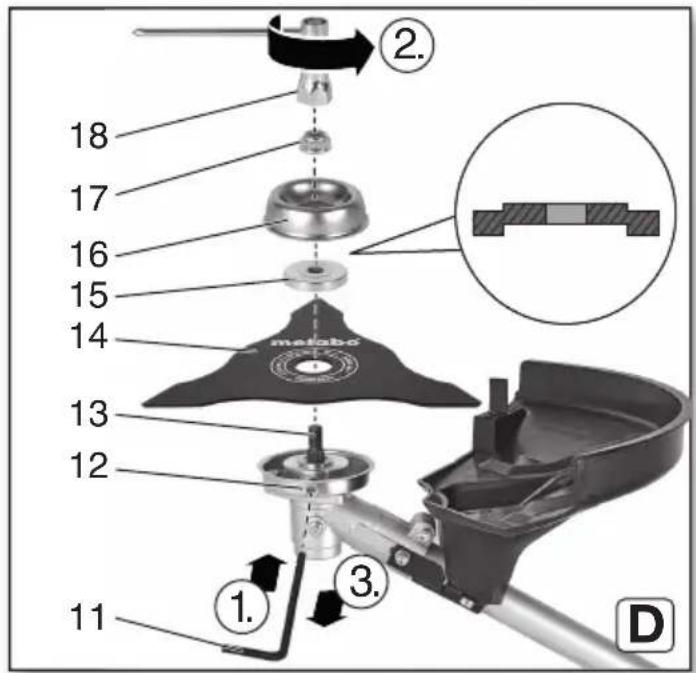
6.4 Fitting / removing the blade (fig. D)
Fitting
- Locking the drive shaft (13):
- Insert the supplied Allen key (11) into the drilled hole (12).
- Turn the drive shaft (13) by hand until the Allen key (11) engages and the drive shaft cannot be turned anymore.
- As show, position the blade (14), disc (15) and clamping cap (16). WARNING! Place the disc (15) in the correct position (see fig. D)! Screw on the clamping nut (17) in anti-clockwise direction and firmly tighten using the supplied combination wrench (18).
- Release the drive shaft:
- Pull out the Allen key (11).
Removal
Proceed in the same way as for fitting, however unscrew the clamping nut (17) with the supplied combination wrench (18) in clockwise direction.
6.5 Attach to the cordless multifunction drive
Read the operating instructions supplied with the cordless multifunction drive.

WARNING! No extension rod may be installed between the cordless multifunction drive and hment.
6.6 Battery pack
Read the operating instructions supplied with the cordless multifunction drive.
6.7 Attaching the handle
-
Choose the right position, see chapter 7.1.
-
Attach the handle as shown in the operating instructions for the cordless multifunction drive.
7. Use

WARNING! Wear protective goggles during operation.

WARNING! Before commissioning and periodically during operation: Check that the mine is safely attached to the cordless function drive. The wing screw must be firmlyened and the release button must be securely aged.
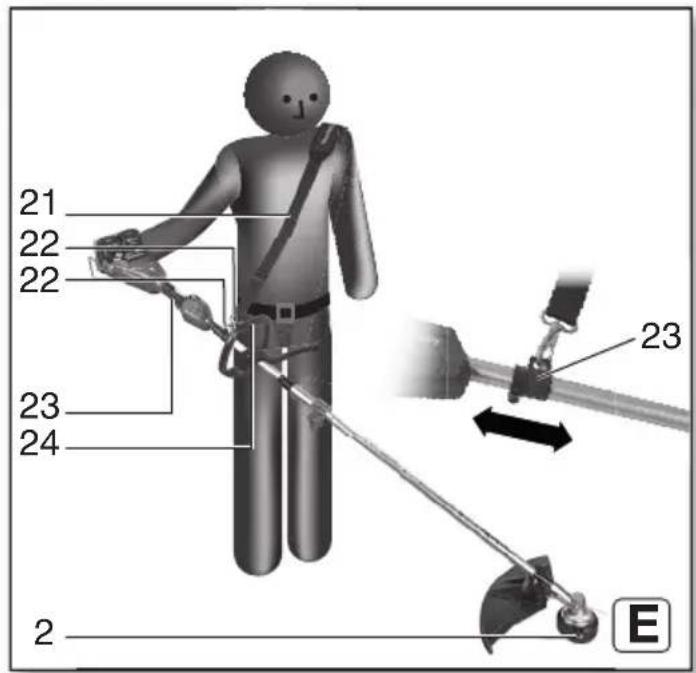
7.1 Setting the machine for the user (fig. F)

WARNING! Use only the supplied shoulder strap. Always use only 1 shoulder strap.
- Tighten the shoulder strap (21). Adjust the length in such a way that the carabiner hook (22) is about a hand width below the hip.
- Hook in carabiner hook from the suspension point (23).
- Balance the machine:
- Loosen the screw of the suspension point (23).
- Move the suspension point in such a way that the cutting head (2) rests slightly on the ground when balanced.
- Tighten again the screw of the suspension point
- Attach the handle in a comfortable position. See chapter 6.7.
7.2 Holding machine correctly, Switching on and off

Before use, check that the device is correctly attached to the battery multifunction drive and operating instructions of the cordless function drive).

The operator must keep good footing and hold the machine firmly. Do not hold on to the step per (20).
Firmly hold the machine with the right hand on the handle (24) and with the left hand on the handle (25).
Switch on and off as described in the operating instructions for the cordless multifunction drive.
7.3 Mowing
Always guide the cutting head (2) close to the ground. More the cutting head (2) evenly back and forth. Walk forward slowly and carefully.
7.4 Readjust the cutting line
With the machine running, briefly tap the line head (19) onto the ground: About 3 cm of line is readjusted. A line that is too long is automatically cut off by the line cutter (4).
If the lines break off directly at the line head or are too short, they must be pulled out by hand:

WARNING! Remove the battery packs. Unintentional start-up can cause serious
injuries. The machine must be stationary.
- Switch off the machine, allow the motor to come to a standstill, remove battery packs.
ENGLISHen
- Press and keep pressed the cap (7).
- Pull out lines by hand.
- If the cutting line is used up: see chapter 6.3.
8. Cleaning, transporting, storage

WARNING! Remove the battery packs. Unintentional start-up can cause serious es. The machine must be stationary.

WARNING! Danger of injury from sharp cutting edge on the line cutter (4) and on the e (14). Wear protective gloves.
8.1 Cleaning
- Clean after each use: Remove grass clippings, leaves, dirt and other deposits.
8.2 Transporting, storage
- Clean and maintain the machine before storage.
- Always keep the cutting line moist. A dry cutting line breaks off more quickly and wears out faster. E.g. remove the cutting line from the reel and store in a bowl of water.
-
Make sure that the machine does not have any loose or damaged parts. If necessary:
-
Replace damaged parts.
-Tighten the screws. -
If necessary, have them repaired in a specialist workshop.
-
Store the machine in a dry place.
- Ensure that children cannot get anywhere near the machine.
- For storage and transport, always slide on the protective cover onto the blade.
- Secure in a safe position for transport.
9. Maintenance

WARNING! Remove the battery packs. Unintentional start-up can cause serious es. The machine must be stationary.

WARNING! Danger of injury from sharp cutting edge on the line cutter (4) and blade Wear protective gloves.
9.1 General maintenance
- Check the machine for damaged, missing or loose parts such as screws, nuts, bolts and caps before each use.
- Check the machine before each use for damage and ageing and have it repaired in a specialist workshop immediately if necessary.
- Tighten all fasteners and caps properly.
- Clean the machine with a dry cloth. Do not use water.
- Never service damaged battery packs. Service of battery packs should only be performed by the manufacturer or authorized service providers.
9.2 Replacing cutting line
See chapter 6.3.
Order number see chapter 11.
9.3 Dull blade

WARNING! A blunt or incorrectly sharpened blade (14) increases the risk of kickback.
A blunt blade (14) can be rotated by 180^ . If both sides are blunt, it is advisable to have it sharpened and balanced in a specialist workshop. Check blades regularly for damage and have them repaired in a specialist workshop immediately if necessary.
9.4 Lubrication
Every 40 operating hours, top-up grease through the grease nipple on the gearbox housing using a grease gun:
12 g high-temperature composite lithium grease.
10. Troubleshooting Guide
One LED of the capacity display (battery pack) flashes.
Battery pack empty.
- Charge the battery packs.
Machine emits a lot of noise.
Cutting line is too short.
- Readjust cutting line (see chapter 7.4)
All LEDs of the capacity and signal display (battery pack) flash.
Overload.
- Let the machine cool down.
- Move forward more slowly.
The machine does not start.
The battery pack performance is weak.
- Charge the battery packs.
The machine vibrates heavily.
The blade (14) is not balanced or worn.
- Replace the blade (14).
The cutting line (6) is not the same length on both side.
- Readjust the cutting line. See chapter (7.4).
The machine stops during the mowing process.
Battery pack empty.
- Charge the battery packs.
There is a blockage.
- Remove the battery packs. Check the blade (14) / the line head (19).
The operating temperature of the machine is too high.
- Let the machine cool down.
When attaching to the cordless multidrive, the rod ends cannot be pushed into each other.
- Read the operating instructions supplied with the cordless multifunction drive.
11. Accessories
Use only original Metabo or CAS (Cordless Alliance System) battery packs and accessories.
Use only accessories that fulfil the requirements and specifications listed in these operating instructions.
A Cordless multifunction drive MA 36-18 LTX BL Q, order no.: 601725850
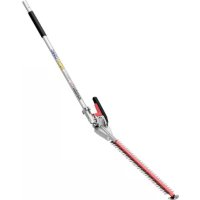
B Thicket blade, 3-wings, ∅ 255 mm, incl. protective cover (as spare): Order no.: 628432000
C Grass blade, 4-wings, ∅ 254 mm, incl.
protective cover:
Order no.: 628433000
D Replacement line ∅ 2 mm, wave-shaped: Order no.: 628430000
E Replacement line ∅ 2 mm, spiral-shaped: Order no.: 628423000
F Complete line head (complete housing incl. reel and cutting line, (as spare)
Order no.: 628429000
For a complete range of accessories, see www.metabo.com or the catalogue.
12. Repairs

Repairs to electrical tools must only be carried out by qualified electricians and only with nal spare parts!
Contact your local Metabo representative if you have Metabo power tools requiring repairs. For addresses see www.metabo.com.
You can download a list of spare parts from www.metabo.com.
13. Environmental Protection
Observe national regulations on environmentally compatible disposal and on the recycling of disused machines, packaging and accessories.
Battery packs may not be disposed of with regular waste. Return faulty or used battery packs to your Metabo dealer!
Do not allow battery packs to come into contact with water!

Only for EU countries: never dispose of power tools in your household waste! According to European Directive 2012/19/EU
on Waste from Electric and Electronic Equipment and implementation in national law, used power tools must be collected separately and recycled in an environmentally-friendly manner.
Discharge the battery pack in the power tool before disposal. Prevent the contacts from short-circuiting (e.g. by protecting them with adhesive tape).
14. Technical Specifications
Explanatory notes regarding the specifications on page 4.
Subject to change in accordance with technical progress.
Measured values determined with cordless multifunction drive MA 36-18 LTX BL.
B = cutting width
H = max. cutting line length
H_X = cutting line diameter
n_0 = no-load speed
m = weight (without cordless multifunction drive, battery pack, carry strap)
Measured values determined in conformity with EN 50636-2-91+EN ISO 22868.
Permitted ambient temperature during operation: -20 °C to 50 °C (limited performance with temperatures below 0 °C). Permitted ambient temperature for storage: 0 °C to 30 °C
Recommended ambient temperature when charging: 0 °C to 40 °C
= direct current
The technical specifications quoted are subject to tolerances (in compliance with relevant valid standards).

Emission values
These values make it possible to assess the emissions from the power tool and to compare different power tools. The actual load may be higher or lower depending on operating conditions, the condition of the power tool or the accessories used. Please allow for breaks and periods when the load is lower for assessment purposes. Arrange protective measures for the user, such as organisational measures based on the adjusted estimates.
Vibration total value (vector sum of three directions):
$$ \begin{array}{l} a _ {h} = \text { vibration emission value } \ K _ {n} = \text { uncertainty (vibration) } \ \end{array} $$
Typical A-weighted sound levels:
$$ L _ {p A} = \text { sound pressure level } $$
$$ L _ {W A} = \text { sound power level } $$
$$ K _ {p A}, K _ {W A} = \text { uncertainty } $$
$$ \begin{array}{c} L _ {W A (M)} = \text { measured sound power level as per 2000 / } \ 1 4 / E C \end{array} $$
$$ L _ {W A (G)} = \text { guaranteed sound power level as per } 2 0 0 0 / 1 4 / E C $$

During operation the noise level can exceed 80 dB(A).

Wear ear protectors!
FRANÇAISfr
Notice originale
--- Corrente contínua
L_pA =äänen painetaso
L_WA =äänen tehotaso
$$ K _ {n} = \text { Usikkerhed (vibration) } $$


- Original instructions
- Declaration of Conformity
- For UK only:
- Specified Conditions of Use
- General Safety Information
- Save all warnings and instructions for future reference.
- Possible hazards:
- Special safety instructions
- Safety instructions for brush cutters
- ENGLISHen
- Blade thrust causes and related warnings
- Introduction
- Preparation
- Operation
- Maintenance and storage
- Use and handling cordless tools
- Icons
- Overview
- Initial Operation
- Attaching the guard (3) (fig. B)
- Attaching / removing the line head (19) (fig. C)
- Fitting
- Removal
- Insert cutting line (6) in line head (19) (fig. A)
- Fitting / removing the blade (fig. D)
- Attach to the cordless multifunction drive
- Battery pack
- Attaching the handle
- Use
- Setting the machine for the user (fig. F)
- Holding machine correctly, Switching on and off
- Mowing
- Readjust the cutting line
- Cleaning, transporting, storage
- Cleaning
- Transporting, storage
- Maintenance
- General maintenance
- Replacing cutting line
- Dull blade
- Lubrication
- Troubleshooting Guide
- One LED of the capacity display (battery pack) flashes.
- Machine emits a lot of noise.
- All LEDs of the capacity and signal display (battery pack) flash.
- The machine does not start.
- The machine vibrates heavily.
- The machine stops during the mowing process.
- When attaching to the cordless multidrive, the rod ends cannot be pushed into each other.
- Accessories
- Repairs
- Environmental Protection
- Technical Specifications
- Emission values
- FRANÇAISfr
- Notice originale
Brand : METABO
Model : MAFS 40
Category : Multitools