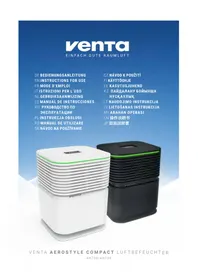
Original Connect - Air Humidifier Venta - Free user manual and instructions
Find the device manual for free Original Connect Venta in PDF.

| Product type | Cool evaporation air humidifier |
| Brand | Venta |
| Model | Original Connect (series AH510/AH515, AH530/AH535, AH550/AH555) |
| Dimensions (L × W × H) | Varies by model: 26×28×31 cm, 30×30×33 cm or 45×30×33 cm |
| Weight | Approx. 3 kg / 3.5 kg / 5.2 kg depending on model |
| Water tank capacity | 5 / 7 / 10 liters depending on model |
| Noise level (levels 1-3) | 24/34/44 dB(A) for models ≤45 m² ; 24/35/45 dB(A) for model ≤60 m² |
| Power consumption (levels 1-3) | 3/5/8 W |
| Power supply | 100-240V, 50/60Hz, power adapter model BI13-240050-Cd / FJSW1982400500 |
| Display type | Interactive touch screen |
| Connectivity | WiFi 2.4 GHz (802.11 b/g/n) and Bluetooth |
| App | Venta Home (iOS 13+ / Android 8+) |
| Main functions | 3 power levels, automatic mode, night mode (SLEEP), touch screen, integrated WiFi |
| Humidification capacity | For rooms up to 35 m², 45 m² or 60 m² depending on model (max height 2.5 m) |
| Technology | Cold evaporation with disc stacks |
| Maintenance and cleaning | SERVICE reminder every 14 days (cleaning + adding hygiene agent); semi-annual cleaning with Venta cleaner |
| Safety | Automatic shut-off in case of low water level (WATER), upper part locking (E1), motor overload protection (E2) |
| Spare parts and repairability | Accessories available at www.venta-air.com ; repair reserved for specialists |
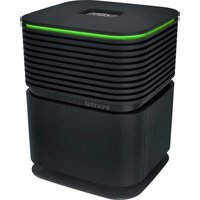
| General information | Colors: glossy white / glossy black ; 2-year warranty ; compatible with Venta hygiene agent |
Frequently Asked Questions - Original Connect Venta
User questions about Original Connect Venta
0 question about this device. Answer the ones you know or ask your own.
Ask a new question about this device
Download the instructions for your Air Humidifier in PDF format for free! Find your manual Original Connect - Venta and take your electronic device back in hand. On this page are published all the documents necessary for the use of your device. Original Connect by Venta.
USER MANUAL Original Connect Venta
SIMPLIFIED EU DECLARATION OF CONFORMITY
Herewith, Venta-Luftwäscher GmbH declares that the radio equipments
AW510 / AW515 / AW530 / AW535 / AW550 / AW555
comply with Directive 2014/53/EU. The full text of the EU Declaration of
Conformity is available at the Internet address:
We are confident that this Venta model will exceed your expectations and hope that you enjoy it.
Please register your Venta appliance here:
www.venta-air.com
Please read this operating manual in its entirety, keep it for later reference and note all safety instructions as well as instructions for the proper use of the appliance. You can find the latest version of the operating manual on our website www.venta-air.com
DEAR CUSTOMER,
With the Original Connect series, you have purchased a high-performance humidifier, which gives you even more convenient operation with the addition of a touch display and Venta AirConnect compatibility.
The Venta Home app allows you to operate your appliances remotely as well as to access information. The Original Connect supports healthy humidity and the natural reduction of pollutants in the air.
Here's how the Venta principle works
A fan directs the ambient air into the water-filled humidifier, where it flows through specially arrayed disk stacks. Hygienically clean air evaporates from their surfaces into the room.
TABLE OF CONTENTS
Safety Instructions 22
Scope of delivery 24
Symbols
Intended use 24
Improper use 24
Overview
Before the first use 25
Putting into operation 26
Displays, functions & settings 27
Wifi / hotspot 29
Configuration & Venta app 30
Cleaning & maintenance 31
Cleaning of 33
the upper housing 33
Technical data 34
Accessories 35
Privacy Policy 35
Guarantee 35
Recycling and disposal 35
What to do if ... 36
Venta Service Team 37
SAFETY INSTRUCTIONS
- This appliance is suitable for use by children over the age of 8 years and people with restricted physical, sensory, or mental capacities or lack of experience and knowledge, providing they are supervised or have received instructions on the safe use of the appliance and understand the existing hazards.
- Read the operating instructions completely before putting the appliance into operation and keep them for later reference.
- The appliance is not a toy for children.
- Cleaning and user maintenance may not be performed by children under the age of 8 years or without supervision.
- Keep the appliance and its switching power supply out of the reach of children under the age of 8 years.
- Improper use can damage the appliance and cause physical injuries.
- Plug the appliance into suitable power outlets only - the mains voltage must correspond to the nameplate data on the appliance.
- This appliance can only be operated with the "Model No. BI13-240050-Cd / FJSW1982400500" switching power supply.
- Never use the appliance if it has a damaged switching power supply plug or cable, or after it has malfunctioned or if it has been dropped or damaged in any other way.
- Disconnect the power plug before every cleaning or maintenance operation or transportation of the appliance.
- Never use the appliance if it has been dropped or damaged in any other way.
- Electrical appliances should only be repaired by professional specialists. Amateur repairs could result in considerable danger to the user.
- Do not sit on the appliance and do not place any objects on it.
- Do not put any foreign objects into the appliance.
- Do not immerse the upper housing in water or any other liquid.
- Never overfill the appliance.
- Never transport or tilt the appliance when the tank is full.
- Never unplug the appliance by pulling on the cable or pulling the switching power supply out with wet hands.
-
The appliance should only be operated when it is completely assembled.
-
Place the appliance on a stable surface which is flat and dry.
- Set up the appliance so that it cannot be knocked over, and so that no one can trip over it or its cable.
- Ensure the appliance is at least 50~cm from any objects such as furniture or walls.
Maximum installation altitude: 2000 metres - Never cover or block the vents to prevent overheating/damage to the appliance.
- A persistent relative ambient humidity of more than 60% , especially in winter, can enable the formation of biological organisms.
- The design of the appliance and the cold evaporation technology make it impossible for water to leak directly from it in the form of droplets, vapour, mist or lime deposits, providing you use it correctly.
- Only operate the appliance with original Venta accessories designed for the purpose. Venta-Luftwäscher GmbH does not accept any liability for damage caused by the use of third-party accessories.
- If you do not use the appliance for several days or put it into storage for a longer period, empty the water tray completely, clean it and dry thoroughly to prevent odours or biological organisms from developing in standing water or water residues.
- Unplug the appliance when it is not in use.
- Ensure the area surrounding the appliance does not become damp or wet. If moisture leaks out, switch to a lower setting. If it is not possible to switch to a lower setting, use the appliance with interruptions. Make sure no absorbent material such as carpets, curtains, net curtains or tablecloths get damp.
SCOPE OF DELIVERY
1 Venta appliance
1 bottle of hygiene additive 50ml
1 quick-start guide
1 safety instruction sheet
If any parts are missing or damaged, please contact the Venta Service Team or your local dealer.
SYMBOLS

Please read the Safety Instructions carefully. Follow the instructions to prevent injuries or damage to property.

Additional information

Helpful tips
INTENDED USE
This Venta appliance is a domestic appliance for humidifying the air in interior rooms. The appliance is not suitable for outdoor areas. Any other use or modification of the appliance is considered to be improper use. Venta is not liable for damage or injuries resulting from improper use.
IMPROPER USE
Using the appliance for something other than the intended purpose can endanger health and lives. This includes use under the following conditions:
- in rooms or locations where there is risk of explosion and/or where there is an aggressive atmosphere
- in rooms where there is a high concentration of solvents
- in the vicinity of swimming pools or other wet areas
- outdoors
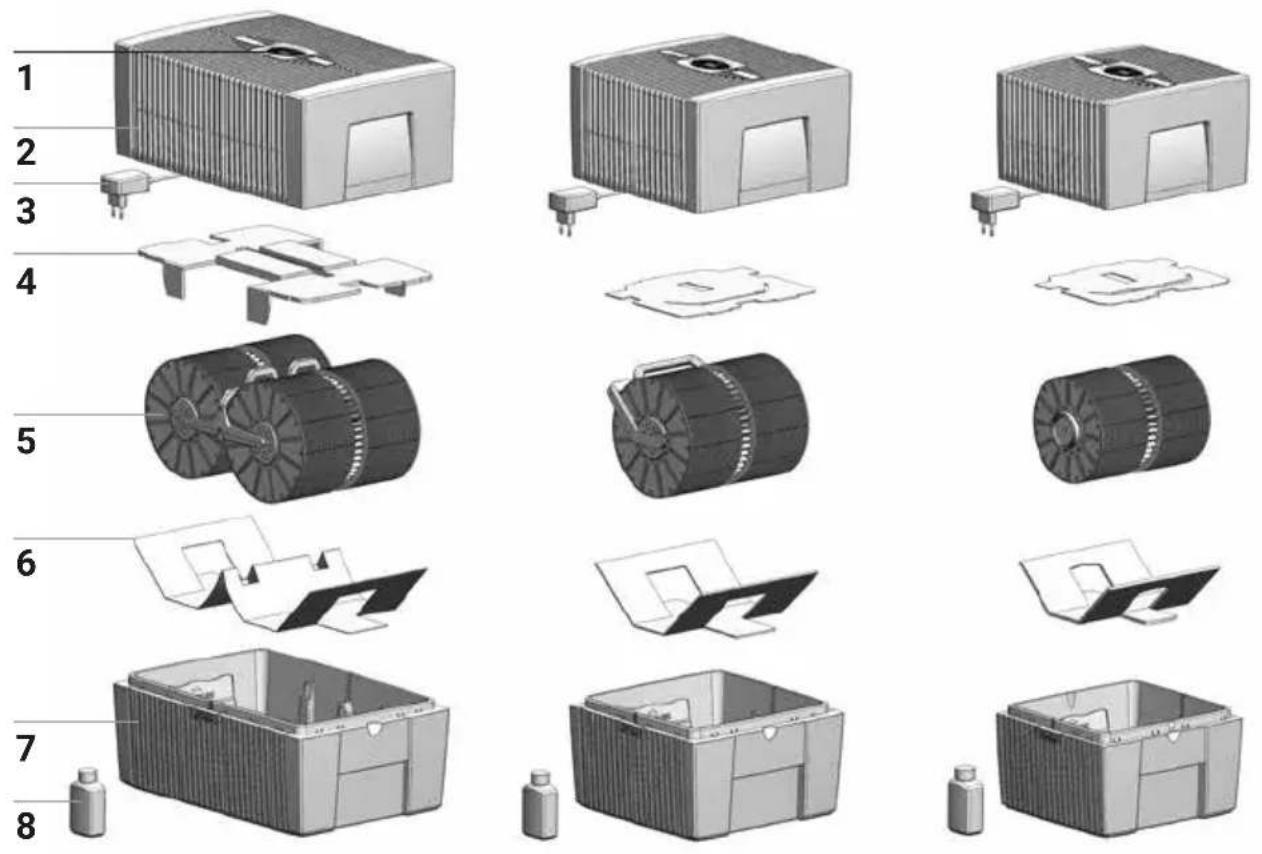
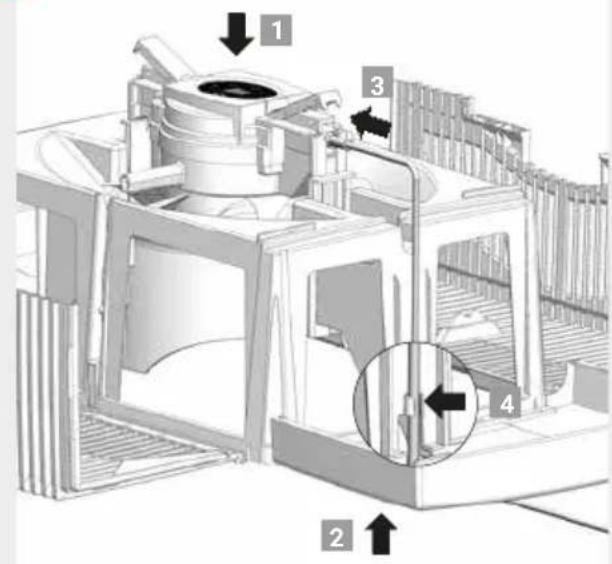
OVERVIEW
1 Display
2 Upper housing
3 Switching power supply (assembled)
4 Transport protection
5 Disk stack
6 Transport protection
7 Lower housing
8 Bottle of hygiene additive 50 ml
BEFORE THE FIRST USE
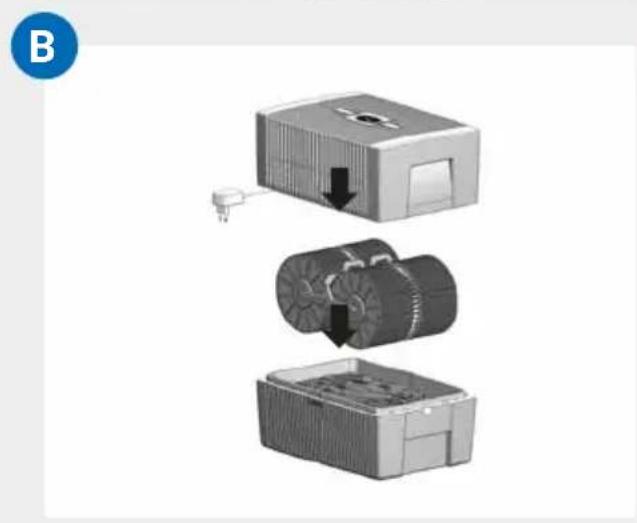
Unpack and set up the appliance. Remove the 50 ml bottle of hygiene additive 8 from the carton. Remove upper housing 2. Remove transport protection 4 from upper housing 2. Remove disk stack 5 from lower housing 7 and remove transport protection 6.


A Fill lower housing 7 with tap water up to maximum WATERLINE marking and add 50~ml hygiene additive 8 (complete content of bottle).
! Never fill the appliance before taking off the upper housing!
i Adding the hygiene additive is very important, because this optimally humidifies the air.
B Insert disk stack 5 into lower housing 7 and place upper housing 2 onto lower housing 7.
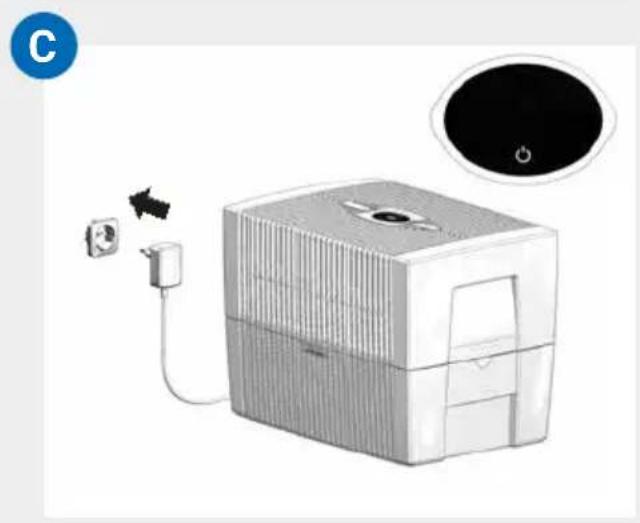
C Connect the switching power supply 3 to the mains and switch on the appliance by tapping the power button in the display 1.
Only once the appliance is connected to the mains will the power button light up to switch the appliance on and off.
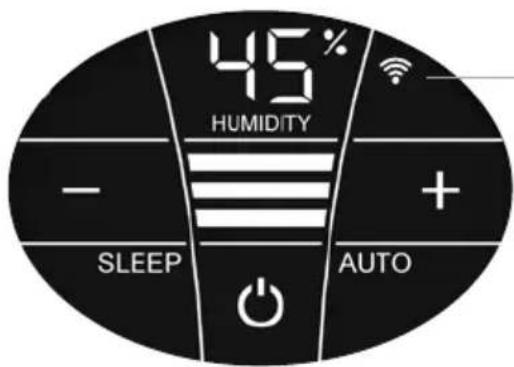
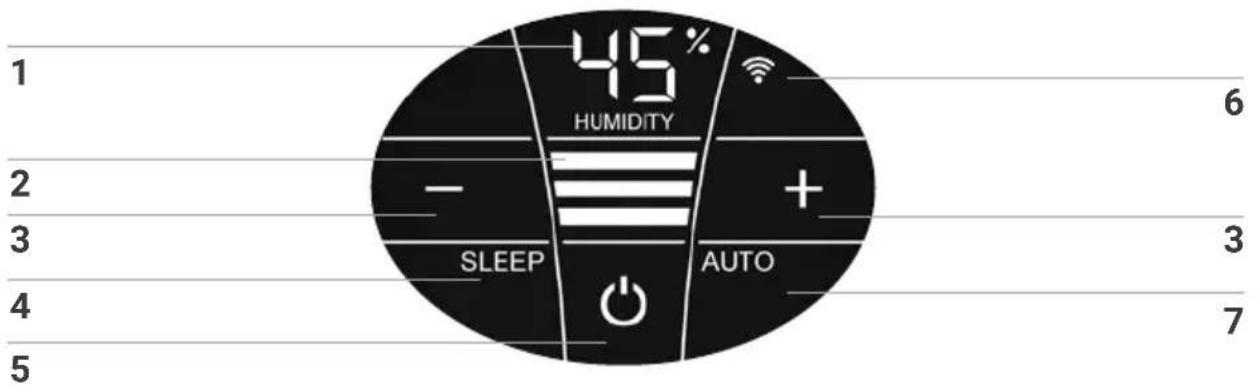
DISPLAYS, FUNCTIONS & SETTINGS
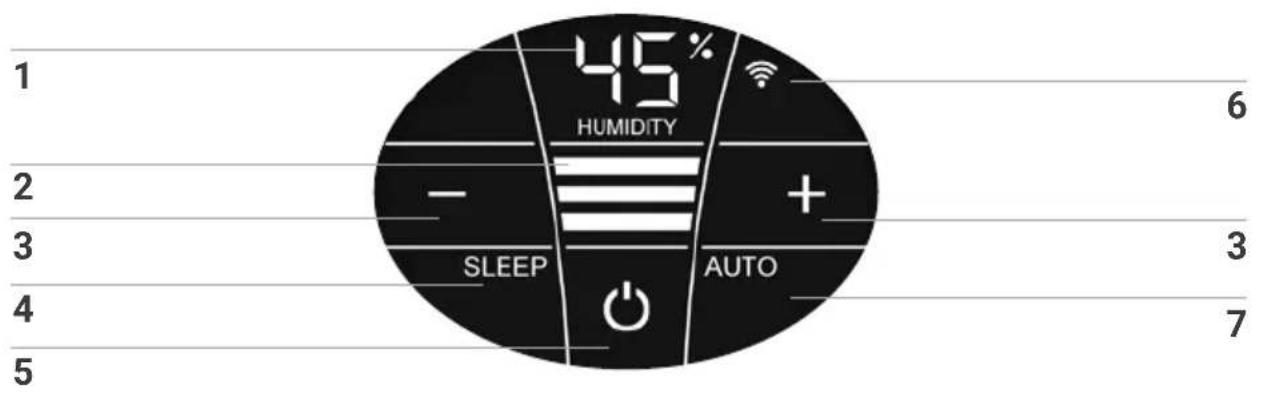
Display Function
| 1 | Humidity | Display the humidity in the room (0 - 99%). If "UP" is displayed instead of the humidity, the appliance is performing a firmware update. If the water level is low, the humidity display can be inaccurate. |
| 2 | Power level | Display speeds 1 - 2 - 3. |
| 3 | - and + | Set the power level by tapping: - reduces and + increases the speed. |
| 4 | SLEEP | Tap to turn the sleep mode on or off. ON: The appliance dims the display lighting and reduces the power level to 1. Power level 2 can be changed manually with the + or - button 3. Automatic mode 7 is not possible. Set the display brightness you want for sleep mode: press the SLEEP button for 3 sec. until the readings HUMIDITY 1 and SLEEP 4 flash. Set the brightness of the display between 0 and 10 with the - or + button 3, which is indicated by flashing in HUMIDITY 1. Press the SLEEP button again for 3 sec. until the readings HUMIDITY 1 and SLEEP 4 are continuously illuminated and the humidity reading for the room is displayed again in HUMIDITY 1. OFF: Bright display illumination and appliance runs in power levels 1 - 3. |
Display Function
| 5 | O | Switch the appliance on or off by tapping the power button. |
| 6 | WIFI | Switch the WiFi connection on and off by tapping. Activate the HOTSPOT mode by touching and holding for 3 sec. You will find a detailed description in the section "WiFi / hotspot". |
| 7 | AUTO | Switch Automatic mode on or off by tapping the AUTO button. ON: In the display, AUTO flashes continuously and the appliance automatically regulates the power level according to the humidity in the room. When switching on AUTO, the desired humidity (50 % pre-set) flashes twice and then the measured humidity in the room is shown in the HUMIDITY display 1. When the preset humidity is exceeded by more than 5 %, the fan shuts off after approx. 60 sec. and no power level appears in the speed reading 2. No humidification occurs. OFF: AUTO in the display is continuously illuminated and the appliance operates with the power level set at 1 - 3. Set desired humidity 30 - 70 %: Hold AUTO button for 3 seconds. The HUMIDITY 1 display flashes continuously. Set the desired humidity (in 5 % increments) using the - or + buttons 3. Hold AUTO button for 3 seconds again until the flashing in display HUMIDITY 1 stops and the humidity measured in the room is shown again. Please make sure that automatic mode is switched on: AUTO flashes continuously in the display! |
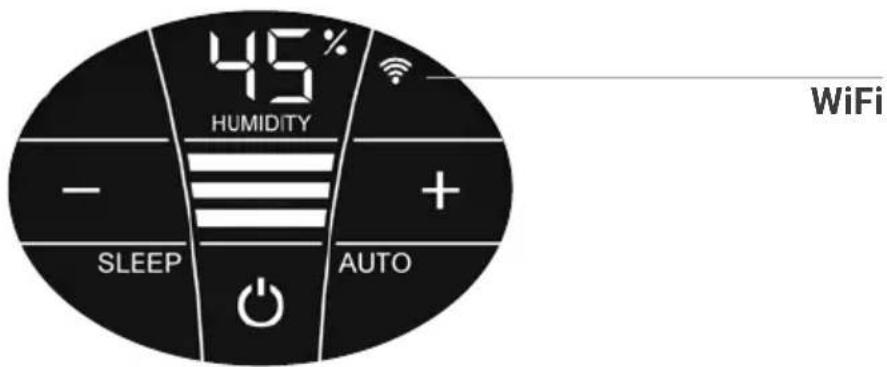
WIFI / HOTSPOT

WiFi
Display Functions & settings
| Switch the WiFi connection on and off or (de)activate it by tapping the WiFi symbol. | |
| WiFi connection ON or activated. | |
| Illuminated | WiFi connection to the Venta server established. |
| Flashes slowly | WiFi connection to the local network established. |
| Flashes rapidly | WiFi connection disabled or waiting for WiFi connection. |
| Illuminated | The WiFi connection is OFF or deactivated. |
| The WiFi module does not send or receive any data and is not connected to any network or appliance. | |
| The Venta appliance is in hotspot mode and is ready for the configuration or network setup. | |
| The four individual segments of the WiFi symbol consecutively light up from the bottom to the top. | |
| The hotspot mode can be activated at any time during device operation by touching the WiFi symbol and holding it for 3 sec. |
CONFIGURATION & VENTA APP
1. Activate the hotspot mode on the Venta appliance
To do this, the four individual segments of the WiFi symbol in the appliance display must light up consecutively from bottom to top.

This mode is automatically activated the first time the appliance is operated.

The hotspot mode can be activated any time by touching and holding the WiFi symbol for 3 sec.
2. Activate WLAN on smartphone or tablet
Make sure that your smartphone or tablet is connected to your WLAN home network.
3. Download the VENTA app or install and open it
You can easily operate your Venta appliance remotely plus use and monitor extra appliance functions with the free Venta app.


4. Set up the WiFi function using the VENTA app
Now please follow the instructions on the screen of your smartphone or tablet.

If problems occur during the WiFi setup, please read the section, "What happens if a WiFi connection can't be established?".
Further information at www.venta-air.com/en_gb/Service/Venta-Home-App/
CLEANING & MAINTENANCE


Caution! Ensure the appliance is switched off during all actions and the switching power supply is disconnected from the power outlet!
Display Actions
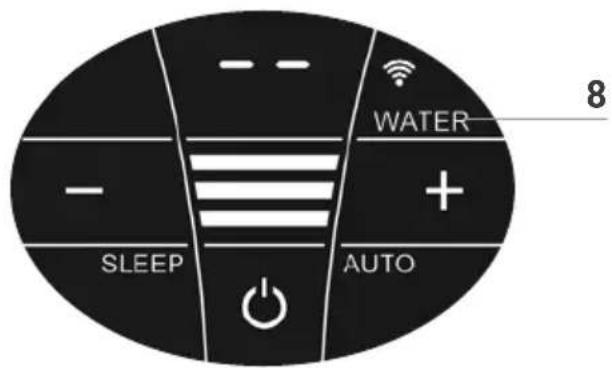
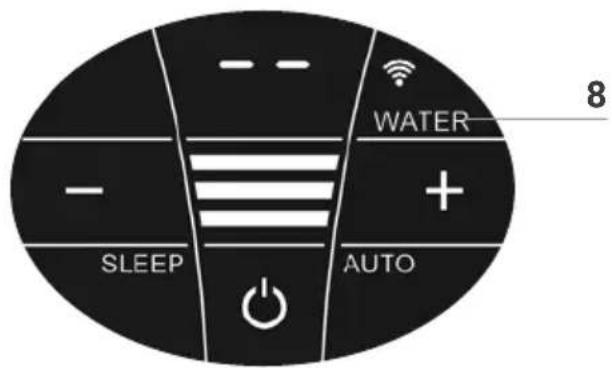
8 WATER
Remove upper housing. Fill lower housing with tap water to the WATERLINE marking. Place upper housing on lower housing and put appliance in operation again.
As soon as there is not enough water in the lower housing, the appliance is switched off automatically and the WATER display appears. In the HUMIDITY display 1, two lines will flash and the humidity in the room is not shown.

To humidify the indoor air continuously, we recommend refilling the water in a timely manner.
9 SERVICE
Remove upper housing. Drain residual water from lower housing. Rinse lower housing and disk stack. Fill lower housing with tap water up to the WATERLINE marking maximum and add the Venta hygiene additive (for dosage see scale on rear of bottle). Re-assemble the appliance. Touch the SERVICE indicator 9 on the display and hold for 3 sec. until it switches off.

For flawlessly hygienic continuous operation, the SERVICE display indicates a reminder every 14 days that this action needs carried out.

This action can be carried out if required, even if the SERVICE message is not shown. When it is completed, simply touch the VICE indicator 9 and hold for 3 sec. The next reminder will now nown again in 14 days with the SERVICE message
Any remaining liquid in the water tray and on the disk stack (white, green-yellow or brown deposits or discolorations) do NOT impair the function of the appliance. For the six-monthly cleaning, we recommend the Venta Cleaner. Please note the instruction manual included with the Venta Cleaner.
CLEANING OF
THE UPPER HOUSING

Caution! Ensure the appliance is switched off during all actions and the switching power supply is disconnected from the power outlet!
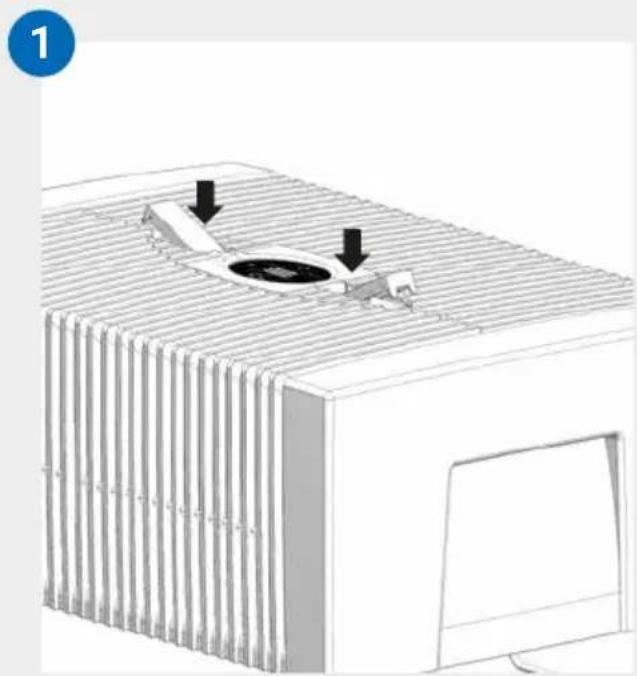
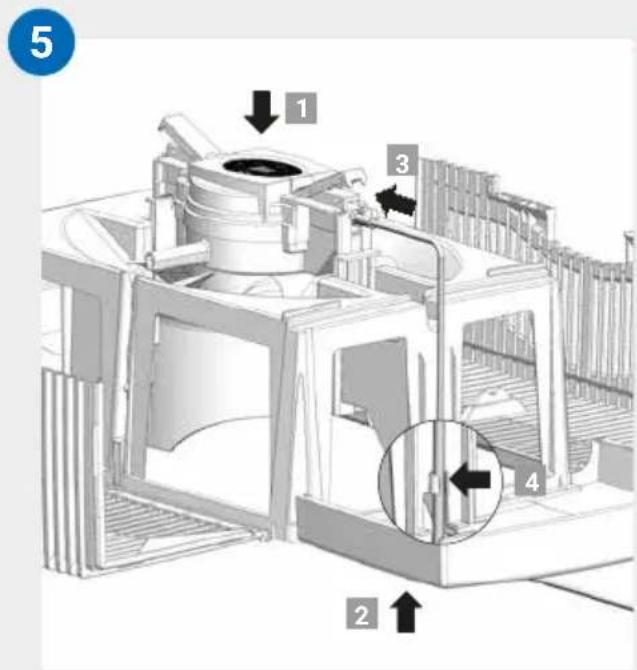
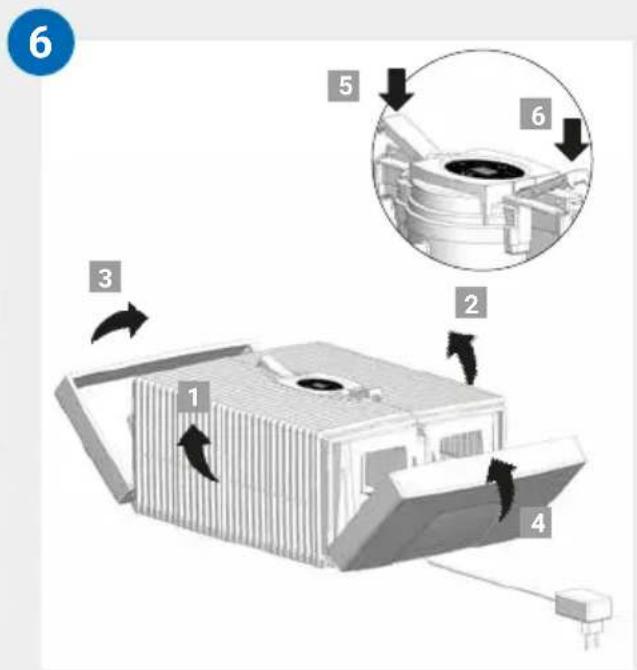
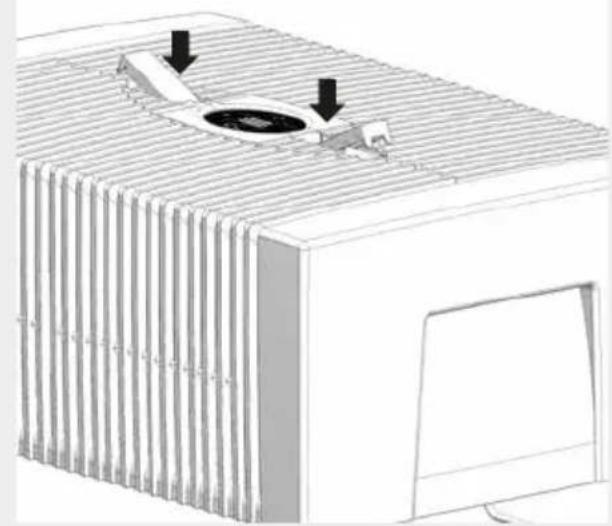
01 Detach upper housing from lower housing. Press locking buttons so that the ends stand up.
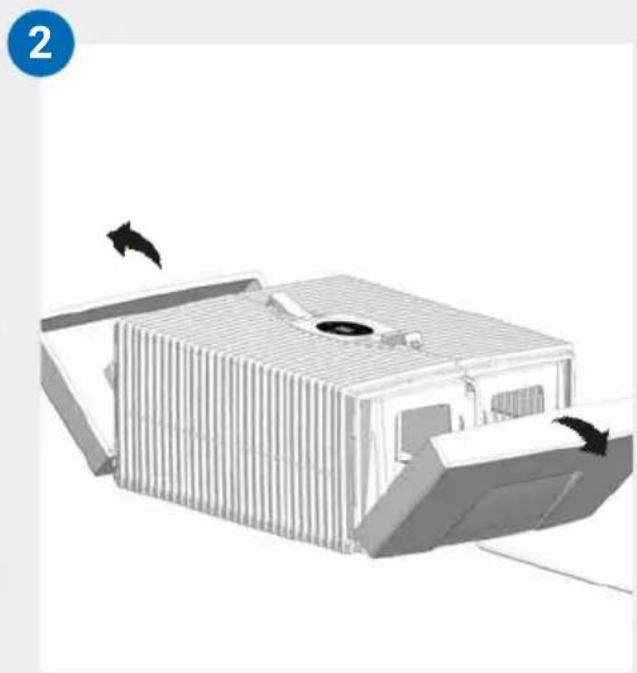
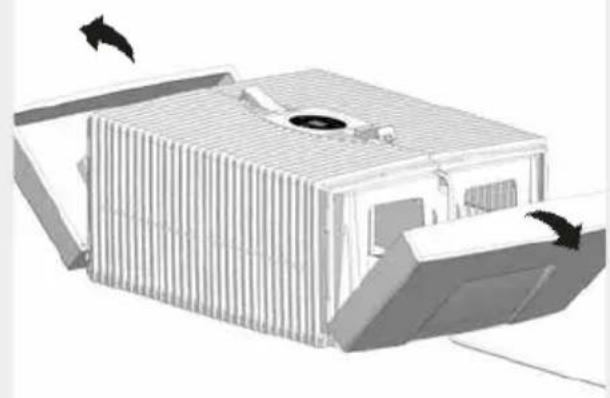
02 Fold side parts out of the way.
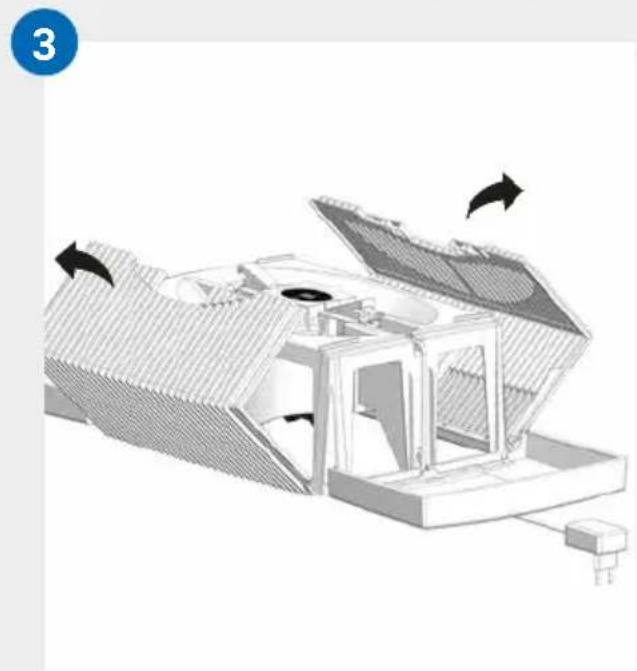
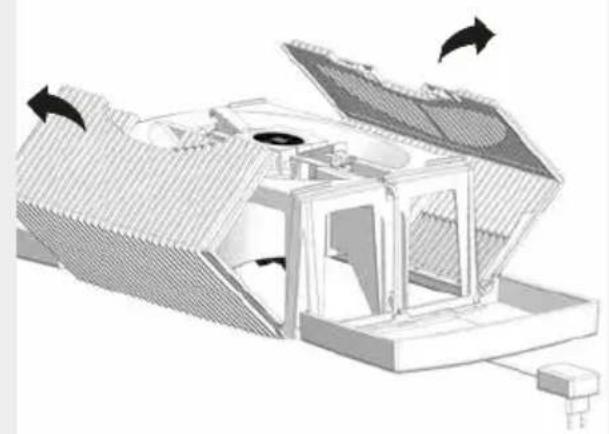
03 Fold ribbed wings out of the way.
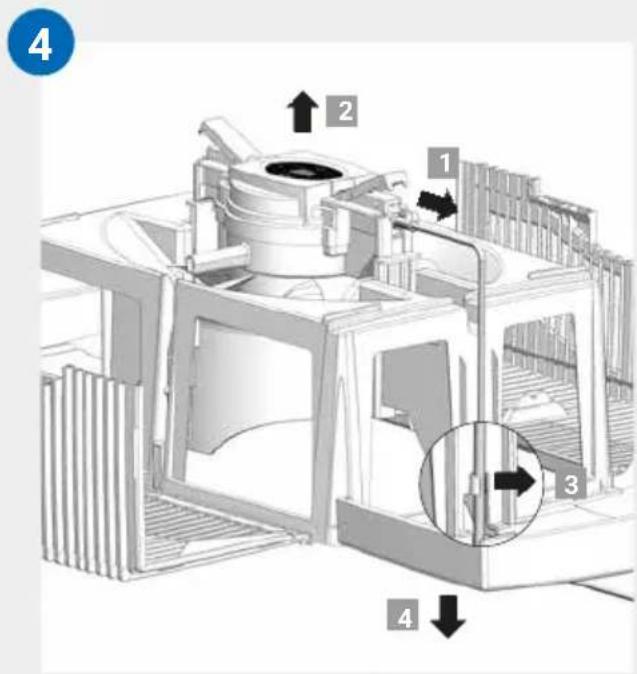
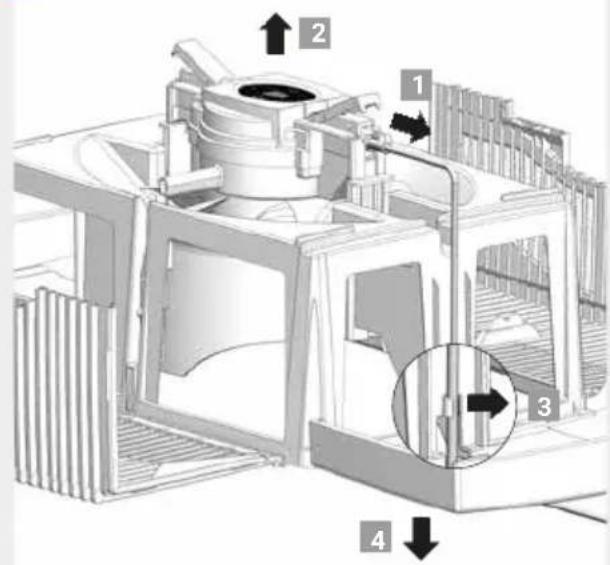
04 Unplug the switching power supply from the drive unit 1. Lift the drive unit upwards and out 2. Disconnect the switching power supply cable by releasing the bracket 3 and pull downward and out through the opening of the upper housing 4.

- Do not disassemble the drive unit and the switching power supply, immerse them in water or bring them into contact with liquids!
- Only clean the drive unit with fan blades and gear with a dry cloth!
- The disassembled upper housing can be cleaned under running water!
- The disassembled upper housing must be absolutely dry before assembly!
05 Insert the drive unit into the upper housing from the correct side 1. Pull the switching power supply from the bottom upwards and through the opening of the upper housing 2 and plug it into the drive unit until it clicks into place 3. Affix the cable with the bracket 4.
06 The outer ends of the locking buttons must be standing up. Fold the ribbed side wings 1 and 2 upwards, then the side elements 3 nd 4. Close the upper housing correctly by pressing down on the outer ends of the locking latches 5 and 6.
TECHNICAL DATA
| Model AH510 / AH515 AH530 / AH535 AH550 / AH555 | |||
| For room sizes* ≤ 35 m² ≤ 45 m² ≤ 60 m² | |||
| Interactive touch display | Standard | ||
| App control Standard WiFi | |||
| Colours brilliant white / brilliant black | |||
| Power levels 3 + Automatic | |||
| Noise emission (spaces 1-3) | 24/34/44 dB(A) | 24/34/44 dB(A) | 24/35/45 dB(A) |
| Power consumption (spaces 1-3) | 3/5/8 watts | ||
| Mains voltage 100-240 V, 50 / 60 Hz | |||
| Water capacity (max.) | 5 litres | 7 litres | 10 litres |
| Dimensions (L x W x H) | 26x28x31 cm | 30x30x33 cm | 45x30x33 cm |
| Weight | approx. 3 kg | approx. 3.5 kg | approx. 5.2 kg |
| WLAN frequency range | 2.4 GHz | ||
| WLAN transmission power | Maximum 20 dBm | ||
- based on a ceiling height of max. 2.5 metres
May be subject to modifications and errors
ACCESSIONS
You can order accessories by phone or online at www.venta-air.com
PRIVACY POLICY
Venta-Luftwäscher GmbH treats your data confidentially. You can find more information about data protection in our Privacy Policy at www.venta-air.com
GUARANTEE
Due to the high quality of our products, Venta-Luftwäscher GmbH guarantees that this product will remain defect-free for two years as from the purchase date, provided it is used correctly. If a material or processing error should occur anyway, please contact the Venta Service Team or your dealer. Venta's general guarantee conditions also apply: www.venta-air.com
RECYCLING AND DISPOSAL

The packaging material is recyclable. Please dispose of the packaging in an eco-friendly way using the recycling scheme at your location.
The "crossed-out bin" symbol indicates that you must dispose of waste electrical and electronic equipment (WEEE) separately. Such equipment may contain dangerous and environmentally hazardous substances. These products should be disposed of at an appropriate collecting point
for recycling electrical and electronic equipment and may not be disposed of in unsorted household waste. This way you can help to protect resources and the environment. For more information, please contact your local authorities.
Children must not be allowed to play with plastic bags and packaging material as there is a danger of injury or suffocation. Store such materials safely or dispose of them in an environmentally friendly way.
WHAT TO DO IF …

Ensure the appliance is switched off during all actions and the switching power supply is disconnected from the power outlet!
... E1 is shown in the display?
The appliance has switched off automatically because the locking latches on the upper housing are not closed properly.

Close upper housing properly again by pushing on the outer ends of the locking latches. Switch appliance off and on with the power button .
... E2 is shown in the display?
The appliance has switched off automatically, because the motor is overstrained (e.g. through the intrusion of foreign objects or similar).

Action: Remove upper housing. Check whether the disk stack in the lower housing as well as fan blades in the upper housing are freely movable. Then switch the appliance on again.
... E3 is shown in the display?
WiFi/cloud connection with the device failed.

Action: Switch appliance off and on with the power button. Follow the instructions in the Venta Home App.
Please check that:
- you are using a 2.4-GHz or a combined 2.4/5-GHz network. This is important because the WiFi/WLAN module in the appliance does not support 5-GHz networks.
- your router supports 802.11b/g/n.
- iOS version 13.0 or higher or Android version 8.0 or higher is installed in your phone or tablet.

If necessary, update the operating system of your phone or tablet.
... white spots appear in the background when you touch the display?
In dry rooms, electrostatic charging can cause white areas to appear in the background on the display. These do not affect the functioning or ability to control the appliance and do not constitute a defect.
... the power button to switch on the appliance does not appear in the display?
Please check whether the switching power supply is connected to the mains.
... the power button to switch on the appliance does not appear in the display, even though the switching power supply is connected to the mains?
Please check whether the switching power supply is firmly plugged into the drive unit.

Action: Remove upper housing. Check for correct positioning (see cleaning instructions for the upper housing). Then switch the appliance on again.
... WATER is shown in the display, even though there is water in the lower housing?
Please check whether there is sufficient water in the lower housing and/or whether the upper housing is placed correctly on the lower housing.

Action: Remove upper housing. Fill lower housing with tap water to the WATERLINE mark. Place upper housing correctly on lower housing.
Make sure that the switching power supply cable is not trapped between the upper and lower housings. Then switch the appliance on again.
VENTA SERVICE TEAM
Do you need additional information about your Venta appliance, do you want advice or to order accessories? Our Service Team is there for you! Call us directly, or visit the Venta website: www.venta-air.com

+49751 5008 88
MERCI BEAUCOUP!
Configuration & application Venta 47
Nettoyage & entretien 48
WIFI / POINT D'ACCès
WiFi
Venta-serviceteam 105
VEILIGHEIDSINSTRUCTIES
3. HentSAMt installer
VENTA-appen, og abn den
RENGØRING AF APPARATETS OVERDEL

OBS! Sørg ved alle foranstaltninger for, at apparatet er slukket, og at stiknetdelen er trukket ud af stikdåsen!
HVAD SKAL JEG GØRE, HVIS...?

Venta serviceteam 139
SÄKERHETSINFORMATION
Venta-serviceteam 156
SIKKERHETSANVISNINGER
WI-FI / PUNKT DOSTEPOWY

Wi-fi
KONFIGURACJA I APLIKACJA
VENTA
RECYKLING I UTYLIZACJA

KONFIGURACE & APLIKACE
VENTA

Wi-Fi
Download on the App Store

DOSTUPNO NA USLUZI Google Play


4. Podesavanje WiFi veze preko VENTA applikacije
Pratite upute sazaslona pametnog telefona odnosno plocastog raucuna.

Naidete li na probleme tijekom podešavanja WiFi veze, pogledajte odlomak „Sto akо se ne moze uspostaviti WiFi veza?".
Zadodatne informacije pogledajte www.venta-air.com/Service/Venta-Home-App/
ČIŠÇENJE I ODRŽAVANJE


Download on the App Store


TERAZ NA Google Play
KAJ STORITI, CE ...?
Ecnn deTann OTCyTCTByOT nnn noBpeJdeHbI, o6paTNTecb B cepBnCHyO cnjx6y Venta nn K MeCTHomy dInlepy.
CNMBOJIbI

Yka3aHnI NO TexHnke 6e3ONaCHoCTN: BHIMaTeJbHo npOyTtTe n CO6JIouDaIte Ix, YTO6bl N36eKaatb TpaBM INOBpeKdEHHaMMyIecTBA.

DOnonHnteIbHaNHOopMaun

Pone3HbIe COBeTbl
ИСПОЛьЗOBAHNE ПО HA3HAЧЕHNIO
Данныnpибop Venta -эTO 6bITOBО npибор ДЯ уВлжHeHЯ BO3dYxa Bnomeшen.прибор He npincnocoblen ДЯ ekcnlyaatauHa OTKpbITOM BO3dYxe.Любoe ДугоЕ nCNoIb3OBAHne ИлmoNФИКaцяnpибopa CHTa- etcЯ nCNoIb3OBAHnem He NO Ha3NaueHIO.ИЗrToBvITeJIb He HeceT OTBeTCTBeHHocTN 3a MaTePnaJIbHbI yUep6 IJI TpaBMbl, BO3HnKShne BCJeDCTBNe HEnpabInbHOrO nCNoIb3OBAHnIA.
ИСПОЛьЗOBAHNE HE ПОHA3HAЧЕHNIO
IcnoIb3OBaHne npnbopa He no Ha3NaueHIO MOKeT co3daTb yrpo3y 3dopoBbU O JxN3HN. K aTOMy OTHocNTc IcNoIb3OBaHne B cIeNyUOxu YCNOBnX:
B nomeeHnX c noteHuaIbHO B3pbIBOONaCHO H/INn aRpeccNBHO aTMocΦepo
B nomeuHnax C BbICOKo KOncHTpauee npTbOpnteJe
·Bo3JIe 6accSeiHOB nJn BlaJXhblx 3OH
·HaOTkpblOMB03dyxe

0630P
1 Ducnnne
2BepxHyaactb np6opa
3IopKIOUaembIb6LOKNTaHnY (yCTaHOBneHHbI)
4 TpaHcnpTnpoBOuHbI ΦNKcaTop
5Пл actинчытbi6apa6aH
6 TpaHcnpTnpoBOuHbI ΦNKcaTop
7 HxKhyaactb np6opa
8ФлakOH rHnneHnueckOro cpeIcTba 50 mJ
TEXHINUÇECKNE XAPAKTEPNCNUKNI
...Ha nucnnee BbIONDTC8 E1?
Ipn6op BbIKIOUHINcA BtOMaTnueCKn 3-3a He npabNlBHOY yCTaHOBKn cNkCnpyuOxN KHOJOK B BepXHeJ qactn.

IpaBnIbHo 3aKpoIte fIKCnpyUOuNe KHOpKn, HaxKaB Ha HapyXHbIe KOHcbl. BbIKIOUHTe np6Op n CHOBa BKIOUHTe erO KHOKNBkJIQUeHnA O
...Ha nucnnee BbIONDTCra E2?
Прибор abTomatnueckи Выключир n3-3a neperpy3kn DBnraTeЯ (Hanpimep, n3-3a nonadaHnnoCTOpOHnX npedMeTOB nT. n.).

Дeистве: CHIMITE BepxHIOU qactb. ПрOBepbTe, CBO6oJHO JIперeme-шаETcЯ пл actnHuaTbI 6apabahВ HIXKHeчactnИ loJaCTN BeHTnJIrTO-BepxHey qactn. Пocne 3tOrO cHOba BVeInte npnbopВ pa60Ty.
...Ha nucnnee BbIONDTcE3?
He ydaetcnahtponb WLAN-/o6lauHoe coeHHene c yctpoiCTBOM.

PpOBepe, nIOTHO nn BCTaBneH 6JOK nITaHnB PpNBODHO 6JOK.

He 03B0JaTeBcHAnOBHIOBaTn npila3HaIiTOIO BepXhboIOuactnHOIO!

Iodabahnra ririiehiuHoro 3acoby e dyxke BaXJIINBIM, OCKiJIbKN BOHO 3a6e3neyuE ONTImaJIbHe 3BOJIOxehnna NobITpI.
B NaKeT DnCKiB 5 BCTaBTe y HxHHo YactHy 7 Ta HaDiHbTe BepXHHo YactHy 2 Ha HxHHo YactHy 7.
C IiKIOHTb WTeNcIb aIaNTepa XINBHeHHa 3 Do eIeKTpOmepeXi Ta yBIMKHITb IIpIIaI KOpOTKOUacHm DOTIKOM Do KHONK JINBHeHHa dnCnJIe1 1.

KhONka KINBJIeHHa OJn yBIMKHeHHa Ta BIMKHeHHa npIaNy CBITNTbcra IInse ToDi, KOJI npIaNad PIKJIoueHO Do DxepeNa IeHHa.
IHДИΚAЦIЯ,ФУнКцIITAHALAHTYBAHHЯ
Ihdkauia FyHKciA
| 1 | ВологICTь | Индikаця вологости nobітray у ріріміційни (0-99%). Якшо замість вологostи вidобра {@ься nobідомлени «UP», то пірісті віковуе о\'овлени- ня мірпоррамнoro з\'а\'б\'е\'\'\'\'\'\'\ надінікатоі вологostі можу'tь bu'dхилени. |
| 2 | Рівень notyxностi | Индikаця webindkosti вентлиега 1 - 2 - 3. |
| 3 | -Ta+ | Встановіль рівень notyxнosti kOPERКIM ДOTиКOM: - Зменшіе i + 3\'\'ьшіе webind\'\'ctь. |
| 4 | SLEEP | Увімknіль abo вімknіль �ічné реким кOPERТКIM ДOTиKOM. YBIMK: Рірілад з\'metшіе о\'с\'тLEнні д\'\'\'\'\'' шу\'\'ь рівень notyxнosti до 1. Pівень notyxнosti 2 м\'\'\'\'\ 3 + abo -. АВТOMATNUHNI реким 7 hemox\'\'\ Bstahobільnotpi6nyя\'\'\'\ ногі рекиму: утprimуіte кноку SLEEP на\'\ потягOM 3 ce\'\ ДOKи He з\'\'\ Б\'\ HUMIDITY 1 i SLEEP 4. Кнокою 3 - abo + м\'\'\ Новиіnotpi6nyя\'\ \'\ Б\'\ HUMIDITY 1. 3NOby утprimуіte кноку SLEEP на\'\ потягOM 3 ce\ Кн, ДOKи И\'\ HUMIDITY 1 i SLEEP 4 He c\'\ CBITNTSCI 6\'\ bepepbvno, a Віміріна вOLORICTb y kimhaTI З\'\ 3NOby He b\'\ O\'\ BIMK: O\'\ С\'\ Not\'\ П\'\ Not\'\ Not\'\ Not\'\ Not\'\ Not\'\ Not\'\ Not\'\ Not\'\ Not\'\ Not\'\ Not\'\ Not\'\ Not\'\ Not\'\ Not\'\ Not\'\ Not\'\ Not\'\ Not\'\ Not\'\ Not\'\ Not\'\ Not\'\ Not\'\ Not\'\ Not\'\ Not\'\ Not\'\ Not\'\ Not\'\ Not\'\ Not\'\ Not\'\ Not\\ Not\\ Not\\ Not\\ Not\\ Not\\ Not\\ Not\\ Not\\ Not\\ Not\\ Not\\ Not\\ Not\\ Not\\ Not\\ Not\\ Not\\ Not\\ Not\\ Not\\ Not\\ Not\\ Not\\ Not\\ Not\\ Not\\ Not\\ Not\\ Not\\ Not\\ Not\\ Not\\ Not\) Not\\ Not\\ Not\\ Not\\ Not\\ Not\\ Not\\ Not\\ Not\\ Not\\ Not\\ Not\\ Not\\ Not\\ Not\\ Not\\ Not\\ Not\\ Not\\ Not\\ Not\\ Not\\ Not\\ Not\\ Not\\ Not\\ Not\\ Not\\ Not\\ Not\\ Not\\ Not\\ Not\\ NoT\\ Not\\ Not\\ Not\\ Not\\ Not\\ Not\\ Not\\ Not\\ Not\\ Not\\ Not\\ Not\\ Not\\ Not\\ Not\\ Not\\ Not\\ Not\\ Not\\ Not\\ Not\\ Not\\ Not\\ Not\\ Not\\ Not\\ Not\\ Not\\ Not\\ Not\\ Not\\ Not\\ Not Not\\ Not\\ Not\\ Not\\ Not\\ Not\\ Not\\ Not\\ Not\\ Not\\ Not\\ Not\\ Not\\ Not\\ Not\\ Not\\ Not\\ Not\\ Not\\ Not\\ Not\\ Not\\ Not\\ Not\\ Not\\ Not\\ Not\\ Not\\ Not\\ Not\\ Not\\ Not\\ Not\\ not\\ Not\\ Not\\ Not\\ Not\\ Not\\ Not\\ Not\\ Not\\ Not\\ Not\\ Not\\ Not\\ Not\\ Not\\ Not\\ Not\\ Not\\ Not\\ Not\\ Not\\ Not\\ Not\\ Not\\ Not\\ Not\\ Not\\ Not\\ Not\\ Not\\ Not\\ Not\\ Not\\ Not\n\ Not\\ Not\\ Not\\ Not\\ Not\\ Not\\ Not\\ Not\\ Not\\ Not\\ Not\\ Not\\ Not\\ Not\\ Not\\ Not\\ Not\\ Not\\ Not\\ Not\\ Not\\ Not\\ Not\\ Not\\ Not\\ Not\\ Not\\ Not\\ Not\\ Not\\ Not\\ Not\\ Not\- Not\\ Not\\ Not\\ Not\\ Not\\ Not\\ Not\\ Not\\ Not\\ Not\\ Not\\ Not\\ Not\\ Not\\ Not\\ Not\\ Not\\ Not\\ Not\\ Not\\ Not\\ Not\\ Not\\ Not\\ Not\\ Not\\ Not\\ Not\\ Not\\ Not\\ Not\\ Not\\ Not\\ 不 不 不 不 不 不 不 不 不 不 不 不 不 不 不 不 不 不 不 不 不 不 不 不 不 不 不 不 不 不 不 不 不 不 不 不 不 不 不 不 不 不 不 不 不 不 不 不 不 不 不 |
IIndkaizyHkci
Download on the App Store

3ABAHTAXUTN 3 Google Play

4. HanaHTyBaHHa Wi-Fi uepe3doaTOK VENTA
DToPmUyTeScb IHcTpkyiHa ekpaHi BaWOrO cMapTfoHa a6o nlaHweta.

KIO nIac HanaHTyBaHHa Wi-Fi BnHnKHyTb npo6JIeMn, 3BepHIbCdo po3diny "Io pObntn, kIO He BdaetbcN pIKNoHTncsdo Wi-Fi?"
DokaTKOBA iHΦopMaζη Ha
www.venta-air.com/Service/Venta-Home-App/
ЧИSSЕНЯТАДОГЛЯД


Ybara! NpekeohaiTeC, 0i nd uac BnKoHaHHBcix i npnaB iDKnIO-ueHni BnIka BnTgHyTa 3 po3eTKN!
IIndkaucia Dii
8 WATER
3HrtnBepxHIO qactHy. HanOBHITb HxKHO qactHy BODonpoBIDHO BOIO DO BiIMtKn WATERLINE. Nomicitb BepxHIO qactHy Ha HxKHO qactHy i 3HOBy yBIMKHITb npnilaI.
i YK TINbKN B HnKHi yactHcIaHe 3amano BOHN, npncptpi ABTOMATNUHO BMNKAeTbcra I BMNKAeTbcra IHNkATOP WATER. Ha iHnKaTopi HUMIDITY 1 6nMaOTb DBi pNCKn I BOIorictb y KIMHaTI He BiO6paXkaetbcra.

Y cyxix npimiiHennex eIekTpoCTaTnHi 3apRIM MOKyTb cnpuHHTN NOBBy 6iINx nOIB Ha TII dncnpe, rki He BpInBaOTb Ha po6Oty a6o npaue3daT HiCTb npnilady Ta He E deΦeKTOM.
... KHONka XnBHeHHa ①ДЯ yBIMKHeHHa npIcTpoI He BiO6paKaεTbcra Ha dinCnIeI?
IpebeipTe, nn iikloueHn aanTep XnBneHHa Do MepexKi.
... KHONka XNBHeHHaДЯ yBIMKHeHHa npucTpoI He BiO6paKaεTbcra Ha dncPnei, xOya aadantep XNBHeHHa NiDKIoueHHn Do MEPexKi?
IpeBipTe, u npabnIbHO BCTaBHeH N TeKepe y 6loK npNbOdy.

Ii: 3HIMiTb BepxHIO qactnHy. IpeBipTe npabNlbHicTb nocaKn (INB.
iHCTpyKciIO 3 OunIeHNr BepXhboI yactnH npnilaIy).NotIM 3HOBy
yBIMKHiTb npnla.
...Ha IincnIe BiO6paXaETbcra WATER, xOua B HxKHi YacTnHi e BoDa?
IpebipTe, HIOCTaTHbO BODN B HIXHi YactnHi Ta/a6o YH BepxHЯ YactnHa npaBnIbHO BCTaHOBJIeHa Ha HIXHi YactnHi.

Ii:3HIMtB BepxHIO qactnHy. HanOBHITb HxKHHo qactnHy BOOpOBI-
HOIO BOIOI DO BIIMITKIN WATERLINE. IpaBnJIbHO HaIInbTe BepXHIO
YacTInHy Ha HIXKHIO YacTInHy.
He 3aTnCKaIe aIaIaTep KINBJIeHHaMIK BepXHbOIO Ta HIXKHbOIO YacCTNuHaM.
Notim 3HOBy yBIMKHiTb npnla.
CEPBICHA CnyXbA VENTA
Bam noTpi6Ha doaTkOba iHΦopMaζi npo npuλd Venta, bαkaeTe oTpmaTn nopadn Yu 3aMObHTn akcecyapn? Hemaε npo6lεm: haça cepbicha cnjx6a
Venta npaioe Inla Bac! 3aTepeohnyte a6o BiDbai Te Be6-caT Venta:
www.venta-air.com
KθΠ PAKMET!
Bi3 ocbl Venta moJIiHcI3IH TaIaIbIbI3dAn acbl TycTeHInHe ceHIMdiMi3 XaHe 6yJ KypblfbiHbI paKaTTaHa naJaIahyblbI3Fa TineKTEcPi3.
Venta KypbIINbIb3dbIMbHa Jepre TipKeHiz: www.venta-air.com
Bny naJaIaNHybI HyCKaylbIFbIH TOIbIK OKbIN 8bIFbIN, KeiH naJaIaNHy ywiH caKtan KoIbIbI3, Kayinc3diK HcCKaynapbIH opbIHdaN, KypblfbiHbIMakCaTKa caI fHa naJaIaNbIHbI3. NaJaIaNHybIHyCKaylbIFbIH eH COHFbl HcCKacBH 6i3dIH www.venta-air.com Be6caTbIMbI3daN aIyblbI3fa 60laDbI
ACA KAdIPJI CATbI IN AInyIbI,
OcbI Original Connect cepnacbIH caTbIN any apKbIbI KocbIMwa TaY DnCnnei opHaTbIFaH, Venta AirConnect caikectik yHKcuaRcBHBiH KEMeImeH 6apbIHwa OHtaJIbI naJaIaNHyFa 6oJaTBiH XaHE JyMbIC KaKbIHbI XoFapbl KypblIFBaIe 6oJbIHbI3. Venta Home KoJdaH6acbIHbIH KEMeImeH KypblIFbIaPbIHbI3DbI cbIPTTaH bAcApbyIHbI3Fa XaHE aKnapaT aNybiHbI3Fa 6oJadbl. Original Connect ayahbIH bIJaIbIbIFbIH DeHCayIbIKKa JaFbIMdbI DeHreJe 6oJyBH KaMTaMaCbI3 eTymEH KaTap, ayaJaFbI 3nHdbl 3aTTapDbI Ta6NFn JoJMeH a3aITabI.
Venta xymblic npnunpi
Белмени ayacbiжелдкiwihкemerimeh iwiHde epekewe we6eprikneh opHaIacTbIPbIFaH aHaMaJIb TaKaTaWanap KInHaFbI 6ap, cy ToIbipBIFaH aya bIFaIdaHdbIpfbiWka kapaJx6epiJe.i. Ocb TaKaTaWanapDbIH 6etHe Ta3apTbIFaH cy 6olme iwihe 6y TypiHde x6epiJe.i.
MA3M¥Hbl
Kayinci3ik eckeptylepi 379
XeTki3iJeTIH XnHaKtbiH
Kypambl 381
Benzinep 381
MaKcaTka cai KoIaHy 381
MaKcaTka cai KoIdaH6ay 381
XaJIbI KepiHici 382
ENaIFaWnaiJaIaNHy aIbIHda 382
KoJdaHbicKa eHri3y 383
Xa6aplaMaIapbI, yHKcIyIapbl
JxHe npaMeTpnepi 384
Wifi / XOTCNOT
386
KoHΦnrgpaunjXaHe Venta
KoJdaH6acbl 387
Ta3aay kHe KyTim KepceTy 388
TexHnKaJIbIKIpeKeKTepe 389
KypbIINFBiHbIH YCTIH
6eJIkTeepiH Ta3aIay 391
KepeK-kaPaKaTapbl 392
KeniДiK 392
MbHa KaFdaIapda He icTey
Kepek? 393
Venta Kbi3MeT KepcTeTo6bl 394
KAYIINCI3ДIK ECKEPTYJIPEI
·БулкypblfblHb8жacTaH acKaH 6aIalap MeH DeHe,ce3IM MyweJIepi MeH on Ka6ilneTI TpyfbICbIHan apHaBI KaJKeTTTliri 6ap aadAMdap,coHBImeH KaTAP TaXipn6eci Hemece 6ilimi JxetKlIKcI3 aadamap 6acka adamdapdbH 6aKbIaybIMeH Hemece KypblFbIHb NaJaIaNHy HysckaynapbIH anca JxHe OHblDyPbIC naJaIaNb6aFaH JxFdaIaTbIH TybIH daTbIH KaTepeJIepi TycIHce, OHda KOJIaHaYbIHa 6OlaDbI.
-Бул пайдалианшынсayльфын Крьлфынл пайдалиу салды мкягт OKын, KeiH Karaan Jypy ywiH caKtan KoIO KepeK.
-Булбалалapfa apHaIFaH OиbIHwblK Kypblfbl EMeC.
- Ta3aIay HeMece Kytim KepeCy JyMbICTapbIH 8 kacKa ToJMaFaH 6aIaIap 6ackaHbIH KaIaFaJaiybiHCbI3 OpbIHdAmaybl KepeK.
KypbIINFbIHbIXeH OhBiH XeJI aAnTepiH 8 KacKa ToJMaFaH 6aJalapdAn anBic YcTay KepeK.
KypbIINfbIHbIKepceTIInReH MaKcaTTa KOJaHa6aca,OfaH 3aKbIM KeIyI HeMece aadamap JapaKaT anybl MymKiH.
KypbIbHbI TeK 03iHe cai KeletiH po3eTKaFa Jkalfay KepeK, an Jeiideri KepHey KypbIbHbIH 6oBbIHdaFbI TexHNKaIbIK aKnapaT TaKTaJWacbHda 6epiInre H mAndepre caikec Keyni KepeK.
- Бул курbingынбь Мьиа кени релега найдалиу kepeк: "Улгий hemipi: Bi13-240050-Cd / FJSW1982400500".
- Θектгжелiche КocatbHадалТерін Ka6eI HeMece aшасы 3aKbIMdαlFaH KypblfBHyI KoJdaHbICKa eHri36ey Kepek.
- Ta3aay HeMece XeHdey XyMbIcTapbIH opbIHdaMaC 6ypbIH, COhbiMeH KaTap 6acka Jepre opHaIacTbipy HeMece TacbImaJday apeKeTTepiH XacaMaC 6ypbIH JeJIiIK aIaITePdi po3eTKaJaH cybipy KepeK.
- Erep Kypblfbl Kylan KaIca HeMece 6aKa7a 3aKbIMdaHFaH 6oIca, OHda OHbl icKe KOJIaHyFa 6OImaIbI.
- Θл ekт р Курьлгьларьин Хэндey куMbICTapьин ТЕКксби Мамандap faHa opьИндayfa Tnic. Kсicи Мамандap таразын acbipblmafahжehdey куMbICTapьи naДаланушьih 03iH kapaKaTTaybl Mymkih.
KypbIINfBInH yCTiHe eWkaaH OTbIPyFa Hemece yCTiHe HApce KOHa 60JMaIDbI.
KypbifbihiH iWHe eWkaaH 6acka HApce canyfa 60MaJdbI.
Kypblfblh yctihri 6oJIirH eWKaah cyfa Hemece 6acka cynbIKTBKKa 6atbipyfa 6olmaJdbI.
KypbIfblbI eWkaaH KaXeTTi MeIWepeH acbipa TOnTbIpyFa 60MaJdbI.
- CaybITbI TOJIbIN TypFaH KypbINFbIHbI TaCbIMaJdAyFa HeMece KncaiTyFa 6OJMaIDbI.
- XeJIiIK aIaITepeI eIkaIaH Ka6eIiHeN TaPbIn HeMece IbIMKbIN KOImeH po3eTKaIaH cybIPbIn anyFa 6OImaiDbI.
KypbIINfbHbI TOJIbIK KypacTbIPfAHHa KeiH FaHa KOJaHbICKa eHri3y KepeK.
KypbIfblHbI Teric api KypfaK 6eTke fana opHaJacTbipy KepeK.
KypblfblblyaapblbIn KeTneTih, api oFaH Hemece OHbIH Ka6eIHe eWKIM cyPiHn KeTneTih etin opHaTy KepeK.
KypbIfbl MeH 6aCKa 3aTTapDbIH XHe Ka6bIpFaIapDbIH apacbIHda KeMInDe 50 cm 6oc opBn KaIyFa Tnic.
- Eн улкен opnatу 6иiktiri: 2000 metp
KypbIfbl IaMaHaH TbIC KbI3bIN/3aKbIMDaHbIN KaImac ywiH aya aImactblpy caHbIaynapbIH eWkaWah 6ypKeH hemec 6eRen Tactayfa 6oJMaIdbI.
- Čcipece kblc aɪnapbɪnda 6eɪmè iɪiHŋeɪ bɪfənɒbɪnbɪk y3aK yαkbɪT 6oɪbɪ 60%-dən acca, 6nOJornaIbɪk aF3aIap naɪda 6ɔnybɪ Mymkɪn.
KypbIfBihH jacaanyi XaHe OHda KOJdaHbIFaH KOHeHcaTTbI 6yHaHbipy TexHOJorNcbl, KypbIFbIHbI Dypbc icKe naJaHaHFaH KaFdaJaOhBiH KopnycbiHaH cydbIH TaMWB HeMece 6by TypiHde 6eJIHyIe XaHe KaK TpyFa Kon 6epMei.
KypbIbHbI TeK e3iHe apHaIFaH TynHycKa BeHTa KepeK-JapaKTapbImeH 6ipre naJaIahy KaKeT. BcIe TaPAnTaH aIbIHFaH KepeK-JapaKTapdbI KOJaHy caIapbHa Venta-LuftwAscher GmbH eW6ip JxayanKepeWiIik KTepeMeiDi.
Kypblfblb6ipHeWe KYN naJaIaHa6acHb3 HeMece aFbITbIn y3aFbIPAk yaKbIT caKTan KOIFbIHb3 KeInce, XaFbIMCbI3 iCTIH HeMece aFbIHcbl3 cyda 6nOToTnBik aF3aIapDbH naJa 6OlybHa xoJ 6epMey HeMece cy XunHaBn KaImay yWIn cy cayblbHbH iWiHdericih 6dEHTerin, KOKbICTapblHaH apblTy XHe KypFaTy KepeK.
Kypblfbln naJaIaHa6aHaN Ke3e JeJIiIK aIaIaTePiH po3eTKaHaH aFbITbIN KOIBHbI3.
KypbIbIHbIH aHaHacbIHdaFbI JepDIn bIIFaI HeMece cy 60nbIN KaIybiHa Koj 6epMeHiz. blfai naJa 6oJca, KypbIbIHbIH JyMbIC KapKbIHbIH a3aTbIHbI3. KypbIbIHbIH JyMbIC KapKbIHbITomeHDeTyre 60MaHTbIH DeHReIe XeTce, KypbIbIHbI apa-Typa y3iNic JacaN naJaIaNbIHbI3. Cy ciHipin aIaNtBn KInem, nepde, rapDnH HeMece YCTeJ XaNkbIw TApi3di HApCenepDiH bIIFaI 60nbIN KaIMaybIH KaJaFaIaNbI3.
KYPAMbl
1×Venta Kypblfbcbl
1×Betekeederi rurnehaibk Kypan 50 M
1xKbickaaHaYcKaayJIbIK
1xKayinci3dkieckepTynepi
Erep 6eIweKtepi Keticnce Hemece 3aKbIMdaHfAn 6oJca, VENTA Kbl3MeT Kepcety To6bHa Hemece KepriliKiTi DnIepre xa6apIacbIbI3.
БЕДΓΙΝΕΡ
Kayinci3ik eceptynepi: Aaamapfa kHe 3aTapfa KeJeTin 3apdan HeMece 3aKbIMhbln aIdbH any ywiH MyKnraT Oky KHe opbIHday KepeK.
KocbIMwa aKnapaTap
PaindaJIkeHeCTep
MAKCATKA CAV KOJIDAHU
BvI Venta KypblfbcI - 6eIme iwiHderi ayahbl bllfanaHdbipyfa apHaIFaH TpyMbICTbIK Kypblfbl. BvI Kypblfbl cbipTTa KOlaHyfa apHaImaFah. KypblfbHbI backa MaKcatta KoIdaHy HeMece oFaH e3repic eHri3y - OHbl 6epinreH MaKcatta KoIdaHbay DeN KapacTbIPbIaDbI. KypblfbHbI eHdipywi OHbl KepceTIReH MaKcattanb Backaa KaDaHy HAtnJecInHe opbIH aIFAH 3aKbIMdap MeH aadamapdbH japaKaT aNybiHa XayanTbI emec.
MAKCATKA CAV KOJI DAHBAY
KypbIbIbIMaKcaTka cai naIdaIaN6aca, deHcayIbIKKa JHe OMpRe Kayin ToHdipyi MymKiH. ByFaH TeMeHderI KaFdaInapDa KOnDaHy KaTaDbI:
- KapbIbIC kaynti 6ap xHe/Hemece arpeccnBti aTMocΦepaIbI opTaanda naIdaIaHy
- Epitkiwterp kən mənwepde caKaTalfah 6əlmenepe KoIdaHy
- BaCCeHnDep MeH bIINFaIbI opTaNapda naIaIaHy
Далада пайдалану

KALII KΘPIHICI
1Диспел
2 KypbIINfbIbIH yCTIHrI 6eJIiri
3 Kei aanTepi (opHaTbINFaH)
4 Tacbimalay kayinci3diri
5 TaKaTaWanap KInHaFbI
6 TacbImaJny kayinci3di
7 KypblfBihbHaCTbIHFB16eJIiri
8 Betekegeri rurnehaBik Kypan 50 mI
EH AIIFAI IAI DAJIAHY AIIbIHDA
KypbIbHbOpambHaHaNbHb3XaHe KoBbHb3.KopaTah 50 Mn8
rurnehaBk KypaIbI aNbHb3.YcTIHI6eJIirH2 aNbHb3.TacbMaJday
Kayinci3diRi KypaIbIH4 KypbIbHbIH yCTIHri 6eJIiriHeH 2 aNbHb3.
TaKaTa7anap XnHaFbIH 5 acTbIHbI 6eJIiriHeH 7 aNbHb3 XaHe TaCbMaJday
Kayinci3diRi KypaIbIH 6 aNbHb3.
KoДАныICKA EHΓI3Y
A ActbHbI 6eJIiH 7 KpaH cybImeH WATERLINE cbI3bIKwaCbHa DeiH ToJIbIPbIn, yCTHe 50 Mn rurnehaBik KypaJdaH 8 KocbHbI3 (6TeKHeH iWIndericin TyreI).
KypbIfblHbI eWkaaH yctiHi 60niri opHaTbIbIn TypFaHda TOnTbIpYfa 6oImaHbI!
i TnHnHaIbIK KypaIbI Kocy eTe MaHbI3DbI, ce6ebi OcbI KypaIbIH KEmerImeH aya 6apbIHwa JkaKcbl bIfAanHdbIpblaDbI.
B TaKaTaIaIap XnHaFbIH 5 actbIHfbl 6eJIiKke 7 eHri3in, yCTiHi 6eJIirih 2 actbIHfbl 6eJIiKke 7 opHaTbIHbI3.
C Xeni aanTepinH 3 aascbn 3neKtp xenicihe Kocbln, nncnneneri 1 Kyat Tynmecin Kbickaasa 6acbln, KypblfbiHbI KOCBih3.
KypbIINFbI əJIeKTp JxeniciHe KocblfH Ke3de FaHa Kyat TyMeci KypbIINFbIHbIKOCy JxHe cOHNipy ywiH XaHbIN TpyaBl.
XABAPJIAMALAPbl, ΦУнкциЯлAPblЖэHE IAPAMETPJIPEPI
Xa6apIamaФункця
1blfalfdbibk Bemedei aya bifandbifbH Kepcety (0 - 99%)
Aya bIfaiBbIfbiXa6apamaCbHbIH OPhbHa "UP" Xa6apbi KepiHce, KypblFbi 6afapamaJIbIK JacaKaTamaHbI KaHApTy yCTiHne. Cy deHreNi TeMeH 6oJca, aya bIfaiBbIfbIH Kepcety xa6apamaCbIHda e3repic naJa 6oJybl MymKiH.
2Kmbic KbIaMbIKTbi1-2-3KepceTy. KapkbiHbl
3 -XaHe+ Kymbic KapKbIHbIN KbICKaaTaTpyTIn opHaTyFa 6oJaIbI: " XblnDaMdbIKTbI a3aNtAdI, +" XblnDaMdbIKTbI Ke6eYTei.
4 SLEEP Tyh peXmH KbICKaaTypTIn, KocyFa JxHe cHnDipyre 6oJaDbI. KOCY: Kypblfbl DncnneJxapblfbln TeMeHdEtin, XyMbIC KapKbIHb1 1 deHreInHe KOaDbI.
2 DeHreIerj KymbIC KapKbIHbIH KOJIMeH HeMece 3 nepHeciHH KEmeImeH petTeyre 6oJaI. ABTomaTTby Tpyde 7 KoJdaHy MymkIn eMec.
Tyn peximine caikec keletin dncnne Jkapbfbn opHaTy:
3cekynd 6oynbI SLEEP tyMecin 6acbin, HUMIDITY 1 xa6apbl KepinH, SLEEP 4 kblnbIbIKtaFaHa 7a Kytepek. - HeMece + TyMecinH KeMerimH 3 KaIaNan DnCnne JkapbIFbH O XaHe 10 KaIIbHa KoBIn, HUMIDITY 1 apKblbI KbIbIKTan KepiHReHwe opHaTy kepek. SLEEP-nepHecin TaFbI 3 cekyHd HUMIDITY 1 XaHe SLEEP 4 y3dkci3 XaHaHa 7aXaHe 6eJIme iWHe eJWeHreH aya bIaNbIbIFbI HUMIDITY 1 apKblbI KepcetilrReHwe YCTan Tpy KepeK.
COHdIPy:IucnneJxapbIKTaHbIN Tpy XaHe Kypblfbl 1-3 Kymblc KapKbIHbI 6oBbIHwa Kymblc icTeT NTyp.
Xa6apIamaФyHKcIa
KypblfblbIeH aIFaIcKe KockaHa oCbI peXIM aBTOMaTTbI TypDe KocblaDbI.

WiFi 6enrinepiH 3 cekynd 6acbIn Tpy apKbInbIXOTcNOT peXmIH Ke3 KeIReH yaKbTTa Kocyfa 6oJaBbl.
2. CmapTfoh Hemece nlaHwete WLAN kocy
CmapTfoHbIb3dbIH HeMece nlaHweTiHi3diH yuJeri WLAN keniCiHe KocblbIN TypFaHbHa K03 JKeTkizhi3.
3. VENTA KoIdaH6acbH JxKTe n any, oPhAty XaHe aWy
Terin Venta KoIdaH6acbIHbIH KemerimEn Venta KypblfBih3dbI cbiptTah OhaBackapyfa XHe KeheiTilreH cyHKunapbIH naIdaIahyfa XHe 6ackapyfa 60anaDbI.


4. VENTA KoIdaH6acbI apKbIbI WiFi opHaTy
CmapTfoHbIb3 6eH nnanweTiH3diH dncnneiHderi HyckaynapdbOpbHaHbI3.

WiFi ophaTy ke3iHnde MaceIeIep naJa 6oJca, "WiFi KocblbIMbl6oJmaca He icTey KepeK?" TapMaFbIH OKbIHbI3.
KocbIMsa aKnapaTbI www.venta-air.com/Service/Venta-Home-App/caHTbIHah KapaHbI3
TA3AJIAY JKÖHE KYTIM KÖPCETY


A6a60nbHb3!BapnbKwaapaanapdbOpbHday aIbIHda KypblfbiHbIH cHdiipin, jeni adanTepiH po3eTKaHa aFBtblbIN TpyFaHbHa Ke3 keTki3yKepek!
Xa6apnama Ic-waapanap
8 WATER
Yctihri 6eJIirH aIbIHbI3. AcTbIHfbl 6eJIIRH WATERLINE CbI3bIKwacbiHa deiH ToIbIPbIHbI3. YcTIHI 6eJIIRH actbIHfbl 6eJIikKe opHaTbI, KypblIFbIHbI KaHTa KOJaHy KepeK.
i ActbHfbl 6eJIkTIc ybl MyIeM a3aHaHa, KypblIbI abTOMaTTbI Tpyde cHei JxHe WATER xa6apnMaCbl KepiHei. HUMIDITY 1 xa6apnAmcbHbIH eki KonFabI XblnbIKtAn, 6eIme iwiHderi ayabIaNdbIbIFbl KepceTinMei.

Bemehin ayacbH y3dkci3 bilfandaHbipy wih cydbi yaKbITbIbIKHOKepeK.
9 Kbl3MET KθPCETY
YctiHri 6oJIiri H aIbIHbI3. ActbIHfBI 6eJIkTe KaIHaH cyDbI Tery KepeK. ActbIHfBI 6eJIkTI XaHe TaKaTbIaIap XInHaBbIH CyMeH WaBbIH3. ActbIHfBI 6eJIiri H KpaH cybIMeH eH Ke6i WATERLINE cb3bIKwacbHa Dein ToNTbIPBn, Venta rurHeHaJIbIK KypaJIbIH KocbIH3 (Kocy MeJsePiH 6eTeKeHIn apTKbl KaFbIHda WkaIaMeH aHbIKTaHbI3. KypbIHbI KaI-Ta KypacTbIpy KepeK. DncnneJeri SERVICE xa6apJaMaCbIH 9 6acbln, cehReHwe 3 cekynd yCTan TypbIH3.

Ta3aIbIK caKtan, KypblfblHbI y3aK yaKbIT Kepeprici 3 naJaIaHaYfMaYMkiHdk6epy ywiH SERVICE xa6apIaMacbi H eTKeH caBbIH OcbI wapaHbI opbHday KaKeTe ekeHH ecepteJI.

Булшарны SERVICE xa6aplamacbl Keipinbece De, KaKeT Ke3depi opbHdAn Tpy KepeK. CoHbHda SERVICE aplamacbln 9 TypTin, 3 cekynd yctay KepeK. Keleci ecepty 14 Heh keiH SERVICE xa6aplamacbl apkblbl KepceTinei.
Cy caybITbIHdaFbI XHe TaKaTaHaJap KInHaFbIHdAfbI KaJIbIKTapDbIH 6apNbIFbI (ak, Xacbl, capfblHemece KOhbpKapdbIKTap HeMece TyciH e3repyi) KypblfbiHn Kymbciha acep ETNEI. Jkaptbl Xblna 6ip Ta3anay Ke3iHde Venta Ta3anaFbIbH KOJaHydbI YcBiHaMbI3. Venta Ta3anaFbIH KypalbIme H 6ipre KeIReH naJaHaHysbI HcKaylbIFbIH KapaHbI3.
TEXHnKAlbIK DEPEKTEP
| Ynlri | AH510 / AH515 | AH530 / AH535 | AH550 / AH555 |
| Белme онлайнingen, Жарам дылбí FBI* | ≤ 35 M² ≤ 45 | M² ≤ 60 M² | |
| Интетаховп тач, диспел | Серияа байсяныctы | ||
| Колданьiblesбаскару | Серияа байсяныctы WiFi | ||
| Тусту ворланиот ak/ брименит кара | |||
| ЖуMbIC KapKbINbINbIN, деньгейлerepi | 3 + АВТOMaTTы | ||
| Дыбысън, Кучегоi (1-3 degиrelerpi) | 24/34/44 ДБ(A) | 24/34/44 ДБ(A) 24 | 35/45 ДБ(A) |
| Злесspr Кучатын Колданy (1-3 degиrelerpi) | 3/5/8 ВаTT | ||
| Желі керneyi 100-240 B, 50 / 60 Гц | |||
| Сydын, Кoleмii (maks.) | 5 лintр | 7 лintр | 10 лintр |
| Өлшемерii (YxExБ) | 26×28×31 сM | 30×30×33 сM | 45×30×33 сM |
| Салmaftы | шamameh 3 кг | шamameh 3,5 кг | шamameh 5,2 кг |
| WLAN-жниik ayкьíMbI | 2,4 Гц | ||
| WLAN-жetimekizу Каркынbl | ен көбi 20 дБМ | ||
* mamameh maKc. 2,5 M 6eJIme eceKe aIbIHraH, e3repTyIep HeMece caikecci3ikTepeybl MYMKiH
1
2
3
4
5

6
KYPbIJIbIHbIH YCTIHΓI 6θJIKTEPIH TA3AJIAY

A6aB 60IbIbI3! BapIbIK WapanapIbI opbIHday aIbIHda KypblfblHbIH cHdipin,KeJI aHaNTepiHn po3eTKaHa h afblblIn TypFaHbHa Ke3 XeTki3y KepeK!
01 YcTirI 6eJIirH actbIHbI 6eJIirHeH aIbIHbI3. WETepi Kofapbl KeTepiy ysiH 6eKITy TYmEnepiH 6acIHbI3.
02 Wettepin cbiptka kapa Kaibpy KepeK.
03 ByinipniK KblI KaIkaHwaIapDbI cbIpTka Kaaiy KepeK.
04 Kei aanTepinH aacbH Ko3faNTKbIaTah afity Kepek 1 . Ko3faNTKbIaTbI KofapbI Kapai TapTbIn any Kepek 2.Kei aanTepinH Ka6eHn 6ekitncineH albIn, 3 yctihri 6eJIikTih caHbIaybl apKblbl TEmeH TapTy Kepek 4.

Ko3raNTkbln nen Xeni aadantepin 6eIweKeTEmey, cyfa 6aTbIPmay XHe cyhblk 3aTkata Tnri36ey Kepek!
XeIeTeKiI KanaKaIaIapbl 6ap Ko3FaIeTKbIuTbI XHe peDyKTopDbI TeK Kypfak CypTkIuNeH FaHa Ta3aIaNbI3.
- Балшектehren yctihi 6oJIkTi afbIn TypraH cyMeH kpeK!
-Балшектehren yctiHri 6eik MOHTaXday anDbIHda Kypfak 6onybl Kepek!
05 Ko3faNTkbIbI yCTiHi 6oJIkKe dYpbIC XaFBImeH opHaTy KepeK 1. AshaHbI JeJI aAdanTepiHeN acTbIHbI XaFBiHaH yCTiHi 6oJIkTiH caHbIaybl apKbIbI XoFapbl KapaTapTbIn, 2 Ko3faNTkbIbKa cbIpTe TkeH dbIbIC ecTIirreHwe KipikTipy KepeK 3. Ka6ebdi 6ekitncine 6ekiTih3 4.
06 BekitnepeHH cbiptkbl WeTTepi Kofapbl KeTepiin TypybI KepeK. Byip kakTaB1 1 XaHe 2 Kblpbl KaIaNkwaIapDbI, COhBiHa 3 XaHe 4 Byip aIemHTEpiH Kofapbl KaIbpy KepeK. BekiTnepeHH cbiptkbl WeTTepiH bacbln, 5 XaHe 6 YcTInrI 6eJIkti KaI-Ta dypbc Xa6y KepeK.
KEPEK-ЖAPAKTAPbl
KepeK-kaPaKaTapFa TelefoH apKbIbI Hemece www.venta-air.com caaTbI apKbIbI OHnaH Tancbipbc 6epyre 6oJaB1.
ДЕPEKTEРДIH KAYIINCI3ДIΓIH KAMTAMACbI3 ETY
Venta-Luftwäscher GmbH DepekTeepiH KynnJIbIbIFbIH KaMTaMaCbI3 ete.i. DepekTeepiH Kayinci3diRiH KaMTaMaCbI3 eTyRe KaTbICTbl KocbIMwa aKnapaTTbI www.venta-air.com caiTbIMbI3daFbI DepeKTeepi Kopfay epexeJepiHe n ana aIacbl3
KENIIIDIK
Venta-Luftwäscher GmbH aTaIbIi KypblfbiHcapanacbi Kofapbl 6oIFaHdbIKTaH, MaKcaTka cai dypbic KOJaHaFah JkaFdaJa, KypblfbiHbI caTbIaIFaH KyHHeH bactan eki XbI iwiHne 6yI KypblfbiDa eW6ip aKay 6oImaIbIHbIH mAnimdei. DeereHmeH, MaTePnAhl Hemece Kypblfbl KymblcBiHa KaTbICTbI aKay 6apbl aHbIKtaIaca, VENTA Kb3MeT KepCey To6bHa Hemece dInlepiHiz re xa6apnaCbIHbI3. ByfAH KocBIMwa KypblfblHbI3fa Venta TapaBbIHan 6epiTeiH jaalnbI KeiJndik apkbIbI rapaHTnI 6epinei: www.venta-air.com
KAIITA ΘHДЕУДЕH ΘTKI3Y ЖАНЕ KOKыICTAPДAH APыIlY

Opam MaTePnAJIbH KaI Ta NaIaJIaHfyFa 6OJaIbI. Opam MaTePnAJIapBbH KOp7aFaH OptaFa 3IaN KeIeTIpMeiTIn JxOJMeH TaCTay XaHe KOKbIC XINHaIbI H apHaIbI OpbIHApFa TaIcBly KepeK.
YcTi cbl3bIiFaH KOKbIC KOHTeHepiH, 6enrici Eckipren anektp jHe
aJIeKTPOHdbI KypblfblapblHaH apblny (WEEE) Hcyckaylapbln caKaTan,
apHaBbIKoKBicKa TaCTaJaTbH Kypblfbl DeReHdi 6ilipeDi. MyHdaI
Kypblfblnapda Kayinti JxHe KOpwaFah opTaFa 3nHDbI 3aTTap
60ana. MyHdai KypblfblapdbI aJeKtp JxHe 3JeKTPoHnKa KypblfblapbHa apHaIFaH apHaBbI opblndapfa anapbIn TaNCbipy XaHE TpyMbICTbIK, KOkbiCTapMeH bipre TacTamay KepeK. Ocblaa pecypcTapdbI naJaIaHy MeH KOpwaFah OpTaHbI Kopfayfa 03 yIeciHi3di Koca aJacbI. KocbIMwa aknapaTTapdbI JepriikTi MekeMere xa6apnaCbIn anybHb3DbI eTIHeMi3.
BaIaIapFa eWkaIaH nIacTnK dOp6aIap MeH opam MaTePnaIapbIMeH O'HayFa pyKcaT bepMey KepeK, ce6ebi oIap JkapaKaT aIybl, dJIipeK aIHTKaHda TYHwbIfbIn KaIybl MymKIn. MyHdai MaTePnaIdbI MVKJrT caKTay Hemece OdaH TnicTi JoIMeH apblny KepeK.
MыHAЖAFДАйлAPДAHEICTEY KEPEK?
Bapnbik wapaanapdbi opbIHday aIbIHda KypbINfbIHbIH cHdiipin, Xeni aadantepiniH, po3eTKaadah aftbITbIn TypFaHbHa K03 XeTKi3y Kepek!
...Диспел徳E1 xa6apbl KepiHeme?
KypbInfbl aBTOMaTTbl Tpyde cehin KaIdb, ce6ebi yctIHri 6oJIirHderi
6eKITnelepi dypbic 6ekitilmereh.
BekitnepepiH cbipTkbl weTTepiH 6acbl, dypbic 6ekiTy Kepek. KypblfblHbl Kyat TyMecimeh OceHdipy JxHe KaTaNocy Kepek.
...ДиспелейдE2 xa6apbl KepiHeme?
KypbIbI aBTOMaTTbI Typde cHIn KaIdbI, ce6e6i Ko3FaNTKbIUtbIH KyKTeMeci apTKaH (MbIcAlbI, cbIpTTaH 6eRde 3aT Kipin KeTy apKbIbI.).
@peke:YcTiHri 6oJiriH any Kepek. AcTbIHfbl 6oJIkTeri TaKtaWanap XnHaftbMeH YcTiHri 6oJIkTeri XeJdTeKlSi KaJaKaWanapDbH epKIn Ko3fana aIaNtBihbH TeKcepy Kepek. CodaH Kein KypblfblHb KaTa icKe Kocy Kepek.
Dypblic OPhaTbIHbI3.
Буган Косьимма Ла щадалтетерин устihглжэн acынгьболikтih apacьин KBICTbIPbIN KaImafaHbIH TeKcepy Kepek.Содан KeiH KypblfBihKaTа icke кocy Kepek.
VENTA KbI3MET KθPCETY TO6bl
Venta KypbIbnfbciha KaTbICTbI KocbIMwa aKnapaT, anJe KeHec aJFbIHb3 Hemece KepeK-jkapKa TaNCbIPbc 6epriH3 Kele Me? OprHe: Bi3diH Venta To6bIMbi3 ci3Re KbI3MeT eTy ywiH! TiKeNei KOhbpay wanybIHb3Fa Hemece Venta www.venta-air.com caNtbiHa 6apyblb3fa 6oJaB1
Ca
| WiFi giaho를 기재 키어 WiFi 키일 eventually => (BI)화상. WiFi 키일 ON => => => => => => => => => => => => => => => => => => => => => => => => => => => => => => => => => => => => => => => => => => => => => => => => => => => => => => => => => => => => => => => => => => => => => => => => => => => => => => => => => => => => => => => => => => => => => => => => => => => =>> WiFi => => => => => => => => => => => => => => => => => => => => => => => => => => => => => => => => => => => => => => => => => => => => => => => => => => => => => => => => => => => => => => => => => => => => => => => => => => => => => => => => => => => => => => => => => => => => => => => => => => =>) WiFi => => => >> => => => => => => => => => => => => => => => => => => => => => => => => => => => => => => => => => => => => => => => => => => => => => => => => => => => => => => => => => => => => => => => => => => => => => => => => => => =>> WiFi => >> >> >> >> >> >> >> >> >> >> >> >> >> >> >> >> >> >> >> >> >> >> >> >> >> >> >> >> >> >> >> >> >> >> >> >> >> >> >> >> >> >> >> >> >> >> >> >> >> >> >> >> >> >> >> >> >> >> >> >> >> >> >> >> >> >> >> >> >> >> >> >> >> >> >> >> >> >> >> >> >> >> >> >> >> >> >> >> >> >> >> >> >> >> >> >> >> >> >> >> > >> >> >> >> >> >> >> >> >> >> >> >> >> >> >> >> >> >> >> >> >> >> >> >> >> >> >> >> >> >> >> >> >> >> >> >> >> >> >> >> >> >> >> >> >> >> >> >> >> >> >> >> >> >> >> >> >> >> >> >> >> >> >> >> >> >> >> >> >> >> >> >> >> >> >> >> >> >> >> >> >> >> >> >> >> >> >> >> >> >> >> >> >> >> >> >> >> >> >> >>> >> >> >> >> >> >> >> >> >> >> >> >> >> >> >> >> >> >> >> >> >> >> >> >> >> >> >> >> >> >> >> >> >> >> >> >> >> >> >> >> >> >> >> >> >> >> >> >> >> >> >> >> >> >> >> >> >> >> >> >> >> >> >> >> >> >> >> >> >> >> >> >> >> >> >> >> >> >> >> >> >> >> >> >> >> >> >> >> >> >> >> >> >> >> >> >> >> >> >> >= >> >> >> >> >> >> >> >> >> >> >> >> >> >> >> >> >> >> >> >> >> >> >> >> >> >> >> >> >> >> >> >> >> >> >> >> >> >> >> >> >> >> >> >> >> >> >> >> >> >> >> >> >> >> >> >> >> >> >> >> >> >> >> >> >> >> >> >> >> >> >> >> >> >> >> >> >> >> >> >> >> >> >> >> >> >> >> >> >> >> >> >> >> >> >> >> >> >> >> = >> >> >> >> >> >> >> >> >> >> >> >> >> >> >> >> >> >> >> >> >> >> >> >> >> >> >> >> >> >> >> >> >> >> >> >> >> >> >> >> >> >> >> >> >> >> >> >> >> >> >> >> >> >> >> >> >> >> >> >> >> >> >> >> >> >> >> >> >> >> >> >> >> >> >> >> >> >> >> >> >> >> >> >> >> >> >> >> >> >> >> >> >> >> >> >> >> >> >> << >> >> >> >> >> >> >> >> >> >> >> >> >> >> >> >> >> >> >> >> >> >> >> >> >> >> >> >> >> >> >> >> >> >> >> >> >> >> >> >> >> >> >> >> >> >> >> >> >> >> >> >> >> >> >> >> >> >> >> >> >> >> >> >> >> >> >> >> >> >> >> >> >> >> >> >> >> >> >> >> >> >> >> >> >> >> >> >> >> >> >> >> >> >> >> >> >> >> >> => >> >> >> >> >> >> >> >> >> >> >> >> >> >> >> >> >> >> >> >> >> >> >> >> >> >> >> >> >> >> >> >> >> >> >> >> >> >> >> >> >> >> >> >> >> >> >> >> >> >> >> >> >> >> >> >> >> >> >> >> >> >> >> >> >> >> >> >> >> >> >> >> >> >> >> >> >> >> >> >> >> >> >> >> >> >> >> >> >> >> >> >> >> >> >> >> >> >> >>>>> >> >> >> >> >> >> >> >> >> >> >> >> >> >> >> >> >> >> >> >> >> >> >> >> >> >> >> >> >> >> >> >> >> >> >> >> >> >> >> >> >> >> >> >> >> >> >> >> >> >> >> >> >> >> >> >> >> >> >> >> >> >> >> >> >> >> >> >> >> >> >> >> >> >> >> >> >> >> >> >> >> >> >> >> >> >> >> >> >> >> >> >> >> >> >> >> >> >> >> \( \Rightarrow \) >> >> >> >> >> >> >> >> >> >> >> >> >> >> >> >> >> >> >> >> >> >> >> >> >> >> >> >> >> >> >> >> >> >> >> >> >> >> >> >> >> >> >> >> >> >> >> >> >> >> >> >> >> >> >> >> >> >> >> >> >> >> >> >> >> >> >> >> >> >> >> >> >> >> >> >> >> >> >> >> >> >> >> >> >> >> >> >> >> >> >> >> >> >> >> >> >> >> >>> WiFi =>> WiFi =>> WiFi =>> WiFi =>> WiFi =>> WiFi =>> WiFi =>> WiFi =>> WiFi =>> WiFi =>> WiFi =>> WiFi =>> WiFi =>> WiFi =>> WiFi =>> WiFi =>> WiFi =>> WiFi =>> WiFi =>> WiFi =>> WiFi =>> WiFi =>> WiFi =>> WiFi =>> WiFi =>> WiFi =>> WiFi =>> WiFi =>> WiFi =>> WiFi =>> WiFi =>> WiFi =>> WiFi =>> WiFi =>. WiFi =>> WiFi =>> WiFi =>> WiFi =>> WiFi =>> WiFi =>> WiFi =>> WiFi =>> WiFi =>> WiFi =>> WiFi =>> WiFi =>> WiFi =>> WiFi =>> WiFi =>> WiFi =>> WiFi =>> WiFi =>> WiFi =>> WiFi =>> WiFi =>> WiFi =>> WiFi =>> WiFi =>> WiFi =>> WiFi =>> WiFi =>> WiFi =>> WiFi =>> WiFi =>> WiFi =>> WiFi =>> WiFi =>> Wireles ->> Wireles ->> Wireles ->> Wireles ->> Wireles ->> Wireles ->> Wireles ->> Wireles ->> Wireles ->> Wireles ->> Wireles ->> Wireles ->> Wireles ->> Wireles ->> Wireles ->> Wireles ->> Wireles ->> Wireles ->> Wireles ->> Wireles ->> Wireles - >> Wireles - >> Wireles - >> Wireles - >> Wireles - >> Wireles - >> Wireles - >> Wireles - >> Wireles - >> Wireles - >> Wireles - >> Wireles - >> Wireles - >> Wireles - >> Wireles - >> Wireles - >> Wireles - >> Wireles <> Wireles - >> Wireles - >> Wireles - >> Wireles - >> Wireles - >> Wireles - >> Wireles - >> Wireles - >> Wireles - >> Wireles - >> Wireles - >> Wireles - >> Wireles - >> Wireles - >> Wireles - >> Wireles - >> Wireles |
FGENTVENTA

WiFi
GAMBARAN KESELURUHAN
1 Paparan
2 Bahagian之作 peranti
3 Bekalan kuasa (dipasang)
4 Kunci pengangkutan
5 Paket plat
6 Kunci pengangkutan
7 Bahagian bawah peranti
8 Botolejen kebersihan 50ml
SEBELUM PENGGUNAAN KALI PERTAMA
service-hu@venta-air.com
www.letmerepair.com
ITALY
LetMeRepair GmbH
Fichtestrasse 1a
02625 Bautzen
service-it@venta-air.com
www.letmerepair.com
JAPAN
Address Service Co., Ltd.
17-9, Shinoda, Togane-shi
Chiba, 283-0013 Japa
Tel.: +81-120-407-554
venta_support@adservice.
co.jp
LATVIA / LITHUANIA
SIA.BALTIJAS
TIRDZNIECIBAS
UZNEMUMS
Darzauguiela1-201
Riga LV-1012, Latvia
Tel.: +371 67790720
info@btu.lv
MALAYSIA / SINGAPORE /
PHILLIPINES / VIETNAM
GA MAKMUR SDN BHD
No.27, Jalan PP 11/4
Alam Perdana Indust-
rial Park, Taman Putra
Perdana, 47130 Puchong
Selangor, Malaysia
Tel. +603-8322 6628
Fax:+603-83226066
info@gasales.com.my
MONGOLIA
AERIS LLC
SUITE 316, Barilga Archi
tecture Building, Chinggis
Avenue, Oron Suuts Street,
2nd horoo, Khan-Uui
district, Ulaanbaatar,
Mongolia 17032
Tel.: +976-99101185
+976-99096696
sales@aeris.mn
www.aeris.mn
PORTUGAL
LetMeRepair GmbH
Fichtestrasse 1a
02625 Bautzen
service-pt@venta-air.com
www.letmerepair.com
RUSSIA
Venta Russia TSK IMPORT
Kelvin South Business
Park, East Kilbride, G75
OYB, Scotland, UK
Tel. +44 (0) 1355 241 222
service-uk@venta-air.com
Fax+441355246575
SLOVAKIA
LetMeRepair GmbH
Fichtestrasse 1a
02625 Bautzen
service-sk@venta-air.com
www.letmerepair.com
SPAIN
LetMeRepair GmbH
Fichtestrasse 1a
02625 Bautzen
service-es@venta-air.com
www.letmerepair.com
SOUTH AFRICA
EUROCARE Wellness
5 Star Business Park,
Unit 2, Persimmon Close
Honeydew, Johannesburg
Südafrika
Tel.: +27 11 888 3255
Fax: +27 11 888 9874
info@eurocarewellness.
CO.Za
SOUTH KOREA
VENTAKOREA CO.,LTD.
3/F., Seojin Bldg., 754
Seolleung-ro, Gangnam
Gu, Seoul 135-948, Korea
Tel:+82220340114
Fax: +82 22 03 40 119
UKRAINE
Venta-Centre Ukraine
Schlichtera, 11
Kharkov, Ukraine
Tel. +38 057 752 72 72
Fax: +38 057 768 01 57
venta@venta.com.ua
SERVICE AND SUPPORT
www.venta-air.com/Service/Service-Support/
VENTA WORLD WIDE
www.venta-air.com/en_de/Venta-worldwide/
EAC C E