USER MANUAL Comfort Plus LW25 Venta
VIELEN DANK!
B
C
INBETRIEBNAHME


REINIGUNG VOM GERÄTE-OBERTEIL
We are convinced that the Venta Airwasher will exceed your expectations, and we hope you enjoy it.
Please register your Venta:
DE

DE
Please read this operating manual in its entirety, keep it for later reference and note all safety instructions as well as instructions for the proper use of the device.
The most current version of the operating manual can be found on our website at www.venta-luftwaescher.de
DEAR CUSTOMER,
when you purchased the LW15/LW25/LW45 Comfort Plus of Venta, you acquired a high-performance quality product for air humidification and air purification so you can create your ideal indoor climate!
Unique Functionality
Dry and polluted ambient air is fed into the device and through a disk stack that rotates in water. This evaporates pure water and the room air is automatically humidified according to the recognised best cold humidification method – this excludes the possibility of over-humidification and lime deposits. The room air is cleaned at the same time. Even the smallest dirt particles up to 10 µ m (10/1000 mm) are retained in the water – there are no filters that are polluted over the course of time. The water is the filter: It's new and fresh every day, year after year with consistently high humidification and cleaning performance.
CONTENT
Safety instructions 18
Scope of delivery 20
Symbols
Intended use 20
Not intended use 20
Overview
Before first use 21
Commissioning
Displays, functions & settings 23
Cleaning & maintenance 25
Cleaning the upper housing
20 of the device 27
Warranty
28
Recycling and disposal 28
21 Venta service team 28
What happens if...? 29
22 Technical data 30

SAFETY INSTRUCTIONS
• Maximum installation altitude: 2000 m
- Never cover or block the vents to prevent overheating/damage to the appliance.
- Only add original Venta additives to the water. Venta-Luftwäscher GmbH accepts no liability for damage which may be caused by the use of other additives.
• Unplug the appliance when it is not in use.
SCOPE OF DELIVERY
1 × Venta Airwasher
1 × bottle of hygiene additive 50 ml
1 × operating manual
If parts are missing or damaged, please contact the VENTA service team or your local dealer.
SYMBOLS

Safety instructions: Read and adhere to these instructions carefully, in order to avoid personal and material damages.

Supplementary information

Helpful tips
INTENDED USE
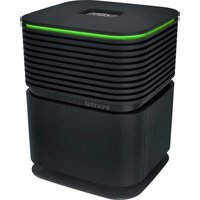
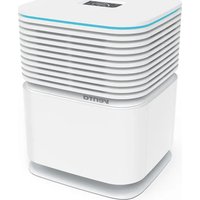
The Venta Airwasher is a domestic appliance for moistening and cleansing the air in homes, offices and leisure facilities.
The appliance is not suitable for outdoor areas.
Any other use or modification of the appliance is considered to be improper use. The manufacturer is not liable for any damage or injuries resulting from improper use.
NOTINTENDED USE
Using the appliance for something other than the intended purpose can endanger health and lives. This includes use under the following conditions:
- In rooms or locations where there is risk of explosion and/or where there is an aggressive atmosphere.
· In rooms where there is a high concentration of solvents.
· In the vicinity of swimming pools or other wet areas.
· In the outdoor area.

OVERVIEW
1 Display
2 Upper housing
3 Switching power supply (assembled)
4 Transport protection
5 Disk stack
6 Transport protection
7 Lower housing
8 Bottle of hygiene additive 50 ml
BEFORE FIRST USE
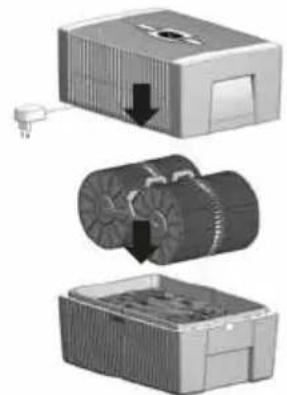
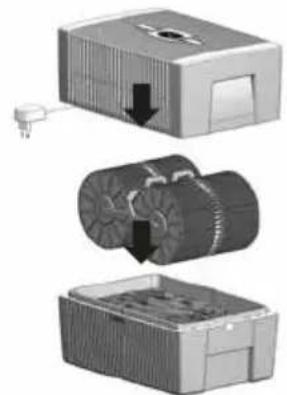
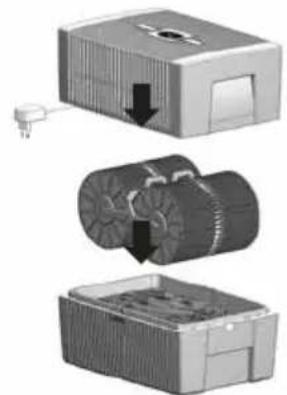
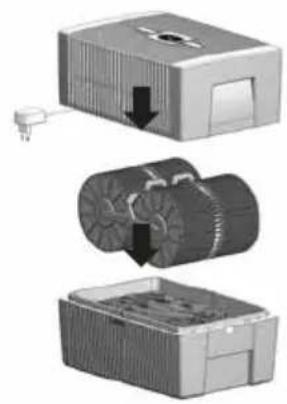
Unpack and set up device. Remove the 50 ml bottle of hygiene additive 8 from carton. Remove upper housing 2. Remove transport protection 4 from upper housing 2. Remove disk stack 5 from lower housing 7 and transport protection 6.
A


B
C
COMMISSIONING
A Fill lower housing 7 with tap water up to maximum WATERLINE marking and add 50 ml hygiene additive 8 (complete content of bottle).

The device may never be filled with the upper housing in place!

Adding the hygiene additive is very important so that the air is optimally humidified and cleaned.
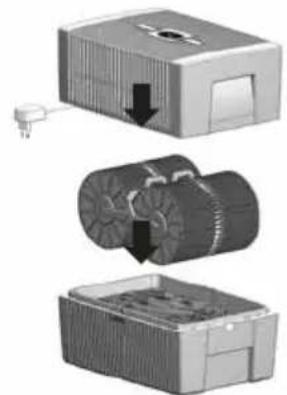
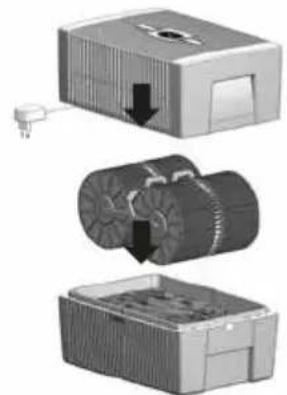
B Insert disk stack 5 in lower housing 7 and place upper housing 2 on lower housing 7.
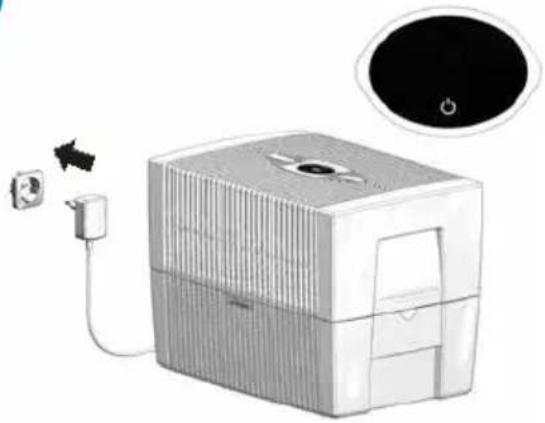
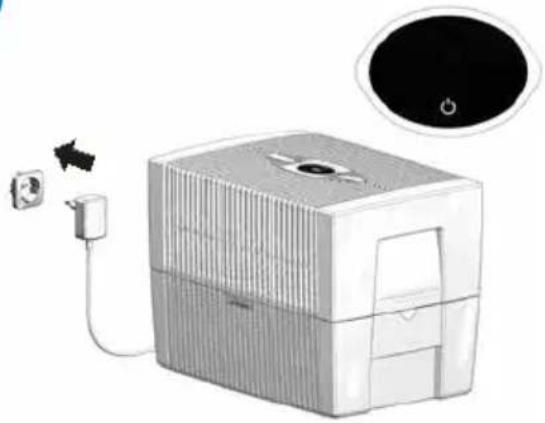
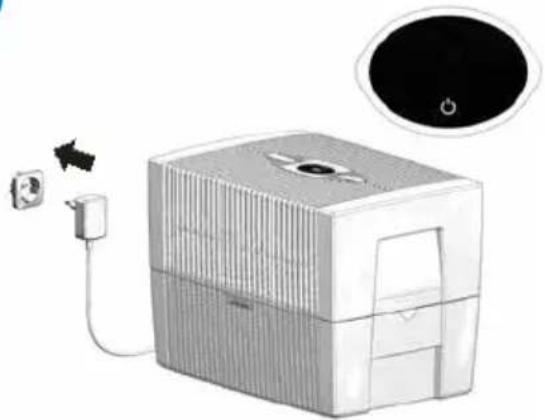
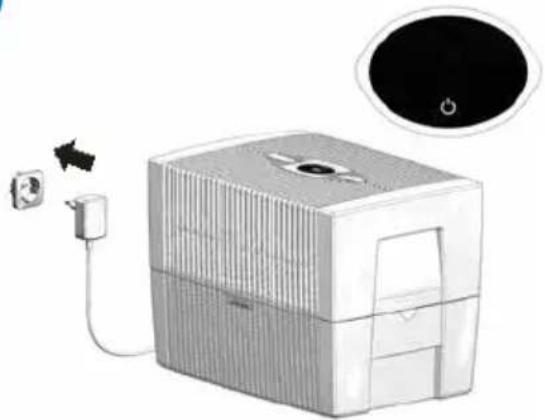
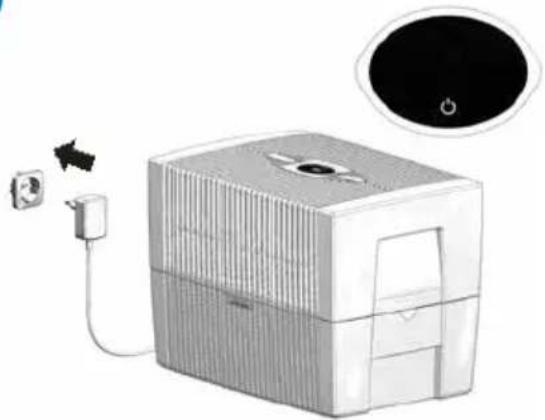
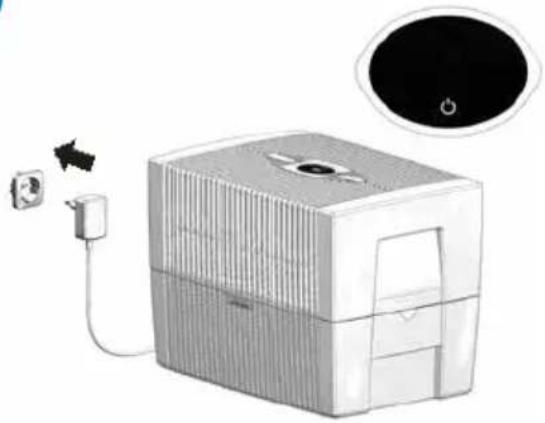
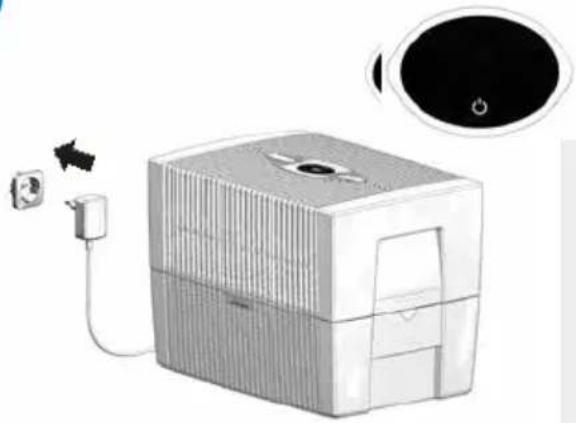
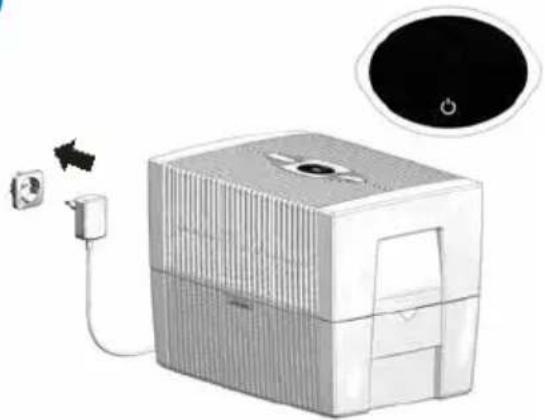
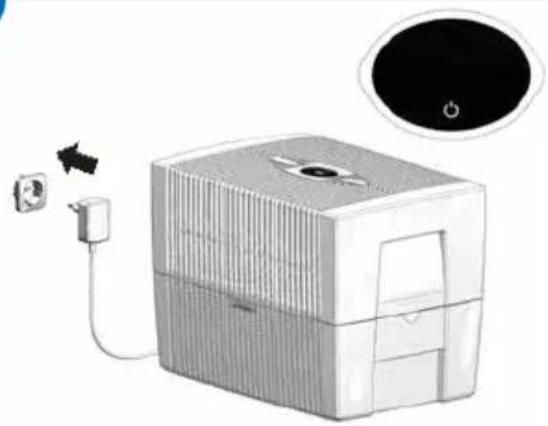
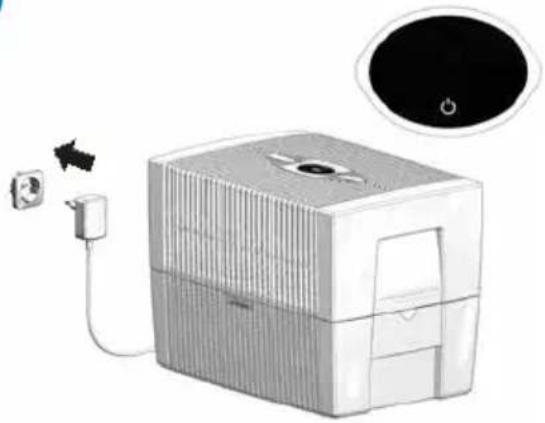
C Connect mains plug of switching power supply 3 to the mains and switch on device by briefly touching the power button in the display 1.

Only once the device is connected to the mains will the power button ⏻ glow to switch the device on and off.
DISPLAYS, FUNCTIONS & SETTINGS

Display Function
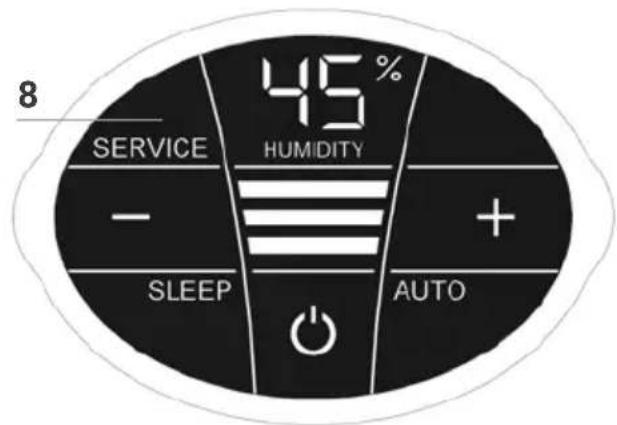
| 1 HUMIDITY | Display humidity in the room. |
| 2 rotational speed | Display rotational speed 1 - 2 - 3. |
The following displays can be changed or switched on and off by lightly touching them.
| 3 - and + | rotational speed: - reduces and + increases the speed. |
| 4 SLEEP Night mode |
| EIN: The device dims the display lighting and reduces the rotational speed to 1. |
| i rotational speed 2 can be changed manually with + or - button 3 . Automatic operation 6 is not possible. |
| OFF: Bright display lighting and device runs with set rotational speed 1 - 3. |
| 5 ⏻ | Power button to switch the device on and off. |
6 AUTO
Switch Automatic operation on device on or off by briefly touching the AUTO button
ON: AUTO in the display flashes continuously and device automatically regulates the rotational speed depending on the humidity in the room.
When switching on AUTO, the desired humidity (50 % pre-set) flashes twice and then will show the measured humidity in the room in the HUMIDITY display 1.
If the pre-set humidity is exceeded by more than 5 %, the fan will switch off after approx. 60 seconds and no rotational speed will appear in speed display 2. No air humidification/air purification will take place.
OFF: AUTO in the display is lit continuously, and the device runs at the set rotational speed 1 - 3.
Set desired humidity 30 - 70 %:
Hold AUTO-button for 3 seconds. The HUMIDITY 1 display will flash continuously. Set the desired humidity (in 5% increments) using the - or + buttons 3. Hold AUTO-button for 3 seconds again until the flashing in display HUMIDITY 1 and the humidity measured in the room is shown again.
CLEANING & MAINTENANCE


Attention! Ensure that the device is switched off during any measures and the switching power supply is disconnected from the outlet!
Display Measures
7 WATER
Remove upper housing. Fill lower housing with tap water up to the WATERLINE marking. Place upper housing on lower housing and put device in operation again.

As soon as there is not enough water in the lower housing, the device is switched off automatically and the WATER display appears. In the HUMIDITY display 1, two lines will flash and the humidity in the room is not shown.

To humidify and clean the room air continuously, we recommend refilling the water in a timely manner.
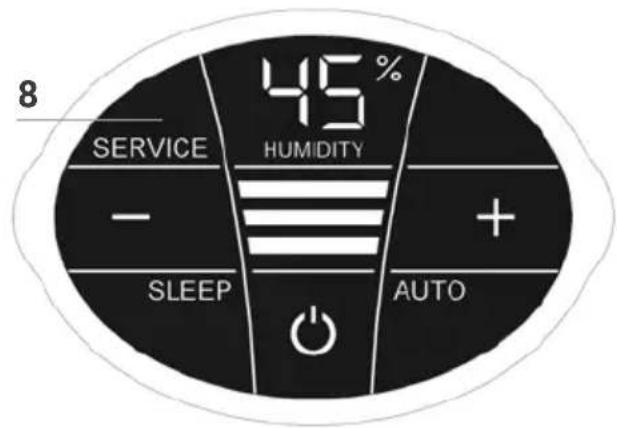
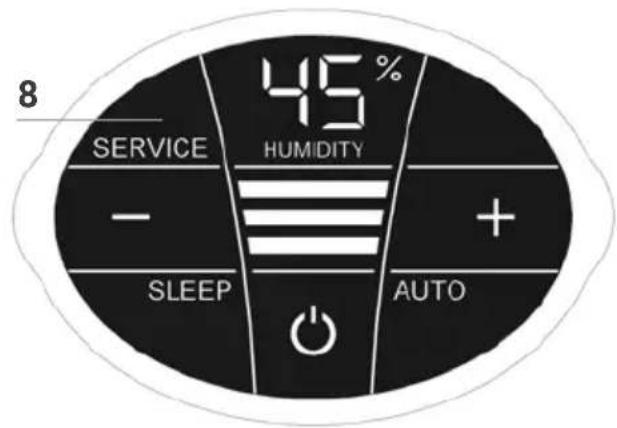
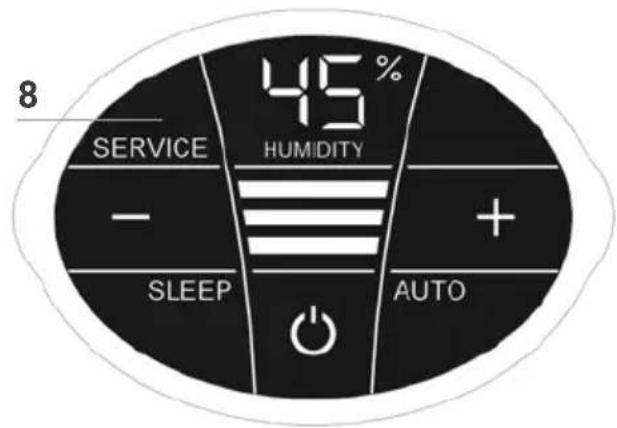
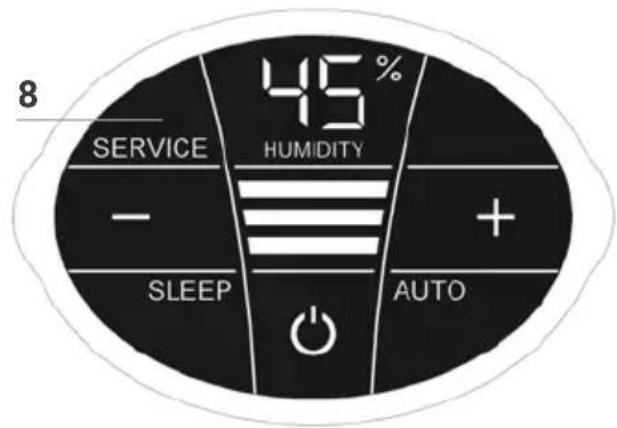
8 SERVICE
Remove upper housing. Drain residual water from lower housing. Rinse lower housing and disk stack. Fill lower housing with tap water up to the WATERLINE marking maximum and add the Venta hygiene additive (for dosage see scale on rear of bottle). Re-assemble the device. Touch SERVICE display 8 in the display and hold it for 3 seconds until it goes off.

For flawlessly hygienic continuous operation, the SERVICE display indicates a reminder every 14 days that this measure needs to be carried out.

This measure can be carried out if required, even if the SERVICE message is not shown. Afterwards, simply touch SERVICE display 8 old for 3 seconds. The next reminder will now be shown again in 14 days the SERVICE message
Any remaining liquid in the water tray and on the disk stack (white, green-yellow or brown deposits or discolorations) do NOT impair the function of the device. For the six-monthly cleaning, we recommend the Venta Cleaner. Please note the instruction manual included with the Venta Cleaner.


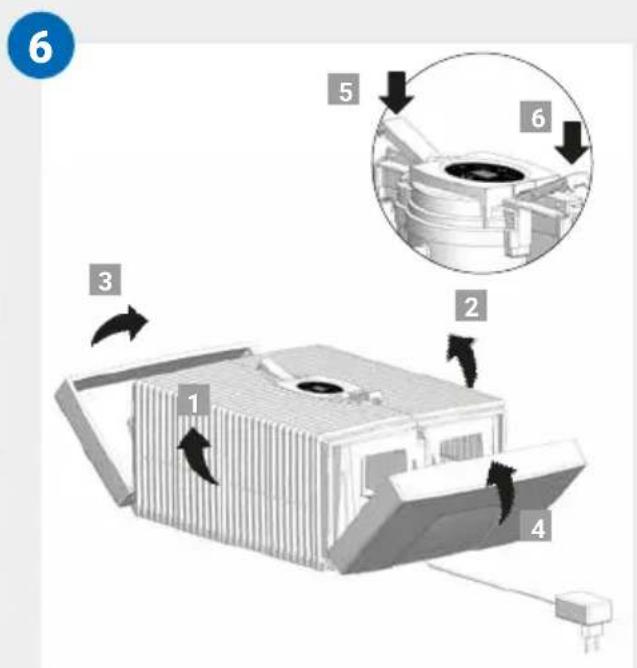
CLEANING THE UPPER HOUSING OF THE DEVICE

Attention! Ensure that the device is switched off during any measures and the switching power supply is disconnected from the outlet!
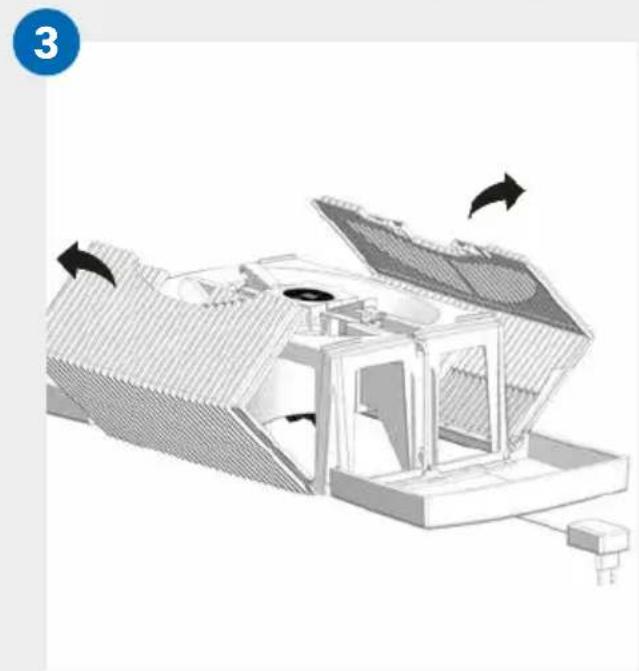
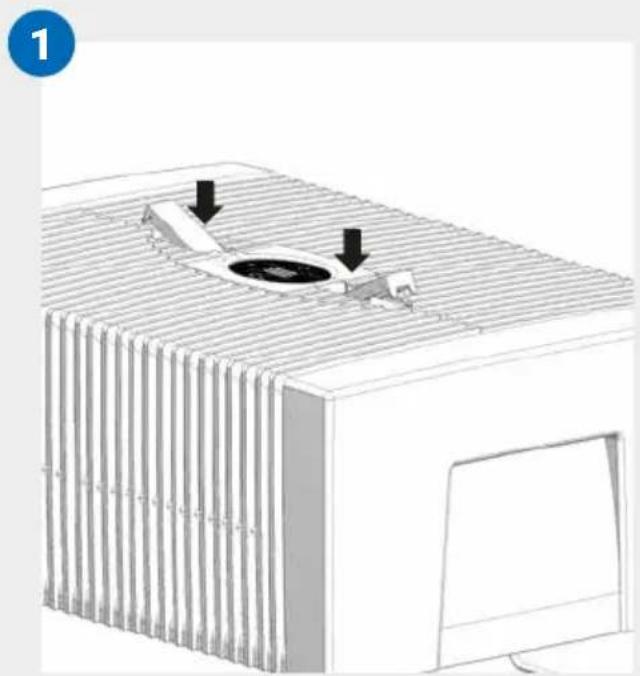
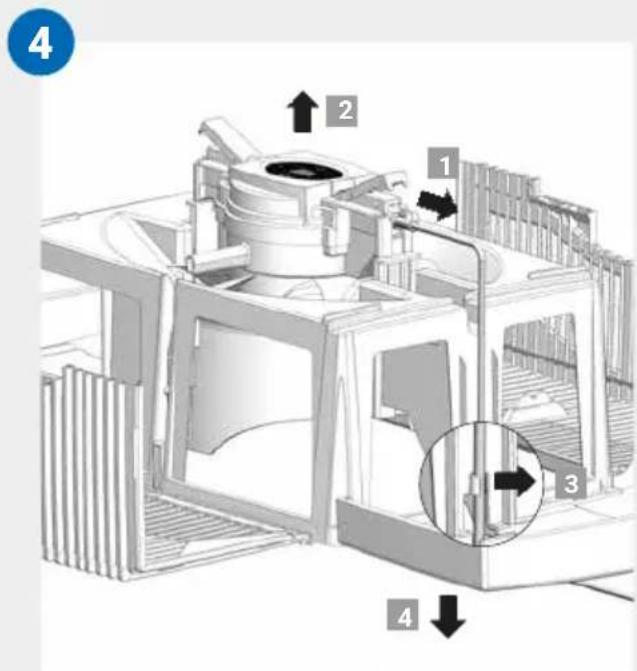
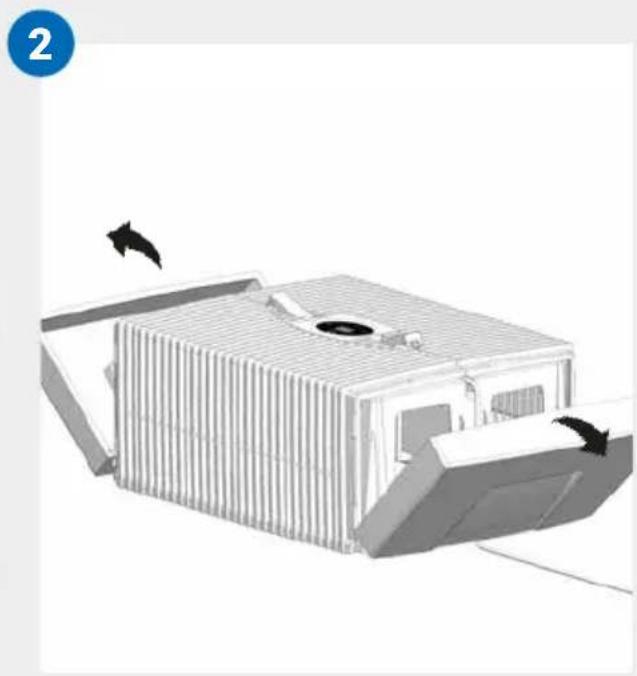
01 Detach upper housing from lower housing. Press locking buttons so that the ends stand up.
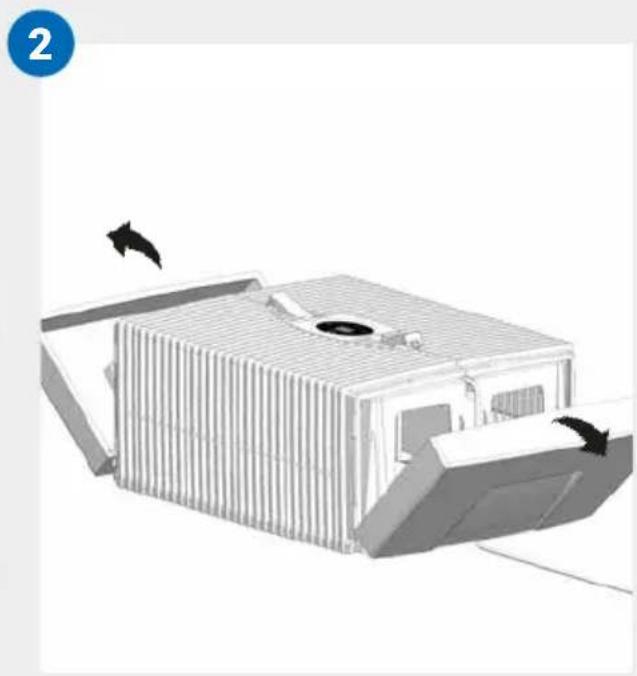
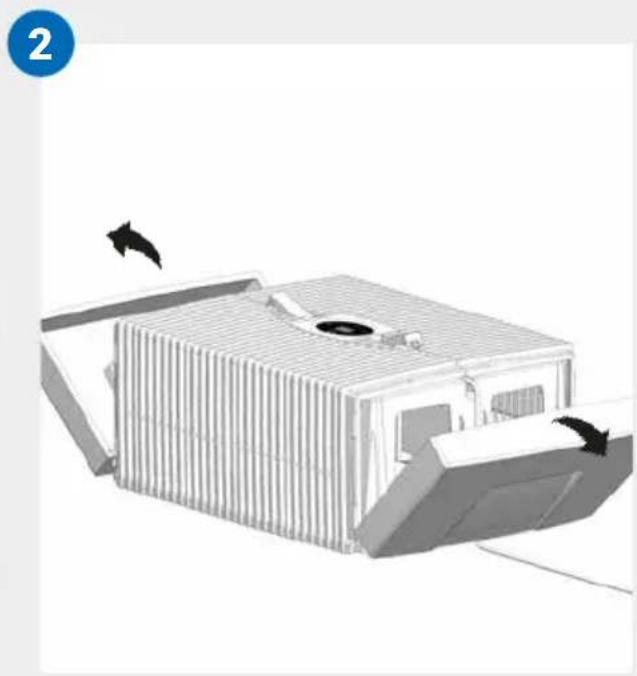
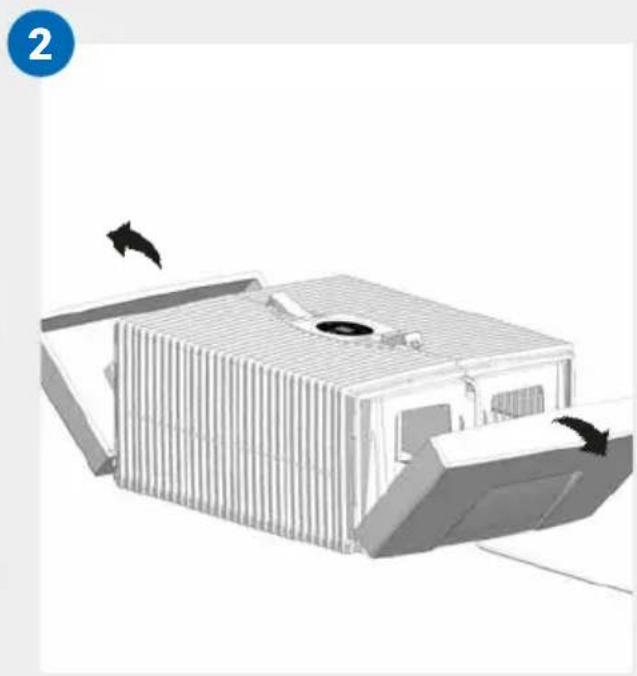
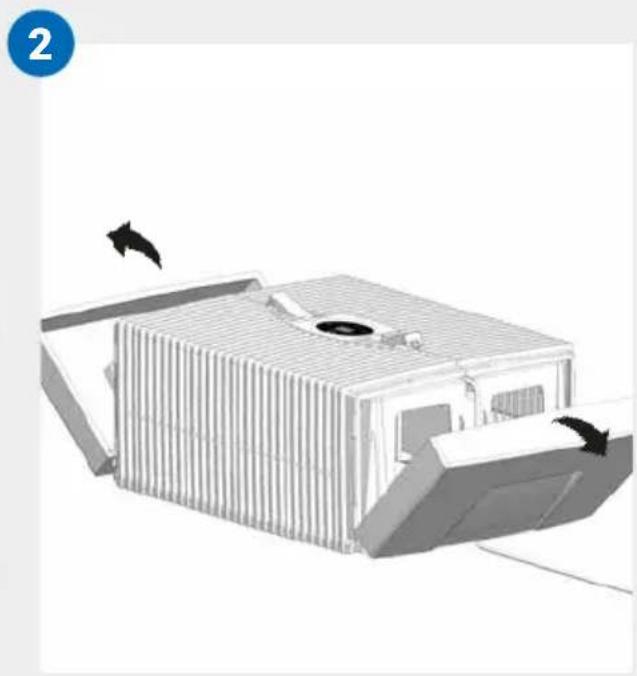
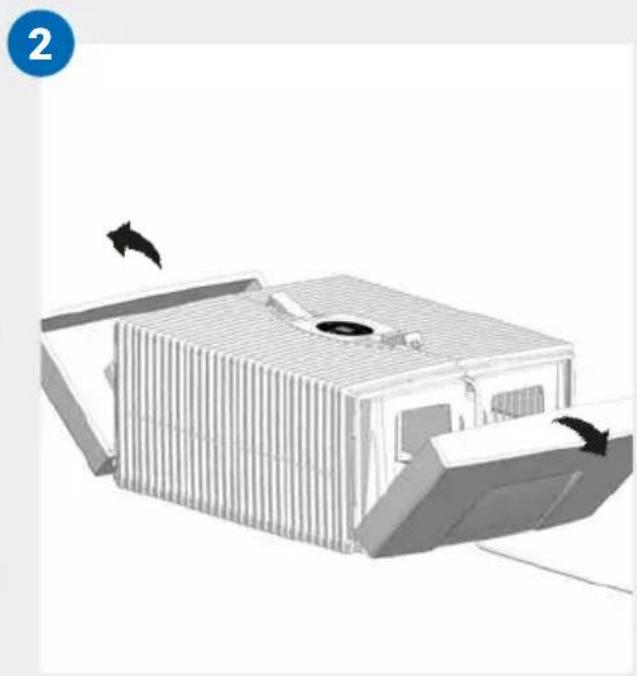
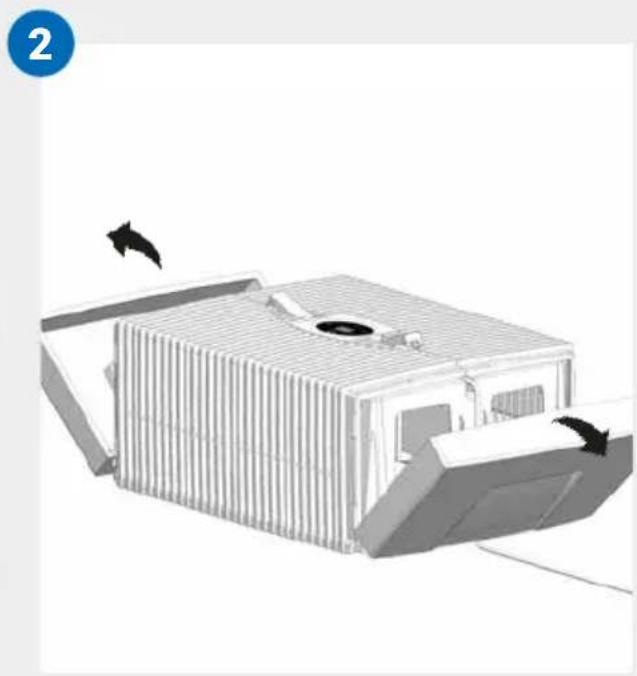
02 Fold side parts out of the way.
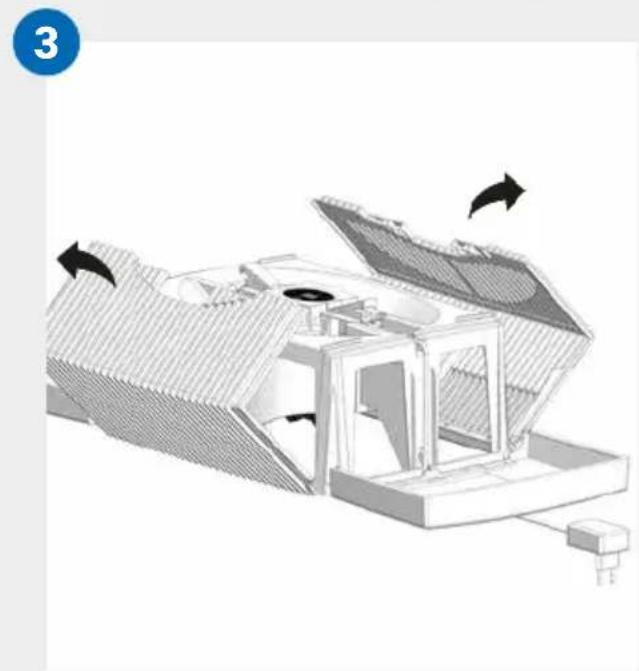
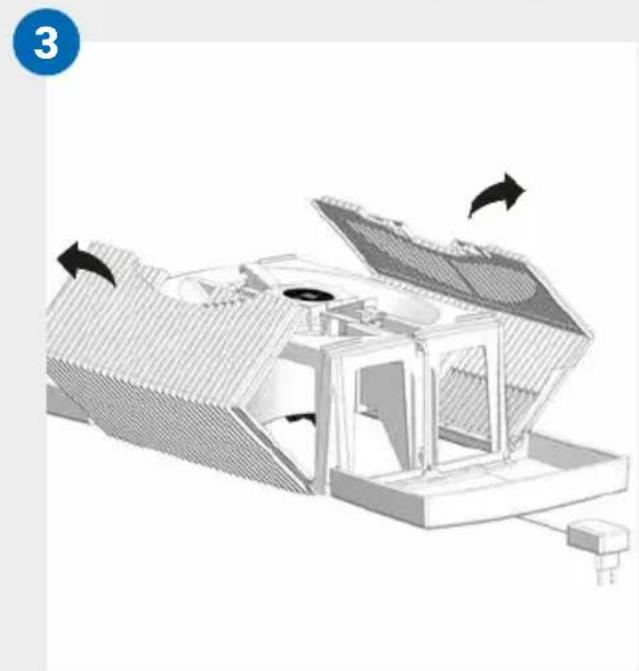
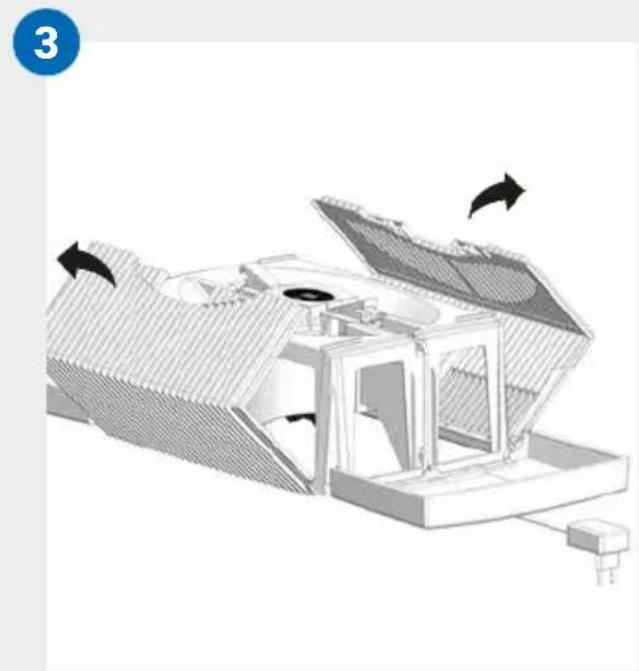
03 Fold ribbed wings out of the way.
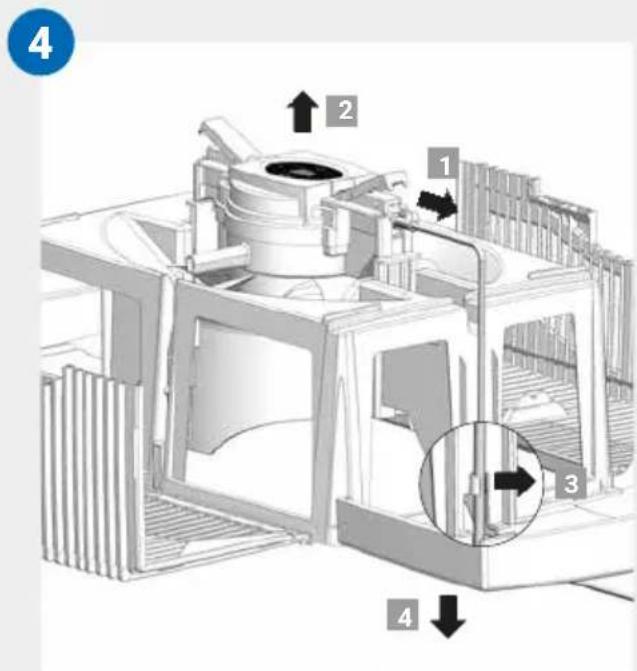
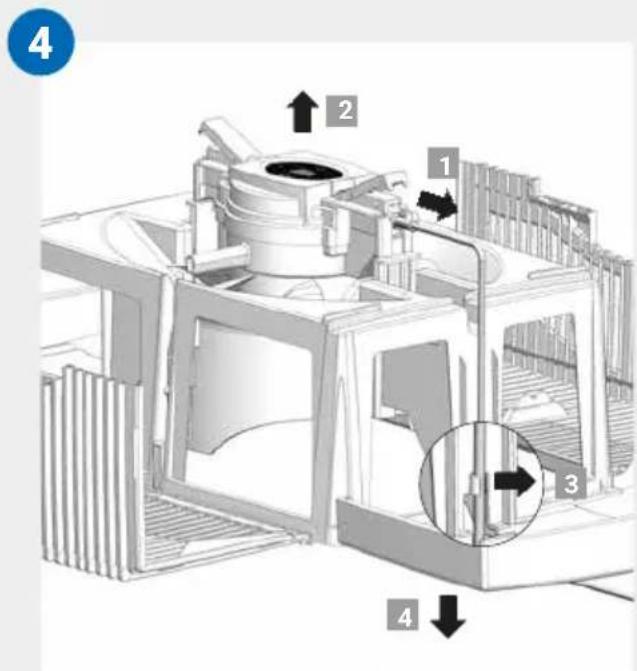
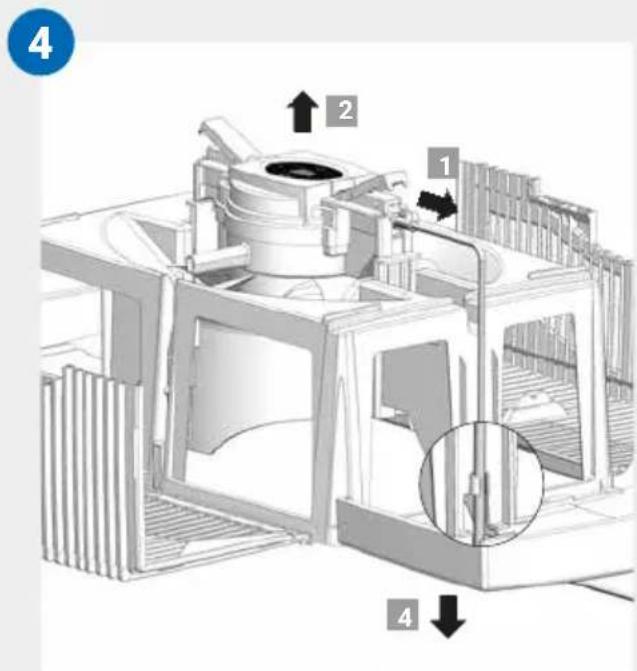
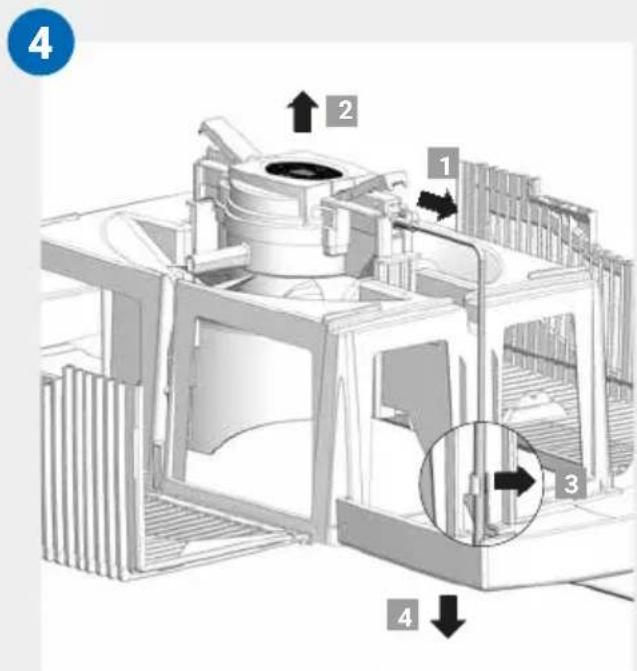
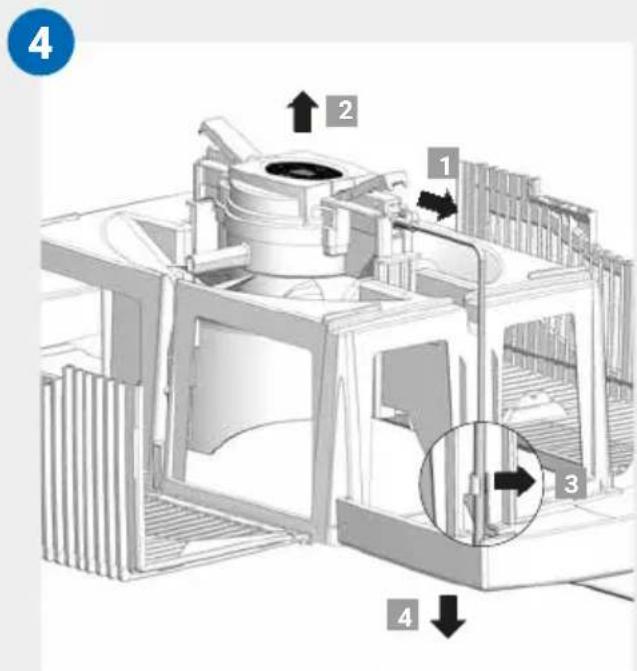
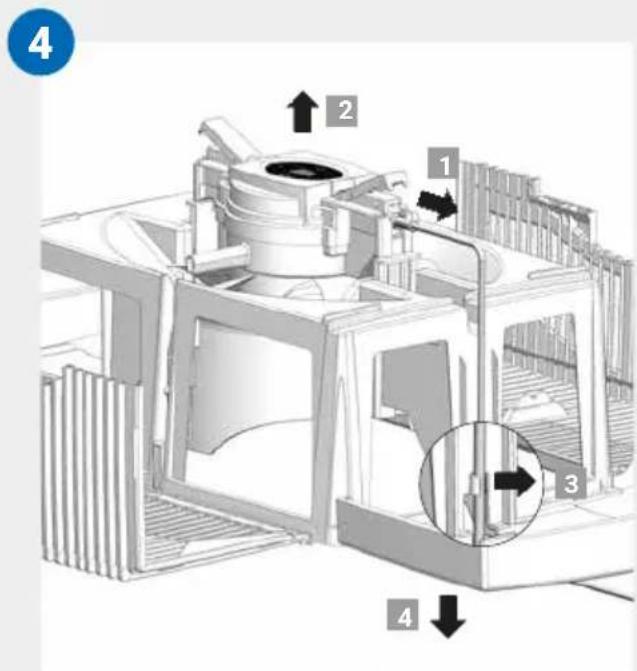
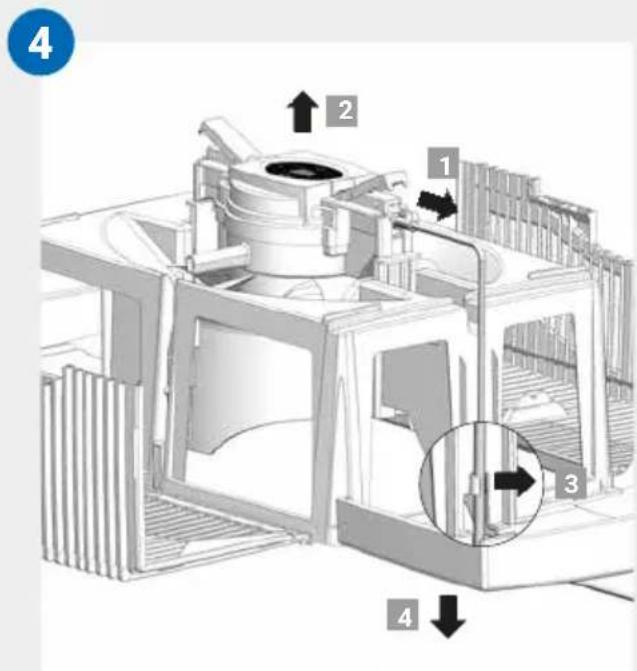
04 Pull the plug of the switching power supply out of the drive unit 1. Pull drive unit upwards and out 2. Disconnect the cable from the switching power supply from the holding bracket 3 and pull out through the opening of the upper housing downward and out 4.

- Do not disassemble the drive unit and switching power supply, do not submerge into the water and do not bring in contact with liquid!
- Only clean the drive unit with fan blades and gear with a dry cloth!
- The disassembled upper housing can be cleaned under running water!
- The disassembled upper housing must be absolute dry before assembly!
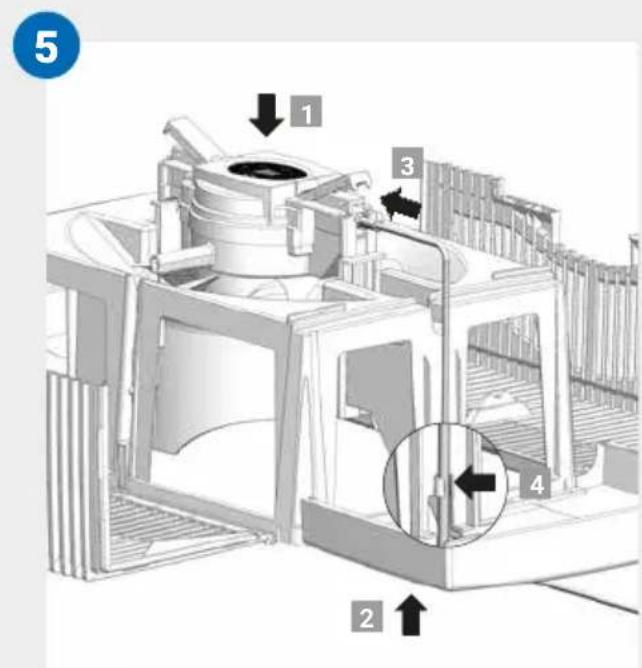
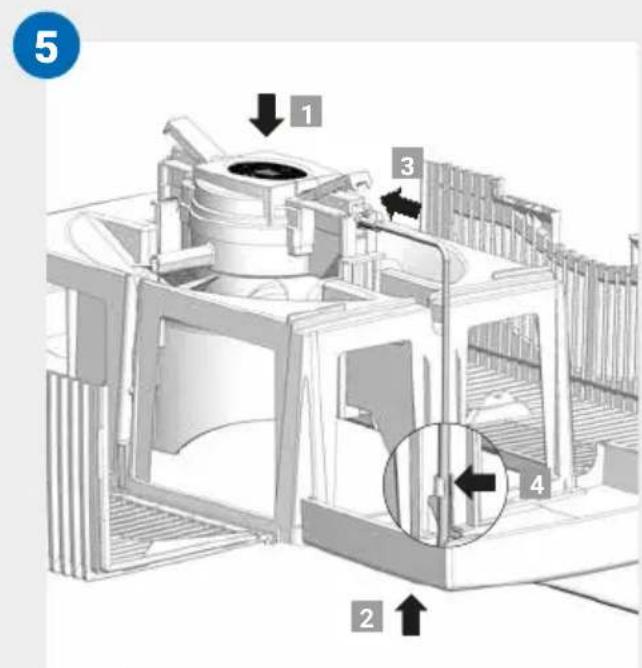
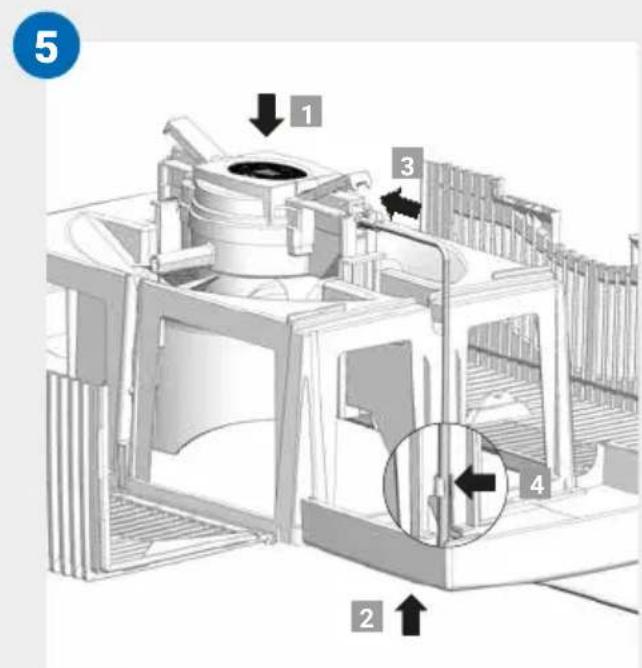
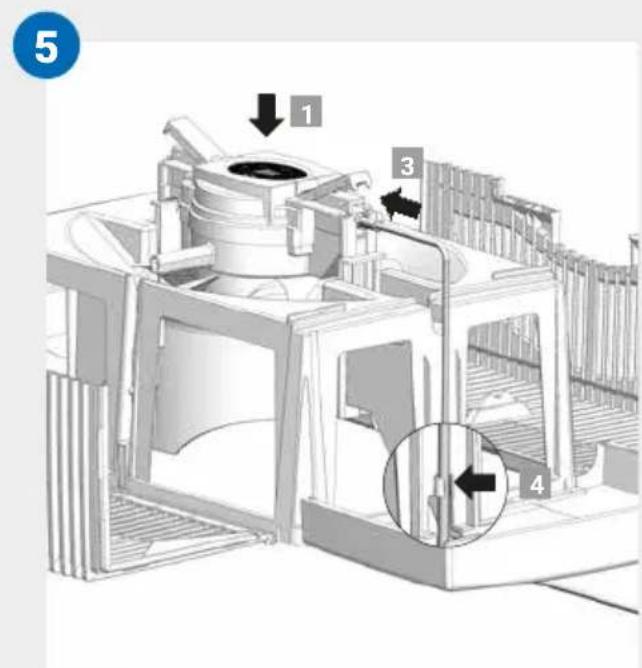
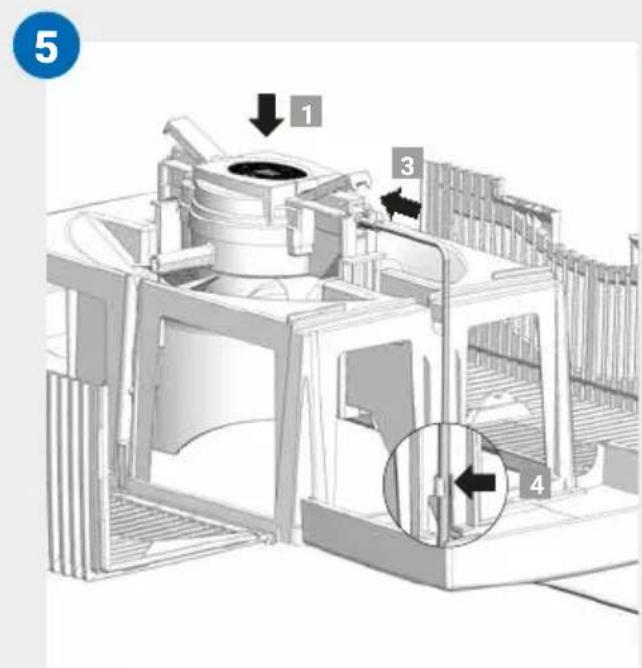
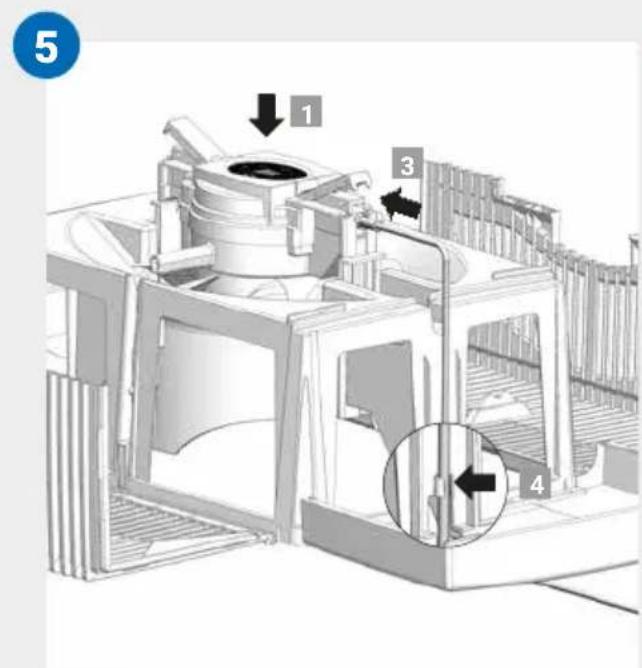
05 Place drive unit in upper housing and ensure that it is laterally correct 1. Pull plug of switching power supply from bottom through opening of the upper housing upwards 2 and plug into drive unit up to the limit 3. Fasten cable in holding bracket 4.
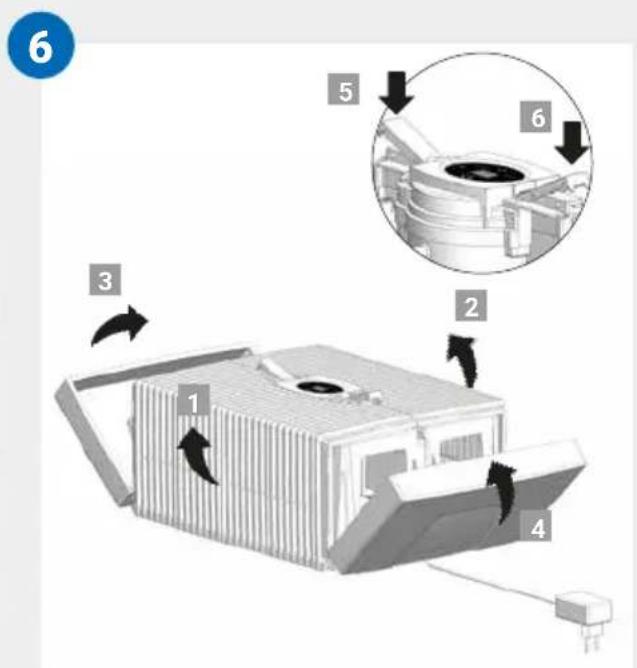
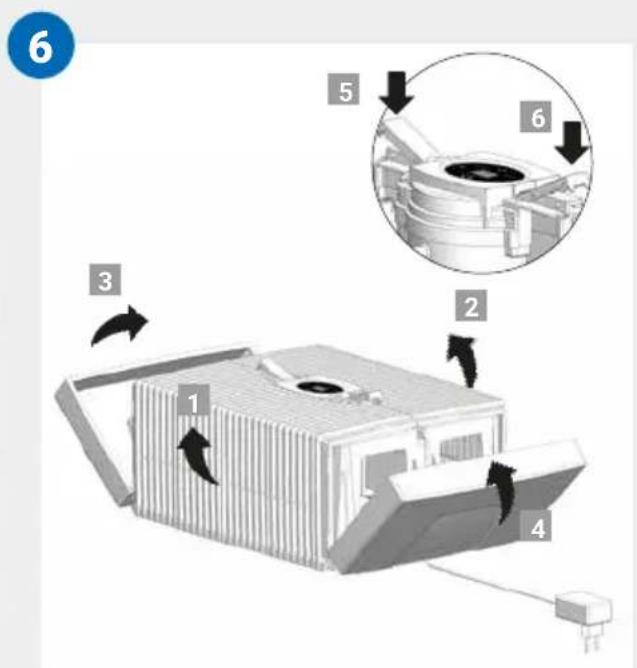
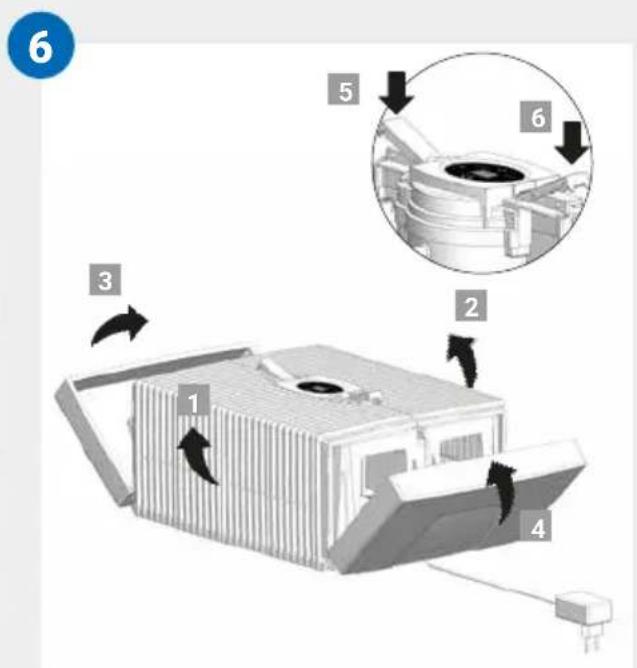
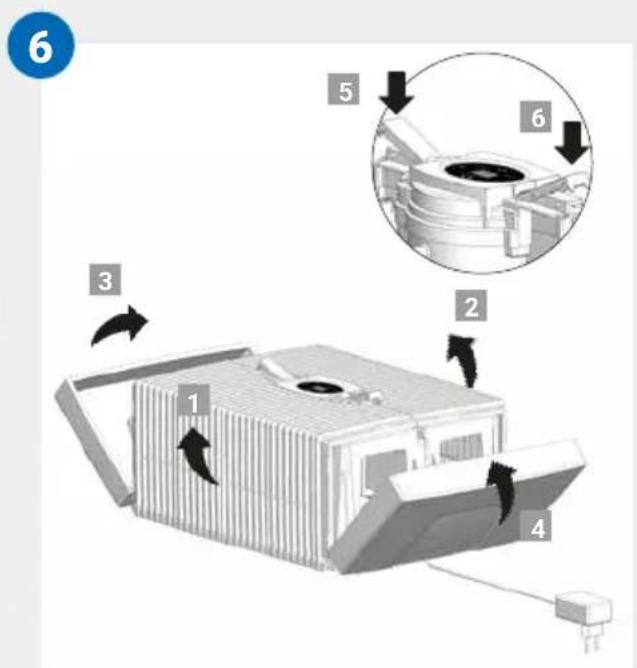
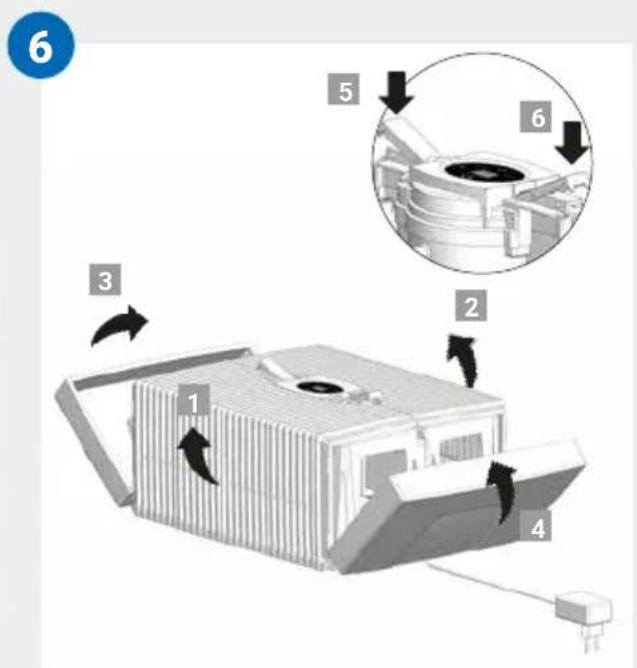
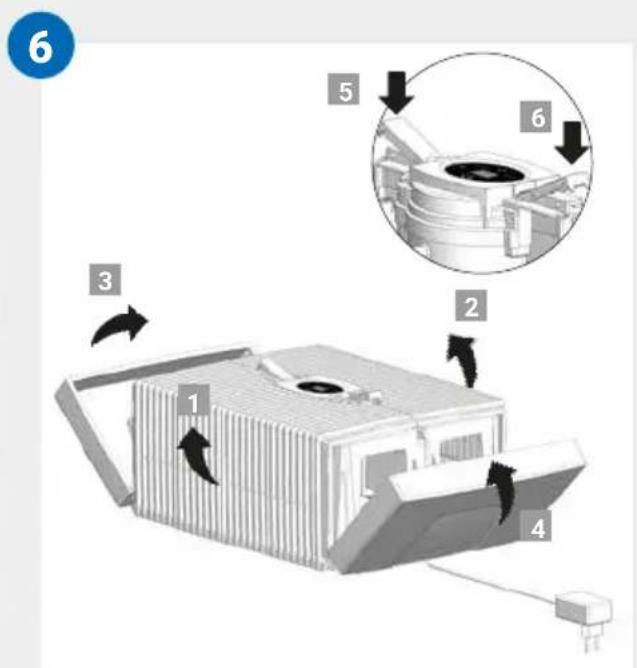
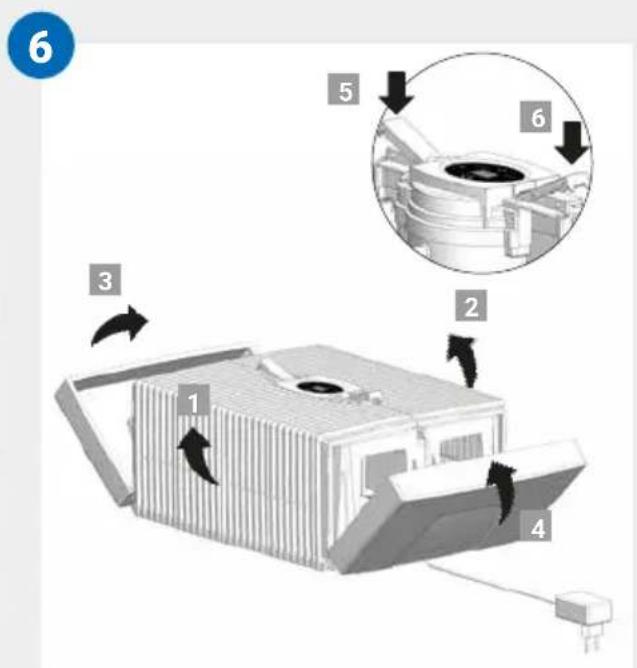
06 The outer ends of the locking buttons must be standing up. Fold ribbed wings 1 and 2 upwards, and finally the side parts 3 and 4. Close upper housing properly again by pushing on the outer ends of locking buttons 5 and 6.
ACCESSORIES
- Venta hygiene additive for flawlessly hygienic continuous operation
• Venta Cleaner for six-monthly cleaning
• Stimulating scents for every season and any mood
- Venta roller cart for a mobile Venta Airwasher (only for LW25 and LW45 ComfortPlus)
- Venta thermo hygrometer for the monitoring of your ideal indoor climate in the individual rooms
WARRANTY
Due to the high quality of the product, the Venta-Luftwäscher GmbH guarantees that this product when used properly will not be defective for a duration of two years from the purchase date. If a material or processing error should occur anyway, please contact the VENTA service team or your dealer. Venta's general warranty conditions also apply: www.venta-luftwaescher.de/service/garantie/
RECYCLING AND DISPOSAL

The packaging material is re-usable. Please dispose of the packaging in an environmentally friendly way and bring it to a collection centre for recyclable materials.
The device may not be disposed of in normal household waste! It must be disposed of at a selected collection point for the recycling of electric and electronic devices (WEEE). Please use the local return and collecting systems that are available to you. By doing so, you are making a valuable contribution to environmental protection and human health. For additional information, please contact the local authorities.
VENTA-SERVICE-TEAM
Do you need additional information about the Venta Airwasher or do you want to order accessories? No problem: the VENTA service team will take care of it! Call the team directly or visit the Venta website.
Ensure that the device is switched off during any measures and the switching power supply is disconnected from the outlet!
... E1 is shown in the display?
The device has switched off automatically because the locking buttons on the upper housing are not closed properly.

Close upper housing properly again by pushing on the outer ends of locking buttons. Switch device off and on with the power button ⏻.
... E2 is shown in the display?
The device has switched off automatically, because the motor is overstrained (e.g. through the intrusion of foreign objects or similar).

Measure: Remove upper housing. Check whether the disk stack in the lower housing as well as fan blades in the upper housing are freely movable. Next, place the device back in operation.
... the display is touched with stronger pressure?
This can result in visible „pressure points“, which does not represent a quality defect. After the pressure is removed, these „pressure points“ will disappear.
Please check whether the switching power supply is connected to the mains.
... the power button ⏻ to switch on the device does not appear in the display, even though the switching power supply is connected to the mains?
Please check whether the switching power supply is firmly plugged into the drive unit

Measure: Remove upper housing. Check correct seating (see instructions to clean the upper housing of the device). Next, place the device back in operation.
... WATER is shown in the display, even though there is water in the lower housing?
Please check whether there is sufficient water in the lower housing and/or whether the upper housing is placed correctly on the lower housing.

Measure: Remove upper housing. Fill lower housing with tap water to the WATERLINE marking. Place upper housing correctly on lower housing. The switching power supply may not be jammed between the upper and lower housings. Next, place the device back in operation.
TECHNICAL DATA
| Model Comfort Plus | LW15 | Comfort Plus LW25 | Comfort Plus LW45 |
| For rooms* up to 35 m2 up to 45 m2 up to 60 m2 | |
| Mains voltage 100-240V/50-60 Hz |
| Speeds 3 3 3 | | | |
| Sound level 24/34/44 dB(A) 24/34/44 dB(A) | 24/35/45 dB(A) | |
| Dimensions | 26×28×31 cm | 30×30×33 cm | 45×30×33 cm |
| Weight | approx. 3 kg | approx. 3,5 kg | approx. 5,2 kg |
| Motor output (Speed 1-2-3) | ca. 3-5-8 Watt | ca. 3-5-8 Watt | ca. 3-5-8 Watt |
| Water capacity | 5 L | 7 L | 10 L |
| Warranty | 2 years | 2 years | 2 years |
* based on a ceiling height at a max of 2,5 m
MERCI BEAUCOUP!
B

C
MISE EN SERVICE



NETTOYAGE DE LA PARTIE SUPÉRIEURE DE L'APPAREIL
B
C
PUESTA EN MARCHA



LIMPIEZA DE LA PARTE SUPERIOR DEL APARATO
B

C

PRIMO UTILIZZO



PULIZIA DELLA PARTE SUPERIORE DELL'APPARECCHIO
Venta serviceteam 84
Wat is er wanneer ...? 85
B
C
INGEBRUIKNAME


B

C

KÄYTTÖÖNOTTO




LAITTEEN YLÄOSAN PUHDISTUS

B

C

EKSPLUATĀCIJA



AUGŠĒJĀ IERĪCES KORPUSA TĪRĪŠANA
APŽVALGA
1 Ekranas
2 Viršutinis korpusas
3 Maitinimo adapteris (prijungtas)
4 Transporto apsauga
5 Diskinis bügnas
6 Transporto apsauga
7 Apatinis korpusas
8 Higieninio priedo buteliukas, 50 ml
PRIEŠ NAUDOJANT PIRMA KARTA
B
C
PALEIDIMAS




VIRŠUTINIO PRIETAISO KORPUSO VALYMAS
ZARYS OGÓLNY
B

C
URUCHOMIENIE


CZYSZCZENIE GÓRNEJ OBUDOWY URZĄDZENIA
B

C

ÜZEMBE HELYEZÉS




B

C
UVEDENÍ DO PROVOZU


ČIŠTĚNÍ HORNÍHO
DÍLU PŘÍSTROJE

RECYKLACE A LIKVIDACE

B

C
UVEDENIE DO PREVÁDZKY




ČISTENIE VRCHNEJ ČASTI PRÍSTROJA
PRIVIRE DE ANSAMBLU
B

C

PRIVIRE DE ANSAMBLU




CURĂȚAREA PĂRȚII
SUPERIOARE A APARATULUI
B

C

ВВОД В ЭКСПЛУАТАЦИЮ



ОБСЛУЖИВАНИЕ
B
C



B

C
ПАЙДАЛАНУГА ЕНГІЗУ


HUNGARY Distributed by
Hungimpex Kft.
Kunigunda útja 60.
H-1037 Budapest
Tel.: +36 1 453 71 00
Fax: +36 1 453 71 01
BENELUX
Venta Benelux B.V.
na Industrial Park, Taman
Putra Perdana, 47130 Puchong,
Selangor, Malaysia
Tel.: +603-8322 6628
E-Mail: info@gasales.com.my
MONGOLIA
AERIS LLC, SUITE 316, Barilga
Architecture Building, Chinggis
Avenue, Oron Suuts Street,
2nd horoo, Khan-Uul district
Ulaanbaatar, Mongolia 17032
Phone: +976-99101185,
sales@aeris.mn, www.aeris.mn
POLAND
Venta-Polen s.c.
ul. Poznańska 37
PL-93-134 Łódź
Tel./Fax: +48 42 681 00 67
www.venta-airwasher.pl
USA
Venta Air Technologies Inc.
US Headquarters
1005 N Commons Dr
Aurora, IL 60504
Toll Free: 1-888-333-8218
www.venta-usa.com
info@venta-usa.com
ROMANIA
S.C. Life Art Distributie S.R.L.
Bucuresti, Sector 6, Bdul. Timi-
Incinta Bucuresti-Construct
Tel: +4021.314.2144
office@lifeart.ro
www.umidificator-venta.ro
RUSSIA
5 Star Business Park, Unit 2,
Persimmon Close, Honeydew,
Tel: +27 (0) 11 888 3255
Fax: +27 (0) 11 888 9874
info@eurocarewellness.co.za
www.venta-airwasher.co.za
SOUTH KOREA
Venta Korea Co., Ltd.
3/F., Seojin Bldg., 754
Seolleung-ro, Gangnam-Gu,
Seoul 135-948, Korea
Tel.: +82-2-2034-0114
Fax: +82-2-2034-0119
www.venta.co.kr
UKRAINE
Venta-Centre Ukrein
Schlichtera, 11
UA-Kharkov
Tel.: +38 057 752 72 72
Fax:+38 057 768 01 57
www.venta.com.ua