SolR 2 HOSAS - Controller THRUSTMASTER - Free user manual and instructions
Find the device manual for free SolR 2 HOSAS THRUSTMASTER in PDF.

| Product type | Flight stick (joystick) HOSAS (Hands on Stick and Stick) for space simulation |
| Compatibility | PC Windows 10/11 |
| Power supply | USB (USB-A to USB-C cable included) |
| Weight | Approximately 1.2 kg |
| Dimensions (base) | Approximately 25 x 20 x 15 cm |
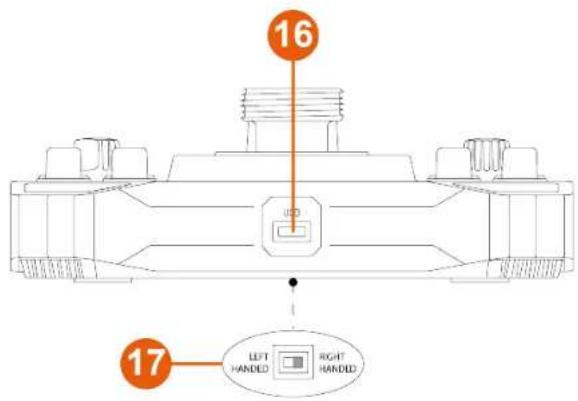
| Stick | Ambidextrous (right-handed/left-handed) with interchangeable thumb rest and palm rest |
| Number of buttons | Over 30 actionable buttons including triggers, toggle switches, encoder, rotary selector, analog mini-stick |
| Directional pad (hat switch) | 1 8-way hat switch (point of view) can be disabled |
| Throttle | Integrated with LED indicators |
| Rudder | By rotating the stick (Z-axis), lockable via 2 mm Allen screw |
| Customizable LEDs | 11 RGB LEDs configurable via Windows Control Panel |
| Backlighting | Mini-stick area backlit (depending on base) |
| Connectivity | 1 USB-C port on the base |
| Firmware update | Required before first use, via Thrustmaster website |
| Programming software | T.A.R.G.E.T. (Thrustmaster Advanced Programming Graphical Editor) |
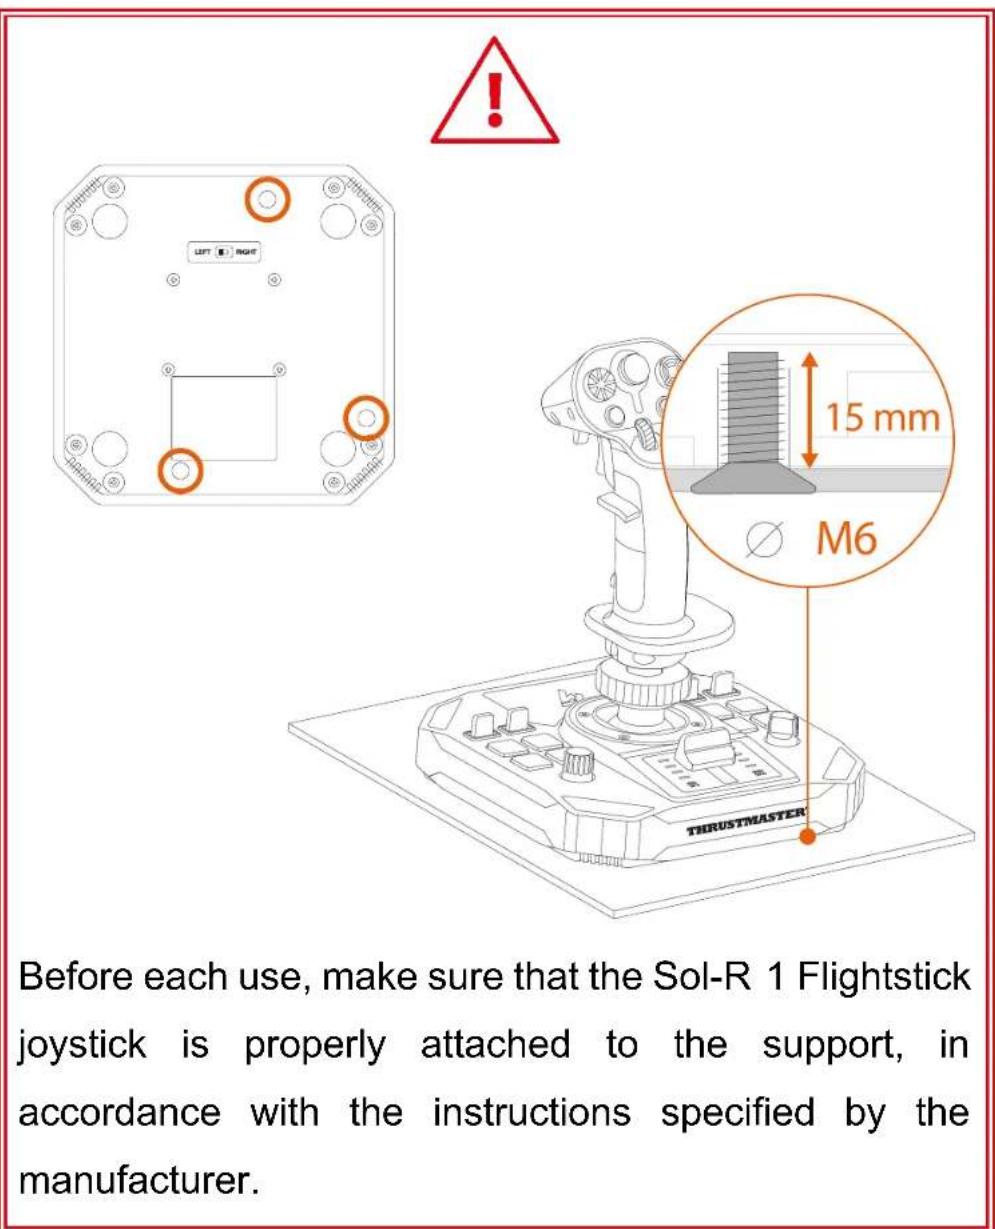
| Mounting | 4 M6 screw threads (max depth 15 mm) for optional mounts (TM Flying Clamp, cockpit) |
| Included accessories | Right and left thumb rests, removable buttons (2), height adapter, stability supports |
| Maintenance | Clean with a soft, dry cloth. Do not use solvents. |
| Safety | Risk of pinching between base and stick. Do not force connector alignment. |
| Warranty | 2 years (spare parts available via Thrustmaster support) |
Frequently Asked Questions - SolR 2 HOSAS THRUSTMASTER
User questions about SolR 2 HOSAS THRUSTMASTER
0 question about this device. Answer the ones you know or ask your own.
Ask a new question about this device
Download the instructions for your Controller in PDF format for free! Find your manual SolR 2 HOSAS - THRUSTMASTER and take your electronic device back in hand. On this page are published all the documents necessary for the use of your device. SolR 2 HOSAS by THRUSTMASTER.
USER MANUAL SolR 2 HOSAS THRUSTMASTER
Carefully read the instructions provided in this manual before installing the product, before any use of the product and before any maintenance. Be sure to follow the safety instructions. Failure to follow these instructions may result in accidents and/or damage. Keep this manual so that you can refer to the instructions in the future.
TABLE OF CONTENTS
- BOX CONTENTS ......6
- TECHNICAL FEATURES ......7
- INFORMATION REGARDING USE ......11
- ASSEMBLY 13
- INSTALLATION ON PC....15
Control panel 16
Mapping....20
- INSTALLATION ON A SUPPORT ......23
Installation on a TM Flying Clamp*......24
Installation on a cockpit* or another fixed
support ^* 25
- FEATURES......26
Throttle 26
Rudder function ......27
Multidirectional point of view hat switch...29
- CONFIGURING THE FLIGHT STICK GRIP .32
Right-handed or Left-handed mode ....32
Height adapter....43
- COMPATIBILITY......44
Flight stick grips 45
Base 46
Rudders....47
- T.A.R.G.E.T ADVANCED PROGRAMMING
SOFTWARE......48
Installation....48
Main features....49
- FAQ AND TECHNICAL SUPPORT......50
SOL-R1
FLIGHTSTICK
Enjoy a truly unique stellar experience with the Sol-R 1 Flightstick joystick: it will accompany you right to the heart of your space battles and explorations.
This manual will help you install and use your Sol-R 1 Flightstick in the best possible conditions. Before taking off, be sure to read the instructions and warnings carefully: they will help you get the maximum amount of enjoyment out of your product.

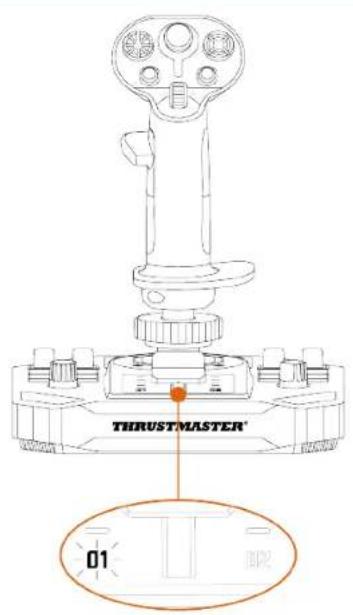
Updating the firmware
In order for the Sol-R 1 Flightstick joystick to work properly with video games, you need to update its firmware.
To carry out the update, visit
https://support.thrustmaster.com/product/sol-r-1-flightstick.
Select Drivers and follow the instructions, including the downloading and installation procedure.
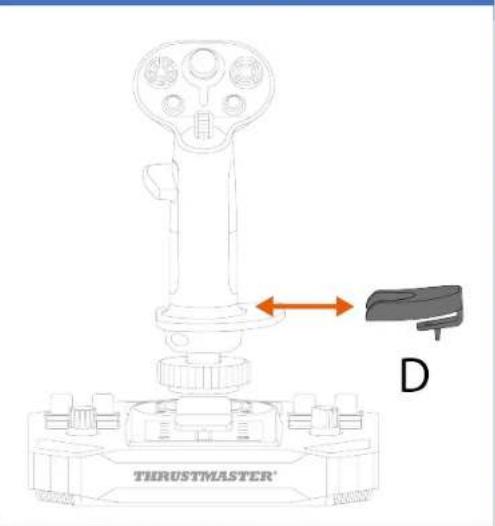
1. Box contents
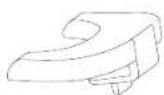
natural_image
Technical line drawing of a mechanical component labeled 'THRUSTMASTER®' (no other text or symbols)
B1

B2

C2

D

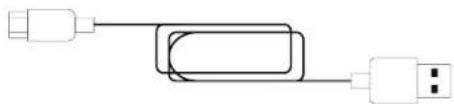
natural_image
Pure electrical circuit lines without any symbols
x 4
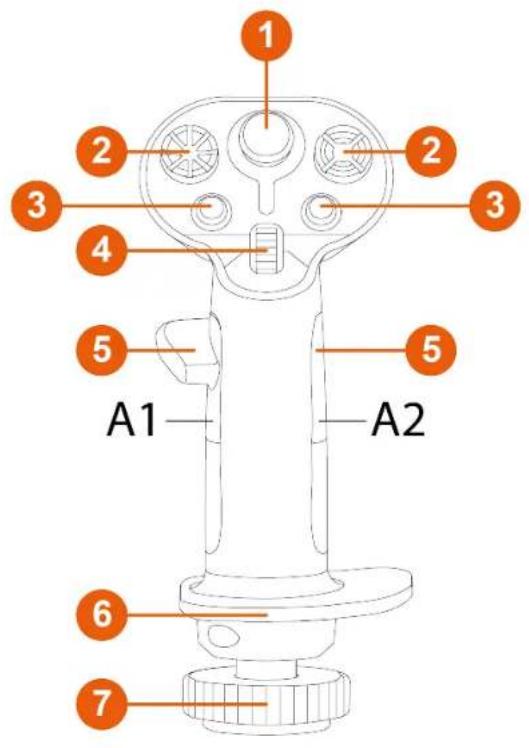
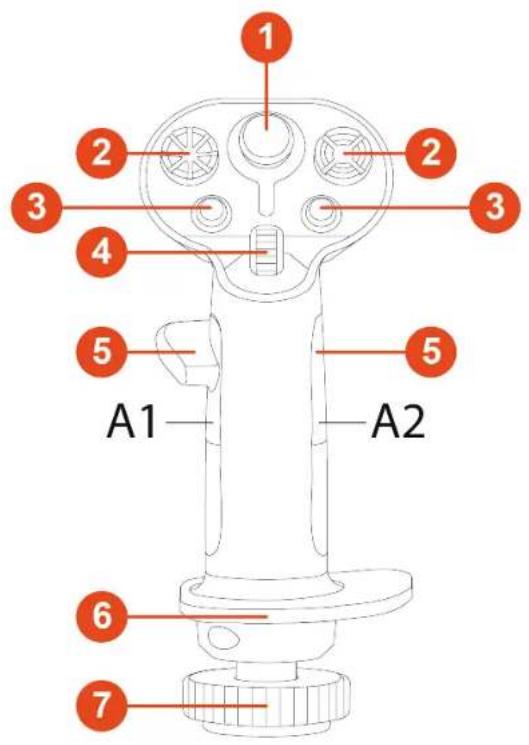
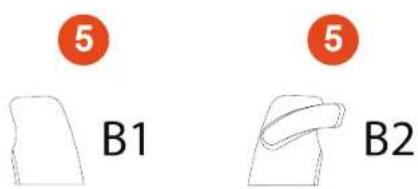
2. Technical features
5
5
B2
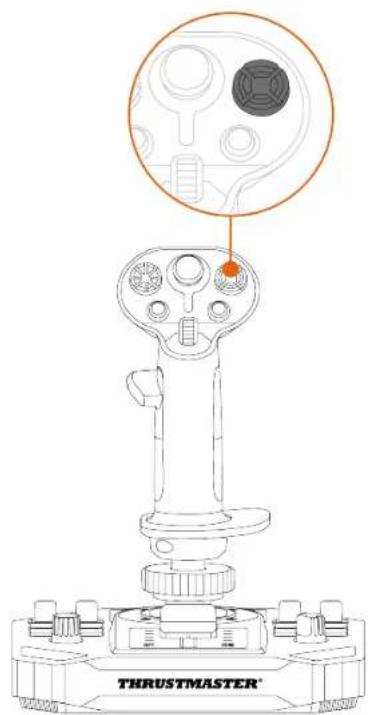
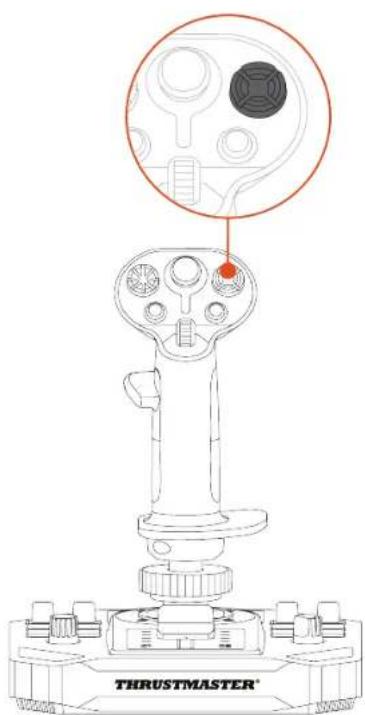
① Analog mini-stick
2 8-way multidirectional point of view hat switches
③ Action buttons
4 Scroll wheel
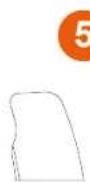
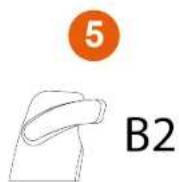
5 Thumb rests (right-handed and left-handed)
6 Ambidextrous wrist rest
⑦ Rudder function via rotating the flight stick grip (lockable)
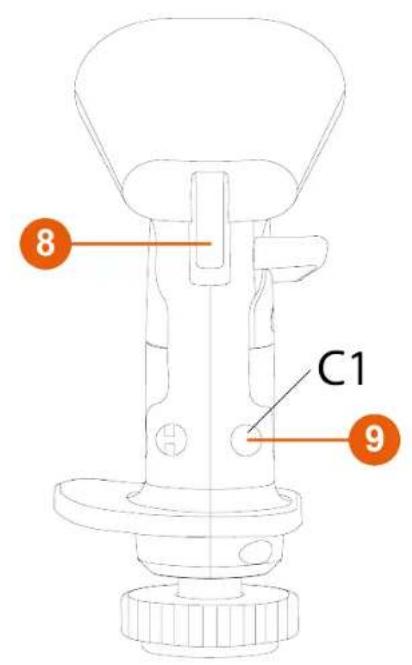
8 Triggers (including one dual-position trigger)
9 Removable buttons
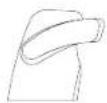
⑩ Removable height adapter (right-handed and left-handed)
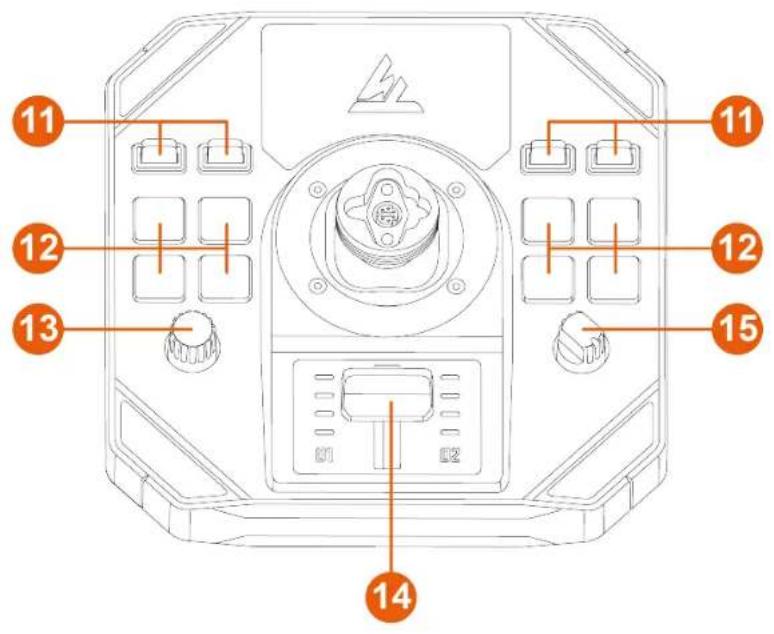
11 Toggle switches (two positions)
12 Backlit action buttons
13 Encoder
14 Throttle with indicator lights
15 Rotary selector (four positions)

flowchart
graph TD
    A["Port 1"] --> B["Node"]
    B --> C["Node"]
    C --> D["Port 2"]
    style A fill:#fff,stroke:#000
    style D fill:#fff,stroke:#000
    note right of B "18"

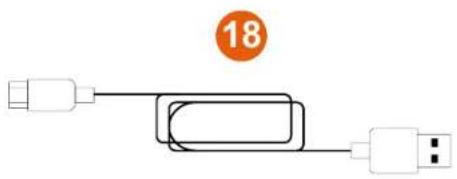
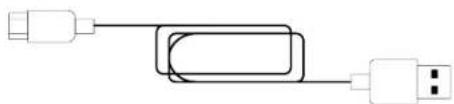
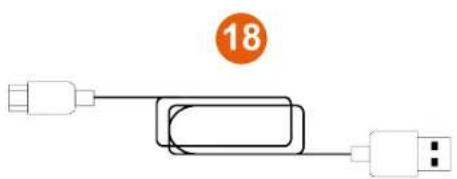
16 USB-C connector
17 Selector switch: LEFT HANDED / RIGHT HANDED
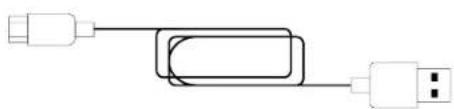
18 USB-A – USB-C cable
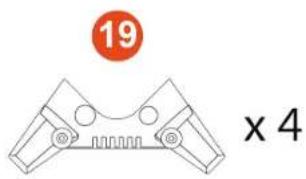
19 Stability supports
3. Information regarding use

Documentation
Before using this product, carefully read this documentation again and keep it for future reference.

Pinch hazard
When using the Sol-R 1 Flightstick joystick, never place your fingers in the space between the base and the flight stick grip's axis.

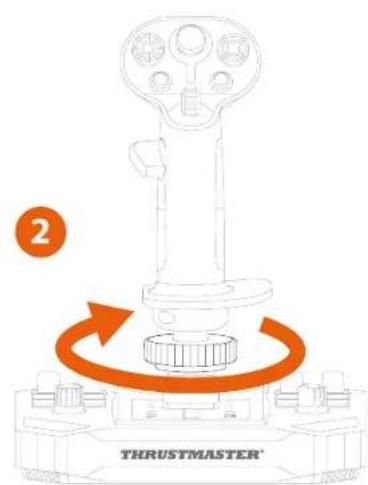
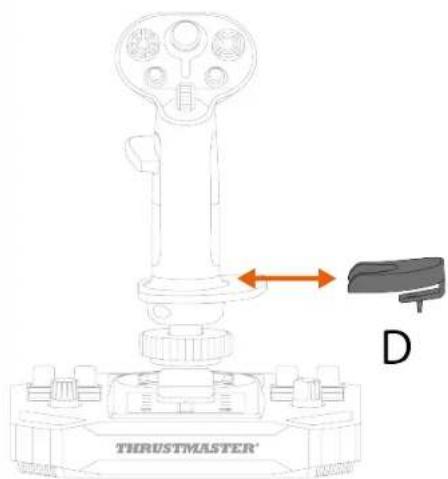
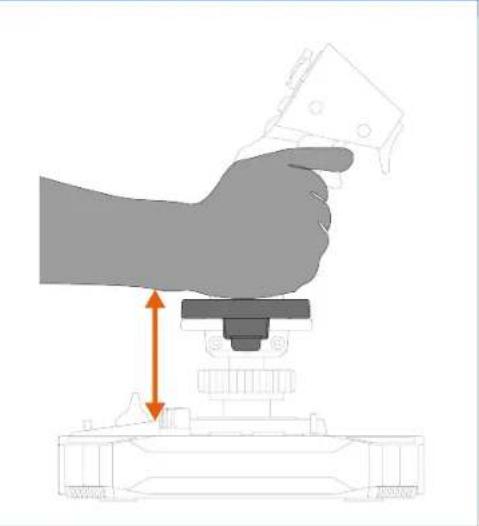
4. Assembly
-
Place the flight stick grip on the base. Make sure that the flight stick grip is properly positioned, as shown in the diagram below.
-
Tighten the clamping ring.
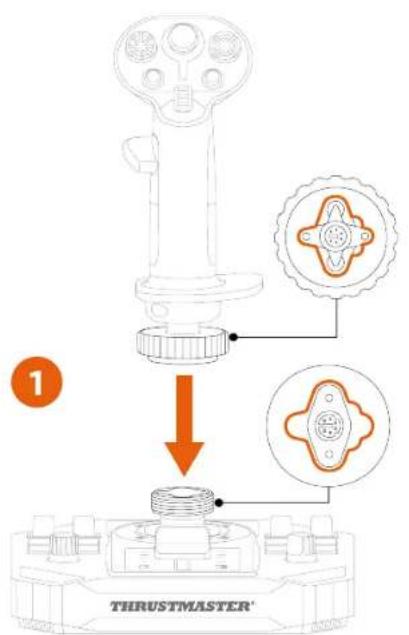


If you feel any resistance, do not force it. Make sure that the connectors for the base and the flight stick grip are properly aligned, as shown above. Failure to comply with this instruction may result in damage to the products.
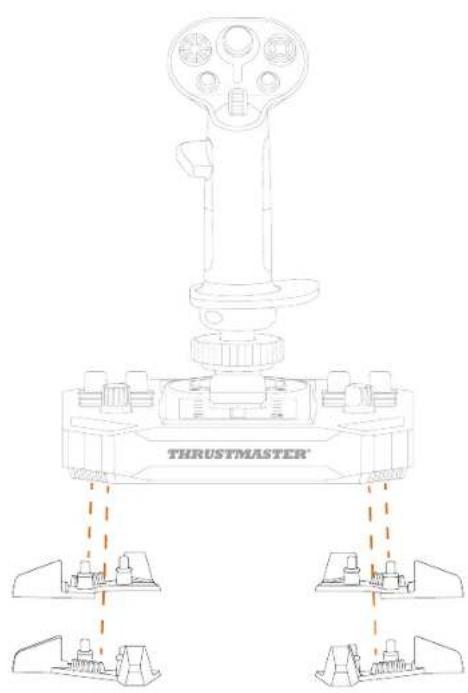
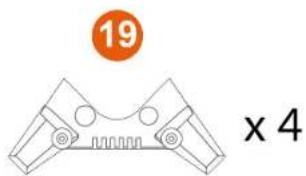
- (Optional) Clip the stability supports into the four corners of the base.
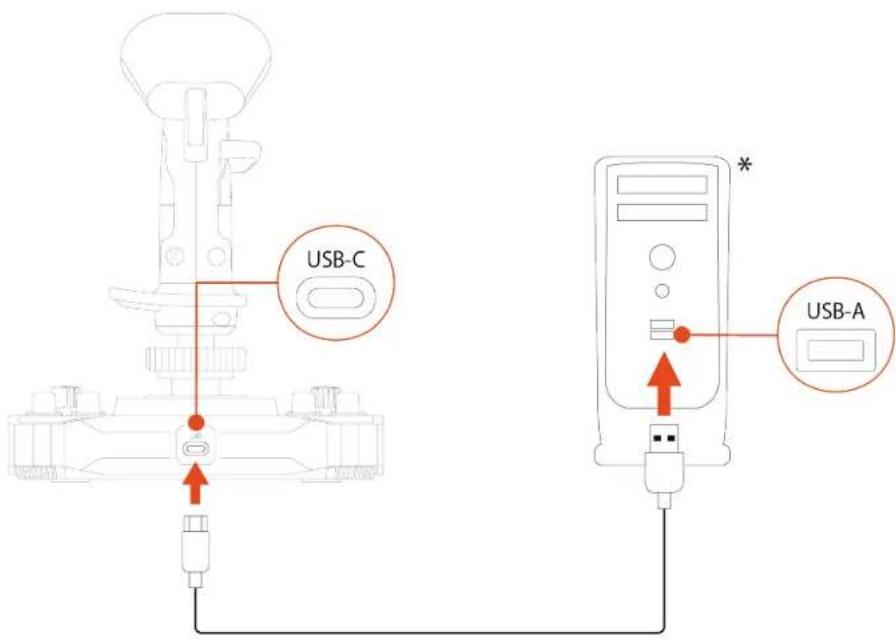
5. Installation on PC
- Please visit:
https://support.thrustmaster.com/product/sol-r-1-flightstick.
-
Download and install the PC driver and its customized interface for the Windows control panel.
-
Once the PC driver has been installed, connect the Sol-R 1 Flightstick joystick to one of your PC's USB ports, using the USB-A – USB-C cable.

Control panel
To access the control panel, select Start, type Control Panel or Control Panel in the search bar, and then click Control Panel or Control Panel (in Windows® 10/11).
Control Panel
The Game Controllers dialog box is displayed. The accessory appears onscreen with the name Sol-R [R] Flightstick or Sol-R [L] Flightstick and OK status.
![Game Controllers These settings help you configure the game controllers installed on your computer. Installed game controllers Controller Status Sol-R [L] Flightstick OK Advanced... Properties OK](/content/2026/03/564978/images/af6013c9ec1a2d771896517e04fefe9778e16d3d0b2d2b94ce85732781bc64b4.jpg)
In the Game Controllers dialog box, click Properties to test and view all features.
Customizable LEDs
The Sol-R 1 Flightstick joystick features eleven LEDs that can be customized via the control panel.


You can assign a different color to each LED.
To change the color of the LEDs:
- Go to the control panel for the Sol-R 1 Flightstick joystick.
- In the Game Controllers dialog box, click Properties.
- In the LEDS tab, click on one of the colored circles to select the LED that you want to change.
- Use the color wheel or the palette of predefined colors, or enter a color code (RGB or HEX) to change the color.
- Click OK to save the change.

When the Sol-R flight stick grip is installed on an AVA base*, the mini-stick area is backlit and you can change the color.
Mapping

Right-handed mode
Left-handed mode

6. Installation on a support
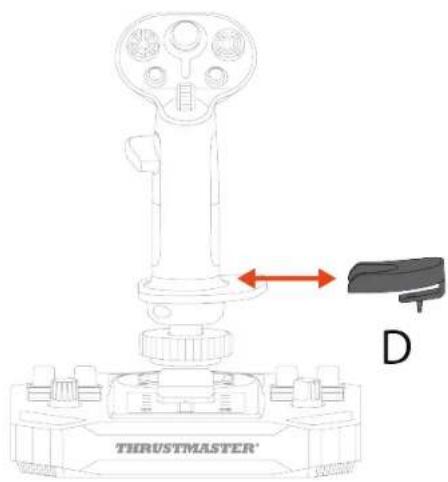
You can install the Sol-R 1 Flightstick joystick on different types of supports using M6 screws (not included) and the screw threads located on the underside of the base. Inside the base, the maximum length of the screw must not exceed 15 ~mm .
Installation on a TM Flying Clamp\*
To attach the Sol-R 1 Flightstick joystick to the TM Flying Clamp support*, use two M6 screws (not included).
natural_image
Pure geometric shapes with no text, numbers, or symbols
natural_image
Technical line drawing of a robotic control device with a lever and labeled 'TERUSTMASTER' (no text or symbols on the device itself)Installation on a cockpit\* or another fixed support\*
To attach the Sol-R 1 Flightstick joystick to a cockpit* or a desk support*, use M6 screws (not included) and the screw threads located on the underside of the base.

natural_image
Technical line drawing of a mechanical clamp or bracket assembly (no text or symbols)
To avoid damaging the Sol-R 1 Flightstick joystick, please consult the cockpit manufacturer or technical support in order to determine the cockpit's compatibility with Thrustmaster products.
7. Features
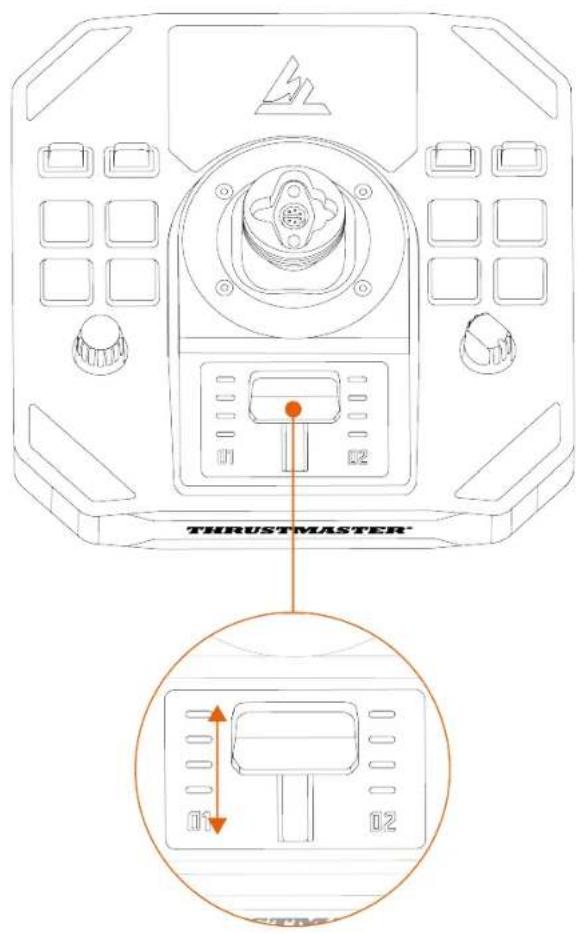
Throttle
The Sol-R 1 Flightstick joystick features a throttle that makes it easy to control your spacecraft engine's thrust. Indicator lights help you to be more precise.
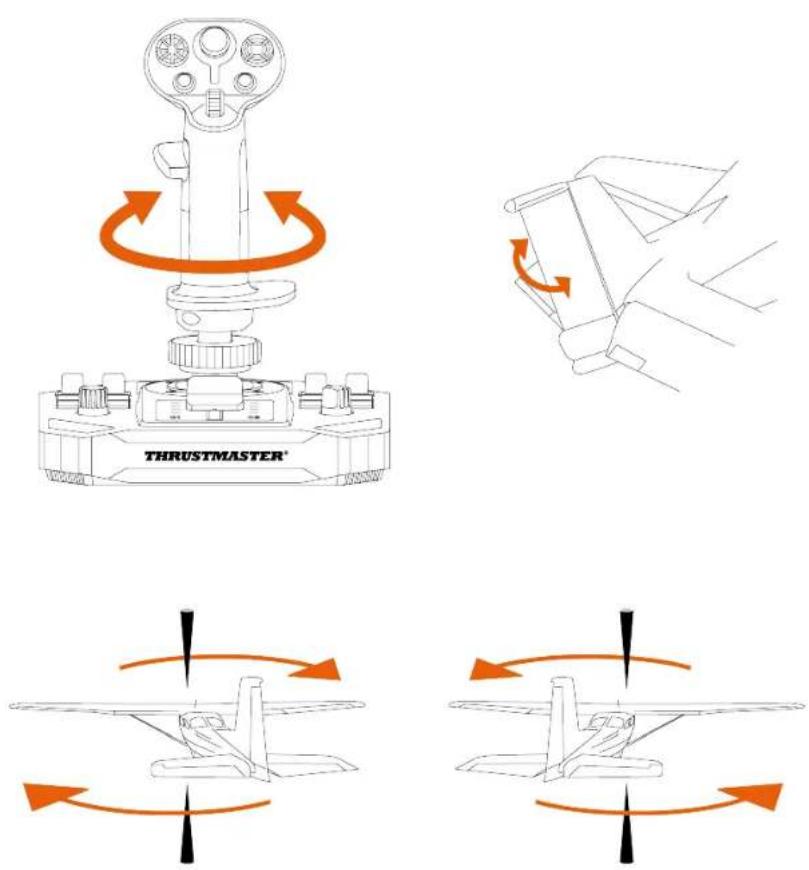
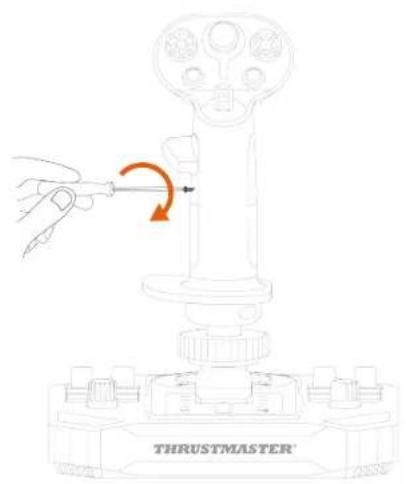
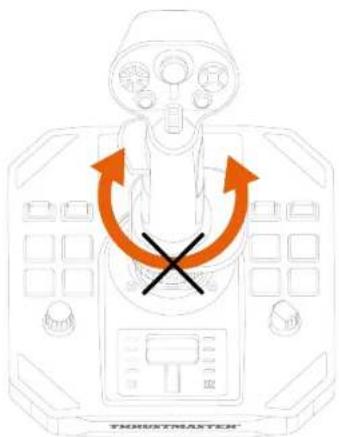
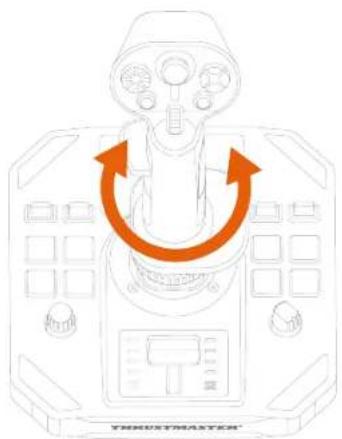
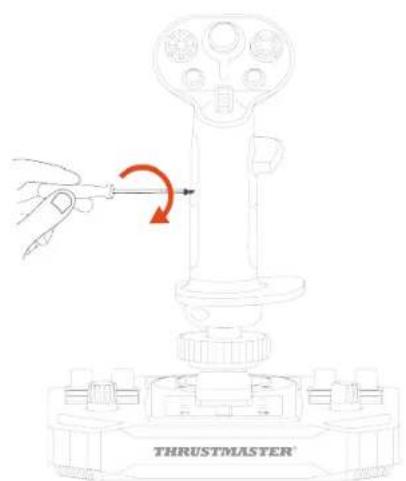
Rudder function
The Sol-R 1 Flightstick joystick features a rudder function that can be accessed by rotating the flight stick grip to the left or to the right.
In an airplane, the pilot manipulates the rudder to pivot the plane around its vertical axis (making the plane turn to the left or to the right).
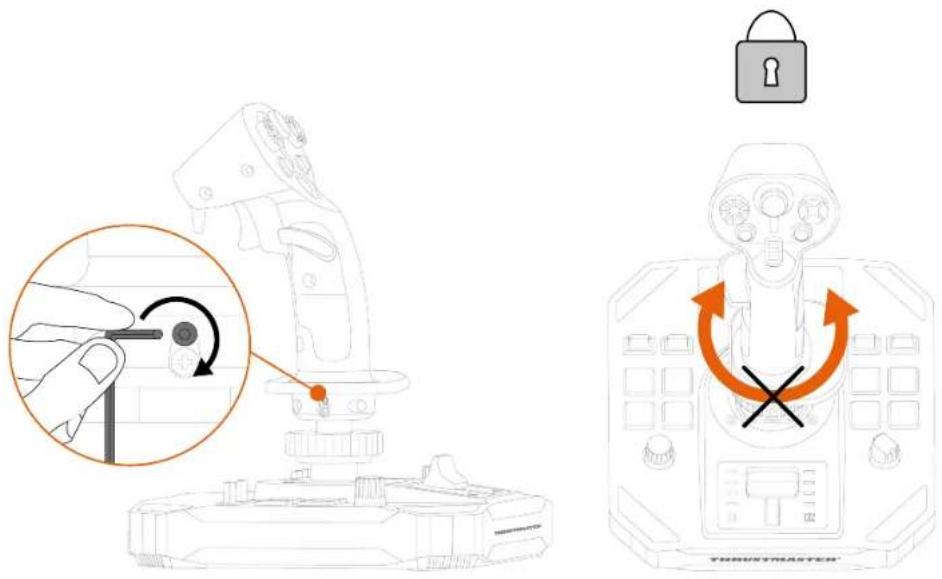
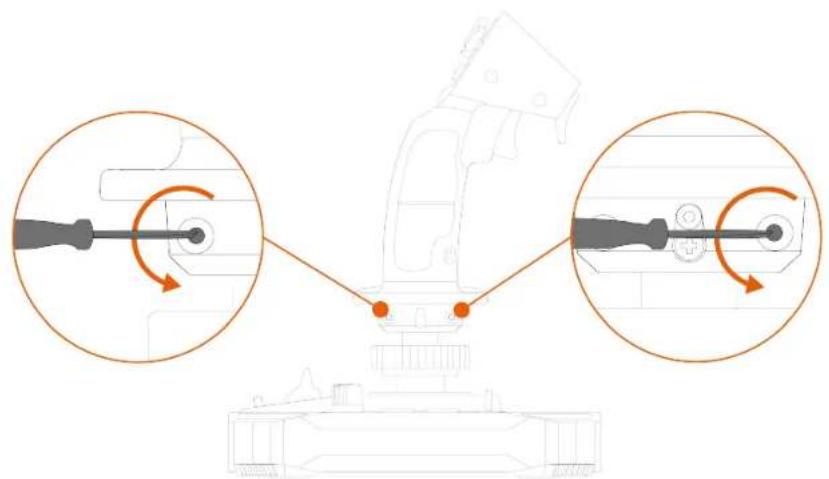
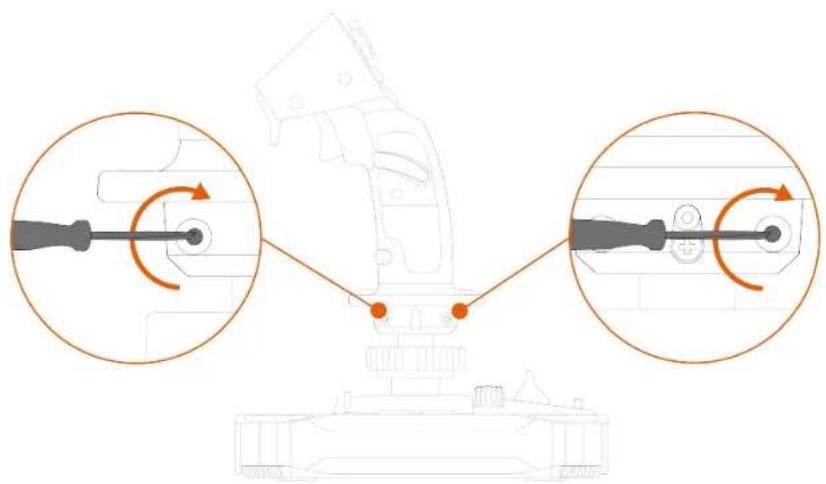
This function can be disabled by locking the rotation of the Z axis (yaw).
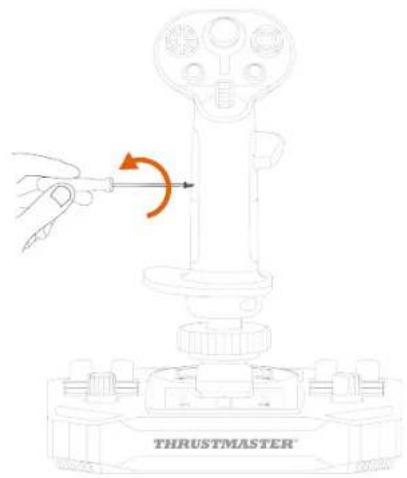
To lock the rudder function:
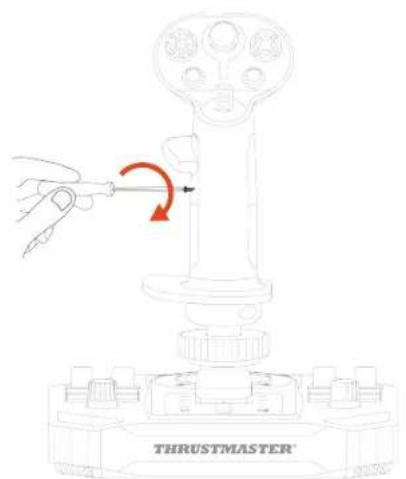
- Using a 2 mm Allen wrench (not included), tighten the hexagonal screw located below the wrist rest.
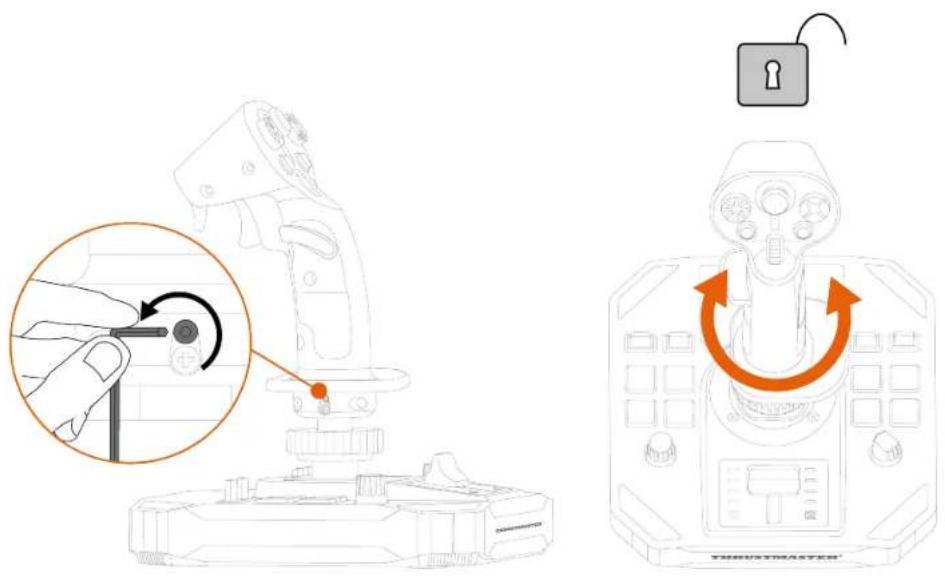
To unlock the rudder function:
- Using a 2 mm Allen wrench (not included), untighten the hexagonal screw located below the wrist rest.
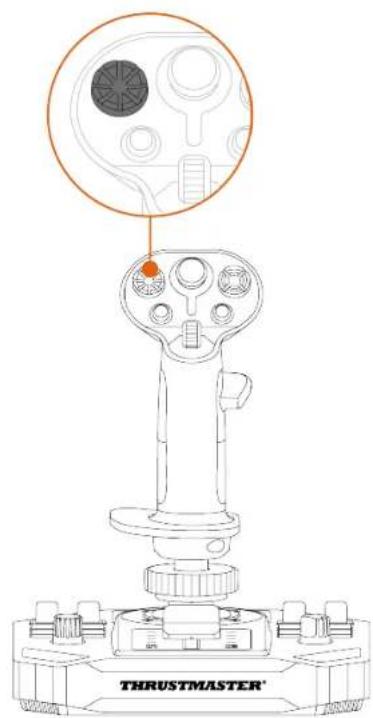
Multidirectional point of view hat switch
The Sol-R 1 Flightstick joystick features a multidirectional point of view hat switch that lets you monitor what's going on around your spacecraft (in games that allow this).
From your game's configuration menu, you can program the different views (rear view, left view, right view, external views) onto the directions of the multidirectional point of view hat switch.
You can also reserve the multidirectional point of view hat switch for other uses (shooting, etc.).
Left-handed mode

Right-handed mode
The point of view function can be disabled. However, the multidirectional hat switch can still be used.
To disable the point of view function:
-
Go to the control panel for the Sol-R 1 Flightstick joystick.
-
In the Game Controllers dialog box, click Properties.
-
In the Test input tab, uncheck (i.e. deselect) Point of view hat-switch.
Point of view function (Right-handed mode)
| Enabled | |
| Disabled |
Point of view function (Left-handed mode)
| Enabled | |
| Disabled |
8. Configuring the flight stick grip
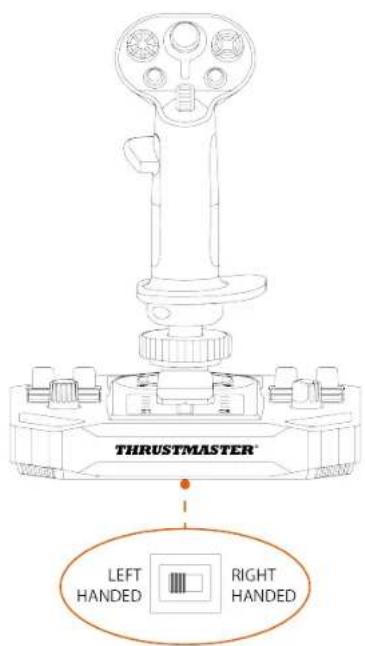
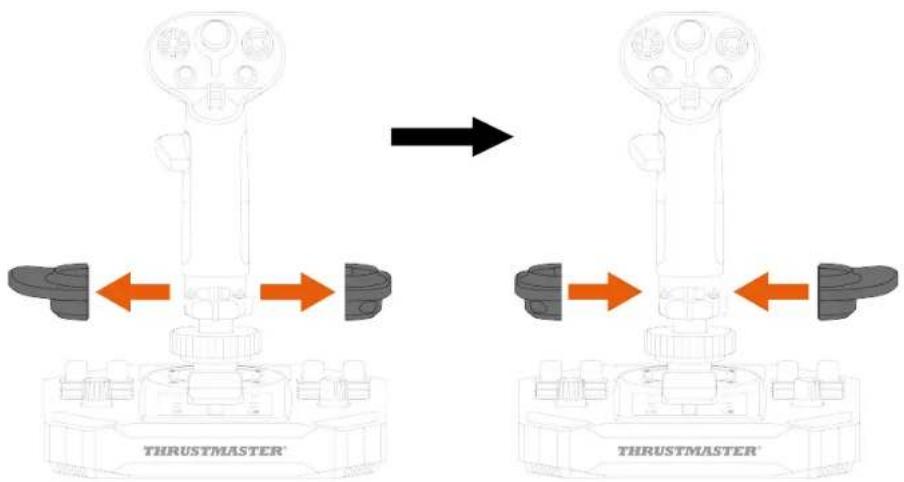
Right-handed or Left-handed mode
The Sol-R 1 Flightstick joystick is ambidextrous, in order to perfectly adapt to all gamers (whether right-handed or left-handed).
By default, the joystick is configured in Right-handed mode.
Left-handed mode
Right-handed mode

Carry out the procedure to switch from Right-handed to Left-handed mode (or vice versa) before connecting the joystick to your PC.
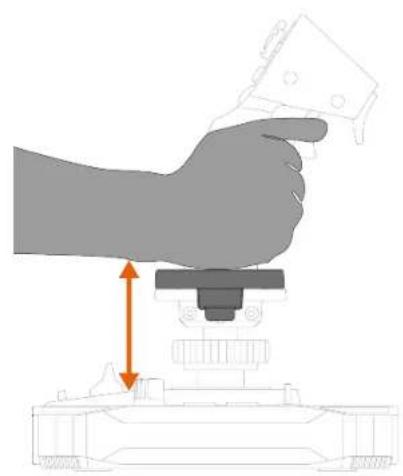
To set the joystick in Left-handed mode:
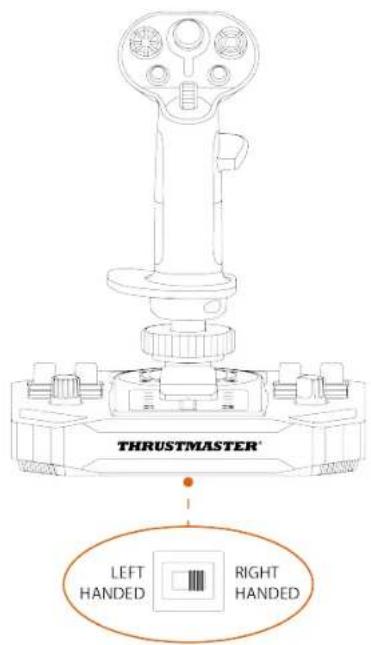
- Set the selector switch located on the underside of the joystick's base to LEFT HANDED.
The joystick is recognized with the name Sol-R [L] Flightstick.
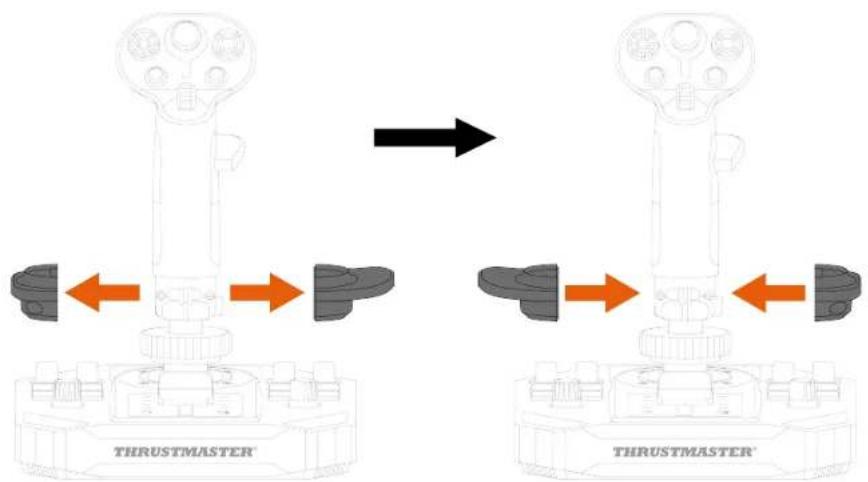
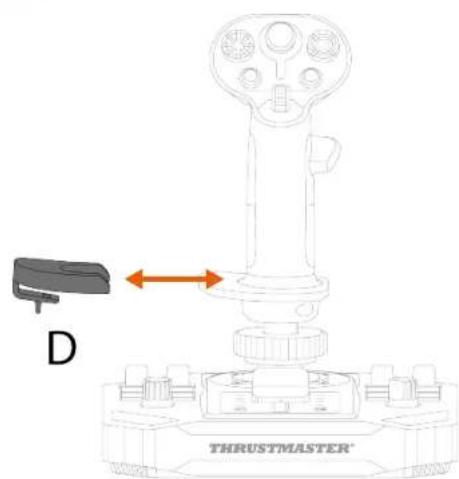
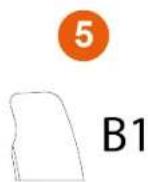
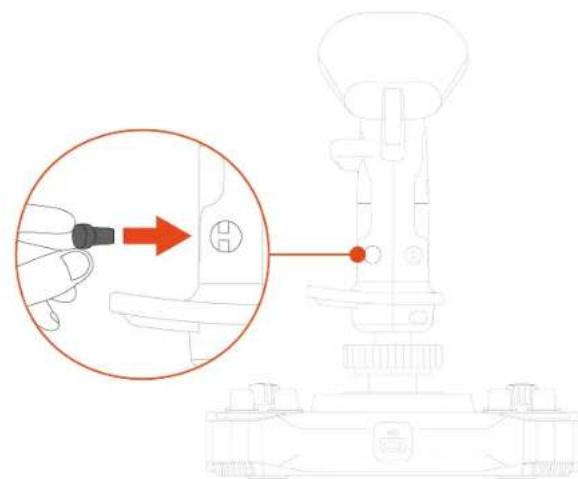
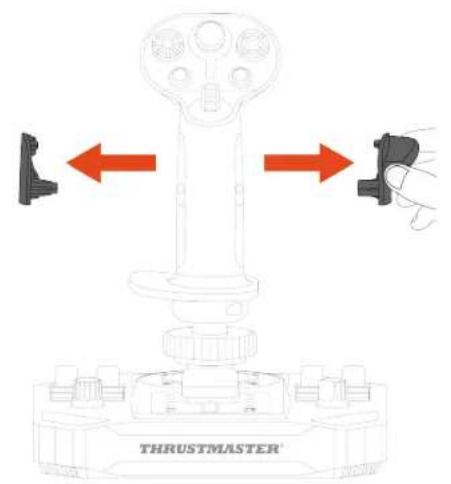
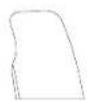
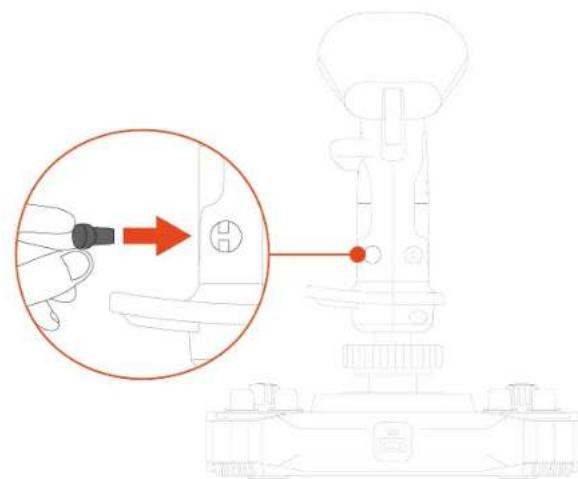
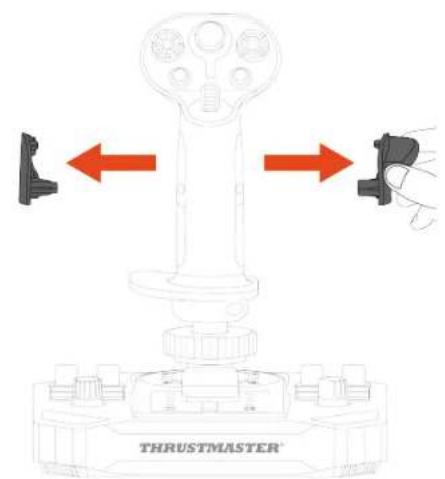
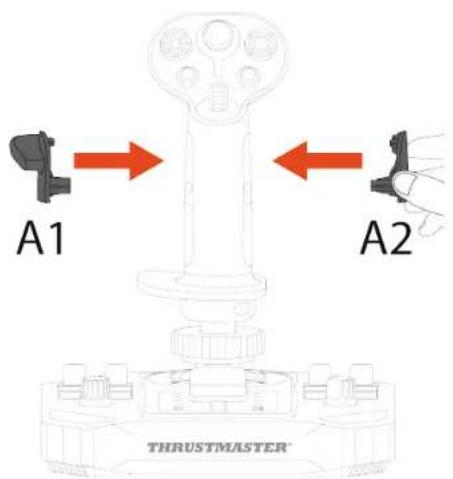
- Unscrew the right-hand thumb rest (A1).
- Remove both parts of the right-hand thumb rest (A1 and A2).
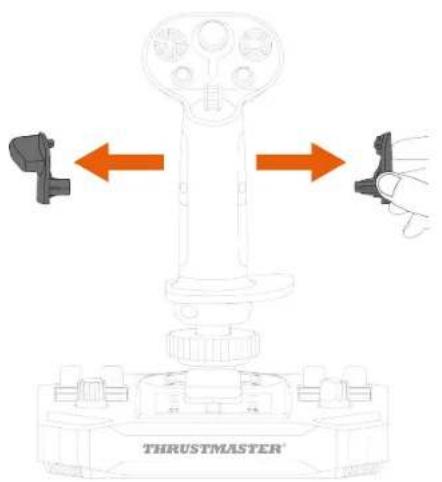
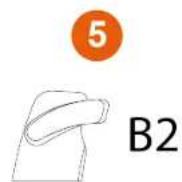
- Place both parts of the left-hand thumb rest (B1 and B2) on the flight stick grip.
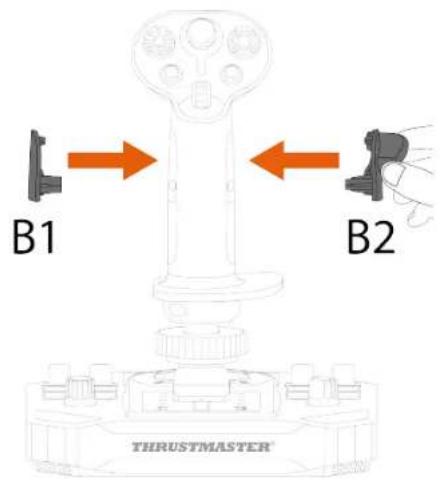
- Screw in the left-hand thumb rest (B1).

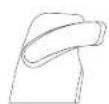
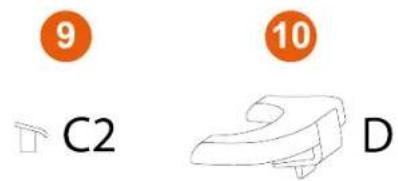
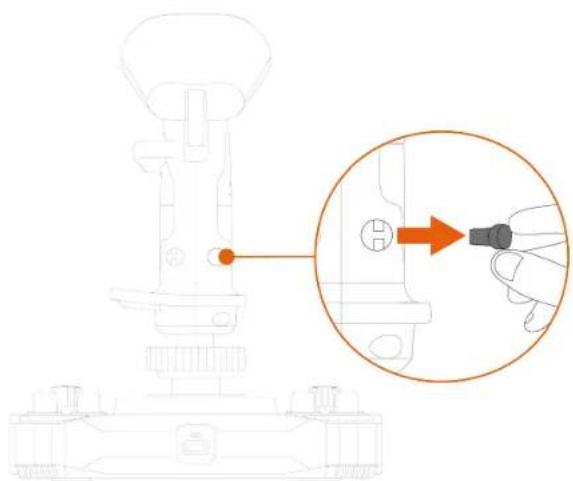
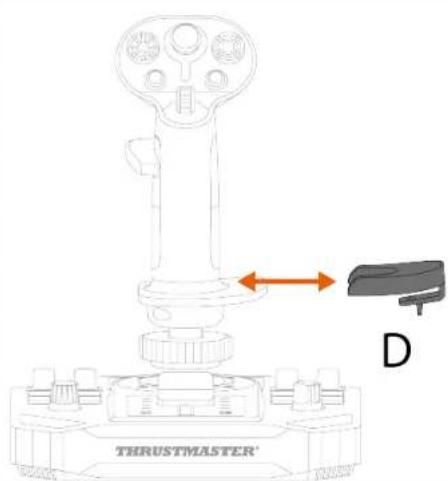
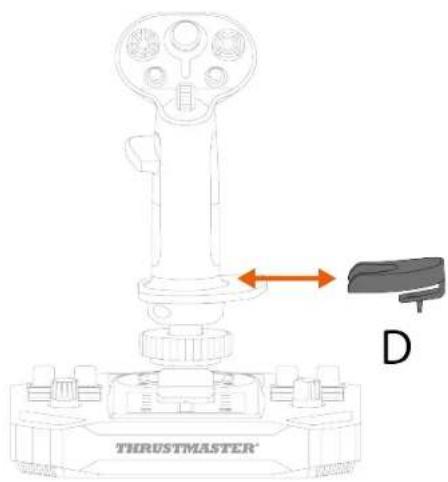
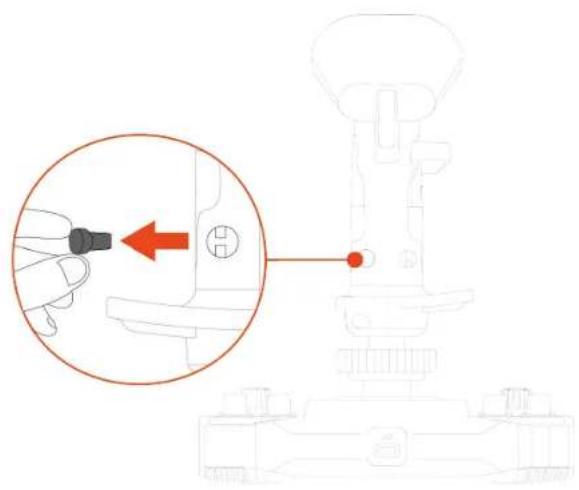
- Remove the removable button (C1 or C2) located on the back of the flight stick grip.
natural_image
Technical line drawing of a mechanical device with an inset showing a hand inserting a component into a housing (no text or symbols present)- Insert the removable button that you prefer (C1 or C2) below the B2 thumb rest.
natural_image
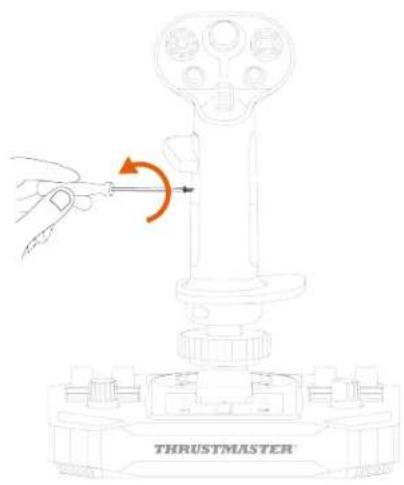
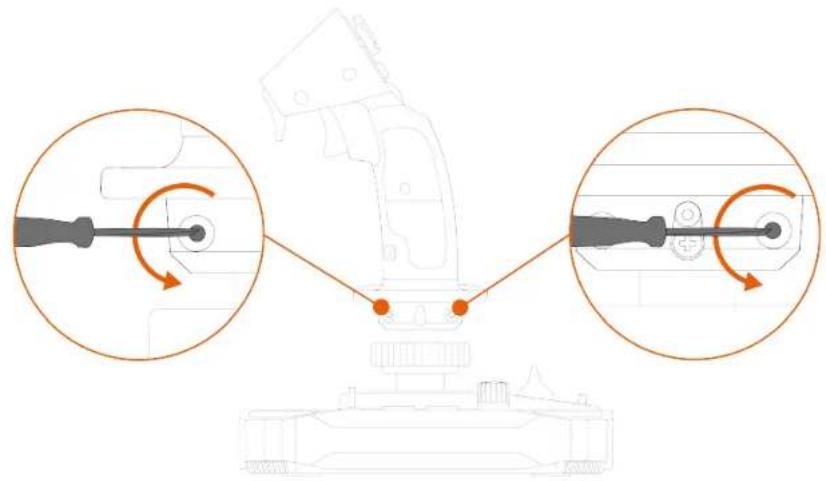
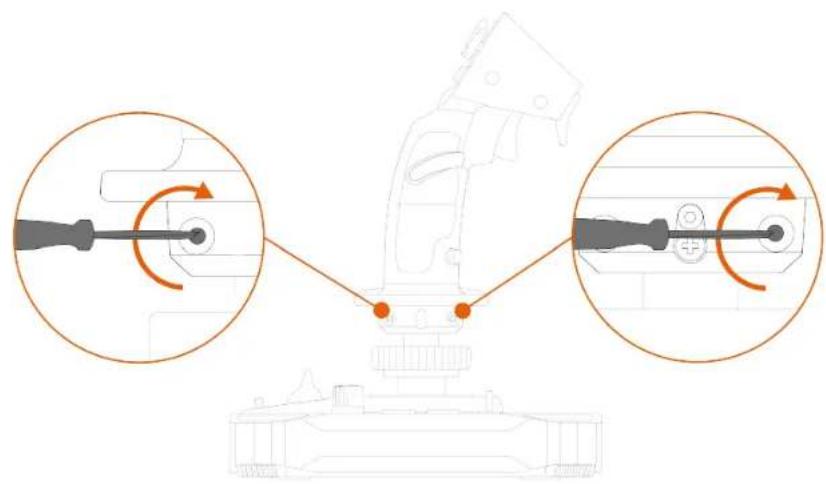
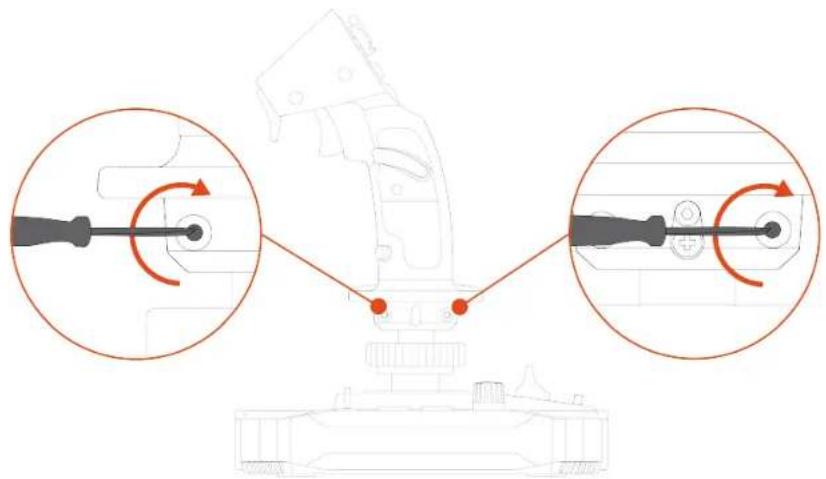
Diagram showing a hand inserting a component into a mechanical device, with an arrow indicating direction (no text or symbols present)- Unscrew the two screws holding the wrist rest in place.
natural_image
Diagram of a tank's internal components with two circular insets showing rotational motion (no text or labels)- Remove the two parts of the wrist rest, and then reposition them on the flight stick grip by reversing the parts.
- Screw in the two screws that hold the wrist rest in place.
natural_image
Diagram of a mechanical assembly with two circular insets showing rotational components (no text or labels)To set the joystick in Right-handed mode:
- Set the selector switch located on the underside of the joystick's base to RIGHT HANDED.
The joystick is recognized with the name Sol-R [R] Flightstick.
- Unscrew the left-hand thumb rest (B1).
- Remove both parts of the left-hand thumb rest (B1 and B2).
- Place both parts of the right-hand thumb rest (A1 and A2) on the flight stick grip.
- Screw in the right-hand thumb rest (A1).

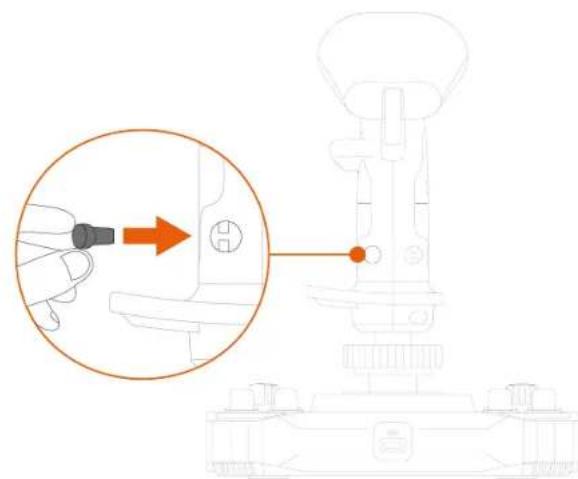
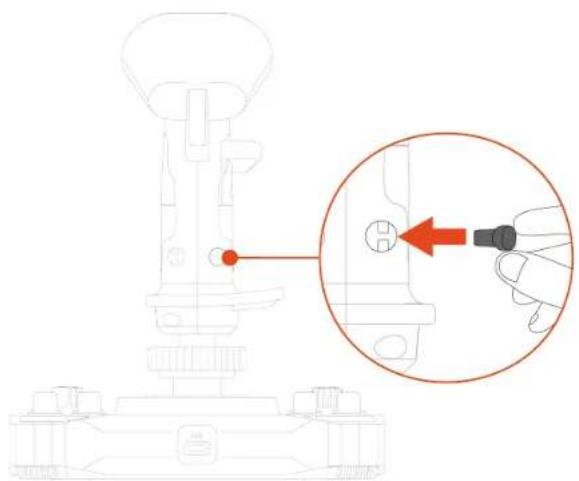
- Remove the removable button (C1 or C2) located on the back of the flight stick grip.
natural_image
Diagram showing a hand inserting a small component into a mechanical device, with an orange arrow indicating the direction (no text or symbols present)- Insert the removable button that you prefer (C1 or C2) below the A1 thumb rest.
natural_image
Technical line drawing of a mechanical assembly with an inset showing a hand inserting a component into a housing (no text or symbols present)- Unscrew the two screws holding the wrist rest in place.
natural_image
Diagram of a mechanical device with two circular insets showing rotational components (no text or symbols)- Remove the two parts of the wrist rest, and then reposition them on the flight stick grip by reversing the parts.
- Screw in the two screws that hold the wrist rest in place.
natural_image
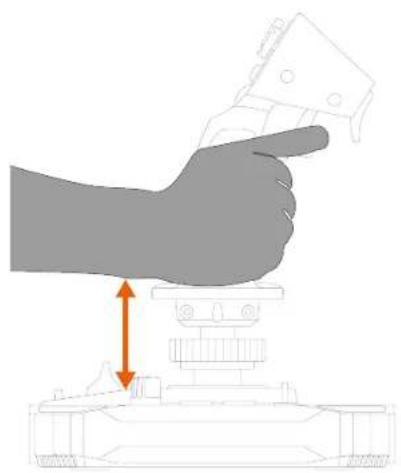
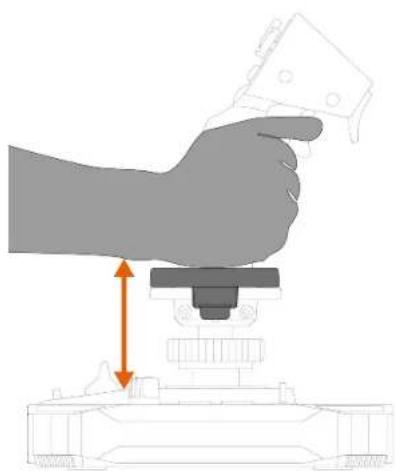
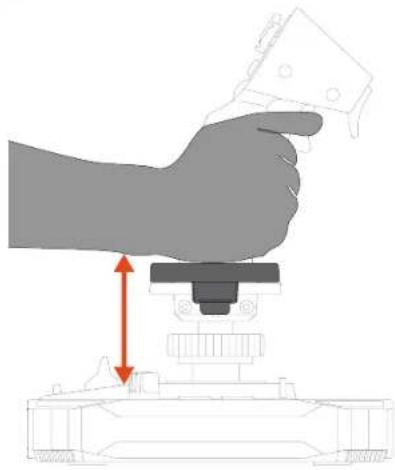
Technical diagram of a mechanical assembly with two circular insets showing rotational components (no text or labels)Height adapter
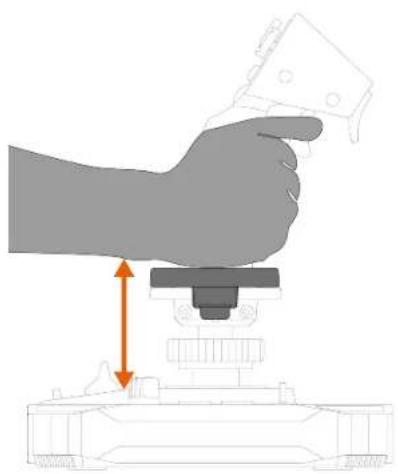
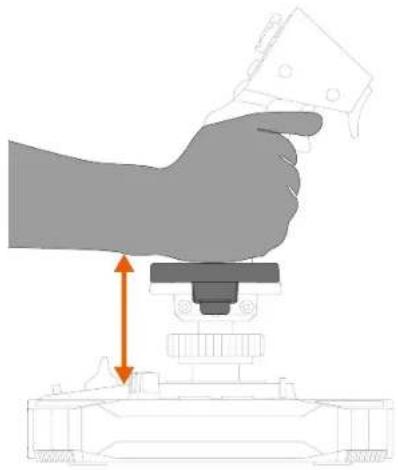
The Sol-R 1 Flightstick joystick features a height adapter to raise your hand when you're holding the flight stick grip, for greater comfort.
Without the adapter
natural_image
Illustration of a hand pressing down on a mechanical component with an orange arrow indicating motion (no text or symbols)With the adapter

natural_image
Illustration of a hand using a tool to press or install a mechanical component, with no visible text or symbols.To install the height adapter, clip it to the wrist rest.
Left-handed mode
Right-handed mode

9. Compatibility

Be sure to only use authorized accessories. The use of unauthorized accessories may damage the product and void the warranty.
Flight stick grips
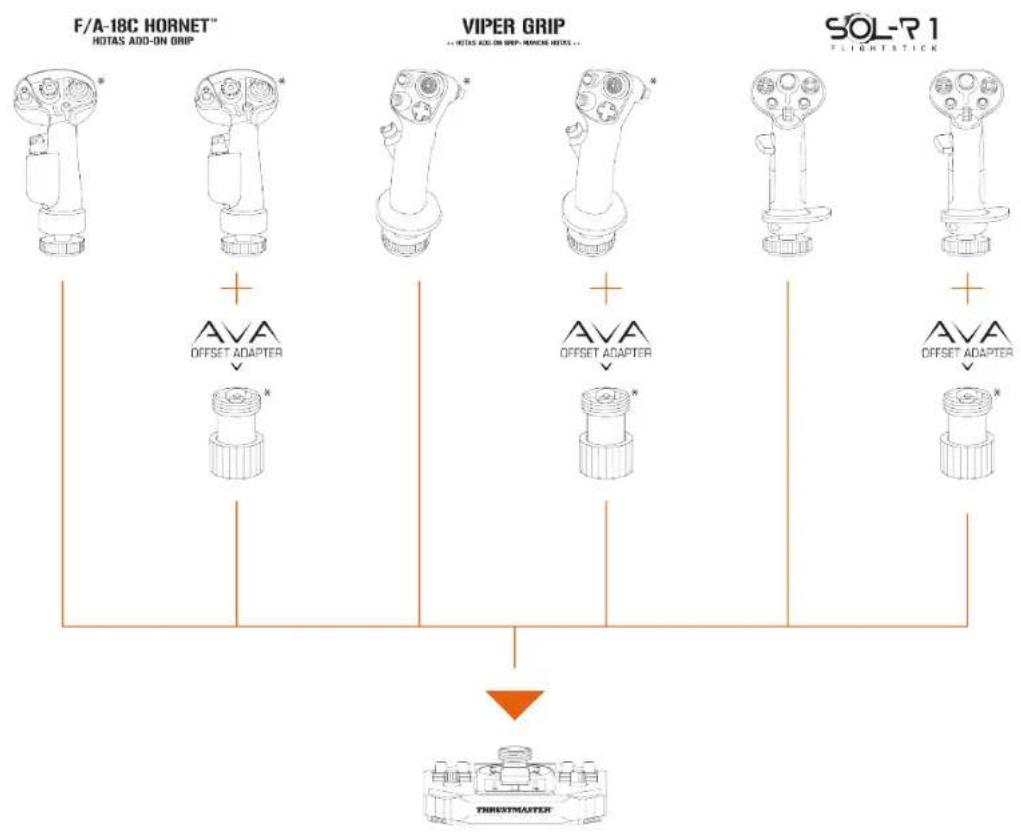
The Sol-R base is compatible with the following flight stick grips and accessories:
- F/A-18C Hornet™ HOTAS Add-On Grip flight stick grip*;
- Viper Grip - HOTAS Add-On Grip flight stick grip* (formerly F16-C Viper HOTAS Add-On Grip);
- AVA Offset Adapter adapter*;
- future Thrustmaster flight stick grips*.
flowchart
graph TD
    A["F/A-18C HORNET\nHOTAS ADD-ON GRIP"] --> B["AVA\nOFFSET ADAPTER"]
    C["VIPER GRIP\nHOTAS ADD-ON GRIP-NIVIOR NOTES"] --> D["AVA\nOFFSET ADAPTER"]
    E["SOL-R 1\nFLIGHTSTICK"] --> F["AVA\nOFFSET ADAPTER"]
    B --> G["THRESHMAUTER"]
    D --> G
    F --> G
*Sold separately
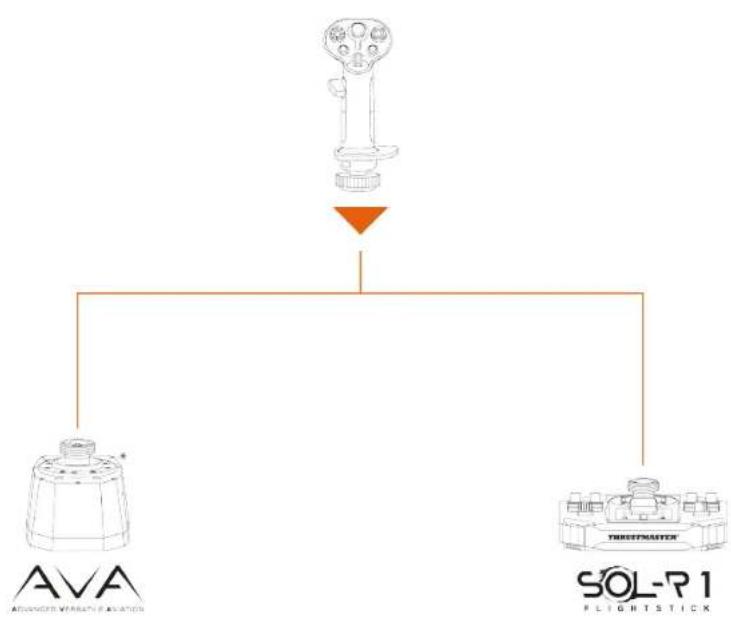
Base
The Sol-R flight stick grip is compatible with the AVA base*.
flowchart
graph TD
    A["Device"] --> B["Sensor 1"]
    A --> C["Sensor 2"]
    B --> D["AVA Sensor"]
    C --> E["SOL-R1 Sensor"]
    style A fill:#f9f,stroke:#333
    style B fill:#ccf,stroke:#333
    style C fill:#cfc,stroke:#333
    style D fill:#fcc,stroke:#333
    style E fill:#cff,stroke:#333
*Sold separately
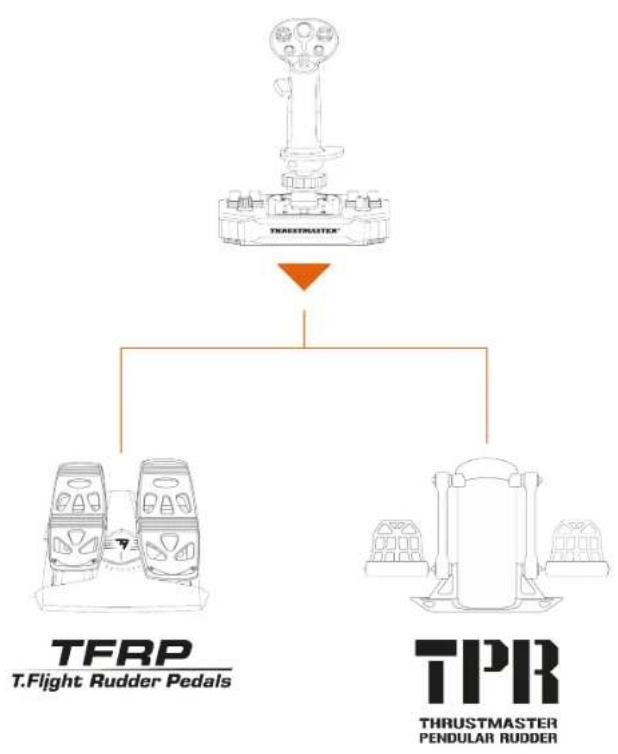
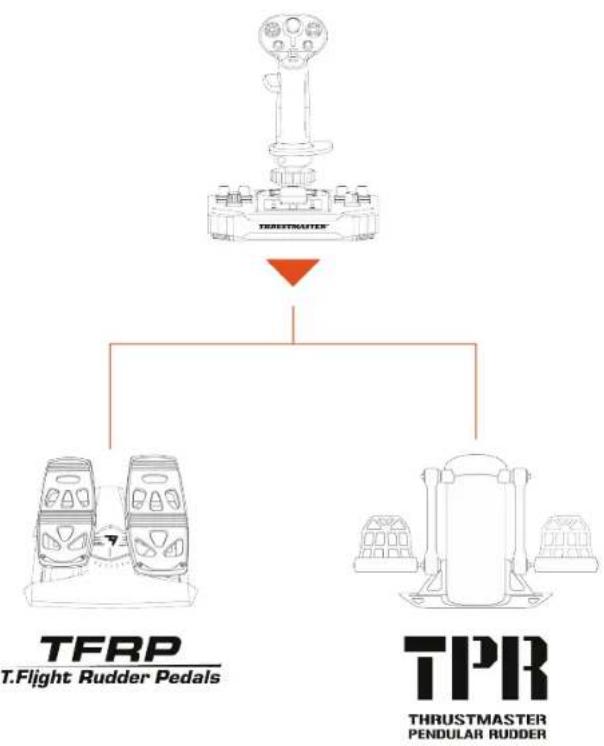
Rudders
The Sol-R 1 Flightstick joystick is compatible with the following rudder pedals systems:
- TFRP T.Flight Rudder Pedals*:
- TPR: Thrustmaster Pendular Rudder*.
flowchart
graph TD
    A["Top Gear"] --> B["TFRP"]
    A --> C["TPRR"]
    B --> D["T.Flight Rudder Pedals"]
    C --> E["Pendular Rudder"]

- The TFRP and the TPR must be connected to your PC via USB.
- The TFRP and the TPR are compatible in all games that support multi-USB and rudders.
*Sold separately
10. T.A.R.G.E.T
advanced
programming software

T.A.R.G.E.T (Thrustmaster Advanced pRogramming Graphical EdiTor) is an innovative, high-performance software suite allowing for improvements to most Thrustmaster flight controllers, and the sharing of profiles with the Thrustmaster community.
Installation
- Visit:
https://support.thrustmaster.com/product/sol-r-1-flightstick.
- In the Software section, download and install the T.A.R.G.E.T advanced programming software.
Main features
- Various possible configurations of the axes.
- Multiple programming levels available: Basic, Advanced and Script.
- Use of the Drag and Drop principle.
- Ability to merge the Sol-R 1 Flightstick joystick with other Thrustmaster flight simulation accessories (Hotas Cougar*, T.16000M FCS*, TWCS*, TFRP*, MFD Cougar Pack*, TCA range*, VIPER range*, AVA range* — all of which are also compatible with T.A.R.G.E.T), allowing for them to be recognized as a single USB device.
- Access to advanced profiles created by the Thrustmaster community.
11. FAQ and technical support
Do you have questions regarding the Sol-R 1 Flightstick joystick, or are you experiencing technical problems? If so, visit the Thrustmaster technical support website: https://support.thrustmaster.com/product/sol-r-1-flightstick.

1. My joystick isn't working properly, or seems to be improperly calibrated
- Power off your PC, disconnect your joystick and then reconnect it, restart your PC and start up your game again.
- When connecting your joystick, be sure to keep the flight stick grip centered and avoid moving it, to avoid any calibration problems.
2. I can't configure my joystick
- Access your game's menu and select Options > Controller > Gamepad or Joystick. Then choose the most appropriate configuration, or completely reconfigure the joystick's options.
- For more information, please refer to your game's user manual or online help.
3. My joystick is too sensitive, or not sensitive enough
- Sol-R 1 Flightstick automatically self-calibrates after a few movements on the different axes.
- Access your game's menu and select Options > Controller > Gamepad or Joystick. Then adjust your joystick's sensitivity and dead zones if these options are available.
4. My joystick isn't working
- In order for the Sol-R 1 Flightstick joystick to work properly with video games, you need to update its firmware.
To carry out the firmware update, visit
https://support.thrustmaster.com/product/sol-r-1-flightstick.
Select Drivers and follow the instructions, including the downloading and installation procedure.
THRUSTMASTER®

FLIGHTSTICK
Pour PC (Windows® 10/11)
https://support.thrustmaster.com/product/sol-r-1-flightstick.
natural_image
Technical line drawing of a mechanical component labeled 'THRUSTMASTER®' (no other text or symbols)
B1

B2

C2

D

natural_image
Pure electrical circuit lines without any symbols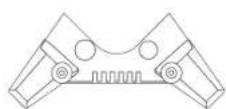
x 4

flowchart
graph TD
    A["Port 1"] --> B["Node"]
    B --> C["Node"]
    C --> D["Port 2"]
    style A fill:#fff,stroke:#000
    style D fill:#fff,stroke:#000
    note right of B "18"

4. Montage


natural_image
Pure geometric shapes with no text, numbers, or symbols
natural_image
Technical line drawing of a robotic control device with a lever and base (no text or symbols)natural_image
Technical line drawing of a mechanical clamp or bracket assembly (no text or symbols)
natural_image
Technical line drawing of a mechanical device with an inset showing a hand inserting a component into a housing (no text or symbols present)natural_image
Diagram showing a hand inserting a component into a mechanical device, with no visible text or symbols.natural_image
Diagram of a tank's internal mechanical assembly with two circular insets showing rotational components (no text or labels)natural_image
Diagram of a mechanical assembly with two circular insets showing rotational components (no text or labels)natural_image
Diagram showing a hand inserting a small component into a mechanical device, with an orange arrow indicating the direction (no text or symbols present)natural_image
Technical line drawing of a mechanical assembly with an inset showing a hand inserting a component into a housing (no text or symbols present)natural_image
Diagram of a mechanical device with two circular insets showing rotational components (no text or symbols)natural_image
Technical diagram of a mechanical assembly with two circular insets showing rotational components (no text or labels)9. Compatibilité

flowchart
graph TD
    A["AVA"] --> C["Processing Node"]
    B["SOL-R1"] --> C
    C --> D["Output"]
Palonniers
https://support.thrustmaster.com/product/sol-r-1-flightstick.

https://support.thrustmaster.com/product/sol-r-1-flightstick.
natural_image
Technical line drawing of a mechanical component labeled 'THRUSTMASTER®' (no other text or symbols)
B1

B2

C2

D

natural_image
Pure electrical circuit lines without any symbols
x 4

flowchart
graph TD
    A["Port 1"] --> B["Node"]
    B --> C["Port 2"]
    C --> D["Port 3"]
    D --> E["Port 4"]
    style A fill:#fff,stroke:#000
    style E fill:#fff,stroke:#000
    note right of B "18"

4. Zusammenbau


natural_image
Pure geometric shapes with no text, numbers, or symbols
natural_image
Technical line drawing of a robotic control device with a lever and base (no text or symbols)natural_image
Technical line drawing of a mechanical clamp or bracket assembly (no text or symbols)
Multidirektionaler
Point-of-View-
Schalter
Rechtshänder-Modus

natural_image
Technical line drawing of a mechanical component with an inset showing a hand holding a small component (no text or symbols present)natural_image
Diagram showing a hand inserting a component into a mechanical device, with no visible text or symbols.natural_image
Diagram of a mechanical device with two circular insets showing rotational components (no text or symbols)natural_image
Technical line drawing of a mechanical assembly with an inset showing a hand inserting a screw into a housing component (no text or symbols present)natural_image
Diagram of a tank with two circular insets showing mechanical components and rotation arrows (no text or symbols)natural_image
Technical diagram of a mechanical assembly with two circular insets showing rotational components (no text or labels)Höhenadapter
natural_image
Illustration of a hand pressing down on a mechanical component with an orange arrow indicating motion (no text or symbols)Mit Adapter
natural_image
Illustration of a hand pressing down on a tank, showing mechanical components and motion direction (no text or symbols)Rechtshänder-Modus
9. Kompatibilität

https://support.thrustmaster.com/product/sol-r-1-flightstick.

https://support.thrustmaster.com/product/sol-r-1-flightstick.
natural_image
Technical line drawing of a mechanical component labeled 'THRUSTMASTER®' (no other text or symbols)
B1

B2

C2
D

natural_image
Pure electrical circuit lines without any symbols
x 4
2. Technische specificaties

flowchart
graph TD
    A["Port 1"] --> B["Node"]
    B --> C["Node"]
    C --> D["Port 2"]
    style A fill:#fff,stroke:#000
    style D fill:#fff,stroke:#000
    note right of C "18"

4. Montage


https://support.thrustmaster.com/product/sol-r-1-flightstick.

natural_image
Pure geometric shapes and dot patterns without any text, numbers, or symbols
natural_image
Technical line drawing of a robotic control device with a lever and base mount (no text or symbols)natural_image
Technical line drawing of a mechanical clamp or bracket assembly (no text or symbols)
Multidirectionele switch
Point-of-View-hat-
- Schroef de linker duimsteun (B1) vast.

natural_image
Diagram of a hand using a screwdriver to adjust a thrust mechanism on a mechanical base (no text or symbols)natural_image
Technical line drawing of a mechanical device with an inset showing a hand inserting a component into a housing (no text or symbols present)natural_image
Diagram showing a hand inserting a component into a mechanical device, with no visible text or symbols.
natural_image
Diagram of a mechanical device with two circular insets showing rotational components (no text or symbols)Om de joystick in de Rechtshandige modus te zetten:
- Schroef de rechter duimsteun (A1) vast.
natural_image
Diagram showing a hand inserting a small component into a device, with an orange arrow indicating the direction (no text or symbols present)natural_image
Technical line drawing of a mechanical assembly with an inset showing a hand inserting a component into a housing (no text or symbols present)natural_image
Diagram of a mechanical device with two circular insets showing rotational components (no text or symbols)
natural_image
Technical diagram of a mechanical assembly with two circular insets showing rotational components (no text or labels)Hoogte-adapter
natural_image
Illustration of a hand pressing down on a tank component with an orange arrow indicating motion (no text or symbols)Met de adapter

natural_image
Illustration of a hand using a tool to press or install a mechanical component, with no visible text or symbols.Rechtshandige modus
9. Compatibiliteit

https://support.thrustmaster.com/product/sol-r-1-flightstick.
https://support.thrustmaster.com/product/sol-r-1-flightstick.

https://support.thrustmaster.com/product/sol-r-1-flightstick.
natural_image
Technical line drawing of a mechanical component labeled 'THRUSTMASTER®' (no other text or symbols)
B1

B2

C2

D

natural_image
Pure electrical circuit lines without any symbols
x 4

flowchart
graph TD
    A["Port 1"] --> B["Node"]
    B --> C["Node"]
    C --> D["Port 2"]
    style A fill:#fff,stroke:#000
    style D fill:#fff,stroke:#000
    note right of C "18"

4. Assemblaggio


natural_image
Pure geometric shapes with no text, numbers, or symbols
natural_image
Technical line drawing of a robotic control device with a lever and labeled 'TERUSTMASTER' (no text or symbols on the device itself)natural_image
Technical line drawing of a mechanical clamp or bracket assembly (no text or symbols)
natural_image
Technical line drawing of a mechanical device with an inset showing a hand inserting a component into a housing (no text or symbols present)natural_image
Technical line drawing of a mechanical device with an inset showing a hand pin pointing to a component (no text or symbols present)
natural_image
Diagram of a tank with two circular insets showing mechanical components and rotational arrows (no text or symbols)natural_image
Diagram showing a hand inserting a small component into a mechanical device, with an orange arrow indicating the direction (no text or symbols present)natural_image
Technical line drawing of a mechanical assembly with an inset showing a hand inserting a screwdriver into a housing component (no text or symbols present)natural_image
Technical diagram of a mechanical assembly with two circular insets showing rotational components (no text or labels)
https://support.thrustmaster.com/product/sol-r-1-flightstick.

https://support.thrustmaster.com/product/sol-r-1-flightstick.
https://support.thrustmaster.com/product/sol-r-1-flightstick.
natural_image
Technical line drawing of a mechanical component labeled 'THRUSTMASTER®' (no other text or symbols)
B1

B2

C2

D

natural_image
Pure electrical circuit lines without any symbols
x 4
flowchart
graph TD
    A["Port 1"] --> B["Node"]
    B --> C["Node"]
    C --> D["Port 2"]
    style A fill:#fff,stroke:#000
    style D fill:#fff,stroke:#000
    note right of B "18"

16 Conector USB-C
17 Interruptor selector: LEFT HANDED (zurdo) / RIGHT HANDED (diestro)
18 Cable USB-A - USB-C
19 Soportes de estabilidad
4. Montaje


https://support.thrustmaster.com/product/sol-r-1-flightstick.

natural_image
Pure geometric shapes with no text, numbers, or symbols
natural_image
Technical line drawing of a robotic control device with a lever and labeled 'TERUSTMASTER' (no text or symbols on the device itself)natural_image
Technical line drawing of a mechanical clamp or bracket assembly (no text or symbols)
natural_image
Technical line drawing of a mechanical device with an inset showing a hand inserting a component into a housing (no text or symbols present)natural_image
Diagram showing a hand inserting a component into a mechanical device, with no visible text or symbols.natural_image
Diagram of a mechanical assembly with two circular insets showing rotational components (no text or labels)natural_image
Diagram showing a hand inserting a small component into a mechanical device, with an orange arrow indicating the direction (no text or symbols present)natural_image
Technical line drawing of a mechanical assembly with an inset showing a hand inserting a component into a housing (no text or symbols present)natural_image
Diagram of a mechanical device with two circular insets showing rotational components (no text or symbols)natural_image
Technical diagram of a mechanical assembly with two circular insets showing rotational components (no text or labels)Adaptador de altura
natural_image
Illustration of a hand pressing down on a mechanical component with an orange arrow indicating motion (no text or symbols)Con el adaptador
natural_image
Illustration of a hand using a tool to press or install a mechanical component, with no visible text or symbols.Modo para diestros
9. Compatibilidad

flowchart
graph TD
    A["F/A-18C HORNET\nHOTAS ADD-ON GRIP"] --> B["AVA\nOFFSET ADAPTER"]
    C["VIPER GRIP\nAVI MOTAS ADD ON GRIP/MONOR MOTAS..."] --> D["AVA\nOFFSET ADAPTER"]
    E["SOL-R 1\nFLIGHTSTICK"] --> F["AVA\nOFFSET ADAPTER"]
    B --> G["THROSTMASTER"]
    D --> G
    F --> G
https://support.thrustmaster.com/product/sol-r-1-flightstick.
https://support.thrustmaster.com/product/sol-r-1-flightstick.

https://support.thrustmaster.com/product/sol-r-1-flightstick.
https://support.thrustmaster.com/product/sol-r-1-flightstick.
natural_image
Technical line drawing of a mechanical component labeled 'THRUSTMASTER®' (no other text or symbols)
B1

B2

C2

D

natural_image
Pure electrical circuit lines without any symbols
x 4

flowchart
graph TD
    A["Port 1"] --> B["Node"]
    B --> C["Node"]
    C --> D["Port 2"]
    style A fill:#fff,stroke:#000
    style D fill:#fff,stroke:#000
    note right of C "18"

16 Conector USB-C
17 Seletor: LEFT HANDED (Modo Esquerdino) / RIGHT HANDED (Modo Destro)
18 Cabo USB-A/USB-C
19 Suportes de estabilidade
4. Montagem


5. Instalação no PC
- Visite:
https://support.thrustmaster.com/product/sol-r-1-flightstick.

natural_image
Pure geometric shapes with no text, numbers, or symbols
natural_image
Technical line drawing of a robotic control device with a lever and labeled 'TERUSTMASTER' (no text or symbols on the device itself)natural_image
Technical line drawing of a mechanical clamp or bracket assembly (no text or symbols)
Hat switch de ponto de vista
multidirecional
- Enrosque o descanso do polegar esquerdo (B1).

natural_image
Technical line drawing of a mechanical device with an inset showing a hand inserting a component into a housing (no text or symbols present)natural_image
Diagram showing a hand inserting a component into a mechanical device, with no visible text or symbols.natural_image
Diagram of a mechanical assembly with two circular insets showing rotational components (no text or labels)natural_image
Diagram showing a hand inserting a small component into a mechanical device, with an orange arrow indicating the direction (no text or symbols present)natural_image
Technical line drawing of a mechanical assembly with an inset showing a hand inserting a component into a housing (no text or symbols present)natural_image
Technical diagram of a mechanical assembly with two circular insets showing rotational components (no text or labels)
natural_image
Technical diagram of a mechanical assembly with two circular insets showing rotational components (no text or labels)Adaptador de altura
natural_image
Illustration of a hand pressing down on a mechanical device with an orange arrow indicating motion (no text or symbols)Com o adaptador

natural_image
Illustration of a hand using a tool to press or install a mechanical component, with no visible text or symbols.Modo Destro

9. Compatibilidade

https://support.thrustmaster.com/product/sol-r-1-flightstick.
https://support.thrustmaster.com/product/sol-r-1-flightstick.

Para proceder à atualização do firmware, visite https://support.thrustmaster.com/product/sol-r-1-flightstick.
natural_image
Technical line drawing of a mechanical component labeled 'THRUSTMASTER®' (no other text or symbols)
B1

B2

C2

D

natural_image
Pure electrical circuit lines without any symbols
x 4

4. Сборка


5. Установка на ПК

natural_image
Pure geometric shapes with no text, numbers, or symbols
natural_image
Technical line drawing of a robotic control device with a lever and base mount (no text or symbols)natural_image
Technical line drawing of a mechanical clamp or bracket assembly (no text or symbols)
natural_image
Technical line drawing of a mechanical component with a magnified inset showing a hand inserting a black plug into a housing (no text or symbols)natural_image
Diagram showing a hand inserting a small black component into a mechanical device, with no visible text or symbols.natural_image
Technical line drawing of a mechanical assembly with a magnified inset showing a hand inserting a component (no text or symbols)natural_image
Technical diagram of a mechanical assembly with two circular insets showing rotational components (no text or labels)natural_image
Technical diagram of a mechanical assembly with two circular insets showing rotational components (no text or labels)Адаптер высоты
natural_image
Illustration of a hand pressing down on a mechanical component with an arrow indicating motion (no text or symbols)С адаптером
natural_image
Illustration of a hand using a tool to press or install a mechanical component, with no visible text or symbols.9. Совместимость

flowchart
graph TD
    A["Device"] --> B["AVA"]
    A --> C["SOL-R1"]
    B --> D["Flight stick"]
    C --> D
Рули направления
https://support.thrustmaster.com/product/sol-r-1-flightstick.

https://support.thrustmaster.com/product/sol-r-1-flightstick.
natural_image
Technical line drawing of a mechanical component labeled 'THRUSTMASTER®' (no other text or symbols)
B1

B2

C2

D

natural_image
Pure electrical circuit lines without any symbols
x 4

flowchart
graph TD
    A["Port 1"] --> B["Node"]
    B --> C["Node"]
    C --> D["Port 2"]
    style A fill:#fff,stroke:#000
    style D fill:#fff,stroke:#000
    note right of B "18"

4. Montáž


5. Instalace na PC

natural_image
Pure geometric shapes and dot patterns without any text, numbers, or symbols
natural_image
Technical line drawing of a robotic control device with a lever and base mount (no text or symbols)natural_image
Technical line drawing of a mechanical clamp or bracket assembly (no text or symbols)
natural_image
Technical line drawing of a mechanical device with an inset showing a hand inserting a component into a housing (no text or symbols present)natural_image
Diagram showing a hand inserting a component into a mechanical device, with no visible text or symbols.natural_image
Diagram of a tank's internal components with two circular insets showing rotational motion (no text or labels)natural_image
Diagram of a mechanical assembly with two circular insets showing rotational components (no text or labels)natural_image
Diagram showing a hand inserting a small component into a device, with an orange arrow indicating the direction (no text or symbols present)natural_image
Technical line drawing of a mechanical assembly with an inset showing a hand inserting a component into a housing (no text or symbols present)natural_image
Diagram of a mechanical device with two circular insets showing rotational components (no text or symbols)Výškový adaptér
https://support.thrustmaster.com/product/sol-r-1-flightstick.
https://support.thrustmaster.com/product/sol-r-1-flightstick.

https://support.thrustmaster.com/product/sol-r-1-flightstick.
- UÇUŞ KOLUNUN AYARLANMASI .....32
https://support.thrustmaster.com/product/sol-r-1- flightstick.
natural_image
Technical line drawing of a mechanical component labeled 'THRUSTMASTER®' (no other text or symbols)
B1

B2

C2

D

natural_image
Pure electrical circuit lines without any symbols
x 4

flowchart
graph TD
    A["Port 1"] --> B["Node"]
    B --> C["Port 2"]
    C --> D["Port 3"]
    D --> E["Port 4"]
    style A fill:#fff,stroke:#000
    style E fill:#fff,stroke:#000
    note right of B "18"

4. Takma


5. PC'de kurulum
https://support.thrustmaster.com/product/sol-r-1-flightstick.

natural_image
Pure geometric shapes with no text, numbers, or symbols
natural_image
Technical line drawing of a robotic control device with a lever and labeled 'TERUSTMASTER' (no text or symbols on the device itself)natural_image
Technical line drawing of a mechanical clamp or bracket assembly (no text or symbols)
natural_image
Technical line drawing of a mechanical device with an inset showing a hand inserting a component into a housing (no text or symbols present)natural_image
Technical line drawing of a mechanical device with an inset showing a hand holding a small component (no text or symbols present)natural_image
Diagram of a mechanical assembly with two circular insets showing rotational components (no text or labels)natural_image
Diagram showing a hand inserting a small component into a mechanical device, with an orange arrow indicating the direction (no text or symbols present)natural_image
Technical line drawing of a mechanical assembly with an inset showing a hand inserting a component (no text or symbols present)natural_image
Technical diagram of a mechanical assembly with two circular insets showing rotational components (no text or labels)natural_image
Technical diagram of a mechanical assembly with two circular insets showing rotational components (no text or labels)Yükseklik adaptörü
flowchart
graph TD
    A["AVA"] --> C["Processing Node"]
    B["SOL-R1"] --> C
    C --> D["Output"]
https://support.thrustmaster.com/product/sol-r-1-flightstick.
- ZAAWANSOWANA APLIKACJA DO
PROGRAMOWANIA T.A.R.G.E.T. 48
Instalacja 48
https://support.thrustmaster.com/product/sol-r-1-flightstick.
natural_image
Technical line drawing of a mechanical component labeled 'THRUSTMASTER®' (no other text or symbols)
B1

B2

C2

D

natural_image
Pure electrical circuit lines without any symbols
x 4

flowchart
graph TD
    A["Port 1"] --> B["Node"]
    B --> C["Node"]
    C --> D["Port 2"]
    style A fill:#fff,stroke:#000
    style D fill:#fff,stroke:#000
    note right of C "18"

4. Zakładanie

https://support.thrustmaster.com/product/sol-r-1-flightstick.

natural_image
Pure geometric shapes with no text, numbers, or symbols
natural_image
Technical line drawing of a mechanical device with a lever and control panel (no text or symbols)natural_image
Technical line drawing of a mechanical clamp or bracket assembly (no text or symbols)
natural_image
Technical line drawing of a mechanical component with an inset showing a hand inserting a plug into a housing (no text or symbols present)natural_image
Technical line drawing of a mechanical assembly with a hand pin inserted, showing a close-up of a component (no text or symbols)natural_image
Diagram of a tank with two circular insets showing mechanical components and rotation arrows (no text or symbols)
natural_image
Technical line drawing of a mechanical assembly with an inset showing a hand pin pointing to a component (no text or symbols present)natural_image
Technical line drawing of a mechanical assembly with an inset showing a hand inserting a screw into a housing component (no text or symbols present)natural_image
Technical diagram of a mechanical assembly with two circular insets showing rotational components (no text or labels)
Adapter wysokości
natural_image
Illustration of a hand pressing down on a tank component with an orange arrow indicating motion (no text or symbols)Z adapterem
natural_image
Illustration of a hand using a tool to press or install a mechanical component, with no visible text or symbols.Tryb praworęczny

9. Zgodność

https://support.thrustmaster.com/product/sol-r-1-flightstick.
https://support.thrustmaster.com/product/sol-r-1-flightstick.

https://support.thrustmaster.com/product/sol-r-1-flightstick.
INNEHÅLLSFÖRTECKNING
- INNEHÅLL I FÖRPACKNINGEN ......6
- TEKNISKA DELAR....7
- ANVÄNDNINGSINFORMATION ......11
- MONTERING....13
- INSTALLATION PÅ PC 15
Kontrollpanelen 16
Mappning....20
- INSTALLATION PÅ ETT STÖD ......23
Installation på en TM Flying Clamp*......24
https://support.thrustmaster.com/product/sol-r-1-flightstick.
natural_image
Technical line drawing of a mechanical component labeled 'THRUSTMASTER®' (no other text or symbols)
B1

B2

C2

D

natural_image
Pure electrical circuit lines without any symbols
x 4
2. Tekniska delar


flowchart
graph TD
    A["Port 1"] --> B["Node"]
    B --> C["Node"]
    C --> D["Port 2"]
    style A fill:#fff,stroke:#000
    style D fill:#fff,stroke:#000
    note right of B "18"

4. Montering


5. Installation på PC
- Gå till:
https://support.thrustmaster.com/product/sol-r-1-flightstick.

natural_image
Pure geometric shapes with no text, numbers, or symbols
natural_image
Technical line drawing of a robotic control device with a lever and labeled 'TERUSTMASTER' (no text or symbols on the device itself)natural_image
Technical line drawing of a mechanical clamp or bracket assembly (no text or symbols)
POV-hattknapp
natural_image
Technical line drawing of a mechanical device with an inset showing a hand holding a small component (no text or symbols present)natural_image
Technical line drawing of a mechanical device with an inset showing a hand holding a small component (no text or symbols present)natural_image
Diagram of a mechanical assembly with two circular insets showing rotational components (no text or labels)natural_image
Diagram showing a hand inserting a small component into a device, with an orange arrow indicating direction (no text or symbols present)natural_image
Technical line drawing of a mechanical assembly with an inset showing a hand inserting a component into a housing (no text or symbols present)natural_image
Diagram of a mechanical device with two circular insets showing rotational components (no text or symbols)
natural_image
Technical diagram of a mechanical assembly with two circular insets showing rotational components (no text or labels)Höjdadapter
natural_image
Illustration of a hand pressing down on a mechanical component with an orange arrow indicating motion (no text or symbols)Med adaptern
natural_image
Illustration of a hand using a tool to press or install a mechanical component, with no visible text or symbols.Högerhänt läge

9. Kompatibilitet

https://support.thrustmaster.com/product/sol-r-1-flightstick.
https://support.thrustmaster.com/product/sol-r-1-flightstick.

https://support.thrustmaster.com/product/sol-r-1-flightstick.
https://support.thrustmaster.com/product/sol-r-1-flightstick.
natural_image
Technical line drawing of a mechanical component labeled 'THRUSTMASTER®' (no other text or symbols)
B1

B2

C2
D

natural_image
Pure electrical circuit lines without any symbols
x 4


4. Asennus


https://support.thrustmaster.com/product/sol-r-1-flightstick.
Napsauta

natural_image
Pure geometric shapes with no text, numbers, or symbols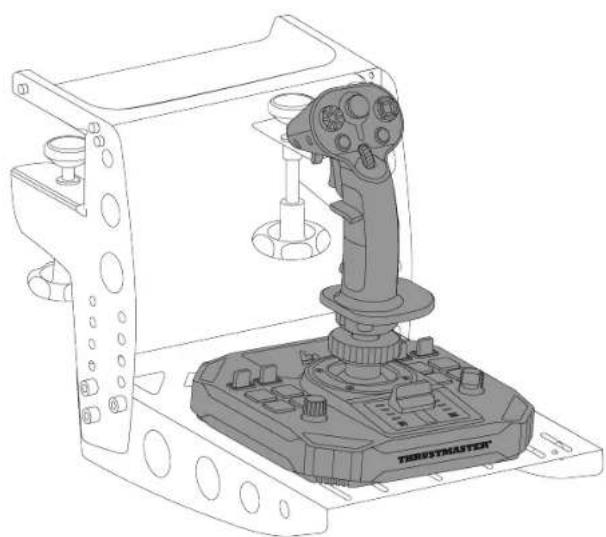
natural_image
Technical line drawing of a robotic control device with a lever and base (no text or symbols)* Myydään erikseen.
natural_image
Technical line drawing of a mechanical clamp or bracket assembly (no text or symbols)
natural_image
Technical line drawing of a mechanical component with an inset showing a hand inserting a plug into a housing (no text or symbols present)- Aseta haluamasi irrotettava painike (C1 tai C2) B2-peukalotuen alle.
natural_image
Technical diagram of a mechanical assembly with two circular insets showing rotational components (no text or labels)natural_image
Technical line drawing of a mechanical component with a red arrow indicating a step, no text or symbols present.- Aseta haluamasi irrotettava painike (C1 tai C2) A1-peukalotuen alle.
natural_image
Technical line drawing of a mechanical assembly with a magnified inset showing a red arrow pointing to a component (no text or symbols present)natural_image
Technical diagram of a mechanical assembly with two circular insets showing rotational components (no text or labels)
Korkeussovitin
natural_image
Illustration of a hand pressing down on a mechanical component with an upward arrow indicating motion (no text or symbols)Sovittimen kanssa
natural_image
Illustration of a hand using a tool to press or install a mechanical component, with no visible text or symbols.Oikeakätinen tila
9. Yhteensopivuus

flowchart
graph TD
    A["Device"] --> B["AVA"]
    A --> C["SOL-R1"]
    B --> D["Flight stick"]
    C --> D
* Myydään erikseen.
Sivuperäsimet
https://support.thrustmaster.com/product/sol-r-1-flightstick.
https://support.thrustmaster.com/product/sol-r-1-flightstick.
natural_image
Technical line drawing of a mechanical component labeled 'THRUSTMASTER®' (no other text or symbols)
B1
B2

C2

D

natural_image
Pure electrical circuit lines without any symbols
x 4


16 USB-C konektor
17 Prepínač: LEFT HANDED (pre l'avákov) / RIGHT HANDED (pre pravákov)
18 USB-A – USB-C kábel
19 Podpory stability
4. Montáž


5. Inštalácia na PC
- Navštívte:
https://support.thrustmaster.com/product/sol-r-1-flightstick.
-
Stiahnite si a nainštalujte PC ovládač a jeho prispôsobené rozhranie pre ovládací panel Windows.
-
Po nainštalovaní ovládača pre PC pripojte joystick Sol R 1 Flightstick k jednému z USB portov vášho počítača pomocou kábla USB A – USB C.

natural_image
Pure geometric shapes with no text, numbers, or symbols
natural_image
Technical line drawing of a robotic control device with a lever and base (no text or symbols)natural_image
Technical line drawing of a mechanical clamp or bracket assembly (no text or symbols)
Režim pre pravákov

- Zaskrutkujte l'avú opierku palca (B1).

natural_image
Technical line drawing of a mechanical component with an inset showing a hand inserting a plug into a housing (no text or symbols present)natural_image
Diagram of a tank with two circular insets showing mechanical components and rotational arrows (no text or symbols)Ak chcete nastavit' joystick v režime pre pravú ruku:
- Odstráňte obe časti l'avej opierky palca (B1 a B2).
- Naskrutkujte pravú opierku palca (A1).
natural_image
Technical diagram showing a hand holding a small component with an arrow pointing to a mechanical assembly (no text or symbols present)natural_image
Technical line drawing of a mechanical assembly with a magnified inset showing a red arrow pointing to a component (no text or symbols present)
Výškový adaptér
https://support.thrustmaster.com/product/sol-r-1-flightstick.

natural_image
Technical line drawing of a mechanical component labeled 'THRUSTMASTER®' (no other text or symbols)
B1

B2

C2

D
natural_image
Pure electrical circuit lines without any symbols
x 4

flowchart
graph TD
    A["Port 1"] --> B["Node"]
    B --> C["Node"]
    C --> D["Port 2"]
    style A fill:#fff,stroke:#000
    style D fill:#fff,stroke:#000
    note right of B "18"

4. Összeszerelés


natural_image
Pure geometric shapes and dot patterns without any text, numbers, or symbols
natural_image
Technical line drawing of a robotic control device with a lever and base mount (no text or symbols)natural_image
Technical line drawing of a mechanical clamp or bracket assembly (no text or symbols)
natural_image
Diagram of a hand using a screwdriver to adjust a thrust mechanism on a base (no text or symbols)natural_image
Technical line drawing of a mechanical device with an inset showing a hand inserting a component into a housing (no text or symbols present)natural_image
Technical line drawing of a mechanical device with an inset showing a hand pin pointing to a component (no text or symbols present)natural_image
Diagram of a tank with two circular insets showing mechanical components and rotation arrows (no text or symbols)
natural_image
Diagram of a mechanical assembly with two circular insets showing rotational components (no text or labels)natural_image
Diagram showing a hand inserting a small component into a mechanical device, with no visible text or symbols.natural_image
Technical line drawing of a mechanical assembly with an inset showing a hand inserting a screw into a housing component (no text or symbols present)natural_image
Technical diagram of a mechanical assembly with two circular insets showing rotational components (no text or labels)
natural_image
Technical diagram of a mechanical assembly with two circular insets showing rotational components (no text or labels)Magasság adapter
natural_image
Illustration of a hand pressing down on a tank component with an orange arrow indicating motion (no text or symbols)Az adapter nélkül
natural_image
Illustration of a hand using a tool to press or install a mechanical component, with no visible text or symbols.Jobbkezes mód
9. Kompatibilitás

https://support.thrustmaster.com/product/sol-r-1-flightstick.

https://support.thrustmaster.com/product/sol-r-1-
flightstick
,הכלההוּרָה
natural_image
Technical line drawing of a mechanical component with threaded shaft and mounting flanges (no text or symbols)
B1
B2

C2
D
natural_image
Pure electrical circuit lines without any symbols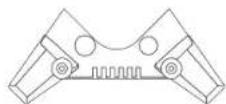
x 4
תְרָה בְּרָה.2
5
5
B2


USB-C 16
RIGHT / (אַרְהָרִי) LEFT HANDED
17 :
HANDED (I'Y)
USB-A - USB-C
18
תְרָהִיַעֹת אַרְבָר
19

תַלְרָה בְּרָה
תְבָרִי.4


PC 1277-1277.5
https://support.thrustmaster.com/product/sol-
r-1-flightstick.

.LED

הכלה, AVA o'or 's' is Sol-R n'or 's' is
*
הַרְשָׁה

תְרָה בַעּוֹת.6
הכלה 15.

תְרָה בַרִיָה TN
TM 7 Sol-R 1 Flightstick 7 (7) M6 7 (*Flying Clamp .(7)

natural_image
Pure electrical circuit lines without any symbols
natural_image
Technical line drawing of a robotic control device with a lever and labeled 'TERUSTMASTER' (no text or symbols on the device itself)תָרִיְה בַעּוֹם*

\*הכלההוּרָהִיַעְבָהִיַעְבָהִיַעְבָהִיַעְבָהִיַעְבָהִיַעְבָהִיַעְבָהִיַעְבָהִיַעְבָה
natural_image
Technical line drawing of a mechanical clamp or bracket assembly (no text or symbols)

"Point of View" PoV
Point of view hat- ⁷⁶ (הכלההוֹרָה כְרִי)
.תְרָבִי-הַת ("Point Of View") PoV בַלְעֹן) switch


הכלה (B2-1 B1)
.תְקּוֹר אַל

.(B1) 7500-7500-7500-7500-7500-7500-7500-7500-7500-7500-7500-7500-7500-7500-7500-7500-7500-7500-7500-7500-7500
natural_image
Technical line drawing of a mechanical component with an inset showing a hand inserting a small component (no text or symbols present)
הכלה (C2 16 C1) כִרְבָרְבָרְבָרְבָרְבָרְבָרְבָרְבָרְבָרְבָרְבָרְבָרְבָרְבָרְבָרְבָרְבָרְגּוֹן.7
הכלההעַרְבָאִיָהB2.
10
natural_image
Diagram of a mechanical device with two circular insets showing internal components and rotation arrows (no text or symbols)

-1 B1) 7707777777777777777777777777777777777777777
B2.(
הכלה (A2-IA1)
.תְקּוֹרָה

הכלה (C2 16 C1)
.תְקּוֹר אַלְבָה
natural_image
Diagram showing a hand holding a small black object with an arrow pointing to a mechanical component, connected to a base (no text or symbols present)10
.תְקּרָה בַעֹשִׁים

.*Thrustmaster Pendular Rudder :TPR –
flowchart
graph TD
    A["Top Mount"] --> B["TFRP"]
    A --> C["TPRR"]
    B --> D["Pender Rudder Pedals"]
    C --> E["Pendular Rudder Peders"]

Thrustmaster Advanced pRogramming) T.A.R.G.E.T
https://support.thrustmaster.com/product/sol-r-1-
.flightstick
.Script - Advanced, Basic:
-
MFD ,*TFRP ,*TWCS ,*T.16000M FCS ,*Cougar
https://support.thrustmaster.com/product/sol-r-1-.flightstick

https://support.thrustmaster.com/product/sol-r-.1-flightstick
https://support.thrustmaster.com/product/sol-r-1-
.flightstick
natural_image
Technical line drawing of a mechanical component labeled 'THRUSTMASTER' (no other text or symbols)
B1

B2

C2
D
natural_image
Pure electrical circuit lines without any symbols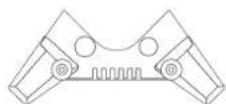
x 4
USB-C موصّ 16 ل
4. تجmeg القطع


https://support.thrustmaster.com/product/sol-r-
.1-flightstick
رواجهتی 2

natural_image
Pure geometric shapes with no text, numbers, or symbols
natural_image
Technical line drawing of a robotic control device with labeled 'TROSTMASTER' on the base (no other text or symbols)* تُباع منفصلة
natural_image
Technical line drawing of a mechanical clamp or bracket assembly (no text or symbols)
natural_image
Line drawing of a hand using a microscope to adjust a button, with an inset showing the step and rotation (no text or symbols)
natural_image
Top-down schematic of a flight simulator cockpit with orange directional arrows indicating flight cycles (no text or symbols)لفتح وظيفة التوجيه:
natural_image
Line drawing of a microscope with an inset showing a hand holding a tool, highlighting the eye area (no text or symbols present)
natural_image
Line drawing of a helicopter cockpit with orange circular arrows indicating rotational motion (no text or symbols)وضع اليد اليسري

1C#2C#### ### ### ###
6.)_
natural_image
Technical line drawing of a mechanical component with an inset showing a hand holding a small black connector (no text or symbols present)natural_image
Diagram showing a hand inserting a plug into a mechanical component, with an arrow indicating the process (no text or symbols present)natural_image
Diagram of a mechanical assembly with two circular insets showing rotational components (no text or labels)natural_image
Technical line drawing of a mechanical assembly with an inset showing a hand holding a screwdriver (no text or symbols present).*Thrustmaster Pendular Rudder :TPR -

flowchart
graph TD
    A["Top Gear"] --> B["TFRP"]
    A --> C["TPRR"]
    B --> D["Flight Rudder Pedals"]
    C --> E["Pendular Rudder"]

T.A.R.G.E.T (Thrustmaster Advanced pRogramming
Graphical EdiTor
https://support.thrustmaster.com/product/sol-r-
.1-flightstick
MFD Cougar و *TFRPTWCS و *T.16000M FCS و
*AVA *Viper *TCA *Pack
https://support.thrustmaster.com/product/sol-r-1-.flightstick

https://support.thrustmaster.com/product/sol-r-
.1-flightstick
https://support.thrustmaster.com/product/sol-r-1-flightstick
natural_image
Technical line drawing of a thrust master device with no visible text or symbols on the component itself
B1

B2

C2

D

natural_image
Pure electrical circuit lines without any symbols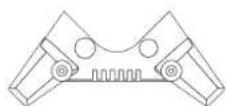
x 4
2. 技術仕様


flowchart
graph TD
    A["Device 1"] --> B["Node"]
    C["Device 2"] --> D["Node"]
    B --> E["Node"]
    D --> E
    style A fill:#fff,stroke:#000
    style C fill:#fff,stroke:#000
    style E fill:#fff,stroke:#000
    note right of B "18"

4. 組み立て


5. PC で使用する
- 以下のサイトにアクセスしてください:
https://support.thrustmaster.com/product/sol-r-1-flightstick

natural_image
Pure geometric shapes with no text, numbers, or symbols
natural_image
Technical line drawing of a robotic control device with a lever and base (no text or symbols)natural_image
Technical line drawing of a mechanical clamp or bracket assembly (no text or symbols)
ラダー機能のロックを解除するには:
多方向視点ハットスイッチ
natural_image
Technical line drawing of a mechanical component with a magnified inset showing a hand holding a connector (no text or symbols)natural_image
Diagram showing a hand inserting a small black component into a mechanical device, with no visible text or symbols.natural_image
Technical line drawing of a mechanical assembly with a magnified inset showing a hand inserting a component (no text or symbols present)高さアダプター
T.A.R.G.E.T ( Thrustmaster Advanced pRogramming
https://support.thrustmaster.com/product/sol-r-1-flightstick
https://support.thrustmaster.com/product/sol-r-1-flightstick

https://support.thrustmaster.com/product/sol-r-1-flightstick
natural_image
Technical line drawing of a mechanical component labeled 'THRUSTMASTER' (no other text or symbols)
更新固件
http://support.thrustmaster.cn/product/sol-r-1-flightstick
natural_image
Technical line drawing of a mechanical component labeled 'THRUSTMASTER®' (no other text or symbols)
B1

B2

C2
D

natural_image
Pure electrical circuit lines without any symbols
x 4
2. 技术特性


16 USB-C 接口
17 选择器开关: LEFT HANDED (左利手) / RIGHT HANDED (右利手)
18 USB-A - USB-C 电缆
19 稳定支架
3. 用法信息

文档
4. 组装


5. 安装到 PC 上
- 请访问:
http://support.thrustmaster.cn/product/sol-r-1-flightstick

natural_image
Pure electrical circuit lines without any symbols
natural_image
Technical line drawing of a robotic control device with labeled 'TERUSTMASTER' and no other text or symbols*另售
natural_image
Technical line drawing of a mechanical clamp or bracket assembly (no text or symbols)
要解锁方向舵功能,请:
多向视角苦力帽开关
5.拧紧左手拇指托(B1)。
natural_image
Technical line drawing of a mechanical component with an inset showing a hand inserting a small component (no text or symbols present)- 拧松用于固定腕托的两颗螺丝。
- 拧紧用于固定腕托的两颗螺丝。

natural_image
Technical diagram of a mechanical assembly with two circular insets showing internal components (no text or symbols)要将摇杆设置为右利手模式,请:
5.拧紧右手拇指托(A1)。
natural_image
Diagram showing a hand holding a small black object with an arrow pointing to a mechanical component, no text or symbols present.natural_image
Technical line drawing of a mechanical assembly with a magnified inset showing a hand inserting a screw into a component (no text or symbols present)- 拧松用于固定腕托的两颗螺丝。
- 拧紧用于固定腕托的两颗螺丝。
natural_image
Technical diagram of a mechanical device with two circular insets showing internal components (no text or symbols)高度适配器
http://support.thrustmaster.cn/product/sol-r-1-flightstick
http://support.thrustmaster.cn/product/sol-r-1-flightstick

http://support.thrustmaster.cn/product/sol-r-1-flightstick
https://support.thrustmaster.com/product/sol-r-1-flightstick。
natural_image
Technical line drawing of a mechanical component labeled 'THRUSTMASTER®' (no other text or symbols)
B1

B2

C2

D

natural_image
Pure electrical circuit lines without any symbols
x 4
2. 技術特性


flowchart
graph TD
    A["Port 1"] --> B["Node"]
    B --> C["Node"]
    C --> D["Port 2"]
    style A fill:#fff,stroke:#000
    style D fill:#fff,stroke:#000
    note right of C "18"