SBSPT200SB - Scale STEINBERG - Free user manual and instructions
Find the device manual for free SBSPT200SB STEINBERG in PDF.
Download the instructions for your Scale in PDF format for free! Find your manual SBSPT200SB - STEINBERG and take your electronic device back in hand. On this page are published all the documents necessary for the use of your device. SBSPT200SB by STEINBERG.
USER MANUAL SBSPT200SB STEINBERG
SBS-PT-30SN SBS-PT-150SN | SBS-LW-40DE
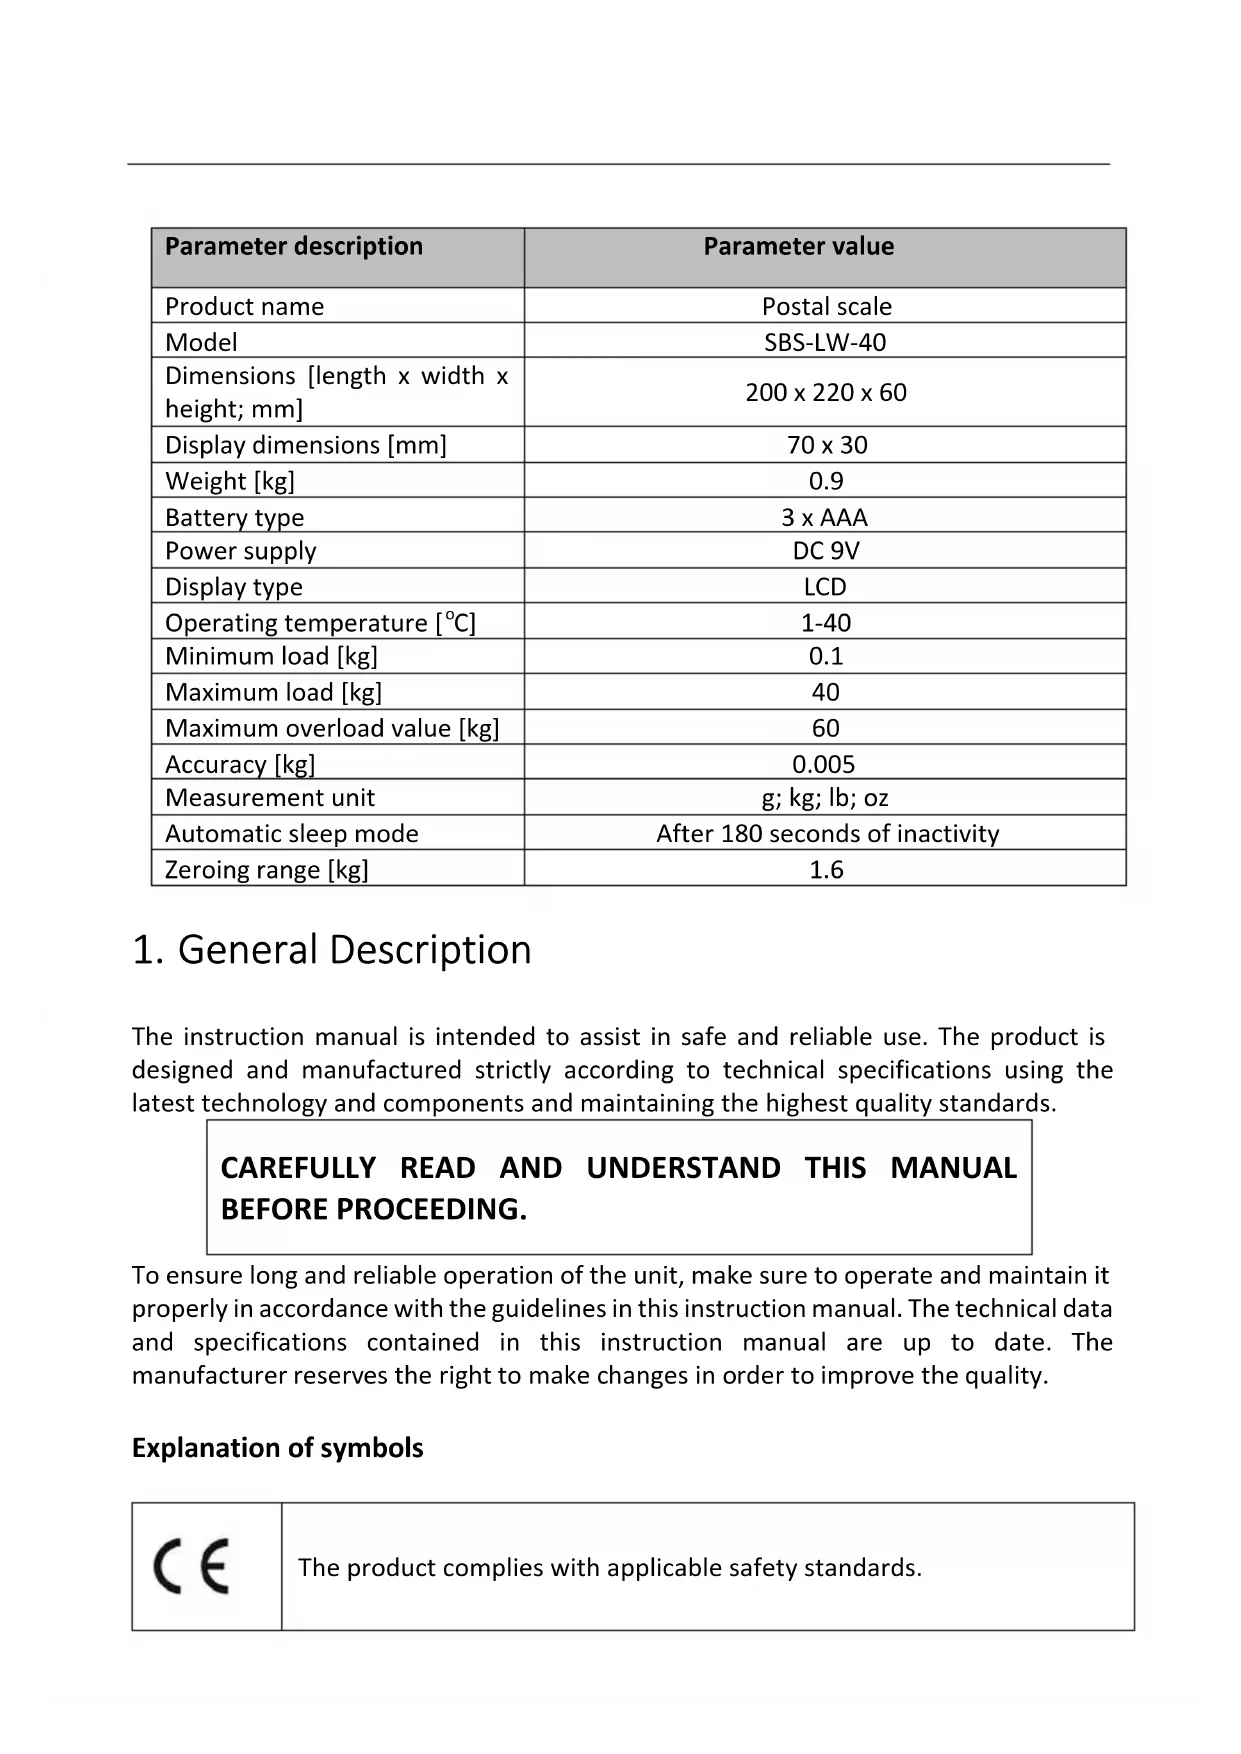
Product name: Postal scale Letter scale
Modell: SBS-PT-200S SBS-PT-100S SBS-PT-200SB SBS-PT-100SB SBS-PT-200SK SBS-PT-100SK SBS-PT-60SNL SBS-PT-150SNL SBS-PT-30SN SBS-PT-150SN SBS-LW-40
Battery type 4 x AA 4 x AAA Power supply DC 6V DC 9V Display type LCD Operating temperature [
1-40 Minimum load [kg]
Measurement unit kg; lb Automatic sleep mode After 180 seconds of inactivity After 120 seconds of inactivity After 180 seconds of inactivity Zeroing range [kg]
Parameter description Parameter value Product name Postal scale Model SBS-PT-200SK SBS-PT-100SK CAUTION! This User Manual has been translated for your convenience using machine translation. Reasonable efforts have been made to provide an accurate translation; however, no automated translation is perfect nor is it intended to replace human translators. The official User Manual is the English version. Any discrepancies or differences created in the translation are not binding and have no legal effect for compliance or enforcement purposes. If any questions arise related to the accuracy of the information contained in the User Manual, please refer to the English version of those contents which is the official version.Dimensions [length x width x height; mm] 360 x 405 x 65 Display dimensions [mm] 135 x 65 Weight [kg]
Battery type 4 x AA Power supply DC 6V Display type LCD Operating temperature [
1-40 Minimum load [kg]
Measurement unit kg; lb Automatic sleep mode After 180 seconds of inactivity Zeroing range [kg]
Battery type 6 x AA 6 x AAA Power supply DC 9V Display type LCD Operating temperature [
1-40 Minimum load [kg]
Measurement unit kg; lb Automatic sleep mode After 180 seconds of inactivity After 140 seconds of inactivity After 180 seconds of inactivity Zeroing range [kg]
Battery type 3 x AAA Power supply DC 9V Display type LCD Operating temperature [
1-40 Minimum load [kg]
Measurement unit g; kg; lb; oz Automatic sleep mode After 180 seconds of inactivity Zeroing range [kg]
The instruction manual is intended to assist in safe and reliable use. The product is designed and manufactured strictly according to technical specifications using the latest technology and components and maintaining the highest quality standards.
BEFORE PROCEEDING. To ensure long and reliable operation of the unit, make sure to operate and maintain it properly in accordance with the guidelines in this instruction manual. The technical data and specifications contained in this instruction manual are up to date. The manufacturer reserves the right to make changes in order to improve the quality. Explanation of symbols
The product complies with applicable safety standards.Please read the instructions before use.
CAUTION! Warning of electric shock!
Class II power supply with double insulation.
CAUTION! The illustrations in this instruction manual are for reference only and may differ from the actual product in some details.
The original instruction manual is in the German language version. Other language versions are translations from German.
CAUTION! Read all safety warnings and all instructions. Failure to follow the warnings and instructions may result in electric shock, fire and/or severe personal injury or death. The term "unit" or "product" in the warnings and in the description of the instructions refers to the POSTAL SCALE. 2.1. Electrical safetyCAUTION! The "electrical safety" rules must be followed when the unit is powered from the mains. a) The plug of this unit must fit into the outlet. Do not modify the plug in any way. Original plugs and matching outlets reduce the risk of electric shock. b) Avoid touching grounded parts, such as pipes, heaters, ovens, and refrigerators. There is an increased risk of electric shock if your body is grounded and touches the unit exposed to direct rain, wet pavement, and operation in a humid environment. If water enters the unit, there is an increased risk of damage to the unit and electric shock. c) Do not use the cord in an unintended manner. Never use it to carry the unit or to pull the plug out of the socket. Keep the cord away from heat sources, oil, sharp edges or moving parts. Damaged or tangled cords increase the risk of electric shock. d) Do not use the power adapter if the power cord is damaged or shows signs of wear. A damaged power cord should be replaced by a qualified electrician or the manufacturer's service department. e) To avoid electric shock, do not immerse the cable, plug, or unit itself in water or other liquid. f) Only the use of a power supply with adequate power is allowed. An inadequate power supply may damage the unit. 2.2. Safety in the workplace a) If you have any doubts as to whether the unit is working properly or if it is damaged, contact the manufacturer's service department. b) Only the manufacturer's service department may repair the unit. Do not carry out repairs yourself! c) Check the condition of the safety stickers regularly. Replace them if they are illegible. d) Keep these instructions for use for future reference. If the unit is to be passed on to a third party, the operating instructions must also be handed over together with the unit. e) Keep the packaging and small assembly parts out of the reach of children. f) Keep the unit away from children and animals. g) When using this unit together with other units, also follow the other instructions for use. 2.3. Personal safetya) The unit is not intended to be used by persons (including children) with reduced mental, sensory or intellectual functions or persons who lack experience and/or knowledge unless they are supervised or have been instructed by a person responsible for their safety on how to operate the unit. b) The unit may be operated by persons who are capable of operating it and who have read this instruction manual and have been trained in occupational safety and health. c) The unit is not a toy. Children should be watched to ensure that they do not play with the unit. 2.4. Safe use of the unit a) Do not use the unit if the ON/OFF button does not function properly (does not turn on and off). b) Disconnect the unit from the power supply before adjusting, cleaning, or servicing. This precaution reduces the risk of accidental start-up. c) Keep unused equipment out of the reach of children and out of the reach of anyone unfamiliar with the unit or this instruction manual. These units is dangerous in the hands of inexperienced users. d) Keep the unit in good working condition. e) Keep the unit out of the reach of children. f) Repairs and maintenance should be carried out by qualified personnel using only original spare parts. This will ensure the safety of use. g) To ensure the designed operational integrity of the unit, do not remove factory-installed covers or loosen screws. h) Clean the unit regularly to prevent permanent dirt build-up.
i) The unit is not a toy. Cleaning and maintenance must not be performed by
children without adult supervision. j) Do not tamper with the unit to alter its performance or design. k) Keep the unit away from sources of fire and heat. l) Do not overload the unit. m) Keep unused batteries out of the reach of children. n) Avoid high humidity that could cause condensation and direct contact with water. Avoid extreme temperatures. Do not place the scale directly in the sun or near air conditioning systems. o) Do not place the scale near open windows or doors, air conditioning systems or fans, which can cause unstable measurement results due to improper air circulation. p) Do not leave the weight on the scale for a long time. This reduces the accuracy of the scale and shortens the life of the sensors. q) Do not use the scale during a storm or rain.r) Before taking a measurement, make sure that the unit is placed on a stable surface, is not exposed to vibrations or sudden temperature changes that may adversely affect the measurement results. s) The scale should not be subjected to any shocks, mechanical pressure or falls. t) Do not use radio, electronic or electrostatic units in the vicinity of the scale in use (such as cell phones). This can cause inaccurate measurement readings. u) Distributing the weight in the very center of the scale to ensure the most accurate measurement is recommended.
v) When deciding to replace the batteries, replace them all at once.
w) Do not exceed the maximum weight of the scale!
CAUTION! Although the product has been designed to be safe, with adequate safeguards, and despite the additional safety features provided to the user, there is still a slight risk of accident or injury when handling the unit. You are advised to use caution and common sense when using this product.
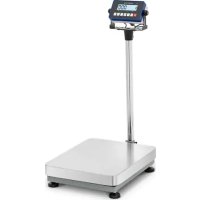
The unit is used to measure the weight of letters and packages placed on the weighing platform. The user is responsible for any damage resulting from misuse. 3.1. Description of the unit SBS-PT-200S; SBS-PT-100S; SBS-PT-200SB; SBS-PT-100SB1. Weighing platform
- Model SBS-PT-200SB; SBS-PT-100SB have an additional handle at the weighing platform.
7. "UNIT" button - change of measurement unit
8. "TARE" button - tare function
9. "HOLD" button - retaining the weight reading
12. Weighing platform
13. Display with function buttons14. Display
15. "ON/OFF" button - turning the unit on/off.
16. "TARE" button - tare function
17. "UNIT" button - change of measurement unit
A. Low battery indicator B. Measurement error indicator C. Selected unit of measurement indicator D. Zeroing indicatorSBS-PT-60SNL; SBS-PT-150SNL
20. Cable connecting the display to the weighing platform
25. "UNIT" button - change of measurement unit
26. "TARE" button - tare function
27. "HOLD" button - retaining the weight reading
30. Cable connecting the display to the weighing platform
32. "I/O" switch (I - on; O - off)
SBS-PT-30SN; SBS-PT-150SN33. Display with function buttons
34. Cable connecting the display to the weighing platform
35. Weighing platform
39. "ON (on) / OFF (off)" button.
40. "HOLD" button - retaining the weight reading
41. "UNIT" button - change of measurement unit
42. "ZERO/TARE" button - responsible for zero/tare function
43. Cable connecting the display to the weighing platform
45. Pressure screw that adjusts the angle of the display
A. Measurement error indicator B. Selected unit of measurement indicator C. Indicator of the stability of the number of measurements taken so far D. Low battery level indicator E. Zeroing function indicator F. Readout retention function indicator APPLIES TO MODELS SBS-PT-60SNL; SBS-PT-150SNL; SBS-PT-30SN; SBS-PT-150SN:46. Installation board for computer
51. "ON (on) / OFF (off)" button.
52. "UNIT" button - change of measurement unit
53. "ZERO/TARE" button - zero/tare function
54. "HOLD" button - retaining the weight reading
A. Selected unit of measurement indicator B. Zeroing indicator C. Measurement error indicator D. Enabled reading retention function indicator E. Stability of readings indicator 3.2. Preparation for operation
POSITIONING OF THE UNIT
The ambient temperature must not exceed 40°C and ambient humidity should not exceed 85%. Place the unit in a way that ensures good air circulation. Maintain a minimum clearance of 10 cm from any wall of the unit. Keep the unit away from any hot surfaces. Always operate the unit on a level, stable, clean, fireproof and dry surface and out of the reach of children and persons of impaired mental, sensory and intellectual functions. Place the unit in such a way that the mains plug can be reached at any time. Ensure that the power supply to the unit corresponds to that specified on the identification plate! HANGING OF THE DISPLAY (models SBS-PT-60SNL; SBS-PT-150SNL; SBS-PT-30SN; SBS-PT-150SN):
1. Drill a hole for a wall plug at the target location of the display installation.
2. Place the wall stud in the drilled hole.3. There is a mounting plate on the back of the display. There are two holes in the mounting plate for screws.
4. Put the screws through the holes in the mounting plate.
5. Position the mounting plate at the target installation location of the display.
6. Screw the screws into the wall studs.
7. Use the pressure screws on both sides of the display to secure it at the desired
- Hold the "ZERO" button for a few seconds, then press the "ON/OFF" button. The unit will turn on displaying "X00.00". The letter "X" will start flashing.
- Select the calibration unit (kg; Ib) by pressing the "UNIT" button to the effect.
- A flashing symbol in the displayed message indicates that the digit can be changed. Use the "HOLD" button to select the digit to be changed, and use the "ZERO" button to increase the flashing value.
- Place the weight with the displayed weight on the weighing platform.
- After the reading has stabilized, press the "UNIT" button.
- The display "----" indicates that the calibration is complete. Remove the weight from the platform.
- Switch off the unit using the "ON/OFF" button B. SBS-PT-200SK; SBS-PT-100SK:
- When the scale is off, hold the "UNIT" button for a few seconds, then press the "ON/OFF" button. The display will show "CALU=".
- Press the "UNIT" button until the calibration unit (kg; Ib) is selected.
- Press the TARE button. The display will show the message "XXX.XX + (selected calibration unit)".
- The first symbol in the displayed message will start flashing. This indicates that a particular digit can be changed. Press the "UNIT" button to select the digit to be changed, and use the "ZERO" button to increase its value.
- Press the TARE button. The display will indicate "-CAL-". Press the "UNIT" button twice. The display will indicate the set calibration value.
- Place the weight with the displayed weight on the weighing platform.
- After the reading has stabilized, press the "UNIT" button.• The message "----" indicates that the calibration is complete. Remove the weight from the platform.
- Switch off the unit using the "ON/OFF" button C. SBS-PT-60SNL; SBS-PT-150SNL:
- While holding the "ZERO" and "TARE" buttons simultaneously, turn on the unit with the "I/O" switch. The display will show "CAL".
- Press the TARE button. The display will indicate the calibration value set in the Setup Menu.
- Place the weight with the displayed weight on the weighing platform.
- After the reading has stabilized, press the "TARE" button.
- The message "----" indicates that the calibration is complete. Remove the weight from the platform and turn off the unit by setting the switch to the "O" position. D. SBS-PT-30SN; SBS-PT-150SN:
- While holding the "UNIT" and "TARE" button, turn on the unit with the "ON/OFF" button. The display will show "CAL".
- Press the "UNIT" button again. The display will indicate the calibration value.
- Place the weight with the displayed weight on the weighing platform.
- After the reading has stabilized, press the "UNIT" button.
- The display of a string of numbers (the number of measurements taken so far) indicates the completion of the calibration. Remove the weight from the platform.
- Switch off the unit using the "ON/OFF" button E. SBS-LW-40:
- When the scale is off, hold the "UNIT" button for a few seconds, then press the "ON/OFF" button. The display will show "C=xx".
- Press the "UNIT" button to select the calibration unit (kg; lb).
- Press the "ZERO/TARE" button. The display will indicate "CAL", followed by the number of measurements taken so far.
- Press the UNIT button. The display will show "-----" followed by the calibration value.
- Place a weight of the indicated weight on the platform.
- Press the UNIT button.
- The message "-----" and the subsequent display of the number of measurements taken so far indicate the completion of the calibration process.
- Remove the weight from the platform.
- Switch off the unit using the "ON/OFF" button CAUTION! (applies to all models)1. If the calibration process fails several times in a row:
- replace the batteries,
- change the position of the unit (the reason may be uneven ground or the influence of nearby radio waves).
2. During the calibration process, the display may show a string of numbers. This
is the number of measurements taken so far. It may vary by -/+ 5 readings. If it disproportionately increases or decreases, the load cell is probably defective.
3. To check whether the calibration process has actually been successful, you
- turn the unit on again,
- place a load cell of a given weight on the platform and check whether the reading agrees with the weight of the load cell. If the reading differs from the actual weight, repeat the calibration process.
4. If it is possible to set the calibration value, setting it at least at 50% of the
maximum load value is recommended. 3.3. Working with the unit
Insert the batteries into the compartment according to the polarity.
Turn on the unit using the "ON/OFF" button or the "I/O" switch (depending on the model). Wait for a moment after turning on before starting weighing.
Press the "UNIT" button to select the unit of measurement. Press until the desired unit appears.
Place the object on the weighing platform.
Wait a few seconds for the reading to stabilize.
When the weighing is complete, remove the object from the platform. FUNCTION BUTTONS A. "ZERO" button: If the weighing platform is empty and the display shows a value other than 0, press the "ZERO" button to zero the value on the display and only start weighing. B. "TARE" button:
1. Place the object on the platform while the unit is on.2. Wait until the reading stabilizes.
3. Press the "TARE" button and leave the object on the platform. The display will
indicate a value of 0.
4. Add the object on the platform. The display will indicate the weight of the
5. Repeat as necessary, not exceeding the maximum load value of the scale.
C. "UNIT" button: Press to change the weighing unit. D. "HOLD" button:
1. Place the object on the weighing platform.
2. Wait until the reading stabilizes.
3. Press the HOLD button. The display will show the "HOLD" button.
4. Remove the object from the weighing platform. The reading will still remain
visible on the display.
- For models SBS-PT-30SN; SBS-PT-150SN; SBS-LW-40, the reading remains visible for 120 seconds after removing the weight.
5. Press the "UNIT" button to convert the reading value to another measurement
6. Press the "HOLD" button to return to normal operation.
- For SBS-PT-30SN; SBS-PT-150SN models, when the "HOLD" button is held down, the data from the scale is transferred to the computer. E. "ZERO/TARE" button:
- if the weighing platform is empty: in case the display shows a value other than 0, press the "ZERO/TARE" button to zero the value on the display and only start weighing
- if the weighing platform is not empty (tare function):
- place the object on the platform when the unit is on
- wait until the reading stabilizes
- press the "ZERO/TARE" button and leave the object on the platform. The display will indicate a value of 0
- add another object on the platform. The display will indicate the weight of the second object only
- repeat as needed, not to exceed the maximum load value of the scale SETTINGSA. SBS-PT-200S; SBS-PT-100S; SBS-PT-200SB; SBS-PT-100SB1:
Press the "HOLD" button again. Press the "HOLD" button again. The display will show "L-ON" (enable the display backlight function) or "L-OFF" (disable the function). Press the "ZERO" button to select "L-ON" or "L-OFF".
3. Readout retention function:
Press the "HOLD" button again. The display will show "H_ON" (enable the read retention function when the weight is removed from the platform) or "H_OFF" (disable the function). Press the "ZERO" button to select "L-ON" or "L-OFF".
4. To return to normal weighing mode, turn the unit off and then back on with the
Turn off the unit. Hold down the "ZERO" button for a few seconds, then press the "ON/OFF" button simultaneously. The display will show "A-OFF" (disable auto sleep function). Press the "ZERO" button to select "A-ON" (enable function) or "A-OFF".
2. Display backlight function:
Press the UNIT button. Press the "HOLD" button again. The display will show "L-ON" (enable the display backlight function) or "L-OFF" (disable the function). Press the "ZERO" button to select "L-ON" or "L-OFF".3. To return to normal weighing mode, turn the unit off and then back on with the "ON/OFF" button.
C. SBS-PT-60SNL; SBS-PT-150SNL: Level 1:
1. Turn on the unit while holding down the "ZERO" button. When the unit is
started, let go of the "ZERO" button.
2. Press the "TARE" button three times. The unit will go to the list of available
functions to adjust.
3. To adjust the displayed parameter, press the "UNIT" button. The parameters
are adjusted using the "TARE" button.
4. To return to the main settings menu or skip a parameter and move to the next
one, press the "ZERO" button. Available settings: DISPLAYED MESSAGES: Corresponding function Function adjustment options A-OFF Automatic shutdown (adjusting the time after which the function will be activated) Automatic shutdown will occur after:
- 300 seconds of inactivity,
- STB – on if there is an animal/object on the platform; turns off automatically 12 seconds after the reading is stabilized
- AUTO – on if there is an animal/object on the platform; off if the reading is 0 UNIT Weighing unit (selecting the weighing unit in this menu is responsible for its appearance when the "TARE" button is pressed during measurement)
- ON kg or OFF kg – weighing in kilograms on/off
- ON LB or OFF LB – weighing in pounds on/off
- ON oz or OFF oz – weighing in ounces on/offPor.u Default weighing unit Selected weighing unit shown after startup:
- KG.LB.OZ – selection to be made after each startup G.SW Use of gravitational force on the weighed object
- OFF – off Bmi.sw Use of body mass index (BMI)
- OFF – off bAud Data transmission speed (body)
- 9600 PAr Parity bit control
- EwEn – even Mod Data transmission (via D-SUB connector). After connecting the unit, insert the installation disc into the drive. Open the "DVD" folder and double press on the "Access Port" icon.
- kEy – data transfer after holding down the "HOLD" button.
- Stb – data transfer after the reading stabilizes
- coN – continuous data transfer
- OFF – function disabled Ani.sw Animal weighing mode
- 10 – animal with low activity
- 30 – animal with normal activity
- 50 – animal with high activity
- OFF – function is not taken into account Pzr Percentage of weight on the scale, which will be
- 20equal to the value "0" after activation Kzr Percentage of weight on the scale that will enable the zeroing function
1. Turn on the unit while holding down the "ZERO" button. After turning on the
unit and still holding the "ZERO" button, press the "UNIT" button three times. The unit will go to the list of available functions to adjust.
2. To adjust the displayed parameter, press the "UNIT" button. The parameters
are adjusted using the "TARE" button.
- lb CAP Maximum load When the "UNIT" button is pressed, "0000" will be displayed.
- Press the "HOLD" button to mark the desired digit in the displayed number sequence.
- Press "TARE" to increment the marked digit. CALU Calibration unit
- lb CAL Calibration value When the "UNIT" button is pressed, "0000" will be displayed.
- Press the "HOLD" button to mark the desired digit in the displayed number sequence.
- Press "TARE" to increment the marked digit. DIVS Breakdown
- 2 ADC ADC processing (in bits)
- While holding down the "HOLD" button, turn on the unit with the "ON/OFF" button. The display will show "A._".
- Press the "ZERO" button until you select the time after which you want the automatic sleep function to occur: "A.120" (after 120 seconds); "A.180" (after 180 seconds); "A.300" (after 300 seconds); "A.off" (function off).
2. Display backlight function:
- While holding down the "HOLD" button, turn on the unit with the "ON/OFF" button. The display will show "A._".
- Press the HOLD button. The display will indicate the message "L._".
- Press the "ZERO" button until the option is selected: – enable backlighting "L.on" – turn the backlight off "L.off" – turn on the backlight only after the reading is stabilized "L.Stb" – turn on the backlight after placing the weight on the platform "L.Aut"
3. Determining the data transmission speed:
- While holding down the "HOLD" button, turn on the unit with the "ON/OFF" button. The display will show "A._".
- Press the "HOLD" button twice. The display will indicate "b._".
- Press the "ZERO" button until the option is selected: "b.9600”; "b.1200”; "b.2400”; "b.4800”.
4. Data transmission mode:
- While holding down the "HOLD" button, turn on the unit with the "ON/OFF" button. The display will show "A._".
- Press the "HOLD" button three times. The display will show the message "n._".
- Press the "ZERO" button until the option is selected: – continuous data transfer "n.Con" – data transfer only after the computer issues a command "n.Conn" – data transfer while holding down the "HOLD" button - "n.key" – data transfer after the reading has stabilized "n.Stb"
5. Measurement unit selection function:• While holding down the "HOLD" button, turn on the unit with the "ON/OFF"
button. The display will show "A._".
- Press the "HOLD" button four times. The display will indicate the message "U._".
- Press the "ZERO" button until it reaches to select the measurement unit selection option "U.on" or the measurement option off in kg "U.off".
6. Function of "HOLD" button:
- While holding down the "HOLD" button, turn on the unit with the "ON/OFF" button. The display will show "A._".
- Press the "HOLD" button five times. The display will indicate the message "K._".
- Press the "ZERO" button until it is done to select the option of the function to be performed by the "HOLD" button: retaining the reading "K.PCS" or calculating the number of pieces on the platform "K.HOLD". CAUTION! Press the "ON/OFF" button to save changes and exit the setting menu. E. SBS-LW-40:
1. Auto sleep function:
While holding down the "ZERO/TARE" button, turn on the unit with the "ON/OFF" button. The display will show "A_ON" or "A_OFF". Press the "ZERO/TARE" button until it is pressed to select the option to activate "A_ON" or deactivate "A_OFF" of the auto sleep function.
2. Display backlight function:
Press the UNIT button. The display will indicate "L_ON" or "L_OFF". Press the "ZERO/TARE" button until it stops to select the option to activate "L_ON" or deactivate "L_OFF" of the display backlight function.
3. Automatic reading retention function:
Press the UNIT button. The display will indicate "H_ON" or "H_OFF". Press the "ZERO/TARE" button until it reaches to select the option to activate "H_ON" or deactivate "H_OFF" of the automatic reading retention function.
4. Press the "ON/OFF" button to turn off the unit saving the changes.ERROR MESSAGES
A. SBS-PT-200S; SBS-PT-100S; SBS-PT-200SB; SBS-PT-100SB1:
- "Err-0": overload of weighing platform
- "Err-5": reading is not stable
- "Err-C": calibration error - a weight with the correct defect was not placed on the platform
- “ ”: low level of battery charge B. SBS-PT-200SK; SBS-PT-100SK:
- “ ”: low level of battery charge
- "Err-0": overload of weighing platform
- "Err-Z": range of zero values does not agree when the unit is turned on
- "Err-S": reading is not stable
- "Err-C": calibration error - a weight with the correct defect was not placed on the platform C. SBS-PT-60SNL; SBS-PT-150SNL:
- "Err-0": overload of weighing platform
- "Err-2": the range of zero values does not agree when the unit is turned on
- "Err-5": reading is not stable
- "Err-C": calibration error - a weight with the correct defect was not placed on the platform
- " ": low level of battery charge D. SBS-PT-30SN; SBS-PT-150SN:
- "Err-0": overload of weighing platform
- " ": low level of battery charge E. SBS-LW-40:
- "Err-0": overload of weighing platform
- "LoB": low battery level 3.4. Cleaning and maintenance a) Use only non-corrosive cleaning agents for cleaning the surfaces.b) Store the unit in a dry and cool place protected from moisture and direct sunlight. c) Do not spray the unit with a stream of water or immerse it in water. d) Perform regular inspections of the unit checking technical fitness and any damages. e) Do not leave the batteries in the unit when it will not be used for a long time. f) Use a soft, damp cloth for cleaning. g) Do not use sharp and/or metal objects (e.g. a wire brush or metal spatula) for cleaning, as these may damage the surface of the material from which the unit is made. h) Do not clean the unit with acidic substances, medical products, diluent, fuel, oil or other chemicals as this may cause damage to the unit. INSTRUCTIONS FOR THE SAFE DISPOSAL OF BATTERIES: The units are equipped with AA batteries. Remove used batteries from the unit in the same way you put them in. Return the batteries to a unit responsible for their disposal. DISPOSAL OF USED UNITS: At the end of its useful life, this product should not be disposed of with normal household waste but should be taken to a collection point for the recycling of electrical and electronic equipment. This is indicated by the symbol on the product, operating instructions or packaging. The materials used in this unit are recyclable according to their marking. You will be making an important contribution to protecting our environment by reusing, recycling or otherwise disposing of used units. Your local administration will provide you with information about the appropriate disposal point for used units.Dane techniczne Opis parametru Wartość parametru Nazwa produktu Waga paczkowa pocztowa Model SBS-PT- 200S SBS-PT- 100S SBS-PT- 200SB SBS-PT- 100SB Wymiary [długość x szerokość x wysokość + wysokość nóżki; mm] 310 x 320 x 35 + 5 360 x 425 x 40 + 5 360 x 405 x 35 + 5 Długość przewodu łączącego wyświetlacz z platformą ważącą (min– max; m) 1,1–2,2 1,4–3 1,1–2,2 Ciężar [kg]
1-40 Charge minimale [kg]
1-40 Charge minimale [kg]
C. SBS-PT-60SNL; SBS-PT-150SNL: Nivel 1:
A. SBS-PT-20 0S; SBS-PT-100S; SBS-PT-200SB; SBS-PT-100SB1: