SBSPF602 - Scale STEINBERG - Free user manual and instructions
Find the device manual for free SBSPF602 STEINBERG in PDF.
User questions about SBSPF602 STEINBERG
0 question about this device. Answer the ones you know or ask your own.
Ask a new question about this device
Download the instructions for your Scale in PDF format for free! Find your manual SBSPF602 - STEINBERG and take your electronic device back in hand. On this page are published all the documents necessary for the use of your device. SBSPF602 by STEINBERG.
USER MANUAL SBSPF602 STEINBERG
natural_image
Digital scale balance with digital display and control buttons (no visible text or symbols)SBS-PF-60/10 | SBS-PF-30/5 | SBS-PF-150 / 20N:
natural_image
Digital balance scale with red and black buttons, showing measurement display (no readable text or symbols)SBS-PF-60/2 | SBS-PF-300/10 | SBS-PF-150/5 | SBS-PF-60 / 2S | SBS-PF-30 / 1S:
natural_image
Digital measuring scale with a digital display and a base labeled '1', no visible text or symbols on the device itself.X = 5: ST, NT 1,234 kg
This User Manual has been translated for your convenience using machine translation. Reasonable efforts have been made to provide an accurate translation; however, no automated translation is perfect nor is it intended to replace human translators. The official User Manual is the English version. Any discrepancies or differences created in the translation are not binding and have no legal effect for compliance or enforcement purposes. If any questions arise related to the accuracy of the information contained in the User Manual, please refer to the English version of those contents which is the official version.
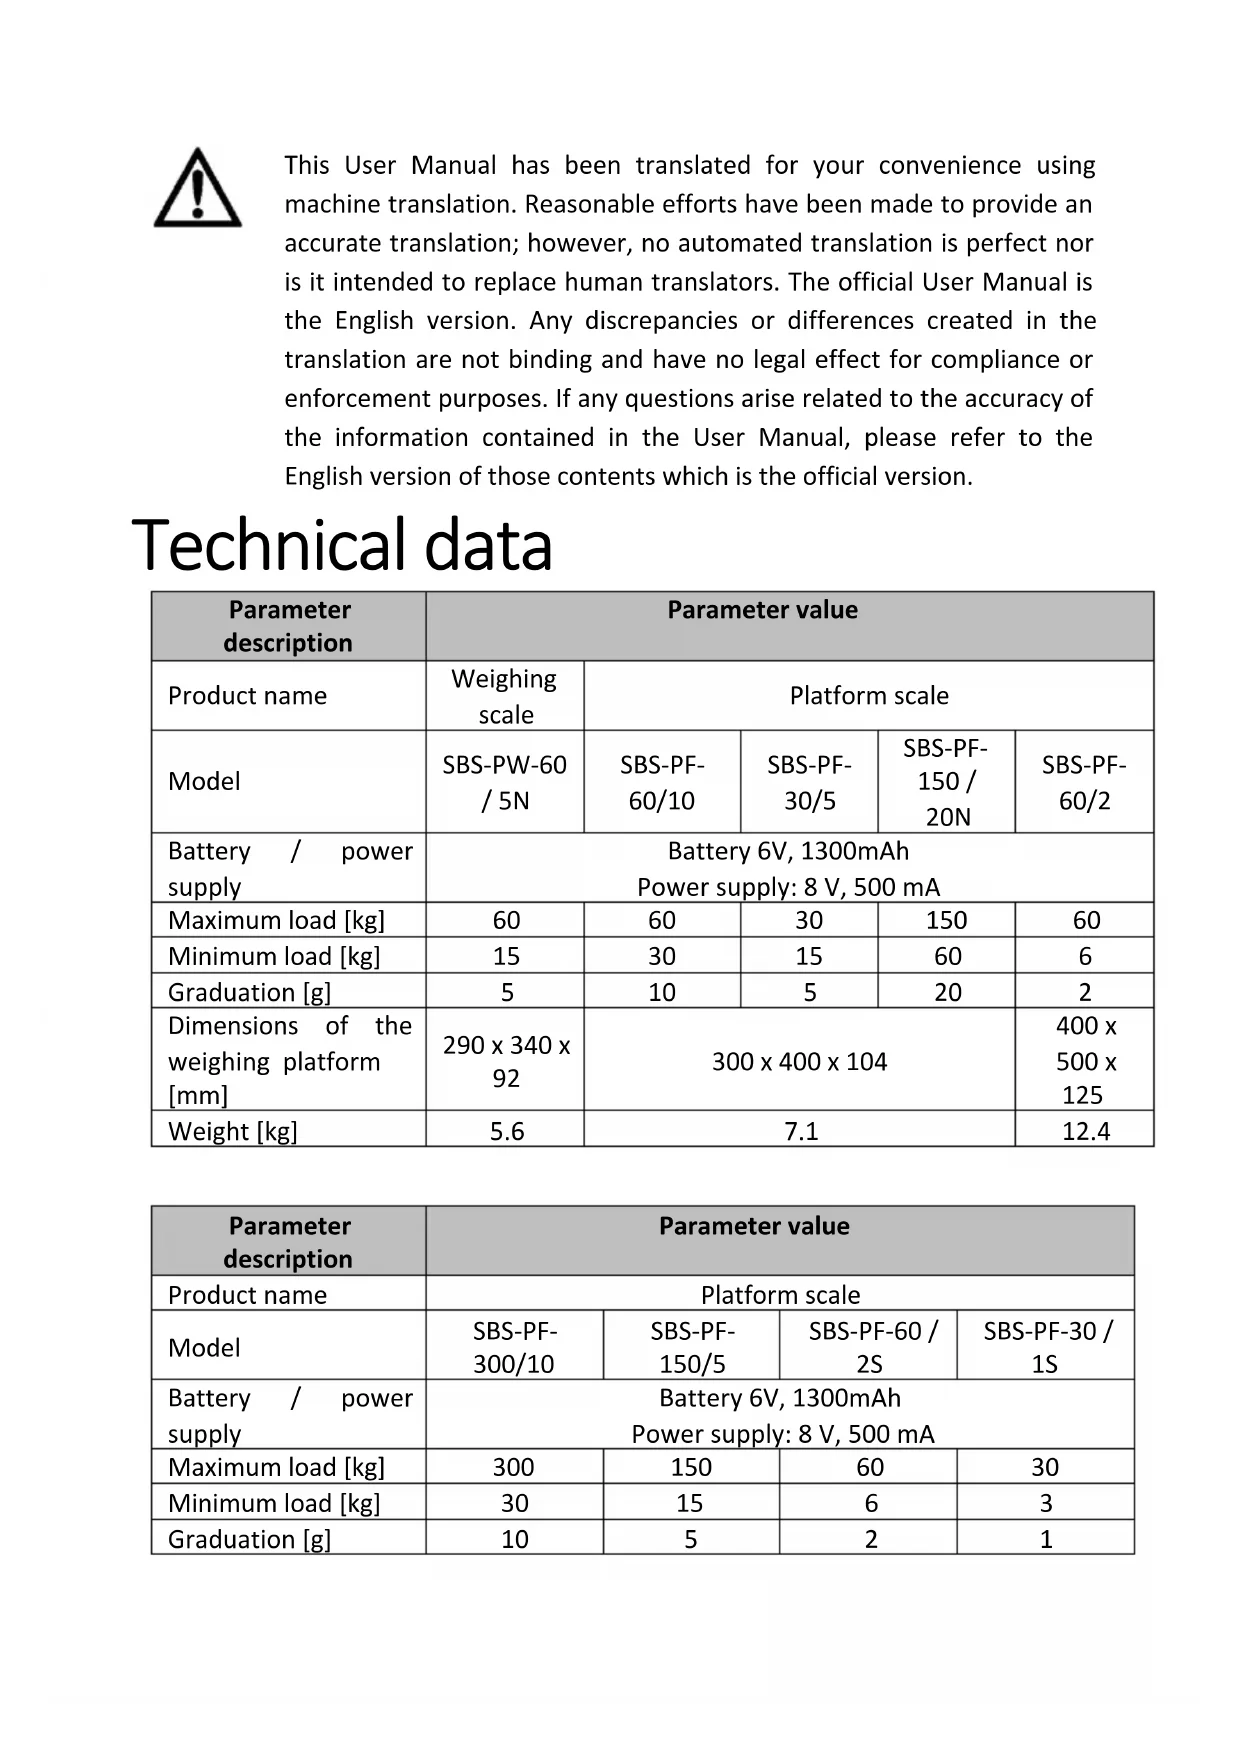
Technical data
| Parameter description | Parameter value | ||||
| Product name | Weighing scale | Platform scale | |||
| Model | SBS-PW-60 / 5N | SBS-PF-60/10 | SBS-PF-30/5 | SBS-PF-150 / 20N | SBS-PF-60/2 |
| Battery / power supply | Battery 6V, 1300mAhPower supply: 8 V, 500 mA | ||||
| Maximum load [kg] | 60 | 60 | 30 | 150 | 60 |
| Minimum load [kg] | 15 | 30 | 15 | 60 | 6 |
| Graduation [g] | 5 | 10 | 5 | 20 | 2 |
| Dimensions of the weighing platform [mm] | 290 x 340 x 92 | 300 x 400 x 104 | 400 x 500 x 125 | ||
| Weight [kg] | 5.6 | 7.1 | 12.4 | ||
| Parameter description | Parameter value | |||
| Product name | Platform scale | |||
| Model | SBS-PF-300/10 | SBS-PF-150/5 | SBS-PF-60 / 2S | SBS-PF-30 / 1S |
| Battery / power supply | Battery 6V, 1300mAhPower supply: 8 V, 500 mA | |||
| Maximum load [kg] | 300 | 150 | 60 | 30 |
| Minimum load [kg] | 30 | 15 | 6 | 3 |
| Graduation [g] | 10 | 5 | 2 | 1 |
| Dimensions of the weighing platform [mm] | 400 x 500 x 122 300 x 400 | 300 x 400 x 117 | |
| Weight [kg] | 12.4 | 8.8 | 8.9 |
1. General Description
This manual is intended to assist you for safe and reliable use. The product is designed and manufactured strictly according to technical specifications using the latest technology and components and maintaining the highest quality standards.
CAREFULLY READ AND UNDERSTAND THIS MANUAL BEFORE STARTING THE WORK.
To ensure long and reliable operation of the device, make sure to operate and maintain it properly in accordance with the guidelines in this instruction manual. The technical data and specifications in this manual are up-to-date. The manufacturer reserves the right to make changes in order to improve the quality. Taking the technical progress and the possibility of reducing noise into account, the unit is designed and built in such a way so that risks resulting from noise emissions are reduced to the lowest possible level.
Explanation of symbols
 | The product complies with applicable safety standards. |
 | Read the manual before use. |
 | Recyclable product. |
 | CAUTION! or WARNING! or REMEMBER! describing a given situation (general warning sign). |
 | For indoor use only. |

CAUTION! The figures in this manual are illustrative only and may vary in some details from the actual appearance of the product.
2. Safety of use

CAUTION!
Read all safety warnings and instructions. Failure to follow the warnings and instructions may result in electric shock, fire and/or serious injury or death.
The term "device" or "product" in the warnings and in the description of the instructions refers to
Weighing scale
Platform scale
2.1. Electrical safety
Applies to the battery charger:
a) The plug of this device must fit into the outlet. Do not modify the plug in any way. Original plugs and matching outlets reduce the risk of electric shock.
b) Avoid touching grounded parts, such as pipes, heaters, ovens, and refrigerators. There is an increased risk of electric shock if your body is grounded and touches the device while exposed to direct rain, wet pavement, or while working in a damp environment. If water enters the device, there is an increased risk of damage to the unit and electric shock.
c) Do not touch the device with wet or damp hands.
d) Do not use the cord in an unintended manner. Never use it to carry the device or to pull the plug out of the socket. Keep the cord away from heat sources, oil, sharp edges or moving parts. Damaged or tangled cords increase the risk of electric shock.
e) If you cannot avoid using the product in a wet environment, use a residual current device (RCD) to connect it to electrical mains. Using an RCD reduces the risk of electric shock.
f) Do not use the device if the power cord is damaged or shows signs of wear. A damaged power cord should be replaced by a qualified electrician or the manufacturer's service department.
g) CAUTION – DANGER TO LIFE! When cleaning or using the appliance, never immerse it in water or other liquids.
2.2. Safety in the workplace
a) Keep the work area tidy and well lit. Disorder or poor lighting can lead to accidents. Be foresighted, watch what you are doing and use common sense when using the device.
b) If in doubt as to whether the product is working properly or found to be damaged, contact the manufacturer's technical service.
c) Repairs to the device may only be carried out by the manufacturer's service. Do not attempt to repair the product on your own!
d) In the event of ignition or a fire, use dry powder or CO2 extinguishers only to suppress the fire of the appliance is live.
e) Keep this manual for future reference. If the product is to be handed over to a third party, hand it over with this user manual.
f) Keep packaging components and small installation parts out of the reach of children.

Remember! Keep children and other bystanders safe while operating the appliance.
2.3. Personal safety
a) Do not operate this device if you are tired, ill or under the influence of alcohol, drugs or medication that could impair your ability to operate the device.
b) The device is not intended to be used by persons (including children) with reduced mental, sensory or intellectual functions or persons who lack experience and/or knowledge unless they are supervised or have been instructed by a person responsible for their safety on how to operate the device.
c) The appliance is not a toy. Children should be watched to ensure that they do not play with the appliance.
2.4. Safe use of the device
a) Do not overload the device. Use tools that are suitable for the application. A correctly selected product will do a better and safer job for which it was designed.
b) Do not use the device if the ON/OFF switch does not function properly (does not turn on and off). Units that cannot be controlled by the switch are unsafe, cannot operate, and must be repaired.
c) Keep unused product out of the reach of children and anyone unfamiliar with the device or this manual. Products are dangerous when used by inexperienced users.
d) Keep the product out of the reach of children.
e) Repairs and maintenance should be carried out by qualified personnel using only original spare parts. This will ensure the safety of use.
f) To ensure the designed operational integrity of the device, do not remove factory-installed covers or loosen screws.
g) Clean the device regularly to prevent permanent dirt build-up.
h) Do not overload the scale. This can damage the strain gauges.
i) Before taking a measurement, make sure that the unit is placed on a stable surface, is not exposed to vibrations or sudden temperature changes that may adversely affect the measurement results.
j) Do not leave any weight on the scale for a long time. This reduces the accuracy of the scale and shortens the life of the sensors.
k) Do not use the scale during a storm or rain.
I) Avoid extreme temperatures. Do not place the scale directly in the sun or near air conditioning systems.
m) The scale should not be used near power-consuming devices such as welding machines or large electric motors.
n) Do not leave the battery in the scale if it is not used for a long time.
o) Avoid high humidity that could cause condensation and direct contact with water.
p) Do not place the scale near open windows or doors, air-conditioning systems or fans, which may cause unstable measurement results due to improper air circulation.
q) The scale should be kept clean. Do not put objects on the scale when it is not in use.

CAUTION! Although the product has been designed to be safe, with adequate safeguards, and despite the additional safety features provided to the user, there is still a slight risk of accident or injury when handling the unit. Caution and common sense are advised when using the product.
3. Instructions for use
The device is designed to measure the weight of elements placed on the pan. Do not exceed the maximum load of the scale - it may damage it!
The user is responsible for any damage resulting from misuse.
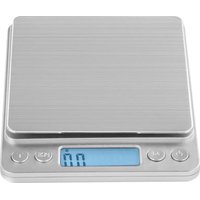
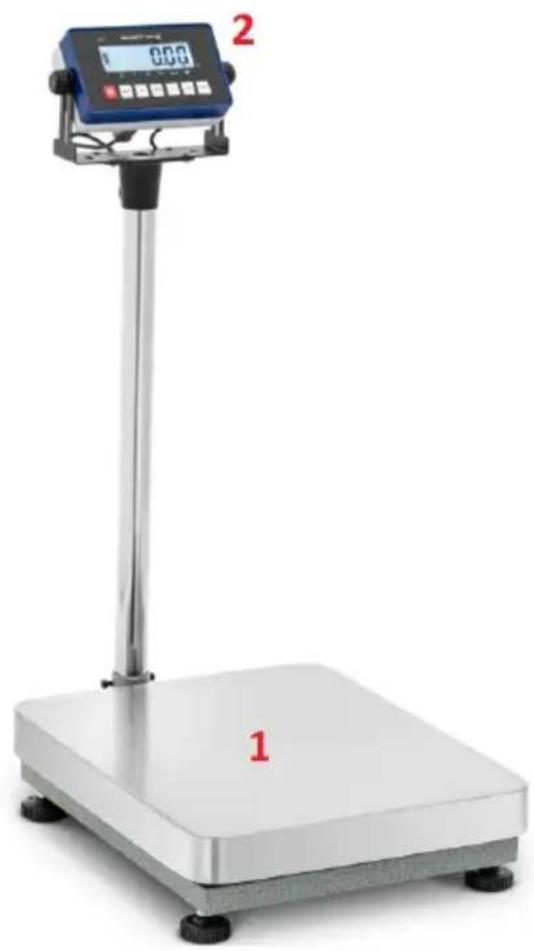
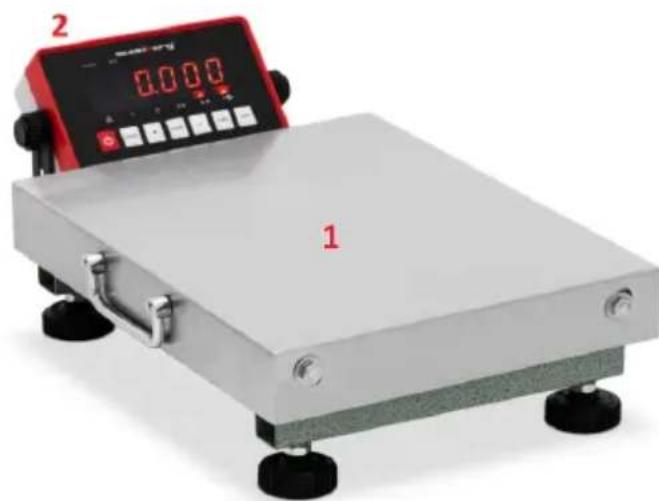
3.1. Product overview
SBS-PW-60 / 5N:
natural_image
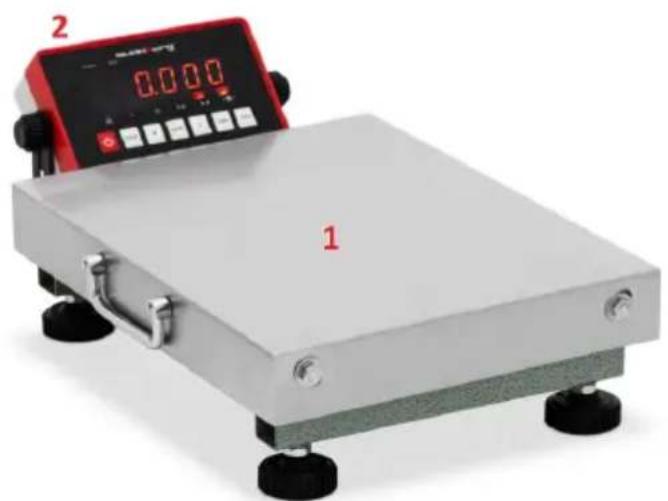
Digital measuring scale with digital display and control buttons, no visible text or symbols on the device itself.SBS-PF-60/10 | SBS-PF-30/5 | SBS-PF-150 / 20N:
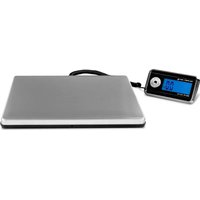
natural_image
Exterior view of a dual-scale industrial balance scale with control panel and display (no text or symbols visible)SBS-PF-60/2 | SBS-PF-300/10 | SBS-PF-150/5 | SBS-PF-60 / 2S | SBS-PF-30 / 1S:

natural_image
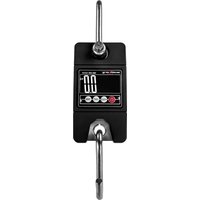
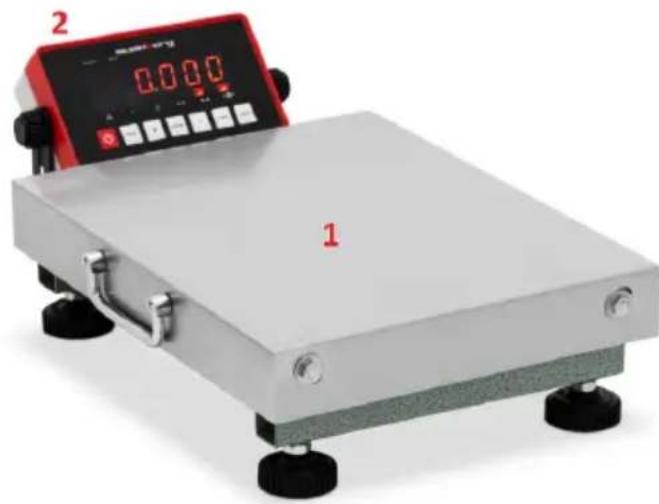
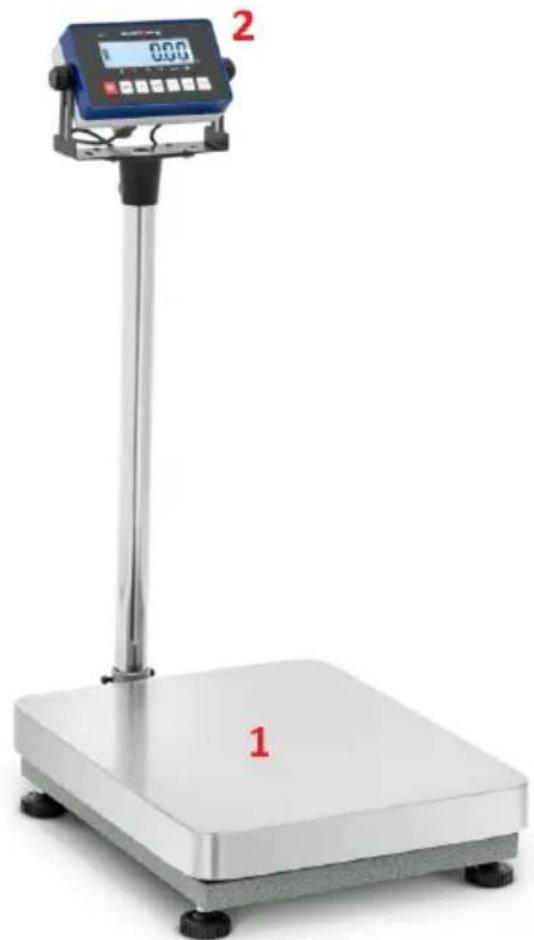
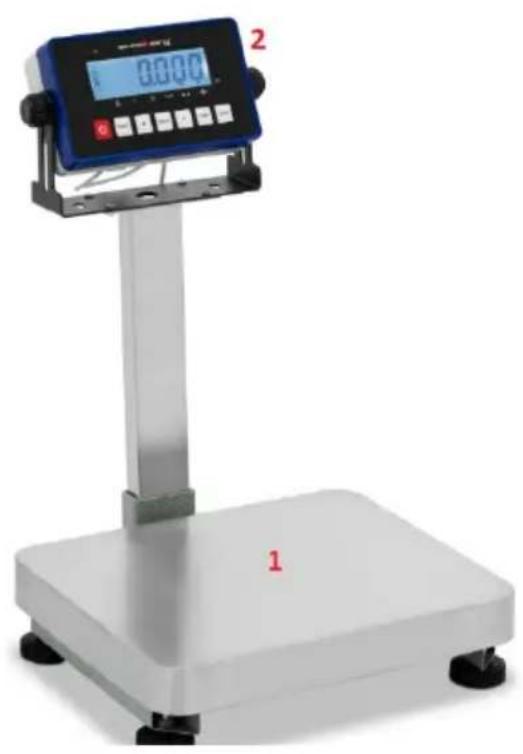
Digital pressure scale with a digital display and a base labeled '1', no visible text or symbols on the device itself.1 - Weighing platform.
2 - Control panel with display:
SBS-PW-60 / 5N | SBS-PF-60/2 | SBS-PF-300/10 | SBS-PF-150/5 | SBS-PF-60 / 2S | SBS-PF-30 / 1S:

text_image
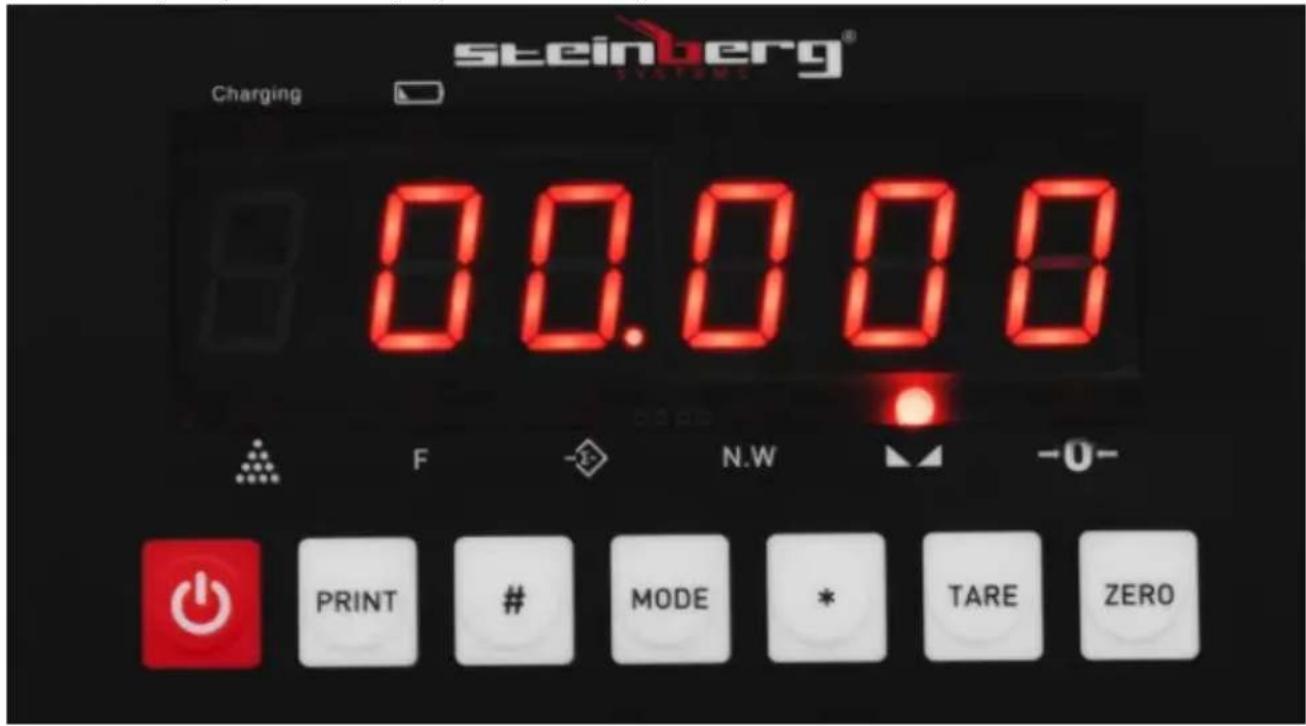
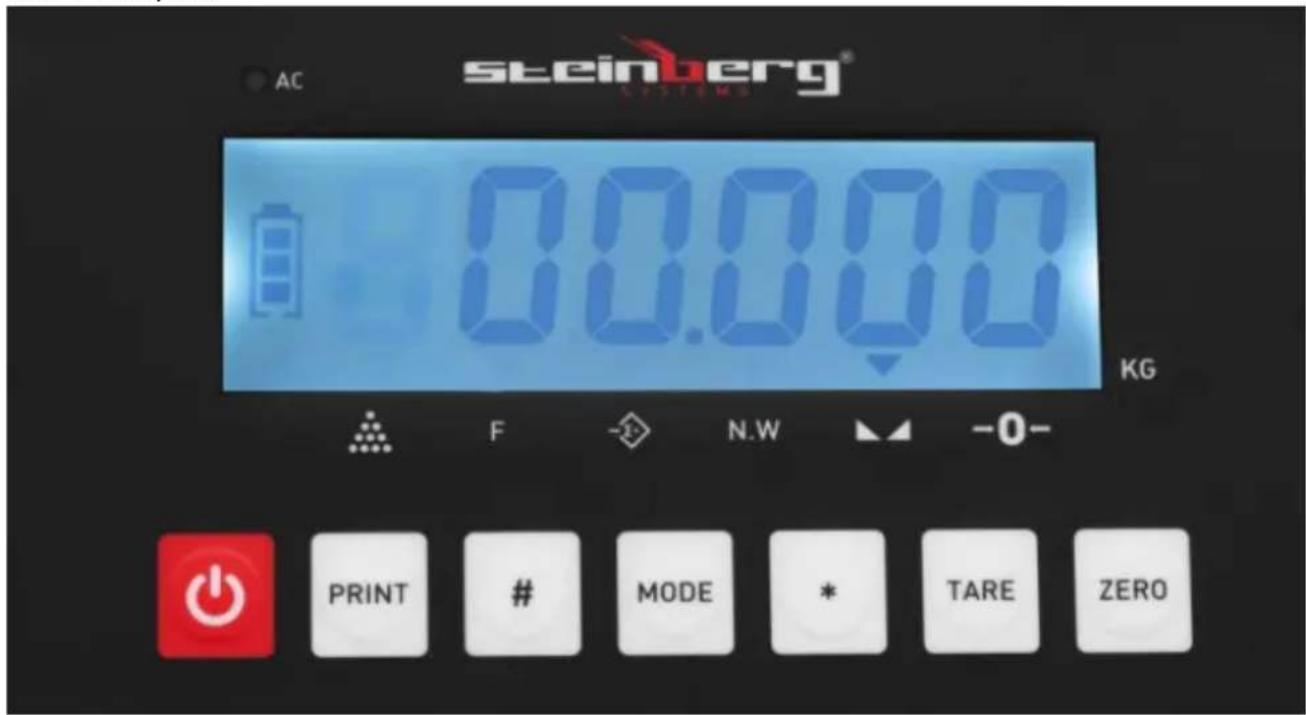
AC steinberg® 80.000 KG F N.W -0- PRINT # MODE * TARE ZEROSBS-PF-60/10 | SBS-PF-30/5 | SBS-PF-150 / 20N:
text_image
steinberg® Charging 00.008 F N.W -0- PRINT # MODE * TARE ZERO
- scale switch
PRINT - button not assigned / not applicable.
# - button used during the calibration process
MODE - By pressing this button for 5 seconds in weighing mode, the scale will enter the user setting mode; by pressing it for less than 5 seconds, the scale enters the counting mode.
* - button for weight cumulation in weighing/sampling mode in counting mode.
TARE - The tare function is the weight of the package itself. It is the difference between the total weight of the goods with packaging and the weight of the goods without packaging. The tare is used to remove the weight of an item that should not be included in the overall weight measurement.
ZERO (also used as TARE; display indicator) The zero function should only be used when there is nothing on the pan and the display does not show "0". The scale may not read "0" due to dust, dirt or moisture on the weighing pan or when a heavy object is dropped on the scale. The zeroing function essentially corrects the true zero on the scale and informs it that there is nothing on the pan.
AC/Charging - indicator of connected power supply (battery charging).
3.2. Preparation for operation
POSITIONING OF THE UNIT
The ambient temperature must not exceed 40^ and ambient humidity should not exceed 85% . Place the unit in a way that ensures good air circulation. Maintain a
minimum clearance of 10 cm from any wall of the unit. Keep the unit away from any hot surfaces. Always operate the unit on a level, stable, clean, fireproof and dry surface and out of the reach of children and persons of impaired mental, sensory and intellectual functions. Place the unit in such a way that the mains plug can be reached at any time. Ensure that the power supply to the unit corresponds to that specified on the identification plate!
3.3. Working with the unit
3.3.1. Cumulation function
When the displayed value in weighing mode is positive and stable, press the [*] key to cumulate the current weight and display the cumulated weight - the cumulation indicator will be on. When this button is pressed again, it will return to the weighing mode and the cumulation indicator will be turned off. Another cumulation operation must be performed after the scale has been zeroed. When the cumulated weight is displayed, press the [MODE] key to clear the cumulated weight from the memory and press the [*] key to return to weighing mode. If it is necessary to check the cumulated weight, reset the platform load and then press [*] to display the accumulated weight.
3.3.2. Counting function
In weighing mode, press [MODE] to enter the counting mode. The display will show "count. When pressing [*], it will display "C00000". Then press [TARE] to move the digit which will be incremented by one each time after pressing the [ZERO] key. The scale will enter the counting mode after entering the sample number and pressing [*]. The display will show "0" and the counting light will come on. Press the [MODE] key to return to weighing mode. After entering the counting mode, "count" will be displayed. Press [*] twice to enter the counting mode directly and the indicator will be displayed according to the last sampling result. (In this process, if ERR4 appears, it means sampling has failed.)
3.3.3. Alarm setting
a) Setting the upper limit value (displaying the sign of the upper limit and the upper limit value alternately by flashing) 0.000 - HH-
- Press the [TARE] key to enter the number input - increase the value with the [ZERO] key and press the [*] key to enter the lower limit value setting.
- If it is not necessary to change the upper limit value, press the [*] key to enter the lower limit setting.
- Press the [*] button to exit directly from the setting.
- If the upper limit value is set lower than the lower limit value, clear the lower limit value.
b) Setting the lower limit value (displaying the sign of the lower limit value and the lower limit value alternately by flashing) 0.00 - L L-.
- Press the [TARE] key to enter the number input - increase the value with the [ZERO] key and press the [*] key to confirm alarm setting.
- If it is not necessary to change the lower limit value, press the [*] key while the values are flashing alternately.
- Press the [*] button to exit the settings directly.
- If the lower limit value is not set to zero and is greater than the upper limit value, error [-erro-] will be displayed.
c) Setting the alarm mode.
The display shows - No- means no alarm;
The display shows - IN- indicates the alarm in the set range;
The display - OUT- indicates an alarm outside the set range.
- Press the [TARE] key to toggle the three alarm modes and press the [*] key to complete the setting.
- If it is not necessary to change the alarm mode, press the [*] key to complete the setting.
Caution:
IN- the sound signal rings in the set range;
OUT: the audible signal is ringing outside the set range.
In weighing mode, press [#] for 5 seconds and the scale will enter the user setting mode (P mode). There are 18 modes from P1 to P18 - press [*] to select the mode and press [TARE] to select the parameter.
- P1 x kg Lb change
X = 1: kg display
X = 2: Lb setting (display does not indicate)
- P2 x automatic power off
X = 1: lack of this function
X = 2: Power is turned off after 10 minutes
X = 3: 20 minutes
X = 4:30 minutes
- P3 x setting the band rate
X = 1:9600
X = 2:4800
X = 3:2400
X = 4:1200
- P4 x RS232 weight output net/gross optional
X = 1: Net weight output
X = 2: Gross weight output
X = 3: Tare weight output
- P5 x RS232 output mode option
X = 1: No transmission (RS232 stop)
X = 2: Continuous transmission
X = 3: Continuous transmission when stable
X = 4: Command mode (Z: zero, T: tare, R: send weighing data once)
X = 5: Remote display output
X = 6: Send once when RS232 stable
6.P6 x Backlight setting (LCD) Setting the energy saving function (LED)
X = 1: No backlight (LCD) No energy saving function (LED)
X = 2: Automatic backlight (LCD) Power saving 3 seconds to zero (LED)
X = 3: Continuous backlight (LCD) with energy-saving 1 minute during weighing (LED)
- P7 x Zero tracking range
X = 1:0.5e
X = 2:1.0e
X = 3:1.5e
X = 4:2.0e
X = 5:2.5e
X = 6:3.0e
X = 7:5.0e
X = 8: Forbidden
X = 9: Automatic zero tracking
- P8 x Zero tracking range
X = 1: 2% FS
X = 2: 4% FS
X = 3:10% FS
X = 4: 20% FS
X = 5: 100% FS
- P9 x Zero range at start
X = 1: 2% FS
X = 2: 4% FS
X = 3: 10% FS
X = 4: 20% FS
X = 5: 100% FS
X = 6: forbidden
- P10 x Intensity of digital filtering
X = 1: high
X = 2: average
X = 3: low
X = 4: very slow
- P11 X Stabilization time
X = 1: high
X = 2: average
X = 3: low
- P12 X Stability range
X = 1: low
X = 2: average
X = 3: high
- P13 X Strength of the animal scale function
X = 1: low
X = 2: average
X = 3: high
- P14 X Animal scale function ON/OFF
X = 0: OFF
X = 1: ON (go to the animal scale function by briefly pressing the "*" key)
- P15 X Print transmission format - not applicable
X = 1: Default Weight: 1.234 kg
X = 2:1.234
X = 3: = 432,100
X = 4: Tare, Gross Weight, Net Weight sent at once
X = 5: ST, NT 1.234 kg
- P16 X Turn on/off alarm lamp
X = 1: OFF
X = 2: ON
- P17 X Creep on/off
X = 1: OFF
X = 2: ON
- P18 X Error compensation: 0 means off, other means x.
3.3.4. Calibration
Turn on the scale, press the [#] key during initialization and the scale will enter the calibration mode. Calibration steps below:
| STEP | ACTION | DISPLAY | REMARKS |
| 1 | Press [TARE] to select the scale | [d X] | Select the scale (1/2/5/10/20/50), press [ #] to confirmExample: 20 |
| 2 | Press [TARE] to select the DECIMAL POINT | [PX] | Select the decimal place: 0 ~ 3, press [ #] to confirmExample: 3 |
| 3 | Set the full range of the scale | [FULL] | Press [TARE] to change the digit value;press [ZERO] to select a digit;Press [ #] for to confirm the set range |
| 4 | Zero point calibration:Press [ #] when the scale is stabilized | [nOLOAD] | Make sure there is no load on the scale |
| 5 | Full scale calibration: press [ #] when the input value is the same as the loaded weight and the weight is stabilized | [AdLOAD] | When entering the loaded weight, press [TARE] to select the digit value. Press [ZERO] to select a digit. When the input value is the same as the load weight, press [#] when the weight is stabilized |
| 6 | [End] | End of calibration |
3.4. Cleaning and maintenance
a) Pull out the mains plug before each cleaning and when the unit is not in use.
b) Use only non-corrosive cleaning agents for cleaning the surfaces.
c) Store the unit in a dry and cool place protected from moisture and direct sunlight.
d) Do not spray the unit with a stream of water or immerse it in water.
e) Make sure that no water enters through the ventilation openings in the casing.
f) Clean the ventilation openings with a brush and compressed air.
g) Perform regular inspections of the unit checking technical fitness and any damages.
h) Do not leave the batteries in the unit when it will not be used for a long time.
i) Use a soft, damp cloth for cleaning.
j) Do not use sharp and/or metal objects (e.g. wire brush or metal spatula) as they may damage the surface of the material from which the device is made.
k) Do not clean the product with acidic substances, medical agents, thinners, fuel, oils or other chemicals. It may cause damage to the device.
INSTRUCTIONS FOR THE SAFE DISPOSAL OF BATTERIES.
The devices are equipped with 6 V, 1300 mAh batteries.
Remove used batteries from the unit in the same way you put them in.
Return the batteries to a unit responsible for their disposal.
DISPOSAL OF USED UNITS.
At the end of its useful life, this product should not be disposed of with normal household waste but should be taken to a collection point for the recycling of electrical and electronic equipment. This is indicated by the symbol on the product, operating instructions or packaging. The materials used in this appliance are recyclable according to their marking. By reuse, recycling or applying other forms of use of waste machines, you make a significant contribution to the protection of our environment.
Your local administration will provide you with information about the appropriate disposal point for used appliances.

natural_image
Digital digital balance scale with a digital display and metal frame (no visible text or symbols)SBS-PF-60/10 | SBS-PF-30/5 | SBS-PF-150/20N:

natural_image
Exterior view of a silver dual-scale balance scale with control panel and digital display (no text or symbols visible)SBS-PF-60/2 | SBS-PF-300/10 | SBS-PF-150/5 | SBS-PF-60/2S | SBS-PF-30/1S:

natural_image
Digital measuring scale with a digital display and a base labeled '1', no visible text or symbols on the scale itself.SBS-PW-60/5N | SBS-PF-60/2 | SBS-PF-300/10 | SBS-PF-150/5 | SBS-PF-60/2S |
SBS-PF-30/1S:
text_image
AC steinberg® SYSTEMS 00.000 KG F N.W -0- PRINT # MODE * TARE ZEROSBS-PF-60/10 | SBS-PF-30/5 | SBS-PF-150/20N:

text_image
steinberg® Charging 00.008 F N.W -0- PRINT # MODE * TARE ZERO
- włącznik wagi
X=1: 2%FS
X=2: 4%FS
X=3: 10%FS
X=4: 20%FS
X=5: 100%FS
natural_image
Digital measuring scale with digital display and control buttons, no visible text or symbols on the device itself.SBS-PF-60/10 | SBS-PF-30/5 | SBS-PF-150 / 20N:

natural_image
Exterior view of a dual-scale industrial balance scale with control panel and display (no text or symbols visible)SBS-PF-60/2 | SBS-PF-300/10 | SBS-PF-150/5 | SBS-PF-60 / 2S | SBS-PF-30 / 1S:

natural_image
Digital pressure scale with a digital display and a base labeled '1', no visible text or symbols on the device itself.X = 5: ST, NT 1,234 kg
- P16 X Zapnutí/vypnutí kontrolky alarmu
X = 1: VYPNUTO
X = 2: ZAPNUTO
- P17 X Creep on/off
X = 1: VYPNUTO
X = 2: ZAPNUTO
natural_image
Digital pressure scale with digital display and control buttons, no visible text or symbols on the device itself.SBS-PF-60/10 | SBS-PF-30/5 | SBS-PF-150/20N :

natural_image
Exterior view of a silver dual-scale balance scale with a digital display and control panel (no visible text or symbols)SBS-PF-60/2 | SBS-PF-300/10 | SBS-PF-150/5 | SBS-PF-60 / 2S | SBS-PF-30/1S :

natural_image
Digital measuring scale with a digital display and a base labeled '1', no visible text or symbols on the device itself.X = 2 : transmission continue
$$ X = 1: 2 \% \text {PE} $$
$$ X = 2: 4 \% \text {PE} $$
$$ X = 3: 10 \% \text{PE} $$
$$ X = 4: 20 \% \text {PE} $$
$$ X = 5: 100 \% \text{PE} $$
$$ X = 1: 2 \% \text {PE} $$
$$ X = 2: 4 \% \text {PE} $$
$$ X = 3: 10 \% \text {PE} $$
$$ X = 4: 20 \% \text {PE} $$
$$ X = 5: 100 \% \text{PE} $$
$$ X = 6: \text { interdit } $$
$$ X = 3: \text {faible} $$
X = 5 : ST, NT 1,234 kg
natural_image
Digital pressure scale with digital display and metal frame (no visible text or symbols)SBS-PF-60/10 | SBS-PF-30/5 | SBS-PF-150/20N:

natural_image
Exterior view of a silver dual-scale balance scale with digital display and control buttons (no text or symbols visible)SBS-PF-60/2 | SBS-PF-300/10 | SBS-PF-150/5 | SBS-PF-60/2S | SBS-PF-30/1S:

natural_image
Digital pressure scale with a digital display and a base labeled '1', no visible text or symbols on the device itself.SBS-PW-60/5N | SBS-PF-60/2 | SBS-PF-300/10 | SBS-PF-150/5 | SBS-PF-60/2S | SBS-PF-30/1S:

text_image
AC steinberg® SYSTEMS 80.000 KG F N.W -0- PRINT # MODE * TARE ZEROSBS-PF-60/10 | SBS-PF-30/5 | SBS-PF-150/20N:

text_image
steinberg® Charging 00.008 F N.W -0- PRINT # MODE * TARE ZERO
X = 5: ST, NT 1,234 kg
natural_image
Digital pressure scale with digital display and metal frame base (no visible text or symbols)SBS-PF-60/10 | SBS-PF-30/5 | SBS-PF-150 / 20N:

natural_image
Exterior view of a silver industrial balance scale with control panel and digital display (no text or symbols visible)SBS-PF-60/2 | SBS-PF-300/10 | SBS-PF-150/5 | SBS-PF-60 / 2S | SBS-PF-30 / 1S:
natural_image
Digital pressure scale with a digital display and a base labeled '1', no visible text or symbols on the device itself.X = 5: ST, NT 1,234 kg
- P16 X Encender/apagar lámpara de alarma
X = 1: APAGADO
X = 2: ENCENDIDO
natural_image
Digital pressure scale with digital display and metal frame base (no visible text or symbols)SBS-PF-60/10 | SBS-PF-30/5 | SBS-PF-150 / 20N:
natural_image
Digital scale balance with red and white buttons, no visible text or symbols on the device itselfSBS-PF-60/2 | SBS-PF-300/10 | SBS-PF-150/5 | SBS-PF-60 / 2S | SBS-PF-30 / 1S:

natural_image
Digital pressure scale with a digital display and a base labeled '1', no visible text or symbols on the device itself.X = 5: ST, NT 1,234 kg
natural_image
Digital measuring scale with digital display and control buttons, no visible text or symbols on the device itself.SBS-PF-60/10 | SBS-PF-30/5 | SBS-PF-150 / 20N:

natural_image
Exterior view of a dual-scale industrial balance scale with control panel and digital display (no text or symbols visible)SBS-PF-60/2 | SBS-PF-300/10 | SBS-PF-150/5 | SBS-PF-60 / 2S | SBS-PF-30 / 1S:

natural_image
Digital pressure scale with a digital display and a base labeled '1', no visible text or symbols on the device itself.1 - Vægtningsplatform.
2 - Betjeningspanel med display:
SBS-PW-60 / 5N | SBS-PF-60/2 | SBS-PF-300/10 | SBS-PF-150/5 | SBS-PF-60 / 2S | SBS-PF-30 / 1S:

text_image
AC steinberg® 80.000 KG F N.W -0- PRINT # MODE * TARE ZEROSBS-PF-60/10 | SBS-PF-30/5 | SBS-PF-150 / 20N:

text_image
steinberg® Charging 00.008 F N.W -0- PRINT # MODE * TARE ZERO
- Skala skifte
APPARATETS PLACERING
X = 1: Ingen transmission (RS232-stop)
X = 2: Kontinuerlig transmission
X = 3: kontinuerlig transmission, när den er stabil
X = 4: Kommandomodus (Z: nul, T: tara, R: send vejedata én gang)
X = 5: ST, NT 1,234 kg
For the disposal of the device please consider and act according to the national and local rules and regulations.
CONTACT
expondo Polska sp. z o.o. sp. k.