Limpia Hero - Humidifier OLIMPIA SPLENDID - Free user manual and instructions
Find the device manual for free Limpia Hero OLIMPIA SPLENDID in PDF.
| Product Type | Humidifier |
| Brand | Olimpia Splendid |
| Model | Limpia Hero |
| Power Supply | Mains (220-240 V~, 50/60 Hz) |
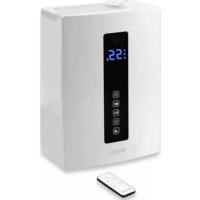
| Main Functions | Cold mist, warm mist, plasma ionization, automatic humidity maintenance, programmable timer (1-12 h), Auto/Child/Sleep/Manual modes, Wi-Fi, 7-color LED indicator, aroma compartment |
| Safety | Automatic shut-off when water is low, control lock (child safety), thermal protection |
| Maintenance | Cleaning the ultrasonic disk with brush, descaling with vinegar, cleaning the tank every 3 days |
| Filter | Washable purifier filter (rinse under running water, dry completely before reinstalling) |
| Spare Parts | Water tank, lid, brush, thermal protection, purifier filter |
| Repairability | Do not disassemble yourself; contact technical support service |
| Use | Household use only |
| Installation | Place on a flat, stable, water-resistant surface, at least 15 cm from walls, 60 cm from the floor |
| Aroma Compartment | Yes, for essential oils (do not pour into the water tank) |
| Display | LCD screen with room temperature, relative humidity, mode indicators |
| Control | Touch panel with dedicated buttons (ON/OFF, Timer, Humidifier, Plasma, Mist, Diffusion, Mode, Lock) |
Frequently Asked Questions - Limpia Hero OLIMPIA SPLENDID
User questions about Limpia Hero OLIMPIA SPLENDID
0 question about this device. Answer the ones you know or ask your own.
Ask a new question about this device
Download the instructions for your Humidifier in PDF format for free! Find your manual Limpia Hero - OLIMPIA SPLENDID and take your electronic device back in hand. On this page are published all the documents necessary for the use of your device. Limpia Hero by OLIMPIA SPLENDID.
USER MANUAL Limpia Hero OLIMPIA SPLENDID
natural_image
Line drawing of a rectangular electronic device with a circular top and side panels (no text or symbols)LIMPIA HERO

SMALTIMENTO - DISPOSAL - ELIMINATION - ENTSORGUNG - DESGUACE - ELIMINAÇÃO - VUILVERWERKING - METAPOIHΣH - UTYLIZACJA - ELIMINARE - BORTSKAFFNING - HÄVITTÄMINEN - KASSE-RING - ÁRTALMATLANÍTÁS - LIKVIDACE - УТИЛИЗАЦІЯ - BORTSKAFFELSE
This symbol on the product or its packaging indicates that the appliance cannot be treated as normal domestic trash, but must be handed in at a collection point for recycling electric and electronic appliances. Your contribution to the correct disposal of this product protects the environment and the health of your fellow men. Health and the environment are endangered by incorrect disposal. Further information about the recycling of this product can be obtained from your local town hall, your refuse collection service, or in the store at which you bought the product. This regulation is valid only in EU member states.
$$ \text { Medium } (\clubsuit) \dashrightarrow \text { Low } (\clubsuit) \dashrightarrow \text { High } (\clubsuit) \dashrightarrow \text { Medium } (\clubsuit) \dashrightarrow \dots $$
natural_image
Illustration of a hand using a power plug to switch an electrical outlet (no text or symbols present)2.1 - POSITIONING....4
2.2 - FILLING....4
2.2.1 - Flavour compartment (7)....5
3 - INSTRUCTIONS FOR USE 5
3.1 - USE OF THE APPLIANCE....5
3.1.a - Preliminary operations....5
3.2 - DISPLAY AND CONTROL PANEL......5
3.3 - OPERATION ....5
3.3.a - ON/OFF key (A1) 5
3.3.c - Humidifier key (A3)......6
3.3.d - Plasma key (A4)....6
3.3.e - Mist key (A5) 6
3.3.f - Mist emission key (A6)....6
3.3.g - Mode key (A7)......6
3.3.h - Control lock (A8)....6
3.4 - OTHER FUNCTIONS....7
3.4.a - LED light....7
3.4.b - WIFI function 7
3.4.c - Absence of water....7
4 - MAINTENANCE AND
CLEANING 7
4.1 - END OF SEASON STORAGE .....8
5 - TROUBLESHOOTING GUIDE......8
ILLUSTRATIONS
The illustrations are grouped on the initial pages of the manual

0 - WARNINGS
0.1 - GENERAL INFORMATION
First of all, we would like to thank you for choosing our appliance.
0.2 - SYMBOLS
The pictograms in the next chapter provide the necessary information for correct, safe use of the machine in a rapid, unmistakable way.
0.2.1 - Editorial pictograms
 | Indicates that this document must be read carefully before installing and/or using the appliance. |
| Indicates that this document must be read carefully before any maintenance and/or cleaning operation. | |
 | Indicates that there may be additional information in attached manuals. |
| Indicates that information is available in the user manual or in the installation manual. | |
 | Indicates to the personnel concerned that it is necessary to clean the tank every three days. |
 | Signals to the personnel that the operation described could cause electrocution if not performed according to the safety rules. |
 | It informs the personnel concerned that if the operation is not carried out in compliance with the safety regulations, it presents the risk of suffering physical damage. |
 | It informs the personnel concerned that if the operation is not carried out in compliance with the safety regulations, it presents the risk of burns due to contact with components at very high temperatures. |
 | Paragraphs marked with this symbol contain very important information and recommendations, particularly as regards safety. Failure to comply with them may result in:- danger of injury to the operators- loss of the warranty- refusal of liability by the manufacturer. |
 | Refers to actions that absolutely must not be performed. |
| [27WX] | Indicates to the personnel concerned, that it is prohibited to cover the appliance, to prevent over-heating. |
0.3 - GENERAL WARNINGS
WHEN USING ELECTRICAL EQUIPMENT, BASIC SAFETY PRECAUTIONS MUST ALWAYS BE FOLLOWED IN ORDER TO REDUCE RISKS OF FIRE, ELECTRIC SHOCKS AND INJURY, INCLUDING THE FOLLOWING:

- This document is restricted in use to the terms of the law and may not be copied or transferred to third parties without the express authorization of the manufacturer, OLIMPIA SPLENDID. Our machines are subject to change and some parts may appear different from the ones shown here, without this affecting the text of the manual in any way.

ad this manual carefully before performing any operation (installation, maintenance, use) and follow the instructions contained in each chapter.

ep the manual carefully for future reference.

- To reduce the risk of severe burns, keep this product out of the reach of children and pets.

-
After removing the packaging, check that the appliance is in perfect condition. The packaging materials must not be left within reach of children as they can be dangerous.
-
Disassembly, repair or remodelling by an unauthorized person may result in serious harm and will void the manufactures warranty.

-
Do not operate the appliance in case of damaged cord or plug, after the appliance malfunctions, or if it has been dropped or damaged in any manner. Return appliance to manufacturer for examination, electrical or mechanical adjustment or repairing.
-
Always place this humidifier on a firm, flat and level surface at least 60cm from the floor. This humidifier may not work properly on an uneven surface.
-
Do not clog the air inlet or outlet, do not position the unit on cloth, mats or any other absorbing material or any other absorbing material.
-
Do not permit the area around the humidifier to become damp or wet. If dampness occurs, turn the output of the humidifier down. If the humidifier output volume cannot be turned down, use the humidifier intermittently. Do not allow absorbent materials, such as carpeting, curtains, drapes, or tablecloths, to become damp.
EN - 2
-
Do not place humidifier near heat sources such as stoves, radiators and heaters.
-
Do not place humidifier near electrical outlet.
-
This product releases mist. Do not place this humidifier directly on wood furniture, flooring or any surfaces that could be damaged by water. Manufacturer does not accept any liability for damage in the case of the unit being placed incorrectly.
-
Unplug the appliance during filling and cleaning.
-
Once the humidifier has been plugged in, do not tilt or move the unit.
-
Do not remove the water tank from the unit while it is on.
-
Do not handle the plug with wet hands.
-
Do not excessively bend, twist, pull or damage the power cord.
-
Avoid placing this product where the humidity spout is pointed directly at an object or person.
-
Do not inhale the mist/vapor expelled from the product or drink water from the tank.
-
Do not fill the water tank with hot or boiling water.
-
Do not use this product in direct sunlight or near a heat source such as a stove, heater or radiator.
-
If the water tank becomes cracked or damaged, do not use.
-
Do not keep this product running for an extended period of time.
-
Unplug the cord when unit is not in use for an extended period of time and/or when no one is home.
-
Do not keep water in the tank when not in use for an extended period of time.
-
Do not clean the unit, water tank or water reservoir with detergents or chemicals of any kind.

-
The use of water additives including ethereal/essential oils, fragrances, eucalyptus, water conditioners, etc. will damage the appliance materials and as a consequence the whole unit. Any use of such additives will void the manufactures warranty.
-
Do not use this product near any other electronic device.
-
Do not cover the spray spout at any time during use. Do not put anything on or in the tank.
-
When unplugging from outlet hold humidifier securely.
-
Do not place cord over objects.

-
Do not get water in or on the power cord or where it connects to the product. Do not use near a sink.
-
Do not touch the water tank during operation.
-
Do not submerse the unit in water or pour water on the unit or in the humidity spout.
-
When emptying water from water tank, pour on drain side.
-
Do not cover the spout with cloth or hand and do not use without the spout.
-
Use clean or distilled water in tank. Hard water areas will require more frequent cleaning.
-
If moisture forms on the walls or windows of the room, turn off the humidifier.
The room already has plenty of humidity and additional moisture may cause damage.
-
NEVER leave water in the reservoir when the appliance is not in use.
-
Empty and clean the humidifier before storage.
-
Clean the humidifier before next use.
-
Be aware that high humidity levels may encourage the growth of biological organisms in the environment.

-
Micro-organisms that may be present in the water or in the environment where the appliance is used or stored, can grow in the water reservoir and be blown in the air causing very serious health risks when the water is not renewed and the tank is not cleaned properly every 3 days. Clean the water tank every three days.
-
FOR HOUSEHOLD USE ONLY.

This product must be used exclusively according to the specifications indicated in this manual. Use different to that specified, could cause serious injuries.
UFACTURER IS NOT LIABLE FOR INJURY/DAMAGE TO PERSONS/OBJECTS DERIVING FROM FAILURE TO COMPLY WITH THE REGULATIONS CONTAINED IN THIS MANUAL.
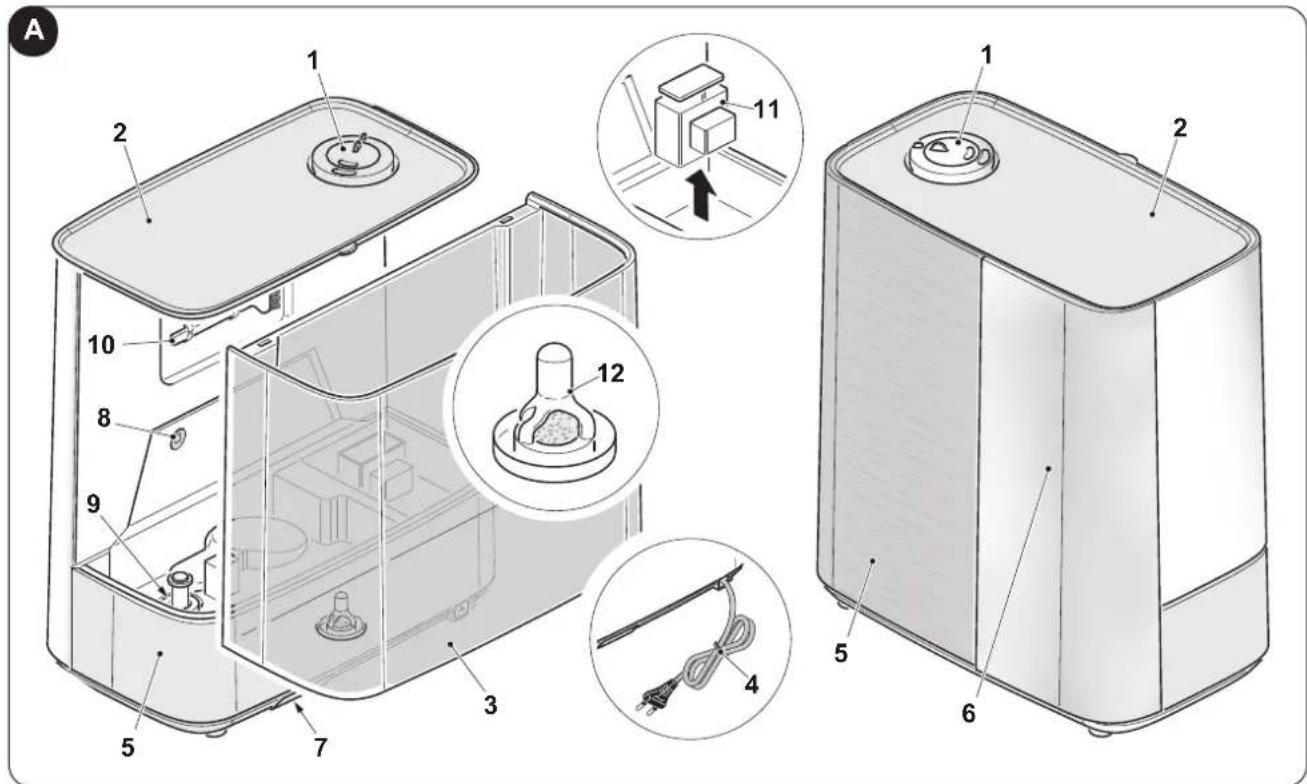
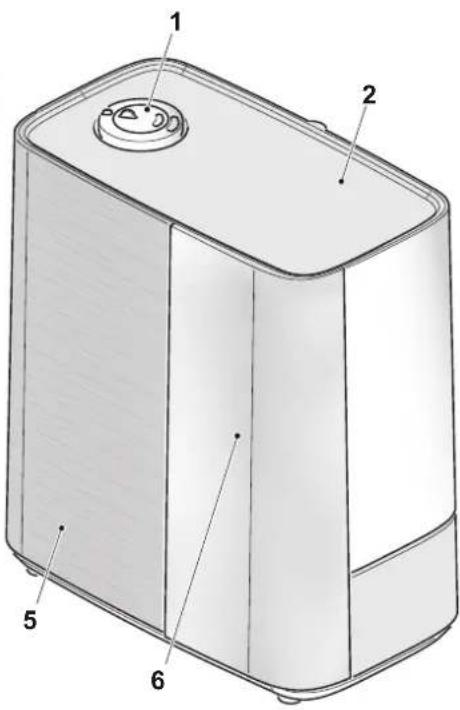
1 - MAIN CHARACTERISTICS (Fig.A)
1 - Mist outlet
2 - Lid
3 - Water tank
4 - Power cord
5 - Body
6 - Display and control panel
7 - Flavour compartment
8 - Led light
9 - Float
10 - Brush
11 - Thermal protection
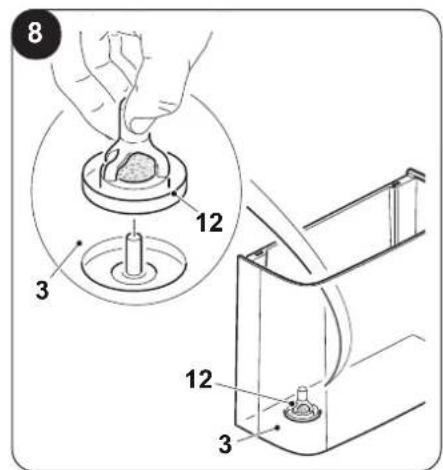
12 - Purifier filter
2 - PRE-OPERATING INSTRUCTION
2.1 - POSITIONING (Fig.1)

Select a firm, level, flat location at least 15cm from any wall or object for proper air flow. Place the humidifier on a water-resistant surface, as water can damage furniture and some flooring. Do not place unit directly on carpet, towels, blankets or other absorbent surfaces.

We will not accept responsibility for damage caused by water spillage.
2.2 - FILLING

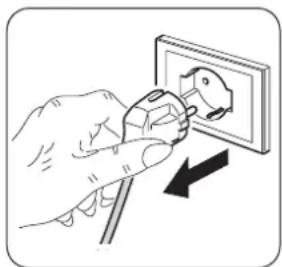
Before filling the tank, always make sure that the appliance is disconnected from the power socket.
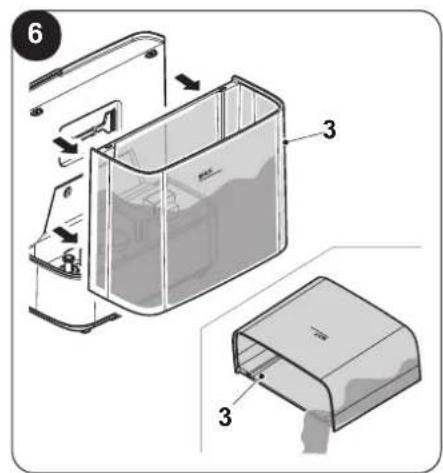
a. Separate the tank (3) from the base of the unit (5) as shown in fig 2.
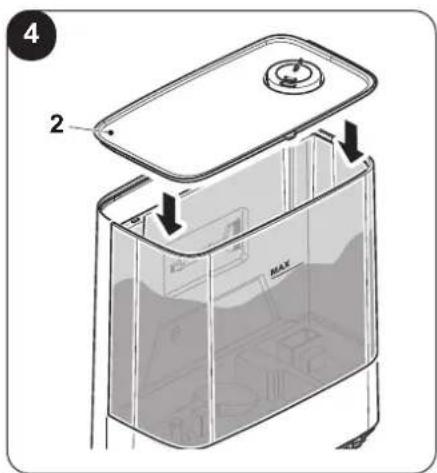
b. Raise the lid (2).
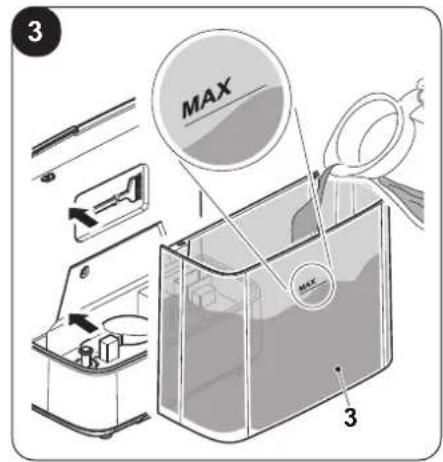
c. Pour drinkable water directly into the tank paying attention not to exceed the "MAX" filling level (Fig.3).

Do not pour flavours or other additives inside the tank. Use the specific compartment (7).
d. Close the lid (2) (Fig.4).

Do not use the humidifier without water inside the tank.
EN - 4
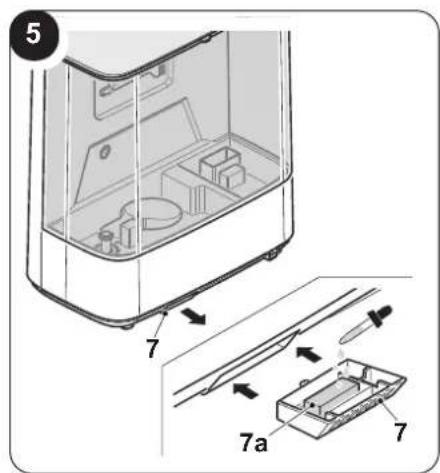
2.2.1 - Flavour compartment (7)
Press the flavour compartment (7) and extract it from its seat; make sure to wet the white filter (7a) with the desired essential oil. Reposition the flavour compartment (7) in its seat and press until locking (fig.5).
3 - INSTRUCTIONS FOR USE
3.1 - USE OF THE APPLIANCE
3.1.a - Preliminary operations

- Before connecting the plug into the power socket, make sure the network data correspond to what is indicated on the nameplate of the appliance.
Insert the plug into the power socket; the keys of the control panel light up for a few seconds, then the appliance sets itself to stand-by mode.
3.2 - DISPLAY AND CONTROL PANEL
B
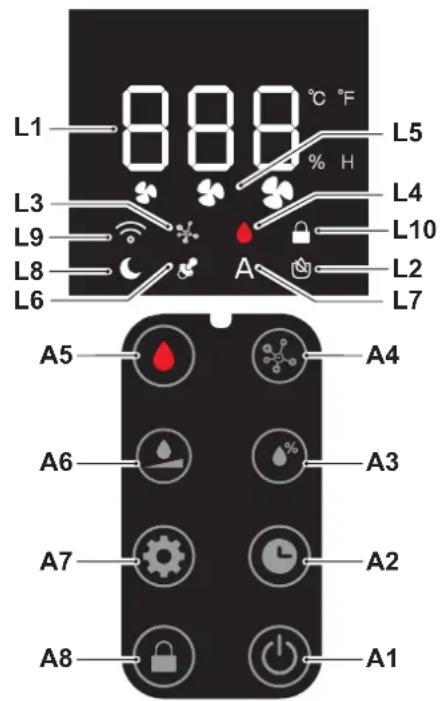
A1. ON/OFF key
A2. Timer key
A3. Humidifier key
A4. Plasma key
A5. Mist key
A6. Mist emission key
A7. Mode key
A8. Children lock key
L1. Display
L2. Humidifier mode LED
L3. Plasma mode LED
L4. Mist LED
L5. Mist emission intensity LED
L6. Children mode LED
L7. Automatic mode LED
L8. Sleep mode LED
L9. WiFi LED
L10. Controls lock mode LED
3.3 - OPERATION
3.3.a - ON/OFF key (A1)
In stand-by mode, all the keys are disabled, except for the ON/OFF key.
Press the key (A1) to switch the appliance on/off.
Dispensing of the mist is set to "Medium" by default (Led L5 "II" on); visualization of the ambient temperature alternates with the visualization of the percentage of detected humidity on the display (L1). All the functions are available.
When the appliance is switched on again, without disconnecting it from the power socket, it memorizes the last active settings (except for the Sleep, Timer and Children lock functions).
3.3.b - Timer key (A2)
Press the key (A2) to activate this function; press the key (A2) several times to set the desired time according to this sequence:
$$ (0 h (\text { Timer off }) \dashrightarrow 1 h \dashrightarrow 2 h \dashrightarrow .. 1 1 h \dashrightarrow 1 2 h \dashrightarrow .. 0 h (\text { Timer off }) \dashrightarrow ..). $$
The set value flashes on the display (L1) three times before returning to display alternatively the ambient temperature and the percentage of humidity detected. When the function is active, the display (L1) shows the ambient temperature, the percentage of detected humidity and the set timer value alternatively.
Press the button (A2) once to display the remaining time, press the key a second time to reset the timer.
3.3.c - Humidifier key (A3)
Press the key (A3) to increase/decrease the percentage of desired humidity; on the display, the set value flashes on the display (L1) three times before returning to display alternatively the ambient temperature and the percentage of detected humidity.
The settable value is included between 40% and 80% (with 5% steps).
When the detected humidity is lower than the set value, the appliance starts to dispense mist.
When the detected humidity is higher than the set value, the appliance stops dispensing mist.
3.3.d - Plasma key (A4)
Press the key (A4) to activate the function; the corresponding LED (L3) switches on.
This function generates ions which neutralize the positive and negative charges in the air, disassembling the pollutants and making them harmless, reducing the bacteria and removing fume, dust and smell.
Press the key (A4) a second time to deactivate the function.
3.3.e - Mist key (A5)
Press the key (A5) to activate the warm mist dispensing function; the corresponding LED v(L4) lights up red.
Press the key (A5) a second time to deactivate the function.
3.3.e.1 - Temperature unit of measurement setting
Keep the key (A5) pressed for 5 seconds to change the unit of measurement of temperature from °C (Celsius) to F (Fahrenheit).
3.3.f - Mist emission key (A6)
Press the key (A6) to select the emission level of mist according to this sequence:
$$ \text { Medium } (\clubsuit) \dashrightarrow \text { Low } (\clubsuit) \dashrightarrow \text { High } (\clubsuit) \dashrightarrow \text { Medium } (\clubsuit) \dashrightarrow \dots $$
The LED (L5) corresponding to the desired level of emission lights up on the display.
3.3.g - Mode key (A7)
Press the key (A7) several times to select the desired mode.
3.3.g.1 - Automatic mode
In this mode, the appliance automatically keeps humidity constant at 55% and the mist emission level is adjusted based on the detected humidity; the corresponding LED (L7) lights up. The plasma function signalled by the respective LED (L3) is active.
When the detected humidity is lower than 45%, the mist emission level is adjusted to "High (III)".
When the detected humidity is higher than 55%, the appliance stops supplying mist.
When the detected humidity is lower than 10^ C, the appliance starts to supply warm mist, LED (L4) red.
3.3.g.2 - Children mode
In this mode, the appliance automatically keeps humidity constant at 55% and the mist emission level is adjusted based on the detected humidity; the corresponding LED (L6) lights up.
When the detected humidity is lower than 45%, the mist emission level is adjusted to "High (III)".
When the detected humidity is higher than 55%, the appliance stops supplying mist.
In this mode, the plasma function and the warm mist dispensing function are deactivated.
3.3.g.3 - Sleep mode
In this mode, the appliance automatically keeps the mist emission level set to "Low (I)" and all the lights remain off; the respective LED (L8) lights up.
3.3.g.4 - Manual mode
In this mode, the mist emission level, the dispensing of mist or warm mist and the activation/deactivation of the lights are set manually.
3.3.h - Control lock (A8)
Press the key (A8) for a few seconds to activate the control lock function; the respective LED (L10) lights up; when the function is activate, all the other keys are disabled.
Press the key (A8) for a few seconds to deactivate the function.
EN - 6
3.4 - OTHER FUNCTIONS
3.4.a - LED light
Press the key (A7) for a few seconds to activate/deactivate the LED light (8).
When the function is active, the light varies between 7 shades of colour.
3.4.b - WIFI function
When switched on, the appliance enters the device search mode and the LED (L9) flashes.
In case it is desired to activate the function in a second step, keep the key (A1) pressed for a few seconds until the LED (L9) starts to flash.

When the appliance connects with the smartphone, the LED (L9) stops flashing and remains steady on on the display.

frame the QR code to download the instructions for connection to the WiFi network and for use of the App.
If the appliance does not connect within 2 minutes, the LED (L9) stops flashing.

3.4.c - Absence of water
The appliance stops working without water inside the tank, the LED (L2) lights up red and switches off automatically after 10 seconds; the appliance enters stand-by mode.
4 - MAINTENANCE AND CLEANING

Before proceeding with any maintenance and cleaning intervention, always make sure you disconnected the power plug from the power socket.
natural_image
Illustration of a hand using a power plug to switch an electrical outlet (no text or symbols present)- Use a dry cloth to clean the appliance.
- If the appliance is very dirty, it is possible to use a cloth dampened with warm water (max 50^ ) and a mild detergent to clean its external parts. Dry with a dry cloth.
- Remove the tank and empty all water from unit bowl and tank (Fig.6).
- Locate the ultrasonic disk on the inside centre of the base unit; ONLY use a soft paintbrush to delicately clean the disk and remove accumulations and deposits.

Do not scrub or scrape the ultrasonic disk.

• Make sure the appliance is completely dry before reconnecting the plug to the power socket. Not use a chemically treated or antistatic cloth to clean the appliance.
not use petrol, solvents, polishing pastes or similar. These products could break or deform the plastic surface.
- Do not use oils, chemical substances or abrasive products to clean the appliance.
-
Neither wash nor immerse the appliance with/in water.
-
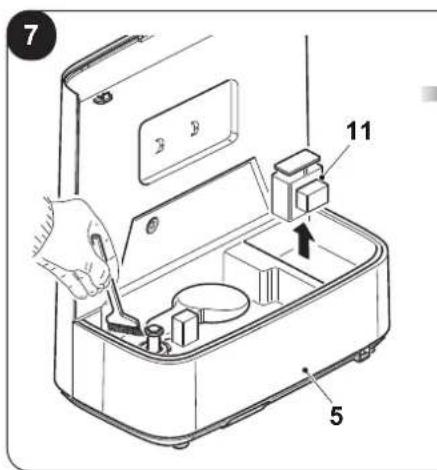
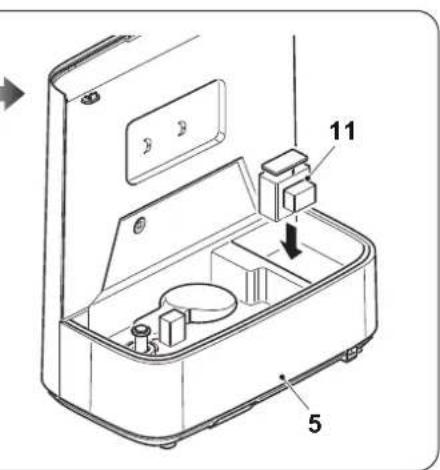
Remove the thermal protection (11) and clean the inside of the appliance body (5); when the inside of the appliance has been cleaned, make sure to correctly reposition the protection and check that no water residues remained in the various components (Fig.7).
- Remove the filter (4) and rinse it under running water. Make sure the filter (4) is completely dry and reposition it inside the appliance (Fig.8).

In case of an appliance malfunction, do not try to disassemble it but instead refer to the retailer or to the technical assistance service.
If calcium becomes difficult to remove with a paintbrush:
- Fill the tank with the mix of 1 spoon of white vinegar and 1 spoon of water.
- Let solution stand for 5 minutes.
• With the vinegar inside the tank, clean all the internal surfaces with a soft cloth or a brush to help removing limescale. - Also check mist nozzle and mist tube in water tank. Clean as needed.
- Rinse the Base thoroughly with water to remove scale and vinegar solution.
4.1 - END OF SEASON STORAGE
- Follow the Cleaning and Descaling instructions when the humidifier will be stored at the end of the season.
- Dry the humidifier completely before storing. DO NOT store with water inside the bowl or Water Tank.
- Pack the unit in its original carton and store in a cool, dry location.

If you experience a problem do not attempt to open the motor housing yourself. doing so may void your warranty and cause damage to the humidifier or personal injury.
5 - TROUBLESHOOTING GUIDE
| PROBLEM SOLUTION | |
| Water vapor and humidity are not produced. | Power plug: Unplug and then try again.Power Failure: When the power is returned, try again.Tank Installation: Make sure the tank is correctly attached.The surface of the ultrasonic disk is dirty: Clean ultrasonic disk. |
| Air blows but water vapor is not produced. | Excessive Water: Remove a certain amount of water from the tank.Detergent residue and/or oil ingredients from cosmetics, etc may be in tank; wash out tank and try again.The surface of the ultrasonic disk is dirty: Clean ultrasonic disk.If you use hard water, replace with softer water. |
| Humidity level is low. • The surface of the ultrasonic disk is dirty: Clean ultrasonic disk.The water in the unit is too cold: Replace with cool, but not cold water. | |
| The humidity has a bad smell. | Poor maintenance or dirty water: Clean the product thoroughly, and fill it with fresh water. |
| White dust is forming on nearby furniture. | Hard water may deposit a certain of dust. Dust in the air also settles because of added humidity in the room. Use distilled water if this becomes a nuisance. |
| Unit has stopped working. • No or low water. Unplug unit and refill tank. | |
| Water is accumulating outside of unit or area surrounding unit. | Saturation of humidity. Lower mist control setting.Unit not level and water is accumulating. Unplug and place on level surface. Point spray away from objects. Raise unit on a water-resistant level surface at least 60 cm from the floor. |
| Water dripping when refilling. | Water remaining on bottom of tank. Wipe tank or tilt to drain before transporting. |
| Increased noise level. | Unit must be placed on a flat, level, hard surface. Make sure it is NOT placed on a soft or absorbent surface. |
| Flashing light symbols. • Indicates low water. Unplug and refill tank. | |
EN - 8
0 - MISES EN GARDE....1
0.1 - INFORMATIONS GÉNÉRALES .....1
0.2 - SYMBOLES....1
0.2.1 - Pictogrammes éditoriaux....1
0.3 - MISES EN GARDE GÉNÉRALES .....2
1 - CARACTÉRISTIQUES PRINCIPALES ...... 4
2 - INSTRUCTIONS AVANT L'UTILISATION .... 4
2.1 - MISE EN PLACE....4
2.2 - REMPLISSAGE....4
2.2.1 - Compartiment à arômes (7) ....5
3 - INSTRUCTIONS POUR L'UTILISATION ..... 5
3.1 - UTILISATION DE L'APPAREIL....5
3.1.a - Opérations préliminaires ....5
3.2 - ÉCRAN ET PANNEAU DE COMMANDE..5
3.3 - FONCTIONNEMENT .....5
3.3.a - Touche ON/OFF (A1) 5
3.3.b- Touche minuteur (A2)....5
3.3.c - Touche humidificateur (A3)......6
3.3.d- Touche plasma (A4) 6
3.3.e- Touche brume (A5) 6
3.3.f - Touche émission brume (A6)......6
3.3.g - Touche mode (A7)....6
3.3.h - Blocage commandes (A8)......6
3.4 - AUTRES FONCTIONS....7
$$ \text { Medium } (\clubsuit) \dashrightarrow \text { Low } (\clubsuit) \dashrightarrow \text { High } (\clubsuit) \dashrightarrow \text { Medium } (\clubsuit) \dashrightarrow \dots $$
natural_image
Illustration of a hand using a power plug to switch an electrical outlet (no text or symbols present)natural_image
Illustration of a hand using a power plug to install an electrical socket (no text or symbols present)$$ \text { Medium } (\clubsuit) \dashrightarrow \text { Low } (\clubsuit) \dashrightarrow \text { High } (\clubsuit) \dashrightarrow \text { Medium } (\clubsuit) \dashrightarrow \dots $$
natural_image
Illustration of a hand using a power plug to switch an electrical outlet (no text or symbols present)0 -WAARSCHUWINGEN....1
0.1 - ALGEMENE INFORMATIE ....1
0.2 - SYMBOLLEN 1
0.2.1 - Pictogrammen .... 1
0.3 - ALGEMEEN ADVIES ......2
1 - VOORNAAMSTE KENMERKEN .... 4
2 - INSTRUCTIES VOORAFGAAND AAN HET GEBRUIK .... 4
2.1 - POSITIONERING......4
2.2 - VULLEN 4
2.2.1 - Aromacompartiment (7)....5
3 - INSTRUCTIES VOOR HET GEBRUIK......5
3.1 - GEBRUIK VAN HET APPARAAT ....5
3.1.a - Voorafgaande handelingen ....5
3.2 - DISPLAY EN BEDIENINGSPANEEL .....5
3.3 - WERKING 5
3.3.a - ON/OFF-toets (A1)....5
3.3.b - Timertoets (A2)......5
3.3.c - Luchtbevochtigingstoets (A3)......6
3.3.d - Plasmatoets (A4)....6
3.3.e - Neveltoets (A5)....6
3.3.f - Nevelemissietoets (A6) ......6
3.3.g - Modustoets (A7)....6
3.3.h - Blokkering bedieningsorganen (A8)......6
3.4 - ANDERE FUNCTIONS ......7
5 - GIDS VOOR PROBLEEMOPLOSSING......8
ILLUSTRATIES
2 - INSTRUCTIES VOORAFGAAND AAN HET GEBRUIK
2.1 - POSITIONERING (Afb.1)

$$ \text { Medium } (\clubsuit) \dashrightarrow \text { Low } (\clubsuit) \dashrightarrow \text { High } (\clubsuit) \dashrightarrow \text { Medium } (\clubsuit) \dashrightarrow \dots $$
natural_image
Illustration of a hand using a power plug to install an electrical socket (no text or symbols present)5 - GIDS VOOR PROBLEEMOPLOSSING
3.4 - INNE FUNKCJE 7
2 - INSTRUKCJE PRZED UŻYCIEM
2.1 - USTAWIENIE (Rys.1)

natural_image
Illustration of a hand using a power plug to switch an electrical outlet (no text or symbols present)2.2.1 - Recipient arome (7) 5
3 - INSTRUCTIUNI DE UTILIZARE......5
3.1 - UTILIZAREA APARATULUI 5
3.1.a - Operatiuni preliminare ....5
3.2 - DISPLAY ŞI PANOU COMENZI .....5
3.3 - FUNCTIONARE ....5
3.3.a - Buton ON/OFF (A1) 5
3.3.b - Buton timer (A2) 5
3.3.c - Buton umidificator (A3) 6
3.3.d - Buton plasmă (A4)....6
3.3.e - Buton aerosoli (A5)....6
3.3.f - Buton nebulizare (A6)......6
3.3.g - Buton mod de functionare (A7) ......6
3.3.h - Blocare comenzi (A8) ......6
3.4 - ALTE FUNCTII 7
2.2.1 - Recipient arome (7)
$$ \text { Mediu } (\clubsuit) \dashrightarrow \text { Scăzut } (\clubsuit) \dashrightarrow \text { Ridicat } (\clubsuit) \dashrightarrow \text { Mediu } (\clubsuit) \dashrightarrow \dots $$
natural_image
Illustration of a hand using a power plug to switch an electrical outlet (no text or symbols present)3.3.a - ON/OFF-knapp (A1)....5
3.3.b - Timer-knapp (A2) 5
5 - GUIDE FÖR PROBLEMLÖSNING......8
ILLUSTRATIONER
$$ \text { Medium } (\clubsuit) \dashrightarrow \text { Low } (\clubsuit) \dashrightarrow \text { High } (\clubsuit) \dashrightarrow \text { Medium } (\clubsuit) \dashrightarrow \dots $$
natural_image
Illustration of a hand using a power plug to switch an electrical outlet (no text or symbols present)3.4 - MUUT TOIMINNOT....7
$$ \text { Medium } (\clubsuit) \dashrightarrow \text { Low } (\clubsuit) \dashrightarrow \text { High } (\clubsuit) \dashrightarrow \text { Medium } (\clubsuit) \dashrightarrow \dots $$
3.4 - MUUT TOIMINNOT
3.4.a - Led-valo
natural_image
Illustration of a hand using a power plug to switch an electrical outlet (no text or symbols present)$$ \text { Medium } (\clubsuit) \dashrightarrow \text { Low } (\clubsuit) \dashrightarrow \text { High } (\clubsuit) \dashrightarrow \text { Medium } (\clubsuit) \dashrightarrow \dots $$
natural_image
Illustration of a hand using a power plug to switch an electrical outlet (no text or symbols present)natural_image
Illustration of a hand using a power plug to install an electrical socket (no text or symbols present)2 - CO JE TŘEBA UDĚLAT PŘED ZAHÁJENÍM POUŽÍVÁNÍ
natural_image
Illustration of a hand using a power plug to install an electrical socket (no text or symbols present)$$ \text { Medium } (\clubsuit) \dashrightarrow \text { Low } (\clubsuit) \dashrightarrow \text { High } (\clubsuit) \dashrightarrow \text { Medium } (\clubsuit) \dashrightarrow \dots $$
2.2 - OPFYLDNING....4
2.2.1 - Skuffe til duftstoffer (7) 5
3-BRUG 5
3.1 - BRUG AF APPARATET....5
$$ \text { Medium } (\clubsuit) \dashrightarrow \text { Low } (\clubsuit) \dashrightarrow \text { High } (\clubsuit) \dashrightarrow \text { Medium } (\clubsuit) \dashrightarrow \dots $$