Aqua Pure - Humidifier OLIMPIA SPLENDID - Free user manual and instructions
Find the device manual for free Aqua Pure OLIMPIA SPLENDID in PDF.
| Product type | Ultrasonic humidifier |
| Brand | Olimpia Splendid |
| Model | Aqua Pure |
| Use | Domestic |
| Water tank | Transparent, removable |
| Tank capacity | Not specified in the manual |
| Dimensions (approx.) | 30 x 20 x 35 cm (estimate) |
| Weight (approx.) | 2 kg (estimate) |
| Power supply | 220-240 V ~ 50 Hz (typical value) |
| Power | Not specified |
| Main functions | Adjustable hygrostat (40-75% RH or continuous operation), warm/cool mist, timer (1-12 h or continuous), 3 mist levels, night light, 360° nozzle |
| Display | LED with humidity and timer indicator |
| Automatic shut-off | When water runs out |
| Mist type | Ultrasonic |
| Recommended water | Tap water or distilled water |
| Daily maintenance | Empty, rinse and wipe the tank and tray daily |
| Weekly cleaning | Clean the ultrasonic transducer, descale if necessary |
| Descaling | With diluted white vinegar |
| Cleaning brush | Provided, for the ultrasonic disc |
| Safety | Do not use additives, do not immerse in water, do not block openings, place on a stable surface away from water |
| Spare parts | Not specified in the manual |
| Repairability | Do not open the motor yourself, warranty voided |
| Warranty | Voided if additives used or unauthorized opening |
| Included accessories | Cleaning brush |
Frequently Asked Questions - Aqua Pure OLIMPIA SPLENDID
User questions about Aqua Pure OLIMPIA SPLENDID
0 question about this device. Answer the ones you know or ask your own.
Ask a new question about this device
Download the instructions for your Humidifier in PDF format for free! Find your manual Aqua Pure - OLIMPIA SPLENDID and take your electronic device back in hand. On this page are published all the documents necessary for the use of your device. Aqua Pure by OLIMPIA SPLENDID.
USER MANUAL Aqua Pure OLIMPIA SPLENDID
WHEN USING ELECTRICAL APPLIANCES, BASIC SAFETY PRECAUTIONS SHOULD ALWAYS BE FOLLOWED TO REDUCE THE RISK OF FIRE, ELECTRIC SHOCK, AND INJURY TO PERSONS, INCLUDING THE FOLLOWING:

This product should be used only in accordance with the specifications outlined in this manual. Usage other than what has been specified here may result in serious injury.
1 - CAUTION This is an electrical appliance and requires attention when in use.
2 - CAUTION To reduce the risk of severe burns, keep this product out of the reach of children and pets.
3 - CAUTION Do not allow children to play with any product packaging such as plastic bag
4 - Disassembly, repair or remodelling by an unauthorized person may result in serious harm and will void the manufactures warranty.
5 - Do not operate the appliance in case of damaged cord or plug, after the appliance malfunctions, or if it has been dropped or damaged in any manner. Return appliance to manufacturer for examination, electrical or mechanical adjustment or repairing.
6 - Always place this humidifier on a firm, flat and level surface at least 60cm from the floor. This humidifier may not work properly on an uneven surface.
7 - Do not block air inlet or outlet.
8 - Do not place this product on cloth, carpet or an absorbent surface. This may block air inlet.
9 - Do not place humidifier near heat sources such as stoves, radiators and heaters
10 - Do not place humidifier near electrical outlet
11 - This product releases mist. Do not place this humidifier directly on wood furniture, flooring or any surfaces that could be damaged by water. Manufacturer does not accept any liability for damage in the case of the unit being placed incorrectly.
12 - Before filling or cleaning the unit, make sure it is unplugged.
13 - Once the humidifier has been plugged in, do not tilt or move the unit.
14 - Do not remove the water tank from the unit while it is on.
15 - Do not handle the plug with wet hands.
16 - Do not excessively bend, twist, pull or damage the power cord.
17 - Avoid placing this product where the humidity spout is pointed directly at an object or person.
18 - Do not inhale the mist/vapor expelled from the product or drink water from the tank.
19 - Do not fill the water tank with hot or boiling water.
20 - Do not use this product in direct sunlight or near a heat source such as a stove, heater or radiator.
21 - If the water tank becomes cracked or damaged, do not use.
22 - Do not keep this product running for an extended period of time.
23 - Unplug the cord when unit is not in use for an extended period of time and/or when no one is home.
24 - Do not keep water in the tank when not in use for an extended period of time.
25 - Do not clean the unit, water tank or water reservoir with detergents or chemicals of any kind.
26 - The use of water additives including ethereal/essential oils, fragrances, eucalyptus, water conditioners, etc. will damage the appliance materials and as a consequence the whole unit.
Any use of such additives will void the manufactures warranty.
27 - Do not use this product near any other electronic device.
28 - Do not cover the spray spout at any time during use. Do not put anything on or in the tank.
29 - When unplugging from outlet hold humidifier securely.
30 - Do not place cord over objects.
31 - Do not get water in or on the power cord or where it connects to the product.
32 - Do not use near a sink.
33 - Do not touch the water tank during operation.
34 - Do not submerse the unit in water or pour water on the unit or in the humidity spout.
35 - When emptying water from water tank, pour on drain side.
36 - Do not cover the spout with cloth or hand and do not use without the spout.
37 - Use clean or distilled water in tank. Hard water areas will require more frequent cleaning.
38 - If moisture forms on the walls or windows of the room, turn off the humidifier. The room already has plenty of humidity and additional moisture may cause damage.
1 - MAIN FEATURES AND FUNCTIONING
Adjustable humidistat to maintain the relative humidity selected.
Warm/cool mist.
Transparent water tank to ensure the water level is visible.
Night light can be controlled on/off.
3 levels of moisture control and 12 timer settings.
Misting nozzle with 2 openings rotates 360 degrees.
Unit automatically switches off when the water is empty.

Select a firm, level, flat location at least 15cm from any wall or object for proper air flow. Place the humidifier on a water-resistant surface, as water can damage furniture and some flooring. Do not place unit directly on carpet, towels, blankets or other absorbent surfaces.
We will not accept responsibility for damage caused by water spillage.
FILLING
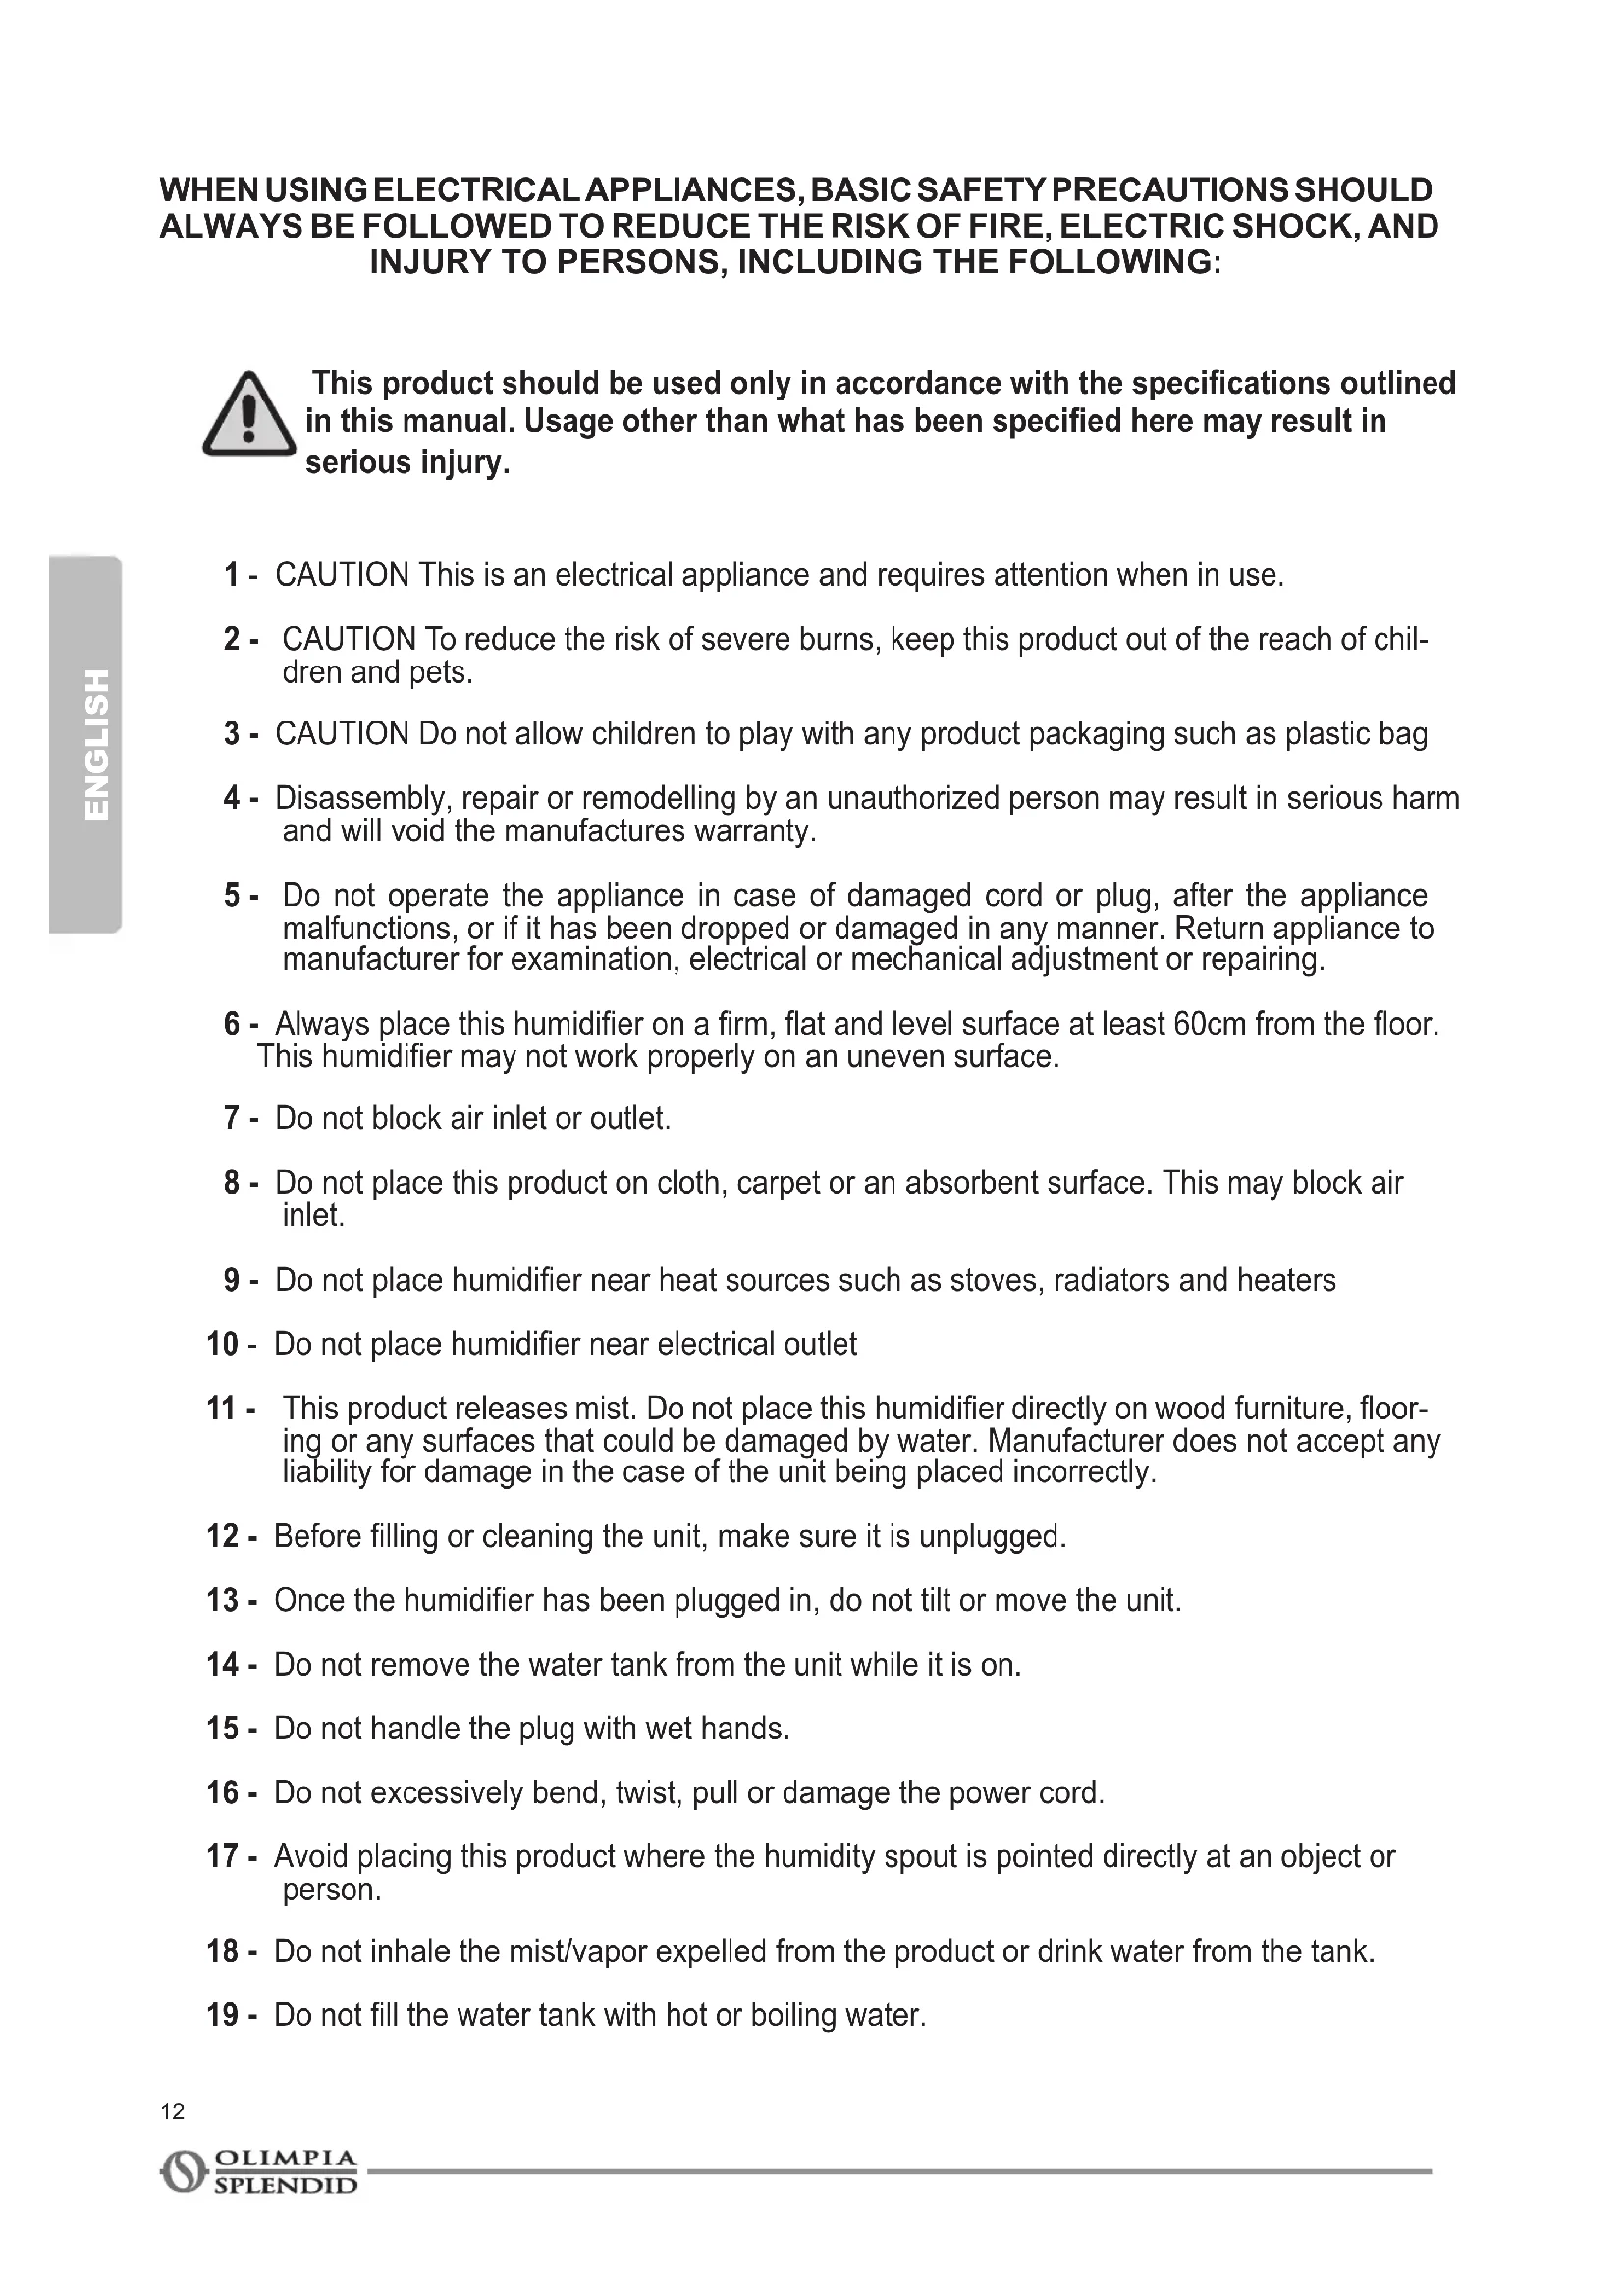
Make sure unit is unplugged.
- Separate the tank from the base of the unit.
-
Pour cool, clean water directly into the tank. Do not pour anything but water into the tank.
-
Attach tank to base of unit.
-
Before turning ON the humidifier make sure there is water in the Bowl.
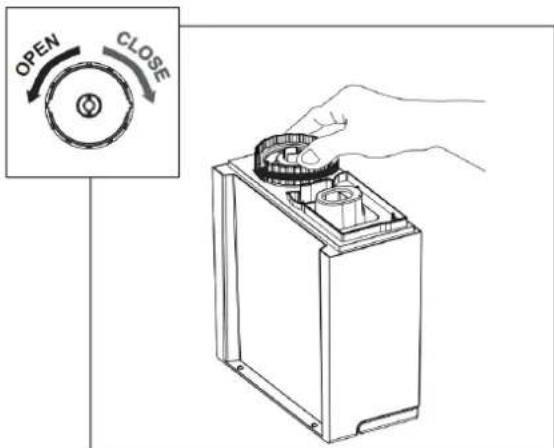
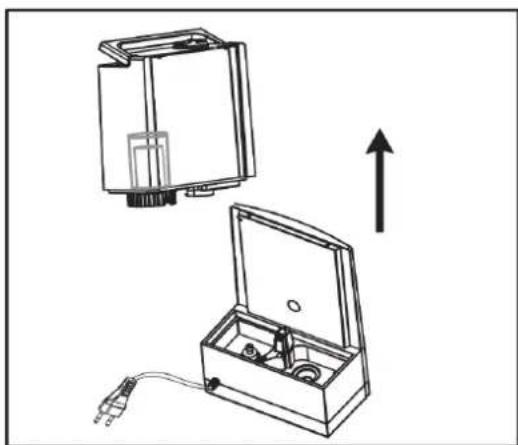
- Flip over water tank and open the tank lid, turning it to the left.
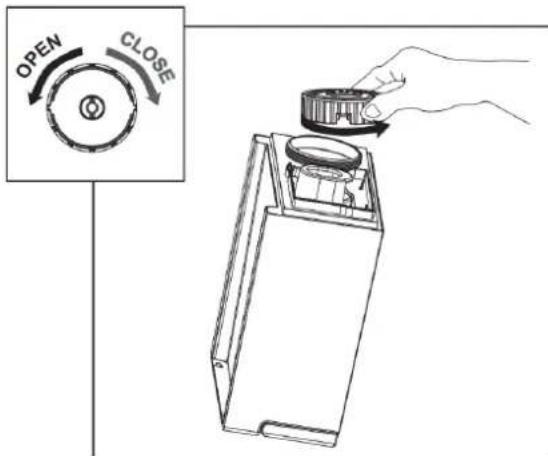
- Close the tank lid, turning it to the right. It is important to FIRMLY secure cap after filing the tank with water.
3 - OPERATING INSTRUCTIONS
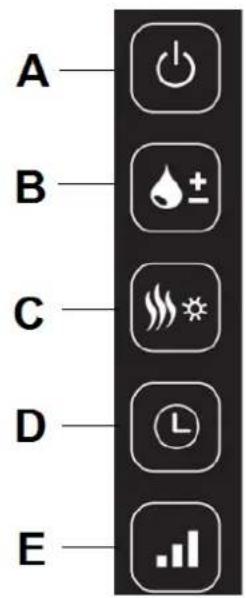
A) ON/OFF
Press Button A to turn the humidifier ON and OFF.
B) Set humidity
Set the desired humidity in % by pressing Button B. We recommend a relative humidity of between 50% and 60% . The appliance can be regulated from 40% to 75% or continuous operation "CO". If the humidity exceeds the desired setting, the appliance will turn itself off. The appliance will not turn itself off if it has been set for continuous operation "CO".
The desired value is shown while you are making the selection. After a few seconds, the display automatically switches to the current value.
C) Warm Mist and Night Light
Press Button C to turn the Warm Mist on and off.
-
1st Press: Warm Mist ON and Night Light OFF
-
2^nd Press: Warm Mist OFF and Night Light ON
-
3^rd Press: Warm Mist OFF and Night Light OFF
The default setting is Warm Mist ON and Night Light ON, the humidifier will come back to default setting when on the above 4th press.
D) Timer setting
Press Button D to determine the operating time, it can be regulated between 1 and 12 hours or for continuous operation "CO".
E) Mist emission setting
Press the Button E to adjust the low, medium and high mist emission. We recommend to set low mist emission for night use.
Before clearing, turn off the power and unplug the appliance from the electrical outlet. Lift off the tank of the humidifier from the housing. Carry the water tank and the housing to a sink, drain all the remaining water. Drain and rinse water tank and housing to remove any sediment and dirt. Wipe clean and dry with clean soft cloth or paper towel. Refill the water tank with cool tap water as instructed in filling water tank paragraph.

It is necessary to remove daily any residual water, from both the tank and the tank and the bowl, then clean and dry both and finally refill with new and clean tap water.
5 - CLEANING

Always unplug the unit before servicing in any way.
GENERAL CLEANING
- Inside the bowl. Pour excess water out of the unit. Wash out the unit with fresh water using the cleaning brush and a soft cloth as needed. Do not submerse the base of the unit into water, or allow water to enter inside the dry air exhaust port of the unit.
- Water tank. Empty water tank. Remove mist nozzle and clean the mist tube with fresh water and a light brush (bottle cleaning brush is recommended).
- Outer surface of the unit. Wipe the surface of the unit with a soft, damp cloth if needed. If you notice an accumulation of water during usage, reduce humidity and dry outer surface with a cloth.
- Ultrasonic Transducer. If you use the hard water, distilled or tap water, you should clean the transducer weekly.
DESCALING
- Depending on usage and water type, cleaning to remove scale may be required weekly or every other week to optimize unit performance.
- If you live in a hard water area, we recommend the use of distilled water or soften water for your humidifier. This will help reduce the precipitation of minerals or 'white dust'.
- Do not clean the unit or water tank with detergents or cleaning chemicals of any kind.
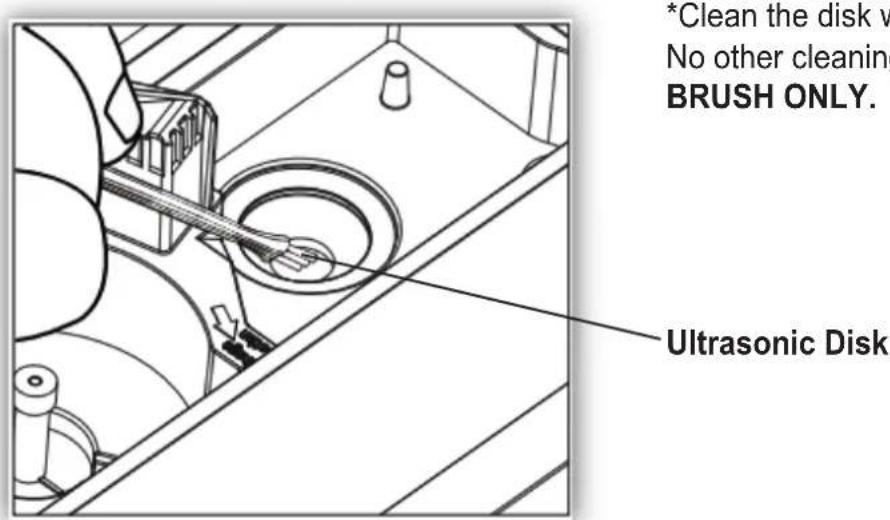
ULTRASONIC DISK
- Unplug unit.
- Remove the tank and empty all water from unit bowl and tank.
- Locate the ultrasonic disk on the inside center of the base unit.
- Use ONLY the enclosed cleaning brush to gently clean disk and remove build up and deposits.
Do not scrub or scrape the ultrasonic disk.
If scale becomes difficult to remove with brush:
- Fill the bowl with mixture of 1 tea spoon of white vinegar and 1 tea spoon of water
- Let solution stand for 5 minutes.
- With the vinegar in the bowl, clean all interior surfaces with a soft cloth or brush to help remove scale.
- Also check mist nozzle and mist tube in water tank. Clean as needed.
- Rinse the Base thoroughly with water to remove scale and vinegar solution.
6 - END OF SEASON STORAGE
- Follow the Cleaning and Descaling instructions when the humidifier will be stored at the end of the season.
- Dry the humidifier completely before storing. DO NOT store with water inside the bowl or Water Tank.
- Pack the unit in its original carton and store in a cool, dry location.
NOTE: IF YOU EXPERIENCE A PROBLEM DO NOT ATTEMPT TO OPEN THE MOTOR HOUSING YOURSELF. DOING SO MAY VOID YOUR WARRANTY AND CAUSE DAMAGE TO THE HUMIDIFIER OR PERSONAL INJURY.
7 - TROUBLESHOOTING GUIDE
| PROBLEM SOLUTION | |
| Water vapor and humidity are not produced. | Power plug: Unplug and then try again. Power Failure: When the power is returned, try again. Tank Installation: Make sure the tank is correctly attached. The surface of the ultrasonic disk is dirty: Clean ultrasonic disk. |
| Air blows but water vapor is not produced. | Excessive Water: Remove a certain amount of water from the tank. Detergent residue and/or oil ingredients from cosmetics, etc may be in tank; wash out tank and try again. The surface of the ultrasonic disk is dirty: Clean ultrasonic disk. If you use hard water, replace with softer water. |
| Humidity level is low. The surface | of the ultrasonic disk is dirty: Clean ultrasonic disk. The water in the unit is too cold: Replace with cool, but not cold water. |
| The humidity has a bad smell. Poor maintenance or dirty water: Clean the product thoroughly, and fill it with fresh water. | |
| White dust is forming on nearby furniture. | Hard water may deposit a certain of dust. Dust in the air also settles because of added humidity in the room. Use distilled water if this becomes a nuisance. |
| Unit has stopped working. No or low water. Unplug unit and refill tank. | |
| Water is accumulating outside of unit or area surrounding unit. | Saturation of humidity. Lower mist control setting. Unit not level and water is accumulating. Unplug and place on level surface. Point spray away from objects. Raise unit on a water-resistant level surface at least 60 cm from the floor. |
| Water dripping when refilling. Water remaining on bottom of tank. Wipe tank or tilt to drain before transporting. | |
| Increased noise level. | Unit must be placed on a flat, level, hard surface. Make sure it is NOT placed on a soft or absorbent surface. |
| Blue light sign "--" on display indicates low water. Unplug and refill tank. | |

This symbol on the product or its packaging indicates that the appliance cannot be treated as normal domestic trash, but must be handed in at a collection point for recycling electric and electronic appliances.
Your contribution to the correct disposal of this product protects the environment and the health of your fellow men. Health and the environment are endangered by incorrect disposal.
Further information about the recycling of this product can be obtained from your local town hall, your refuse collection service, or in the store at which you bought the product.
This regulation is valid only in EU member states.
QUAND L'ON UTILISE DES APPAREILS ÉLECTRIQUES, IL EST TOUJOURS NECESSAIRE D'ADOPTER DES PRECAUTIONS DE SECURITE DE BASE POUR REDUIRE LES RISQUES D'INCENDIE, D'ÉLECTROCUTIONS ET D'ACCIDENTS CORPORELS, Y COMPRIS LES PRECAUTIONS SUIVANTES: