
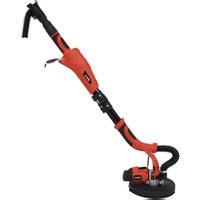
YT09676 - Grinder Yato - Free user manual and instructions
Find the device manual for free YT09676 Yato in PDF.
| Product type | Pneumatic grinder (die grinder) |
| Brand | Yato |
| Model | YT09676 |
| Weight | 0.48 kg |
| Air inlet diameter | 1/4" (6.3 mm) |
| Flexible hose diameter (internal) | 3/8" (10 mm) |
| Free speed | 20,000 min⁻¹ |
| Collet diameter (tool holder) | 6 mm |
| Maximum accessory diameter | 50 mm |
| Maximum working pressure | 0.63 MPa |
| Required air flow (at 6.2 bar) | 113 l/min |
| Sound pressure level (EN ISO 15744) | 92.0 dB(A) ± 3.0 |
| Sound power level (EN ISO 15744) | 103.0 dB(A) ± 3.0 |
| Vibration level (EN 28662-1) | 1.4 m/s² ± 1.5 |
| Power source | Compressed air |
| Maintenance and cleaning | Regular lubrication with SAE 10 oil, cleaning of filter and lubricator, draining of compressor condensate |
| Safety | Wear safety glasses, gloves, and hearing protection; do not use in explosive atmosphere; cut off air supply before changing accessories |
| Spare parts and repairability | Inserted tools (grinding wheels, discs), seals, filters; repair by qualified personnel |
| General information | Use with a suitable compressor, respect maximum pressure, follow safety instructions in the manual |
Frequently Asked Questions - YT09676 Yato
User questions about YT09676 Yato
0 question about this device. Answer the ones you know or ask your own.
Ask a new question about this device
Download the instructions for your Grinder in PDF format for free! Find your manual YT09676 - Yato and take your electronic device back in hand. On this page are published all the documents necessary for the use of your device. YT09676 by Yato.
USER MANUAL YT09676 Yato
Read the operating instruction
Wear hearing protectors
Gehorschutz tragen
Tb30BaTcBcpeDCTBAMM 3aunTb CnyxA
Kopntyteb 3acobam 3axcty cnxyx
Vartoti ausines klausal apsaugo
Jalieto dzirdes drosilbas lidzeklu
Použlvej chrániche sluchu
Použlavajchraniče sluchu
Hasznajon fulvedot!
Intrebuinjeazantifoane
Use protectores de la vista
Wear protective goggles
Schutzbrille tragen
Pb308aTbC3aUHTbIMOOKaM
KopncTyIeB 3axnchmM OKyIpaM
Vartok apsauginius akinius
Jalieto drostbas brilles
Pouzivej ochranné bryle
Použivaj ochranné okuliare
Maximum air pressure
Max. Betriebsdruck
Makcimmanbloe pafooyee daanene
MaKcMaMbHn poBouH TnCK
Maksimalus darbinis sleqis
Maksimäls darba spiediens
Pneumatic grder is p wth a stream of compressed air at the appropriate pressure By using the and cutting and grinding wheels it is possible to cut and grind various materials. Correct, reliable, and safe operation of the tool is dependent on its proper use, therefore:
Prior to working with the tool, you should read all the instruction and keep it around.
For any damage or injuries caused by the tool misuse, failure to comply with safety regulations and instructions in this manual, the supplier is not responsible. The tool misuse causes also the loss of user rights to the guarantee and warranty. as it would be a non-compliance with the contract.
EQUIPMENT
The grder is equipped with a coupling to attach it to the pneumatic system. The device is also equipped with the keys, which allow you to attach an accessory in the holder
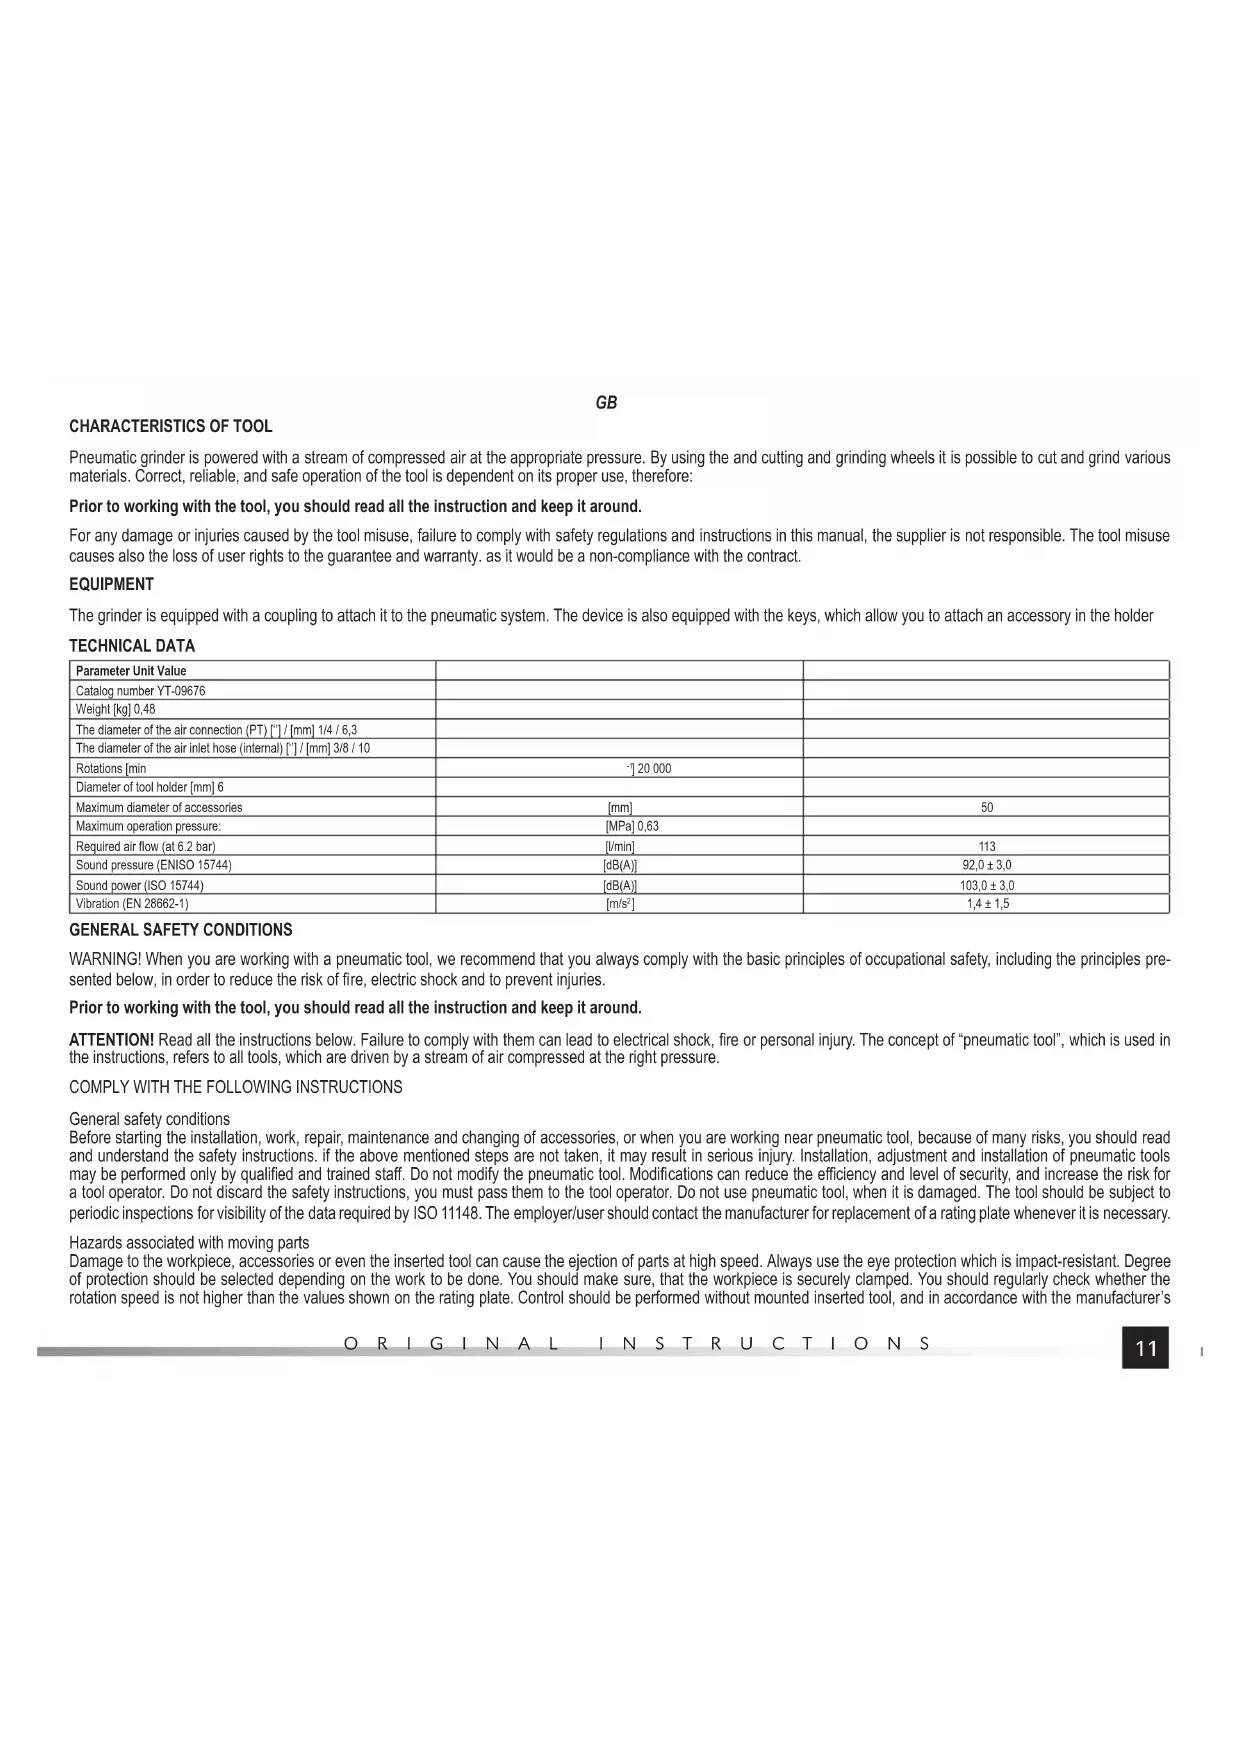
TECHNICAL DATA
| Parameter Unit Value | ||
| Catalog number YT-09676 | ||
| Weight [kg] 0,48 | ||
| The diameter of the air connection (PT) ["] / [mm] 1/4 / 6,3 | ||
| The diameter of the air inlet hose (internal) ["] / [mm] 3/8 / 10 | ||
| Rotations [min] | 20000 | |
| Diameter of tool holder [mm] 6 | ||
| Maximum diameter of accessories | [mm] | 50 |
| Maximum operation pressure: | [MPa] 0,63 | |
| Required air flow (at 6.2 bar) | [l/min] | 113 |
| Sound pressure (ENISO 15744) | [dB(A)] | 92.0 ± 3.0 |
| Sound power (ISO 15744) | [dB(A)] | 103.0 ± 3.0 |
| Vibration (EN 28662-1) | [m/s2] | 1.4 ± 1.5 |
GENERAL SAFETY CONDITIONS
WARNING! When you are working with a pneumatic tool, we recommend that you always comply with the basic principles of occupational safety, including the principles presented below, in order to reduce the risk of fire, electric shock and to prevent injuries.
Prior to working with the tool, you should read all the instruction and keep it around.
ATTENION! Read all the instructions below. Failure to comply with them can lead to electrical shock, fire or personal injury. The concept of "pneumatic tool", which is used in the instructions, refers to all tools, which are driven by a stream of air compressed at the right pressure.
COMPLY WITH THE FOLLOWING INSTRUCTIONS
General safety conditions
Before starting the installation, work, repair, maintenance and changing of accessories, or when you are working near pneumatic tool, because of many risks, you should read and understand the safety instructions. If the above mentioned steps are not taken, it may result in serious injury. Installation, adjustment and installation of pneumatic tools may be performed only by qualified and trained staff. Do not modify the pneumatic tool. Modifications can reduce the efficiency and level of security, and increase the risk for a tool operator. Do not discard the safety instructions, you must pass them to the tool operator. Do not use pneumatic tool, when it is damaged. The tool should be subject to periodic inspections for visibility of the data required by ISO 11148. The employer/user should contact the manufacturer for replacement of a rating plate whenever it is necessary.
Hazards associated with moving parts
Damage to the workpiece, accessories or even the inserted tool can cause the ejection of parts at high speed. Always use the eye protection which is impact-resistant. Degree of protection should be selected depending on the work to be done. You should make sure, that the workpiece is securely clamped. You should regularly check whether the rotation speed is not higher than the values shown on the rating plate. Control should be performed without mounted inserted tool, and in accordance with the manufacturer's
GB
recommendations. Make sure, that sparks and debris created during operation do not cause hazards. Disconnect the tool from its power supply before changing the inserted tool or before maintenance. You must constantly take into account the risk to bystanders.
Risks of getting tangled
The risk of getting tangled may cause choking, scalpng and/or injury, when loose clothing, jewelry, hair or gloves are not kept away from tools or accessories.
The risks associated with the work
To prevent cuts of hands and other parts of the body. avoid contact with a rotating spindle and the inserted tool. Use of the tool may expose the operator's hands for threats, such as crushing, impact, cut-off, abrasion and heat. You should dress appropriate gloves to protect your hands. The operator and maintenance personnel should be physically able to cope with the quantity, the weight and power of the tool. Grip the tool properly. Be ready to withstand normal or unexpected movements and always keep both hands ready. Keep balance and to ensure the safe foot positioning. Wear safety glasses, it recommended to use tight gloves and protective clothing. Do not use the rotary file at a speed which is exceeding the speed rating. When you are working with tool over your head, use protective helmet. Be careful because the inserted tool is spinning for some time after the release of the actuator. Depending on the workpiece, you should take into account the risks of explosion or fire.
The risks associated with repetitive movements
During the application of the pneumatic tool for work consisting of the repetition of movements, the operator is exposed to experience discomfort in hands, arms, shoulders, neck or other parts of the body. In the case of use of pneumatic tool, the operator should take a comfortable posture for correct setting of feet and should avoid postures that are strange or not providing the balance. The operator should change posture during the long work, this will help to avoid discomfort and fatigue. If the operator is experiencing symptoms such as: persistent or recurring discomfort, pain, pulsed pain, tingling, numbness, burning or stiffness. Operator should not ignore them, should tell the employer about it and consult a doctor.
The risks associated with accessories
Disconnect tool from the power supply before changing the inserted tool or accessory.
Use accessories and supplies only in sizes and types, which are recommended by the manufacturer. Do not use accessories in other sizes and types. Avoid direct contact with the inserted tool during or immediately after work, it can be hot or sharp.
Check whether the maximum speed of the inserted tool is greater than the rated speed of a sander or polisher. Check whether the maximum speed of the inserted tool is greater than the rated speed of the tool. You should never mount a grinding wheel, cutting wheel or milling cutter on the tool grinding machine. The grinding wheel, which has been done damaged can cause very serious injury or death. Do not use cracked or broken wheels or wheels that have been dropped. Use only the allowed inserted tools of an appropriate diameter of the mandrel. Please pay attention, that the rotational speed of the installation point must be reduced due to the increase in the shaft length between the end of the sleeve, and the installation point. Make sure, that the minimum length of the mandrel which is clamped in the tool holder is at least 10mm (you should also take into account the recommendations of the manufacturer of inserted tool). Beware of errors by adjusting the diameter of the mandrel of inserted tools and clamping of the pneumatic tool.
Risks associated with the workplace
Slips, trips and falls are the main causes of injuries. Beware of slippery surfaces caused by the use of tools, and threats of tripping caused by the pneumatic system. Proceed with caution in an unknown environment. There may be hidden threats, such as electricity or other utility lines. Pneumatic tool is not intended for use in potentially explosive atmospheres and is not isolated from contact with electricity. Make sure, that there are no electric wires, gas pipes, etc., that can cause a threat in the event of their damage by using the tool.
Hazards arising from vapors and dust
Dust and fumes caused by using a pneumatic tool can cause bad health condition (such as cancer, birth defects, asthma and/or inflammation of the skin). There are necessary: a risk assessment and implementation of appropriate control measures in relation to those risks. The risk assessment should include the effect of dust created by using tools and the possibility of excitation of the existing dust. The air outlet must be aimed to minimize generating dust in a dusty environment. Where dust or fumes are created, priority should be to control them at the source of their emission. All integrated functions and equipment for collection, extraction or reduction of dust or fume should be properly operated and maintained in accordance with manufacturer's recommendations. Wear suitable respiratory protective equipment, in accordance with the instructions of an employer and in accordance with the requirements of hygiene and safety. Service and maintenance of the pneumatic tool should be carried out according to the recommendations of the manual, this will minimize the emission of fumes and dust. You should select, maintain and exchange inserted tools according to the manual, to prevent increase of and dust. Treatment of certain materials can cause fumes and dust, that produce a risk of explosion.
Noise hazard
Exposure, without any protection, for high noise levels can cause permanent and irreversible hearing loss and other problems, such as tinnitus (ringing, buzz, whistling or humming in the ears). It is necessary to perform the risk assessment and implement appropriate control measures in relation to those risks. The appropriate checks, performed in order to reduce the risk, may include activities such as: application of insulation materials to prevent the "ringing" of the workpiece. Use hearing protection in accordance with the instructions
GB
of employer and in accordance with the requirements of hygiene and safety. Service and maintenance of the pneumatic tool should be carried out according to the recommendations of the manual, to avoid the unnecessary increase of noise level. If the pneumatic tool has a muffler, you should always make sure that it is correctly mounted when you use the tool. Select, maintain and replace worn inserted tools according to the recommendations of the manual. This will allow to avoid the unnecessary increase in noise.
Risks of vibrations
Exposure to vibration may cause permanent damage to the nerves and blood supply to the hands and arms. You should stay away from the screw driver sockets. You should wear warm clothing when working at low temperatures and you should keep your hands warm and dry. If you experience numbness, tingling, pain or skin whitening in the fingers and hands, you should discontinue the use of pneumatic tool, and then inform your employer and seek medical advice. Operation and maintenance pneumatic tool according to the recommendations of the manual, will allow to avoid the unnecessary increase of vibration. Do not use worn or ill-fitting caps, because it can cause a significant increase in the level of vibration. Select, maintain and replace worn inserted tools according to the recommendations of the manual. It will allow to avoid the unnecessary increase of vibration. Where it is possible the covering assembly should be used. If it is possible, you should subpart the weight of the tool in a rack, tensioner or equivalent. Hold the tool, with light but a firm grip, taking into account the required reaction forces, because the risk from vibration is usually much larger, when the grip force is higher. An improperly mounted or damaged inserted tool can cause an increase in vibration.
Additional safety instructions for pneumatic tools
Air under pressure can cause serious injury:
-
always shut off the air supply, drain hose of air pressure and detach tool from air supply, when it is not in use, before changing accessories or performing repairs;
-
never direct the air stream at yourself or anyone else.
Hose hitting can cause serious injury. You should always check for damaged or loose hoses and fittings. Cold air should be directed away from the hands
Every time when there are used universal screwed connection (claw couplings), you should apply the protecting pins and connectors against the possibility of damage to the connections between the hoses and between the hose and tool. Do not exceed the maximum air pressure specified for the tool.
Never carry the tool, by holding it by the hose.
OPERATING CONDITIONS
You should make sure that the source of compressed air allows you to create the proper working pressure and that it provides the required air flow. In the case of a too high air pressure, a reducer should be used together with a safety valve. The pneumatic tool must be powered by the system of a filter and lubricator. This will ensure, at the same time, the air, which is pure and moistured by oil. The state of the filter and lubricator should be checked before each use, and possibly clean the filter or refill shortage of oil in the lubricator. This will ensure proper operation of the tool and will extend its service life.
If you use any additional handles or supporting racks, you should make sure, that the tool is mounted correctly and securely.
You should adopt an appropriate posture to counteract the normal or unexpected movement of the tool, caused by its torque.
Be careful of your work surroundings, the grinder machine can easily cut through something.
Do not use any grinding wheels and tools designed for grinding the their surface side, for cutting.
Do not use any cutting wheels or wheels for milling.
Self-mounting grinding wheels should be concentric located on the grinder pad.
When you turn off the grinder, your should wait with its stacking, until a complete stop to the rotating tool.
Before the installation of additional equipment, your should make sure the maximum speed of the equipment is higher than the speed of the grinder. Do not use any equipment with handles of other dimensions than those specified in the instructions. Insert tool must be firmly and securely mounted in the tool holder. Do not use reduction rings and sleeves, in order to match the diameter of the tool spindle and grinding wheel.
A
Do not operate the grinder in a place with a high risk of explosion. The sparks, which are produced during operation, can cause a fire.
After mounting the grinding wheel you should run it for about 30 seconds in a safe position. Immediately stop the device, if you observe a large vibration or other defects in the grinder behavior.
Any irregularities must be removed before the next launch of the grinder.
You should make sure that the grinding speed is not greater than the speed which is specified on the rating plate.
During processing of certain materials, poisonous or combustible dusts and fumes can be created. Work in well ventilated areas and use personal protective equipment.
When you are selecting safeguard measures you should take into account the type of workpiece.
You should make sure, that sparks and debris created during operation do not cause any hazards.
GB
Use personal protective equipment such as gloves, apron, helmet.
In the case of dropped tools with a mounted grinding wheel, before subsequent switching it on, you should carefully check the condition of the grinding wheel.
Before each use, you should check that none of the components of the product is damaged. If you notice any damage, you should replace the element immediately with new one, undamaged system component.
Before each use of the pneumatic system, you should dry the moisture condensed inside the tool, compressor and pipes.
Connecting the tool to pneumatic system
The figure shows the recommended connection of tool to the pneumatic system. Presented method will ensure the most efficient use of tool, and also it will extend the service life of the tool.
Let a few drops of oil with viscosity SAE 10 to the air intake.
To the thread of air inlet you should tightly and firmly screw the appropriate tip allowing for the connection of air supply hose. (II)
On the tool driver you should mount an appropriate tipl. When you work with pneumatic tools you should use only equipment designed to work with the impact tools.
Set the desired direction of rotation. The letter F means, that the rotation is clockwise, letter R that the rotation is counter-clockwise.
Where it is possible you can adjust the pressure (torque).
Connect the tool to an air system by using the hose with an inner diameter of 10mm / 3/8 . Make sure, that the strength of the hose is at least 1.38 MPa. (III)
Start the tool for a few seconds, making sure that it does not issue any suspicious sounds or vibrations.
Starting and stopping the tool
Caution! Before starting the pneumatic tool, make sure that the mounted inserted tool does not come into contact with any object or any body part.
The tool is operated by means of a lever which opens the air valve and thus ensures the supply of compressed air to the tool drive. If the lever is equipped with a lock that prevents the lever from being accidentally pressed. Turn the lock, so that it is parallel to the lever, and then pull the lever towards the tool housing. This will start the tool. Allow the tool to reach its rated speed and only then start working.
The tool stops when the pressure on the lever is released. The lever automatically returns to the rest position and the lock secures the lever. Please note that the inserted tool can still move for some time after. Do not put the tool away until the inserted tool has come to a complete standstill.
Installation and replacement of equipment (IV)
Make sure that the maximum speed of the equipment is higher than the speed of the grinder. You should follow the recommendations of manufacturers of grinding wheels in relation to their speed and the mandrel length, which should be mounted in the spindle.
Grab the spindle and unscrew the mounting nut until the handle will allow for mounting of the equipment.
Mount a piece of equipment, so at least 10mm of the mandrel is located inside the spindle.
By using keys, tightly and firmly screw the nut which is locking the spindle.
Operation of the sander
Choose the appropriate tool for a given operation mode. Before starting work, you must allow for grinding wheel to reach its full speed. Only the rotating grinding wheel should be applied to a workpiece.
You should apply only such pressure to the tool, which is required for the material processing. Too much pressure can damage the grinding wheels and increase the risk of injuries. During work the sparks can occur and workpiece fragments of the workpiece can tear off. You should ensure that sparks and tear-off fragments would not create risks in the workplace.
MAINTENANCE
Never use gasoline, solvent, or any other flammable liquid to clean the tool. The vapors can be ignited, causing the tool explosion and serious injury.Solvents, which are used to clean the tool holder and the body, can cause seals softening. Thoroughly the tool before starting your work.
In case of finding any irregularities in the tool operation, the tool you should be immediately disconnect from the pneumatic system.
All the elements of the pneumatic system must be protected against contamination. Contamination, which entered the pneumatic system can damage the tool and other air system components.
GB
Maintenance the tool before each use
Disconnect the tool from the pneumatic system.
Before each use, let a small amount of liquid preservative (e.g.. WD-40) through the air intake.
Connect the tool to pneumatic system and run for about 30 seconds. This will distribute the liquid preservative inside the tool interior and will clean it.
Again, disconnect the tool from the pneumatic system.
Let small amount of oil SAE 10 to the inside of the tool, through the air inlet and the holes intended for this purpose. It is recommended to use oil SAE 10 intended for maintenance of pneumatic tools. Connect the tool and run it for a short time.
Attention! WD-40 may not be used as an appropriate lubricating oil.
Remove excess of oil, that spill out through the holes. Left oil may damage the tool seals.
Other maintenance operations
Before each use, you should check whether the tool shows any traces of damages. Drivers, tool holders and the spindles must be kept clean.
Every 6 months or after 100 hours of operation, you must pass the tool for inspection by the qualified personnel in the repair shop. If the tool was used without the application of recommended air supply system, you should increase the frequency of the tool inspections.
Troubleshooting
You should stop using the tool immediately after the disguardy of any fault. Work with a defective tool can cause injury. Any repair or replacement of tool components must be carried out by qualifi ed personnel in authorized repair facility.
| Failure Possible solution | |
| The tool has too slow rotations or it does not start | Let a small amount of WD-40 through the air inlet. Run the tool for a few seconds. The blades may stick to the rotor. Run the tool for about 30 seconds. Lubricate the tool with small amount of oil. Attention! The excess of oil can cause a decrease in power of tool. In this case, you should clean the drive. |
| The tool starts and then slows down | The compressor does not provide proper air supply. The tool starts by the air collected in the tank of compressor. As the tank is emptying, the compressor has not kept pace with the refillling of air shortages. Connect the device to a more efficient compressor. |
| Insufficient power | Make sure that your hoses have an internal diameter of at least such as specified in the table in point 3. Check the set point of pressure, whether it is set to the maximum value. Make sure that the tool is properly cleaned and lubricated. In the absence of results, submit the tool for repair. |
Worn tools are secondary raw materials - it is forbidden to dispose of them together with household waste, because they contain substances harmful to human health and the environment! Please actively support the cost-effective management of natural resources and environmental protection by passing the used equipment to the point of storage for worn out devices. To reduce the amount of disposed waste it is necessary to re-use them, recycle or recover in another form.
MERKMALE DES WERKZEUGES
OnachOCTN, BbI3BaHHBie WymOM
Bo3dECTBmUyMa BbICOKO rpoBn63HaIeKaIe 3aunTb moKET cTaTb npHINHO NOCToHHIO Hne6paTMOM nOpEn Cnyx, a TaKke Dpynx np6Lem, TAKX KAK yuax (3BOH, kyykKaHHe, CBNT UINr dyHHe). He6xoDMIO OcEHNTPnCKN IN BHEpntb COOTBETCTBYUHMe CpeCTBA KOHTPOJRA HAD DAHNbIMN pAqKTOAM. COOTBETCTBYUHMI KOHTPOJIb C CEbIO CHNKeHn PnCKa MoKET BKIOHATb IcNOIb3OBaHMe DEMfnpHyOuNX MATEpHnAOB, PpEOITBpaUaHOUX,3BOH" o6pa5aTbBaEMORo npEMeTA. NcONb30BaTb CpeCTBA 3auNTbCnyxA CJeDyET B COOTBETCTBm C hCTpyMeHTa DOKNbOCCyIeCTBnBcR B COOTBETCTBm C Tpe6OBaHMAI NO TmNEHe 630NaChOCTN. 3KnIpyTAuaII INTexNHueCKOE 06cynkBAHme NHEBMATueCKO HhCTpyMeHT aDOKNbOCCyIeCTBnBcR B COOTBETCTBm C hCTpyKlIaMn IO 3KnIpyATAUIN - 3TO N03BOIT N36ExaTb HEHyKHO YBeMENHryPOBn WymA. EcnN HneBMATueCKIn NHCTpyMeHT OCHAeHg ITyWntEm, BCERda He6xoDMIO y6eITbC, YTO BO BPME IAONb3OBaHMA INHCTpyMeHTa OH yctAHOBn HPabINbHO. BblpaTb, 6cNyKBaTb N 3Amehrtb N3HOeHHBe CMeHHBe paOoune IHCTpyMeHTcNeDyET cOrnaCHO IHCTpyKlIaMn IO 3KnIpyATAUIN. 3TO N03BOIT N36ExaTb HEHyKHO YBeMENHryWymA.
Onachoctn,Bbl3BaHhIbe Bnpaunma
Bn6paJIMMOKET npNBCTN K Heo6pTUMOMY NOBpEXDEHIO HepBOB N KPOBOCHABeHn I KNTeINpy. Pyk CNEyET DEPAKATb HA COOTBETCTBYUcEem PACCTOHHM OT ntpoHa dpnn. Heo6xOIMTO TEPNO ODeBAcBc BO BPEMA pAOBTB B XONODHY NOROy, IN PKN DOnKbHbI bOttBbTePbMMN CYXMMN. B cnyae OHEMEHNA, 0KANbAHNA, 00NI INI INI INI INI INI INI INI INI INI INI INI INI INI INI INI INI INI INI INI INI INI INI INI INI INI INI INI INI INI INI INI INI INI INI INI INI INI INI INI INI INI INI INI INI INI INI INI INI INI INI IN1IN1IN1IN1IN1IN1IN1IN1IN1IN1IN1IN1IN1IN1IN1IN1IN1IN1IN1IN1IN1IN1IN1IN1IN1IN1IN1IN1IN1IN1IN1IN1IN1IN1IN1IN1IN1IN1IN1IN1IN1IN1IN1IN1IN1IN1IN1IN1IN1IN1IN1
IPABNATEXHIKBE3NEKIN
YBAI!PiJacpo6oTHNHeBMaTHHMMnpCTPOeM OOB83KOBOOIOPTPMyBaTNCRAOCHOBHX npabIN TexHIKBKN, BKNIOHO 3 BKA3aHIMMHXHE, 3 MeTOO OMeKHeHH Pn3NKny nokeji, yapay eNEKTPuHMM CTpyMOM Ta YHNKHHe HTIeCNHX yHKoDKHeH.
Ipeed noatkom pobtoH daHm npctpoem Heo6xidno deTalbo O3Haonmtca 3 iHctpkyicuTo Ta 36eeprtni.
YB4A! O3haonmtc6 3 yCima Bka3aHmH HKue IHCTpykuiyMn. HeDopmmHn npabnl moke npnaBecn do noKexi, yapy eNtprHm ctpymom ta tinechnx ykoJxHeb. TepmiH nheBMATuHn npctpi" kyn BkBAeTbca B IHCTpykuiX, CTocyeTbca BCix npncptoB 3 XMBNEHn CMnpceBaHO rOBITpni BIDiNDOBIHm TnCKOM.
DOTPIMYITECBBA3AHNXHIXKHEIHCTPYKUIN
3aaraBnI BmOrn IooD 6e3neKn
Ipeaonatkom moHTaxy, pobotn, pemohty, texhiHoro o6cnyroBAAHH i 3amHn npnaad, a6o y paai BkoHAn HPOBt 17pHnneBMAuHnx IHCTPmertTb, bpaxObyouh 6e3nHbe3neK, heo6xidno npOHATn 3po3ymnti nHctpykLIO 3 texHikn 6e3neKn. HeodtpMaHnn daHO Bmorn MoKe np3BeCTn do Cep03nX TpaBM. YctahOBky, hanaTuBaHH myMOHTAX NHEBMATNUHX INCTPymeHtB MOKE 3dInCHOBATn TiNk KBAJIΦIKOBAHn Ta NiROTOBHeHn NEcoHAN. 3abOpOHeNo MOnDfkiyBAtn NHEBMATUHn IHCTPmEHT. MoNdiFikaiii MOxyTB 3HN3NT eFeKTNBHCtB i pIEHb 6e3neKn, a TAKO 3bUnTN He63neKy, ha kY hapaxKaTcN onePapToHCTPmEHT. He BnKDaTn IHCTpykLIO 3 texHikn 6e3neKn - II cnld nepeDatn onepatopy IHCTPMeHa. 3abOpOHeNo BIKOPNCOTByBATn NOKOJXeHn NHEBMATUHn IHCTPmEHT. Heo6xIdno nepioDnH nopeBiprTa UHTabeBHicThdaHnx Ha IHCTPmEHT, ra boro BMARc cTaNapt ISO 11148. PobotoDaBe / KopncTyBaH noBNHeN 3BepHyTcN Do BpuObHKa dner 3amiHn 3ABODcKOro uTtKa B pasi notpe6n
UA
He6e3neKn, NOB'3aHHi 3 eIeMeHTamu, uO MOKytb BiDnItaTu
IooKoJxHnOobp6IOBaHO npEIMeta, npnaia afo Habt 3mIHoro po6OHO IHCTpyMeHTaTn pnpHIO BkndHaHne IeMeHTy Ha BeNKi WbIKocTi. 3abKn He6xio BkOPncTOByBATn yapocntknn 3axnct dno oeN.Ctyinb 3axncty cnid nD6npatn 3aneKHO bID BkOHyBaHO POBOTn. PepeKoTHcA, 0o obp6IOBAHNI pEmET HADINHO 3akpinneHn. Perynphno nepeBiprtn BiDnOBInCt PhAKTNHO WbIKOCtIObePtaHHIhCTpyMeHTA 3 HOMHaJIbHO WbIKcTIO, 3aHaHEHO HA 3aBOcBKOMy uNTKY. PepeBipKa NOHNHn npOBOnTbc 63 BCtAHOBNeHnx 3mHNXpo6OHX IHCTpyMeHITb IBINOBInHO DO IHCTpyKuB INPO6Hnka. PepeKoTHcA, 0o icpn i OCKoKN, 0o yTBOpHO TBc NiD qac po6To, He e He6e3neHHMn. Bi'ednatn npCtpiB iD Jxepela XMBNEHnpeD texHnHM oBCnyTOByBaHHM Nn 3amHO 3mHORo po6OHO IHCTpyMeHTA. CniD TAKOX BraxOByBATn P3NKN, Ha kki MoKyb HapaXaTNCSTOpOHHI OcoBN.
He63neKn, nob'3aHi 3anJyTVbHHAM
3aanybHMOeCTaTn pinnHNO 3adyweHH, cKaIbnyBaHH I/a6 TpABMn, kAIOBHN OJr, npKpaCn, BONCC Ta pykabni HaMTOCTbca HINCTpymEn A bnpnaia
He6e3neKn, NOB'3aHi 3 pObToHO
I pyk ta iHux yactn ti a cn yHKaTH KOtAky 3 uHNHeNem, 0o oepTaetbca, Ta 3MHHMn poohmm IHctpymentam. nIac BHKOPCTAHn HcTpyMeHTa pykOnepatop a MyKytb hapaXATNC HA HAcTyHNI Hebe3neK: pOzPobNeHH, yApn, BiDp3AHn, CTpaHNN, onIKN. Heo6xIDHO BHKOPCTOByBatn BiNDobHni pykABuNi dna 3axmcty pyk. Oepatop i ocbnyrobynn nepcoan nobHH by 3mo3Bnopatnc 3 pO3MpOM, BarOTo a NotyHicHO HcTpyMeHTa. Cnd npabInbHO TpIMAtn IHcTpyMeH. Takox Notp6ho 6tyn roTOBM iBDpearyBatn Ha HopMaBHi afo HeCNOiBaH pyxN i 3abXdN 6Tyr TOBOHM BHKOPCTOByBatn 0bDi pyk. 36epiratn pIBHOBy I npabInbHy no3uio HIR, kra 3abe3neYe 63neK. OdaRn 3axChi OKyIpn, TAKOX peKOMeHdy6TcBHKOPCTOByBatn pykABuNi, 0 npnilraAOTb do pyk i BIDnoBdHn 3axChn Oar. He BOKOpCTOByBatn 6bppe3n Ha WbIKocTi, 0o nepeBnuCy homHaJIbHy. PnppoBti 3 NIDHtM HAD rONBOIO IHcTpymentom Heo6xIDHO BHKOPCTOByBatn 3axmchy KACKy. DtoPMYBaTHc OBepKeHcTi, OckInbM 3MHHN pOboHIO HcTpyMeHT ue oepTaetb cIpTgrom DeKORO Yacy NiE BMMKHeHH npCTPOH. B 3aENXHO t B 6pO5bUbaHo r MaTePian cy nI bpxoBvBATn Hebe3neKy BV6xy A60 noKexi.
He6e3neKn, NOB'ra3aHI 3 NOBTOPOBAHIMM pyxamn
Piuc BkOpncTahn HneBmatuHnx IHcTpymetrib npo60tn, nob'ra3aoi 3 nobTOpOBAHmpyxamn, onepatop moe BiyBaTH nDCKOMpOPT b pykax, nepeaniu4x, niab obo IHnX qactHnx tna. y pabi BkOpncTahnn HneBmatuHnx IHcTpymetrib, onepatop nobHe 3aHrtn 3pyHe nooxenHH, 3a6e3neye npabInbhe po3auyBAHH cTOn, iYHKATn DnBHX nooxenHb, afo nooxenHb, kki He 3a6e3neuytob piBHOarn. Onepatop nobHe mHHTN nooxenHH nIac TpBAnoi po60tn - ce doonomoke yHNKHTn DNCKOMpOpy Ta BTOMn. KoNl onepatbDyBaAc hcyntmTo: noCTHn ABO NOBTOpOBAHm DNCKOMpOFT, 61nb, nybcyohm 61nb, NOKIOBAAHH, OHIMHH, neCHHH a60 3aJIaKnIc7b, biH ne NobHe Hix irHopyBatn, a 3o6oR'3aHn HOBIDOMTN npHX CBORo PO60TDABUa I 3EBPHTNC Do IKAPar.
He6e3neKn, NOB'3aHi 3 npunaDiam
Bic'ednTnpctpi Bid dxkepeJxKnBneHn nepe 3amHO 3mHHnx po6oHx IHcTpMeHtB afo npnaad.
BnKOpNCTOByBaTn pinnadra Ta BnTpAHI MATEPIAH N tINbKn peKOMeHNoBaHx BNPO6HnKOM pO3mIPIB i TnIN. 3a6OpOHeHO BnKOpNCtOBaByBaTn pinnadra IHINX TnIN bP03mipIB. YHKATn Be3nOpeepdHbOro KOhtakTy 3i 3MHHHM pOboHM IHcTpyMeHToM nID cAc i nICr pOBoTn, OckINbKn BIn MOKe 6yTn rapYMM a6o roCTPM.
IpekoHATnca, 10 MaKcImaBbHa 3mHnx p6oohx IHCTpymeTb e 6blho, HIX HomHaBbHa 5wnikciBt bniPyBaHoi a60 nonipyBaHoi Maunn. IpekoHATnca, 10 MaKcImaBbHa 3mHnx po6oohx IHCTpymeTb e 6blho, HIX HomHaBbHa 5wnikciBt npCtpo. KateropuHO 3a6opoHeHO BCTaOHIOBAtn Ha 7niFByaBHyMa MauHny abpa3BnH kpyr, dNCKOBY mny a60 pEey. PioKoJxehn AB43BnH kpyr MOKe npBeCTn do dyke cepO3hX nTBPAM 6 Cmept. 3a6opoHeHO BkOpNCTOByatn TpiCHy, 3amani Hnckn, aTAKO DNCKN, 10 naDAnin. MoKha BnKOpNCTOByatn TINBKn DO3BOHNI 3mHI h IHCTpymeTn 3 BIDNOIBHM diametpOM tHnptA. Heo6iINO 3BepHytn yBary, 106 JocTota obeptahra ToOnkay ToMQTHx By 3B'3Aye 3iBbUeHNMA DOBKNH bany MIX KInM ToTKOIO MOtAXy. CnIq pekoHATnca, 10 MiIMaBbHa DoBxaHna 3aTNCHyTO B natoHOr IHCTpymeTA DOPIBHO, npHnMI, 10 MM (Takox Heo6OJHO bpAxbyAtn PekOMeHdaiii BPO6HnKa 3mIHnx po6oohx IHCTpymeTb i natPOna NHEBMATNUHO pncTPO.
He6e3neKn, noB'ra3ani 3 Micem po60Tu
Kob3aHH, cNOTkaHH i naHn e rObHMn npuHnAMn TpAM. CnD octepirataNc CIn3bKnx NOBepxOHy, yTBOpEHx ype3ybltati BkOpNCTAHH IHCTpyMeHTA, a TAKOX cNOTaHaB6 0hnaHn nHEBMATUHOYCTAHOBKn. DToPMByatnc ObepexHOCTI B He3HaONiM oObTaHOBci. Moxyb mat Ni Mce npuxoahi He63neKn, taik ENEKTPAk a60 iHI KOMyHikaJI. PHeBMAtuHn IHCPymEt He np3HaueHn dR BkOpuctAHn y B6yx Ohe63neHx 30hax i He Ma e ENEKTPOIsOJI. IpekoHATNC, 10 BiCyTHi 6y-b-ki ENEKTPNHi dpOTn, ra3oBi ty6n iT.n., kri MoKyb CTBopNTn He63neky B pasi nowKOJXeHH Nd Yac BkOpNCTAHH IHCTpyMeHTA.
He6e3neKn, noB'3aHi 3 npoIO i nnom
PnI napa, yTBOpEni Bpe3yIbTaTI BnKOpCTAHN HHEBMATNUHOrIO IHcTpymeHTa, MoxyT CTaTI npuHIO 3axBopOBaHb (HapnKlad, pak, BpOJKeH Badin, actMa Ta/a6o depMaTIT). Tomy HeoixIDHO OuiHNTn P3UNK I BnPOBaDITN BiNDOBiDi H zocob KOHTPOIHO Na daHIMM PaKTOPAM. OiciKa pn3IKIB NOINHA BKIOHATN OUIHK BY NNY, yTBOpEHOROBepyIbTaTI BnKOpCTAHN IHcTpymeHTA, i MOxNIbICTb NiHHTT B NOITprichyioHOrO Nny. CtpymHB nobITpr, 00 BxQdHT, Heo6xIdHO HanpaBnTn Tak, 006 niHimana
UA
AkhaimeHsa KInbKcTb Nny y 3aunneHomy cepenobu. y Micx BnHKnHHe Nny a60 npn pnpntom NobHn6ytn KOHTpnoh Naix yTBOpHHM y Jkepei yTBOpHHN. Yci IterpoBahi Fynkui iYctaKyBaHHn Dn3 360py i BiBedeHHn Nny Ta dmy, a60 3MeHWeHH X kInbKOCTi NobHHI BIKOPNCOTByBatnc PpaBnHo TA oCcyroByBatnc BIDOBIOHO do IHcykui BnOHN HIO BKA3IBOK poBtOdaBua i BINOBDIO DO BmOR rieH N 63neKN. EcknnyaTaia T aTexHnue OcbnyroByBaHH NHEBMAtuHoro IcHtpMeNTa NOBHNI 3diChOBATnc BIDNOBDIO DO IHCTpykui 3 ekCnnyatauII, 10do 3BOITb MImiMyBAtn yTBOpHH Napi i nny. B6bpatn, ocbnyroByBatn i 3amHnTn 3HOWeH 3MHHI pOoH i HcTpMeHn Cnd 3rDIO 3 IHCTpykueo 3 ekCnnyatauII, u6yHKHTN 36lbweHHy TBOpHH Nny i napi. B peyntati obpok Deeknx MaepianB Moxyb yTBopOBATnc Bvbyxohoe3neHni npa i nnn.
He6e3neKn, BnKnIkaHl ShyMOM
Ji ciBHO 63n HAnxHOro 3axHCTy MoKe CTATn npuHIO NOcTIN Ho He3BpOHTHO BpaTH Cnyx, a TAKOX IHnx npoBnem, taKHX K, Wm y Byxax (d3BH, d3NcxHnH, CBNT ABO rHyHn). Heo6xIDHO OHUHNr pM3NK INPbOaIITn BiDIOBIH 3acobn KOHPTNO HA DAHHM PAKTOAM. BiNDOBHIM KOHTPOB 3 MEOHO 3NHXeHn Pm3NK Mye BkIOvATn BIKOPACCTAHn DEMfpyOHn MATEpIaIIb, Ioo 3anobiraOy ,D3BeHHH" O6pOJIbAOHO NpeMDeta. BIKOPCTOBaTH n 3acoSy 3axHCTy CNYx BYIOB1HO DO BKAIBOK PObToDAuCi i BIDIOBINO Do BmOR rInEHN 63NeK. EKnIyataiTa texHue O6CnyROByAHn NHEBMAtuHO IcHTpMeHTA NOBNIH III DIO INCTpyKui 3 eCNPLATAci - ue DO3BONITy YHKHyTN HENOTPiHO 36blweHH pIBNA WMy. RaIO NHEBMAtuHn IHCTpMeHT OCAUHe OryHMOM, 3ABKn NEo6xIDHO nepeKohATnC, 0io Niad cBikopncSTAHN hctpyMeHT bIN BCTaHOBneHN npablnHo. BbOpATn, o6CnyOByBaTn i 3amHn 3HOWeHI mHIhpoBoH IHCTpyMeHT CNid 3IHCTpyLIEO 3 ekCnIyataJI. Lc Do3BONITy YHKHyTN HENOTPiHO 36blweHH WMy.
He6e3neKn, BmKlunKaHi BiBaPauJMy
Bibpaia moepnnp3bectn do he3bopotHO nookdojHHepeB i kpoBonocTachn n'actey i pyk. Pykn cnid tpmatn ha Biinobinhi Bictahi Bid natpona dpnna. Heo6xio htenno oaratnc nucac po0b0n B xoloHy norOy, pykn nobHHi 6ytn Tcnnmmy Cuymmy. y pasi onimn HNOKOLBAHH, 6010 npni no6liHHi uipn naanbux i pykax, Heo6xio hno npinnHnnpooy 3 nheBMATuHMM IHCTpymeHTOM, NOIDOMNTN POBOOABUaI 3BEPHTCNO DO NIKAPR. DToPMAHNA BKA3IBOK IHCTpykui 3 EKnnyataui n d ac BHKOPCTAHH I texHIO HO bCBYBAHH NHEBMATVHO IHCTpymeTA DO3BONNTy HNNKHTN HENTP6HO 36blweHHH PIBH B6paui. He BOKOPCTOByBATn 3HOHEHXA 6010rano npinnACOBHn HacaDOK, Ocklbkn ue MoKE np3bEcn Do 3HaHHO 36blweHH PIBH B6paui. B6paun, OcbryOBaTN 3AMHN 3HOHNI 3MHNPOHn Tcni 3riHIO 3 IHCTpykui 3 EKnlyataui. Ld DO3BnTb YNNKHTN HENTpHOro 36blweHH B6paui. No MOXINBOCTMOHTAX CNlD BKNOHBYTN 3 BOKOPCTAHNM 3axCHNX ekpahid Jksoe moKIIBO, IHCTpymeTc cnid nItpmByaTN 3a Donomoro HO CTIKN, HataxHORo npncpto afo 6anaHCpa. IHCTpymeT Heo6xioHO TpIMATn NERKO, ane HaidHo, bpaxobyou MoxNBI CNPi peakui, OckbKn He63neKa, BIKNKAKa Hbpaieio, R npabInno, 3poctae npn 6bnOWMY 3cuuNti 3aTtCKy. HenpabInbHO BCTAHOBNeH i ao NKdokehi 3MIHI IHCTpymeHTN MoKyTB CTAn npnuHNO OncuHHe B6paui.
Iodatkobi iHCTpykii zoO 6e3neKn IJI NHEBMaTHNX IHCTpyMeHTIB
CTNCHENE NOBITPMAKHe Pn3BecTN Do cepno3HIN TpaBM:
-
3aBxN BIDKIOUATN NOAUY NOBITP, CTpABNIOBATN TCK NOBITP 3I WLaHra i BiD'EDHATN INCTpyMeHT BiD NOAHI NOBITP, RkIo: IHCTpyMeHT He BIKOPNCOTBycR, nepei 3aMHO npnnd a6o nid qac pemOHTy IHCTpyMeHTa;
-
HIKONH He HanpaBnTn CTpymIHb NobITpr Ha Ce6e a6o IHnx IHOe.
Udap 7nahrom Moke np3Bcctn do cepno3Hx TpaBM. 3abxdn Heo6xidno nepebiprtn 7naHn i 3'edhaHH yOo HABHOCTIO nowKOJKeHB, a taKOH qn BOH He ocAneHI. He cnIaHpAbTn Ha pyk n CTPMihb XONODHOro NOBITpr. KoKeH pa3, KOIN BnkOpncTOBYOTcY HIBePCaJIbHI TBHTOBi 3'EDHaHH (WTHTOBI 3'EDHaHH), Heo6xIDHO 3actOCobyBatn CTepKHi Ta 3'EDHYBaHi, 10 3axuauoTB 3'EDHaHH MIX WNaHramn Ta 3'EDHaHH MIX WNaHROM i IHCTpyMeHOM BiD MOXNBHX NOKoJKeHB. He nepeBnuByatn Bka3aHOrO dIn IHCTpyMeHTa MAKCImalbHoro Tncky NobITpr. KateropuH O3abOpHeHO NepeHocNTn IHCTpyMeH, TpMaKOn MuO 3a Wlnahr.
EKCJIYATALIHI YMOBI
Heo6xHNO nepeKohatncy y Tomy, 00 dxKepeNo KOMnPecobahoro noBITpy 3a6e3neUcnoTPObOHy nOToPbHnPoBouHn TCK Ta BiNIOBHN O6I NOBtpy nHEBMauHHi CnCTeM. Y BnAky HADMIHPORO TCKy nobITpy y cHTeMI XNBNEHNA CND CKOPNCATNC PEDYKTPOPM 3 aONOBKHMM KlanAHOM. XNBNEHRA IHEBMauHOro pNCTPOPO NOBHHO BIDyBatNC 3 BIKOPACHTHHM CNTTEM NfJIbTPa TA MacNHKn. Lc 3a6e3neUcNCTOTy Ta ODOHOACHO 3BONOXEHNN NOBITpy MAcNOM. CTAH fJIbTPa TA MacNJHKn CND pepeBipTN nepeD KOHXMN YCKOM pAa NTpeBn DOaTn MACNa y MaCnRHKy, RkIo NOrO He BnCTauec. 3ABdAnu 3a6e3neUcYbCp npabINbHa EKCNlyatai npCTPOTO BAIOBxyTBc nepioD Joro npae3daTHOC.
Y BnAdky KopncTyBaHHaDndaTkoBmnyuKAMn abo onOpHmM CTiKAMn CnI dnepeKHaTcR y TOMy, 0eEJEMHT npaBnHbTO Ta HadiHNo 3akpInJeHm.
PnHnBn BIDNOBHy No3y, 3a6e3neHy e npToNDIO HOpMaIbHIM a6o HeouikyBaHIM pyxam npiNcTPOK, BIKNIKAHN MOMENTOM OBeptAHHa.
Heo6xjno 3BepTaTu yBaru Ha OToeHnpo6Ouro Micr, OckiBkn uDpyBaIbHa MaunHa MoKe NERKO nepepiAtu Deaki eEmeHTM.
3a6opohreTcKOpCTyBaTncA 6pa3nBHHMn Kpyramn 3 MeTOk O6piaHHra Ta ppe3epybaHH.
IyBaJIbHI Kpyr3 ABTOMaTHHm KpInnEHHM CnID KOHcEHPNHO NOMICTHTHa NOdyuUe IiNfYBaBbHOI MaunHm.
Iicra BmKHeHHaJiCyBaBHO MaunHcN cIid TpMaTn II y pykax, nokpoobouin HCTpyMeHT NOBHCIO He 3aTPMaTaBCa.
UA
IpeT TMMK 3AMOTyBATN DoaTkoBE OCHAeHn. cnIe nepeKOHaTncr V TOMV. 10 MaKcHMaJIbHI o6eTN OCHAeHHn BmHi 3a o6eTN uJiDyBaJIbHOI MaunHn.
3abopohreBCKOPNCTyBATnC OCHaHnM, npn3NaueHm Dn NaTPOHBiHOrO diamETpy, HIX BkazAHnY IHCTpykU. DoatKObe OCHAeHH CnIaHIO 3akpiHnY naTPOHi. 3abopohreBCKOpNCTyBATnC BTVnKAMn Ta nepeXdHMn PhaHmM 3 MetoIO DOcRHTn CInbnaHn DiamETpy uINHdeJe pncTPOK TA abpa3NBHO Kpyra.
6b031BkAMN BnO6HkIB OCHaENH. 3abOpOHcKOPnCtYBaTmCPOHcHMM OCHaENH. 36yHKMNAdAMn CnI HerAHO 3amHn HOBM Ta cnpABHM. NpeBipNTCtAH WnHdEeTa Na TpOHB 3TOK 30py CnpaIOBANH Ta NOKoJXeHb.
3abopohrebcnpaobatmniipybaibhoMmaunnooYmicx3BnCOKIMpn3kOMBb6xy.1ckp,uoytbpOIObCnIacpoBtMOKByCTaTn npuHNOIOKeki. Iicnla 3amOnTyBaHHa 6pa3nBHO Kpyra 3abeCTn npctpi np6bn3HO Ha 30 ckyHd y 6e3neHOMy nOIOKeHHI. HeraHNO 3atPImaTu npncptpi, kUcO cnocTePiAOTcb3NaHII konBaHHa 6o iHNI nepe6oI y poboti niipybaibhoMmaHHN.
BcijnokdokeHHN CJIyCyHyTN nepeD yeproBNm npckpOIO.
Cni nepekohatncy tomy, 0o oeptn uipbAalboHoi Maunn Hbe BuaaHa H aHomHaBti Taanu.
Iiuc 606kn DeKnx MATEPIABn MOyTb yTBOPOBATnC TOKCNH i a6o nabHi BNnapu nn. Heo6xIDHO BcTn po6Oty y npMIeHHax 3 BiNobIDHO BEHTINrJIO Ta KopCTyBATnC 3ac6aMn OC6ntO1 63neKn.
Cni nepekohatncy y Tomy, 00 icpn Ta Bixxodn, 00 yTBPOIOCTCB nD vac poBOTn, He ABAHOT co6oHO 3arpo3y.
CnI KOpNCTyBATncra 3acobamocobnto 6e3neKn Tny pykabu, paptyx, kaca. Iicna BmKHeHHa po3pHoi Maunn CnI dpumTu y pykax, noKn pOboun IHcTpyment nobHicTIO He 3atPmaetbce
KpI npCTpi 3aAMOTOBaHm abpa3bHM Kpyrom Bnab 3 pyk,peepyeproBn m yckom cnid ctapanHO nepebipNT CTan Kpyra.
KOPNUCTYBAHNNIPINCTPOEM
IpeK KOxHM NcKOM npCTPO Heo6xioHO nepeKOHATnC y TOMy, 00 He NOsKOJKeH H OIN ENeMHT INEBMaTHUHO CNTEMN. KIO BnKpTO NOIKOKeHH, CnD HeraiHO 3aIMHTN HecnpabHI eENeMTN CNTTEMN HOBIMN.
Ipeed KOKHIM NyckOM PHeBMaTNUHO CnCTeMn Heo6xIDHO No3bTyNCB BONrN, 00 KOHNecHycTBc BcepeDNI pncTPOH, KOMPecopa Ta IJAHRI.
PpuoHaHHn npucmpo0 do nHeMaMuHoi CuMeMu
Ha pncyky 36paackhen pekomehdoabann cnoic npneHnHH npntpoio do nheBmatnuho ciCTemn. Bka3aHn cnoic 3ae3neue hainbIepekntbHe kopnctybaHH npn-CTPOEM, 3abJHK HbOMy BNDOxyETBCr TaKoX nepiO npae3dathOHTI npntpoio.
Iodatn kijbka kpannnh macna B3kocti SAE 10 uepe3 BxHn nobitprn otbip.
Dio p3b6n Bxidno NOBITpHoro OTbopa HadiiHO pnpKpyTHTN BiIDNOBHy HacaKy, 3aBdRk Rki MoHs bye npncdHaTn nnaHr noaHi Nobitpr. (II)
3aMOHTyBaTn Hx OMyTmky npCTpOo BiNObiHy hacaKy. Iic qac po60Tu 3 NHeBMaTHHMM npNCtpoMn KOpNCtyaTncBnKIOUHO OChauEHHM, pN3HaueHMM dIpa 1060Tu 3 ydapHMn npCTpOAMn.
BbpaTn BiinobiHn Hapmok oebpt. Jitepa F 03hae o6eptn 3a roHHNKOBoO ctpinko, jitepa R - o6eptn npotro HHNKBOOc tprilkn.
Tam, de ue MOxNIBO, BIDperyIIOBATn TCK (MOMeHT oBeptAHH).
PnneHATn npntprrn do nheBmatnuho ciTcEMn 3a donomoroo xiahra diametpm y 3/8" (10 mm). IpekoHaTmcay toM, 100 nlaH BHTpmye HabaHTaeHH Mihym 1,38MPa. (III)
3aBecn npicpii Ha KjIbka CekyHd Ta nepekoHaTcra y ToM, 0o Bin He Buae HiaKx nio3pInx 3BykTa He Bipye.
3anyck ma 3yunka iHcmpymEmmy
Ybara! NpHw HIX 3anyckaTn PHEBMTuHIn IHCTpyMeHT, nepeKoHaTeCc, 10 BCTabHe IHCTpyMeHT He KOHTaKToe 3 6yIb-kaMIM pPeDMOT aO b-koO qactHO tIa. IHCTpyMeT 3anyckaTeBcra 3a DonOMoTO BaxKeR, kAn BiKPNBaE nobITPnHKnanAH i TAKM YHOM 3a6e3neUe NOAHy CTNCHEHO NOBITPA HA pNBI dIHCTpyMeHT. KaIO BAJIb OCHaSeHn 3AMKOM, kAn He Do3BOJAE BnAPKOBo HATNCKaTn BaxINb. 3AmOK NOBHe HbTNOBepHYmTak, 10bBb NapaneNBHM BaxKeH, a NOTIM cId NotARHTBaxINb y Kopnyc IHCTpyMeHTy. Lc 3anyctntb IHCTpyMeHT. Do3BOJte IHCTpyMeHT DOcARTn HomHaNBoHoi WBNKOci I JnWe NTIM NOHITb npauOBaH.
Ppnnnne Hno 1060 nHctpmHa BldyBaetbCnna 3nTn Tncky Ha Baxnl. Baxnl abTomauHO NOBepTaecdo NoaTKOBOr noNoKeHHa 3ano6iKHe 3aOikcy BaXin. CnI BpaoxByatn, 10 CbtaBneHm IHcTpmeH BCE ue moe pyxatncr. He KnaDItb IHcTpMeH nepe NOBHM 3ynHeHHm pyxy BCTabNeHOro IHcTpMeHtA.
MoHmazamaOcHaeHHn (IV)
IpekoHATnca y Tomy, 0o MaKcImaJIbHi o6eTn OChaSeHH Bnui 3a MaKcImaJIbHi o6eTn 7ni4yBaJIbHOi MaunH. Heo6xioHO dOtpmYBaTncBkazIBOK Bnpo6HKnIB a6pa3NBHX KpyRtB iDnHO cOeptT Ta DOBXHH CTpnKHN, 0o Maee yBIINu B nHnndJIb.
B3rTn 1nnHdJIb Ta BIKpyTuNTraIky KpInIeHHa ax Do MOMeHTy, KOJI MoXHa 6yde 3akpinTu pObouY eIeMeHT.
TakmHOM 3aMOHTyBaTH enemENT OchaueHH, yoB y wnnHdneB ybiu mo mihym 10 mm ctpnKHA.
3a donomoroKnIOHb 3aikcyBaTu rky KpInneHnHa unHHenl.
UA
KopucmyaehnwnidpyeaybhoMauuHoo
Bbipn BIDnoBHH IHcTpymEn, np3HauHem nIaHoro BNDy po60TN. Ipeep noatkom po60TN NOeKaTH, NOKN abpa3NBH Kpyr He habepe MAKCImaJIbHI o6epTN. MoTepiany npKnlaDAtn Niue abpa3NBH Kpyr, 1O o6eTaTbcra.
HaNCKaTn Ha npncpti JInne 3 CnIO, Heo6xHIO DnI Obo6Kn MaTepiAly. HaMIPHH HaTNC MOKe CTATn PnPHHOIO NOnKoJKeHH Kpyra Ta NiBnUe PN3NK TineChnx YuOkoKeHb. Pid cac pOobTu MoKyTB yTbOPOBaTnc icKpn Ta BiDpNBaTnc paarmEnr MaTepiAly obpo6Kn. CnI nd no6batn Ipo Te, o6icKpn Ta fpaarmEnr, Ioo BiDpNBaOTbcR, He ctaHOBNi co6o0 3arpo3y ha po6Oohmy Micci.
KOHCEPBALIJI
Hi ByKOMy pa3i He KOpNCTyBaTnC6eH3INOM, PO3HHNKOM a6o iHoo NaIbHO pIDHIO dIra OYcTK npNCtPO. BInapm MoKyb 3aropitncB, BIKIMKAOH NBI6yx npNCtPO Ta nobaxhi tinechi ykoDxehn.
Po3HHHnK, 00 BnKOpNCBOyTOBcA DnO OCHcKn NaTPOHa Ta KOpNyca, Moxyb BnKnKATn NoripweHH yuJIbHOIOHx enemeHTIB. Y 3B83ky 3 cIM cIid CTapaHNO BnCyUHTn npCTpi neped noaTkom p6OTn.
Kuio Bknpto 6ydb-kyi nepeooy poboti npctpo, cnid heraiHO bideHaTH npctpiB iD nHEbMaTHOHO CTTEM.
Bci enemtn nhebmatuHoi ciTcEmn noBHHi 6yTN 3axnueHmN BiD 3a6pydHeHH. bpyd, 10 npOHka y nhebmatuHcy CTeMy, moKe BnKlnKaTu 3HnueHH npCTpOu Ta iHux enemtib nhebmatuHoi ciCTeMn.
KoHceaeuaI npucmpoIO nepeo KOxHm TyckOM
BIDeHaTHn pNCTpi BID nHEBMaTHuHOI CNTEm.
Ipeed Koxhmmyckomdoatn Hebeuky kInbkictb mnoooi pidiHn (hap.,WD-40) yepe3 Bxidn nobitprn otBip.
PnEHaTHPiNCTPiDIOHeBMaTHHHOICTeMnTa3aBeCTnPi6n3HoHa30ceKHyd.3aB4kniCbOmyMnOHa pOizHa pOizHa pOizHa pOizHa pOizHa pOizHa pOizHa pOizHa pOizHa pOizHa pOizHa pOizHa pOizHa pOizHa pOizHa pOizHa pOizHa pOizHa pOizHa pOizHa pOizHa pOizHa pOizHa pOizHa pOizHa pO1eTb PpOHTb Ioro.
3HOBY BIDENHATN PnncptiB iD NHEBMaTHUHOI CNCTeM.
HeBENky KINbkiCTb MaCna SAE 10 DoaTn BCEpEnHy pncTPOU Chee3 BxIDHn NIOITpyHm OTBip Ta pni3NaueHn IINZoO OTOBpN. PeKOMeHnyETbcra Bkmbatn MacNo SAE 10, pni3NaueHne dIy KOHcpeBaui II HeBMATuHnx pncTPOIB. PnEHaHTn pncTpi Ta 3aBeCTn HOrO Ha KOPOTKn Yac.
Ybara! Macnom WD-40 He moKHa KopnCTyBaTnCRA K macIOM, np3HaueHIM dIra 3MaUyBaHHA.
BInTeptn 3aIIuKm Macna, 10 BmIJIy Uepe3 BxidHt OBpN. 3aIIuKm Macna Moxyb BnINBaTn Ha nOriipSeHHra 11bHOCTi npCtPO.
Ihwi konchepeauihi npoueypu
Peped KoxnHm NcKOM npncrpoHO Heo6xIDHO npeBipTN, Hn Ha HbOMy Hemae BnDnMnx CnIiB pIHOMaHITHX NOkOKeHb. XomYtIKn, naTPOHN dIg IHCTpyMeHTIB Ta WnHdien cIy TpyMByATN y uctotI.
Yepe3 Koxn 6 muiB a0 100 roHn pOoTn cnB iDn Tn npCTPi Ha ornAa KBanidikoBaHomy nepcoany peMOHTHO 3akna. JaKIO npCTpi BkOpctOByBaBC 6e3 3actocobyabHH peKomeHdoBaHO CNTemN noaui Nobitpr, Heo6xioH OacTIwe BiDaBAtu Ioro HA ornA.
UcyeaHnna ooukodKeHb
Heo6xHNO nepepBATn pOBOy npNCPTPOEM 3pa3y JNICrToro, RIKBNKPTO 6yNb-Ke NOKOJXEHN. PoBoTa HcnpaBHM nPNCPTPOEM MOE CTATn PnPHHO TineCHHX yIkoDxKHeB. Byb-jAkm peMOHT ABO 3amHy eneMeHtIB nPNCPTPO MOE npOBODTN NIIe KBanifIOBAHm NEpCOHAN YNOBHOAXeHOro peMOHTHO 3aknaNy.
PoiKoJxEHnMoXJIbE pIeHNr np6neMn
| Пикстрипрацюно заимадуно Кьыхообер tax do He zabodnitsя | Ддати Иеленик Кьбкіctм Macna WD-40 чесь Вддд поитрий OTbip. 3aБeNTс писстрии на Кьыka секунД. ПonaCTi МоггпprnkiiTncьdo hotopа. 3aБeNTс писстri prn6mnoHa 30 cekynd, HebeNikkoIO KibKlcSTO Macna 3MaCTHn pnicstri. YBaRa!пepebI macna мося ВКИNKATM 3MeHSeHNe NOtYKHOCTI pnicstpo. Y TakOMy BnAmpdKy cnld npocHTnnpWbD. |
| Пикстриzzabodntbcj i notimcnoBilhnoe pyx | Компесор He zabeanuye NOTIPbY noqduNo nobITpy. Писстrizzabodntbcz 3a paxyHok nobITpy, Рц haKanOnuYeTcB y pezeepByapi komпесорa. Y mipy toro,Яр pezeepByaponopoxHHoTcB, Komпесор He bCTHraE komnHecyBatn HeceTuNoy nobITpy. CndпрнEDnatn писстri do bIIsh noTsyKhoro komпесорa. |
| Hedoctathno notukhici | ПepekoHATmC y Tomy, Дцiametru shaHrib - MihIMyM 3/8 / 10". ПepebIPrN HAcTPOChn TmCK, УВи hab MaKCMaJIbHOMy pIBH. ПepekoHATmC y Tomy, Дц innpисстri hyalekhHm QMHOMOchHmTa 3maUeHem. RkaQ zu He npinHOCHTpeaybIbTaty, BiDatn pnicstri y pemont. |
Cnpaobahni npnctpoi - Btropnhna cnpoHna. 3 orny ha ue 3abopnohe BOKdAtn ix y miu knd pam 3 KOMyHaJIbHMN BIxOdaAM, OCKINBKn BOH MictrpeHOHN, He63neHi dIra 3doPOB Ta hABKOImHbOro cepeOBuHa! Bu Bi3mete akTbHy yactb y BTOpHHNI nepepooj BiXODIB 3 MeTOO oxopoHn HABKOIMHBOrO cepeOBuHa, AIOBACCTe CnpaobAHm npncptiy nyHK T 360py BiXoDIB TAKORO NOOXJDeHH. IINObMeKeHHN OBcMBy BIXoDIB, IO NiIpaTb 3HmUeHHIO, Heo6xJaH iBTOPHNA nepepokka shnxom peuknHry n B INshn cnoc6.
LT
IRANKIO CHARACTERISTIKA
H XPHSH TOY EPTAIEOY
Pniv Tnv Evapn Tnc epyaiaac TpeTc va baiwite, TWC Kaveva 0toxieou Tou TVEmuatikou epyaleiou dev exi naei Bala. Tnv Tepinwn Tc napatnponc Tuv BaaW, TpeTie aea va avtikataotane e v Ea 0toxieia Tou ouaTmuatoc.
Pniv Tnv Kabepeapayo Tu Tveuatikou Ooutnato Cipetie va oteyvwoete Tnu Upaia ouuukwovn oTo eepiko Tou epaaleou, Tou uumtiotn kai twkawdelta.
DEKLARACJA ZGODNOSCI | DECLARATION OF CONFORMITY | DECLARATIE DE CONFORMITATE
0818/YT-09676/EC/2018
We declare and guarantee with full responsibility that the following products:
meet requirements of the following European Standards / Technical Specifications: EN ISO 11148-9:2011
satisfac cerintele Standardelor europene / Specificatjilor tehnice urmatoare:
and fulfill requirements of the following European Directives:
si satisfac cerintele Directivelor europene urmatoare:
2006/42/WE Maszyny urzadzenia bezpiecznych | Machinery and safety elements | Direcva pentru Utilaje si dispositove de siguranta
Serial number: concern all serials numbers of item(s) mentioned in this declaration
The person authorized to compile the technical file:
Persoana autorizata sā intocmeasca dosarul tehnic:
Tomasz Zych
TOYA S.A., ul. Softysowicka 13 - 15, 51-168 Wroclaw
Polska | Poland | Polonia
Wroclaw, 2018.08.01
(nume si semnatura persone autorzate)(locul si data emit


- Prior to working with the tool, you should read all the instruction and keep it around.
- EQUIPMENT
- GENERAL SAFETY CONDITIONS
- COMPLY WITH THE FOLLOWING INSTRUCTIONS
- Hazards associated with moving parts
- GB
- Risks of getting tangled
- The risks associated with the work
- The risks associated with repetitive movements
- The risks associated with accessories
- Risks associated with the workplace
- Hazards arising from vapors and dust
- Noise hazard
- Risks of vibrations
- Additional safety instructions for pneumatic tools
- OPERATING CONDITIONS
- MAINTENANCE
- MERKMALE DES WERKZEUGES
- OnachOCTN, BbI3BaHHBie WymOM
- Onachoctn,Bbl3BaHhIbe Bnpaunma
- IPABNATEXHIKBE3NEKIN
- Ipeed noatkom pobtoH daHm npctpoem Heo6xidno deTalbo O3Haonmtca 3 iHctpkyicuTo Ta 36eeprtni.
- DOTPIMYITECBBA3AHNXHIXKHEIHCTPYKUIN
- UA
- He6e3neKn, BnKnIkaHl ShyMOM
- He6e3neKn, BmKlunKaHi BiBaPauJMy
- Iodatkobi iHCTpykii zoO 6e3neKn IJI NHEBMaTHNX IHCTpyMeHTIB
- EKCJIYATALIHI YMOBI
- KOPNUCTYBAHNNIPINCTPOEM
- KOHCEPBALIJI
- LT
- IRANKIO CHARACTERISTIKA
- H XPHSH TOY EPTAIEOY
- DEKLARACJA ZGODNOSCI | DECLARATION OF CONFORMITY | DECLARATIE DE CONFORMITATE
Brand : Yato
Model : YT09676
Category : Grinder