
HCA63640Z - Range hood BEKO - Free user manual and instructions
Find the device manual for free HCA63640Z BEKO in PDF.
| Product type | Cooker hood |
| Brand | Beko |
| Model | HCA63640Z |
| Width | 596 mm |
| Depth | 410 mm |
| Height | 750 mm (min) - 1080 mm (max) |
| Supply voltage | 220-240 V ~ 50 Hz |
| Total power | 216 W |
| Motor power | 210 W |
| Lighting | 2 x 3 W (LED) |
| Number of speeds | 3 |
| Control type | 3-level digital electronic |
| Automatic shut-off | Yes, after 15 minutes |
| Ducted operation | Yes, diameter 120/150 mm |
| Ductless operation (recirculation) | Yes, with charcoal filter |
| Minimum distance from hob | 65 cm |
| Grease filter (aluminium) | Dishwasher safe, monthly cleaning |
| Charcoal filter | Replacement every 3 to 6 months |
| Exhaust pipe diameter | 120/150 mm |
| Material | Glass and stainless steel |
| Weight | Not specified |
Frequently Asked Questions - HCA63640Z BEKO
User questions about HCA63640Z BEKO
0 question about this device. Answer the ones you know or ask your own.
Ask a new question about this device
Download the instructions for your Range hood in PDF format for free! Find your manual HCA63640Z - BEKO and take your electronic device back in hand. On this page are published all the documents necessary for the use of your device. HCA63640Z by BEKO.
USER MANUAL HCA63640Z BEKO
Please read this user manual first!
Dear Valued Customer,
Thank you for preferring this Beko appliance. We hope that you get the best results from your appliance which has been manufactured with high quality and state-of-the-art technology. For this reason, please read this entire user manual and all other accompanying documents carefully before using the appliance and keep it as a reference for future use. If you handover the appliance to someone else, give the user manual as well. Follow the instructions by paying attention to all the information and warnings in the user manual.
Remember that this user manual may also apply to other models. Differences between models are explicitly described in the manual.
Meanings of the Symbols
Following symbols are used in various sections of this user manual:

Important information and useful hints about usage.

WARNING:Warnings against dangerous situations concerning the security of life and property.
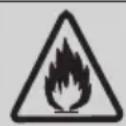
Warning for danger of fire.
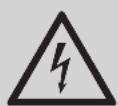
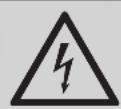
Warning for electric shock.

This product was manufactured using the latest technology in environmentally friendly conditions.
1 Important instructions for safety and environment
1.1 General Safety
Important Safety Instructions Read Carefully And Keep For Future Reference This section contains safety instructions that will help protect from risk of fire, electric shock, exposure to leak microwave energy, personal injury or property damage. Failure to follow these instructions shall void any warranty.
- Beko products comply with the applicable safety standards; therefore, in case of any damage on the appliance or power cable, it should be repaired or replaced by the dealer, service center or a specialist and authorized service alike to avoid any danger. Faulty or unqualified repair work may be dangerous and cause risk to the user.
- This appliance is intended to be used in household and similar applications such as:
- Staff kitchen areas in shops, offices and other working environments;
- Farm houses
- By clients in hotels, and other residential type environments;
-
Bed and Breakfast type environments.
-
Operate the appliance for its intended purpose only as described in this manual.
-
The manufacturer cannot be held liable for damages resulting from improper installation or misuse of the product.
- This appliance can be used by children aged from 8 years and above and persons with reduced physical, sensory or mental capabilities or lack of experience and knowledge if they have been given supervision or instruction concerning use of the appliance in a safe way and understand the hazards involved.
Children shall not be allowed play with the appliance. Cleaning and user maintenance shall not be made by children without supervision.
- The minimum distance between the supporting surface for the cooking vessels on the hob and the lowest part of your product must be at least 65~cm .
- If the instructions for installation for the gas hob specify a greater distance, this has to be taken into account.
Make sure that your mains power
1 Important instructions for safety and environment
supply complies with the information supplied on the rating plate of the appliance.
- Never use the appliance if the power cable or the appliance itself is damaged.
- Prevent damage to the power cable by not squeezing, bending, or rubbing it on sharp edges. Keep the power cable away from hot surfaces and naked flame.
- Use the appliance with a grounded outlet only.
WARNING: Do not connect the appliance to the mains until the installation is fully complete.
- Place the appliance in a way so that the plug is always accessible.
- Do not touch the lamps if they have operated for a long time. They can burn your hands since they will be hot.
- Follow the regulations set out by competent authorities on discharge of the exhaust air (this warning is not applicable for use without flue).
-
Operate your appliance after putting a pot, pan etc. on the hob. Otherwise, high heat may cause deformation in some parts of your product.
-
Turn off the hob before taking the pot, pan etc. from it.
- Do not leave hot oil on the hob. Pans with hot oil may cause self combustion.
- Pay attention to your curtains and covers since oil may catch fire while cooking food such as fries.
-
Grease filter must be replaced at least monthly. Carbon filter must be replaced at least every 3 months.
-
Product shall be cleaned accordance with user manual. If cleaning was not carried out in accordance with user manual, there may be fire risk.
- Do not use non-fire-resistant filtering materials instead of the current filter.
- Only use the original parts or parts recommended by the manufacturer.
- Do not operate the product without the filter and do not remove the filters while the product is running.
In the event of be started any flame, de-energize your product and cooking appliances.
In the event of be started any flame, cover the flame and never
1 Important instructions for safety and environment
use water to extinguish.
- Unplug the appliance before each cleaning and when the appliance is not in use.
- The negative pressure in the environment should not exceed 4 Pa (4 x 10 bar) while the hood for electric hob and appliances running on another type of energy but electricity operate simultaneously.
- In the environment where the appliance is being used, the exhaust of devices running on fuel oil or gas, such as room heater must be absolutely isolated or device must be hermetical type.
- When connecting the flue, use pipes with a diameter of 120 or 150~mm . Pipe connection must be as short as possible and have as few elbows as possible.
Danger of choking! Keep all the packaging materials away from children.
CAUTION: Accessible parts may become hot when used with cooking appliances.
- The product outlet must not be connected to air channels that include other smoke.
The ventilation in the room may
be insufficient when the hood for electric hob is used simultaneously with the devices operating on gas or other fuels (this may not apply to appliances that only discharge the air back into the room).
- Objects placed on the product may fall. Do not place any objects on the product.
- Do not flambe under the your product.
WARNING: Before installing the Hood, remove the protective films.
- Never leave high naked flames under the hood when it is in operation
- Deep fat fryers must be continuously monitored during use: overheated oil can burst into flames.
1
Important instructions for safety and environment
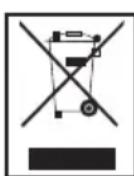
1.2 Compliance with the WEEE Directive and Disposing of the Waste Product: This product complies with EU WEEE Directive (2012/19/EU). This product bears a classification
symbol for waste electrical and electronic equipment (WEEE).
This symbol indicates that this product shall not be disposed with other household wastes at the end of ice life. Used device must bed to offical collection point clicing of electrical and elec- devices. To find these collect- stems please contact to your authorities or retailer where oduct was purchased. Each old performs important role veering and recycling of old ce. Appropriate disposal of appliance helps prevent pone negative consequences for ironment and human health.
1.3 Compliance with RoHS Directive
The product you have purchased complies with EU RoHS Directive (2011/65/EU). It does not contain harmful and prohibited materials specified in the Directive.
1.4 Package Information

Packaging materials of the product are manufactured from recyclable materials in
accordance with our National
Environment Regulations. Do not dispose of the packaging materials together with the domestic or other wastes. Take them to the packaging material collection points designated by the local authorities.
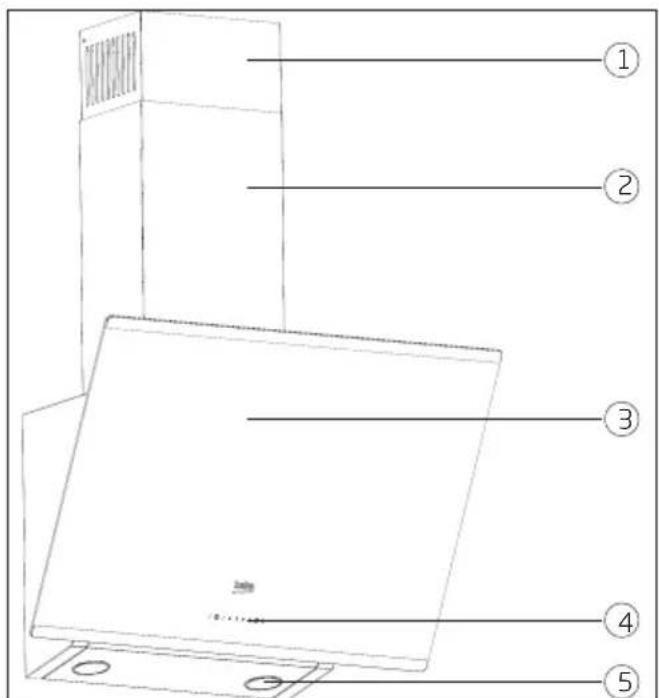
2 Technical specifications of your appliance
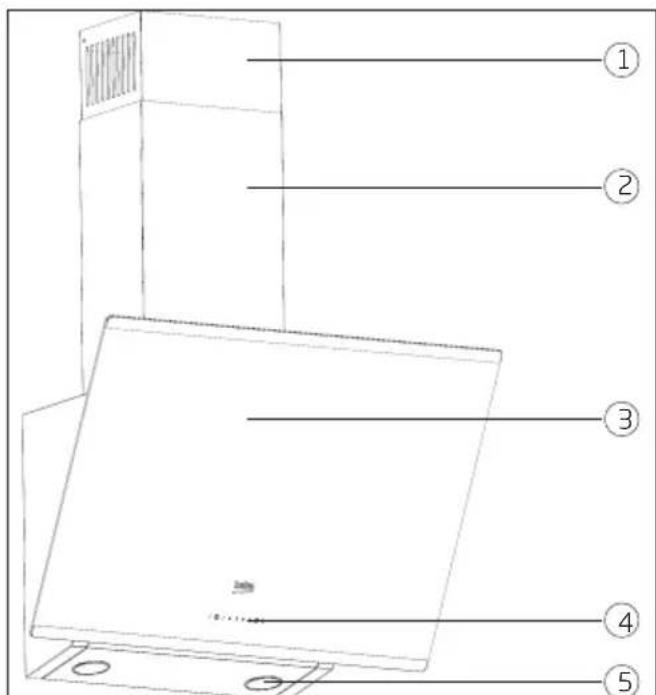
Figure 1
- Inner Chumney
- Outer Chmney
- Glass Cover
- Control Panel
- Lightning
| HCA63640B-W | HCA63640BH HCA93640BH HCA93641BH HCA63640Z | ||||
| Wlth 596 | mm 596 mm 896 mm 896 mm 596 mm | ||||
| Depth 410 | mm 410 mm 410 mm 410 mm | ||||
| Height | 750 mm/1080 mm | 750 mm/1080 mm | 750 mm/1130 mm | 750 mm/1130 mm | 750 mm /1080 mm |
| Supply voltage | 220 - 240 V~ 50 Hz | 220 - 240 V~ 50 Hz | 220 - 240 V~ 50 Hz | 220 - 240 V~ 50 Hz | 220 - 240 V~ 50 Hz |
| Control | With 3 levels | With 3 levels | With 3 levels | With 3 levels | With 3 levels |
| Lamp power | 2 x 3 W | 2 x 3 W | 2 x 3 W | 2 x 3 W | 2 x 3 W |
| AIR outlet pipe | 120 / 150 mm | 120 / 150 mm | 120 / 150 mm | 120 / 150 mm | 120 / 150 mm |
| Motor power | 210 W | 210 W | 210 W | 210 W | 210 W |
| Total power | 216 W | 216 W | 216 W | 216 W | 216 W |
| Colour | B=Black W=White | Zara grey | |||
Values stated on the product labels or in the documentation accompanying it are obtained in laboratory conditions in accordance with relevant standards. These values may vary depending on operational and environmental conditions of the product.
3 Installing your appliance

WARNING
Please consult the nearest Authorised Service Agent for the installation of your hood.

WARNING
*Preparation of location and electrical installation for the product is under customer's responsibility.

WARNING
Remove the protective film (if any) on the hood and flue surface after the installation.

Figure 2a)
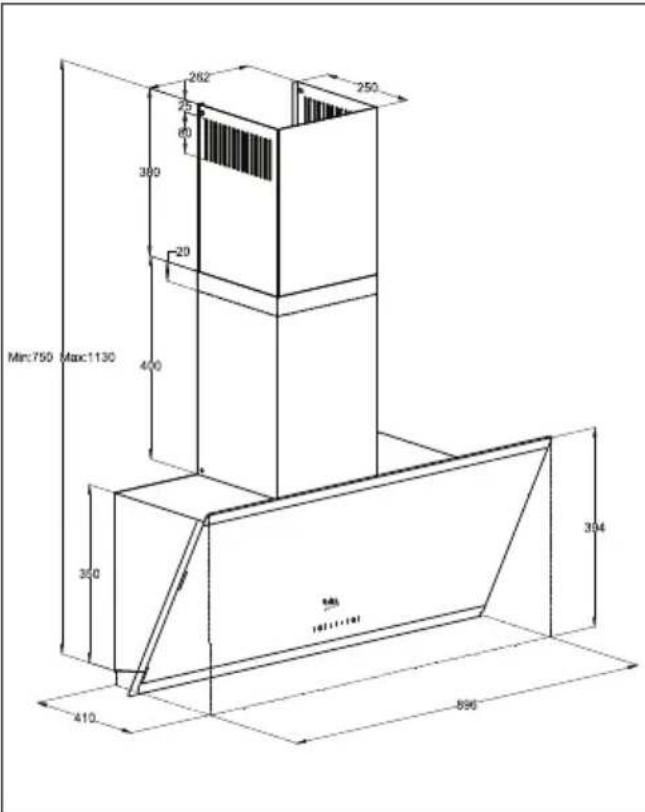
Figure 2b)
Distance between lower surface of the hood and upper surface of the hob should be at least 65cm
Have a qualified electrician make the electrical connection.
Install your appliance so that you can reach the power connection (plug, outlet) easily after installation.
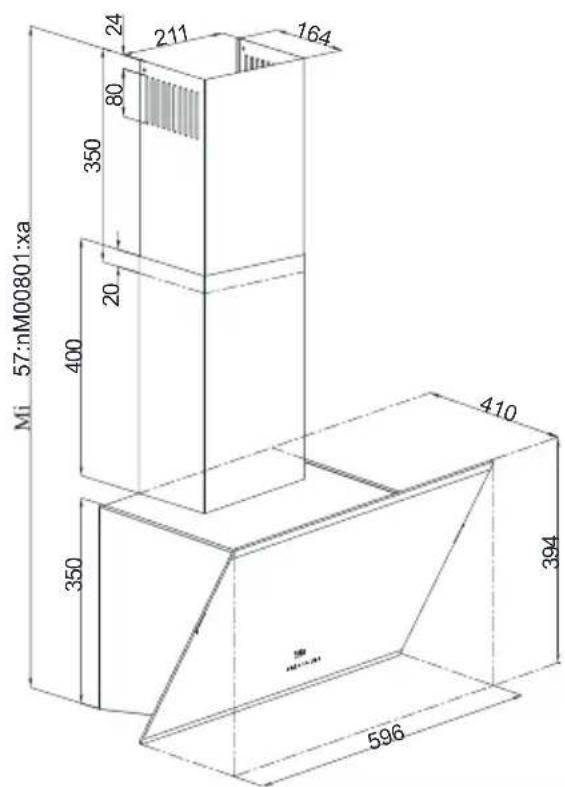
Dimensions are given in mm.
3 Installing your appliance
3.1 Installation accessories
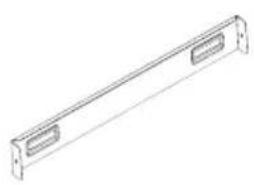
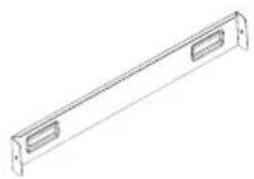
1x flue connection plate
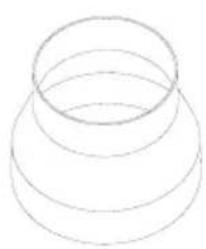
1 x 0120/150 mm plastic flue adapter
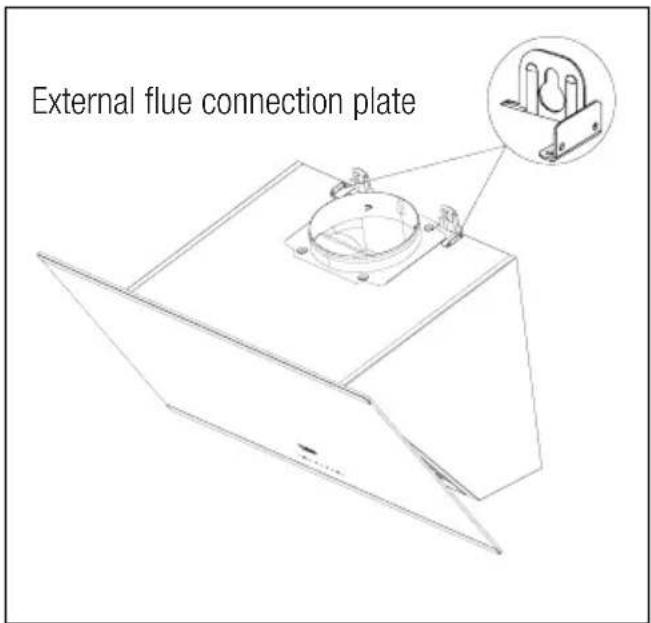
Figure 3b
If you will use 0 120 mm flue pipe, install 0 120 mm flue adapter onto it.
Information required for the preparation of the installation place for your hood is given below.
3.2 Installing the hood onto the wall
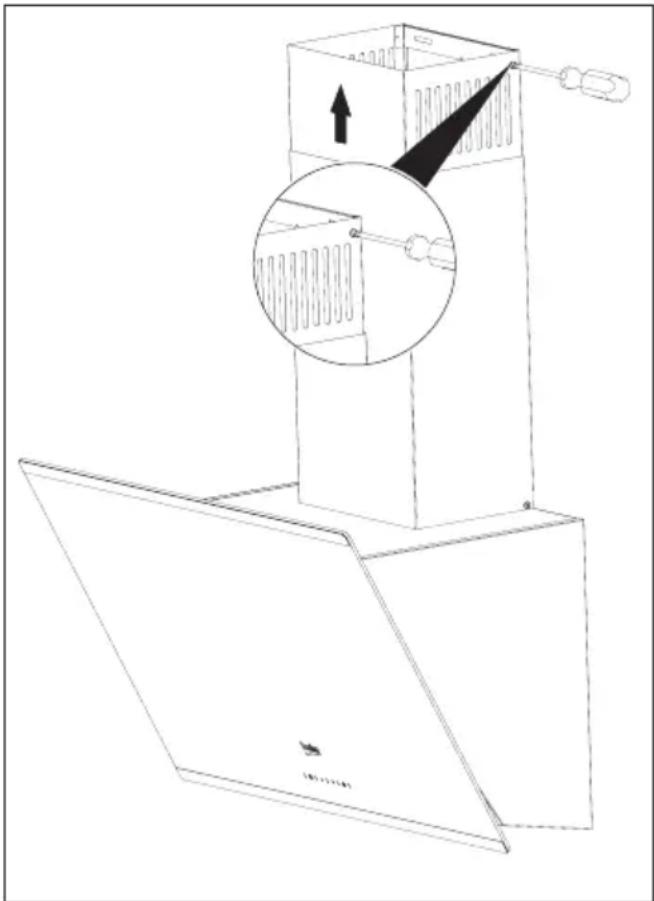
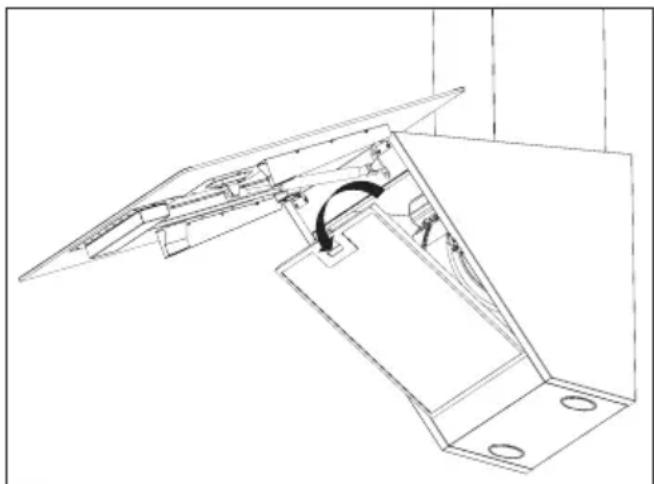
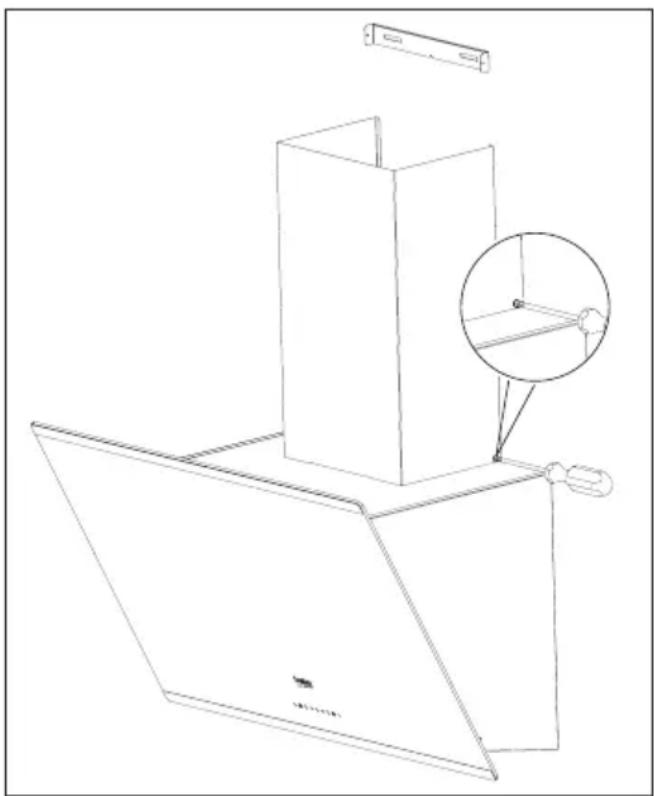
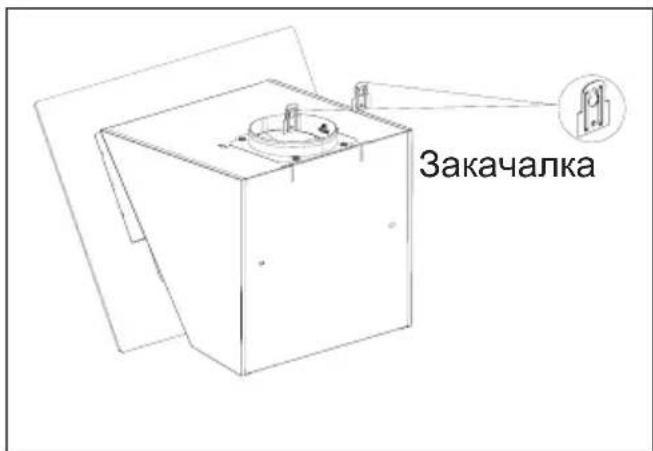
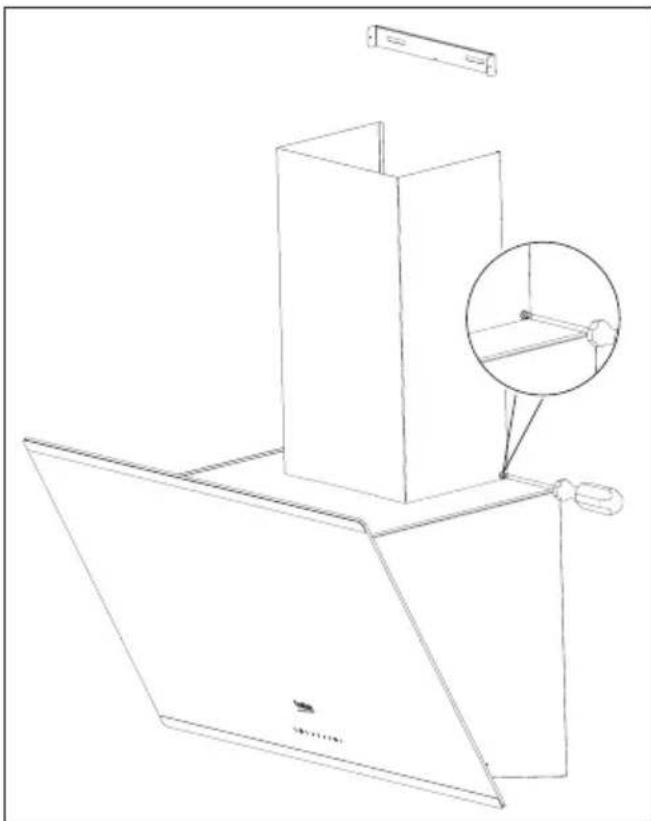
To install the hood onto the wall, loosen the screws of hanger plates on the motor housing and pull the plates upwards. Then, tighten the screws of the hanger plates. (Figure 3a).
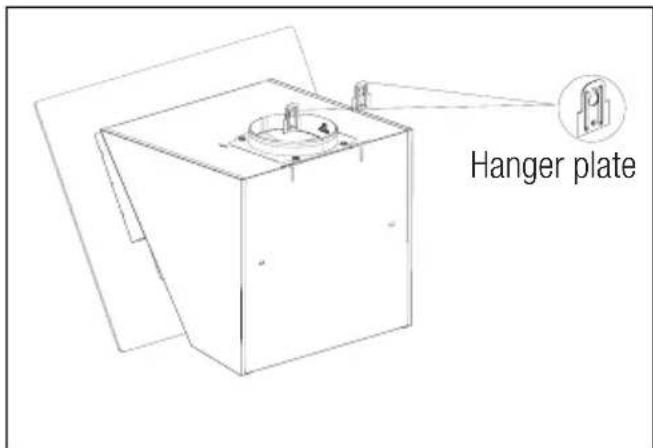
Figure 3a)
3 Installing your appliance
3.2.1 Boring the hanger holes
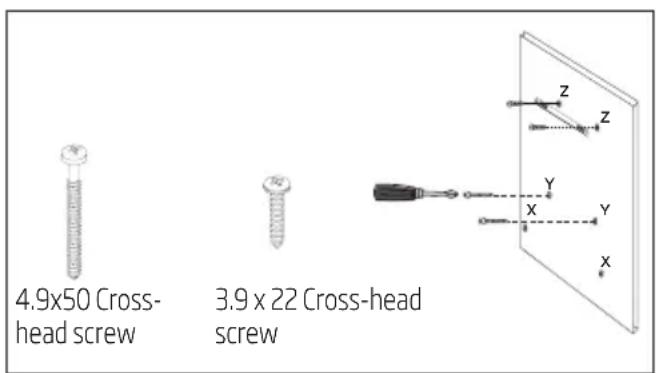
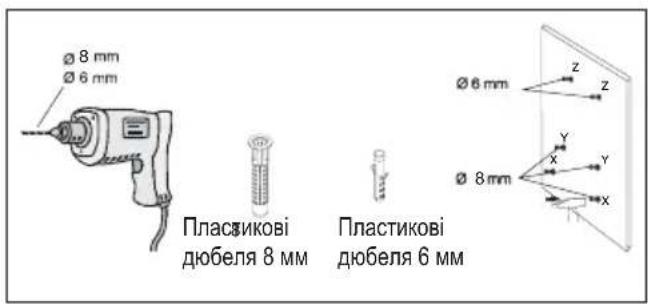
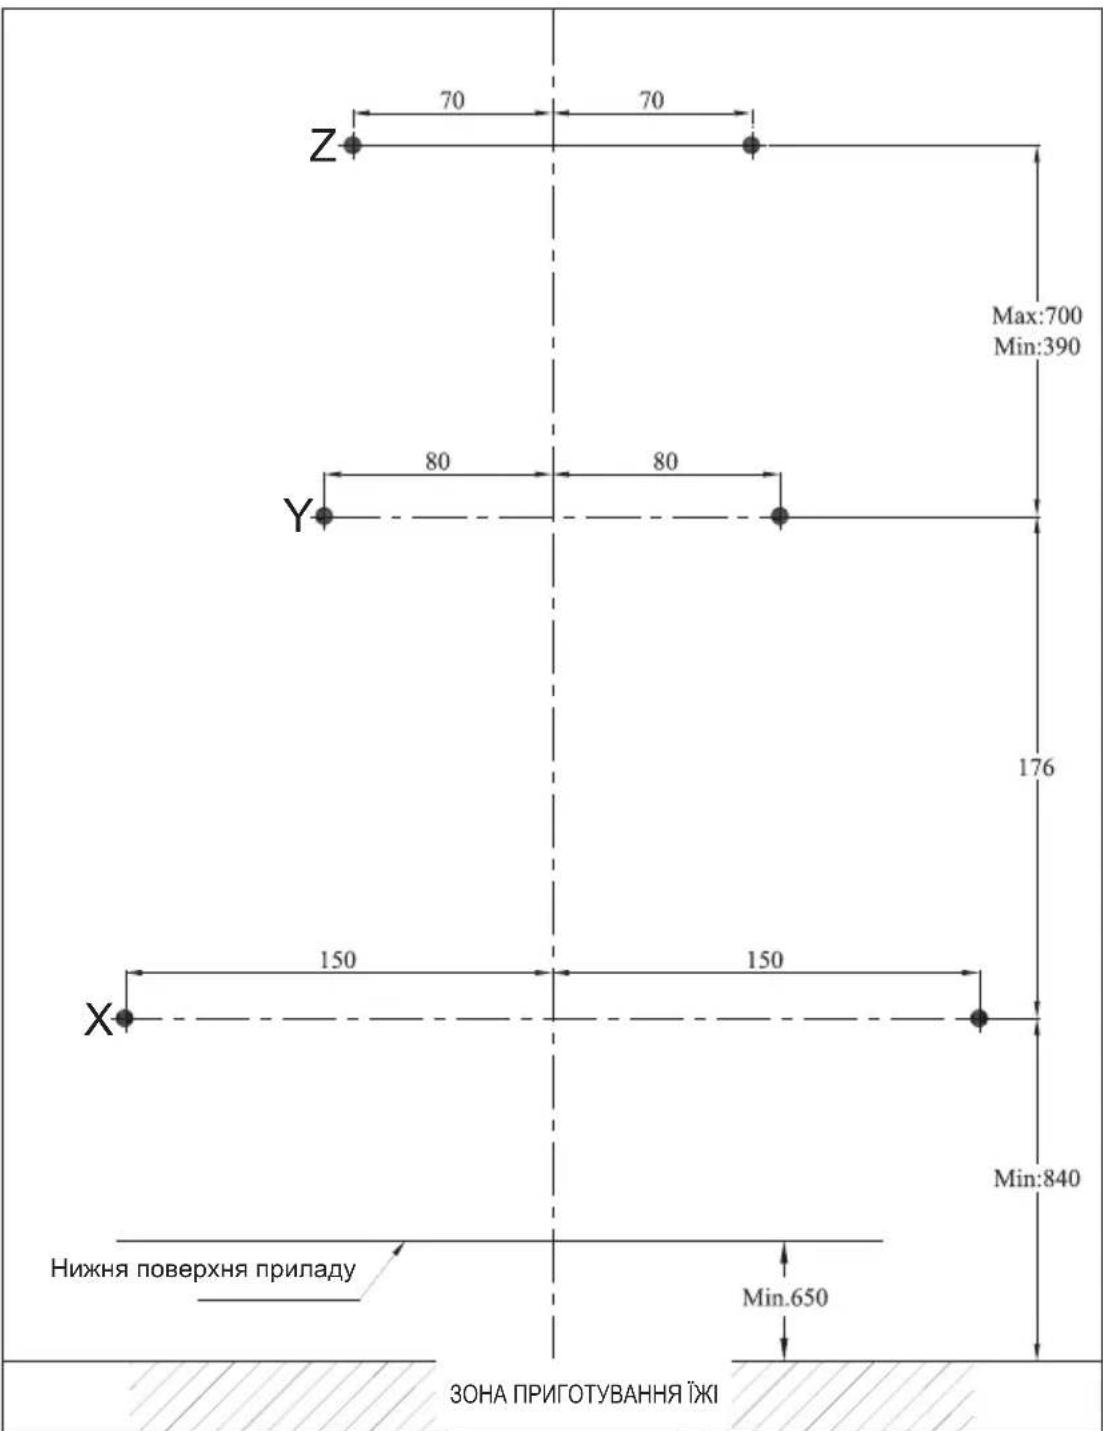
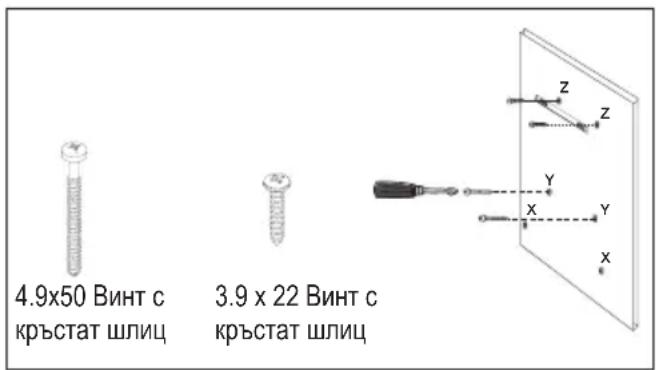
Affix the installation template onto the installation place of the hood. Drill the points market with (X,Y) (Figure 4) using a 0.8mm bit and points market with (Z) (Figure 4) using a 0.6mm bit.


Figure 4)
3 Installing your appliance
3.2.2 Hammering the wall plugs
Hammer 0 8 mm wall plugs (X,Y) into the holes drilled for hanger screws. Hammer 2 × 06 mm wall plugs (Z) into the holes drilled with a 0 6 mm bit for the external flue connection plate. (Figure 5)
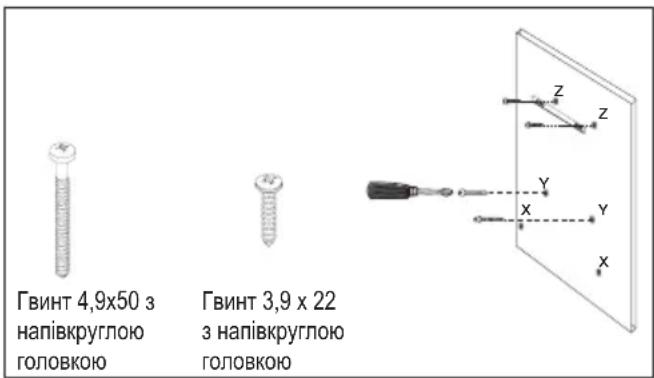
3.2.3 Installing the hanger screws
Install 4.9x50 hanger screws into the 08mm wall plugs (Y) you have hammered into the wall. There must be a gap of 5mm between the screw head and the wall. (Figure 5)
Connect the internal flue connection plate to the 8 mm wall plugs (Z) on the wall using 3.9x22 screws.(Figure 5)
(Figure 5)
3.2.4 Hanging the hood onto the wall
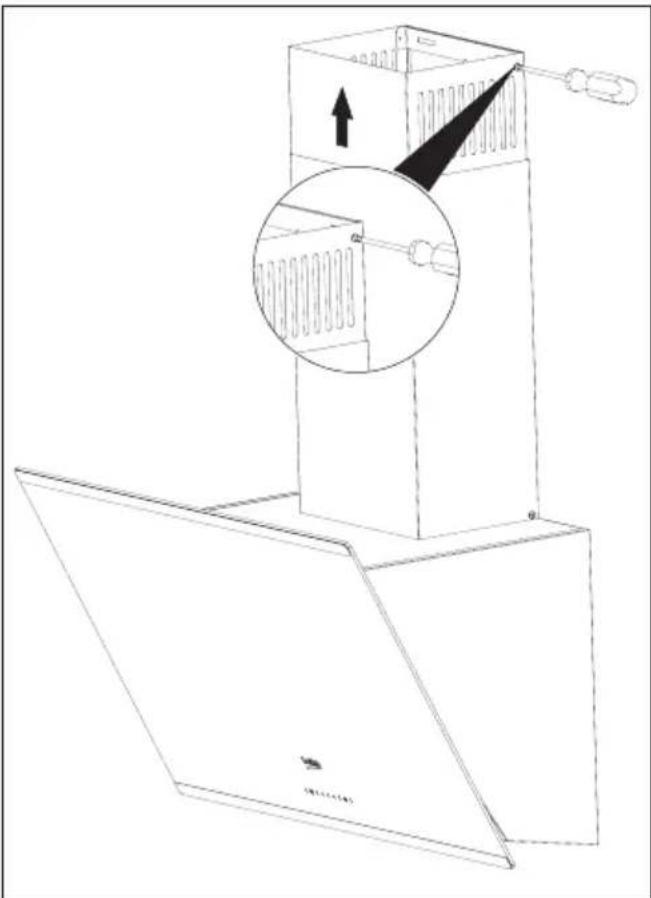
- Hang the hood onto the screws you have installed into the Y holes.
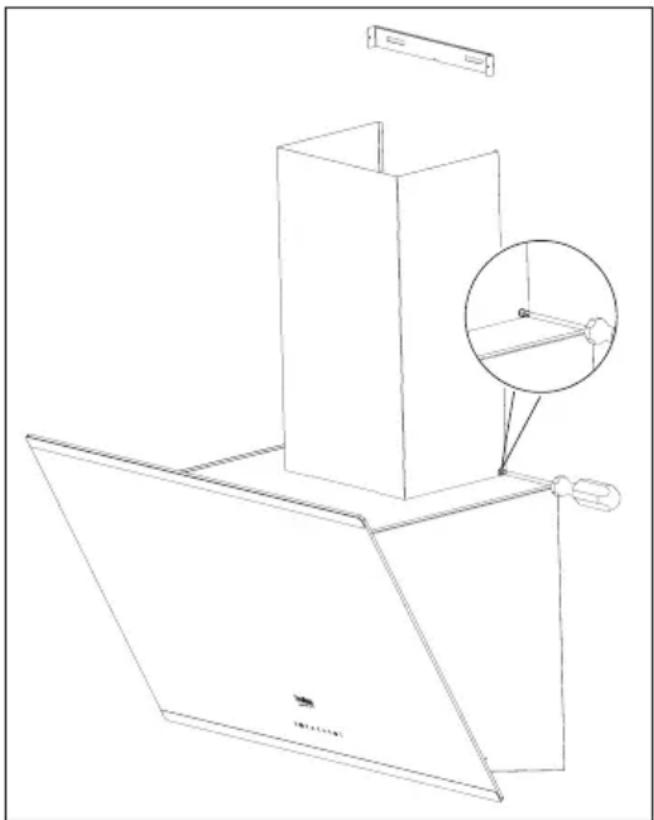
- Open the side suction window of the hood by pulling it towards yourself. Install the 4.9 × 50 screws through the X holes located inside in order to secure the appliance.
3 Installing your appliance
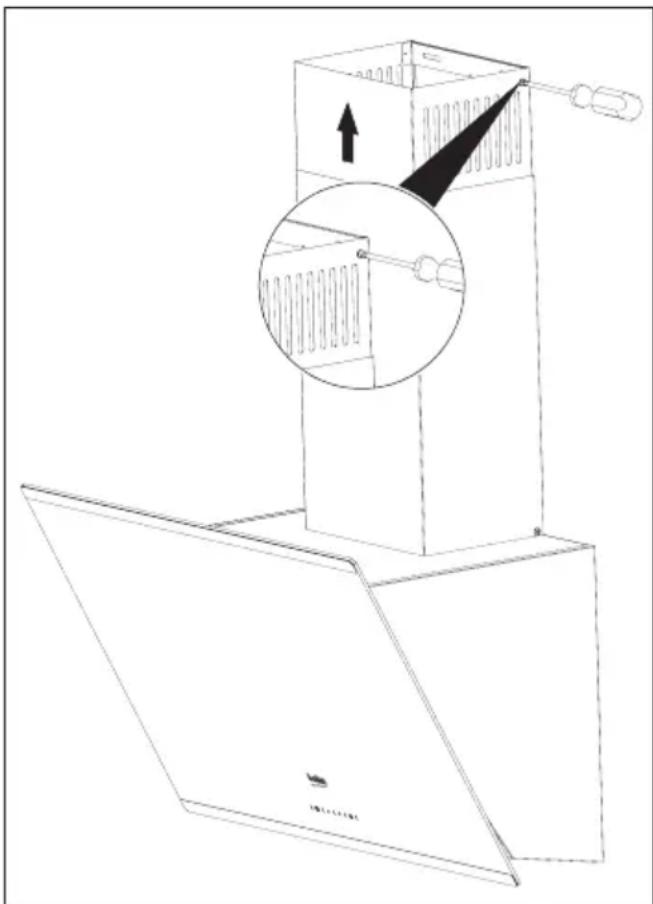
3.3 Installing the hood flue
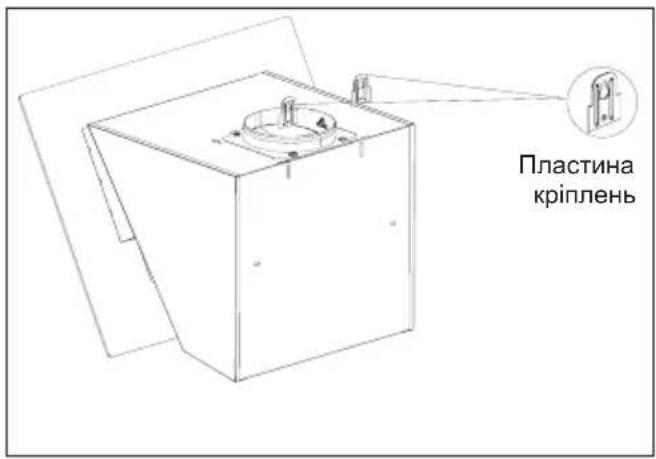
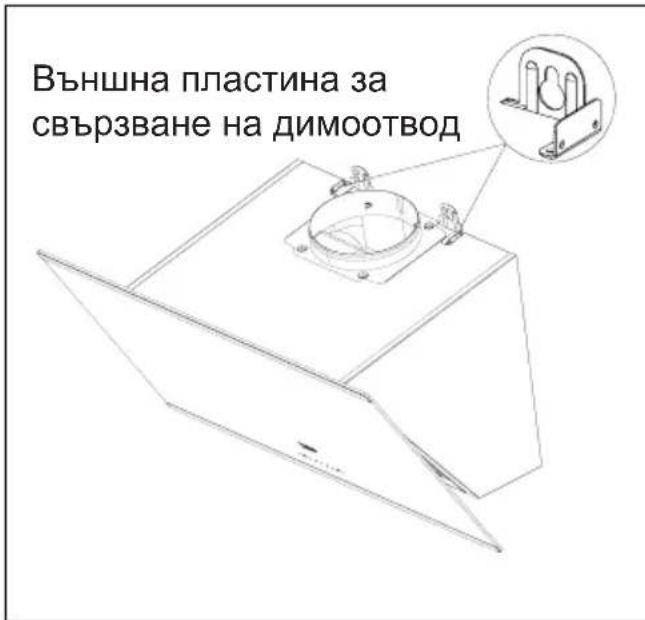
Disconnect the product from mains supply before starting flue installation. Fit the sheet metal flue parts around the body.
Screw the external flue to the external flue connection plates located on the motor housing. (Figure 3b / 6)
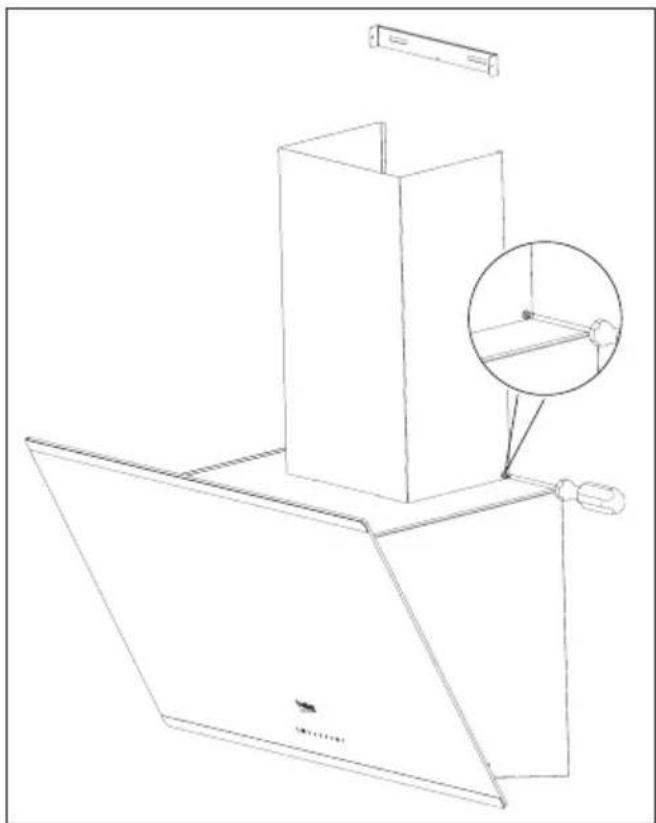
Figure 6
Extend and screw the internal flue from its outer edges onto the flue connection plate which was secured to the wall (Figure 7).
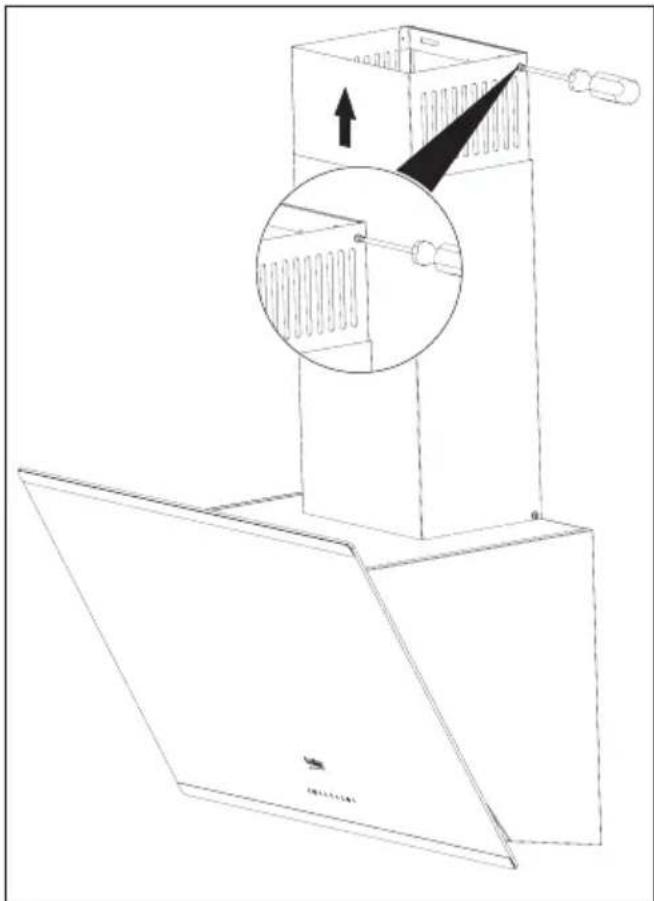
Figure 7
3 Installing your appliance
3.4.1 Using with flue connection
- The vapour is removed via flue pipe which is secured to the connection head on the hood.
- Diameter of the flue pipe should be equal to the diameter of connection ring. To allow the air be removed easily out of the room in horizontal arrangements, the pipe should be slightly tilted upwards (approximately 10^ ).
3.4.2 Using without flue connection
- Air is filtered by the carbon filter and returned to the room. Carbon filter is used when there is no flue in the house.
-
If the hood will be used without flue connection remove the diverters inside the flue adapter.
-
Remove the aluminum filter. To install the carbon filter, center the carbon filter on the plastic part on both sides of the fan body, and secure it on the tabs. Secure the filter by turning the tabs to right or left.
Install the aluminum filter.
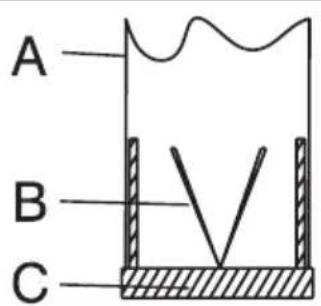
3.5 Flue connection:
Place adapter supplied together with the hood into the ventilation hole located on the top section of the hood. Procure a pipe with a diameter of 120 / 150mm . Connect one end of the pipe to the adapter and the other end to the flue.
Make sure that these two connections are secure enough
so that they will not dislocate when the hood is operated in max. speed. Check that the flaps inside flue are functional when tightened with the clamp. Fit the flue connection pipe onto the adapter. If you fit the flue connection pipe inside the adapter, air suction will not occur since the flaps that prevent air backflow will remain closed.
It is not advisable to make connections to the flues connected with stoves or exhaust shafts. Do not make connections to such flues.
Pipe connection must be as short as possible and have minimum number of elbows.
A: Flue outlet pipe
B: Flaps that prevent backflow
C: Plastic flue
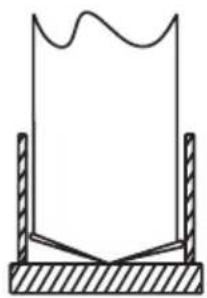
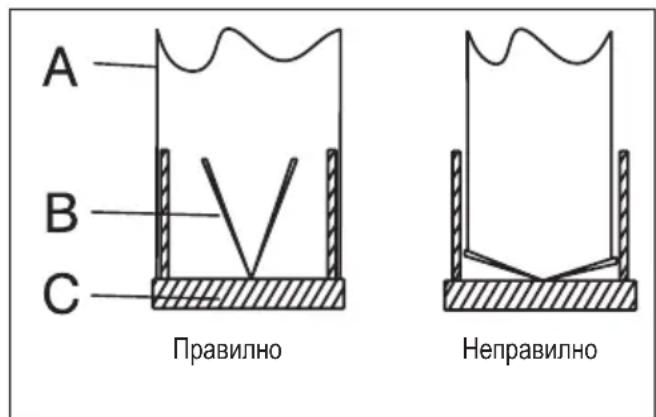
3.5.1 Backflow prevention system (N-RV)
When the hood is operated, flaps are closed in order to prevent possible odours and dust from entering into the ambient from outside.
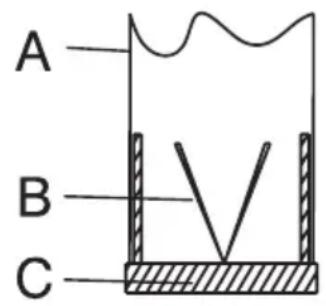
Correct
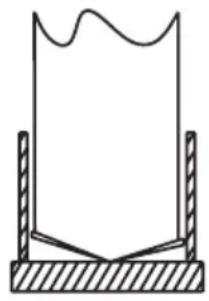
Not correct
Figure 7
4 Operating your appliance
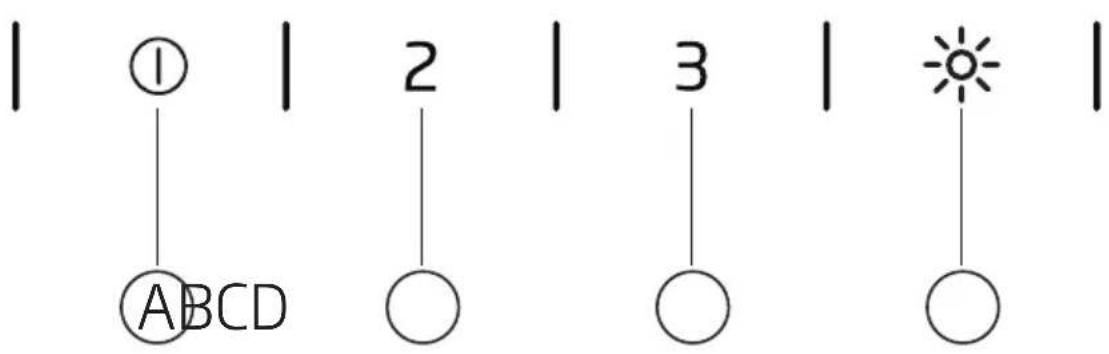
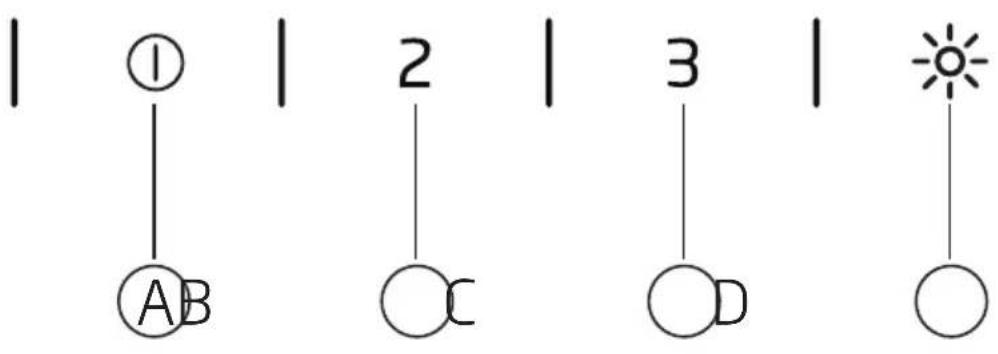
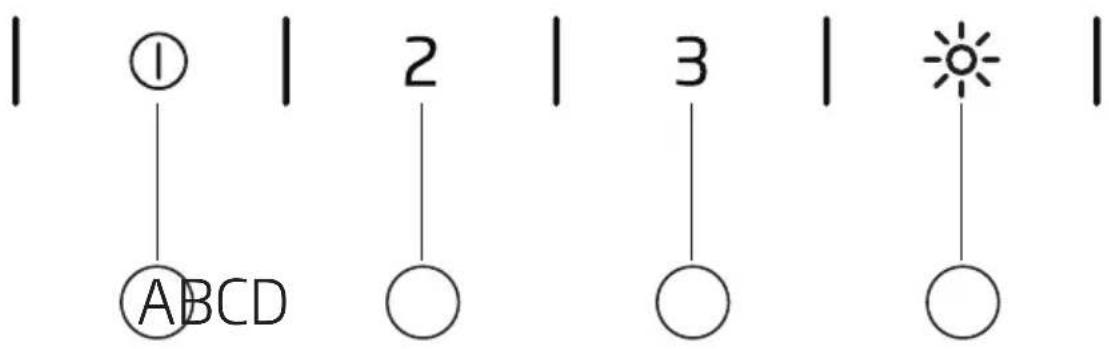
Figure 8)
(A):1st level key
(B): 2nd level key
(C): 3rd level key
(D): Light On / Off key
4.1 Digital electronic control with 3 levels
(A) You can start your hood at speed level 1 by pressing this key.
When you press this key again to switch off the appliance, speed level indication on the display disappears.
(B) key: You can start your hood at speed level 2 by pressing this key.
When you press this key again to switch off the appliance, speed level indication on the display disappears.
(C) key: You can start your hood at speed level 3 by pressing this key.
When you press this key again to switch off the appliance, speed level indication on the display disappears.
(D) key: Light On/Off Key: You can illuminate the cooking area by pressing this key.
Auto-stop in 15 min.:
This appliance is equipped with an Auto-Stop function which allows the appliance to ventilate the room for an additional period of time in order to remove the unpleasant odour and vapour in the room after the cooking is over. Appliance stops automatically after a certain period of time.
To enable the Auto-stop function, press any of the speed level keys (A, B, C) on the control for longer than 2 seconds. A timer with 15 minutes will be activated.
If you press the same speed level key while the Auto-stop function is enabled, function will be disabled and the appliance will stop.
If you select a different speed level this function will be disabled.
If you want your appliance to stop automatically, you must enable the Auto-stop function again.
Periodical cleaning of metal filters:
Filters must be cleaned at about every 60 hours of operation or 4 weeks depending on the frequency of usage.
4 Operating your appliance
4.2 Energy efficient usage:
- When operating the hood, adjust the speed level according to the odour and vapour intensity in order to prevent unnecessary power consumption.
- Use low speeds in normal conditions (1-2), and high speed (3) when smell and vapors are intensified.
- Lights on the hood are intended for illuminating the cooking zone.
Using them to illuminate the ambient/kitchen will result with unnecessary power consumption and inadequate illumination.
4.3 Operating the hood:
- Hood is equipped with a motor having various speed settings.
- For a better performance, we advise you to use low speeds in normal conditions, and high speeds when smell and vapors are intensified.
- You can start the hood by pressing the desired speed level key (A,B,C).
- You can illuminate the cooking area by pressing the light key. (D)
5 Cleaning and maintenance
Prior to cleaning and maintenance, unplug the appliance or turn the main switch off or loosen the fuse that supplies the hood.
5.1 Aluminum filter
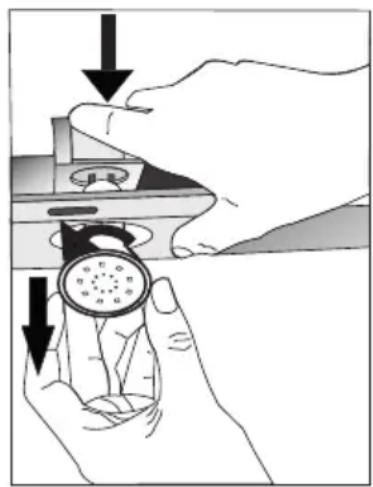
This filter captures oil particles in the air. You are recommended to clean your filter every month under normal usage conditions. First remove the aluminum filters for this process. Wash the filters with liquid detergent and rinse them with water and install them back after they get dry. Aluminum filters may get discolored as they are washed; this is normal and you don't need to change your filter.
5.1.1 Removing the aluminum filters
- Push the aluminum filter lock forward.
- Then, slightly lower it and pull forward. Otherwise, you may bend the filter. (Figure 9) After the aluminum filter is washed and dried, reinstall the filter to its slot by applying above steps in reverse order.
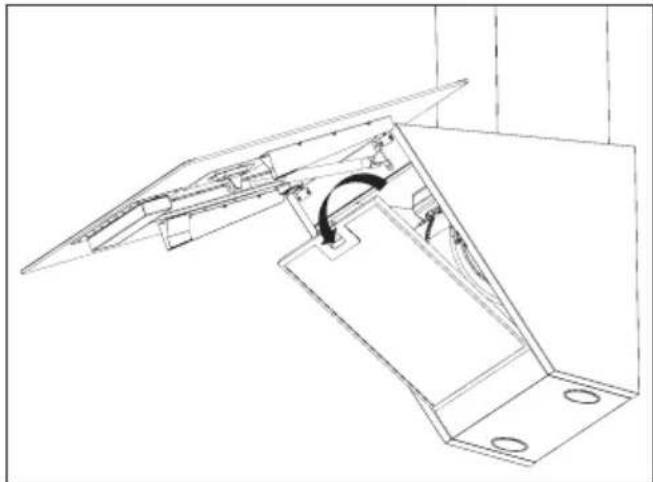
Figure 9

You can also wash aluminum filters in dishwasher.
Carbon filter (Using without flue)
This filter removes the cooking odours. If it is not possible to use a flue, it purifies the air which is circulated inside the kitchen. Carbon filter of your appliance will get clogged in time depending on the frequency of use, style of cooking and regular cleaning of the aluminum filters.

Caution!
Carbon filter should never be washed.
You may obtain carbon filters from Beko Authorised Service Agents.
5.2.1 Replacing the carbon filter
- Remove the aluminum filters. (Figure 9)
- To remove carbon filter, turn the tabs counterclockwise and release the filter. (Figure 10)
Install the new carbon filter.
Install the aluminum filters.

(Figure 10)
Anti-odor filters contain charcoal (active carbon).
They must be changed with periods of approximately 6 months.
Regardless of using a carbon filter or not, aluminum filters must always be installed.
Do not operate your appliance without the aluminum filter in place. Using with carbon filter will decrease suction performance of the appliance.
5 Cleaning and maintenance
5.3 Cleaning
Particularly do not neglect to clean your hood immediately after you have made frying.
Use a soft cloth soaked with liquid detergent to clean the outer surface of your hood.
Never use abrasive or scratching materials for cleaning.
You may use the cleaning agents commercially available for persistent grease etc. by following the warnings on the product. In order not the scratch the brushed steel body, wipe in the same direction with the bush trace.
Do not use cleaning agents containing hydrochloric acid, bleach or abrasive powders in order to maintain the surface quality of your product. Use a cloth dampened in soapy water or special stainless steel cleaning spray for stainless steel steel surfaces. Remove the protective foil on the appliance.

Caution!
You may cause a fire if you do not follow the instructions on the cleaning and replacement of the filters of your hood.
If you need to transport the appliance:
- Keep the original packaging of the appliance. Transport the appliance with its original package, and follow the transport markings on the original package.
If you do not have the original package:
- Do not place any objects on the hood.
- Protect the outer surface from impacts.
- Pack the appliance so that it would not be damaged during transport.
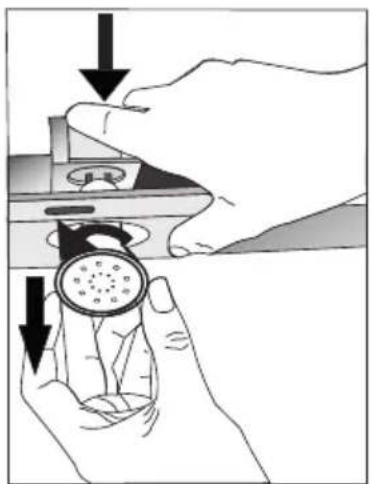
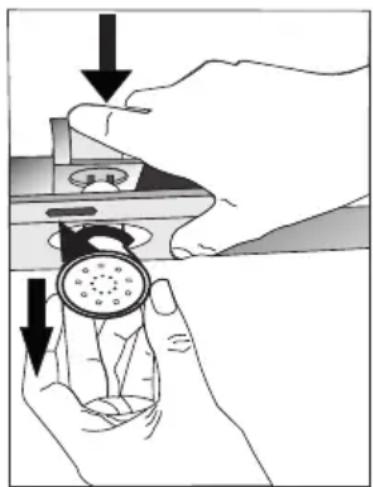
5.4 Replacing the lamps
Disconnect the hood from the mains supply.
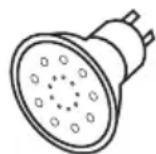
This appliance is equipped with 3 W halogen lamps.
To replace the halogen lamps, press the lamp downwards from the rear section of the lamp holder to release the lamp. Then turn it counterclockwise by 1/4 tour and remove it.
Perform the above steps in reverse order to fit the new lamps.
Max:3W

You may procure lamps from Authorised Service Agents.
6 Troubleshooting
| Troubleshooting Root Cause Help | ||
| Appliance is not working. | Check your fuses. Fuse may be blown, inspect and restore it. | |
| Appliance is not working. | Check the electrical connection. Mains voltage shall be between 220 and 240 V. | |
| Appliance is not working. | Check the electrical connection. Check if other appliance in your kitchen operate. | |
| Illumination light does not operate. | Check the electrical connection. Mains voltage shall be between 220 and 240 V. | |
| Illumination light does not operate. | Inspect the lamp switch. Lamp switch shall be at "on" position. | |
| Illumination light does not operate. | Inspect the lamps. The lamps of the appliance shall illuminate. | |
| Air inlet of the appliance is inadequate. | Inspect the aluminium filter. Under normal operating conditions, aluminium grease filter shall be cleaned at least once in a month. | |
| Air inlet of the appliance is inadequate. | Check the air discharge chimney. The air discharge chimney shall be at "on" position. | |
| Air inlet of the appliance is inadequate. | Inspect the carbon filter. The filters of the appliances with carbon filters shall be replaced once in every 3 months under normal conditions. | |
5.1 Aluminium filter
BénbMnShaHOBn KJIeHTe!
Дякемо 3a пибання сьOTO npILAу TOPROВОМарkn Beko. Mn cnodibaemocra, lo Bn otpmaete haikpaani pezylbtaTN BiD BVKOPINCTAHNЯ npILAay, BnroTOBLeHORO 3a HaIKpaUIMN CTaHdApTAMN YKOCTI 3 BVKOPINCTAHNЯнсCyuacHIwX TexHOJorI. Came TOMy, 6ydIJaCKa, yBaJxHO I NobHicTIO npOHTaIte uei Noci6Hnk KOpNCtYBaaya Hyci iHsi cynpOBiDNi DOkUMeHTN nepeD BVKOPINCTAHNЯm Bnpo6y Ta 3bepejItb Noci6Hnk ДЯ DoBIdkn B MaIByTHbOMy. IpepaBaTu npINAad iHsiO oc6i Tpe6a pa30M 3 Noci6HnkOM KOpNCtYBaaya. DToPIMyITeCb IHcTpyKci, 3BeptAIOCh yBaIg Na BCIO INΦopMaciIO n PonepeJxENHRA B Noci6HNIy KOpNCtYBaaya.
- Léen eIeKtpoPpIaI npn3NaYeHO TiiBkn dIyNo6yToBOrO nOdi6 HOrO 3aCTOCyBaHnI, a Came:
-y KyxohnX 30Hax IJnI nepcoHaNy B Mara3nHaX, ophiacx Ta iHnx po6oyn npimiueHHx;
- HaΦepmax
-yHomepax roTeJIb, MOTeJIb TOIO; - yПримиених, со Надаютбсдл поживаши Ha yMObax Ha -пibnaHCioHy.
BnKopncToByte eey eNeKtpo npnaT iNbKn 3a noRo 6e3nocepeHim npn3HaueHHam, k OnncAo B cboMy noci6Hnky.
Bnpo6HnK He Hece BiDIOBidaNb-HocTi 3a 3bntKn, kI BnHKnBHaCNIiOK HnPaBnIbHoro BCTaHOBJIeHHa 6o HeHaJIeXHoro BN-KOpNCtAHnY Bnpo6y.
- Zei npilad He npn3naeHOn dIy BIKOPnCTaHHa DITbMn BIKOM Do 8 pOKIB Ta Oco6am 3 ObMeJxHmN oI3uHMM, CeHCOPHMM a6o po- 3ymOBHMM MOXJIINBOCTaMM a6o Oco6aMn, kI He MaOTb BiIDNOBID-Horo DOCBiDy uN 3HaHb 3 BIKOPnCTaHHa NpNJADy, 3a BInrKOM BInpaKIB, KOJI N BOH npe6yBaHTb NiD HargJdOM a6o npoiHcTpykTOBahi zoDo BIKOPnCTaHHa npNCtpoU B 6e3neuHm cnoci6 i po3ymiOTb He6e3neKy.
BukopncTaHnIitbMn Bnp6y Ik irpaikn 3a6OponeHo. OunueneHny o6cnyroByBaHHn He MaOTb 3diinCHOBaTn dITn 6e3 Hargny.
MihimalbHa BiDcTaHb MIX ONOpHOIO NOBepxHeIO EMHOCTI DnI npiroTyBaHHa Ixi Ha BapnilbHi
1 BaxJIiBi iHcTpkykciI 7oDo texhikn 6e3peKn Ta oxopOHn HABKOJINHbOrO cepeIOBnIa
NoBepxHi HauHHKyoU qactuHOIO Bnp6y Mae 6yTu He MeHwe 65 cm.
-Якшо inhctpykciя zuoO BCTaHOBJIeHHra30BOI BapnilbHOI NOBepxHi BN3Naue 6iNbuy BiD CTaHb, Taki peKOMeHaaui Tpe6a 6patn do yBaRn.
- Ipekehntec, 0Ba7eEektpnHa Mepeka BiIOBidae BmOram, 3a3NaueHnM Ha nacnpTHiTabnuci npnaNy.
- Y kOДHOMy pa3i He KOpNCTuYTeCya eIeKTpOpPnJaDOM, JaKIo shHypr XnBJIeHHa6o Cam eIeKTpOpPnJaI NOsKOJxEHO.
- HamaraiTeC8 3anobiratn noxkoJxKeHHIO Ka6eJIIO XNVBJeHHa: yHnKaIte NOrO CTnCKaHHa, 3rHaHHa a6o KOHTaKTy 3 roCTpIMn IpeMeTaMn. He TpMaIte Ka6eJIb XNVBJeHHa 6iJa rapaynx NOBepXohb i BIDKPNToro BOrHIO.
-Пд'еднання риладу Tpe6a 3dINCHIOBATN BKNJIIOUHO B pO3ETKy i3 3a3eMЛIOBaJIbHIM KOHTaKTOM.
YBAG: He πiδ'εdHynte npuJaIdo eJeKtpomepejIo ciIKOBHToro 3aBepseHnMoHTaXnXpo6it.
- Po3tauye npnaTak, 06 BnIka 6yna 3aBxdn DoCTynHOIO.
He TopkaTecr Iamn nicJx Tpmbaoi pobotn.BoHmMaOTb
BnCOKy Tempepatpy Moxytb 6NeKTI KINZIBKN.
-ДOTPIMyIteCByBn3HaueHnxKOM-NeteHTHMnOprAHmnpaBnJ ⅢOo BIDBeDeHHNobITpyHx Mac(ue nonepedXeHHHe 3actOCOBYcTBcA JINBkOpncTaHb6e3 ra3OBiDBoDiB).
Eknpnyataia npnada 3iHcHIOCTbCnIpcnpaHnHaBapnblHi nobepxHi kactpyl,CKOBOPiKn TToO.lHaKWe BnCOKaTemnepaTypa MoKe CnpuHHTNDeΦopMyBaHHdEaKnx DeTaJeBNpO6y.
- Перед 3няпг am kactpyni, ckoBopiДКИ TOso BmKHiTb BapnIbHy NOBepxHIO.
He 3aIuShaTe rapuy onIO Ha BapnIbHi NOBepxHi. CkOBopiKn i3 3aIuShKaMn rapyaOoi OJIIMoJyTb 3arOpitncra.
3BepHItb yBary Ha 7tOpn I Ooxnn, ockinbkn OIIa Moxe 3arO - pITscI nd qac npiroToyBaHnI iXi, HapnknaKaptonPi fpi.
3aminy KINPOBNOBbHOro 0iNbTpa Tpe6a 3dIChOBaTu 0HaMHeHspe pa3 Ha Micr. 3aminy ByrInbHorO 0iNbTpa Tpe6a 3diCnHOBaTu 0HaHaMHeHspe pa3 Ha 3MiCi.
- YnueHnBnpo6y Tpe6a BnKoHyBaTn BiINOBiIDNo Do peKOMeHdaui, 3a3NaueHnx y noci6Hnky
1 BaxJIiBi iHcTpUkciI 7oDo texhIKn 6e3peKn Ta oxopoHn HABKOJINHbOro cepeIOBnIa
KopnctyBaay. RaKo quHsEHHBnO6y BnKOHyBaNoC H e BiDno -BiHO do peKOMeHaCiN noCi6-HNKa KopnctyBaay, icHyE pN3NKBnHKHeHHr NoKexi.
BnKOpNCTaHHn npOTnNOxexHnx ⅡIbtpyBaJIbHnx MaTepiJiB 3a MICTb NToUHO 0IbTppa 3a6o- poHeHo.
BukopncToByte Inwe opriHaJIbHi Detani a6o J Detani, peKOMeHDoBaHi Bnpo6HnKOM.
BukopncTaHnBnpo6y 6e3 pfIb- Tpa N BmMaHnF oIbTpiv niD yac po6OTn Bnpo6y 3a6OpOHeHo.
- Y pa3i BnHnKHeHHЯ NOXeXi BnMKnHiTb XnBJIeHHra BnPo6y I Ky-XOHnIX npnlaIb.
- Y pa3i BUNHKHeHHaNoKexi Ha-KpInTe NOyM' Ta HikOn He BnKOpNCTOBuY Te BOdy dIpy Ioro racinHra.
Bid'ednyte npnilad BiD eleKtpomepexi neped KoxHm YI-ueHHaM, a TAKoX KOJIb H He BnKOpNCTOByeTbcra.
-Пдчасоночас hoі рбOTи BnTЯждя eLEKtpuHoiВapnlbHoI naHeni a6o ДЯ npuJaIB, ⅢO npaTOb Ha iHwOMy BNDi eHepii, BiMInHOi BiD eLEKtpuKN, BiD'EMHn TnCK HABKOJINHbOro cepeOBuHa He nobHHen nepeBnuSyBaTu 4 Pa (4 x 10 6ap).
- Y npimiieneHHi, De BnKOpncTOBcTbCnPiJaD, BnXJOnHi ra3n npictpoiB, 10 npaioHb Ha Ma-3yTi a6o ra3i, Hapnikad HarpiBaya npimiieneHHa, NOBHHi 6ytu a6coIIOTHo iOJbOBaHmM a6o J Takni npictpiN NobHeh Matn repmetnue BnKOHaHHa.
-Пд часпд'едннга30ВIDBOy BnKOpNCTOBuYTe Tpy6n DiaMeTrop120abo150mm.Tpy6onpoBiMa6byTuKOMORA KOpOTShM i MaTu YKOMORA MeHsu KiIbKICTb KOJIiH.
He6e3neka 3aIyxn! 36epiraTe naKyBaIbHi MaTepiAn B HeIoCTynHOMy dIa ITei Micci.
Obepexho!PiJ yac BnKopn-CTaHHy KyxOHnX npnlaIb IerkoDocTyHl DeTani MoKytB Ha rpiBatncra.
Bnynckn OTBip Bnpoby He MoxHaPiD'EnHyBaTn Do NobiTpy-Hnx KaHaJIb, De e iHsN dM.
KoII BnTjXka IJI eJIeKTPnHoiBapnIbHOI nanei BNkOpncTOBycTBcOndHocHo 3 npncToPOMN,IO npauHOTb Ha ra3i nnIHOMy naNBi (ue MOxe He CTOCyBaTnCpnilaID, kI liWe BnPyCKaHTb NOBITra B npmiiEHH), BEHTNIOBAAHBAHNA pIMiEHHI MoKe 6yTN HeIOCTaTHIM.
- Po3miüeni Ha Bnpo6i npedmetn moxytbyynactn. He po3miuye
1 BaxklnBi iHcTpyKcii 7oDo texhikn 6e3neKn Ta oxopOHn HABKOJIshNbOrO cepeIOBnIa
Ha Bntjxci 6ydb-ryki npedmetn.
-Фламбуваньстрав,як рo3taшовано пд виробom,заборно.
YBAGA: Ipeed yctaHOBJIeHHaM BNTJKKI 3HIMITb 3axnchy pIIiBky.
Hikon He 3aIIwaIte dxpeela BnCOKOro BiKpntoro nOlym'piBnTJxKOHO, kA npaIOe
Tpe6a 3a6e3neuHTn noCTiHn KOHTpOJIb PpNTIOpHNuCb NiD Yac ix pObotn: neperpita oIia MoKe cPAnaxHyTu.
Infopmaia, Heo6xHa dna nirnroTOBkn Micya yctahOBKn BNTXKN, noDaHa HxKye.
3.2 YctaHOBKa BNTJxKn Ha CTiHi
Uo6 BCTaHOBnB BNTJkKy Ha CTiHi, BiKpyTiB rBNHTn PnactnH KpinHeh Ha Kopnyci DnryHa i NotarHITb PnactnH BBepx. Picna 3akpyTtB rBNHTn PnactnH KpinHeh. (PncyHok 3a)
(PucyHok 3a)
3 YcTaHOBka npnlaNy
3.2.1 CbeprnHHn OTbopIB Jn KpinneHb
PnKpinitb MoTaxHn 7a6noh Ha Micue yctahOBKn BNTXKN. BncBepnItb OTBOpn y Tockax,No3HaueHnx (X,Y) (PncyHok 5), 3a DonomorToIO CBePnA 0 8 MM, a TOnkN, No3HaueHi (Z) (PncyHOK4) 3a DonomoroTO CBePnA 0 6 MM.
(PucyHok 4)
3 YcTaHOBka npnlaNy
3.2.2 3a6nBaHnЯДIO6eJIIB MOJOTKOM
3a6nTe MoNtKom 8 MM (X,Y) B OTBOpN, BnCBepDneHi nnPiBicHx rBnHTiB. 3a6nTe MoNtKom 2 x 6 MM nO6eJI (Z) y OTBOpN, BnCbePdneHi CBepDnom 6 MM, nnPiAnKn iEHaHHa 3OBHIshbOro NobITponpoBody. (PncyHok 5)
3.2.3 YcTaHOBka nIDBicHNx rBNHTiB
BCTaHObIb 4,9x50 nIDBiCHi rBnHTn y IIO6eJx 8 MM (Y), 3a6ntux y CTHy. MIX rOIOBKOIO rBnHTa i CTiHO MaE 6yTN BiDCTaHb 5 MM. (PncyHok 6) 3aKpinitb nnAkHz nID'EDHaHHra 3OBHIuHbOro NOBITPOnpOBOdy Ha IIO6eJx 6 MM (Z) 3a DOnOMoTOO rBnHTib 0 3,9 x 22. (PncyHok 6)
3.2.4ПиДВИшУВань ВИТЯЖКИНСТIHI
PiBicbTe BNTkKy Ha TBnHTN, BCTaHOBneHi y OTbopax Y.
Bikpnite 6iHne BIKHO BCMOKTyBaHHn, NotarHyBwn noHa ce6e. BcTaHOBIT rBnHTn 4,9x50 y OTbOpn X, jki 3NaXoJrTbcr BCEpeDnHi, 106 3akpinnt npnilad.
3.3 YcTaHOBka NOBiTpponpoBODY BNTJXKN
Iid yac BnKoHaHH np6it 3 yctaHOKn npncTpiHneOxIDHO Bi'EDHaTN BiMepexi eNeKTPOXNBenHn. BcTaHOItb MetaneBi nactuHn HABKOJOKpnycy.
PnKpyTb 3OBHsiHni NOBtponpoBiD O nHaKNPiEHaHHN 3OBHsHbOro NOBtponpBOy, Ka 3HaxoHTbcra Ha Kopnyci DBuRyHa. (PncyHok 3b/7)
(PncyHok 5)
3 YcTaHOBka npnlaNy
Po3cyhblei 3akpinitb 30BhiuHi KpaBHytpiuHboro nobitponpoBiy Ha nlaCTnHi Ni'd'EdHaHnNoBtponpoBody, kka BCTaHOBJIeHa Ha CTiHi (PncyHok 6).
(PncyHok 6)
3.4.1 BnKOpncTaHnBnTJxKn i3 nobITponpOBOdom
- Iapa BndaIaIeTbcI 3 npMiiueHnHaYepe3 Tpy6y nobITpOnpoBOda, kA npKpInHeHa Do 3'EdHyBaJIbHOI rONOBKn BNTJxKn.
- Diametp trpy6n nobitponpoB0da maE dopibHOBatn diametpy 3'EDHyBaIbHOro KInbUa. 3o63a6e3neuHTn HaneXHe BvBeDeHHra NobiTp3 npimiuHnry y rOpN3OHTaIbHOMy HAnpymKy, trpy6y Heo6xIDHO 3Jerka NiDnTn Bropy (npn6n3Ho Ha 10^
3.4.2 BnKOpncTaHnBnTJxKn 6e3 nobitponpoBody
- Nobitprp qinbtpyecbcy ByrilbHm pimbtpom i nobepTaecbcy npmiueHHa. ByrilbHn pInbTp BnKOpncToBycBc, kUo y 6ydnKyu Hemae nobitponpoBody.
-ЯкwoBNTJkKa BnKOpNCToByBaTmEtbc86e3 NOBITpOnpoBOy,3HIMITb BiDbIHi npNCTpoi BCEpeHHiaaANTepa nobITpOnpoBOy. - 3himtb aHOMiHcBn fipbTp. 06 BCTaHOBTu ByrIbHn fipbTp, po3MicITb Ioro y nactNKOBHX DetanJx 3 06ox Ctopin Kopnycy BeHTNlAToPA i npKpinitb Ioro do nlaHok. 06 3aikCyBaTH fipbTp, NOBepHITb nHaKN BInBO abo Bnpabo.
BctaHObitb aIOMiHieBn pfIbTp.
3.5ПiД'ЕнаннЯ NOBITponpoBODY:
BctaHObITb aanTep, knn noCTaBnEeTbcpa30m i3 BntjKoO, y BeHTnIaIiHOMy OTbOp, 10 3HaXoIITbcry BepxHi yacTHHi BNTJkN. PnpI6aIte Tpy6y diametpom 120/150 MM. Iid'ednaIte oIN KineCb Tpy6n Do aanTepa, a IHsH - do nobiTponpoBoda.
IpekeohaTeC8, 00 ci Dba nID'edHaHnDocTaT HbO HaIiHi,
H He 3MiUyBaIINc, KOJI BNTJXKa IpaQHe Ha NobHi NOTyxKHOCTI. IpeBipTe, YN 3acyBKN y NOBITponpoBOi MOKyTB cyHKIOHyBaTn, kKIO IX 3aΦikCyBaTN XOMYtOM. BCTAHOBiTB Tpy6y Ni'EdHaHHN NOITponPOBOy Ha aAnTEpi. KIO BV npKpInTe Tpy6y Ni'EDHaHHN NOBITponPOBOy DO aAnTEpy, BCMOKTyBaHHN NOITpr He BiD6yBaTMetbcr, OckIbKn 3acyBKn, kI nepeWkoJkaHObT bBOpOTHi CnpKuIyIe II NOTOKY NOBITpr, 3aIIuTaBCr 3akPHTMn.
He pekomeHdyetybca nID'edHyBaTu BnTjKky do NOBITponpoBODI, kki NIKNUOyeHi Do neey a6o BnTjKHX xaxt. He nID'edHyuTe BnTjKky Do TaKnx nobITponpoBODI. 3'edHyBaIbHn Tpy6oPobiD MaE byTu YKOMORA KOpOTsM i Matn YKOMORA MeHsy KJIbKICTb KOINH.
3 /ctaHObKa npnlaNy
A:BunyckHa Tpy6a nobitponpoBoda
B:3acybki,io npeewkoJxauTb 3BOpOTnIuKyIaII NOtOKy
C:Пл actikobи noBITponpoBID
3.5.1 Cnctema 3anobirahna 3BOPOTniu npkylaui noToKy (N-RV)
IiD qac po60TN BNTJxKn 3acyBkn 3akpnti 3 MeTOIO 3anobirAHn MOXINVBOMy NOTpanJIHnO 3anaxIB i Nnny 33OBHI y npMiuSeHHN.
PpabunbHo HenpaunbHo
(PncyHok 7)
4 Ekplnyataizipnilady
(PncyHOK 8)
(A): KhoNka 1-ro piBnA
(B): KhoNka 2-ro piBnA
(C):KHONKa 3-ro piBHa
(D): Khonka yBIMK./BIMK. CBITna
4.1 TpboxpiBHeBa cnCTema uΦpOBo- ro eIeKtpOHoro ynpaBnHn
Khonka (A):HaTnCHyBnHa 10 KhONky,MOxHa yBIMKHyTN BnTjKkY Ha DpyrOmy pIBHi WbNdkoCTi. KaO BN 1e pa3 HATnCHete Ha 10 KhONky, 106 BmMKHyTN npnla, INnKaui pIBH WbNdkoCTi Ha ekpaHI 3HnKHe.
Khonka (B):HaTnCHyBn Ha LIO KHONKY,MOxHa yBIMKHyTN BnTAAKKy Ha DpyROMy pIBHI WBNkOCTI. RaIO BN Ie pa3 HATnCHete Ha LIO KONky,IO6 BmMKHyTN npnaI, iHnKaui pIBN WBNkOCTi Ha ekpaH 3HnKHe.
Khonka (C):HaTnCHyBn Ha 10 KhONky,MOxHa yBIMkHTn BnTjXKy Ha Tpebomy pIBHi WBNIOCTi. (D) Khonka yBIMk./BnMk.Cbitna:HaTnCHyBn Ha 10 KhONky,MOxHa yBIMkHTn OCBiTJeHHa 3OHn npiroTOyBaHH iKi.
KIO Bn ige pa3 HATNCHeTe Ha cIO KHONky, IO6 BIMKHyTn npnaI, IHNkaizir pIBHr WbNdkoCTi Ha ekpaHI 3HNIKHe.
ABTOMATNCHa 3yINHka yepe3 15 XB.:
üe npnlaOchaueHn yHKciEIO
《ABTomatnHa 3ynHka》,ka Do3BOJrE npoBiTPOBaTI npMlueHHI pOraROMdoaTkoBOrO yacy 3 MeTOU BuaJIeHHr HePnEMHx 3anaxiB i Bnapib nicna npiroTuBaHHr iXi. Ppnaad 3ynHЯETbcra ABtomATnuHO nO 3akIHcEHHIO neBHOROpomixkkyacy.
Iio6 yBIMKHyTN cyHKciIO ABTomatnHa 3ynHka》,HaTNCiTB 6yDb-ky KONky pIBH RA BvNDKOCTi (A,B,C)Ha naHeJI Ta yTpmyTe II 2 cekyHn. YBIMKHeTbcraTaimep Ha 15 xBNHN.
KaHnCHyTu Camy KONky pIBNkOkti, KOJIyBIMKHeHa yHKsIg «ABTomTuHa 3ynHka», To Ia yHKsIg BUMKHeTbcR, a npuJa3ynHHtbcR.
Ko obpatn Hnn pBeHb WBNKOCTI,TO cyHKJia BIMKHeTbcra.
Kuo notpi6Ha aBTomatnHa 3ynHka npna, noTpi6Ho ue pa3 BmKHytn FyHKciio «ABTomatnHa 3ynHka
PepioDnHa OunchKa MeTaJIeBHX pIbTpIb:
fijbtpn cniD ouuCyBaTu np6n3Ho KoxHi 60 roDInH po6OtN a6o KoxHi 4 TnxHi, 3aJeXHO BiJ HactOTn BnKOpNCtAHHa.
4 Ekplnyataci npnilady
4.2 EheproeΦeKTHBHa eKcnnyatai:
-пд час ВИКОРиСТаHHЯ ВИТЯЖКи, PerулJOte pIBeH b WbNДКоCTi, 3aJexKHO BiD iHTeHCnBHOcti 3anaxiB Ta BInapiB, Ⅲo6 3anobirn HAdMipHOMy CNoXnBaHHO eHeprii.
3a 3BnuaHnx yMOB, BCTaHOBIOIte Hn3bky WbNdkictb (1-2), i 36iNbWyIe ii (3), kkuo piBeHb 3anaxIB Ta BnnapiB Ctae 6ilbW iHTehCINBHNM.
- JAMNn Ha BNTJxu npn3naeHi dny OCBiTJeHHa 3OHn npnroTyBaHH ia.
BnKOpNCTaHHI x 3 MeTOIO OCBiTNeHHHaBKOINHbOi 30HN a6o KxHi npN3BeDe Do HeuInbOBOrO eHeproCNOXINBaHH Ta HeIOCTaTHbOro pIBHcBITna.
4.3 Ekcnnyataciia Bntjxkn:
- Bntjka ochauneHa DnryHom, 0o Mae pi3Hi HanaTsyBaHHra WbNdkOcTi.
-Дя крашою роботи пиладу 3а Hopmaльнх yMOB peKOMeHdYETbCЯ BNKOPnCTOByBaTи HN3bKi WBNkOcTi, i BnCOki,Якso piBeHb 3anaxiВ ta BNnapiB cTaE 6iNbW iHTehCNBHm. - Bntjka BMkacbca, kso hATnchTyN KHONky Heo6xHoro pIBHa WbndKocTi (A,B,C).
- OcbitIeHHa 30Hn npiroTyBaHHa iXi BMnKaCTbcra 3 DonOMOrIO KhoNk NiDCbiuYBaHHa. (D)
5 OuHnHn iTexHicHe o6cnyroByBaHHa
Ipeed ouhiuHnM iTexHiHm 06cnyroByBaHHaBid'edHaTepnad BiD MepeXi eNKeTPOKINBHeHnAbo BIMKHiTB rOIOBHN BIMNKaU, aBo BiKpyTiB 3anobixHnK, knn 3diChIOe eNKeTPOKINBHeHn BUTJxKN.
5.1 AnomhiBn qinbTp
Ley pBnOe qactKn onii y nobitpi. 3a HopMaIbHnx yMOB eKcIpyataqii peKOMeHdyetbCra OunuBaTu cei pIbTp uomicra. Iy zuoro cNoay Keo6xIDHO 3HrTn anHomHiEbi pIbTpN. PpOmNte pIbTpPiDKm MIOUHM 3acobom i CNOLOCHITb ix YnCTOBO BDOIO. Iicra zuoro Do3-BOJIbTe pIbTpam BnCOXHyTN i BCTaHOBi bix Ha Micue. AnHomHBeBi pIbTpN MOKyTB BtpATNTn KOJip BHaClNiDOK MTTT. Lc HOpMaIbHo, pIbTp, y TaKOMy BnnaDky, 3MiHOBaTN He NOTpi6Ho.
5.1.1 3nra aniomhiBnx pibtpiB
- Nocyhte Bnepea Kcataop aHmiHicBoro 0ntpa.
2.ПicЯцboro 3лERka onyctitb noro i notarHITb Bneped.Y inhOmy BnnaKBy BN MoKete nOrHytn φiNbTp.(PncyHok 10)ПicЯ mttTЯ i BnCyuBaHHa φiNbTp a BCTaHOBiTb Noro Ha MlCe, BnKOHyUOn BnUeBkA3aHI KpOKn y 3BOPOTHom npAky.
(PncyHOK 9)

MUTTA ANHOMHIEBNX φiNbTpIB MOXHa 3diNCHIOBATN y NOCyDOMnHiMaunHi.
ByrilbHnI IInbTp (BnKOpncTaHHa 6e3 nobitponpoBody)
Ley fipbtp BuaJae 3anax npirotyBaHH iKi. RaKuo Hemae MoXJIbBOcTI BnKOpNCTOByBAtn NOIbTPoPBoiD, fipbTp Ounuye NobITpy,Ke NOBePTaCTbcra Ha3ad y KuxHIO. 3 YacOM ByrInbHNI pIbTp npnaady MoKe 3acMIITncB 3aJeXHOCTi BiD qactOTN BnKOpNCtAHH BNTJKKN, CnOCOby npiroTyBaHH iKi i ChTOT N OUnUeHHA AnOMHiEBrx fipbTpIB.

ybara!
Mun ByinbHn pInbTp 3a6oponeHO.
Pnp6aTn ByrInbHi fInbTpN MoXHa y npedctabHnKIB aBTOpN3ObaHoro cepBicHoro cEHtpy Beko.
5.2.1 3aɪnə ByrɪŋbHoro φɪnbTpa
5 OuHHe i TexHiue He o6cIyroByBaHHa
ΦiNbTpN, 10 yCyBaIOb 3anax, MICTaTb DepeBHe ByrInn (akTNBHe ByrInn).
3amHy TaKnx pInbTpib Heo6xidHO BnKOHyBaTH KOxHi 6 MicaIb.
He 3anexHo BiD TORO, BnKOpNCTOBHyOTbcr ByrInbHi iNbTpPrn Hn Hi, aHOMiHcBi iNbTpPrn MaOtB 3aBX- nn 6ytn BCTahOBnEhi.
He BnKOpNCToBnyTe npuJa 6e3 aniOMiHicBnx nTpiB. BnKOpNCaHHa ByrInbHnx nTpiB 3MeHnITb NotyKHiCTb BCMOKTyBaHHa npuJaY.
5.3 OuHnueHHa
OuHHeHH BnTJHKn Heo6xIDHO 3iINCHOBaTH BiDpa3y X nICn CMAKeHH.
Дя Oчишеня 3OBHIshBoi NOBepxHi BNTJXKN BHKOPNCTOByTe M'ky TkaHInHy, 3MoueHy piKIM MIOUChM 3acobom.
He BnKOpNCToBvTe abpa3uBHi MaTepiAnu Ta MaTepiAnu, kI MOKyTb NOpPraNaTu NOBepxHIO BNTaXKN.
Y pa3i BnKOpNCTaHnHaBbHx y npOdaKy MIOyux 3ac06iB, rki NiDxOJaTb DnI 3HrTTA CTIKORO KInpy, 3abPydHeHHra Toio, dOTpIMyTeCb Bka3iBOK 3 BnKOpNCTaHHra TaKOrO MIOUoTO 3ac06y. Ioo 6 He nOpaTn MaOBn cTaJIeBn KOpNyc npuAdy, BHTnpaIte BnTJkky Y TOMy HAnpMky, y kOMy HaHeceHO MaOBe NOKPTT.
36eepTn kicTb nobepxhi BNTJxK, He BNKOpNCTOByIte MIOUcI 3acO6n, kI MicTb coJIaHy KNCIoTy, BiD6IIIOUcI peoBHN a6o abpa3NBH iNoPoUsKn. IIN NOBepXOHb i3 HEPKaBIIOoi CTani BIKOPNCTOByIte TkaHHy, 3MOueHy y MNlbHi BOdi, a6o CneiaIbHI cnpei dIra OunIeHHa HEPKABIOOi CTani. 3HIMITb 3axnchy f0nbry 3 npnaNy.

ybara!
HeDToPImaHnI hCTpyKci3 Oun- 13aMIHN pJIbTpIB BNTJXKMOxpe np3BecTn DO BUNHKHeHHnOxeki.
Uo6 BCTaHOBHTN HOBy Iamny, BnKoHaIte BnIeBkA3aHI II y 3BOpOTHomY nOpy.
Max:3W

PnD6aTN NaMnn MoXHa y PpeICTaBnKIB aBTOpN3ObaHOro cepBicHOro ueHTpy.
6 BvpiiheHn npo6JeM
POMHInTe, YTO DaHHa NHCtpyKcIg MoXeT OTHOCITbCry K DpyrIM MoDeJIaM. Pa3nUHa MExdy MoJeIaMn POpPo6Ho OINcaHbI B pyKOBoDCTBe.
YcnoBhpie 06o3haueHnra
B pa3nHbIX pa3dEJax daHHoro pyKOoDCTBa nIb3OBaTeJI NcIb3yOTc cIeIyUJIne o6O3HaueHnI:

BaxnHa HOpMaun I noJe3HbIe COBeTbI NO nCNoJb3OBAHIO.

ПРЕДОCTEPEХЕНЕ: Празу-праздени O ситуацях, опachы дя киЗни И мушиства.
IpeDynpexKdene o6 onacnoctn noxapa.
IpeDynpexJeHne 6 onaChocn npaxKeHna 3JIeKTPnueCKM TOKOM.

3NeKtpnueckne CoeHHeHnI DOnXHbIBbINOHrTbcKBAJIuΦNtropOBaHHbIM 3NeKtpNKOM.
BbIyKc yCneJyET yCTaHabnBaTb TaK, YTO6bl NOTOM MOxHO bIIO C IeKoCTbO DOTaHyTbC DO CETNITAHNA (PO3eTK, BbIXOda).
Pa3Mepbl npBVeHb B MM.
3 YcTaHOBKa np6opa
3.3 YcTaHOBKa BbITaJxHOJ Tpy6bl
Heobxodmo OTknHouatb npnbop ot 3neKtpocetn, npexde yem npnstynatb K yctahOBKe Tpy6bl. YcTaHOBtB MetaJIInueckne JnCTbl Tpy6bl BOKpyr Kopnyca.
PpIKpyTntb HApyKHyIO Tpy6y K CoeINHITeJIbHbIM PnactInHam BHeUHeN Tpy6bl, paCNOJoxEHHbIM Ha Kopnyce DBrarTeIa (pucyHok 3b/6).
(pncyHK 6).
3 YcTaHOBKa np6opa
Pacunpntb npKpyTntb BHyTppeHHIO Tpy6y ot ee BHeuHero KpaK CoeINHTeBHOI pnaCTnHe Tpy6bl, npKpePnEHHoK CTeHe (pcnyok 7).
(pncyHok 7)
I P E D Y N P E X K D E H N E: I p e d y n p e x k d e H N A C P E U O N A C H N C N T Y A C U N O T H O C H O 3 d p a B E T O N C O B C T B E H O C T T A.
IpeynpejdeHne 3a onacnoct ot noxap.
IpeDynpexKeHne 3a onaCHOCT OT TOKOB ynap.

To3n npodukTe npo3BeDeH no nocJeHa texHoIogna B ekocbO6pa3Hn ycNoBna.
1 Baxhni Hnctpykun 3a 6e30napcHocT n Opa3BaHe Ha OKoJHaTa CpeDa
1.1 O6ua 6e3oNaChocT
BaxHn INCTpyKcHn 3a
6e3Opacnoct Ipooyetete
BHNMaTeJIHO n rN 3aNa3eTe 3a
6bDeuca cnpaBka
To3n pa3dEJI cIbIbpJx a INCTpyKcHn
3a 6e3Opacnoct, KOnto ige BN
POMOrHaT Da ce 3aUHTnte OT
pNCK OT N0Xap, eJeKTPnueckn
yDap, n3JaTaHe Ha yTeUka
OT MInKPOBbJIHOBa eHeprna;
HapaHЯBaHe nIi NOBpeDi Ha
co6CTBeHoCtTa. HeCpa3BaHeTo
Ha INHCTpyKcHnTe IpaBV BcKa
raPaHcYn HEBaJIndHa.
-Пюдуктinte Beko sbOTbETCTBaT Ha npINIOJIMITE cTaHdApTN 3a 6e3OJaNACHOCT; eTO 3aIoo, B Cny Chn Ha NOBpeDa nO ypeDa nIi 3axpaHbAsnKa6eI, ToI Tp86Ba Da 6bDe peMOHTnpaH nIi CMe HEn OT dINlbP, cepBN3eH cEHTbp IINI CneuJIInCT n OToPi3IpaH cepBN3 C ZeI N36yRbAHe Ha BCaKBrn OnaCHOCtN. POrpeWeH nIi HeKBaIIOnCuPaH peMOHT MoKe Da DoBeJe Do OnaCHOC T n PnCK 3a NotpeBnteJia.
- YpeDbTe npedHa3NaueH 3a 6nTOBa yNtpe6a n IoO6Hn npIIOJxHn KaT0: - KuxHeHcKn 3oHn 3a nepcoHaJaB MaRa3HH, oΦncn i dpyrnpa -
60THN cpei;
-Φeρмерски Кьши
-OT KJIneHTN B XOTeJI N IpyrNBIOBE XJIINuHn CpeHn,
-MecTa 3a HooBka Cbc 3akycKa.
- Изполизвашие урEDA само по преднаначене, КakTo e ONИ CAHO B TOBA рьковODCTBO.
- ПОНЗВОДИТЕЛТ He HOCN OTROBOPHOCT 3a NOBpeDN B pe3yIITaT Ha He npabINJIeH MOHTaK IIN He -правINHa yNtpe6a Ha npodykTa.
To3n ypeD moKe da 6bDe n3noJ3BaH OT Deca HaI 8 roDHH nIuCa C OrpaHueHn cN3UeCKn,CEH3OpHN IIN YMCTBHeHn CNOcO6HOCTn IIN TaKnBA, 6e3 Heo6-XODIMNA ONIT N IO3HaHnA,AKOCbIHTe Ca HAD3npaBAn HINHCTpyKTupaHn OTHOcHO yNo -Tpe6ata Ha ypeDa no 6e3onaceH NaHH n Ca HAreCHO CbC CBbp3a -Hnte pNCKOBe.
Ha decaTa He Tp6Ba Da ce no3B0JaBa Da nIpaT cypeDa. NocCTBaHTo I NOdPbXkata Haypea He Tp6Ba Da ce n3Bbp WBat OT Deca 6e3 Hnd30pa Ha Bb3pacTeH.
MHHMaHOTO pa3CToHne mexdy HOceaTa NOBbPxHOCT 3a rOTBaP cKNTe CbDOBE Ha KOTIOHNTe N
1 Baxhni nHctpyKuIN 3a 6e30nacHOCT u ONa3BaHe Ha OKoJIHaTa CpeDa
dOJIHaTa YacT Ha BaIaIyKToTpI6Ba Da 6bIe Hau-MaJIko 65 CM.
- Ako nHCTpyKcNITe 3a MOHTax Ha ra3OBnKOTIOH NOCOyBaT NO-TO -IЯMo pa3CTOJHnE, TOBa Tp6Ba Da 6bDe B3eTo NOd BHIMaHnE.
-Пюверete далданнite 3a Baшето мecтно eileKtpo3axpaH-BAHe OTROBapT Ha INHΦopMaциЯТа Вьрху TabeJkata C daHHN. - Hnkora He n3noJ3BaIte ypeDa, ako 3axpaHbAaIyT Ka6eI nn camn ypeI e NOBpeIeN.
3a Da n36eHHeTe pNcKa OT NOBpeDa Ha 3axpaHbAun Ka6eJ, BHIMaBaIte Da He rO npTnCKaTe, OYBaTe IIN TbpKaTe B OCTpI pb6oBe. DpbXTe 3axpaHbAun Ka6eJ daneu OT HaropeUeHN IOBbPxHOCTN IN OTKpNT PJIaMbK.
-Използваитуpeда само сбс 3a-3eMeHn KOHTaKTH.
I P E D U N P E X J D E H N E: He c B b p - 3B a Ite ype da K b M e I J E K T p u c e-CKaTa MpeJa DOKaTo MOHTaJbT He e H a n b l h o p r i k J I O u n.
Pa3noJoxe Te ypea no TaKbB Naun, Ye uenceT BnHaT da e DoCTbneH.
He nipaTe Iamnte aKO ca pa-60TnI IN DbJiro BpeMe. TbN KaTO
ca ropeu, morat da Bn n3ropaT pbuete.
CneBaiTe Hape6nte, onpeJeIeHn OT KOMPeTeHTHnte OprAHN OTHOCHO OCBO6XdAbaHeTo Ha OF pa6oTeHn Bb3dyx (TOBa npedyPpeJdeHne He ce npilara npu ynoTpe6a 6e3 BeHTnlaucNoHna Tpb6a).
Pa6oTe c Baun ypei cIeKaTO nOCTaBnTe TeHJxepa, TnraHn T.H. Ha KOTNoHa. B npotuBeHcIyau, TOnPiHaT a MoKe da npeDn3BnKa DeOpMnpaHe Ha HЯKoU qactn Ha Baun npOdyKT.
- Изк nullуete кOTLOHa npeДа OTCTpaHnte TeHdXepaTa, TuraHa nT.H. OT Hero.
He octabraye ropeza Ma3HnHa Ha KOTNoHa. Tngan C ropeza Ma3HnHa Moat da npedn3BnKaT cAm03aapanBaHe.
BnIMBaIte c BaIte nepdeTa n NOKPnBKn, TbN KaTO Ma3HnHaT a MoXe Da Ce Bb3PiAmEH DoKATO npriOTBTe XpaHa KaTO PbPxHeN KapToΦn.
- Φилтьрьт 3a Ma3HnHn Tpr6Ba
da 6bde NOdMeHn NOHe BeDnBx
MeceyHo. ΦилтьрьT C aKTHBeH
BbIeH Tpr6Ba Da 6bde NOd-
MeHn NOHe eDnH nBt Ha 3 Me-
1 Baxhni nHctpyKuIN 3a 6e30nacHOCT N ONa3BaHe Ha OKoJIHaTa CpeDa
ceça.
- Пюдуктг Трябва Да ce поиства според ИнструкциnteВ рькововоствOTO 3a уnotpe6a.Ако почесва了半天 He e n3Bbpшени Според ИнструкциnteВ рькововоствOTO 3a уnotpe6a, може дa CBшесства рпсК OT пожар.
He n3noI3BaIte HeorHeynOpHn 1nnTbpHn MaTePnaJI N BmecTo HactoJnA qnTbp.
-Използваite само оригинални части пл тakиba, пpenopьчанOT пон3ВODNTeЯ.
He pa6oTeTe c npOdykTa 6e3 cnIbpa n He OTcTpaHraBaIte cnItpnte,doKATO npOdykTbT pa6OTn.
B cIyauHa IoBa Ha HkaKbB IIaMbK, PpeKbChete 3axpaHbA HeTo Ha Baunn npOdyKT n Ha dpYrTe rOtBapcKn ypeiN.
B cIyauHa IoBa Ha HraKaKbB PAmbK, NOKpuTe PAmbKa HrKora He n3POn3BaIte Boda, 3a da ro 3aracnte.
-ИЗКПЮЧВайтЕ урEDA ппди BCЯКО ПОчNTВанE И KOraTO He Го ИЗПОД 3ВaTe. - OTPицateното habяганы В okол-hata cpeda He trpa6Ba da npeBn-shaBa 4 Pa (4 x 10 6apa)dokaTo
a6copbatopt 3a eIektpnueckn KOTIOH IN dpyu nppeDn pa6oTAT 3aeDHO, 3axpaHBaHn OT dpyr BND eHeprna, OCBEN eIektpnueCTBO.
B OkonhaTa Cpea, KbdeTo ce n3noI3Ba abcop6atopa, Otpa6oTeHnT Bb3dYx OT yCTPOcTBA, 3axpaHbAHn C ra3 IIN TeUHO rOpNBO, KaTO HApPIMep CTaHaNpeyka, Tp6Ba Da 6bDe HAnbJHo N3OJInpaH INIy UcTPOcTBOTO da 6bJe OT XepMeTInueckn I3OJInpaH BVd.
Korato cBbp3BaTe KbM BeHTIN- Iaunra, nIIOJ3BaIe Tpb6n C dIaMeTbp 120 nIu 150 MM. Tpb6HaT a Bp3ka Tpr6Ba da 6bJe Bb3MOxH O Ha-NbCa N da IMa Bb3MOxH O Hau-MaJIbK 6poi ChyPkN.
Ima onachocT OT 3aDywaBaHe!
ДрьжTe onaKOBbUHnte MaTePn aIи daley OT DoCTbNa Ha Deça.
BHIMAHNE: OocbHnTe yactm Morat da ce HaropeaT aKO ce n3NoI3BaT 3aeDnO C ypeD 3a ro-TBeHe.
- I3xoDbT Ha npOdykTa He Tpr6Ba Da e Cbbp3aH C Bb3dUxONpOBoDN, B KOnTO Ce I3BexKa Dpyr DM.
- BeHTnlaaTb B cTaTb Tp8Ba Da 6bDe OckbDHa, KOrato a6cop-6atopbT 3a eJekTpuecKn KOt-A6cop6atop / PbKOBOCTBO 3a ynoTpe6a
1 Baxhni nHctpyKuIN 3a 6e30nacHOCT u ONa3BaHe Ha OKoJIHaTa CpeDa
JOH Ce n3noJ3Ba eJHOBpeMeHHO C yCTpoIcTBA, pa6oteuHa ra3 IJIi dpyrI rOpNBa (TOBa 6n MoIIO Da He Ce npIra 3a ypeN, KOnTO cAmO OCBO6oKdAbAT Bb3dyxa O6- pATHO B CTaTa).
-ПocтавенITE Вьрху пpoДуКТа npeДмETn можеда паднат. He noCTabYIte HkaKbN npeДмETn Bьрху уpeda.
He pfam6paTe npBawnya ypeI.
ПРЕДУПЕХДЕHNE: ПраздамоHTираTe abcopbaTopa OTcTpa-HeTe 3aUHTHOTo FOJINo.
He octabray Te BncoK pIaMbK da ropn noaabcop6atopa kOrato e BKJIIOUeH
CbIOBETe B KOnTO Ce IIpIXN C MHOrMa3HnHa Tp8Ba Da 6bDaT NOCTOHHo CJIeDeHN Prn yNo - Tpe6a: IperpIOTO OINo MOKe da CE Bb3PnAmEHn.
1.2 CbOTBcTcBnE c DnpeKtNbata WEEE n 3xBpJrHe Ha OTnaDb YHnte npOdykTn:
UpeiBcBOTBcTBAHaEBpOeN cKaTa DnpeKtNbWEEE.(2012/19/ EU).To3n npoDyKT npTeJxaba Kna CnФkaCNoHEn CmBOJ 3a OTpaDb- yHO eJIeKTPnuecko n eJIeKTPoHNO obOpuyBaHe (WEEE).
To3n cIIMBOJ yka3Ba,Ye npOdyKTBt He 6nBa Da ce n3XBbPnC dpyn 6ntOBn OTnadBcN B KpaHa EKC-
Плоataционня cn XINBOT.ИЗползванот устюгоство Трбвада 6ьд e ВьрноВ OФицаленпунктза сьбирае и peцклupaеHa eЛжТрчески eЛжТрОннустюгоства.3a Да OTКрпete Te3nпунктоBE 3a CSbирае,MOЯ obb-pHete ce KbM MeCTHЯ Oрган ИлиТьproBeцbt,OT KOДTO e 3akyneнпpoДуКтBT. BсякdoMaKInHCTBOИграe ВaxHa роля ВьВ Вь3ctaHoBЯBaHeTo n peцклupaHeto Ha CTap уpei.
IpaBnHOTO n3XBbPnHe Ha n3- NOJ3BaHn ypeDi cNoMaRa 3a IpeD0TbPaTaBaHeto Ha NOTeHcuaJIHn HERatNBn NocJeNcN Bbpxy OkoJHaTa CpeDa n YOBeShKOTO 3dpaBe.
1 Baxhni Hnctpykun 3a 6e30napcHocT n Opa3BaHe Ha OKoJHaTa CpeDa
1.3 CbOTBcTcTBnE c DnpeKTHBa RoHS
3akyneHnT OT BAC npOdyKT CbOHTBcTBA Ha eBpOeNCKaTaDInpeKtBa RoHS (2011/65/EU).HeCbDbPka BpeHNi 3a6paHEnMaTePnAJI. DInpeKtBa.
1.4 Информаця за опakовkaТа

OnaKOBbHnTe MaTePnAIn Ha npOdykTa ca. ca npOn3 BeDeHN OT peuNKnPyemn
MaTePnAIn B CbOTBeTCTBHe C Ha
ShIte HaOnHaJIHn HapeD6n 3a
OkoJHaTa CpeJa. He n3XBbPrlYTe
ONaKOBbUHIne MaTePnAIn
3aEINO C. 6HTOBIne N dpyrN OT-
PaDbuN. OTHecTe rN B nyHKTOBe
3a Cb6IpaHe Ha ONaKOBbUHn MaTePnAIn, PocOueHN OT MeCTHIne BlnaCTN.
2 Texnueckn cneuokauin Ha ypeda
(ФИгура 1)
- BbTpewen DnMOOTBOD
- BbHWeH dNMOOTBOd
- CtbKneH kanaK
- KoHTpOJIeH nAHeI
- OcbetneHne
| HCA63640B-W | HCA63640BH HCA93640BH HCA93641BH HCA63640Z | |||
| Широчина 596 | MM 596 MM 896 MM 8 | 96 MM 596 MM | ||
| Дълбочина 4 | 10 MM 410 MM 410 MM | 410 MM 410 MM | ||
| Височина | 750 MM/1080 MM | 750 MM/1080 MM | 750 MM/1130 MM | 750 MM/1130 MM |
| Зхранваши мошност | 220 - 240 V~ 50 Hz | 220 - 240 V~ 50 Hz | 220 - 240 V~ 50 Hz | 220 - 240 V~ 50 Hz |
| КонtrPOR | С 3 НИВА | С 3 НИВА | С 3 НИВА | С 3 НИВА |
| Мошност на лампата | 2 x 3 W | 2 x 3 W | 2 x 3 W | 2 x 3 W |
| Трьба за извекдане на вьздуна | 120 / 150 MM | 120 / 150 MM | 120 / 150 MM | 120 / 150 MM |
| Мошност на motopa | 210 W | 210 W | 210 W | 210 W |
| ОвSETS мошност | 216 W | 216 W | 216 W | 216 W |
| Цвац Б=Черен W=бяп | СИВО | |||
CToHocHTe, nocouehn Bbpxy TaBeIKNTe NIN npndpykBaUaTa DOKymeHTaun, ca noJyuHn B Ia6opatOpHn ycNoBnB npi cna3BaHe Ha cbOTBeTHNe CTaHdApTn. Te3n cToHocTn Moxe da BapnpaT, B 3aBNCIMOcT OT pa60THNe YCNOBnHa npOdykTa n ycNoBnTa Ha OKoHNata CpeDa.
3 MoNTaX Ha ypeDa

PPEyPExEHEHNE
Cbpxte ce c Han-6Jn3Kna yHbHOMOeH cepBn3eH areHT 3a MOHTax Ha a6copbaTopa.

PPEyPExEHE
*Iodrotobkata Ha MCTOTO n eJeKtpueckOTO HnCTaIInpaHe Ha npOdykTa ca OTROBOPHOCT Ha notpe6nteJ.

PPEyIpeXDEHNE
OTCTpaHete 3aunTHOTO fOJNO (ako HMa TAKOBa) OT NOBbpxHOCTTa Ha a6cop6atopa N dIMMOOTBOJa Cnei MOHTaKa.
(Фураза 2a)

(Фигура 26)
Pa3cToaHHeTo MExdy DoJHnTe NOBbpxHOCTHa a6copbataOp n rOpHnTe NOBbpxHOCTHaKOTIOHnTe Tp6Ba Da 6bDe Ha-MaIKo 65 cm.
EneKtpnuecknte Bpb3Kn Tp8Ba Da ce HappaBt OT KBaIINΦuIpuH eNeKtpoTeXHnK.
MOnTupaIte ypeTa Taka, Ye da MoXeTe Da doCTnIraTe 3axpaHbAunKa6en (Uencen, KOHTAKT) IeCHO CNeD MOHTaJa.
Pa3mepnte ca daeneB mm.
3 MoNTax Ha ypeDa
3.1 MoHTaK Ha akcecoapn
1xTpb6a3a Cbbp3BaHe HaIMMOOTBOda

1x0120/150MMПпаCTмсов aадаNTep 3aДИМOOTBOI
No-dony e daheHa HnΦopMaunra, Heo6xOuMa 3a noTROBkata Ha MOHTaxHOTo MRCTO Ha abcop6aTopa.
3.2 Crno6BaHe Ha a6cop6aTopa Ha cTeHaTa
3a da crno6te abcop6atopa Ha cTeHata, pa3xna6eTe BnHTOBeTe Ha nlaCTnHnte 3a 3aKaYBaHe Bbpxy Kopnyca Ha MOTopa n N3TerIeTe nnactnHnte Hanpei. CneT TOBa 3aterHete BnHTOBeTe Ha nlaCTnHnte 3a 3akaYBaHe. (Furpa 3a).
(Фигура 3a)
(Фигура 36)
Ako n3noJ3BaTe Tpb6a 3a dIMoOTbOd 0 120 MM, MOHTnpaIte B Hea aanTep 3a dIMoOTbOd 0 120 MM.
3 MoNTaX Ha ypeDa
3.2.3 MoHTaX Ha BnHTObTe 3a OKaUBaHe
MoHTnpaIte BnHTOBe 3a OKaUBaHe 4,9x50 B CTeHNITe IIO6eJI N O 8 MM (Y), KOnTO CTe HApNII IN BCTeHaT. Heo6XoIMo e da nMa MeKdInHa ot 5 MM MExdy rIabata Ha BnHTa N CTeHaT. (Furpa 5)
CbpxTe BbtpeHnTa nlaactnHa 3a Cbbp3BaHe Ha dIMOOBTBODa KbM IIO6eNa 8 MM Ha cTeHata (Z), KaTo n3noJ3BaTe BnHTObe O 3,9x22. (Furpa 5)
(Фигура 5)
3.2.4 Crno6BaHe Ha a6cop6aTopa Ha cTeHaTa
- OkaheTeДИМоOTВОдаHa BИNTOBeTe, KONTO CTe MOHTIpaJIиВ OTBOpIte Y.
- OTbopeTe CTpaHnUHnB BCMyKaTeJIeH npO3opeu Ha a6cop6aTopa, KaTO rO n3IbPnATE KbM ce6e cn. MoHTnpaIte BnHTObE 4.9x50 npe3 OTbOpnte X, pa3noJoxeHn HABbTpe, 3a da fNkCupate ypeDa.
3 MoNTax Ha ypeDa
3.3 Ctrno6BaHe Ha ДиMoOTbOda Ha a6cop6aTopa
Ipei Da 3aOnuHHeTe MOHTaxa Ha dIMOOBTbOda,
n3KJIouHeTe ypeDa ot 3axpaHbAHeTo. NocTaBeTe
yactnte Ha Tpb6OpPbOda OKoIo TAnoto.
3aBnTe BbHnna Tpb6OpBOd KbM BbHnnte
PnactnHa 3a Cbbp3BaHe Ha Tpb6OpBOda,
Hamupaue Ce Ha Kopnyca Ha MOTopa.
(Фура 36/6)
(Фигура 6)
Pa3wnpeTe n 3aBnIte BbTpewHn Tp6oNpOBoD OT BbHNHTe N KpaIuca Bbpxy PnaCTHaT3a CBbp3BaHe Ha Tp6oNpOBoDa, KOrTO e 3akpeneha KbM CTeHata (Фура 7).
(Фигура 7)
3.4.1 Ynotpe6a c Tpb6a 3a CBbp3BaHe KbM DnMOOTBOD
- Napata ce otctpnaHra ype3 Tpb6onpoB0da, KOITo e 3akpenen KbM CbeHNHTeJIHaTa rIaBa Ha dIMOOTBOda.
-ДиametbptHaДIMOOBDA Tp6Ba Da 6bde paBEN HaДиametbpaHa CBbp3BaUЯ npbCTeH. 3a Da ce N03BOUN JecHOTO OTBeKdAnHe Ha Bb3Dyxa OT NOMEUeHNTo B XOpN3OHTaJIHO NOLOXeHne, Tpb6ata Tp6Ba Da 6bDe Jeko HAKNoHHe HArope (npu6n3ntelHo Ha 10^
3.4.2 Ynotpe6a 6e3 Tpb6a 3a CBbp3BaHe KbM DnMOOTBOD
Bb3duyxbT ce cHnTpnpa BbB BblnepeH cHnTbp n ce Bpbua B NOMeueHneTO. BblneopdHnT cHnTbp ce H3noJ3Ba BcnyaN, KOraTO B NOMEueHHeTo HMA DmOOTBOD.
- Ako abcopbataopbt ue ce n3noJ3Ba 6e3 Bp3ka C dIMOOTBOU, IpemaxHete PpeBkIOuBaTeJIInTe B aadantepa 3a dIMOOTBeJdaHe.
- Otctpahe anymnneBnA qnntb.3a da nHCTaInpate BbrIepoDnA qnntb, ceHTpnpaTe ro Bbpx yIaCTmacOBata qact OT dBete cTpaHn Ha TAnOTo Ha BeHTnIaTopa n ro qnknpaTe Bbpxy uNqKnte.3akpenete qnntbpa, kato 3aBbPTnte yuNqKnte BdrcHO nnHaJBO.
- MoHTnpaIte aIyMnHneBna 1nTbP.
3.5 CBbP3BaHe HaДИМOOTBOIDA:
MoHTnpaIte aIantepa,IOCTaBeH 3aeHc C dIMMOOTBODa,BbB BeHTnlaUOHHN OTBOP, pa3noJoxeH B rohpata qact Ha abcop6aTopa. OcnrypeTe Tpb6a c DnAmetbp 120/150 MM. CbpxkTe eINHnKpaH Na Tpb6aTa c aIantepa, aDpyrna KpaC Tpb6OpPOBa.
YBepTe ce, ye n DBeTe Bpb3Kn ca doCTaTbUHO cnrypHn,
Taka, Ye KOrato abcopbato pabotn Ha MaKcImaJIHa cKOpOCT, Hma Da ce pa3mecTu. PpOBepTe daHn KlaPnte BbTpE B dIMoOTBoDa, KOrato ca 3aterHaTu Cbc cKobata, ca FyHKUHOHNI. NocTabete Tpb6ata 3a CBbp3BaHe Ha dIMoOTBoDa KbMa aAnTepa. Ako NocTabte Tpb6ata 3a CBbp3BaHe Ha dIMoOTBoDa B aAnTepa, HMA Da ce 3acMyKBA Bb3dyx, TbJ KaTO KlaPNTe, KOtO npedOTBpaTЯBaT o6paTHnI NOtOK Ha Bb3dYxa, Ie OCTaHaT 3aTBOpEHN.
He ce npenopbUba DnMOOTBOJNTe Da ce CBbp3BaT C rOtBapcKn NeuKu NnC n3nyckaTeHn KlaanH. He npabTe Bpb3Kn Mexy TaKNBa Tpb6oNpOBoDn.
Tp6hata Bp3ka Tpa6Ba Da 6bDe Bb3MOxHO Han-Kbca N da nMa MNHImaJeH 6poi UyKN.
A: Tpb6a 3a n3Bexdahe Ha Bb3dyxa
B:Klaann, konTo npedotbpaTBAt o6paTHnI noTOK
C:Пл actmacobТрьбогровd
3.5.1 CnCTema 3a npeIoTbpaTaBaHe Ha o6paTHnI noTOK (N-RV)
Korato abcop6aTopbT pa6OTn, KlaNTe ce 3aTBaprT, 3a da ce npedOTbpaTN Bb3MOxHocCTTa OT Bn3aHe Ha Mnpu3Mn I npax OTbH HABbTpe.
(Фигура 7)
4 Pa6ota c ypeda
(Фигура 8)
(A): ByToH 3a 1-BO HnBO
(B): ByToH 3a 2-po HnBO
(C): ByToH 3a 3-TO HNBO
(D): ByToH 3a BkN./n3Kn. Ha OCBetIeHneTeO
4.1ДигntaJIHo eIeKTpOHHO ynpabJIeHne c 3 HnBa
(A) C HaTnCKaHeTo Ha To3n 6yToH, MoXeTe Da BKNIOHTe BaUNa 6cOp6aTop Da pa6OTn CbC CKOPOCT Ha 1-BO HNBO.
Korato haTnchete 6yToHa OTHOBO,3a Da n3KnUoHTe ypeDa, INHdkaTopbT 3a HNBOTO Ha CKOPoCT 1ue N3Ye3He OT DnCnIe.
(B) 6yToH: C HATnCKaHeTo Ha To3n 6yToH, MoKTe Da BkIIOHTe BaUNa a6cop6aTOp da pa6OTn cbc CKoPocT Ha 2-TO HnBO.
Korato HATNCHEte 6yToHa OTHOBO,3a Da n3KnIOHTe ypeDa, INHdNKaTOpBT 3a HNBOTo Ha CKOPoCT 1ue N3Ye3He OT DnCnIe.
(C) 6yToH: C HaTnCKaHeTo Ha To3n 6yToH, MoKTe Da BKNIOHTe BaUNA abCop6aTop da pa6OTn CbC CKOPOCT Ha 3-BO HNBO.
Korato HATNCHEte 6yToHa OTHOBO,3a Da n3KnIOHTe ypeDa, INHdNKaTOpt 3a HNBOTo Ha CKOPoCT 1ue N3Ye3He OT DnCpIe.
(D) 6yToH: 6yToH 3a BKn./n3Kn. Ha OCBETJIeHHeTo MoKTe Da OCBETIte 3oHaTa 3a rOTBeHe Ype3 HATNCKaHe Ha To3n 6yToH.
ABTOMaTHNo cnpaHe cne15 MNH.:
To3n ypeD e obopydban c cyHKcna 3a
aBTOMaTHUHO cHpaHe, KOrTO My No3BOJRA Da
BeHTNJIIPA NOMEeHHeTO 3a DOnbJIHNTeHEn
IepNoDT BpEMe, 3a Da OTCTpaHn HEPnTHTe
MmPn3MN n N3napENn CNeI npKJIIOvBaHe Ha
rotBeHTo. CneI onpeJeHn nepNoDT BpeMe,
ypeDbT cHnpa paBota aBTOMaTHUHO.
3a da BKNIOHTe cyHKUraTa 3a aBTOMaTHUHO cnIPAHe, HATNCHETe HKOJ OT 6yTOHnTe 3a HNBO Ha ckopocT (A,B,C) Bbpxy KOHTPOJIHH naHeJ, 3a NOBuee ot 2 cekyn. Ie ce akTbIpa TaMep 3a o6paTHO OT6pOBAHe Ha 15 MNHyTN.
AkoHaTnCHete Cbuny6yToH 3a HnBO Ha CKOpocTTa, DOKaTO cyHKuYrTa 3a ABtOMaTHUHO cnnpaHe e aKtBnPaHa, yHKuYrTa ige 6bDe DeaKtBnPaHa n UpeDbT ige cnpe.
Ako n36epete npyr 6byTOH 3a HnBO Ha cKOpocTta, yHKuYraTa 6bJe DeakTNBupaHa.
Ako nckaTe Bauny ypeI da cnnpa pa6ota aBTOMaTnUHO, Tp6Ba Da aKTNBnPaTe OTHOBO cyHKnIraTa 3a aBTOMaTnUHO cnnpaHe.
IepnoDnUHO NOuNCTBaHe Ha MeTaHnTe cnItpn:
Фиntpnte Tpr6Ba Da ce nouchTbaT Ha BCEkn 60
Yaca pa6Ota HnHa 4 ceMnU B 3aBnCmOcT OT
YeCTOTata Ha n3NoJ3BaHe.
4.2 EHeprnHOb eΦeKTHBHa ynoTpe6a
- По врeme Ha pa6ota Ha abcop6atopa perynilpaite HnBaTa Ha ckopoc T cnopei nHTeH3nBHOCTTHa Mnpu3MITE n NapTe, 3a da npedeotbpaTte HeXeJNaHa eHepROKOHcMaun.
- I3noJ3BaIte HnCKn CKOpocTn (1-2) npn HopMaJIHn ycIOBnI BnCOKn CKOpocTn (3) npn TOrJaMa INTeH3NBHOCT Ha MmPn3MnTe n NapTe.
- Jlamnite Ha a6cop6aTopa ca npedHa3HaueHn 3a OCBETBaHe Ha 30HaTa 3a rotBeHe.
N3noJ3BaHTo NM 3a OCBetTneHne Ha KuxHraTa
Ie DoBeDe Do HeKeJanaHa eHePROKcMaunn
HeadeKBaTHO OCBetTneHne.
4.3 Pa6ota c a6cop6aTopa
- A6cop6aTopbTe o6opyDbH c DBratEn C pa3JIuHn HAcTpoiKn Ha CKOpOCT.
3a noobpahe Ha pa6oTaBn CbBeTbame da n3no3BaTe HnCKn CKOpOCTn Pn O6nKHOBEHn YCIOBn I BnCOKn CKOpOCTn Pn INHTeH3NBn Mnpu3Mn n napn. - Moxete Da cTapTupate abcop6aTopa, kaTo HATNCHeTe 6yToH 3a XeJHaHOTo HnBO 3a CKOpOCT (A,B,C).
- Moxe Ta OCBETte 3oHaTa 3a rOtBeHe ype3 HATnCKaHe Ha 6yToHa 3a OCBetneHne. (D)
IpeNi NouchBaHe N NOdpbJxka N3KlIOUeTe ypeNa N3KJIIOUeTe npeBkIIOUbaTeJe Ha 3axpaHbAHeTo IIN pa3XnAbTe IIN N3KlIOUeTe npedna3ntela Ha 3axpaHbAaata Bepira Ha abcop6aTopa.
5.1 AnymHneB qnTbp
To3nФиNTbpyJnaBMa3HnTe yactuBvBvB B3dyxa.ПpenOpbUBa ce da nouchTbateФиNTbpa exemecyeNo npn HopMaJIHn ycIOBnHa ynoTppe6a.3a Ta3n ueI nbpBO OTcTaPheTe anyMHnEBnTeФиTPn.N3MnTeФиTPnTe C TeueH npenapat n rN n3PnakHeTe C B0da.MontpaIte rN obpatHO cIeD kaTO n3cbxHaT.AnyMHnEBnTeФиTPn MORAT Da ce oBe3CBeTAY C n3MnBaHeto; TOBa e HOPMaJIHo n He npomehra TExHaT eΦeKTHBHOCT.
5.1.1 OTeTaPaHbAHe Ha aIyMnHneBnte ФИNTpn.
- HatncheTe 6IOKIpOBkata Ha anyMnHneBna HnTbp Hanpei.
2.CneTob6abHO ro cBaneTe n 3TeIeTe HADONY.B npOTnBEH CnyaM,MOXeTe da NOBpeNTe FInTbpa.(FInrpa9)CneK aTo aJyMNHeBnT FInTbp Ce N3MnE N 3CyuN, NOCTaBeTe FInTbpa OTHOB B HeROBOT OHe3da,KATO N3PbJIHnTE rOpHnTe CTbKN B 06paTeH pei.

(ФИтура 9)

Moxete da MneTe anyMHnEBrte cnItpn BcbdOMnHa MaunHa.
BbIepoDen ΦnTbp (YnoTppe6a 6e3 trpb60npoBOd)
To3nФиNTbPOTCTpaHЯBaMnp3MITEOTROTBHe. Ako He e Bb3MOxHO Da ce N3NOJ3Ba DmOOTBOD, TOI ppeuNCTBa Bb3dUxa, KOITOnuPKyInpa BbTpe B KuxHra. BByrpeoHNrTФиNTbP Ha ypeDa ige Ce 3anyuBbB BpeMeTO B 3aBnCIMoCT OT YecTOTata Ha N3NoJ3BaHe, CTnI Ha rotBeHe N YecTOTata Ha NOuchTaBeHa aanyMHnEBnTe ΦiHTpN.

BHHMaHne!
BbIepoHnTe qnnTpHnKora He ce MnT.
Moxete da nonyuHTe BbIepoHn fHITpN OT yblHOMOeHNTe cepBn3n Ha ,Beko".
5.2.1 ПомmaHa Ha BbIepoHna ФИТьр
- Otrpahe anymnneBte qnttn. (Furpa 9)
3a da npemaxheTe BblnepoHnna fntbp, 3aBbptete yuNcKte no nocoka, obaTnHa Ha yacOBnKOBaTa cTpeIka, n OCbo6oTe fntbpa. (fnpypa 10 - MoHTnpaIte HOBnB BbIpeoDeH cHITbP.
- MoNTnpaIte anyMnHneBnTe cHnTpI.
Hnkora He n3noJ3BaITe a6pa3nBn nnHaadpackBaUm MaTePnaJI 3a noHCCTBaHe.
Mozete da n3noJ3BaTe npedJaraHnte B TbproBcKaTa Mpeka npenapatn 3a nouchTbaHe 3a OTCTpaHraBe Ha ynpHTu 3ambpcaHna KaTO cna3BaTe npedynpexdHnra Ta Bbpy npodykTa. 3a Da He Hndpackate Kopnyca ot MaTnpaHa CTOMaHa, Ro 6bpwe Te Nocokata Ha MaTnpaHe. He n3noJ3BaIte NouchTbaU npenapata, CbDbpXaun XnDPOXnOPHa Kncelina, BeInHa nnabpa3nBn npaxObe, 3a Da noDlbpXaTe KaueCTBOTo Ha NobbpxHOCTTa Ha npodykTa. I3noJ3BaIte HABNaJxHeHa B canyHeHa BOda KbPna nn CneuaJIHn NouchTbaU cnpeioBE 3a HepBXJaema CTOMaHa pni NouchTbaHe Ha CTOMaHeHnte NOBbpxHOCTn. OTCTpaHete 3aUnTHOTO fOJIOOTypeA.

BhmuHne!
Bb3MOxHo e da npuHnTe noXap, aKO He cna3BaTe nHCTpyKUnTe 3a nouchBaHe n CmHa Ha qnItpnte Ha abcop6atopa.
Ako e Heo6xOIMo Da TpaHcnpTnpate ypeia.
3ana3ete opunnHaHata My onakOBka. TpaHCnpTupaTe ypeDa B opunnHaHata onakOBka n cneBaIte TpaHCnpTHnte N MapKnpoBkn.
Ako He pa3nojaraTe c opurHajHa onaKOBka:
He nocTaBraIte HnKaKBN npEaMeTn Bbpxy CTbKJIeHaTA NOBbpxHOCT.
3aunTeBbHnHaTnOBbpXHOCTOTyapn.
- Onakobai Te ype Ta Ka, Ye da He 6bde NobpeDeH np TpaHcnpTupaHeTo.
5.4 CmHa Ha Jamnnte
I3KJIIOUeTe abcop6aTopa ot eJekTpueckata Mpeka.
To3n ypeD e obOpyDbAn c 3 W xaIoreHn Iamnn.
3a da noDMeHnTe xaIoreHHnTe lamnn, HATNCHEte lamnata HaOJy OT 3aHaTa yact Ha dbpkaa Ha lamnata, 3a da y ocbo6oJte. CneT OToBa 3aBbptete o6paTHo Ha yacOBHKOBaTa CTpeKc a 1/4 3aBbptane n I n3BaDeTe.
3a da noctabute HObata lamna, n3nbHete rohpnte CTbnKn B o6paTeH pei.

Max:3W

Moxete da 3akynite lamnn ot OTOpunpaH cepBn3.
| Остразимявае на неиз该怎么办 | Прочина Ромош | |
| Прочиьт не заannot. | Проче поедаимеля. Взм. | Можно e поедаимеля вида e затворень. напrabete тaka чу за pавOTи. |
| Прочиьт не заannot. | Проче поедаимеля врьзka. | Главно на поеденияхетрабва насыдев мени 220-240 V. |
| Прочиьт не заannot. | Проче поедаимеля врьзka. | Проче поедаядругпente рожукп вьв Вашatura кухни pавOTЯ ппи не. |
| Лампата за освétlingenе не заannot. | Проче поедаимеля врьзka. | Главно на поеденияхетрабва насыдев мени 220-240 V. |
| Лампата за освétlingenе не заannot. | Проче поедаимеля влампата. | Проче поедаядругпente на лампата Трябва на в. послжени "ВКличени". |
| Лампата за освétlingenе не заannot. | Проче поедаимеля. Лампатe | Н поедыт с поедыдь. н поеден. н поеден. н поеден. н поеден. н поеден. н поеден. н поеден. н поедen. н поедen. н поедen. н поедen. н поедen. н поедen. н поедen. н поедen. н поедen. н поедen. н поедen. н поедen. н поедen. н поедen. н поедen. н поедen. н поедen. н поедen. н поедen. н поедen. н поедEN. н поедEN. н поедEN. н поедEN. н поедEN. н поедEN. н поедEN. н поедEN. н поедEN. н поедEN. н поедEN. н поедEN. н поедEN. н поедEN. н поедEN. н поедEN. н поедEN. н поедEN. н поедEN. н поедEN. н поедen. н поедEN. н поедEN. н поедEN. н поедEN. н поедEN. н поедEN. н поедEN. н поедEN. н поедEN. н поедEN. н поедEN. н поедEN. н поедEN. н поедEN. н поедEN. н поедEN. н поедEN. н поедEN. н поедen. н поедen. н поедEN. н поедEN. н поедEN. н поедEN. н поедEN. н поедEN. н поедEN. н поедEN. н поедEN. н поедEN. н поедEN. н поедEN. н поедEN. н поедEN. н поедEN. н поедEN. н поедEN. н поедen. н поедEN. н поедen. н поедEN. н поедEN. н поедEN. н поедEN. н поедEN. н поедEN. н поедEN. н поедEN. н поедEN. н поедEN. н поедEN. н поедEN. н поедEN. н поедEN. н поедEN. н поедEN. н поедEN. н поедen. н поедen. н поедen. н поедEN. н поедEN. н поедEN. н поедEN. н поедEN. н поедEN. н поедEN. н поедEN. н поедEN. н поедEN. н поедEN. н поедEN. н поедEN. н поедEN. н поедEN. н поедEN. н поедen. н поедEN. н поедEN. н поедen. н поедEN. н поедEN. н поедEN. н поедEN. н поедEN. н поедEN. н поедEN. н поедEN. н поедEN. н поедEN. н поедEN. н поедEN. н поедEN. н поедEN. н поедEN. н поедEN. н поедen. н поедEN. н поедen. н поедen. н поедEN. н поедEN. н поедEN. н поедEN. н поедEN. н поедEN. н поедEN. н поедEN. н поедEN. н поедEN. н поедEN. н поедEN. н поедEN. н поедEN. н поедEN. н поедEN. н поедen. н поедen. н поедEN. н поедen. н поедEN. н поедEN. н поедEN. н поедEN. н поедEN. н поедEN. н поедEN. н поедEN. н поедEN. н поедEN. н поедEN. н поедEN. н поедEN. н поедEN. н поедEN. н поедEN. н поедen. н поедen. н поедen. н поедen. н поедEN. н поедEN. н поедEN. н поедEN. н поедEN. н поедEN. н поедEN. н поедEN. н поедEN. н поедEN. н поедEN. н поедEN. н поедEN. н поедEN. н поедEN. н поедen. н поедEN. н поедEN. н поедEN. н поедen. н поедEN. н поедEN. н поедEN. н поедEN. н поедEN. н поедEN. н поедEN. н поедEN. н поедEN. н поедEN. н поедEN. н поедEN. н поедEN. н поедEN. н поедEN. н поедen. н поедEN. н поедEN. н поедen. н поедen. н поедEN. н поедEN. н поедEN. н поедEN. н поедEN. н поедEN. н поедEN. н поедEN. н поедEN. н поедEN. н поедEN. н поедEN. н поедEN. н поедEN. н поедEN. н поедen. н поедEN. н поедen. н поедEN. н поедen. н поедEN. н поедEN. н поедEN. н поедEN. н поедEN. н поедEN. н поедEN. н поедEN. н поедEN. н поедEN. н поедEN. н поедEN. н поедEN. н поедEN. н поедEN. н поедen. н поедEN. н поедen. н поедen. н поедen. н поедEN. н поедEN. н поедEN. н поедEN. н поедEN. н поедEN. н поедEN. н поедEN. н поедEN. н поедEN. н поедEN. н поедEN. н поедEN. н поедEN. н поедEN. н поедen. н поедen. н поедEN. н поедEN. н поедen. н поедEN. н поедEN. н поедEN н поедEN н поедEN н поедEN н поедEN н поедEN н поедEN н поедEN н поедEN н поедEN н поедEN н поедEN н поедEN н поедEN н поедEN н поедEN н поедEN н поедEN н поедEN н поедEN н поедEN. н поедEN н поедEN н поедEN н поедEN н поедEN н поедEN н поедEN н поедEN н поедEN н поедEN н поедEN н поедEN н поедEN н поедEN н поедEN н поедEN н поедEN н поедEN н поедEN; н поедEN н поедEN н поедEN н поедEN н поедEN н поедEN н поедEN н поедEN н поедEN н поедEN н поедEN н поедEN н поедEN н поедEN н поедEN н поедEN н поедEN н поедEN н поедEN н поедEN; н поедEN; н поедEN н поедEN н поедEN н поедEN н поедEN н поедEN н поедEN н поедEN н поедEN н поедEN н поедEN н поедEN н поедEN н поедEN н поедEN н поедEN н поедEN н поедEN н поедEN; н поедEN; Н поедEN N N N N N N N N N N N N N N N N N N N N N N N N N N N N N N N N N N N N N N N N N N N N N N N N N N M M M M M M M M M M M M M M M M M M M M M M M M M M M M M M M M M M M M M M M M M M M M M M M M M M N N N N N N N N N N N N N N N N N N N N N N N N N N N N N N N N N N N N N N N N N N N N N N N N N Y Y Y Y Y Y Y Y Y Y Y Y Y Y Y Y Y Y Y Y Y Y Y Y Y Y Y Y Y Y Y Y Y Y Y Y Y Y Y Y Y Y Y Y Y Y Y Y Y Y N N N N N N N N N N N N N N N N N N N N N N N N N N N N N N N N N N N N N N N N N N N N N N N N N n n n n n n n n n n n n n n n n n n n n n n n n n n n n n n n n n n n n n n n n n n n n n n n n n n N N N N N N N N N N N N N N N N N N N N N N N N N N N N N N N N N N N N N N N N N N N N N N N N N y y y y y y y y y y y y y y y y y y y y y y y y y y y y y y y y y y y y y y y y y y y y y y y y y y N N N N N N N N N N N N N N N N N N N N N N N N N N N N N N N N N N N N N N N N N N N N N N N N N B B B B B B B B B B B B B B B B B B B B B B B B B B B B B B B B B B B B B B B B B B B B B B B B B B N N N N N N N N N N N N N N N N N N N N N N N N N N N N N N N N N N N N N N N N N N N N N N N N N S S S S S S S S S S S S S S S S S S S S S S S S S S S S S S S S S S S S S S S S S S S S S S S S S S N N N N N N N N N N N N N N N N N N N N N N N N N N N N N N N N N N N N N N N N N N N N N N N N N L L L L L L L L L L L L L L L L L L L L L L L L L L L L L L L L L L L L L L L L L L L L L L L L L L N N N N N N N N N N N N N N N N N N N N N N N N N N N N N N N N N N N N N N N N N N N N N N N N N R R R R R R R R R R R R R R R R R R R R R R R R R R R R R R R R R R R R R R R R R R R R R R R R R R N N N N N N N N N N N N N N N N N N N N N N N N N N N N N N N N N N N N N N N N N N N N N N N N N F F F F F F F F F F F F F F F F F F F F F F F F F F F F F F F F F F F F F F F F F F F F F F F F F F R R R R R R R R R R R R R R R R R R R R R R R R R R R R R R R R R R R R R R R R R R R R R R R R R r r r r r r r r r r r r r r r r r r r r r r r r r r r r r r r r r r r r r r r r r r r r r r r r r r R R R R R R R R R R R R R R R R R R R R R R R R R R R R R R R R R R R R R R R R R R R R R R R R R F F F F F F F F F F F F F F F F F F F F F F F F F F F F F F F F F F F F F F F F F F F F F F F F F f f f f f f f f f f f f f f f f f f f f f f f f f f f f f f f f f f f f f f f f f f f f f f f f f f F F F F F F F F F F F F F F F F F F F F F F F F F F F F F F F F F F F F F F F F F F F F F F F F F E E E E E E E E E E E E E E E E E E E E E E E E E E E E E E E E E E E E E E E E E E E E E E E E E E F F F F F F F F F F F F F F F F F F F F F F F F F F F F F F F F F F F F F F F F F F F F F F F F F P P P P P P P P P P P P P P P P P P P P P P P P P P P P P P P P P P P P P P P P P P P P P P P P P P F F F F F F F F F F F F F F F F F F F F F F F F F F F F F F F F F F F F F F F F F F F F F F F F F G G G G G G G G G G G G G G G G G G G G G G G G G G G G G G G G G G G G G G G G G G G G G G G G G G F F F F F F F F F F F F F F F F F F F F F F F F F F F F F F F F F F F F F F F F F F F F F F F F F M M M M M M M M M M M M M M M M M M M M M M M M M M M M M M M M M M M M M M M M M M M M M M M M M F F F F F F F F F F F F F F F F F F F F F F F F F F F F F F F F F F F F F F F F F F F F F F F F F T F T F T F T F T F T F T F T F T F T F T F T F T F T F T F T F T F T F T F T F T F T F T F T F T F T F T F T F T F T F T F T F T F T F T F T F T F T F T F T F T F T F T F T F T F T F T F T F T F T F T F F T F T F T F T F T F T F T F T F T F T F T F T F T F T F T F T F T F T F T F T F T F T F T F T F T F T F T F T F T F T F T F T F T F T F T F T F T F T F T F T F T F T F T F T F T F T F T F T F T F E N S O N S O N S O N S O N S O N S O N S O N S O N S O N S O N S O N S O N S O N S O N S O N S O N S O N S O N S O N S O N S O N S O N S O N S O N S O N S O N S O N S O N S O N S O N S O N S O N S O N S O.N S O N S O N S O N S O N S O N S O N S O N S O N S O N S O N S O N S O N S O N S O N S O N S O N S O N S O N S O N S O N S O N S O N S O N S O N S O N S O N S O N S O N S O N S O N S O N S O N S O N sO N S O N S O N S O N S O N S O N S O N S O N S O N S O N S O N S O N S O N S O N S O N S O N S O N S O N S O N S O N S O N S O N S O N S O N S O N S O N S O N S O N S O N S O N S O N S O N S O N S O . N S O . N S O . N S O . N S O . N S O . N S O . N S O . N S O . N S O . N S O . N S O . N S O . N S O . N S O . N S O . N S O . N S O . N S O . N S O . N S O . N S O . N S O . N S O . N S O . N S O . N S O . N S O . N S O . N S O . N S O . N S O . N S O . N S O . N S O . N S O . N S O . N S O . N S O . N S O . N S O . N S O . N S O . N S O . N S O . N S O . N S O . N S O . N S O . N S O . N S O . nS O . nS O . nS O . nS O . nS O . nS O . nS O . nS O . nS O . nS O . nS O . nS O . nS O . nS O . nS O . nS O . nS O . nS O . nS O . nS O . nS O . nS O . nS O . nS O . nS O . n S O . nS O . nS O . nS O . nS O . nS O . nS O . nS O . nS O . nS O . nS O . nS O . nS O . nS O . nS O . nS O . nS O . nS O . nS O . nS O . nS O . nS O . nS O . nS O . nS O . noS O . noS O . noS O . noS O . noS O . noS O . noS O . noS O . noS O . noS O . noS O . noS O . noS O . noS O . noS O . noS O . noS O . noS O . noS O . noS O . noS O . noS O . noS O . noS O . noS O . nS O . nS O . nS O . nS O . nS O . nS O . nS O . nS O . nS O . nS O . nS O . nS O . nS O . nS O . nS O . nS O . nS O . nS O . nS O . nS O . nS O . nS O . nS O . nS O . no S O . no S O . no S O . no S O . no S O . no S O . no S O . no S O . no S O . no S O . no S O . no S O . no S O . no S O . no S O . no S O . no S O . no S O . no S O . no S O . no S O . no S O . no S O . no S O . no S O . no sO . no S O . no S O . no S O . no S O . no S O . no S O . no S O . no S O . no S O . no S O . no S O . no S O . no S O . no S O . no S O . no S O . no S O . no S O . no S O . no S O . no S O . no S O . no S O . no S O . no SO . no S O . no S O . no S O . no S O . no S O . no S O . no S O . no S O . no S O . no S O . no S O . no S O . no S O . no S O . no S O . no S O . no S O . no S O . no S O . no S O . no S O . no S O . no S O . no S O . no sS O . no S O . no S O . no S O . no S O . no S O . no S O . no S O . no S O . no S O . no S O . no S O . no S O . no S O . no S O . no S O . no S O . no S O . no S O . no S O . no S O . no S O . no S O . no S O . no S O . N S O . N S O . N S O . N S O . N S O . N S O . N S O . N S O . N S O . N S O . N S O . N S O . N S O . N S O . N S O . N S O . N S O . N S O . N S O . N S O . N S O . N S O . N S O . N S O . N S O . F 1 1 1 1 1 1 1 1 1 1 1 1 1 1 1 1 1 1 1 1 1 1 1 1 1 1 1 1 1 1 1 1 1 1 1 1 1 1 1 1 1 1 1 1 1 1 1 1 1 1 2 2 2 2 2 2 2 2 2 2 2 2 2 2 2 2 2 2 2 2 2 2 2 2 2 2 2 2 2 2 2 2 2 2 2 2 2 2 2 2 2 2 2 2 2 2 2 2 2 2 8 8 8 8 8 8 8 8 8 8 8 8 8 8 8 8 8 8 8 8 8 8 8 8 8 8 8 8 8 8 8 8 8 8 8 8 8 8 8 8 8 8 8 8 8 8 8 8 8 8 6 6 6 6 6 6 6 6 6 6 6 6 6 6 6 6 6 6 6 6 6 6 6 6 6 6 6 6 6 6 6 6 6 6 6 6 6 6 6 6 6 6 6 6 6 6 6 6 6 6 8 8 8 8 8 8 8 8 8 8 8 8 8 8 8 8 8 8 8 8 8 8 8 8 8 8 8 8 8 8 8 8 8 8 8 8 8 8 8 8 8 8 8 8 8 8 8 8 8 1 1 1 1 1 1 1 1 1 1 1 1 1 1 1 1 1 1 1 1 1 1 1 1 1 1 1 1 1 1 1 1 1 1 1 1 1 1 1 1 1 1 1 1 1 1 1 1 1 8 8 8 8 8 8 8 8 8 8 8 8 8 8 8 8 8 8 8 8 8 8 8 8 8 8 8 8 8 8 8 8 8 8 8 8 8 8 8 8 8 8 8 8 8 8 8 8 8 5 8 8 8 8 8 8 8 8 8 8 8 8 8 8 8 8 8 8 8 8 8 8 8 8 8 8 8 8 8 8 8 8 8 8 8 8 8 8 8 8 8 8 8 8 8 8 8 8 8 7 8 8 8 8 8 8 8 8 8 8 8 8 8 8 8 8 8 8 8 8 8 8 8 8 8 8 8 8 8 8 8 8 8 8 8 8 8 8 8 8 8 8 8 8 8 8 8 8 8 3 8 8 8 8 8 8 8 8 8 8 8 8 8 8 8 8 8 8 8 8 8 8 8 8 8 8 8 8 8 8 8 8 8 8 8 8 8 8 8 8 8 8 8 8 8 8 8 8 8 9 8 8 8 8 8 8 8 8 8 8 8 8 8 8 8 8 8 8 8 8 8 8 8 8 8 8 8 8 8 8 8 8 8 8 8 8 8 8 8 8 8 8 8 8 8 8 8 8 8 4 8 8 8 8 8 8 8 8 8 8 8 8 8 8 8 8 8 8 8 8 8 8 8 8 8 8 8 8 8 8 8 8 8 8 8 8 8 8 8 8 8 8 8 8 8 8 8 8 8 2 8 8 8 8 8 8 8 8 8 8 8 8 8 8 8 8 8 8 8 8 8 8 8 8 8 8 8 8 8 8 8 8 8 8 8 8 8 8 8 8 8 8 8 8 8 8 8 8 10000000000000000000000000000000000000000000000000000000000000000000000000000000000000000000000000000100000000000000000000000000000000000000000000000000000000000000000000000000000000000000000000000000110000000000000000000000000000000000000000000000000000000000000000000000000000000000000000000000000020000000000000000000000000000000000000000000000000000000000000000000000000000000000000000000000000002100000000000000000000000000000000000000000000000000000000000000000000000000000000000000000000000000 |


- Please read this user manual first!
- Meanings of the Symbols
- Important instructions for safety and environment
- General Safety
- Important instructions for safety and environment
- Compliance with the WEEE Directive and Disposing of the Waste Product: This product complies with EU WEEE Directive (2012/19/EU). This product bears a classification
- Compliance with RoHS Directive
- Package Information
- Technical specifications of your appliance
- Installing your appliance
- WARNING
- Installation accessories
- Installing the hood onto the wall
- Boring the hanger holes
- Hammering the wall plugs
- Installing the hanger screws
- Hanging the hood onto the wall
- Installing the hood flue
- Using with flue connection
- Using without flue connection
- Flue connection:
- Operating your appliance
- Digital electronic control with 3 levels
- Auto-stop in 15 min.:
- Periodical cleaning of metal filters:
- Energy efficient usage:
- Operating the hood:
- Cleaning and maintenance
- Aluminum filter
- Removing the aluminum filters
- Carbon filter (Using without flue)
- Caution!
- Replacing the carbon filter
- (Figure 10)
- Cleaning
- If you do not have the original package:
- Replacing the lamps
- Troubleshooting
- Aluminium filter
- BaxJIiBi iHcTpkykciI 7oDo texhikn 6e3peKn Ta oxopOHn HABKOJINHbOrO cepeIOBnIa
- BaxJIiBi iHcTpUkciI 7oDo texhIKn 6e3peKn Ta oxopoHn HABKOJINHbOro cepeIOBnIa
- BaxklnBi iHcTpyKcii 7oDo texhikn 6e3neKn Ta oxopOHn HABKOJIshNbOrO cepeIOBnIa
- YctaHOBKa BNTJxKn Ha CTiHi
- YcTaHOBka npnlaNy
- CbeprnHHn OTbopIB Jn KpinneHb
- 3a6nBaHnЯДIO6eJIIB MOJOTKOM
- YcTaHOBka nIDBicHNx rBNHTiB
- 3.2.4ПиДВИшУВань ВИТЯЖКИНСТIHI
- YcTaHOBka NOBiTpponpoBODY BNTJXKN
- BnKOpncTaHnBnTJxKn i3 nobITponpOBOdom
- BnKOpncTaHnBnTJxKn 6e3 nobitponpoBody
- 3.5ПiД'ЕнаннЯ NOBITponpoBODY:
- /ctaHObKa npnlaNy
- Cnctema 3anobirahna 3BOPOTniu npkylaui noToKy (N-RV)
- Ekplnyataizipnilady
- TpboxpiBHeBa cnCTema uΦpOBo- ro eIeKtpOHoro ynpaBnHn
- ABTOMATNCHa 3yINHka yepe3 15 XB.:
- PepioDnHa OunchKa MeTaJIeBHX pIbTpIb:
- Ekplnyataci npnilady
- EheproeΦeKTHBHa eKcnnyatai:
- Ekcnnyataciia Bntjxkn:
- OuHnHn iTexHicHe o6cnyroByBaHHa
- AnomhiBn qinbTp
- 3nra aniomhiBnx pibtpiB
- ByrilbHnI IInbTp (BnKOpncTaHHa 6e3 nobitponpoBody)
- ybara!
- 3aɪnə ByrɪŋbHoro φɪnbTpa
- OuHHe i TexHiue He o6cIyroByBaHHa
- OuHnueHHa
- BvpiiheHn npo6JeM
- YcnoBhpie 06o3haueHnra
- YcTaHOBKa np6opa
- YcTaHOBKa BbITaJxHOJ Tpy6bl
- Baxhni Hnctpykun 3a 6e30napcHocT n Opa3BaHe Ha OKoJHaTa CpeDa
- O6ua 6e3oNaChocT
- Baxhni nHctpyKuIN 3a 6e30nacHOCT u ONa3BaHe Ha OKoJIHaTa CpeDa
- Baxhni nHctpyKuIN 3a 6e30nacHOCT N ONa3BaHe Ha OKoJIHaTa CpeDa
- Ima onachocT OT 3aDywaBaHe!
- CbOTBcTcTBnE c DnpeKTHBa RoHS
- Информаця за опakовkaТа
- Texnueckn cneuokauin Ha ypeda
- MoNTaX Ha ypeDa
- PPEyPExEHEHNE
- PPEyPExEHE
- PPEyIpeXDEHNE
- (Фигура 26)
- MoHTaK Ha akcecoapn
- Crno6BaHe Ha a6cop6aTopa Ha cTeHaTa
- (Фигура 36)
- MoHTaX Ha BnHTObTe 3a OKaUBaHe
- Crno6BaHe Ha a6cop6aTopa Ha cTeHaTa
- Ctrno6BaHe Ha ДиMoOTbOda Ha a6cop6aTopa
- Ynotpe6a c Tpb6a 3a CBbp3BaHe KbM DnMOOTBOD
- Ynotpe6a 6e3 Tpb6a 3a CBbp3BaHe KbM DnMOOTBOD
- CBbP3BaHe HaДИМOOTBOIDA:
- Pa6ota c ypeda
- 4.1ДигntaJIHo eIeKTpOHHO ynpabJIeHne c 3 HnBa
- ABTOMaTHNo cnpaHe cne15 MNH.:
- IepnoDnUHO NOuNCTBaHe Ha MeTaHnTe cnItpn:
- EHeprnHOb eΦeKTHBHa ynoTpe6a
- Pa6ota c a6cop6aTopa
- AnymHneB qnTbp
- OTeTaPaHbAHe Ha aIyMnHneBnte ФИNTpn.
- ПомmaHa Ha BbIepoHna ФИТьр
- BhmuHne!
- CmHa Ha Jamnnte
Brand : BEKO
Model : HCA63640Z
Category : Range hood