Canvio AeroMobile - External hard drive TOSHIBA - Free user manual and instructions
Find the device manual for free Canvio AeroMobile TOSHIBA in PDF.

| Product type | Wireless external hard drive with SSD |
| Brand | Toshiba |
| Model | Canvio AeroMobile |
| Dimensions (L x W x H) | 123.5 mm x 63.0 mm x 12.5 mm |
| Weight | Approximately 120 g |
| Internal SSD capacity | 128 GB (NTFS format) |
| Battery | Rechargeable lithium-ion, 3100 mAh |
| Battery life | Up to 8 hours in continuous video streaming |
| Charging time | Up to 3 hours |
| USB interface | USB 3.0 (compatible with USB 2.0) |
| Wireless network | Wi-Fi 802.11 b/g/n, 2.4 GHz, 1T1R up to 150 Mbps |
| Supported file formats | Video: mp4, 3gp, m4v, mov, avi; Music: mp3, m4a, AAC, wav; Images: jpg, bmp, png, gif, tif; Documents: pdf, doc, docx, ppt, pptx, xls, xlsx, txt, rtf |
| Compatible operating systems | Windows 7/8/8.1, Mac OS X 10.7/10.8, iOS, Android |
| Key features | Wireless access, DAS mode (direct), media streaming, backup via SD card, dedicated mobile app |
| Additional storage | SD/SDHC/SDXC card reader (Class 10) |
| Operating temperature | 5 to 35 °C |
| Storage temperature | -20 to 60 °C |
| Operating humidity | 20 to 80% |
| Storage humidity | 8 to 90% |
| Safety | Do not immerse, avoid heat and fire, do not disassemble the internal battery |
| Care and cleaning | Use a dry, soft cloth; do not use chemical products |
| Spare parts and repairability | Internal battery not user-replaceable; contact Toshiba support for any repairs |
| Included accessories | Power adapter, USB 3.0 cable, quick start guide, case |
Frequently Asked Questions - Canvio AeroMobile TOSHIBA
User questions about Canvio AeroMobile TOSHIBA
0 question about this device. Answer the ones you know or ask your own.
Ask a new question about this device
Download the instructions for your External hard drive in PDF format for free! Find your manual Canvio AeroMobile - TOSHIBA and take your electronic device back in hand. On this page are published all the documents necessary for the use of your device. Canvio AeroMobile by TOSHIBA.
USER MANUAL Canvio AeroMobile TOSHIBA
Important notice for security
English
Please be sure to change the default Wi-Fi password and the default Admin password immediately upon first usage of the product. To set your unique password, please refer to this user manual on your applicable regional support site.
The default password is automatically set upon shipping of the product. Even if the default password is changed to your unique password, your unique password may be reset to a default password in the following situation:
In case the product is reset by depressing the Reset button to accomplish a reset of the product.
Regulatory statements
CE Compliance
CE
This product is CE marked in accordance with the requirements of the applicable EU Directives. Responsible for CE marking is Toshiba Europe GmbH, Hammfelddamm 8, 41460 Neuss, Germany. A copy of the official Declaration of Conformity can be obtained from following website: http://epps.toshiba-tec.com.
Working Environment
The Electromagnetic Compliance (EMC) of this product has been verified typically for this product category for a so called Residential, Commercial & Light Industry Environment. Any other working environment has not been verified by Toshiba and the use of this product in these working environments is maybe restricted or cannot be recommended. Possible consequences of the use of this product in non verified working environments can be: Disturbances of other products or of this product in the nearby surrounding area with temporarily malfunction or data loss/ corruption as result. Example of non verified working environments and related advices:
Industrial environment (e. g. where 3-phase 380V mains is being used mainly): Danger of disturbances of this product due to possible strong electromagnetic fields especially near to big machinery or power units.
Medical environment: The compliance to the Medical Product Directive has not been verified by Toshiba, therefore this product cannot be used as a medical product without further verification. The use in usual office environments e.g. in hospitals should be no problem if there is no restriction by the responsible administration.
Automotive environment: Please search the owner instructions of the related vehicle for advices regarding the use of this product (category).
■ Aviation environment: Please follow the instructions of the flight personnel regarding restrictions of use.
Additional Environments not Related to EMC
- Explosive atmosphere: The use of this product in such special working environment (Ex) is not allowed.
Following information is only valid for EU-member States:
REACH - Compliance Statement
The new European Union (EU) chemical regulation, REACH (Registration, Evaluation, Authorization and Restriction of Chemicals), entered into force on 1 June 2007.
Toshiba will meet all REACH requirements and is committed to provide our customers with information about the chemical substances in our products according to REACH regulation.
Disposal of products
The use of the symbol indicates that this product may not be treated as household waste. By ensuring this product is disposed of correctly, you will help prevent potential negative consequences for the environment and human health, which could otherwise be caused by inappropriate waste handling of this product.
For more detailed information about recycling of this product, please contact your local city office, your household waste disposal service or the shop where you purchased the product.
Disposal of batteries and/or accumulators
The crossed out wheeled dust bin symbol indicates that batteries and/or accumulators must be collected and disposed of separately from household waste. By participating in separate collection of batteries, you will help to assure the proper disposal of products and thus help to prevent potential negative consequences for the environment and human health. For more detailed information about the collection and recycling programs available in your country, please contact your local city office or the shop where you purchased the product.
The following information is valid only for Turkey:
Compliant with AEEE Regulation.
Safety icons
This manual contains safety instructions that must be observed to avoid potential hazards that could result in personal injuries, damage to your equipment, or loss of data. These safety cautions have been classified according to the seriousness of the risk, and icons highlight these instructions as follows:
| Signal Words Meaning | |
| ▲DANGER | Indicates an imminently hazardous situation which, if not avoided, will result in death or serious injury. |
| ▲WARNING | Indicates a potentially hazardous situation which, if not avoided, could result in death or serious injury. |
| ▲CAUTION | Indicates a potentially hazardous situation which, if not avoided, may result in minor or moderate injury. |
| CAUTION | Indicates a potentially hazardous situation which, if not avoided, may result in property damage. |
| NOTE | Provides important information. |
Other icons used
Additional icons highlight other helpful or educational information:
| TECHNICAL NOTE: This icon indicates technical information about the device. | |
| HINT: This icon indicates helpful hints and tips. | |
| DEFINITION: This icon indicates the definition of a term used in the text. |
Battery safety precautions
| DANGER | Do not immerse the device (with the internal battery in it) in liquid such as water, beverages, or other fluids. |
| The battery (including protection circuit) may catch on fire, smoke, explode, or cause heat generation by unexpected electrical load. | |
| DANGER | Keep the device (with the internal battery in it) away from heat and fire. Heat will damage the battery and may cause it to generate heat, smoke, catch fire, or explode. |
| DANGER | Do not disassemble the device and the internal battery. Disassembly or modification of the battery may damage the protection circuit. This may cause the battery to generate heat, smoke, catch fire, or explode. |
| WARNING | Keep away from small children. Keep the battery away from small children. If the battery or any of its component parts is swallowed, seek medical attention immediately. |
| WARNING | Stop charging if the charging process cannot be finished. If the battery can not finish the charging process within the specified time, halt the charging process. The battery may generate heat, smoke, catch fire, or explode. |
| WARNING | This device has a rechargeable battery inside. Do not throw away used batteries as home rubbish. Please bring them to a recycle agency or put in a recycle box for portable rechargeable batteries. If used batteries are thrown away as home rubbish, there is a possibility that they may cause the rubbish collection to catch fire or smoke. |
| CAUTION | Only charge the battery in temperatures between 5°C and 35°C. Charging outside of this temperature range may cause the battery to leak, generate heat, or result in serious damage. It may also cause the battery's performance and life to deteriorate. |
Safety information and Rules and Regulations for wireless LAN
| ▲CAUTION | Wireless LAN devices may cause interference with medical equipment such as cardiac pacemakers. If you use personal medical equipment, consult with your physician and medical equipment instructions before using the Product. The Product should not be used in environments with medical equipment such as hospitals and medical offices, or near users of personal medical equipment, as use of this Product may cause injury in such environments. |
| ▲CAUTION | Always turn off wireless functionality if the computer is near automatic control equipment or appliances such as automatic doors or fire detectors. Radio waves can cause malfunction of such equipment, possibly resulting in injury. |
- Do not use the Wireless LAN functionality near a microwave oven or in areas subject to radio interference or magnetic fields. Interference from a microwave oven or other source can disrupt Wireless LAN operation.
The transmission speed over the wireless LAN, and the distance over which the wireless LAN can reach, may vary depending on surrounding electromagnetic environment, obstacles, access point design and configuration, client design and software/hardware configurations. The transmission rate described is the theoretical maximum speed as specified under the appropriate standard - the actual transmission speed will be lower than the theoretical maximum speed.
Notice
The information contained in this manual, including but not limited to any product specifications, is subject to change without notice.
TOSHIBA EUROPE GMBH PROVIDES NO WARRANTY WITH REGARD TO THIS MANUAL OR ANY OTHER INFORMATION CONTAINED HEREIN AND HEREBY EXPRESSLY DISCLAIMS ANY IMPLIED WARRANTY OF MERCHANTABILITY OR FITNESS FOR ANY PARTICULAR PURPOSE WITH REGARD TO ANY OF THE FOREGOING. TOSHIBA ASSUMES NO LIABILITY FOR ANY DAMAGES INCurred DIRECTLY OR INDIRECTLY FROM ANY TECHNICAL OR TYPOGRAPHICAL ERRORS OR OMISSIONS CONTAINED HEREIN OR FOR DISCREPANCIES BETWEEN THE PRODUCT AND THE MANUAL. IN NO EVENT SHALL TOSHIBA BE LIABLE FOR ANY INCIDENTAL, CONSEQUENTIAL, SPECIAL, OR EXEMPLARY DAMAGES, WHETHER BASED ON TORT, CONTRACT OR OTHERWISE, ARISING OUT OF OR IN CONNECTION WITH THIS MANUAL OR ANY OTHER INFORMATION CONTAINED HEREIN OR THE USE THEREOF.
GNU General Public License ("GPL")
Firmware incorporated into this product may include third party copyrighted software licensed under the GPL or Lesser General Public License ("LGPL") (collectively, "GPL Software") and not Toshiba's End User License Agreement. A copy of that license may be obtained at http://www.gnu.org, and www.toshiba.eu/externalstorage/support. With respect solely to the GPL Software, no warranty is provided, to the extent permitted by applicable law. Modification of or tampering with the Software is solely at your own risk and will void the product warranty. Toshiba is not responsible for any such modification or tampering. Toshiba will not support any product in which you have or have attempted to modify the Software supplied by Toshiba.
Copyright
This manual may not be reproduced in any form without the prior written permission of Toshiba. No liability is assumed with respect to the use of the information contained herein.
©2014 Toshiba Europe GmbH, All Rights Reserved.
©2014 TOSHIBA CORPORATION, All Rights Reserved.
Trademarks
Canvio AeroMobile is a trademark of Toshiba America Information
Systems, Inc., Toshiba Corporation and/or their respective affiliates.
Google Play and Android are trademarks of Google Inc.
Mac, Mac OS, OS X, iPad, iPhone and Time Machine are trademarks of
Apple Inc., registered in the U.S. and other countries.
IOS is a trademark or registered trademark of Cisco in the U.S. and other
countries and is used under license.
App Store is a service mark of Apple Inc.
DLNA is a trademark or a registered trademark of the Digital Living Network
Alliance.
Wi-Fi® is a registered trademark of the Wi-Fi Alliance®.
Windows is either a registered trademark or a trademark of Microsoft
Corporation in the United States and/or other countries.
All other brand and product names are trademarks or registered
trademarks of their respective companies.
Table of Contents
Introduction. 10
Overview 10
Components 10
Hardware specifications 10
Software specifications 11
Chapter 1 Getting Started 12
Charging the Canvio AeroMobile 12
Function modes. 12
DAS mode (Direct-Attached Storage) 12
Wireless LAN mode (Wireless LAN storage) 13
Features 14
Chapter 2 Software Utility 16
System login 16
Connect wirelessly to a PC/Mac 16
Web browser login 16
Client login for iPhone or iPad 17
AndroidTM client login 18
Main interface 19
Web main interface 20
Application main interface. 20
Pictures Management interface. 22
Picture Viewer interface 23
Videos Management interface. 24
VideoPlaybackinterface (iPhone,iPad,andAndroidTMdeviceonly) 26
Music Management interface 27
Music Player interface (iPhone, iPad, and Android™ device only) 29
Documents Management interface 31
Document Viewer interface (iPhone, iPad, and Android™ device only) 32
File/Folder Management interface. 33
Chapter 3 SD Card Management 37
Unmount SD card 37
Access to SD Card 37
Chapter 4 Backup Management 38
Using the SD Card 38
Manual backup 38
Automatic backup 38
Using the Backup Management 38
Chapter 5 Settings Management. 40
Using the Settings Management 40
Configurations. 40
Wireless LAN settings for the Application 41
Wireless LAN settings for a Web browser. 43
Internet Settings (application) 45
Internet Settings (Web browser) 46
System settings. 47
DHCP Settings (Web browser only) 51
User image and name management 52
Cache (Applications only) 53
Language (Applications only) 53
Logout 53
TOSHIBA Support 54
Index. 55
Introduction
Overview
The Toshiba Canvio AeroMobile allows you to wirelessly access your music, videos, pictures, and data, streaming it to your iPad, iPhone, tablets, smartphones, and notebooks, no longer requiring you to tangle with cords or cables. With the internal SSD storage, there is no need to worry about running out of space on your mobile devices and the built-in USB 3.0 port makes file transfer easier and much faster.
Components
The Canvio AeroMobile includes the following components:
AC adapter
USB 3.0 cable
Quick Start guide
Pouch
Hardware specifications
| Product dimension: | 123.5 mm (L) x 63.0 mm (W) x 12.5 mm (H) [4.9 in (L) x 2.5 in (W) x 0.5 in (H)] | |
| Weight: approx. 120 g | ||
| Battery: 3100mAh Li-ion type (Charging time: max. 3 hours) | ||
| Environmental requirements: | ||
| Wireless LAN | ||
| Standard: 802.11 b/g/n | ||
| Frequency: 2.4 GHZ | ||
| Speed: 1T1R up to 150 Mbps | ||
| Temperature | ||
| Operating: 5 to 35° C (41 to 95° F) | ||
| Storage: -20 to 60° C (-4 to 140°F) | ||
| Humidity | ||
| Operating: 20-80% | ||
| Storage: 8-90% | ||
Software specifications
| Compatible file types: | ||
| Videos: mp4, 3gp, m4v, mov,avi | ||
| Music: mp3, m4a, AAC, wav | ||
| Pictures: jpg, bmp, png, gif,tif | ||
| Documents pdf, doc, docx,ppt,pptx,xls,xlsx,txt, rtf | ||
| Others: Opens in external software | ||
| System requirements: | ||
| Operating System | ||
| Windows®: Windows® 7, Windows® 8, Windows® 8.1 | ||
| Mac OS: X 10.7, 10.8 | ||
| iPhone or iPad operating system: | Support for AndroidTM and iOS smartphones or tablets. Please check "Wireless SSD for Toshiba" app site for supported versions. | |
| AndroidTM: | ||
NOTE
This drive is formatted in NTFS for Windows®. In case for use with both Windows® PC and Mac, by installing "Tuxera NTFS for Mac" on Mac, user can read and write data to both Windows® PC and Mac. But in this case, user cannot use the Time Machine function of OS X.
Chapter 1
Getting Started
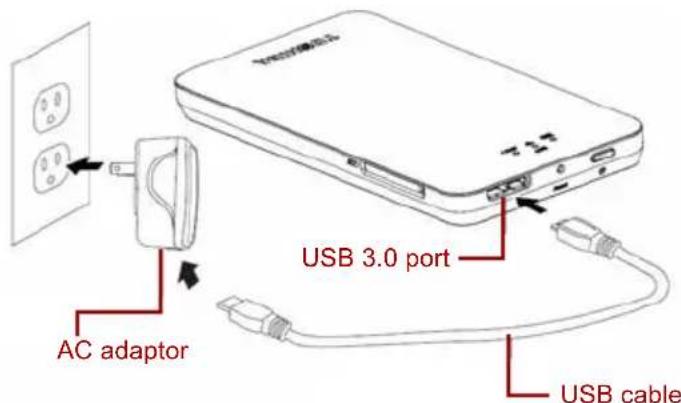
Charging the Canvio AeroMobile
The Canvio AeroMobile can be charged via the AC adaptor and USB cable. Charge the Canvio AeroMobile when you see that the battery indicator is Yellow (indicates low battery charge).
(Sample Image) Canvio AeroMobile charging
To charge the Canvio AeroMobile:
- Attach the USB cable to the AC adaptor.
- Plug the USB cable into the USB 3.0 Host port on the Canvio AeroMobile.
- Plug the AC adapter into a live electrical wall outlet. While charging, the battery indicator light will blink slowly (interval time is 2 seconds).
Function modes
There are two available function modes on the Canvio AeroMobile. You can either connect to it directly with the included USB cable (DAS mode) or connect wirelessly (Wireless LAN mode).
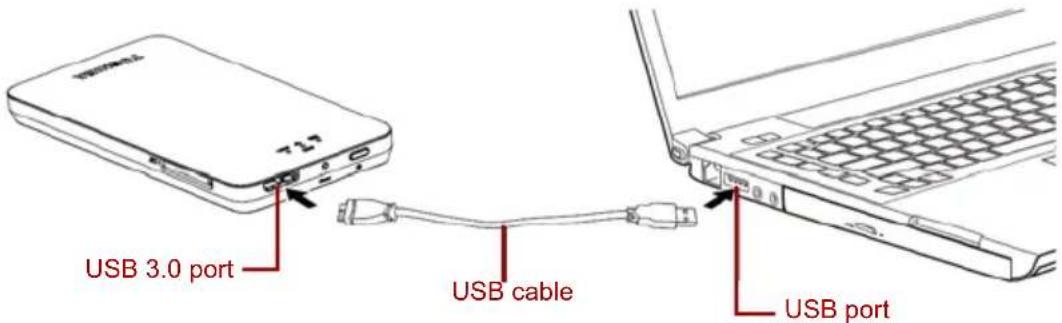
DAS mode (Direct-Attached Storage)
To operate via DAS mode, connect the Canvio AeroMobile to the computer's USB port using the included USB cable.
For Mac users:
To write files in DAS mode, you will need to install the "NTFS driver for Mac" to your Mac. Refer the pre-loaded manual stored on the Canvio AeroMobile's SSD.
NOTE Battery life may differ depending on user conditions.
(Sample Image) Canvio AeroMobile DAS mode
To connect the Canvio AeroMobile to your computer:
- Make sure the Canvio AeroMobile is powered OFF.
- Connect the included USB 3.0 cable to the Canvio AeroMobile.
- Connect the other end of the USB 3.0 cable to your computer's USB port.
You can now begin transferring data to and from the product.
Wireless LAN mode (Wireless LAN storage)
You can access the Canvio AeroMobile wirelessly from Windows®, Mac, iPhone, iPad, Android™ mobile devices and DLNA® devices by connecting to Canvio AeroMobile.
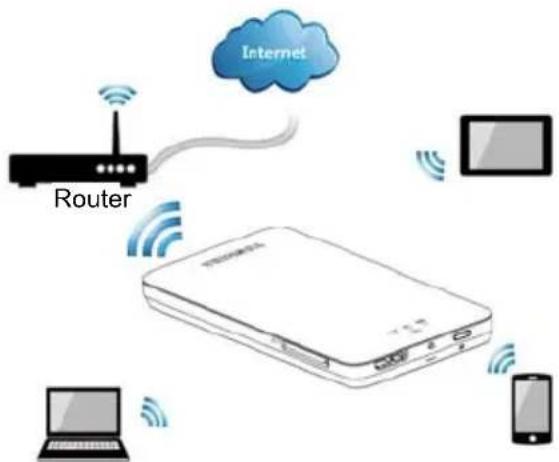
(Sample Image) Canvio AeroMobile Wireless LAN mode
Press the ON/OFF button to power on the system.
The Canvio AeroMobile automatically functions in Wireless LAN mode once the connection has been set up, see "Connect wirelessly to a PC/ Mac" on page 16.
Features
Two available modes:
DAS (Direct-Attached Storage) mode
Wireless LAN mode (Wireless LAN Storage mode)
Access and stream your music, videos, pictures and data using the free Application supporting iPhone, iPad, and Android™ operating systems.
Up to 8 Hours of continuous battery life in video streaming condition.
NOTE Battery life may differ depending on user conditions.
Search function to locate and access your files much faster.
Internet access capability via wireless, supporting 802.11 b/g/n.
Built-in 128 GB SSD with NTFS format.
Supports SD/SDHC/SDXC memory card, Class 10 compatible. Please check "Wireless SSD for Toshiba" or "Wireless SSD for Toshiba Ver2" app site for SDXC supporting version.
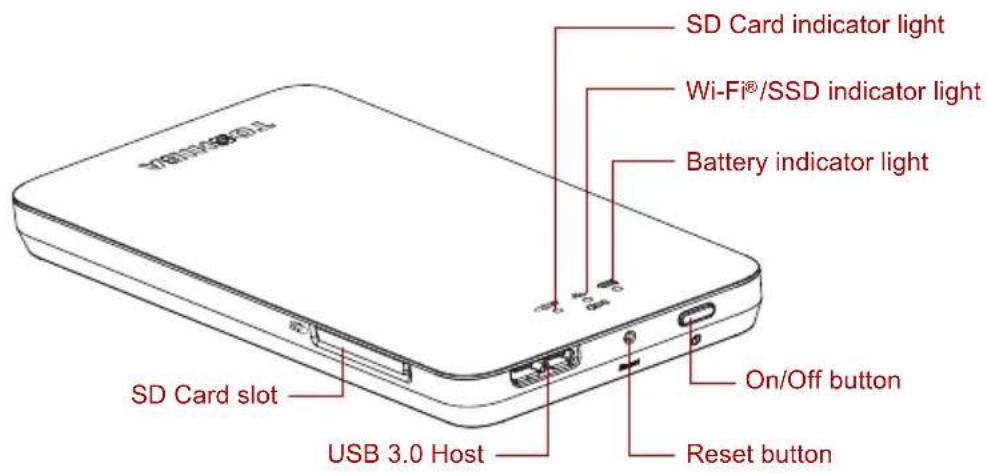
(Sample Image) Canvio AeroMobile features
On/Off button:
Press and hold for 2 seconds, (Wireless LAN mode turns ON).
Press and hold for 2 seconds again, (Wireless LAN mode turns OFF).
NOTE If the battery is too low, you cannot turn the Canvio Aeroviboe ON. The battery indicator will blink Orange for 6 seconds, and then off.
Reset button:
In Wireless LAN mode, press and hold for 5 seconds. The system will restore to its factory settings.
USB 3.0 Host:
Compatible with USB 3.0 and USB 2.0.
- Allows for data transfer between a computer and the Canvio AeroMobile, when connected.
- Allows you to charge the product battery when connected to the AC adapter.
SD Card Slot:
Supports SD/SDHC/SDXC memory card, Class 10 compatible. Please check "Wireless SSD for Toshiba" or "Wireless SSD for Toshiba Ver2" app site for SDXC supporting version.
In Wireless LAN mode, you can access the SD Card.
Battery Indicator light:
Green: The battery power is ≥ 30% .
Yellow: The battery power is < 30% and >10% .
Orange (blinking fast): the product is out of battery power or the operating temperature is too high. the product will shut down after 30 seconds.
Green or Yellow (blinking slowly): The battery is charging.
Green (Not blinking): Finish charging.
Green or Yellow (blinking fast): The product is shutting down or turning ON.
LED Off: The device is powered OFF.
Wireless LAN/SSD indicator:
■ Wireless LAN Mode
Blue: Wireless LAN is ON (no data access).
Blue (blinking): Wireless LAN is ON (accessing storage).
Blue (turned off): Wireless LAN is OFF.
DAS Mode
White: No data access.
White (blinking): Accessing data.
White (turned off): "Safely Remove", system "Sleep" or "Standby."
SD Card indicator:
Only glows in Wireless LAN Mode
Violet: No SD Card access.
Violet (blinking): Accessing SD Card.
Violet (turned off): SD Card enters into standby.
Chapter 2
Software Utility
System login
Connect wirelessly to a PC/Mac
- Press the ON/OFF button to power on the system.
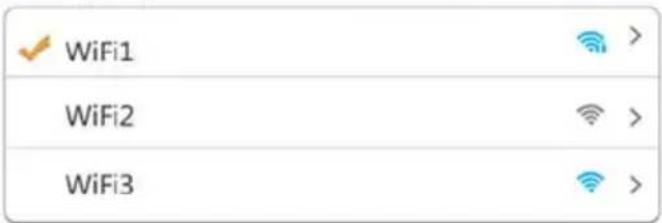
- Once the Wi-Fi indicator light stops blinking, enable the Wireless LAN feature on your PC/Mac and open the Wireless Network connection.
- Select the Toshiba wssd xxxxx wireless connection (default wireless SSID: Toshiba wssd xxxxx), and then enter the default password 12345678.
Web browser login
- Once you have successfully connected to your Canvio AeroMobile, open a Web browser and enter the "http://10.10.10.254" or "http://wirelessssd/" URL.

(Sample Image) Web browser address field
If an Internet connection is not available, input any URL and the Web browser will take you to the above page.
(Sample Image) Log in screen
- Enter your login information in the Log In screen, using the following credentials:
■ User Name: admin
User Password: Leave the field blank
- Click or touch the Log In button to access the main Web Interface.
Client login for iPhone or iPad
Install the application for iPhone and iPad
- Search and locate the free TOSHIBA app called "Wireless SSD" in the App Store.
- Install the Wireless SSD app and follow the on-screen installation instructions.
- The Wireless SSD icon appears on the Desktop once the installation process is complete.
Connecting wirelessly to an iPhone or iPad
- Press the ON/OFF button to power on the system.
- Once the Wi-Fi indicator light stops blinking, go to Setting, and then the Wireless LAN option in your iPad/iPhone.
- Click or touch Toshiba wssd xxxx.
- Enter the default password 12345678.
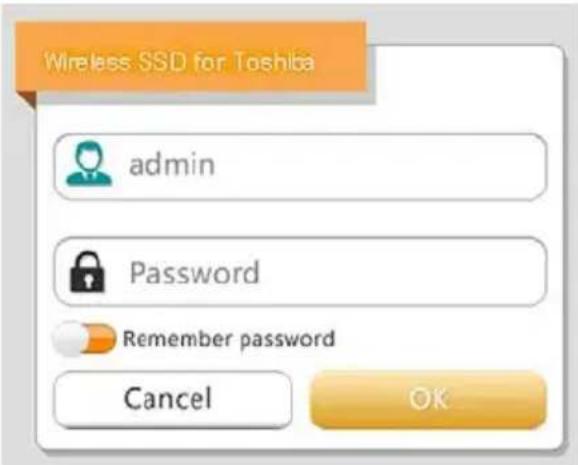
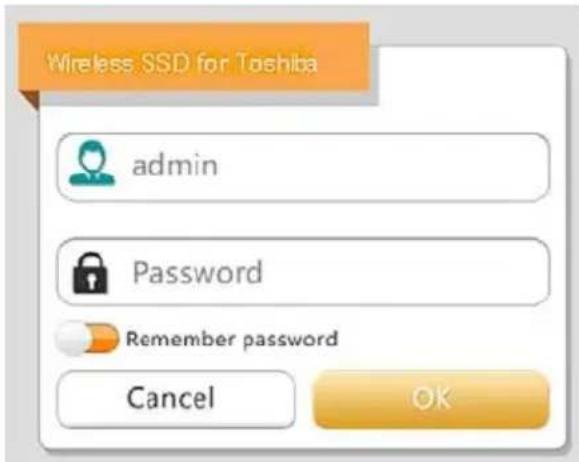
Application login
- Run the "Wireless SSD" applet, and then log into the "Wireless SSD."

(Sample Image) iPhone or iPad Log in screen
- Enter your login information in the Log In screen, using the following credentials:
■ User Name: admin
User Password: Leave the field blank
- Click or touch the OK button to access the main interface.
Android™ client login
Install the Android™ application
- Search and locate the free TOSHIBA app called "Wireless SSD" in the Google Play™.
- Install the Wireless SSD app and follow the on-screen installation instructions.
- The Wireless SSD icon appears on the Desktop once the installation process is complete.
Connecting wirelessly to an Android™ device
- Press the ON/OFF button to power on the system.
- Once the Wi-Fi indicator light stops blinking, go to Setting, and then the Wireless LAN option in your tablet or smart phone.
- Click or touch Toshiba wssd xxxx.
- Enter the default password 12345678.
Application login
- Run the "Wireless SSD" applet, and then log into the "Wireless SSD."
(Sample Image) AndroidTM Log in screen
- Enter your login information in the Log In screen, using the following credentials:
■ User Name: admin
User Password: I leave the field blank
- Click or touch the OK button to access the main interface.
Main interface
When entering the main interface, Wireless SSD software may inform you if a new Firmware is available. The following 3 options are available:
OK to update
Cancel
Do not prompt

(Sample Image) Firmware update screen
If you select OK to update, the system will inform you to wait 5 minutes.
The system is being upgraded. Please wait 5 minutes. Remaining # n seconds... After the upgrade is successful, please reconnect the device Wi-Fi.
(Sample Image) Firmware update - wait 5 minutes screen
If you select Cancel, you may be informed of any available upgrades the next time you login and enter the main interface.
If you select Do not prompt, Wireless SSD software will never again automatically inform you of a firmware upgrade, however, you can manually upgrade the firmware on the Setting page, see "Upgrade the Firmware:" on page 50.
Web main interface
Below is an example of the main interface viewed in a computer's Web browser.

(Sample Image) Main interface - Web browser
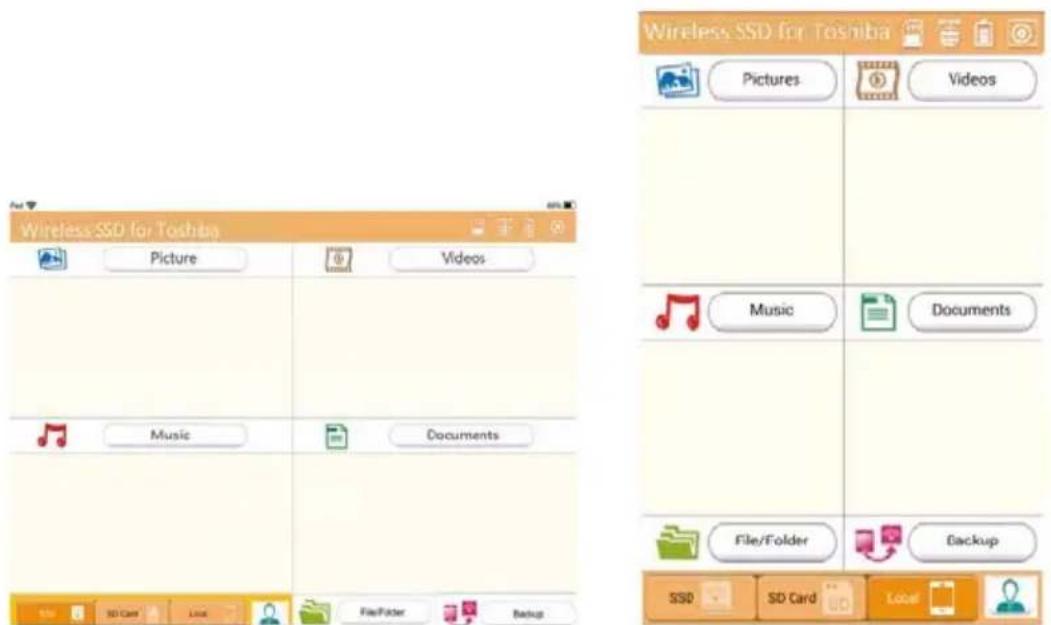
Application main interface
Below is an example of the main interface viewed in the iPhone, iPad, or Android™ app.

Tablet/iPad Smart phone/iPhone
(Sample Image) Main interface - application
Application main interface functionality
Below is a description of each button/icon and its function within the application main interface:
| Button/Icon Function | |
| Picture | Displays the picture preview. Click or touch the Picture button to enter Pictures Management. |
| Videos | Displays the video files preview. If no videos are available, the default image is used. Click or touch the Videos button to enter Videos Management. |
| Documents | Displays the document files preview. If no documents are available, the default image is used. Click or touch the Documents button to enter Documents Management. |
| File/folder | Click or touch the File/Folder button to enter the File/Folder Management Interface. This is where you can create folder(s), copy file(s)/folder(s), delete file(s)/folder(s), share file(s), upload/download file(s) etc. |
| Back up data | Click or touch Back up data button to access Back up menu, see “Backup Management” on page 38. |
| The SD Card is available. | |
| Internet connection is available. | |
| No Internet connection is available. | |
| Displays the current battery level of the Canvio AeroMobile. | |
| Click or touch the Settings button to enter the Canvio AeroMobile system settings. | |
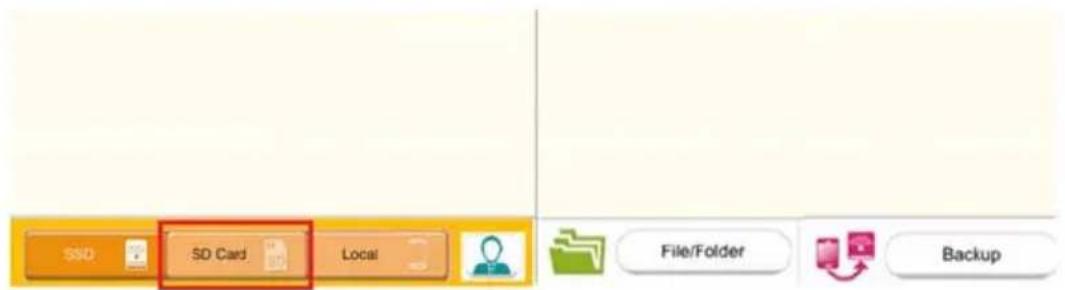
| SSD | Click or touch the SSD Storage icon to switch to the Canvio AeroMobile's internal SSD storage. |
| SD Card | Click or touch the SD Card button to switch to the Canvio AeroMobile's inserted SD Card. |
Pictures Management interface
NOTE
Before using this feature, content should be transferred to the Canvio AeroMobile device via direct connection to your computer, see "DAS mode (Direct-Attached Storage)" on page 12.
When you click or touch the Picture button the Pictures Management window appears.
Below is an example of the Pictures Management interface window.


(Sample Image) Pictures Management interface window
Below is a description of each button/icon and its function within the Pictures Management interface window:
| Button/Icon Function | |
| C | Click or touch the Back button to return to the main window. |
| A | When the Sort by name icon is displayed, the list is in “sort by name” mode. |
| When the Sort by date icon is displayed, the list is in “sort by date” mode. | |
| Click or touch the icon to toggle between modes. | |
| When the Thumbsail icon is displayed, the list is in “Thumbnail” mode. | |
| When the List icon is displayed, the list is in “List” mode. | |
| Click or touch the icon to toggle between modes. | |
Button/Icon Function
| You can choose picture files from the Calendar menu. | |
| Search | Enter key letters or numbers in the search box to perform a search of a specific file or folder. |
| SSD | Click or touch the SSD Storage icon to switch to the Canvio AeroMobile's internal SSD storage. |
| SD Card | Click or touch the SD Card button to switch to the Canvio AeroMobile's inserted SD Card. |
| Local | Click or touch the Local button to switch to the local iPhone, iPad, or Android™ device. (iPhone, iPad, or Android™ devices only.) |
| Owner1 | When switching to the Canvio AeroMobile's internal SSD storage, you can choose pictures from one of 4 users. The 4 user default names are: Default, Owner1, Owner2, and Owner3. |
| Owner2 | |
| Owner3 | |
| Owner4 |
Picture Viewer interface
Click or touch a picture file to enter the Picture Viewer interface. Below is an example of the Picture Viewer interface window.

(Sample Image) Picture Viewer interface window
Below is a description of each button/icon and its function within the Pictures Management interface window:
| Button/Icon Function | |
| Click or touch the Back button to return to the Pictures Management interface window. | |
| Click or touch the Download button to download the current picture to the local album. | |
| Click or touch the Upload button to upload the current picture from local to Canvio AeroMobile device. | |
| Click or touch the Play/Pause button to start/stop the photo slide show. | |
| When the Loop playback icon is displayed, the photo slide show plays in “Loop playback” mode. When the Sequential icon is displayed, the photo slide show plays in “Sequential” mode. Click or touch the icon to toggle between modes. | |
| Click or touch the Share button to share the current picture to social media or email. | |
Videos Management interface
NOTE
Before using this feature, content should be transferred to the Canvio AeroMobile device via direct connection to your computer, see "DAS mode (Direct-Attached Storage)" on page 12.
When you click or touch the Videos button the Videos Management window appears.
Below is an example of the Videos Management interface window.

(Sample Image) Videos Management interface window
Below is a description of each button/icon and its function within the Videos Management interface window:
| Button/Icon Function | |
| C | Click or touch the Back button to return to the main window. |
| A | When the Sort by name icon is displayed, the list is in “sort by name” mode. |
| When the Sort by date icon is displayed, the list is in “sort by date” mode. | |
| Click or touch the icon to toggle between modes. | |
| When the,Thumbsail icon is displayed, the list is in “Thumbnail” mode. | |
| When the List icon is displayed, the list is in “List” mode. | |
| Click or touch the icon to toggle between modes. | |
| Search | Enter key letters or numbers in the search box to perform a search of a specific file or folder. |
| You can choose picture files by this Calender menu. | |
| Click or touch the SSD Storage icon to switch to the Canvio AeroMobile's internal SSD storage. | |
| SDCard | Click or touch the SD Card button to switch to the Canvio AeroMobile's inserted SD Card. |
| Local | Click or touch the Local button to switch to the local iPhone, iPad, or AndroidTM device. (iPhone, iPad, or AndroidTM devices only.) |
| When switching to the Canvio AeroMobile's internal SSD storage, you can choose pictures from one of 4 users. The 4 user default names are: Default, Owner1, Owner2, and Owner3. | |
| Owner1 | |
| Owner2 | |
| Owner3 | |
| Owner4 | |
| Cancel | |
Video Playback interface (iPhone, iPad, and Android™ device only)
Click or touch a video file to enter the Video Playback interface. Below is an example of the Video Playback interface window.
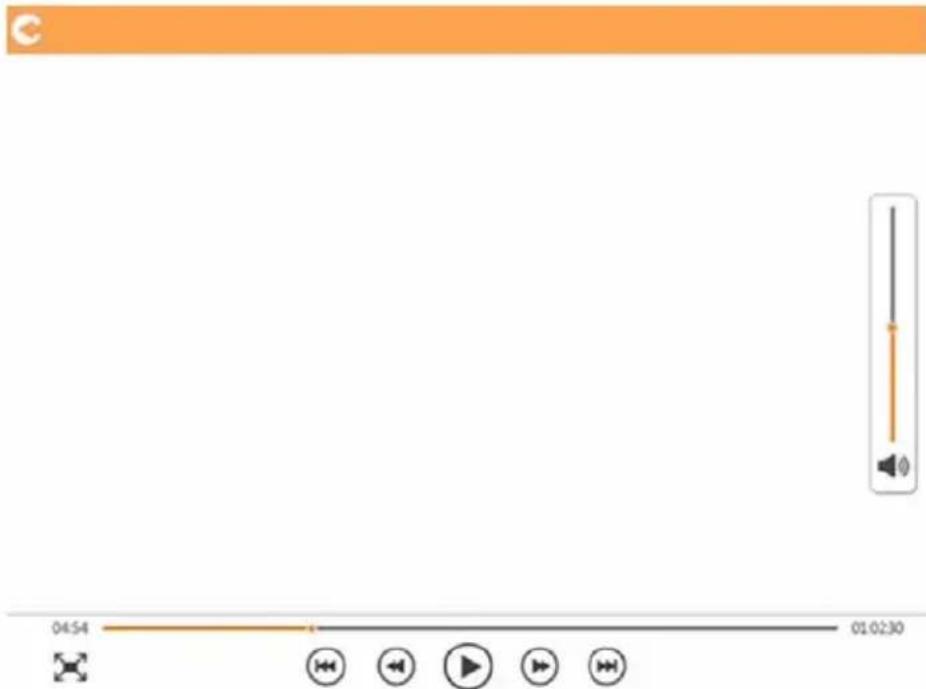
(Sample Image) Video Playback interface window
Below is a description of each button/icon and its function within the Video Playback interface window:
| Button/Icon Function | |
| Click or touch the Back button to return to the main window. | |
| Click or touch the Zoom button to adjust the playback screen size. | |
| Click or touch the Previous button to switch to the previous video playback. | |
| Click or touch the Next button to switch to the next video playback. | |
| Click or touch the Rewind button to rewind the video 20 seconds. | |
| Click or touch the Forward button to forward the video 20 seconds. | |
| Click or touch the Play/Pause button to play/pause the currently playing video. | |
| Click or touch the Download button to download the current picture to the local album. | |
| Click or touch the upload button to upload the current picture from local to Canvio AeroMobile device. | |
| 04:54 | |
| Drag thePlayback progress bar, to navigate to different positions in the video playback. | |
| Drag the Volume control bar to adjust the volume of the video. The volume is divided into four states: Quiet, Small, Medium, and Maximum volume. | |
If the Web browser supports video playback, you can play the video within a Web browser, otherwise, you will be asked to download the video to a local device.
Music Management interface
NOTE
Before using this feature, content should be transferred to the Canvio AeroMobile device via direct connection to your computer, see "DAS mode (Direct-Attached Storage)" on page 12.
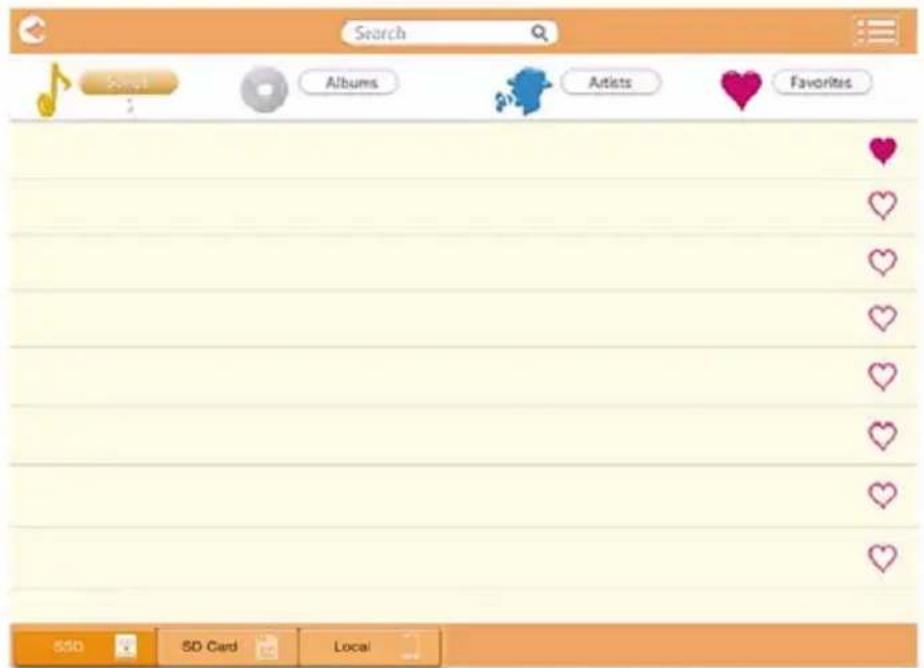
(Sample Image) Music Management interface window
Below is a description of each button/icon and its function within the Music Management interface window:
| Button/Icon Function | |
| C | Click or touch the Back button to return to the main window. |
| When the Thumbsail icon is displayed, the list is in “Thumbnail” mode. When the List icon is displayed, the list is in “List” mode. Click or touch the icon to toggle between modes. | |
| Search | Enter key letters or numbers in the search box to perform a search of a specific file or folder. |
| SSD | Click or touch the SSD Storage icon to switch to the Canvio AeroMobile's internal SSD storage. |
| SD Card | Click or touch the SD Card button to switch to the Canvio AeroMobile's inserted SD Card. |
| Local | Click or touch the Local button to switch to the local iPhone, iPad, or Android™ device. (iPhone, iPad, or Android™ devices only.) |
| Songs | Click or touch the All Songs button to view all of the song files available on the Canvio AeroMobile (default mode). |
| Albums | Click or touch the Albums button to view all of the song files by albums. |
| Artists | Click or touch the Artist button to view all of the song files by Artist. |
| Favorite | Click or touch the Favorites button to view all of your favorite songs. You can add songs to the favorites screen by clicking or touching the ( ) button on the All music screen, Album screen, and the Artist screen. Remove songs from the Favorites screen by clicking or touching the ( ) button on the Favorites screen. |
Music Player interface (iPhone, iPad, and Android™ device only)
Click or touch a music file to enter the Music Player interface. Below is an example of the Music Player interface window.
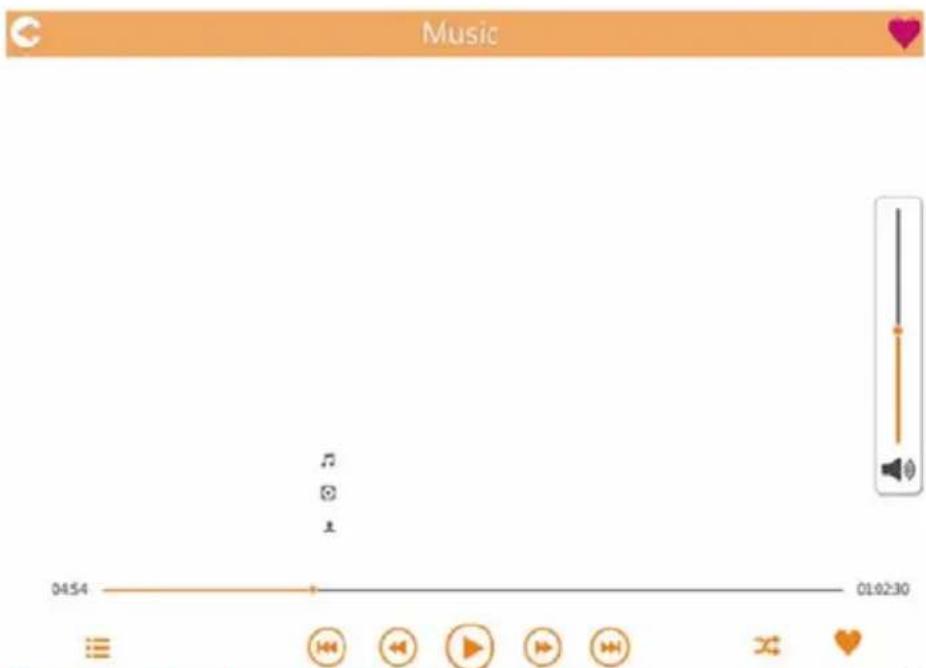
(Sample Image) Music Player interface window
Below is a description of each button/icon and its function within the Music Player interface window:
| Button/Icon Function | |
| Click or touch the Back button to return to the Music Management interface window. | |
| ♥ | The Favorites icon displays in the Music Player interface window when playing in Favorites mode. |
| Return to the beginning or previous music playback | |
| Click or touch the Next button to switch to the next song. | |
| Click or touch the Rewind button to rewind the song 20 seconds. | |
| Click or touch the Forward button to forward the song 20 seconds. | |
| Click or touch the Play/Pause button to play/pause the currently playing song. | |
| 04:54 | |
| Drag thePlayback progress bar, to navigate to different positions in the music playback. | |
| Drag the Volume control bar to adjust the volume of the music. | |
| Click or touch the Music mode button to switch between the following four musical modes: Shuffle ( ) (default mode), Loop Playback ( ), Order Play ( ) and Single Cycle ( ). | |
| Click or touch the Favorites button to add the currently playing music to your Favorites. | |
If the Web browser supports music playback, you can play the music within a Web browser, otherwise, you will be asked to download the music file to a local device.
Documents Management interface
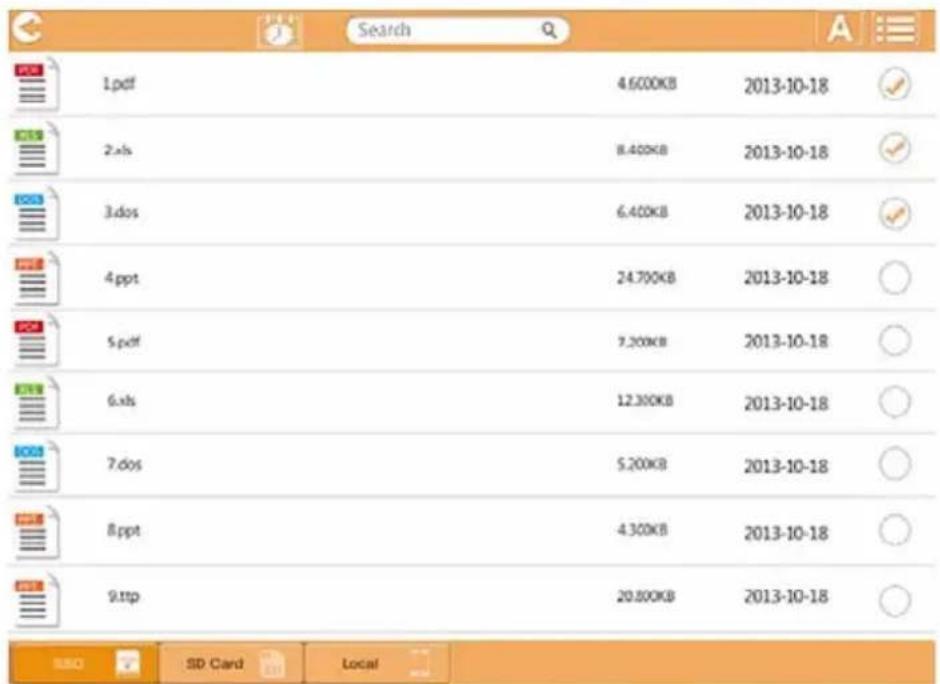
(Sample Image) Documents Management interface window
Below is a description of each button/icon and its function within the Documents Management interface window:
| Button/Icon Function | |
| C | Click or touch the Back button to return to the main window. |
| A | When the Sort by name icon is displayed, the list is in “sort by name” mode. |
| When the Sort by date icon is displayed, the list is in “sort by date” mode. | |
| Click or touch the icon to toggle between modes. | |
| When the Thumbsail icon is displayed, the list is in “Thumbnail” mode. | |
| When the List icon is displayed, the list is in “List” mode. | |
| Click or touch the icon to toggle between modes. | |
| You can choose picture files by this Calender menu. | |
| Search | Enter key letters or numbers in the search box to perform a search of a specific file or folder. |
| SSD | Click or touch the SSD Storage icon to switch to the Canvio AeroMobile's internal SSD storage. |
| SD Card | Click or touch the SD Card button to switch to the Canvio AeroMobile's inserted SD Card. |
| Local | Click or touch the Local button to switch to the local iPhone, iPad, or AndroidTM device. (iPhone, iPad, or AndroidTM devices only.) |
Document Viewer interface (iPhone, iPad, and Android™ device only)
Click or touch a document file to enter the Document Viewer interface. Below is an example of the Document Viewer interface window.

(Sample Image) Document Viewer interface window
Below is a description of each button/icon and its function within the Document Viewer interface window:
| Button/Icon Function | |
| Click or touch the Back button to return to the Documents Management interface window. | |
| Click or touch the Share button to share the current document by email. | |
If the Web browser supports file view, you can display the document within a Web browser, otherwise, you will be asked to download the document file to a local device.
File/Folder Management interface
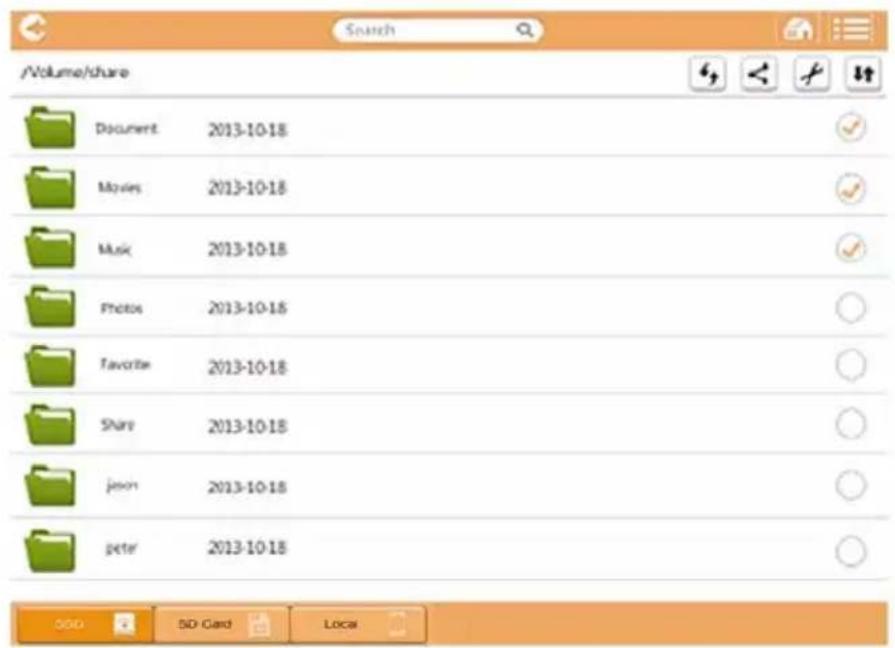
(Sample Image) File/Folder Management interface - Application window
(Sample Image) File/Folder Management interface - Web browser window
Below is a description of each button/icon and its function within the File/Folder Management interface window:
| Button/Icon Function | |
| C | Click or touch the Back button to return to the main window. |
| When the Thumbsail icon is displayed, the list is in "Thumbnail" mode. When the List icon is displayed, the list is in "List" mode. Click or touch the icon to toggle between modes. | |
| Search | Enter key letters or numbers in the search box to perform a search of a specific file or folder. |
| SSD | Click or touch the SSD Storage icon to switch to the Canvio AeroMobile's internal SSD storage. |
| SD Card | Click or touch the SD Card button to switch to the Canvio AeroMobile's inserted SD Card. |
| local | Click or touch the Local button to switch to the local iPhone, iPad, or Android™ device. (iPhone, iPad, or Android™ devices only.) |
| Click or touch the Refresh button to refresh the screen. | |
| Click or touch the Share button to share the current document by email. (Within an Application only.) | |
| A Checkmark icon indicates that the file or folder is selected. | |
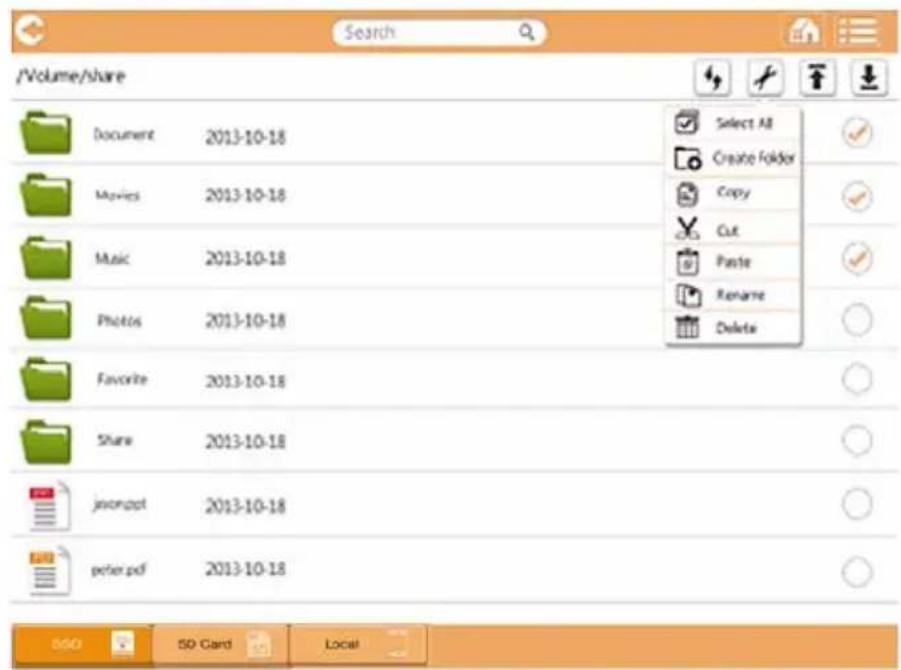
| Click or touch the Setting button to display the following options: | |
| Select All Create Folder Copy Cut Paste Rename Delete | |
| Application Web browser | |
Button/Icon Function

Click or touch the Transmission button to enter the File transmission dialog box.
When an action is taken with a file or folder (copy, cut, upload, or download), the File transmission dialog box opens. A progress bar of each transmission is displayed as well as successful and failed transmissions.
(Application only.)
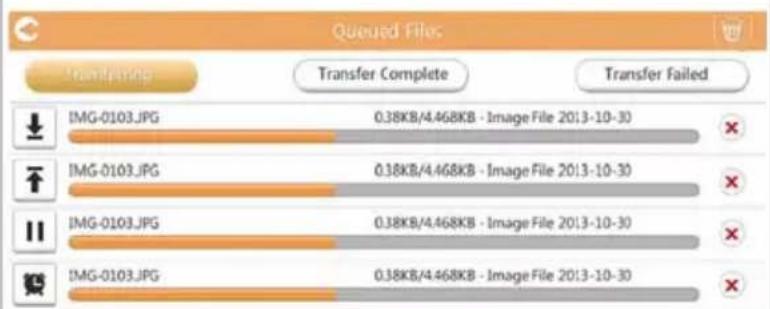
The Upload ( icon indicates an uploading file/ folder in progress.
The Download ( 已 icon indicates a downloading file/folder in progress.
Touch the Upload/Download icon to pause the upload/download process. The Pause (II) i c displayed.
The ( )icon indicates that a file/folder is waiting for upload/download. This application allows for individual file/folder upload/download.
Touch the Cancel () icon to cancel all queued files.
The buttons above the Queued Files list indicate "Transfer Complete" or "Transfer Failed."
Transfer Complete
Transfer Failed
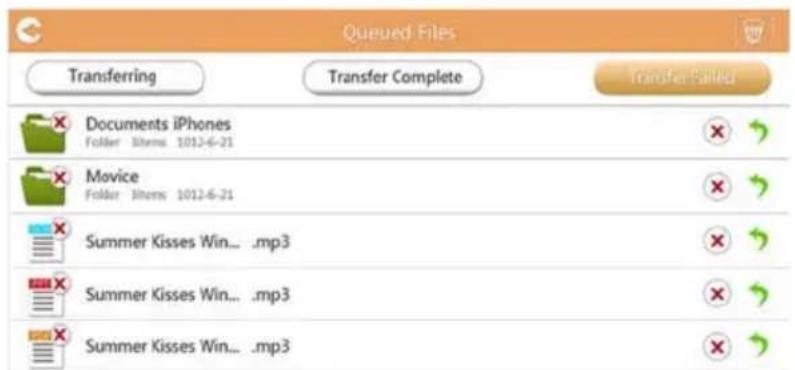
(Sample Image) Document Viewer Queued Files window
If a transfer fails and you wish to try again, click the ( ) Re-Transfer button.
To upload/download file(s)/folder(s) within a Web browser:
The Upload ( ) icon indicates an uploading file/folder in progress from a local system.
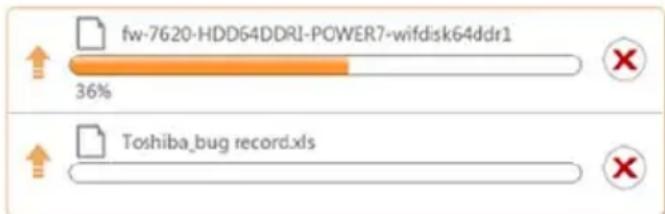
(Sample Image) Upload progress bar - Web browser window
When a selected local file is uploaded to the Canvio AeroMobile, a progress bar is displayed in the Web browser window.
The Download (Icon) indicates a downloading file/folder in progress from the Canvio AeroMobile.
NOTE
The downloading method may vary, depending on the Web browser used.
Chapter 3
SD Card Management
Unmount SD card
Click or touch SD card button, open the pop up menu to unmount SD Card.
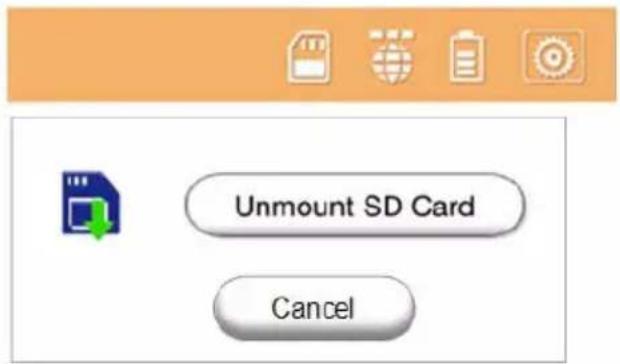
Access to SD Card
Click or touch SD Card button to access the SD Card.
Chapter 4
Backup Management
Using the SD Card
You can back up the files on the SD Card to one of the four user directories: Default, Owner1, Owner2, or Owner3. The backup is an incremental backup.
You can backup the SD card manually or use the automatic backup function.
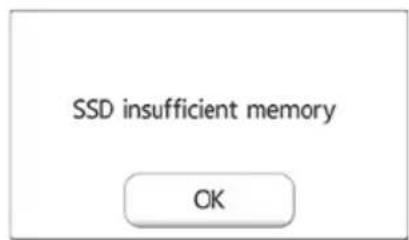
If the size of the backup files are larger than the available space on the Canvio AeroMobile's SSD, you will see a warning message before the backup process begins.
Manual backup
You can select a backup user. Click or touch Start Copy. Videos and pictures from the SD Card will be backed up to the selected user directory. The backup progress is displayed at the bottom of the interface window.
Automatic backup
You also have the option to select Automatic backup. The next time you insert the SD Card, all of the videos and pictures on the SD Card will be automatically backed up to the selected user directory.
Using the Backup Management
(For iPhone, iPad, and Android™ devices only.)
You can back up the videos and pictures on your iPhone, iPad, and Android™ device to one of the Canvio AeroMobile's four user directories: Default, Owner1, Owner2, or Owner3.
Click or touch the Start Backup button to start the backup process.
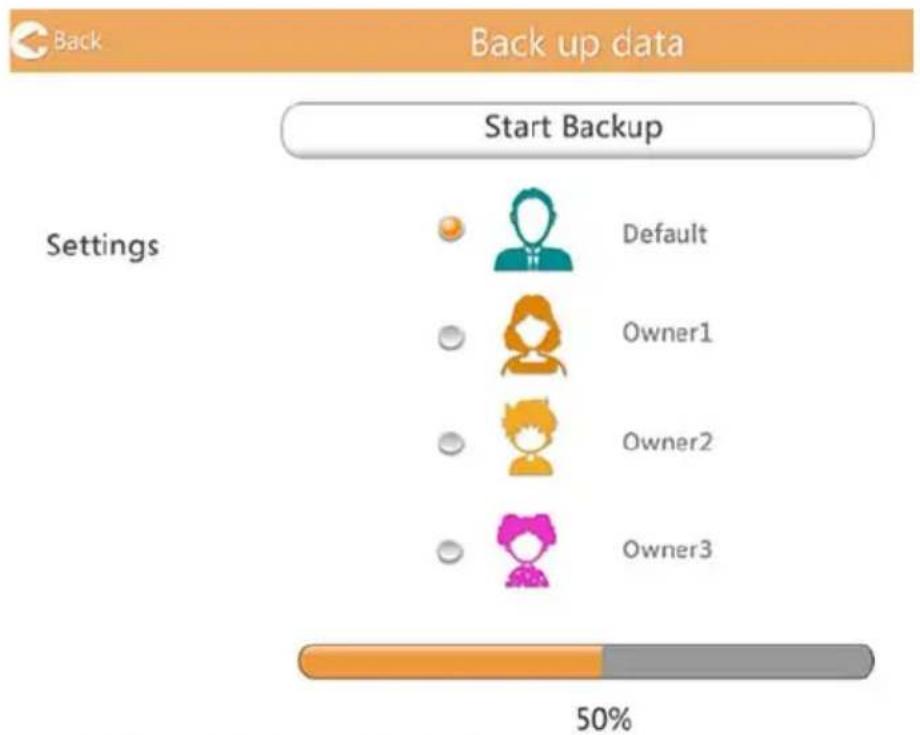
(Sample Image) Back up data window
The backup progress bar is displayed in the bottom of the interface window.
(Sample Image) Back up data window
If the size of the backup files are larger than the available space on the Canvio AeroMobile's SSD, you will see a warning message before the backup process begins.
Chapter 5
Settings Management
Using the Settings Management
Click or touch the Setting button on the upper-right corner of the Main interface window to enter the setting interface window. The following modules are available:
- Configurations
User image and name
Cache (Application only)
Language (Application only)
About
■Logout
Configurations
Below is an example of the Settings Configuration window for the Application.
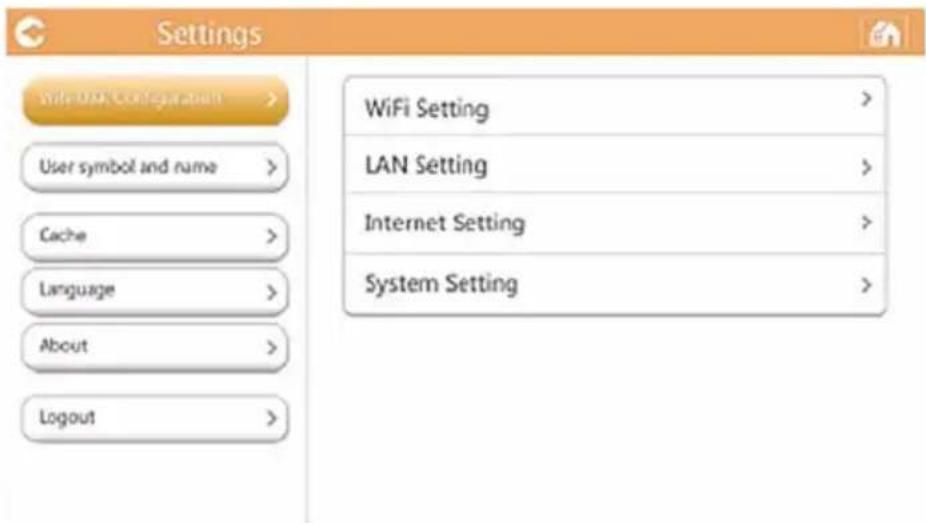
(Sample Image) Settings Configurations - (Application) window
Below is an example of the Settings Configuration window for a Web browser.
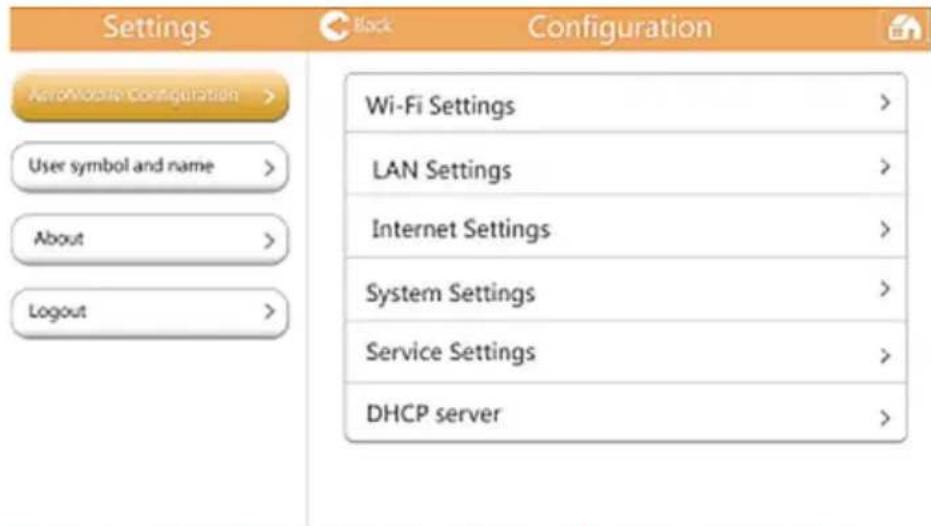
(Sample Image) Settings Configurations - (Web browser) window
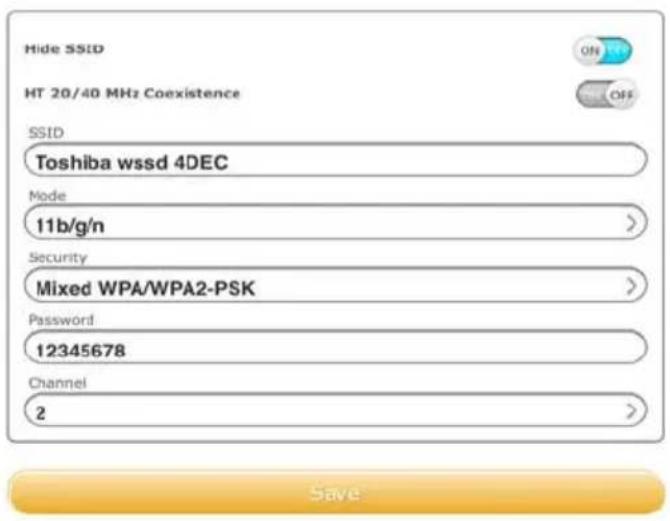
Wireless LAN settings for the Application
Click or touch WiFi Setting to enter the Wireless LAN settings window.
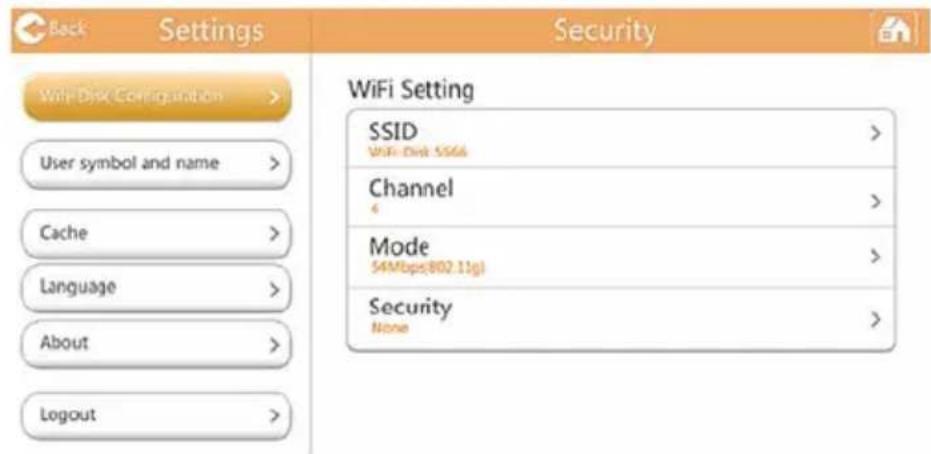
(Sample Image) Settings Configurations - Wi-Fi® window
The following options are available:
SSID
Channel
Mode
Security
SSID:
- Click or touch the SSID button to enter the SSID settings window.
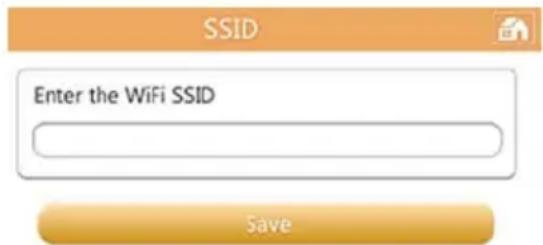
(Sample Image) Settings Configurations - SSD settings window
- Enter your SSID. The default SSID is "Toshiba wssd xxx."
- Click or touch the Save button.
Channel:
- Click or touch the Channel button to enter the Wireless LAN Channel window.
- Select the desired Wireless LAN channel, or set it to Auto.
- Click or touch the Save button.
Mode:
- Click or touch the Mode button to enter the Wireless LAN mode window.
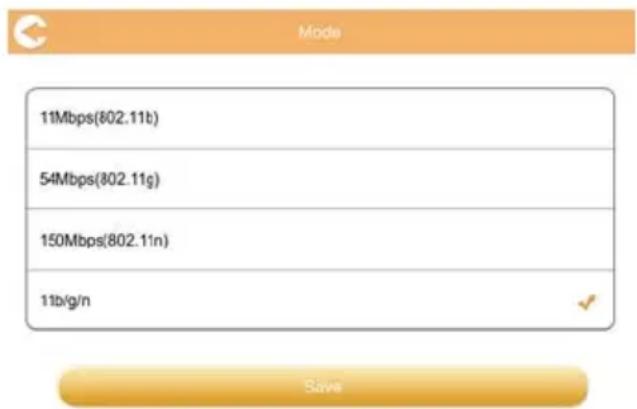
(Sample Image) Settings Configurations - Select Mode window
- Select the desired Wireless LAN mode.
- Click or touch the Save button.
Security:
- Click or touch the Security button to enter the Wireless LAN security window.
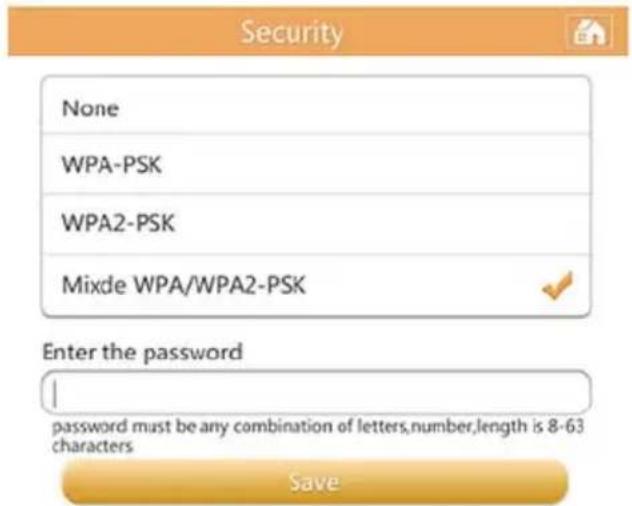
(Sample Image) Settings Configurations - Security window
- Select the desired Wireless LAN security setting.
NOTE
Password authentication is required if you select WPA-PSK, WPA2-PSK or Mixed WPA/WPA2- PSK. The default password is "12345678."
No password is needed if None is selected.
- Enter your password, if requested.
- Click or touch the Save button.
Wireless LAN settings for a Web browser
The setting functions within the Web browser version of this software are similar to the Application Wireless LAN settings, however, there are design differences in the screen designs.
In the Web browser, you can elect to Show or Hide the SSID settings.
- To Show the SSID settings move the switch in the uppperright corner of the screen to the ON position. To Hide the SSID settings move the switch to the OFF position.
(Sample Image) Settings Configurations - SSID window
- Click or touch the Save button.
LAN Settings:
- Click or touch the LAN setting to enter LAN setting window.
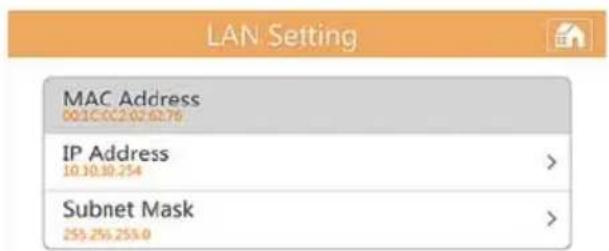
(Sample Image) Settings Configurations - LAN Setting (Application) window
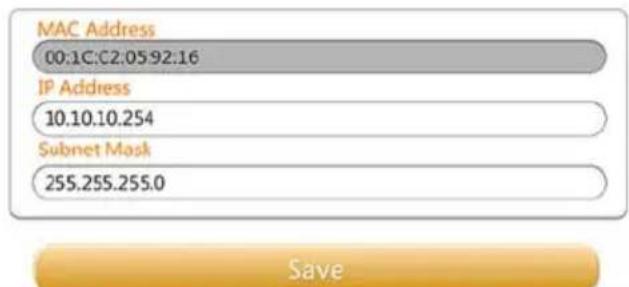
(Sample Image) Settings Configurations - LAN Setting (Web browser) window
MAC address: This is for your reference and cannot be changed.
IP Address: Click or touch the field to modify the IP address of device.
-
Subnet Mask: Click or touch the field to modify the Subnet Mask of device.
-
Click or touch the Save button.
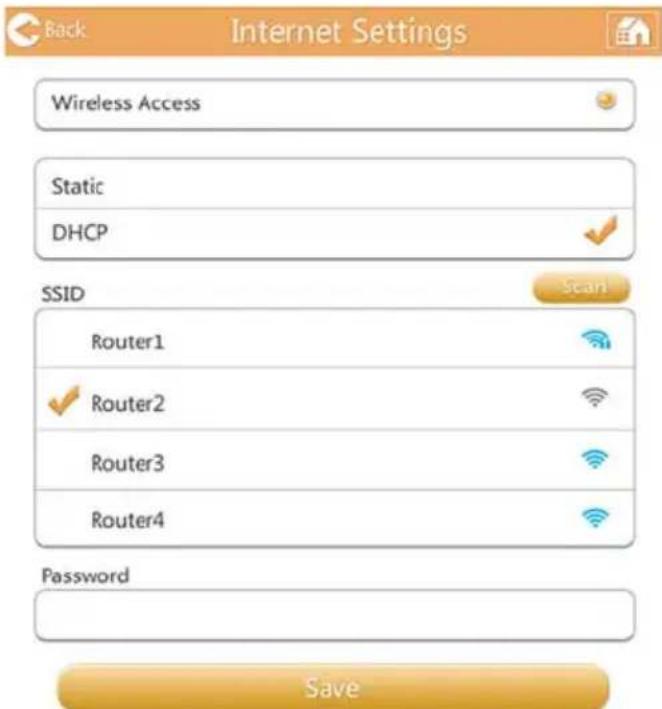
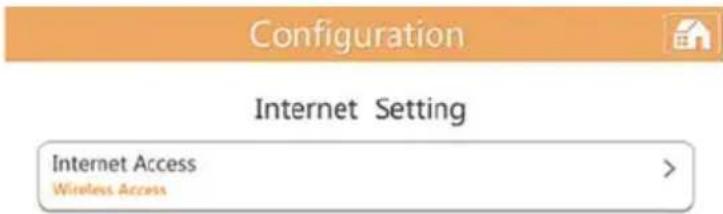
Internet Settings (application)
Click or touch Internet Settings to enter the Internet setting window. You can configure your network connection between the Canvio AeroMobile and Wireless LAN router.
Configuration

Internet Setting
Internet Access
Wisthehns.
Configure your network connection
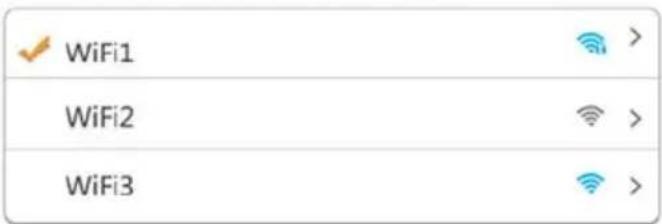
(Sample Image) Settings Configurations - Internet Setting (Application) window
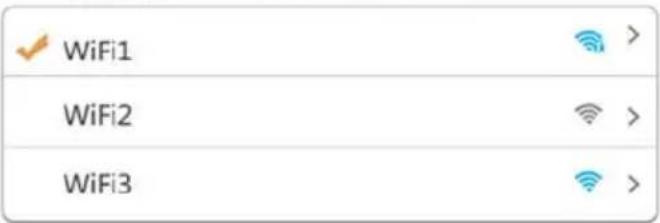
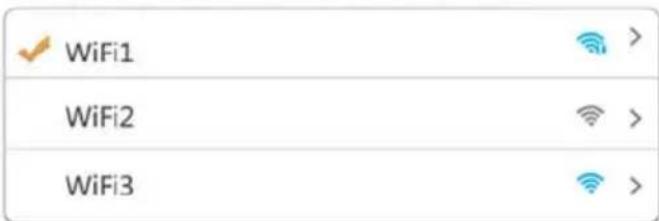
- Select your router from the Access Points list.
NOTE
You may be asked to input a password for the connection.
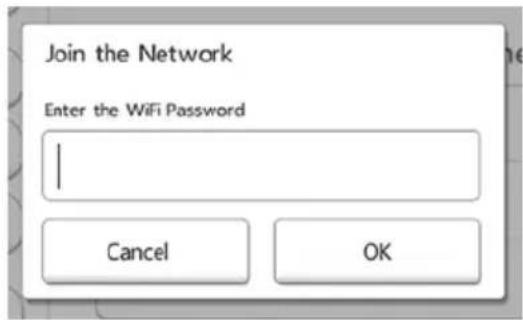
(Sample Image) Internet Setting - password window
If connected successfully, a checkmark appears next to the access point.
- Set the Dynamic IP or static IP as desired within the Internet setting.
3. Click or touch OK.

(Sample Image) Dynamic IP or static IP Settings windows
NOTE
Be careful when connected to network in a public place.
Other person can connect to your device.
Internet Settings (Web browser)
The setting functions within the Web browser version of this software are similar to the Application Internet settings, however, there are design differences in the screen designs.
(Sample Image) Settings Configurations - Internet Setting (Web browser) window
System settings
In the System settings, you can modify the user's password, change the host name, and check the Canvio AeroMobile's SSD capacity and remaining capacity, and upgrade the firmware.

(Sample Image) System Settings window
Modify Admin Password:
- In the System Settings window click or touch Modify Admin Password to open the Modify Admin Password window.
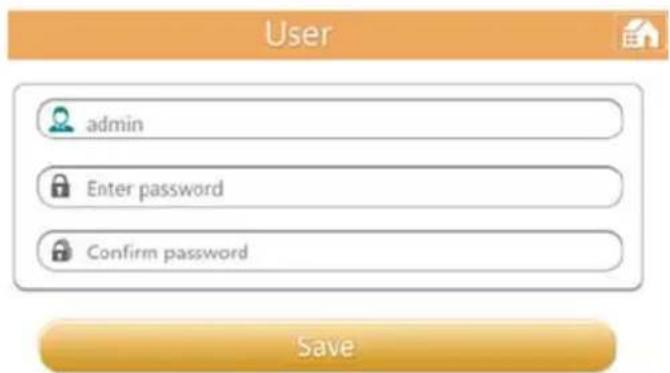
(Sample Image) Modify Admin Password window
- Enter your new login information in the following fields:
■ User Name
User Password
Confirm Password
- Click or touch the Save button.
Host Name:
- In the System Settings window click or touch Host Name to open the Host Name window.

(Sample Image) Host Name window
- Enter your new Host Name.
- Click or touch the OK button.
Time Settings (Web browser only):
You can manually select the time zone, date, and time for your Canvio AeroMobile.
You can also set your Canvio AeroMobile to synchronize the date and time with your mobile device or the Internet.
- In the System Settings window click or touch Time Settings to open the Time Settings window.
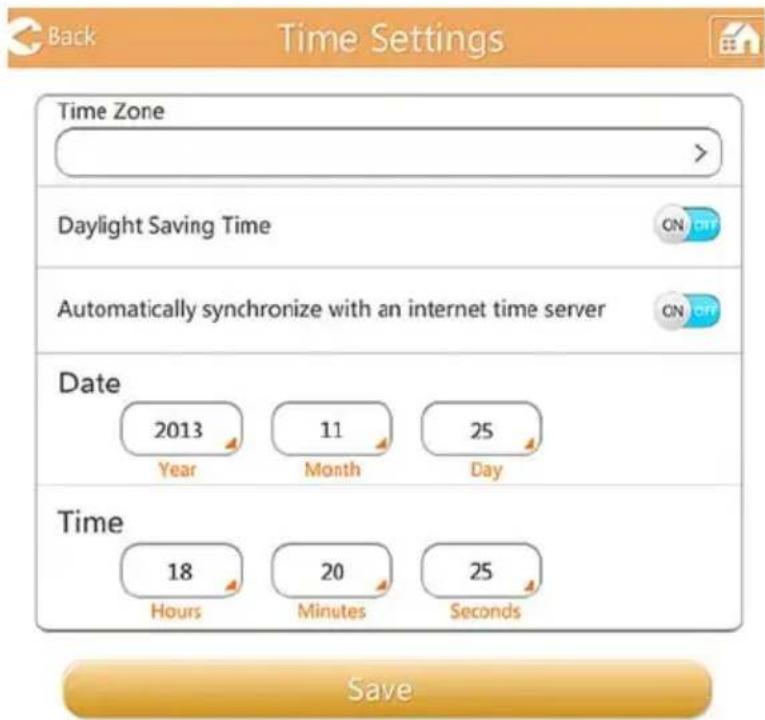
(Sample Image) Time Settings window
- Click or touch the Time Zone button to choose your desired location.
-
Move the switch to the ON/OFF position to choose the appropriate Daylight Saving Time setting.
-
Move the switch to the ON/OFF position for the Automatically synchronize with an internet time server selection.
- In the Date fields, enter the Year, Month, and Day.
- In the Time fields, enter the Hours, Minutes, and Seconds.
- Click or touch the Save button.
Disc Information:
In the System Settings window click or touch Disk Information to open the Disk Information window.
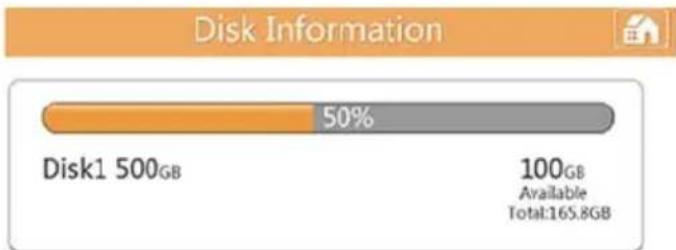
(Sample Image) Disk Information window
This window shows the amount of available disk space remaining on your Canvio AeroMobile.
Reset the Settings/Restore the factory setting (Web browser only):
- In the System Settings window click or touch Reset Settings to open the Reset Settings window.
Restore to Factory Default settings


Restoring the device to the factory default settings will remove all the customized configuration and destroy all the date
(Sample Image) Reset Settings window
CAUTION
All information stored on the Canvio AeroMobile will be erased during this formatting process.
Be sure to save your data to another storage device before executing this procedure.
- To restore your Canvio AeroMobile to its original Factory Default settings, move the switch to the ON position.
- Click or touch the Save button.
Upgrade the Firmware:
-
In the System Settings window click or touch Upgrade Firmware to open the Upgrade Firmware window.
-
Click or touch the Online Upgrade button.
If new Firmware is available, the following screen appears.

(Sample Image) Upgrade Firmware window
- Click or touch the OK button.
If no new Firmware is available, the screen below appears.

(Sample Image) No detected firmware window
If you are in a Web browser, you will have the option to upgrade manually with the screen below.
Manual Upgrade

(Sample Image) Manual Upgrade window
- Click or touch the Upgrade button.
The following screen appears.

(Sample Image) Wait 5 minutes window
- Reconnect your Canvio AeroMobile.
DHCP Settings (Web browser only)
You can set up the DHCP server information.
- Click or touch Settings.
- Click or touch Configuration, and then DHCP server.
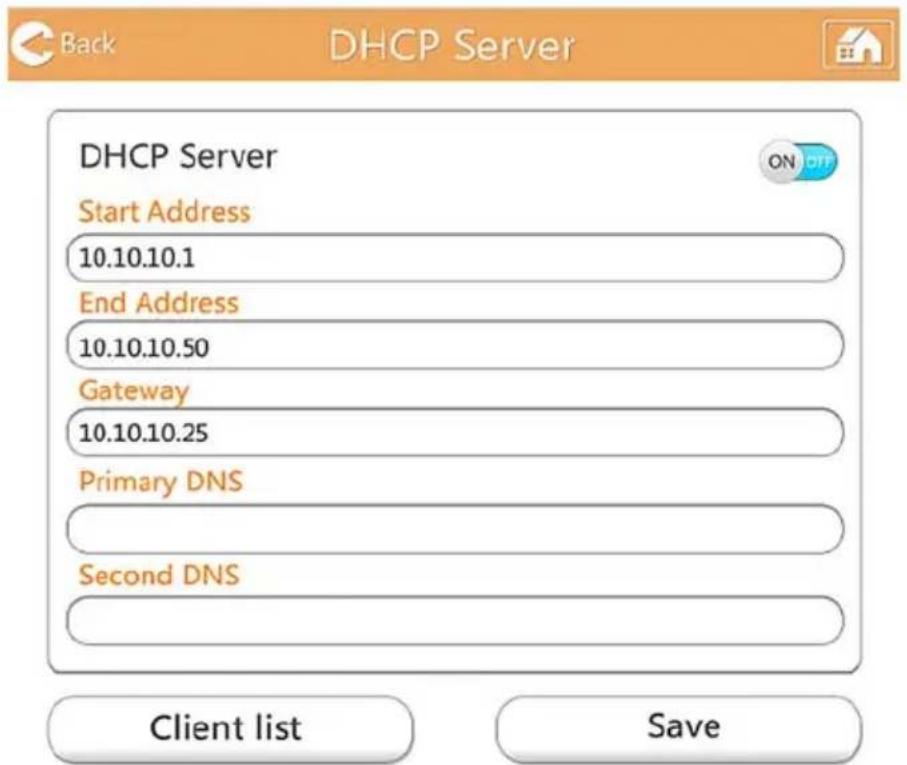
(Sample Image) DHCP Server window
- Enter the required information.
You can also check the client list.
| Client Name: | MAC | IP | Effective time |
| TOSHIBA | 70:11:24:21:1f:0f | 10.10.10.1 | 00:00:10 |
| android_d969961 | c4:6a:b7:af:83:f2 | 10.10.10.2 | 00:00:10 |
| android_1427ba9 | 74:45:8a:e0:5f:50 | 10.10.10.3 | 00:00:10 |
| 70:11:24:26:60:5c | 10.10.10.4 | 00:00:10 | |
| 74:d0:2b:6e:55:ee | 10.10.10.5 | 00:00:10 | |
| 00:1c:c2:03:47:0f | 10.10.10.6 | 00:00:10 |
(Sample Image) Client list window
User image and name management
Enter the user symbol and name page to see the window below.
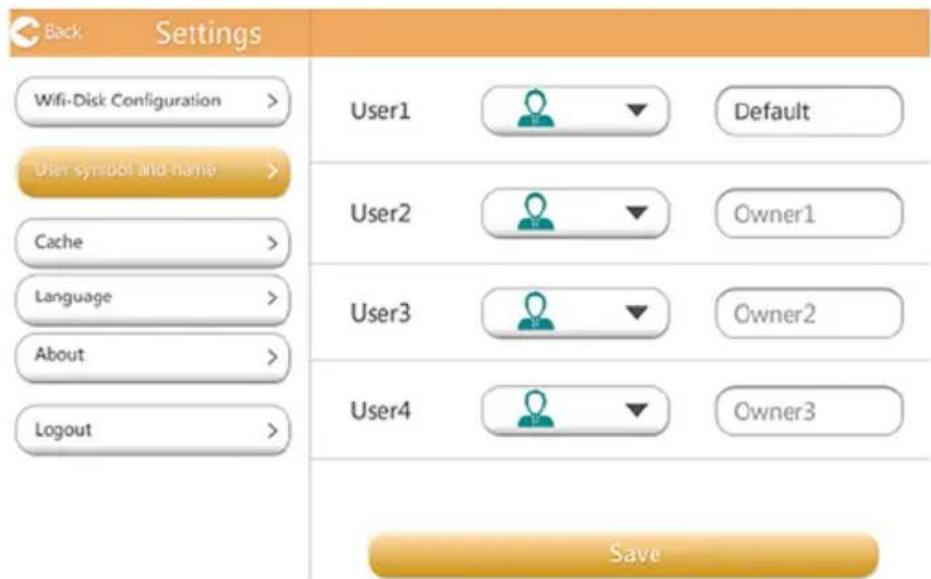
(Sample Image) User image and name management window
On the following screen, you can change the four user's icon and name. This change will reflect on the picture management screen, video management screen, SD card screen, and Backup screen.

(Sample Image) User image and name management window
There are a total of 12 icons to choose from.
You can also type a new name for each user.
- Click or touch Settings.
- Click or touch a User icon, and then Name. In this window, you can change the User icon and User name, (e.g. "Default" to "Father").
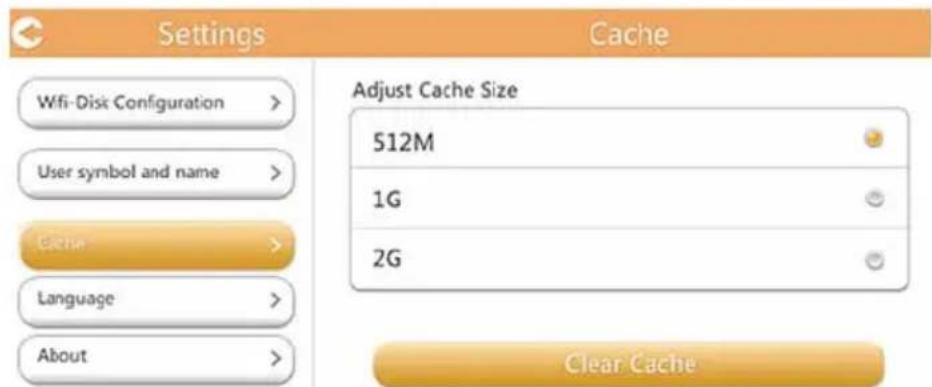
Cache (Applications only)
Applying caches settings on your local device will improve the response speed of the Canvio AeroMobile. You can adjust the size of the caches, which increases the performance.
- Click or touch Settings.
- Click or touch Cache.

(Sample Image) Cache window
- Select the desired Cache size.
Language (Applications only)
You can select the desired language for your Canvio AeroMobile. The default language is English.
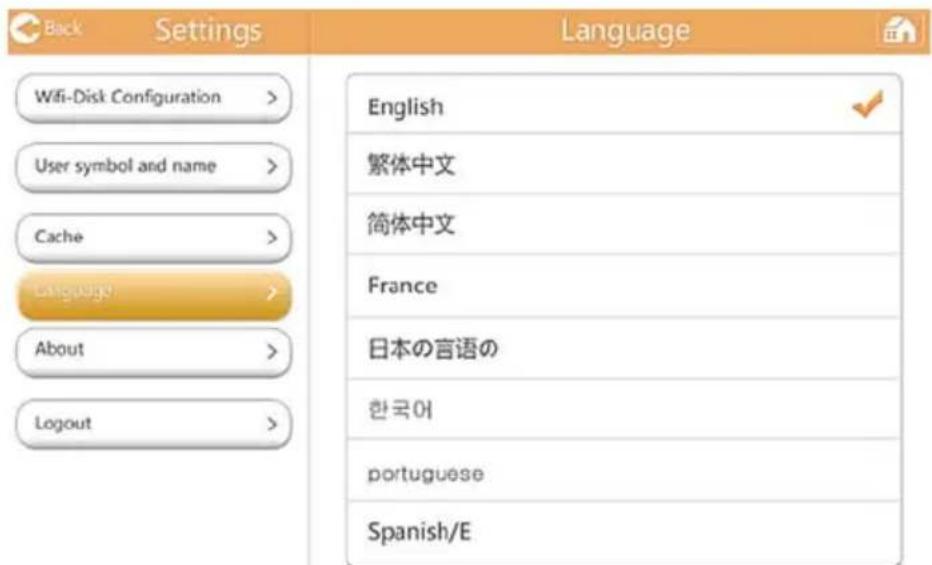
(Sample Image) Language window
Logout
To logout the current user, go to the login screen.
For security reasons, if you log out after you set a password, you will be required to use the password when logging back in.
TOSHIBA Support
Need help?
Please contact TOSHIBA's hard drive and storage products support page: www.toshiba.eu/externalstorage/support
For warranty claims, please check: computers.toshiba.eu/options-warranty
Index
A
AeroMobile Software Utility Main interface 19
AndroidTM device Application login. 18 Connect wirelessly. 18 Install application . 18
B
Backup Management 38
C
Cache 53
Canvio AeroMobile
Charging 12
Features. 14
Function modes 12
Client login AndroidTM 18
Components. 10
Contacting Toshiba. 54
D
DHCP settings 51
Document Viewer interface. 32
Documents Management interface 30
F
File/Folder Management
interface 33
Function modes
DAS mode 12
Wireless LAN mode. 13
H
Hardware specifications 10
1
Icon
Safety.3
iPhone and iPad
Install application..17
iPhone or iPad
Application login.17
Client login.17
Connect wirelessly .17
L
Language. 53
Logout. .53
M
Main interface Application .20 Functionality .21 Web browser .20
Management Name .52 User image .52
Music Management interface.27
Music Player interface .29
0
Overview 10
P
Picture Viewer interface. 23
Pictures Management interface. 22
s
Safety
Icons 3
SDTM Card
Automatic backup 38
Manual backup 38
Using 38
Settings
Management. 40
Settings Management
Configurations 40
Internet Settings
(application) 45
Internet Settings
(Web browser) 46
Wireless LAN
(Application). 41
Wireless LAN
(Web browser) 43
Software specifications 11
System login 16
Web browser login. 16
T
Trademarks. 7
V
VideoPlaybackinterface.26
Videos Management interface . 24
W
Wireless connection
PC/Mac 16
Regulačné opatření
Splnéni CE
CE
The system is being upgraded. Please wait 5 minutes. Remaining # n seconds ... After the upgrade is successful, please reconnect the device Wi-Fi.
Restoring the device to the factory default settings will remove all the customized configuration and destroy all the date
You can upgrade to the latest version, Upgrade in progress, do not cut off the power! Click the "OK" button to continue.
OK
No detected firmware!
The system is being upgraded. Please wait 5 minutes.
Remaining # n seconds ... After the upgrade is successful, please reconnect the device Wi-Fi.
Internet Access Wireless Access

Configure your network connection
100GB Available total 165.8GB
Restoring the device to the factory default settings will remove all the customized configuration and destroy all the date
www.toshiba.eu/externalstorage/support
©2014 TOSHIBA CORPORATION, Alle rettigheder forbeholds.
Varemaerker
DAS-tilstand (Direct-Attached Storage). 11
Tradlost LAN-tilstand (tradlost LAN-lager) 12
Egenskaber 13
Kapitel 2 Softwarehjaelpeprogram 15
Systemlogon 15
Opret tradlOs forbindelse til en pc/Mac 15
Webbrowserlogon 15
Kclientlogon for iPhone eller iPad. 16
AndroidTM-kclientogon 17
18
Primae webbrugergraenseflade 19
Primae programbrugergranseflade 19
DAS-tilstand (Direct-Attached Storage)
Installation of AndroidTM-programmet
The system is being upgraded. Please wait 5 minutes. Remaining # n seconds... After the upgrade is successful, please reconnect the device Wi-Fi.
(Eksempel) Skaermbilledet Firmware update - wait 5 minutes (Firmwareopdatering - vent 5 minutter)

Tablet/iPad Smartphone/iPhone
(Eksempel) Primaer brugergranseflade - program
You can upgrade to the latest version, Upgrade in progress, do not cut off the power! Click the "OK" button to continue.
OK
(Eksempel) Vinduet Upgrade Firmware (Opgrader firmware)
- Klik eller tryk på knappen OK.
No detected firmware!
The system is being upgraded. Please wait 5 minutes. Remaining # n seconds ... After the upgrade is success please reconnect the device Wi-Fi.
(Eksempel) Vinduet Wait 5 minutes (Vent 5 minutter)
- Tilslut din Canvio AeroMobile igen.
DHCP-indstillinger (kun web browser)
Modo DAS (Direct-Attached Storage) 12
Modo DAS (Direct-Attached Storage)
The system is being upgraded. Please wait 5 minutes. Remaining (#n) seconds ... After the upgrade is successful, please reconnect the device Wi-Fi.

Tablet/iPad Smart phone/iPhone
Internet Access Wireless Access

Configure your network connection
Restoring the device to the factory default settings will remove all the customized configuration and destroy all the date
You can upgrade to the latest version, Upgrade in progress, do not cut off the power! Click the "OK" button to continue.
OK
No detected firmware!
The system is being upgraded. Please wait 5 minutes. Remaining # n seconds ... After the upgrade is successful, please reconnect the device Wi-Fi.
www.toshiba.eu/externalstorage/support
DAS-tila (Direct-Attached Storage) 11
Langaton lahiverkko -tila (tallennus langattoman lahiverkon avulla). 12
Ominaisuudet 13
DAS-tila (Direct-Attached Storage)
The system is being upgraded. Please wait 5 minutes. Remaining # n seconds ... After the upgrade is successful, please reconnect the device Wi-Fi.
Internet Access Wireless Access

Configure your network connection
Restoring the device to the factory default settings will remove all the customized configuration and destroy all the date
You can upgrade to the latest version, Upgrade in progress, do not cut off the power! Click the "OK" button to continue.
OK
No detected firmware!
Manual Upgrade Upgrade
The system is being upgraded. Please wait 5 minutes.
Remaining # n seconds ... After the upgrade is successful, please reconnect the device Wi-Fi.
Mode DAS (stockage à attachment direct) 12
Mode DAS (stockage à attachment direct)

Tablette/iPad Smartphone/iPhone
(Illustration) Interface principale de l'utilitaire AeroMobile - Application
Internet Access Wireless Access

Configure your network connection

Restoring the device to the factory default settings will remove all the customized configuration and destroy all the date
You can upgrade to the latest version, Upgrade in progress, do not cut off the power! Click the "OK" button to continue.
OK
No detected firmware!
The system is being upgraded. Please wait 5 minutes. Remaining # n seconds ... After the upgrade is successful, please reconnect the device Wi-Fi.
Écran Veuillez patienter 5 minutes (illustration)
Cache (application圭lement)
Écran Cache (illustration)
Langue (application单单)
www.toshiba.eu/externalstorage/support
Duo diathetaiuec kataoaeic
KataaTaon DAS (Meo aTnKeuong aEoang ouvEo)
KataoTaon I oupyiaac aupatou diktou LAN (Katotaon atoNkeuaoc aupatou diktou LAN)
PpOoBaon kai poN TPOC Tn MouaIKn, Ta BIVTeO, Tc QwToypaipieCs KAI TA 8eDooEv aac xpoaIIOIoWvTac ta Aetoupyika SuotnmaTa Tnou uTTOtnpizouv ta iPhone, iPad kai AndroidTM avEgaptntou eapauoyns.
EwCai 8 wpeC ouvexouc Aetoupyiae μe mTatapia e kataoTaon poC BivTeo.
ZHMEIΩΣH
Koupi On/Off (Evεpyoioησαπεvεpyoioησ):
NatnoTe kai kpatnoTe Tnnevo yia 2 eutepoAeTTa, (evpyoioiTa i n kaTaoan aeitoupyiaac aupatou diktou LAN).
NatnoTe kai kpatnoTe TnntmuEvo yia 2 dutepOaTtga xava, (aTVEpyoioiEitai n kataoataon IeIToupyiacg aupuatou diktou LAN).
ZHMEIΩ
The system is being upgraded. Please wait 5 minutes. Remaining # n seconds ... After the upgrade is successful, please reconnect the device Wi-Fi.
(EiKoVa) Evnpewon uIkooyoiikou - oovn avapovns ia 5 eTTa
Av eTIAEETe Cancel (Akupo), 0a evnepwveote yia TIG diathetaiEs avaaOIOEIs TIV ETOEVN 0pa Tou 0a OuvdEte kai 0a EIeAeTe OTNV Kupia diaouvdoen.
Av eTIAEe Do not prompt (Na unv ePavicetai TPOPTn), To loyioiko Tou aupatou SSD dev tha oac evnpewei Tote hava autoua yia mia avabaiuoloayoiikou, wotoso, mtopeite va to evnpwoeTe xepokivnta ot n eA ida Setting (PuOio), "AvaBaiou uIkoLoyoiikou:" ot n eAid 54.
Tablet/iPad Smart phone/iPhone
(Eikova) Kupia diaouvεon - εφαρμογη
Aeitoupyikotnta kupiaac diaouvdoan ts apoyns
Akoouo3i maia Tepiypaqn ka3e kouptiou/ikovidiou kai tns 5eitoupyiaoc tou a stnv kupia diauuvdoan tnc 4apoyng:
You can upgrade to the latest version, Upgrade in progress, do not cut off the power! Click the "OK" button to continue.
OK
No detected firmware!
(EiKov) No detected firmware (EvTOniToNkUAIKOlyoiuKiO - npaOupo
Av eioe o npoypauma nepinyonc oTo Web, 0a exe Tnv eTIAovn va avaBaeiOeXeipokivnta e Tnv papaKATw Ooyn.
Manual Upgrade
Upgrade
(EiKoVa) Xεipokivnη avαβaθμiσ - npaθuρo
The system is being upgraded. Please wait 5 minutes. Remaining # n seconds ... After the upgrade is successful, please reconnect the device Wi-Fi.
www.toshiba.eu/externalstorage/support
m = 311 ;
Ovaj znak označava da se ovaj proizvod ne smije smatrati kućnim opadom. Propisnim zbrinjavanjem ovog ureža pomociće u prevalciji mogučih negativnih posljedica po okoliš i ljudsko zdravlje, do kojih bi u protivnom moglo doci nepropisnim zbrinjavanjem ovog proizvodu o tepad.
Vise pojedinosti o recikliranju ovog proizvoda zatražite od lokalnih vlasti, vase lokalne organizacione za zbrinjavanje opada ili trgovine u kooj ste kupili ovaj proizvod.
Zbrinjavanje baterija i/ili akumuladora
Simbol prekrižene kante za smece s kotačima označava da baterije i/ili akumulatore treba prikrupljati i zbrinjavati odvojeno od kućanskog optada. Sudjelovanjem u odvojenom prikrupljanju baterija, pomažete pravilnom načinu zbrinjavanja proizvoda i na taj način pomažete sprječavanju šetnih posljedica za okolis i zdravlje Čovjeka. Detaljnije podatke o programima za prikrupljanje i recikliranje u vašoj zemlji, stipite u vezu s vašom gradskom lokalnom upravom ili trgovinom u kojoj ste kupili proizvod.
The system is being upgraded. Please wait 5 minutes. Remaining # n seconds... After the upgrade is successful, please reconnect the device Wi-Fi.
(Slika primjera) Ažuriranje firmvera - zaslon za Čekanje 5 minuta
Ako odaberete Cancel (Odustani), prilikom sljedeće prijave i ulaza u glavnosucelje za bit cete obaviješeni o svim dostupnim nadogradnjama.
Ako odaberete Ne šalji upit, bežični SSD vas nikada više neće automatski obavijestiti o nadogradnji firmvera, medutim, firmver cete moci ručno nadograditi na stranici Podesavanje, pogledajte „Nadogradnja firmvera" na stranici 50.
Restoring the device to the factory default settings will remove all the customized configuration and destroy all the date
You can upgrade to the latest version, Upgrade in progress, do not cut off the power! Click the "OK" button to continue.
OK
No detected firmware!
The system is being upgraded. Please wait 5 minutes. Remaining # n seconds ... After the upgrade is successful, please reconnect the device Wi-Fi.
www.toshiba.eu/externalstorage/support
U vezi popravaka u jamstvenom roku potražite: computers.toshiba.eu/options-warranty
Indeks
A
Android™ uredj
Bežicno povezivanje 18
Instalacija aplikacije 18
Prijava u aplikaciju 18
Arhiviranje
Upravljanje. 38
B
Bezicna vezaraRacunalo/Mac. 16
C
Canvio AeroMobile Načini rada. 12 Punjenje. 12 Značajke 14
D
DHCP postavke 51
G
Glavno suceIje Aplikacija 20 Funkcije 21 Internetski preglednik. 20
1
Ikona Sigurnost 3 iPhone i iPad Instalacija aplikacije 17
Configure your network connection
Restoring the device to the factory default settings will remove all the customized configuration and destroy all the date
You can upgrade to the latest version, Upgrade in progress, do not cut off the power! Click the "OK" button to continue.
OK
No detected firmware!
The system is being upgraded. Please wait 5 minutes. Remaining # n seconds ... After the upgrade is successful, please reconnect the device Wi-Fi.
(Mintaábra), "Várjon 5 percet" ablak
- Csatlakoztassa ubol a Canvio AeroMobile eszkocz.
www.toshiba.eu/externalstorage/support

Tablet/iPad Smartphone/iPhone
Restoring the device to the factory default settings will remove all the customized configuration and destroy all the date
You can upgrade to the latest version, Upgrade in progress, do not cut off the power! Click the "OK" button to continue.
OK
No detected firmware!
The system is being upgraded. Please wait 5 minutes.
Remaining # n seconds ... After the upgrade is successful, please reconnect the device Wi-Fi.
www.toshiba.eu/externalstorage/support
Rete locale wireless
(applicazione) 42
Rete locale wireless
(browser web). 44
1
Icona
sicurezza 3
Impostazioni
Gestione 41
Handmatige back-up. 39

Tablet/iPad Smartphone/iPhone
Internet Access Wireless Access

Configure your network connection

Restoring the device to the factory default settings will remove all the customized configuration and destroy all the data
You can upgrade to the latest version, Upgrade in progress, do not cut off the power! Click the "OK" button to continue.
OK
No detected firmware!
The system is being upgraded. Please wait 5 minutes. Remaining # n seconds ... After the upgrade is successful, please reconnect the device Wi-Fi.
www.toshiba.eu/externalstorage/support
Handmatige back-up 39
Software
Hoofdinterface 19
Softwarespecificities 11
Systeemaanmelding 16
Aanmelding via
webbrowser 16
T
Taal. 54
V
Veiligheid
Pictogrammen 3
Nettleserpålogging 15
Klientplogging for iPhone erer iPad 16
AndroidTM-klntpalogging. 17
Hovedgrensesnitt 18
Hovedgrensesnitt for nettleser 19
Hovedgrensesnitt for app 19
Grensesnitt for bildebehanding. 21
Grensesnitt for bildevisning. 22
Grensesnitt for videobehandling 23
DHCP-innstlinger (bare nettleser) 50
Sprak (bare apper) 52
Logg av 53
The system is being upgraded. Please wait 5 minutes. Remaining # n seconds... After the upgrade is successful, please reconnect the device Wi-Fi.
Innstillinger for Intnett (app)
Klikk eller berør Internet Settings (Internet-innstillinger) for a gå til vinduet for innstillinger for Internett.
Du kan konfigurere nettverkstilkoplingen mellom Canvio AeroMobile og en ruter for tradløst nettverk.
Configure your network connection
Restoring the device to the factory default settings will remove all the customized configuration and destroy all the date
You can upgrade to the latest version, Upgrade in progress, do not cut off the power! Click the "OK" button to continue.
OK
No detected firmware!
(Eksempelbilde) Vinduet for ingen ny fastvare
The system is being upgraded. Please wait 5 minutes. Remaining # n seconds ... After the upgrade is success please reconnect the device Wi-Fi.
(Eksempelbilde) Vinduet for a venti fem minutter
- Kople til Canvio AeroMobile-enheten på nytt.
DHCP-innstlinger (bare nettleser)
Du kan konfigurere DHCP-serverinformasjon.
Hurtigbuffer (bare apper)
DHCP-innstillinger. 50
F
The system is being upgraded. Please wait 5 minutes. Remaining # n seconds... After the upgrade is successful, please reconnect the device Wi-Fi.

Tablet/iPad Smartfon/iPhone
100GB Available total:165.8GB
Restoring the device to the factory default settings will remove all the customized configuration and destroy all the date
You can upgrade to the latest version, Upgrade in progress, do not cut off the power! Click the "OK" button to continue.
OK
No detected firmware!
The system is being upgraded. Please wait 5 minutes. Remaining # n seconds ... After the upgrade is successful, please reconnect the device Wi-Fi.
www.toshiba.eu/externalstorage/support
Modo DAS (Direct-Attached Storage) 12
Interface principal 19
Interface principal da Internet 20
Interface principal das aplicacoes. 20
Interface para gestao de fotografias 22
Interface do Visionador de fotografias 24
Interface de gestao de videos 25
Interface para reproducao de video (apenas para dispositivos iPhone, iPad e AndroidTM). 27
Interface de gestao de musica 28
Interface do leitor de música (apenas dispositivos iPhone, iPad, e AndroidTM) 30
Interface para gestao de documents. 31
Interface do Visionador de documents (apenas dispositivos iPhone, iPad, e AndroidTM) 33
Interface para gestao de ficheiros/pastas 34
Capitulo 3 Gestao de Cartoes SD 38
Unmount SD card 38
Modo DAS (Direct-Attached Storage)
Para funciona en modo DAS, ligue o Canvio AeroMobile à porta USB do computador incluindo o cabo USB fornecido.
Para utiliser de Mac:
The system is being upgraded. Please wait 5 minutes. Remaining # n seconds ... After the upgrade is successful, please reconnect the device Wi-Fi.

Tablet/iPad Smartphone/iPhone
Restoring the device to the factory default settings will remove all the customized configuration and destroy all the date
The system is being upgraded. Please wait 5 minutes. Remaining # n seconds... After the upgrade is successful, please reconnect the device Wi-Fi.
www.toshiba.eu/externalstorage/support
Interface principal 19
Regulativne izjave
Usaglašenost sa oznakom CE
CE
Ovaj proizvod nosi oznaku CE u skladu sa zahtevima primenljivih Direktiva EU. Odgovorna za oznaku CE je kompanija Toshiba Europe GmbH, Hammfelddamm 8, 41460 Neuss, Germany (Nemačka). Primerak zvanične Izjave o usaglasenosti možete preuzeti sa sledeće veb lokacije: http://epps.toshiba-tek.com.
Radno okruženje
Elektromagnetna usaglasenost (EMC) ovg proizvoda odobrena je tipicno za ovu kategoriju uredaja, za takozvano stambeno, komercijalno i neintezivno industrijsko okruženje. Svako drugo radno okruženje kompanija Toshiba ne odobrava, a upotreba ovg proizvoda u takvim radnim okruženjima要去 bitiograničena ili se ne要去 preporuciti. Muguć posledice upotrebe ovg proizvoda u neodobrenim radnim okruženjima mogu biti ometanja drugih proizvoda ili ovg proizvoda u okolnoj oblasti uz privremeno otkazivanje ili gubitak/ostećenje podataka kao rezultat. Primer neodobrenih radnih okruženja i saveta vezanih za njih:
Industrijsko okruženje (npr. gde se uglavnom koristi trofazno napajanje od 380 V): opasnost od smetnji kod ovog proizvoda usled mogucih snažnih elektromagnetnih polja, posebno u blizini velikih mašina ili strujnih uredaja.
■ Medicinsko okruženje: usaglasenost sa Direktivom za medicinske proizvode nije potvrde na strane kompanije Toshiba, stoga se ovaj proizvod ne moze koristiti u medicinske svrhe bez dodatne potvrde. Upotreba u uobičajenim kancelarijskim okruženjima, nth. u bolnicama, ne bi trebalo da predstavlja problem, ukolko ne postoje ograničenja od strane odgovorne administracione.
Automobilsko okrużenje: pogledajte korisnička uputstva za dato vozilo za savete koji se odnose na upotrebu ovog proizvoda (kategorija).
Vazdušno okruženje: sledite savete letačkog osoblja koji se odnose na ograničenja upotrebe.
Ostala okrużenja koja nisu vezana za EMC
Eksplozivna atmosfera: upotreba ovog proizvoda u takvom specijalnom radnom okruženju (Ex) nods dozvoljena.
Informacije koje slede vaze isključivo za korisnike u državama-članicama EU:
REACH - Izjava o usaglašenosti
Novi propis Evropske Unije (EU) o hemikalijama, REACH (Registration, Evaluation, Authorization and Restriction of Chemicals - Registracija, procena, autorizacija iograničenje upotrebe hemikalija), stipio je na snagu 1. juna 2007. godine.
Kompanija Toshiba ce zadovoljiti sve zahteve propisa REACH i posvećena je pruzanju informacija svojim korisnicima o hemijskim supstancama u svojim proizvodima u skladu sa propisom REACH.
Odlaganje proizvoda na OTPad
Upotreba ovog simbola ukazuje na to da se ovaj proizvod ne sme smatrati otpadom domacinstva. Starajuci se da se ovaj proizvod pravilno odloži na otpad, pomovićete u sprečavanju mogučih negativnih posledica po prirodnu sredinu i ljudsko zdravlje, do kojih bi u suprotnom moglo doci nepravilnim rukovanjem otpadom ovog proizvoda.
Vise informacija u vezi s recikliranjem ovog proizvoda mozete dobiti ukoliko se obratite lokalnoj upravi, preduzeću koje odnosi vaš domaci otpad ili prodavnici u kojoj ste kupili ovaj proizvod.
Odlaganje baterija i/ili akumulatora na OTPad
The system is being upgraded. Please wait 5 minutes. Remaining # n seconds... After the upgrade is successful, please reconnect the device Wi-Fi.
(Slika za primer) Ekran za ažuriranje firmvera - sačekajte 5 minuta
Configure your network connection
(Slika za primer) Prozor za konfiguracje podešavanja - Podešavanje interneta (Aplikacija)
- Izaberite ruter iz liste Tacke pristupa.
NAPOMENA
Restoring the device to the factory default settings will remove all the customized configuration and destroy all the date
(Slika za primer) Prozor za resetovanje podesavanja
OPREZ
Sve informacije sačuvane u Canvio AeroMobile bice izbrisane tokom ovog postupka formatiranja.
Obavezno sačuvajte svoje podatke na drugi urečaj za skladištenje pre nego što izvršite ovaj postupak.
- Da biste Canvio AeroMobile vratili na originalna fabrička podrazumevana podesavanja, pomerite prekidač na Uključeno položaj.
- Kliknite ili pritisnite dugme Sačuvaj.
Nadogradnja firmvera:
-
U prozoru System Settings kliknite ili pritisnite na Nadogradnja firmvera da biste otvorili prozor Nadogradnia firmvera.
-
Kliknite ili pritisnite dugme Nadogradnja na mrezi.
Ako je dostupan novi firmever, pojavice se sledeci ekran.

(Slika za primer) Prozor za nadogradnju firmvera
- Kliknite ili pritisnite dugme U redu.
Ako nods upan nijedan novi firmever, pojavice se donji ekran.

(Slika za primer) Prozor za nijedan detektovan firmver
Ako ste u veb pregledacu, moci cete da ručno nadogradite sa donjim ekranom.
Manual Upgrade

www.toshiba.eu/externalstorage/support
Za zahteve u vezi garancije pogledajte stranu: computers.toshiba.eu/options-warranty
Indeks pojmova
B
Bezbednost Ikone 3
Bezicno povezivanje PC/Mac 16
C
Canvio AeroMobile
Karakteristike 14
Punjenje. 12
Režimi funkcionisanja 12
D
DHCP Podešavanja 52
G
Glavni interfecs Aplikacija 20
Funkcionalnost. 21
Veb pregledac 20
#
Ikona Bezbednost 3
Interfejs Music Player-a 30
Interfejs prikazivača
dokumenata 33
Interfejs prikazivača slika 24
Interfejs za reprodukciju video zapisa 27
Interfejs za upravljanje datotekama/fasciklama 34 Interfejs za upravljanje dokumentima 32
Interfejs za upravljanje muzikom 29
Interfejs za upravljanje slikama 22
Interfejs za upravljanje video
zapisima. 25
iPhone i iPad
Instaliranje aplikacije 17
iPhone ili iPad
Bežićno povezivanje. 17
Client prijavljivanje. 17
Prijavljivanje na aplikaciju. 17
Izrada rezervne kopije
Upravljanje. 39
J
Jezik. .54
K
Karakteristike hardvera 10
Karakteristike softvera 11
Keš 54
Komponente 10
0
Obraćanje kompaniji Toshiba .55
Odjavljivanje .55
P
Podesavanja Upravljanje 41
Pregled .10
Prijavljivanje klijenta AndroidTM 18
Prijavljivanje na systemd 16
Prijavljivanje u veb pregledac 16
R
Režimi Funktionisanja
DAS režim . . . . . . . . . . . . . . . . . . . . . . . . . . . . . . . . . . . . . . . . . . . . . . . . . . . . . . . . . . . . . . . . . . . . .
Režim bežičnog LAN-a. .. 13
Robne marke 7
s
SDkartica
Automatska izrada rezervne
kopije 39
Korischenje 39
Ručna izrada rezervne
kopije 39
U
Upravljanje
Ime. 53
Slika korisnika 53
Upravljanje podesavanjima
Bezicni LAN (Aplikacija). 42
Bežični LAN
(Veb pregledac) 44
Konfiguracao 41
Podešavanja interneta
(aplikacija) 45
Podešavanja interneta
(verb pregledac) 47
Ure'daj Android™
Bezicno povezivanje 18
Instaliranje aplikacije 18
Prijavljivanje na aplikaciju . 18
Usluzni program za softver
Glavniinterfejs. 19
3aayBJIeHnO COOTBcTCTBnHOpMaTHNbHbIM Tpe6oBaHnA
CootBetCTBne Tpe6obAHnIe CE

Данhoe Издени IMeET МаркИровky CE, OТBEчaIOуTO Tpe6OBaHЯМ COOTBeTcTByIOxДиpeKТИB EC.
OTBETCTBEHOCb 3a MapKnIpOBky CE HeceT KOMnaHn Toshiba Europe GmbH, Hammfelddamm 8, 41460 Neuss, Germany (TePmaHn). C TeKCTOM oΦuIaJIbHoJ DeKnapaun COOTBeTCTBnM MoXHO O3HaKOMITbcr Ha Be6-caIte http://epps.toshiba-tek.com.
YcNoBnE KcNpyatau
CoOTBeTCTBHe DaHHORO N3dEJIa Tpe6OBaHnM B OTHOWeHn
3JIeKTPOMaTHHOn COBMecTUMoCTn IPOBepAIOCB TINOBbIM DJIa DaHHoN
KaterOpnn 3dEJIc CNOCo6OM npImeHHTeNB HO K TaK Ha3bIbAeMbIM
6blTOBBIM, KOMMepeCKIM MeIKOPombIuJHbEM YCNOBnM. IPOBepKa
Ha BO3MOxHOCTb NCNoB3OBaHnB A DpyrNX ycNoBnX KopnpaUnei
Toshiba He npOBoDnAcB. IcNoB3OBaHnE DaHHoro N3dEJIa B DpyrNX
ycNoBnX MoKeT 6blb OpaHnueHo H He peKOMeHdyetcR. Bo3MOxHbI
CJeNyUoUne NocJeDCTBn IAcNoB3OBaHn IAHHORO N3dEJIa B
HeNPoBepEHbIX ycNoBnX: HApUSeHnE HopMaIbHO pa60TbI DpyrNX
HaxOJaXxCra NObII3OCTn N3dEJIY INI daHHORO N3dEJIa C
NocJeDyUoUm BbIXODom IN3 CTpOra JIn6O Notepe INI NOBpeXDeHnEm
DaHHbIX. PpimepbI HeNPoBepEHbIX ycNoBn IcNoB3OBaHnI N
COOTBeTCTByUoUne peKOMeHdaUuN:
IpnmbiHneHHbIe ycnoBn (Haepmep, MeCTa, rpe npeMuyecTBehHO nCNoJIb3yeTcra 3-0a3HbI ToK c HappKeHNem 380 B): onachoctb HApUWeHn B pa6Ote DaHHoro I3deJInr N3-3a BO3MOXhbIX CINbHbIX 3JIeKTPOMaHHTbIX NOJe, OcOBeHNO pRdOM C KpyHbIM O6OpydoBaHHeM IN 3HeprTeNueCKMm YCTaHOBkAmn.
MeHnckn yCNOBn: KopnpaTna Toshiba He npoBnna npOBepky DaHHoro n3deNn Ha COOTBeCTBne DnpeKTBbe O MeHnHCKnx n3DeNnX, POToMg DaHHoe N3dEInne HEnb3r IcNoIb3OBaTb B MeHnHCKnx ZeJx 6e3 COOTBeCTByUOSei npOBepKn. IcNoIb3OBaHne B O6bIHyIX OfncbIX YcNOBnX, HAnpIMep, B 60JIbHncax, He DoJHXo npNBecTI K BO3HKnHO BeHnIO npo6JeM pRn OTCyTCTBn ORpaHnueHn Co CTOPOHb OTBeCTBeHHo aDMNHnCTpaun.
AToTpaHcnpT:peKOMeHdaaunBOTHOWeHnNcNoJb3ObaHnJaHHoro n3dennn (IIN KaTeOpnn N3deIi) CMOTpnte B pykoBoDCTBe NOlb3OBaTeJI COOTBeTCTByUoIe TpaHCnOpTHOrO CpeDCTBa.
Bo3duhnyI trpncnpt: co6nOdaTe yka3aHnaJeTHoro nepcoHaNo orpaHnueHIO nCnoJb3OBaHna N3deHn.
Друге усанов,在 Свяразнистордату COBMECTMOCtBuO
B3pbIbOONaChnay aTMocepepa: nCNoJIb3OBaHne daHHoro N3dEINB TaKnx OcO6bIX ycNobnX (Ex) He dOnyckaeTcR.
Излобжени далee Информацьа Akтуальна Толбков Стравх-челенх EC
Pernament dnn ctpan-uehenb EC
1 2007 r. BCTyynB Cnny HObBi peRnaMeHT Ebponeckoro Coio3a (EC) B o6nactn XmMnREACH («O perncTpaun, oueHke, pa3peuHn n orpaHueHn XmMuecknx BeueCTB»).
KopnpaTia Toshiba 6yTe BbIOJHnA Tb BCE Tpe6oBaHna REACH n
063yeTc npedocTabnTb Notpe6nteIcBoei npOdyKuIN INΦOpMaUIO
06 NCIOJIb3yEmbIX B Hei XIMNueCKNX BeIeCTBax B COOTBeTCTBUN C
perlameTom REACH.
YTNIN3aunn n3deenn
PnBHeHbI 3decb CmBOJ yKa3bIBaet Ha To, YTO C HAcTOrUIM
n3DeHnEM HeIb3r ObaaTaBcR KaC 6bITOBbIMN OTXoDAMN.
06ecneHnepaBnIbHOyTnIIN3aunN3deJnnaCnOCoCTByeT npedotBpaueHIO OTPucaTeNbHbIX NocJeDCTBn DnA OKpykaOuSe Cpebl N 3OpOBbJIIODei, KOTOpBE MOY T bITb Bbl3BaHbI HeHaIJIeKaUIM ydaJIeHNEM HaCTOUIero N3dEINBAOTXObl.
3a npo6ho nHOpmaue o npAke BToPnuHo nepepa6OTKn HactoJero N3deJnra Obaaatac b KMeCThblm BnaCTaM, B MyHnUHaJIbHyO cIyK6y, OTBETCTBeHHyO 3a JIKBnDaunOxODOB, INo mo MeCy npno6peTeHna HactoJoo N3dennr.
Ytihn3aun 6aTapei n aKKymyIaTOpOB
CnMBOI B BVIDE nepeuepKHyTOrO MycOpHOrO 6aka Ha KOJecax yka3bIbaet Ha To, YTO 6bTaapeN I aKKyMylAToPbI Heo6xOIMo CO6npaTb N yTuIN3nPoBaTb OTDeJIbHO OT 6bITOBbIX OTXODOB. UyAcTBBy B pa3dJeBHom C6ope 6bTaapeN, Bbl CNOCo6CTByeTe HAdIeKaaSei yTuIN3aUHN3dEIn N TeM CaMbIM NOMORAe TpeD0TBPaTNTb NOTEHuaJIbHbIe HeRaTINBHeIe NocLeIDCTBnI DJIg OKpykaUoSeI CpeDbI N 3DopOBbIa JIOdeN. YTO6bl NOlyuHTb IOndpo6HyIO INΦOpMaUIO O npOBODMbIX B BaWeI CTpaHe IporpAMMax c6opa OTPaBoTbUHX N3dEInN IN X BTOpNUHO Ipepa6OTKn, O6paTntEcB B OTBETCTBeHHyIO MyNuIIaJIbHyIO Cnyk6y INN B TOPROY TOcKy, B KOTopoN 6blIO npNo6peTeHO DaHHoe N3dEJIne.
OCHOBHON INHTeppeic. 20
OchOBHOI Be6-INTeppeic 21
OchOBHOIHTepcEic npnoXeHn. 21
InTepeEic ynpaBneHn H3o6paXeHHaMn 23
InTepeeic nporpaMMbl npocmoTpa n3o6paxeHn 25
InTepeicynpaBneHnBndeomatepnaanm.. 26
Иnteppeic Bocnpon3BedeHn BundeomatepnaIOB (ToIbko dny iPhone, iPad u yctpoiCTB noD ynpabneHnem AndroidTM) .28
InTepeic ynpaBneHMy3bIKoI 30
IHTepcpeic npoirpbibatejmy3bIKI (ToIbko dnn iPhone, iPad u yctpoiCTB noD ynpabneHnem AndroidTM) . . 32
InTepeicynpabHeHnOkyMeHTaMn 34
BxOaB CnCTemy C IOMOUIbIO KJIeHTCKoY yTHIINtBi IJIa iPhone nn iPad
YCTaHOBka npIIOXeHnIЯ iPhone n iPad
- HauTe B App Store 6ecnlaTHe npIIOKeHne TOSHIBA noHa3BaHnem Wireless SSD.
- YcTaHOBHTe npIIOJKeHne Wireless SSD, cJIeIyra BbIBOIMMbIM Ha 3KpaH HnCTpyKIIHM.
- Послесаьершени пюцета установни на paбочем столпяпВТСУЗHAчOK Wireless SSD.
BecpOboHoe pokKluoye Hne K iPhone nn iPad
- BkHIOUHTe CNTeMy HaKaTHem KHOIIKN BKJIIOueHHN/BBIKIIOueHHN.
- Korda nepectaHET MngaTb HnDnKaTop Wi-Fi , B MeHIO IapameTpbi iPad nIi iPhone Bb6epnte PnyKT «BeCnpOBoHaJ IOkaJIbHaJ ceTb>.
- ΠιελκΗΝΤΕ ένην ΚΟχΗΝΤΕς Ḁλβαῦŋα έτη Toshiba wssd xxxx.
- BBeIHTe HcIOJIb3yEmbI IO yMOJIuaHnIO npoJIb 12345678.
Bxod BCnCTeMy C IOMOUIIIOIPIJIOKeHNA
- 3aIyCTHHe MHHn-IIIpHIOJKeHne Wireless SSD, 3aTeM BbIIIOJIHNrte BXoI B Wireless SSD.
3KpaH BxoJaB CnCTemy Ha iPhone nn iPad (npHmepna HJIIOCTpaun)
- Ha 3kpaHe BXoDa B CnCTeMy BBeIte INHΦopMauH, Heo6XoIMyU DJIa BXoDa B CnCTeMy, BOCIOJIb3OBABWHcB CJIeIyUOUMN yYeTHbIMN DaHHbIMN:
■Имя польбовател: admin
Napojb nonb3OBaTeJ: OCTaBbTe 3TO NOJE NcTbIM
- YTo6bI NOJyHTb DOCTyn K OCHOBHOMy INHTeppeiCy, HaxMnte KhoNky OK.
Bxod BCnCTemy C NOMOuKJIeHTCKoYtNlNTbI dJa AndroidTM
YcmaHObKa npUoXeHua dJa AndroidTM
- HaimiTe B Google Play™ 6ecnlaTHe npInoJxHne TOSHIBA noI Ha3BaHnem Wireless SSD.
- YctaHOBnte npINOxKeHne Wireless SSD, cJeDy BbIBOIMMbIM Ha 3KpaH INHCTpyKcIyM.
- После заBERшENЯ поцeCCA yCTaHOBKN Ha pa6ooyem cTone NOBNTcR 3HaouK Wireless SSD.
OK, yTo6bI BbInONHHTb 06HOBJIeHne
OTmeHa
He npednaraTb
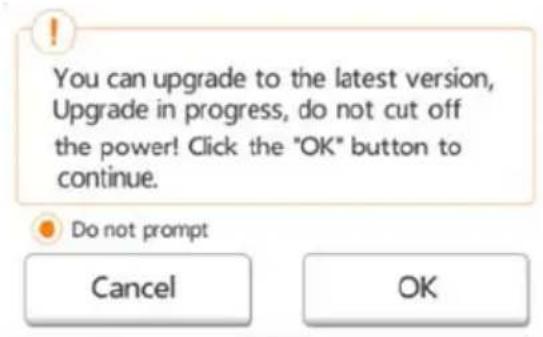
3KpaH o6HOeHua EcmpoEHHOo npOpaMMHOo oEcepeHua (npumepna unIocmpaua)
EcnBbIbpaTb BapnAHT OK, YTO6bl BbINOnHnTB O6HOBneHne, CnCTema COO6uNT O TOM, YTO Heo6xOdIMo NDoXkDaTb 5 MNHyT.
The system is being upgraded. Please wait 5 minutes. Remaining # n seconds ... After the upgrade is successful, please reconnect the device Wi-Fi.
ObnoBneHue BCmpoehHOO npoaspMMHOO obecneHua -3kpan C coo6uHuem O Heobxodumocmu Oxudahua 5 Muhym (npumepna unIIOcmpaua)
Ecni BbIbpaTb BapnaHT Otmeha, CnCTema, BO3MOxHO, COO6uNT O HAnuH NoHOBHeH N CJIeDyUoN pa3 BO BpeM BA BXoDa B CnCTeMy I nepexoHa K OCHOBHom uHTepceiny.
EcnBb6paTb BapnAHT He npednaratb, nporpamma Wireless SSD 6oIbwe HNKOrda He 6ydt aBTOMaTHueCKn COO6uATb O HaJIuHm OBHeHH BCTpoEHNO IporpAMMHO OBeCneHEnr, pni 3tOM BblONHITb erO 06HOBLeHne MOxHO 6ydt BpyHyTO Ha cTpaHnUe «IapametpbI», cm. pa3dEn «OBHOBHeHne BCTpoEHNO IporpAMMHO OBeCneHEnr:» Ha cTp. 54.
OCHOBHON Be6- nHTeppeic
Hnke npBBeHn npMep oCHOBHO nHTepceIca npN erO npocMoTpe B Be6-6pay3epe KOMNbIoTepa.

OchoBou unmepeuc - 66-6pay3ep (npumepna unnncpaua)
OchOBHOn nHTeppeic npJIOxKeHHa
Hnke npBBeH npMep oCHOBHO nHTepceIca npI erO npocMoTpe B npJIOKeHn Ira iPhone, iPad nn AndroidTM.

Планшт/伊PadСмарТфОH/iPhone
OchoeHou uHmeppeuc - npunoXeHue (npumepna unnncmpaua)
ФункцuOcHOBHO2o uHmeppeuca npUJKeHua
Hnke npuBODNTcO nncahne yHKcN KHOPOK N 3HaQKOB OCHOBHOro INTEpeeCa npINOKeHn
B Be6-6pay3epe MoXHo Bbl6paTb, cIeIyET IIN TpaHcIInpoBaTb nIeHTnΦnKaTOp SSID.
1.Чтоби иdentифигаTop SSID trpaHcInpoBaIcra,пepeKIOUaTeIb, haxODaIuIcR B npaBOM bepxHem yIy 3KpaHa, Heo6xOIMO nepeBecrB noIoxHe BkI.Чтоби иdentиФIGaTOp SSID He TpaHCJIpoBaIcra,пepeKIOUaTeIb, haxODaIuIcR B npaBOM bepxHem yIy 3KpaHa, Heo6XoIMO nepeBecrB noIoxHe BblKl.
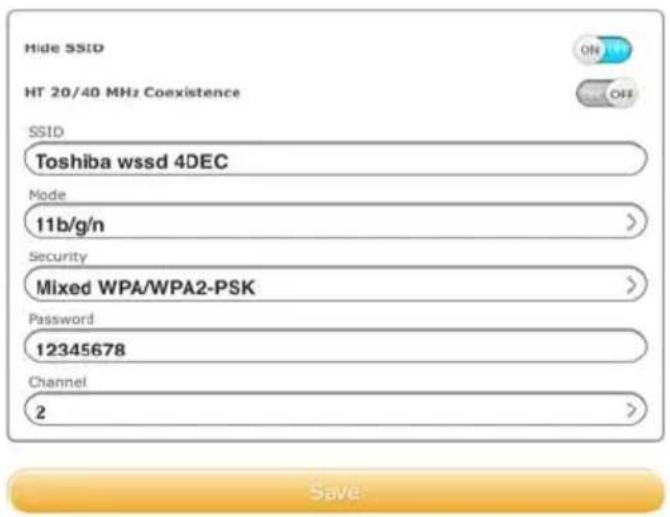
KoHouzpaauu npaempoe -okho SSID (npumepna unncmpaua)
- HaxmTe KhONKy CoxpaHnTb.
Паамерbl NBC:
1.Чтобл поев.TВOKHO napametpoB JBC,нжмITE KhoNKу NapametpbI JBC.

KoHfUzypauuu npamempoe - okho npamempoe JBC 8 npunoKeHuu (npumepna unIIOcmpaua)
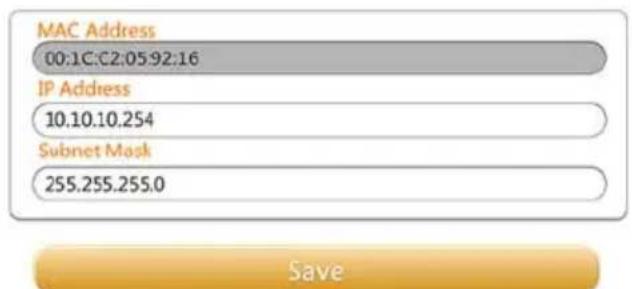
KoHpuyaquu npamempoe - okno npamempoe JBC e ee6-6pay3epe (npumepna unlncmpaua)
MAC-aDpec: yka3aH TOJIbKO dIЯ cnpaBKN He NOJNeKHT N3MeHeHIO.
IP-aDpec: ⅢeIyKOM IJI KacaHnem 3TOrO nOJRA MOxHO N3MeHHTb IP-aDpec yCTpoiCTBa.
Macka noDCETN: UJIHKOM HJN KACAHNEM 3TOrO NOJRA MOXHO N3MeHHTb MACKY NOCDETN YCTPOINCTBa.
- HaxMMTe KhoNky CoXpaHnTb.
NapametpbI NHTepHeTa (B npHIOxKeHH)
UTo6bI nepeiTu B OKHO napameTpOB INHTepHeTa, HaxMnte KhoNky NapameTpBi INHTepHeTa.
Mochho Hacptponb ceTeBoe noKIOueHne hakOnnteJa Canvio AeroMobile K MapuTy3aTopy 6ecnpoBODHO JOKaIbHOcTn.
Configuration

Internet Setting
Internet Access
Windows Access

Configure your network connection

KoHpuzypauu npamempoe - OKHO npamempoe Hmepema e npunoxeHu (npumepna unnocmpau)
- Bb6epnte cBoi MapuTy3aTOp n3 cnNcKa Touek doctyna.
ПРМЕЧАНС
Bo3MOxHO, 6yDEM Heo6xOoMo 8ecMu npoNb Ha nooknoueHue.
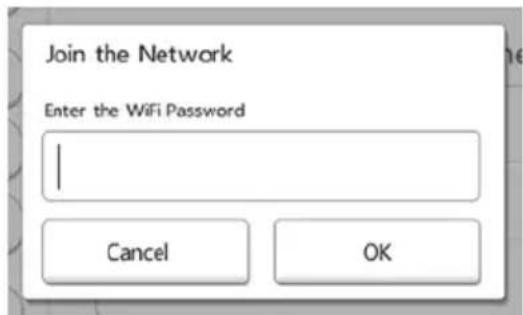
Okho eoopa nponpa napaempax UHmephema (npumepna unncmpaua)
B cnyae ycneuHoro noKIOueHnHaIpoTnB Ha3BaHn ToCKn DoCTyna NOABnEeTcraNoUka.
- B OkHe napaMeTpOB INHTepHeta BbI6epnTe no XeJHaHIO TnIP-apeca: DnHaMnueckn nnn CTatNueckn.
3. HaxmTe KhoNky OK.
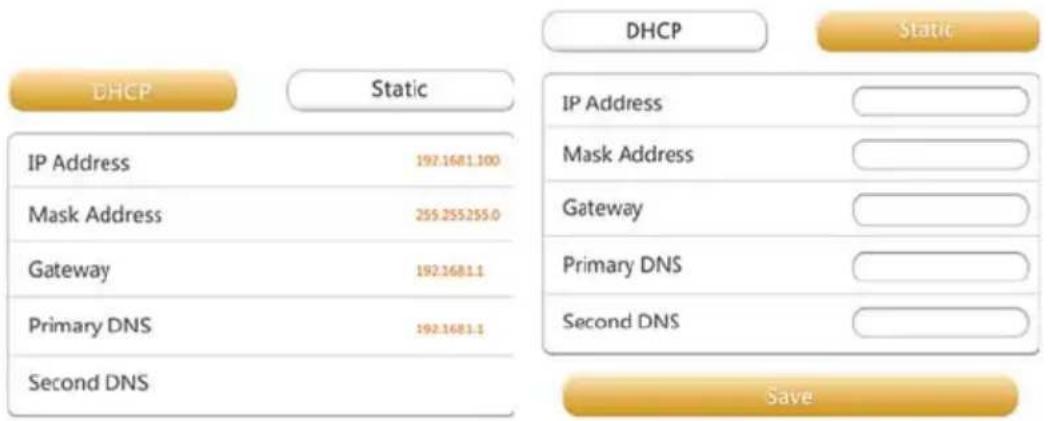
Oka napamempoe duhamuueckozo IP-adpeca u cmamuueckozo IP-adpeca (npumepna unniocmpaua)
ПРIMECHEN
Cneodyem npo8nmb ocmoopxHocmb npu noKnoyeHuK cemm 6 o6uecmbeHHbIX mecmax.
K ycmpoucmey moaym nooknquambcya pyaue nonb3o6amenu.
Парамерbl Иntернета (В Вe6-6pay3epe)
Hacpoika napametpoB INHTepHeTa B Bercn 3TOro nporpaMMHO OBeCneueHna, paccuHaHHo Ha Be6-6pay3ep, BbINOJIeTcA AnaIOnuHOBercn, BbIOJNeHHo B Vnde npNJIOXeHna, Pn3TOM pa3JIuaeTcBHeuHn BvN INHTeppeca.
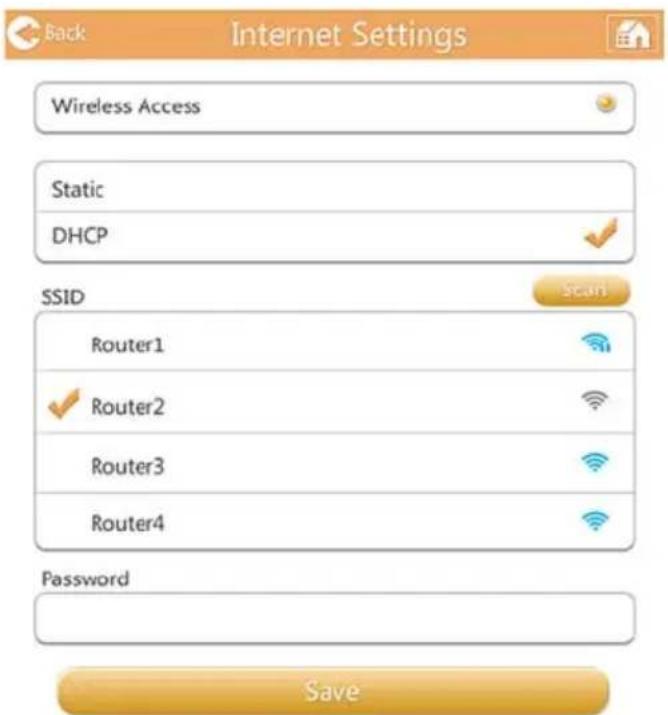
KoHpuyaqua uu npamempoe - okno npamempoe Hmepema e ee6-6pay3epe (npumepna unnccmpaua)
NapametpbicnCTembl
BnapaMeTpax CnCTeMbIOxMOXHO CMeHNTb napOJIb NOJIb3OBaTeJIa, CMeHNTb IIMRA XOCTa, y3HaTb O6UyIO N OCTaTOHyIO EMKOCTb TBepDoTeJbHOrO HAKONITeJI Canvio AeroMobile, a TAKKe O6HOBHTb BCTpOeHHoe nporpaMMHoe o6ecneueHHe.
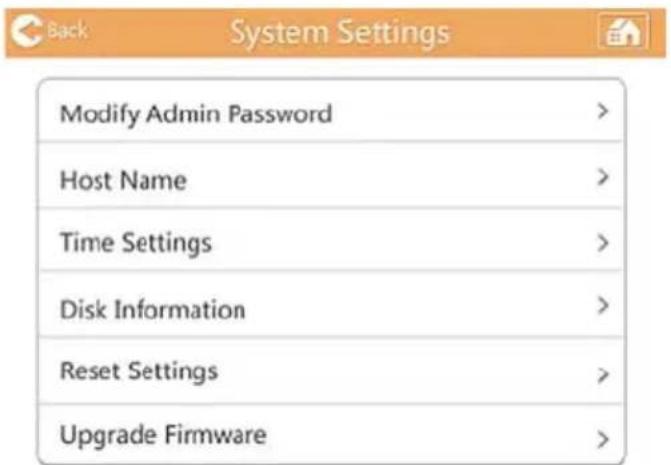
OknnapaempoecucmembI(npumepnaunlncmpaua)
- HaxmTe KhoNky CoxpaHnTb.
HMa xocma:
- YTO6bI OTKpbITb OKHO IMeHn XOCTa, B OKHe napametpoB CNCTembl ⅢeJKNHTe IIN KCHNTecb NyHKta NmXoCTa.

Okho umehu xocma (npumepna unnncmpaua)
- BBeDnTe HOBOE mXoCTa.
- Hαχmnte Khoŋky OK.
Restoring the device to the factory default settings will remove all the customized configuration and destroy all the date
Okno c6poca npamempoe (npumepna uunocpaua)
BHUMAHNE!
B xode npouecca fopmamupobauha 8cra uHfopmauua, haxodyaacnHa hakonumene Canvio AeroMobile, bydem ydaena.
Ipejde yem npucmyumb K ebinoHHeHuO 3mou npoueDpybl, Heo6xodumo coxpanmb daHHbE Ha dpy2oe ycmpoucmeo xpaHeHua.
- UTo6bI BOCCTaHOBnTb OpINHnHaNbHbIe 3aBODcKne 3NaueHnBCEX napametpoh HAKoNITeJr Canvio AeroMobile, nepeBeIDTe 3TOB BbIKIOUaTeJI B NIOJOKeHne BKJI.
- HaxMMTe KhoNky CoXpaHnTb.
06no8JIeHue 8cmpoeHHo2O npo2paMMHO2O o6ecneueHua:
-
UTo6bI OTKpbITb OKHO 6OBHNeHnB BCTpoEHORO nporpaMMHOrO o6ecneueHn, B OKHe npaMeTPOB CnCTeMbI 5eJIKNHTe NIN KOCHTEcB nyHKTa 6OBHNeHn BCTpoEHORO I0.
-
HaxMMTe KhoNky O6HOBHeHne OHnaH.
При Налочи HOBO BCSTpoEHORO nporpaMMHOrO obecneueHn OTKpoETc cNeDuOuee OKHO.
You can upgrade to the latest version, Upgrade in progress, do not cut off the power! Click the "OK" button to continue.
OK
OknO obHOBnHua EcmpoEHNO2o npoepaMMHO2o oecneueHua (npumepna unIOcmpauu)
- HαχκMιTe KΗοΝΚγ ΚΚ.
Pn OTCyTCTBn HOBORO BCTPOeHHORO nporpaMMHoro oecneueHn OTKpoETc CNeDyUoUee OKHO.
No detected firmware!
Okncoo6eHua o6 omcymcmeu Ho8o20 BcmpoeHHo20 npo2paMMHO20 obeceueHua (npumepna unIIOcmpaua)
B cnyuae nCnoIb3OBAHnBa Be6-6pay3epa 6yDet npedIOxEn BapnaHT pyuHoro o6HOBHeHn, KaK poka3aHo HIXe.
Manual Upgrade
Upgrade
Oknho pyHoo 06HOeHn (npumepna unncmpauua)
- HaxMMTe KhoNky O6HOBneHne.
OTKpoeTcCneDyUoueoKHO.
The system is being upgraded. Please wait 5 minutes.
Remaining # n seconds ... After the upgrade is successful, please reconnect the device Wi-Fi.
Okho coo6eHua o6 oxudauu e meueHue 5 MuHym (npumepna unnncmpaua)
- OTKIIOUHTecb OT hakonITeJc Canvio AeroMobile n choba NOdkJIIOHTecb K HeMy.
Takke MoXHO O3HaKOMITbC4 CO CnNCKOM KIneHTOB.
| Client Name | MAC | IP | Effective time |
| TOSHIBA | 70:11:24:21:1f:0f | 10.10.10.1 | 00:00:10 |
| android_d969961 | c4:6a:b7:af:83:f2 | 10.10.10.2 | 00:00:10 |
| android_1427ba9 | 74:45:8a:e0:5f:50 | 10.10.10.3 | 00:00:10 |
| 70:11:24:26:60:5c | 10.10.10.4 | 00:00:10 | |
| 74:d0:2b:6e:55:ee | 10.10.10.5 | 00:00:10 | |
| 00:1c:c2:03:47:0f | 10.10.10.6 | 00:00:10 |
Okho cnucka kIueHmo8 (npumepna unnlocmpau)
YnpaBHeHne n3o6paxKeHnEm N mMeHem NOlb3OBaTeJIa
Ipeennte Ha cTpaHnuy n3o6paxKeHn I mMeH nOJIb3OBaTeJeN, nOKa3aHHyIO HIXe.
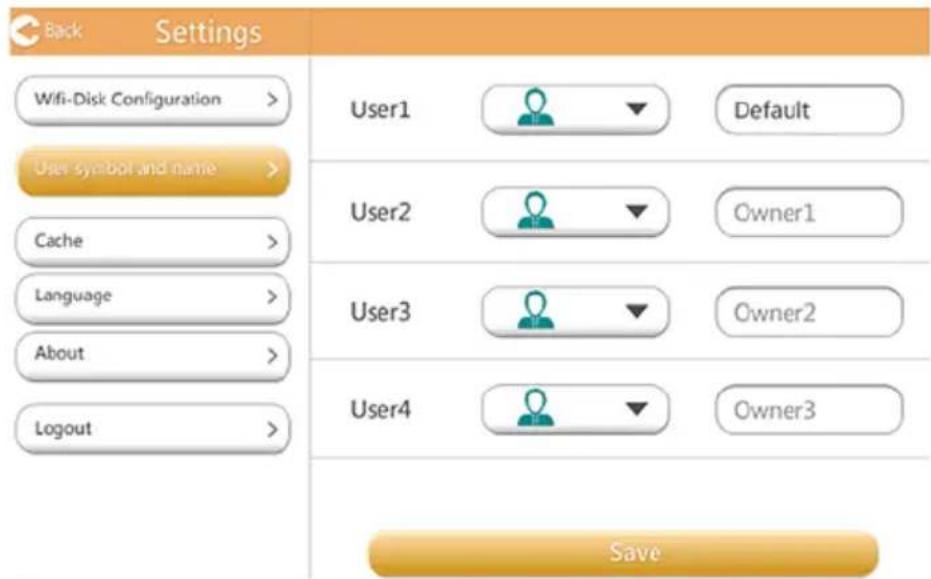
OknO ynpaeneHua u3o6paXeHuMa u UmeHaMu noIb3oeameneu (npumepna unlncmpauua)
B cIeIyUoIeM OKHe MoXHO MeHrTb 3HaUKN I MHeHa YETbIpex nOlb3OBaTeIeN. 3Tu N3MeHEny 6yDyT 3aMeTHbI Ha 3KpaHax ynpaBJIeHn N3O6paJxEHnA M, BundeOMaTePnaJIaMn, Ha 3KpaH e SD-kapTbI N Ha 3KpaH e pe3epBHOro KOnIPOBaHn.
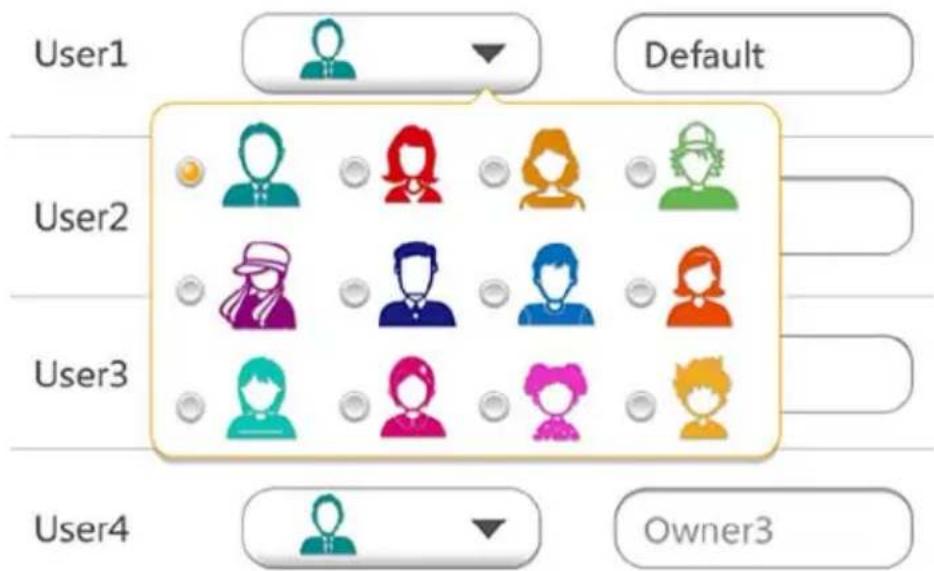
OknO ynpaeneHua u3o6paXeHuMa u UmeHaMu nolb3oeameneu (npumepna unlncmpauua)
Ha Bb6op npednaiaotc 12 haukoB.
Takke nla kajdo ro noIb3OBaTeJ moKHO BBecTI HOBOE mMra.
www.toshiba.eu/externalstorage/support
DAS-laget (Direct-Attached Storage) 12
Tradlost lage (tradlos lagring) 13
Funktioner 14
Kapitel 2 Programvara. 16
Systeminloggning 16
Tradlos anslutning till en dator 16