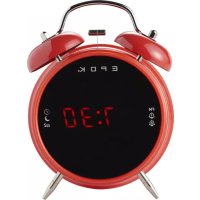
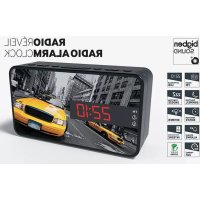
RR140I DAB - Alarm clock radio BIGBEN - Free user manual and instructions
Find the device manual for free RR140I DAB BIGBEN in PDF.

| Product Type | Clock Radio |
| Brand | Bigben |
| Model | RR140I DAB |
| Power Supply | Mains 100-240 V AC, 50/60 Hz (adapter included); backup batteries (not supplied) |
| Power Consumption | See adapter (model OBL-0502400E) |
| Radio Functions | DAB+ (Band III) and FM (88.8-108 MHz) |
| Number of Alarms | 2 independent alarms with snooze |
| NAP Function | Yes, adjustable from 15 to 90 minutes |
| SLEEP Function | Yes, adjustable from 15 to 90 minutes |
| USB Charging | USB port 5 V / 1 A (phone charging) |
| Wireless Charging | Yes, Qi compatible (compatible smartphones) |
| Auxiliary Input | 3.5 mm jack socket |
| Display | LED screen with brightness adjustment (3 levels) |
| Station Memory | Up to 20 DAB stations and 20 FM stations |
| Clock Update | Automatic via DAB or FM, or manual |
| Safety | Do not expose to water, avoid heat sources, unplug during storms |
| Maintenance and Cleaning | Soft, dry cloth; do not use abrasive products |
| Environmental Compliance | Do not dispose of with household waste; use collection points |
| Spare Parts / Repairability | Specific mains adapter; repair by qualified professional |
| Warranty | Not covered if instructions are not followed |
| Manufactured by | Bigben Interactive SA, France (made in China) |
Frequently Asked Questions - RR140I DAB BIGBEN
User questions about RR140I DAB BIGBEN
0 question about this device. Answer the ones you know or ask your own.
Ask a new question about this device
Download the instructions for your Alarm clock radio in PDF format for free! Find your manual RR140I DAB - BIGBEN and take your electronic device back in hand. On this page are published all the documents necessary for the use of your device. RR140I DAB by BIGBEN.
USER MANUAL RR140I DAB BIGBEN
- Recharge sans fil
- March / Fonction
(FM/ DAB/ Entreé Aux)
Puisance absorbee:12W
EN:https://www/bigben-interactive.co.uk/support/
IT: https://www/bigbeninteractive.it/supporto-technico/
AUTRES LANGUES : https://www/bigbeninteractive.com/support/
Care for your product 2
Care of the environment 2
What's in the box 3
Power
Description of Parts 4
Getting Started 4
USB Charging
Wireless Charging 5
Setting the Time 5
Using the Snooze Function 6
Operating DAB Radio 6
DAB Display Information (INFO) 8
Operating DAB Radio ** Page 8-10
Menu: Full Scan, Manual Tune, DRC, Prune, System
- Operating the Radio ** Page 11
Auto Scan, Tuning, Storing Station, Menu
Getting Started
- Remove the appliance from the box.
- Remove any packaging from the product.
- Place the packaging inside the box and either or dispose of safely.
Safety and Notice
Read and understand all instructions before you use this product. If damage is caused by failure to follow the instructions, the warranty does not apply.
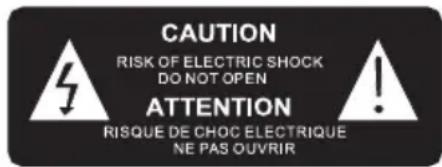
The lightning symbol inside an equilateral triangle warns the user of the presence inside the product of uninsulated hazardous electric voltages powerful enough to represent an electrocution risk.
Safety
Warning
- Never remove the casing of this apparatus.
- Never lubricate any part of this apparatus.
- Never place this apparatus on other electrical equipment.
- Keep this apparatus away from direct sunlight, naked Fames or heat.
- Never look into the laser beam inside this apparatus.
- Ensure that you always have easy access to the power cord, plug or adaptor to disconnect this apparatus from the power.

- Read these instructions.
- Keep these instructions.
- Heed all warnings.
- Follow all instructions.
- Do not use this apparatus near water.
- Clean only with dry cloth.
- Do not block any ventilation openings. Install in accordance with the manufacturer's instructions.
-
Do not install near any heat sources such as radiators, heat registers, stoves, or other apparatus (including amplifiers) that produce heat.
-
Protect the power cord from being walked on or pinched, particularly at plugs, convenience receptacles, and the Point where they exit from the apparatus.
- Only use attachments/accessories specified by the manufacturer.
- Unplug this apparatus during lightning storms or when unused for long periods of time.
- Refer all servicing to qualified service personnel. Servicing is required when the apparatus has been damaged in anyway, such as power-supply cord or plug is damaged, liquid has been spilled or objects have fallen into the apparatus, apparatus has been exposed to rain or moisture, does not operate normally, or has been dropped.
- Apparatus shall not be exposed to dripping or splashing.
- Do not place any sources of danger on the apparatus (e.g. liquid filled objects, lighted candles).
- Where the AC/DC adaptor or an appliance coupler is used as the disconnect device, the disconnect device shall remain readily operable.
- Make sure there is enough free space around the product for ventilation.
- Batteries (battery pack or batteries installed) shall not be exposed to excessive heat such as sunshine, fire or the like.
- The rating label is placed on the bottom side of apparatus.
- Minimum distances 10cm around the apparatus for sufficient ventilation.
- The ventilation should not be impeded by covering the ventilation openings with items such as newspaper, table-cloths, curtains etc.
- No naked flame sources such as lighted candles should be placed on the apparatus.
- Attention should be drawn to the environmental aspects of battery disposal.
- The apparatus should only be used in moderate climates.
Care for your product
- Always unplug the appliance and wait for the unit getting cold before cleaning.
- Do not play music at excessive volume levels as damage to hearing and or the equipment may occur.
- Do not use this unit in wet or damp conditions.
- Clean the appliance with a soft, damp, lint free cloth. Do not use abrasives or harsh cleaners.
Care of the environment


Your product is designed and manufactured with high quality materials and components, which can be recycled and reused.
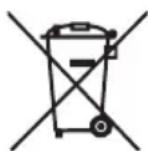
Your product contains batteries covered by the European Directive 2006/66/EC, which cannot be disposed with normal household waste. Please inform yourself about the local rules on separate collection of batteries because correct disposal helps to prevent negative consequences for the environmental and human health.
When this crossed-out wheeled bin symbol is attached to a product it means that the product is covered by the European Directive 2002/96/EC. Please inform yourself about the local separate collection system for electrical and electronic products. Please act according to your local rules and do not dispose of your old products with your normal household waste. Correct disposal of your old product helps to prevent potential negative consequences for the environment and human health.
What's in the box
Check and identify the contents of your package:
- Main unit
- AC adaptor
- User manual
Power

CAUTION
- Risk of product damage! Make sure that the power voltage corresponds to the voltage printed on the back label.
- Risk of electric shock! When you unplug the AC/DC adaptor always pull the plug from the socket. Never pull the cord.
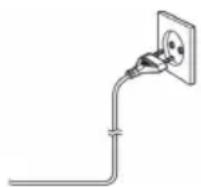
- Before connecting the AC/DC adaptor, ensure you have completed all other connections. Place the unit in the desired position and unravel the mains cable. Insert the cable into the supply socket and switch on if applicable.
Power Source
This unit is designed to operate on a normal AC 100-240V, 50/60Hz household power supply. Do not attempt to operate the system using other power sources. This may result in damage to the unit and void your warranty.
The adaptor manufacturer: Dong Guan Obelieve Electronic Co., Ltd.
Adaptor Model: OBL-0502400E.

Battery Power
- Be sure that the batteries are inserted correctly to avoid damage to the appliance. Always remove the batteries when appliance will not be used for a long period of time, as this will cause leakage to the batteries and subsequently damage to your set.
- Use batteries of the same type. Never use different types of batteries together.
- Do not throw the battery into the fire, or exposed to sunshine or the like.
- If the liquid contained in the batteries comes in contact with eyes or skin, wash the area immediately and carefully with clear water and consult a doctor.
Description of Parts
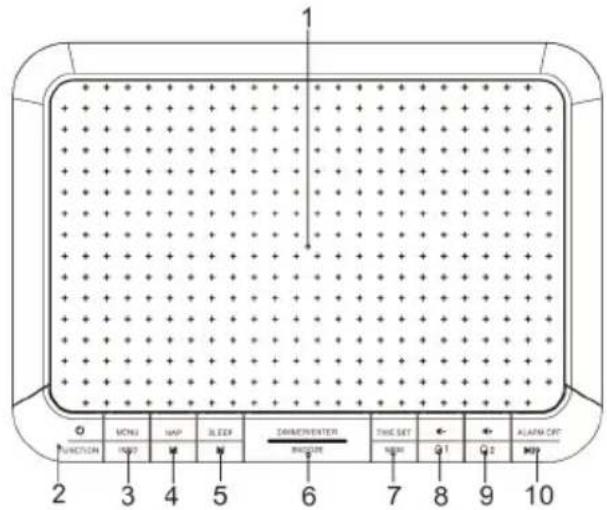

- Wireless Charging
- Power / Function (FM/DAB/Aux in)
- Menu / Info
- NAP / p -
- Sleep / p+
- Dimmer / Enter / Snooze
- Time set / MEM
-
1me-/ (Ala11)
-
ime + / Ala
- Alarm OFF/
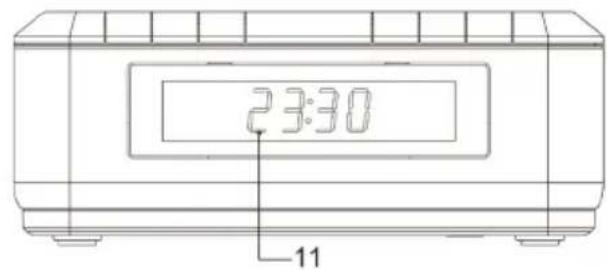
- LED Display
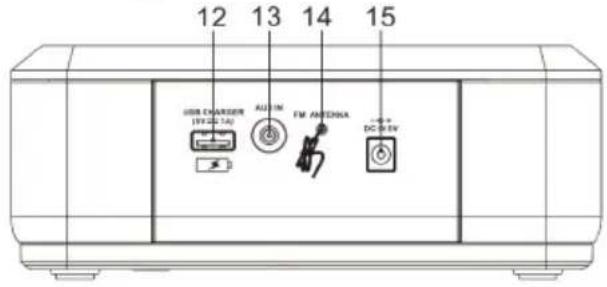
- USB Charger (5 V/1 A)
- Aux In
- FM Antenna
- AC Socket
- Battery Door
Getting Started
Plug the power adapter into the back of the unit, and the other end into a standard electrical outlet.
USB Charging
To charge your device or mobile phone, connect your USB charging cable (not provided) to the USB charging port (12) located on the back of the clock.
Wireless Charging
Compatible with wireless charging enabled smartphones. Other smart phones need to use wireless charging adapters to work.
Put the mobile phone on the top panel.
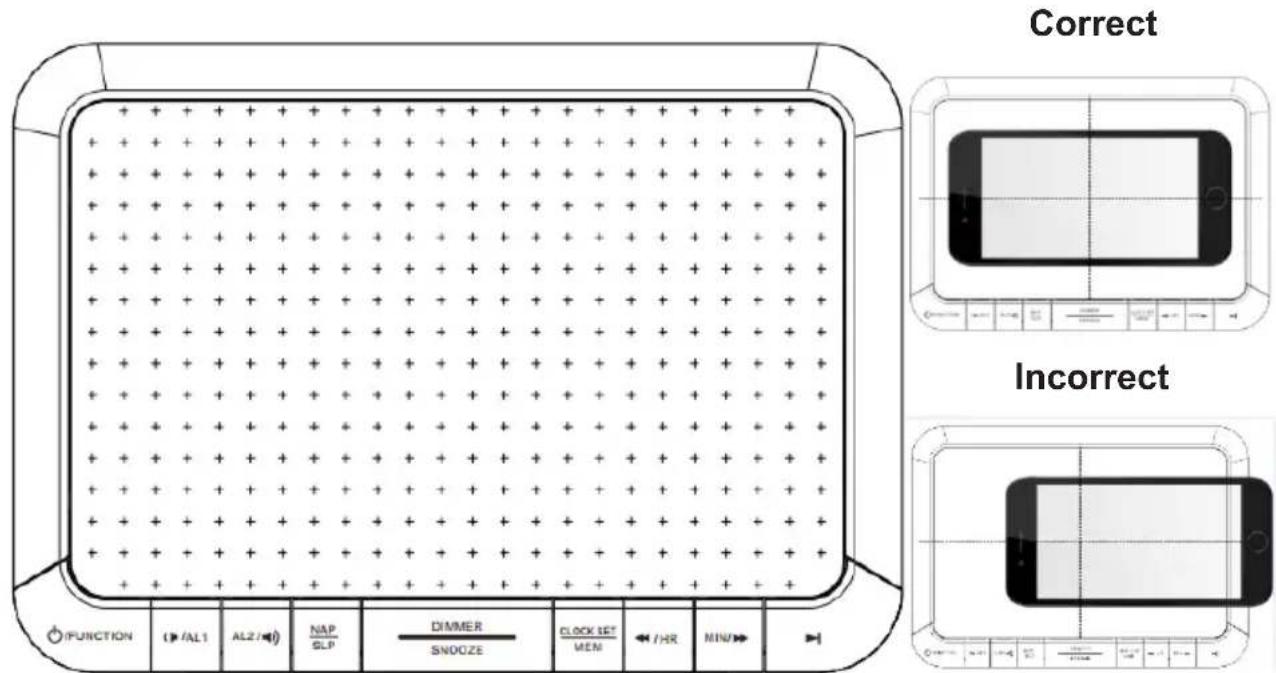
*Note: When the phone is being charged, your phone's charging indicator will show as normal.
*Note: For maximum charging efficiency, the phone must be aligned with the centre of the charging area.
*Note: Phones that are capable of wireless charging may need to be placed slightly off centre. The built-in wireless receiver may not be centred inside the phone. This varies by brand/model.
Note: Wireless Charging and Radio / Aux In can be used at the same time.
Remark
Under the influence of electrostatic phenomenon, the product may malfunction and require user to power reset."
Under an environment with electrical fast transient, the product may malfunction and require user to reset."
Setting the Time
- Long press Power 2 seconds to enter standby mode.
- Press Time Set (7) for 2 seconds. The display will flash.
- Press K o 31 just HR (Hour) and press Enter (6) to confirm
- Press K o a just Min (Minute) and press Enter (6) to confirm
- Unit will go to Date setting format MM-DD - Year
- Press K o 31 just (MM- Month, DD -Date, Year) & press Enter to confirm.
Setting the Alarm
- Long press Power 2 seconds to enter standby mode
- In standby mode, press Alarm 1 & press Enter (6) to enter setting mode.
- Press 10 just Hour and Enter (6) to confirm.
- Press K o r just Min (Minute) and Enter (6) to confirm
- Press to choose Duration, i.e. the number of minutes to ring: 90, 60, 45, 30, 15. Press Enter (6) to confirm.
-
Press to select Source, i.e. the alarm output: DAB, Buzzer & FM. Press Enter (6) to confirm.
-
Press to choose the frequency: Daily, Once, Weekends, Weekdays Press Enter (6) to confirm
- Press select the volume output. Press Enter (6) to confirm.
- Go to Alarm On/Off option. Use Close Close Alarm On.
Press Enter to confirm & save the entire setting.
- There is a dual alarm. Repeat the above steps to set Alarm 2 (9). Once the alarm is set, the alarm display light will be ON.
Turning Off the Alarm
- To turn off alarm 1 or 2, press Alarm Off (10).
- The Alarm clock will resume the function at the same time the next day.
Cancelling / Disabling Alarm Function:
- In standby mode, press Alarm 1 or 2. Press Enter 8 times until it goes to last step, Alarm ON/Off. Press OK to choose Alarm Off & Enter to cancel the alarm setting.
- The alarm display will disappear.
Using the Snooze Function
- When the alarm is ringing, or radio output is on, short press "SNOOZE". The Snooze display light will flash. The alarm will stop, but every 9 minutes, it will ring again, or the radio will turn on. Press Alarm Off (10) to turn off the alarm and the Snooze indicator light will also be off.
Dimmer Control (LED Display)
- Long press Dimmer to control the brightness of the display.
- There are 3 levels: High level (brightness) - Low level (Dim light) OFF.
NAP
- In standby mode, press NAP (4). The DAB/FM/Aux in function will turn on after the selected time.
- It will start to count down from the default 90 minutes. Press NAP again to select the time. There are different options: 90, 60, 45, 30, 15 & OFF.
- Press Enter to confirm the setting. It will show the countdown on LED display. For example, for N15, 15 minutes will count down from the wake-up time.
- When the time is up, the unit will turn the function (DAB/FM/Aux in) on.
- Press turn off DAB/FM/Aux in.
- To cancel the NAP timer, press NAP & select OFF.
Sleep
- When FM radio/DAB is ON, press Sleep (5). The FM radio/DAB will turn off after the selected time.
- It will start to count down from the default 15 to 90 minutes. There are options for the user: 90, 60, 45, 30, 15 & OFF.
Press Enter to confirm - To remind the user of the Sleep function selected, the LED will display the sign SXX with minutes left. For example, S15 means that 15 minutes of Sleep time are remaining.
- If the user wants to cancel the function, press Sleep (5) and select OFF.
Operating DAB Radio
- Press power button to turn on and press function to DAB.
- Fully extend the antenna on the back of the unit to obtain maximum signal.
- When used for the first time, the station list is empty. The unit will automatically scan for DAB radio stations. LED Display will show the scanning progress and the number of stations found. It takes 2-3 minutes. After scan, stations will be listed out.
If DAB signal or desired station is not found, reception signal may be poor. Adjust the position of antenna or relocate your radio & start to scan again.
MENU
- Press K to select the MENU functions.
A. Full Scan, B. Manual Tune, C. DRC, D. Prune, E. System
- Press Enter (6) to enter the function
- Press MENU to confirm & exit the above settings.
A. Full Scan
- In DAB mode, press MENU, to Full Scan and Enter (6). It will search for radio stations for 3 minutes. The screen displays the digits and station numbers. Once completed, the unit will store a maximum of 20 DAB preset stations.
- Short press MEM, K. H. ter to select the desired station to play
B. Manual Tune - Storing a DAB Station Preset
- Press MENU, Ko manual Tune and Enter to start the tuning
- Press move the frequency to the desired station
- Long press MEM for 2 seconds to enter the storing mode
- Press Kost the station number to store. e.g. '01, 02... 20'.
- Press Enter to store the station.
- Press MENU to confirm & exit the above settings.
- Short press MEM, K. E. ter to select the desired station to play.
C. Dynamic Range Control (DRC)
In DAB mode, press MENU & K d m RC & Enter (6) to start the function.
You can use this dynamic range control signal to expand or compress the dynamic range (the difference between the loudest and quietest sounds) of the audio signal.
It will be more suited to your listening conditions and your own personal listening requirements. For example, in a noisy environment, where quiet sounds might be swamped, setting the compression to maximum will 'boost' the quiet sounds, whilst keeping the loudest sounds at their original level.
Further Press Select one of the 3 following compression levels.
DRC off: No compression. This is the default setting.
DRC low: Medium compression.
DRC high: Maximum compression.
Press MENU to confirm & exit the above settings.
D. Prune
To trim DAB stations, you can remove any unreceived stations from the DAB station list. Press the MENU, press Enter to choose the Prune function. Select the station to be deleted. The screen will display Yes or No. Press to select & Enter to confirm the station to be deleted. The inactive or unreceived station will be removed from the list and replaced by a new station.
Press MENU to confirm the above settings & exit the function.
E. System (for both DAB/FM Radio/Aux in Function)
In DAB mode, press MENU & to System & Enter (6) to start the function.
Press K islect
- Time (to set Time/Date) 2. Language 3. Factory Reset 4. SW version
Press Enter (6) to start the function.
1. Time
Use k select the sub-functions & press Enter (6) to confirm.
1.1 Set Time / Date
- Auto update -Update from DAB/Any/FM/No update
- Set 12/24 hour
- Set date format -MM-DD-YYYY or DD-MM-YYYY
1.2 Press MENU to confirm the above settings & exit the sub-functions.
1.3 Press Enter (6) to go back the Time/Date setting again.
Use Ks at the Hour and Minutes and press Enter (6) to confirm
Use K oset the Month, Date and Year and press Enter (6) to confirm Press MENU to confirm & exit the above settings.
2. Language
Use K to select English, Deutsch, Italian & French and press Enter (6) to confirm. Press MENU to confirm the above settings & exit the sub-functions.
3. Factory Reset
Use Ks elect yes or no and Enter (6) to confirm Press MENU to confirm & exit the above settings.
Return the unit to its original factory settings by performing a 'Factory Reset'. This will be useful to re-boot the unit & cancel any settings.
4. SW Version
The unit shows you the details of the SW version.
Press MENU to confirm the above settings & exit the sub-functions.
DAB Display Information (INFO)
When listening to a DAB station, you can change the information that will appear on the display. There are several different types of information that are sent by the broadcaster.
- Dynamic Label Segment (DLS)
This is scrolling text information supplied by the broadcaster. Information could be the name of an artist or music title, DJ's name, contact details for the radio station etc.
-
Multiplex Name :Displays the broadcasting area and collection of radio stations on this frequency e.g. BBC National DAB, Station1.
-
Channel and Frequency : e.g.: 13F 225.648 MHz
-
Signal error: If signal is week or error signal occurs, try to adjust the antenna and relocate the unit to improve reception.
-
Program Type (PTY) such as Pop, Rock, Talk or News.
OPERATING THE RADIO
A. Auto Scan
-
Press the Power button turn on the unit & select the FM function.
-
Long press button (10) for 2 seconds to start the AUTO SCAN function and automatically search for radio stations for 3 minutes. The screen displays the digits and station numbers. Once complete, the unit will store a maximum of 20 preset stations.
-
Short press MEM, to select the desired station to listen.
B. Tuning
- Set the Function (2) to the FM mode
- Press Slip - & Short press to □chan for last station.
- Press ip + & Short press to ▷an for the next station.
- Adjust the Volume (3, 4) to the desired level.
- Long press the Power Button (2) for 2 seconds to turn the radio off & go to standby mode.
C. Storing Stations in Memory Positions Station no. 01 to 20
- Set the function (2) to the FM position.
- Tune in to the desired station, press Skip - / + & short press to scan for the desired station.
- Long press MEM for 2 seconds to enter the storing mode
- Press select the station number to store. e.g. '01, 02... 20'.
-
Press Enter (6) to store the station.
-
Short press MEM, to select the desired station to play
D. MENU
D.1 Short press MENU/ INFO to show the station details.
Pop music, Mono, frequency, time, date,
D.2 Long Press MENU
Press to select Scan Setting/System & Enter (6) to start the function
-
Scan Setting: -> all stations (including weak or strong), strong stations only
-
Press MENU to confirm & exit the above settings.
-
Press start full scanning for all stations or strong stations only as per the setting.
-
System - > Time, Language, Factory reset, SW version
Follow the steps as above mentioned in DAB version for both DAB /FM functions.
Antenna
Extend the wire to obtain the best reception. User may need to turn or change the position of the unit to improve reception.
AUX-IN Function
- Press the Power button turn on the unit & set the Function to AUX-In mode.
- Plug one end of the 3.5mm audio cable (not included) into the Aux-in jack (13) on the back panel and the other end into the line-out jack or headphone jack of an external audio source or computer.
- Long press the Power Button 2 seconds to turn the radio off & go to standby mode.
-
MENU/ Info
-
Short press MENU/ INFO to show the station details
Mains Power, Date & Time
- Long Press MENU to System & Enter (6) to start the functions
Time, Language, Factory reset, SW version
Follow the steps as mentioned above in the DAB version for both DAB/FM/Aux-In functions
Remarks:
Don't discard electrical and electronic appliances in the regular waste disposal.
- Take them to a collection point.
- Some components in these appliances may be hazardous to health and the environment.
Note: To save energy while in the Aux-in function or FM/DAB function (optional), when the unit has no sound output, or no button is pressed for 30 minutes, the unit will be switched to stand-by mode automatically. It can be switched ON by pressing the POWER selector again.
Specifications
Power Supply: AC 100-240V, 50/60Hz
Power Consumption: 12W
Radio Frequency Coverage: F88.8-108 MHz
Operating Frequency: F88.8-108MHz,
Warning!
- Make sure that battery is inserted the right way and with the right polarity
- Remove exhausted battery from the product
- The supply terminals should not be short-circuited
- Dispose of battery safely
Remarks:
Don't discard the electrical and electronic appliances in the regular waste disposal.
a) Take them to a collection point.
b) Some components in these appliances may be hazardous to health and the environment.
- If there is an incoming call while "RR140I DAB range" is connected to your cell phone for music playback, it will pause at once when you answer the call and resume after the call ended. (Sometimes it will pause after end the call, it depends on your cell phone.)
- The undersigned, Bigben Interactive declares that the radio equipment of the RR140I DAB type complies with the 2014/53/EU directive.
To download the full statement, please visit our website:
EN:https://www/bigben-interactive.co.uk/support/
IT: https://www/bigbeninteractive.it/supporto-technico/
OTHER LANGUAGES : https://www/bigbeninteractive.com/support/
Manufactured by BIGBEN INTERACTIVE SA
396, Rue de la Voyette
CRT2-FRETIN
CS 90414
59814 LESQUIN Cedex - France
www/bigben.eu
Made in China


Fabricant: Bigben Interactive FRANCE 396, Rue de la Voyette, C.R.T. 2 Fretin, CS 90414-59814 LESQUIN Cedex, France
Bigben Interactive DEUTSCHLAND GmbH
Walter Gropius Str. 28, 50126 Bergheim, Deutschland
Bigben Interactive BELGIUM, s.a./n.v.
Waterloo Office Park, Bat. H, Dreve Richelle 161 bte 15 1410 Waterloo, Belgium
Bigben Interactive NEDERLAND b.v.
Franciscusweg 249-3B, 1216 SG Hilversum, Nederland
Bigben Interactive SPAIN S.L.
C/Musgo 5,2a planta,28023 Madrid,Spain
Bigben Interactive ITALIA s.r.l
Corso Sempione 221, 20025 Legnano - MI, Italia
FABRIQUE EN CHINE / MADE IN CHINA
HOTLINE
BBC National DAB, Station1.
EN:https://www/bigben-interactive.co.uk/support/
IT : https://www/bigbeninteractive.it/supporto-technico/
OTROS IDIOMAS: https://www/bigbeninteractive.com/support/
EN: https://www/bigben-interactive.co.uk/support/
DE: https://www/bigben-interactive.de/support/
ES: https://www/bigbeninteractive.es/asistencia-technical/
IT: https://www/bigbeninteractive.it/supporto-technico/
ALTRE LINGUE: https://www/bigbeninteractive.com/support/
Fabbricato da BIGBEN INTERACTIVE SA
396, Rue de la Voyette
CRT2-FRETIN
CS 90414
59814 LESQUIN Cedex - Francia
www/bigben.eu
Prodotto in Cina


REACH
2017年1月29日

Fabricant: Bigben Interactive FRANCE 396, Rue de la Voyette, C.R.T. 2 Fretin, CS 90414-59814 LESQUIN Cedex, France
10 Caracteristicas techniques
Nota:
Utilizar o rádio DAB ** Págrina 8-10
O fabricante do adaptor: Dong Guan Obelieve Electronic Co., Ltd.
Modelo do adaptor: OBL-0502400E.

EN: https://www/bigben-interactive.co.uk/support/
DE: https://www/bigben-interactive.de/support/
ES: https://www/bigbeninteractive.es/asistencia-technica/
IT: https://www/bigbeninteractive.it/supporto-technico/
OUTRAS LINGUAS: https://www/bigbeninteractive.com/support/
Fabrindo pela BIGBEN INTERACTIVE SA
396, Rue de la Voyette
CRT2-FRETIN
CS 90414
59814 LESQUIN Cedex - Franca
www/bigben.eu
Fabricado na China


REACH
(一)股东减持计划

Fabricant: Bigben Interactive FRANCE 396, Rue de la Voyette, C.R.T. 2 Fretin, CS 90414-59814 LESQUIN Cedex, France
EN: https://www/bigben-interactive.co.uk/support/
IT: https://www/bigbeninteractive.it/supporto-technico/
WEITERERE SPRACHEN: https://www/bigbeninteractive.com/support/
C. Dynamic Range Control (DRC)
- Dynamic Label Segment (DLS)
BBC National DAB, Station1.
EN: https://www/bigben-interactive.co.uk/support/
DE: https://www/bigben-interactive.de/support/
ES: https://www/bigbeninteractive.es/asistencia-technica/
FR: https://www/bigbeninteractive.it/supporto-technico/
OVERIGE TALEN: https://www/bigbeninteractive.com/support/
EN: https://www/bigben-interactive.co.uk/support/
DE: https://www/bigben-interactive.de/support/
ES: https://www/bigbeninteractive.es/asistencia-technica/
IT: https://www/bigbeninteractive.it/supporto-technico/
ÖVRIGA SPRÄK: https://www/bigbeninteractive.com/support/
Auto Scan (aut. sogning), Tuning (stationsindstilling), Storing Station (lagring af station), Menu
Komigang
EN: https://www/bigben-interactive.co.uk/support/
DE: https://www/bigben-interactive.de/support/
ES: https://www/bigbeninteractive.es/asistencia-technical/
IT: https://www/bigbeninteractive.it/supporto-technico/
ANDRE SPROG: https://www/bigbeninteractive.com/support/
Produceret af BIGBEN INTERACTIVE SA
396, Rue de la Voyette
CRT2-FRETIN
CS 90414
59814 LESQUIN Cedex - Frankrig
www/bigben.eu
Fremstilleti Kina


REACH

Fabricant: Bigben Interactive FRANCE 396, Rue de la Voyette, C.R.T. 2 Fretin, CS 90414-59814 LESQUIN Cedex, France
- Dynamic Label Segment (DLS)
EN: https://www/bigben-interactive.co.uk/support/
IT: https://www/bigbeninteractive.it/supporto-technico/
ANDRE SPRAK: https://www/bigbeninteractive.com/support/
Produsert av BIGBEN INTERACTIVE SA
396, Rue de la Voyette
CRT2-FRETIN
CS 90414
59814 LESQUIN Cedex - Frankrike
www/bigben.eu
Fremstilt i Kina


Fabricant: Bigben Interactive FRANCE 396, Rue de la Voyette, C.R.T.2 Fretin, CS 90414-59814 LESQUIN Cedex, France
EN: https://www/bigben-interactive.co.uk/support/
DE: https://www/bigben-interactive.de/support/
ES: https://www/bigbeninteractive.es/asistencia-technica/
IT: https://www/bigbeninteractive.it/supporto-technico/
JINÉ JAZYKY: https://www/bigbeninteractive.com/support/
BBC National DAB, Station1.
EN: https://www/bigben-interactive.co.uk/support/
DE: https://www/bigben-interactive.de/support/
ES: https://www/bigbeninteractive.es/asistencia-technica/
IT: https://www/bigbeninteractive.it/supporto-technico/
MÁS NYELVEK: https://www/bigbeninteractive.com/support/
EN:https://www/bigben-interactive.co.uk/support/
IT: https://www/bigbeninteractive.it/supporto-technico/
POZOSTAŁE JEUZYKI: https://www/bigbeninteractive.com/support/